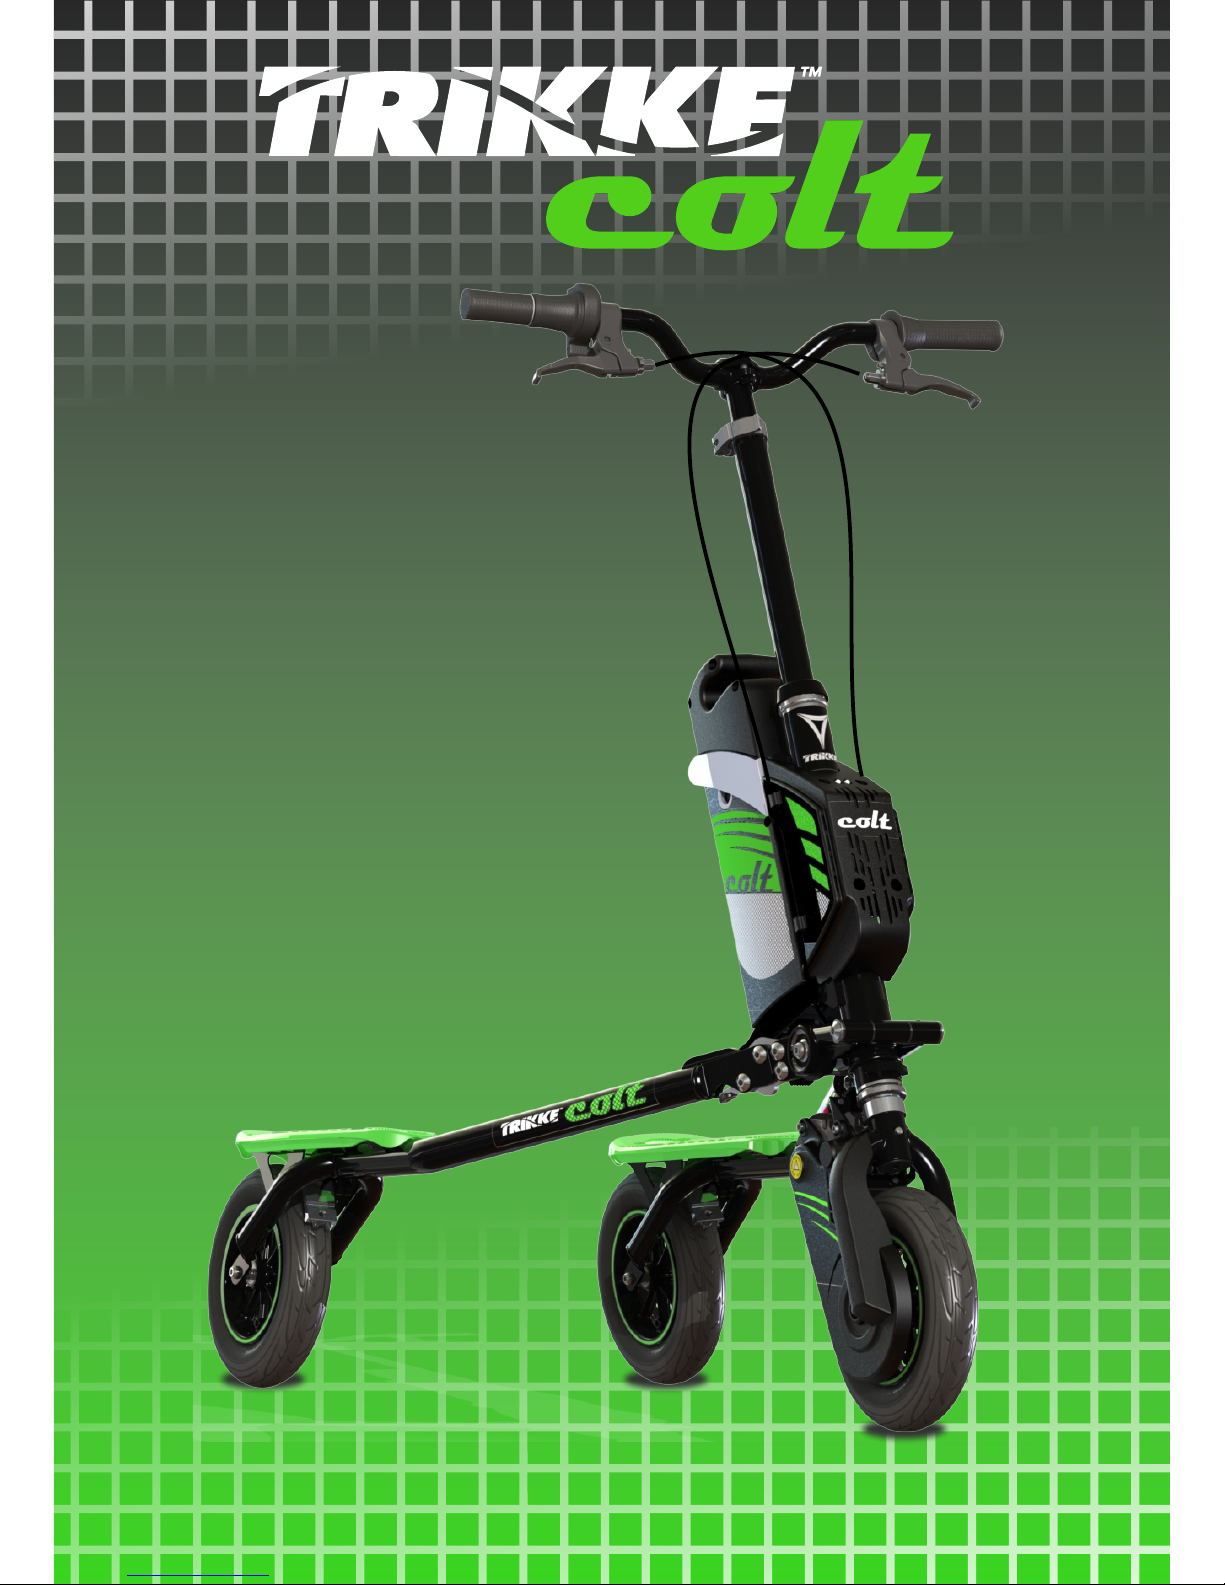
Trikke Colt User manual
Trikke EV - Colt Owner’s Manual v0 11/18/14
Owner’s Manual

Trikke Colt Owner’s Manual - V0 11/18/14 - page 1
Thank you for purchasing a Trikke ™ product. This
manual is designed to help you get the most out of
your Trikke Electric Vehicle. The warnings and
instructions have been carefully prepared to make
your experience safer and more enjoyable. Use
common sense when riding. Read an understand the
Safety Information section on page 17.
CAREFULLY READ THE
WARNINGS, SAFETY
INFORMATION AND
RIDING TIPS.

Trikke Colt Owner’s Manual - V0 11/18/14 - page 2
ŸAlways use proper safety equipment when riding the Trikke EV including a helmet
approved by ANSI, Snell, CPSC, ASTM or DIN EN1078. Use proper footwear and make
sure that shoes with laces are properly tied before riding.
ŸAvoid water, bumps, gravel, sand, cracks, uneven surfaces or obstacles that may
suddenly block your way or cause you to lose control. The Trikke EV is not intended for off
road use. Avoid using at night.
ŸRiding with only one hand or no hands can be extremely dangerous. Use both hands to
hold the handlebars firmly at all times. Do not push too hard or apply uneven pressure to
the two different sides of the handlebars. Do not make sudden sharp turns or apply
your body weight on the handlebars when turning. Such actions can make the front
wheel of the vehicle quickly turn to one side and causing the vehicle to “jack-knife” or
stop suddenly, which can cause fall and serious injury to the rider.
ŸTricks, riding or rolling backwards and/or extreme riding are not recommended on the
Trikke EV. Riding this way you can damage the product, voiding your warranty and may
result in injury or death.
ŸDo not pull up on the handlebars because in doing so the rider can slip off the foot
platforms, resulting in serious injury or death. The rider must keep his weight within the
area delineated by the three wheels and step on the center or frontal part of the deck,
never on the back.
ŸRiding down hills is not recommended, especially for novice riders. The Trikke EV is
designed primarily for use on flat, dry asphalt. Extreme caution should be used when
riding on any inclined surface.
ŸWe recommend that you do not exceed the Trikke EV maximum rider's weigh limit of
200 lbs (91kg).
ŸA rider should be constantly on the lookout for obstacles, debris, cracks or holes in the
riding path, allowing them to be anticipated and avoided.
READ AND UNDERSTAND the sections of assembly,
maintenance and safety in the owner's manual before riding. Always
follow the directions and read all warnings.

Trikke Colt Owner’s Manual - V0 11/18/14 - page 3
ŸBecause of the speed increase, the risk of injury and death are increased when riding
with the electric motor. Attention to the ride is a constant.
ŸThe braking to a full stop, at high speed, in a safe environment, to assess the distance
required to stop.
ŸBe aware of low objects. You are taller than you think when you ride the Trikke EV. Be
ready to duck for tree branches, street signs, etc..
ŸWhenever you ride, follow the traffic rules, including traffic signs, traffic lights and
crosswalks. Usually, you must follow the same rules as a bicycle or an electric bicycle.
ŸTire wear, puncture, or blowout may result in sudden loss of control, which can cause
serious injury. Always make sure that the tire maintenance is being done correctly.
ŸBraking and locking or skidding with the rear wheels will damage the tires, and such
damage is not covered under warranty. Rider may lose control and fall when locking the
wheels during braking. Control braking power by the force applied on the brake lever.
ŸIf you do not have the proper tools or find that you are unable to understand the
assembly instructions, contact an authorized dealer to assemble the Trikke EV for you.
ŸStop riding immediately if you suspect that some part of the vehicle is not working
properly. Inspect the vehicle to confirm what the problem is. Contact your dealer or
TRIKKE Technical Support directly if you suspect that a there is a malfunction or defect
that affects safe operation.
ŸIf you do not understand how to operate the Trikke EV properly, do not use it. Contact
your dealer or Technical Support Trikke for proper training.
ŸAlways inspect your vehicle before each use and make sure the handlebar clamp and
folding mechanism of the arms are locked in place. Read the important assembly,
operation and maintenance information in this manual.
ŸTest the brakes properly before each use; always engage both brakes equally with your
weight evenly distributed over the rear wheels.

Trikke Colt Owner’s Manual - V0 11/18/14 - page 4
ŸChildren must be supervised by an adult while riding. The parent is responsible for
proper maintenance and vehicle inspection before each use. The Trikke EV is not
recommended for children under 13 years of age or less than 5 feet tall.
ŸAlways use caution when you are riding close to other vehicles, pedestrians, and
especially near cars if you're riding on a street. Obey all traffic laws. Be courteous to
drivers of other vehicles and pedestrians. Share the road!
ŸDo not modify your Trikke EV. Use only original Trikke parts or accessories. See limited
warranty for restrictions on use of non-original parts or modifications.
ŸAny modification of the electrical system will void the warranty, to increase the speed
or power of the motor.
ŸThe electrical system is designed to operate at specified voltage and current. Using any
other batteries than the original TRIKKE battery and charger can result in system failure.
Any modification will void the warranty. Trikke Tech; Inc. is not liable for injuries and / or
death or any other damages caused by such changes.
ŸThe Trikke EV vehicle is a lightweight, low-power electric vehicle, and may require the
rider's help. Continuous turning right and left should be applied to help the engine while
on a climb.
ŸThe use of the electric motor will propel you to speeds you may not be accustomed
to, and may be beyond your skill level. Begin by practicing at lower speeds for your
own safety.

ŸThe Trikke EV is an electric vehicle and as such there is potential for shock or fire, if the
electrical system is tampered with or exposed to conditions of high humidity, causing
possible short circuit or overload of the electric system. Electrical components must be
protected from conditions of high humidity and physical damage.
ŸUsing a charger other than the original Trikke charger can cause overheating of the
battery and potential risk of fire.
ŸCOMMON SENSE AND EDUCATION ARE VERY IMPORTANT IN THE OPERATION OF
YOUR TRIKKE EV. DRIVERS SHOULD USE COURTESY WHEN USING AND SHARING THE
ROADS AND SIDEWALKS. PEDESTRIANS ALWAYS HAVE THE RIGHT OF WAY. WHEN
RIDING ON PUBLIC ROADWAYS, KEEP ON THE RIGHT SIDE OF THE ROAD AND REDUCE
YOUR CARVING ACTION TO MINIMIZE CAUSING CONFUSION WITH THE OTHER
DRIVERS ON THE SAME ROUTE.
ŸREMINDER: TRIKKE VEHICLES ARE DESIGNED TO RIDE FORWARD ONLY. PLEASE, DO
NOT RIDE BACKWARDS AS THERE IS THE POSSIBILITY OF DAMAGING THE FRAME.
Trikke EV Owner’s Manual - V5 06/30/14 - page 5
Trikke Colt Owner’s Manual - V0 11/18/14 - page 6
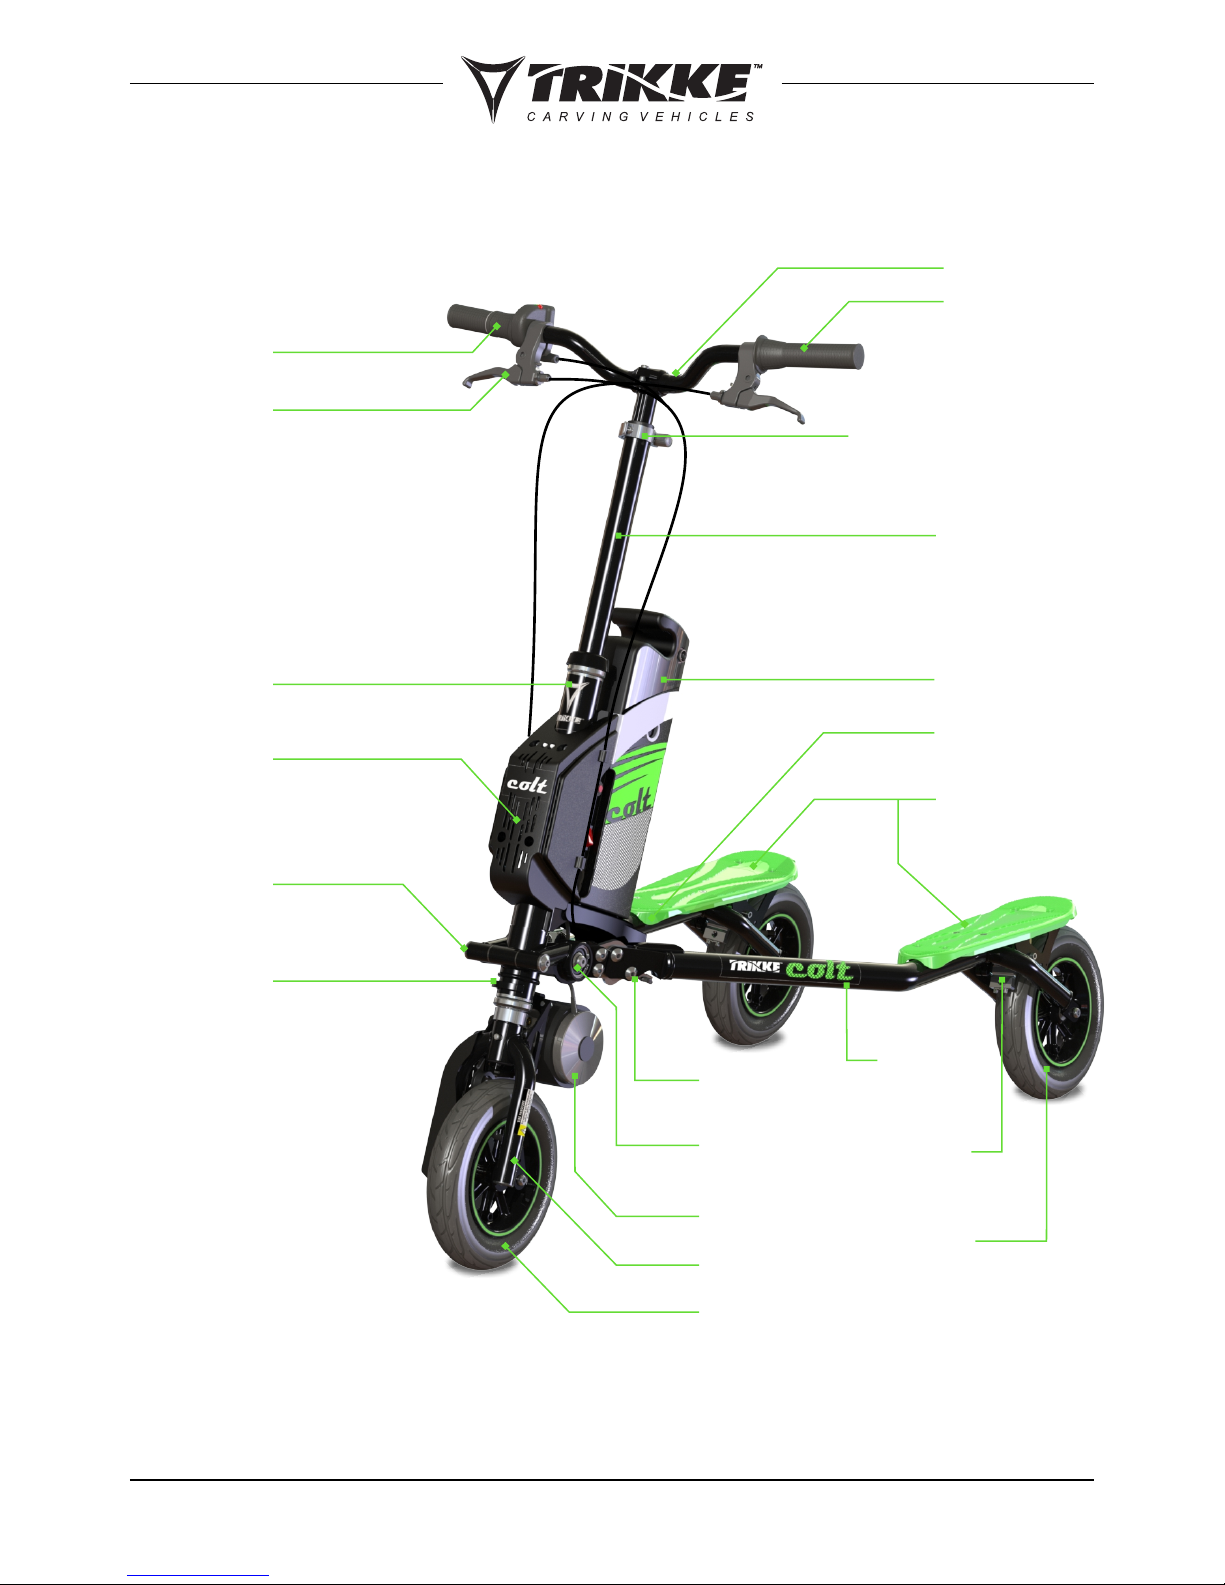
Know the Colt
* - POWER COMPONENTS
Handlebar
Handgrip
Brake
Lever Handlebar Height
Adjustment Quick
Release
Steering
Axle
Front
Tube
Controler
Box* Decks
Right Arm
Speed
Throttle*
Battery
Box*
Front Fork
Motor*
Cambering
Axle
Steering
Stopper
Folding
Mechanism
Cambering
Joint
Rear
Wheel
Brake
Pad
Front Wheel
Left
Arm
Trikke Colt Owner’s Manual - V0 11/18/14 - page 7
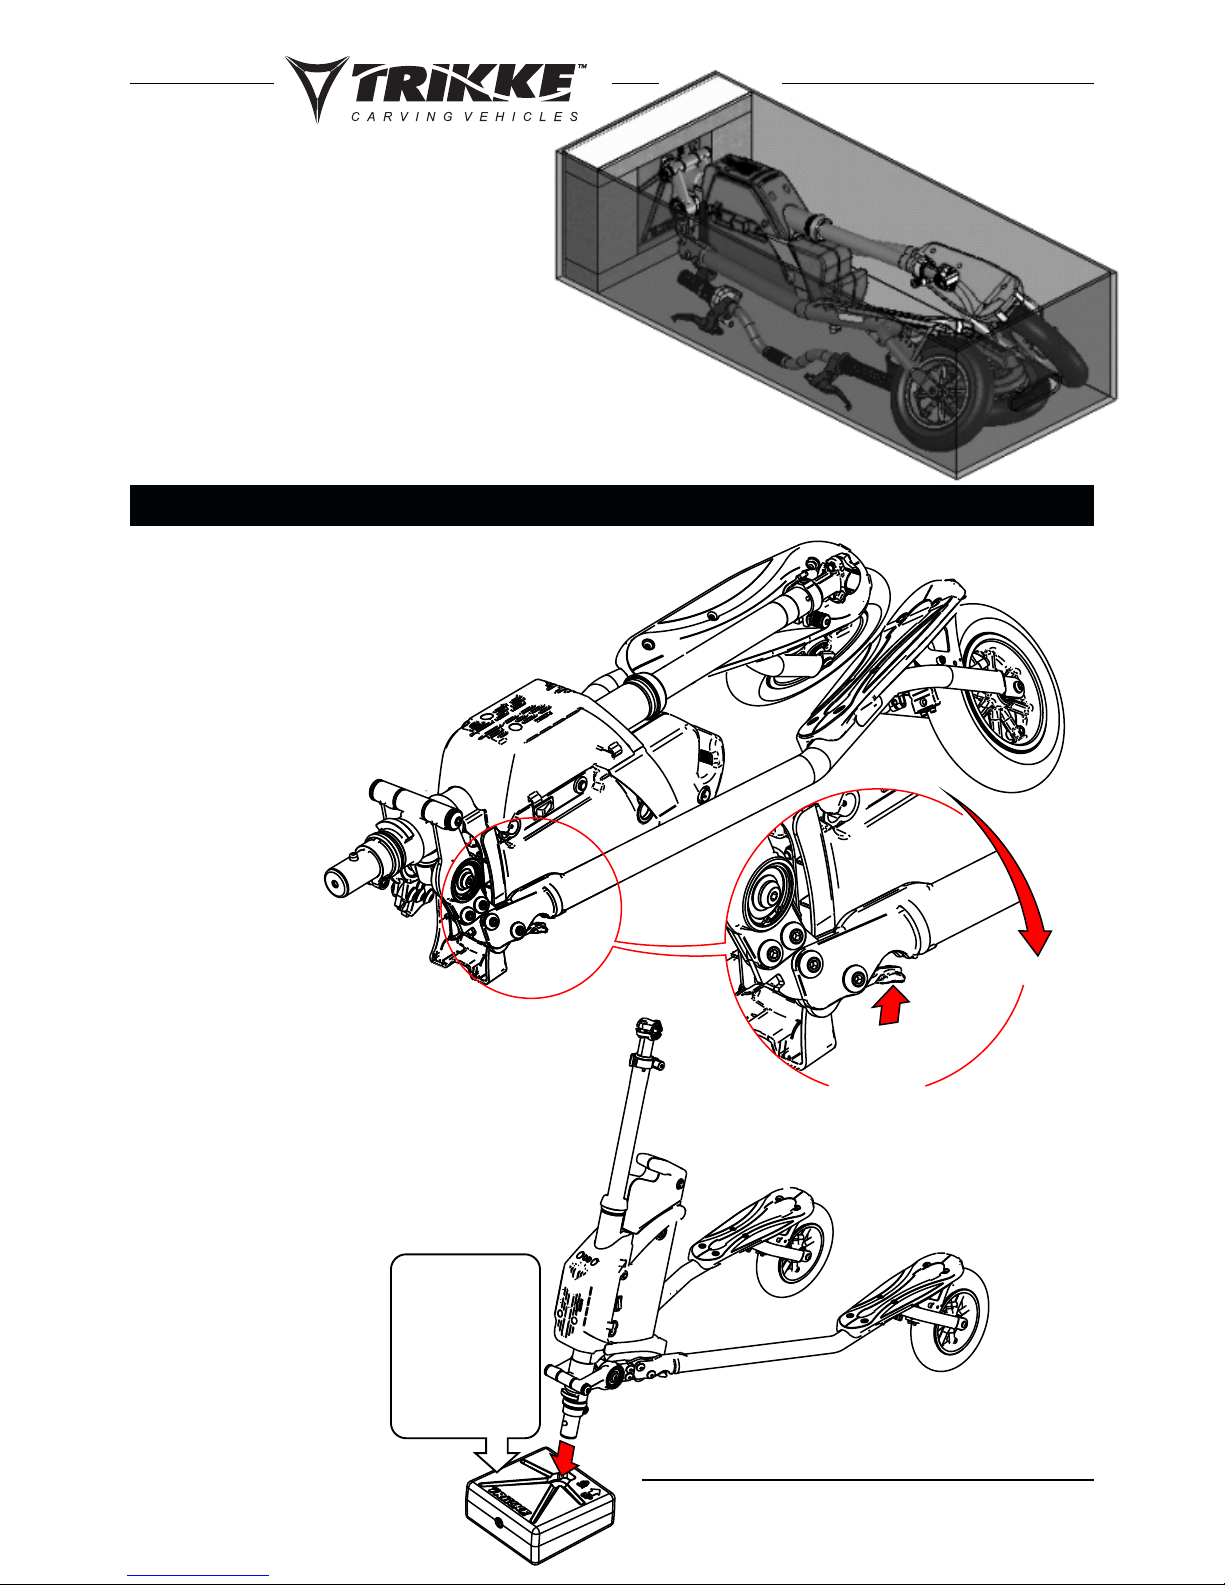
Assembly
Colt - First Assembly
The Colt comes pre-assembled
and only requires the mounting of
the handlebar, front fork with
motor assembly, and a quick
check of some items before riding.
Note: For assembly instructions go to www.trikke.com/tech-support/
STEP 1
At the front of each
arm there is a folding
joint near the
cambering mechanism.
Each of the two joints
has a spring loaded
trigger which locks and
releases the folding
mechanism.
The vehicle should be
in its unfolded standing
position in order to
attach the handlebars.
Unfolding the Frame
1. Push
trigger
button
2. Unfold
arm
Use the plastic
support (part of
the packaging)
on the floor to
protect and
stabilize the
frame for
step 2.

Trikke Colt Owner’s Manual - V0 11/18/14 - page 8
STEP 2
Mount the Handlebar
2.2 - Position the handlebars with the brake cables like shown on the image above.
2.1 - Remove the two bolts securing the stem plate to
the handlebar stem using the supplied 5mm Hex
wrench. Remove the plate, but keep it nearby. To
ensure that the whole steering system is facing the
correct direction (in the direction the vehicle will be
traveling), look down by the floor where the steering
column is touching the ground. The three inch fork
post has a spring loaded push-pin. Rotate the
handlebar stem until the pin is facing the direction
the vehicle will be traveling. This is important for
proper front fork/motor alignment (step 3).
5mm Hex
wrench
45˚
2.3 - Once the brake cables are properly
routed you can secure the handlebar.
Holding the handlebars on the bottom
stem plate, replace the top plate and the
2 bolts. Position the handlebar raked
forward at 45˚ angle to the steering
column, center it on the stem and tighten
the 2 bolts evenly.
= =
Trikke Colt Owner’s Manual - V0 11/18/14 - page 9
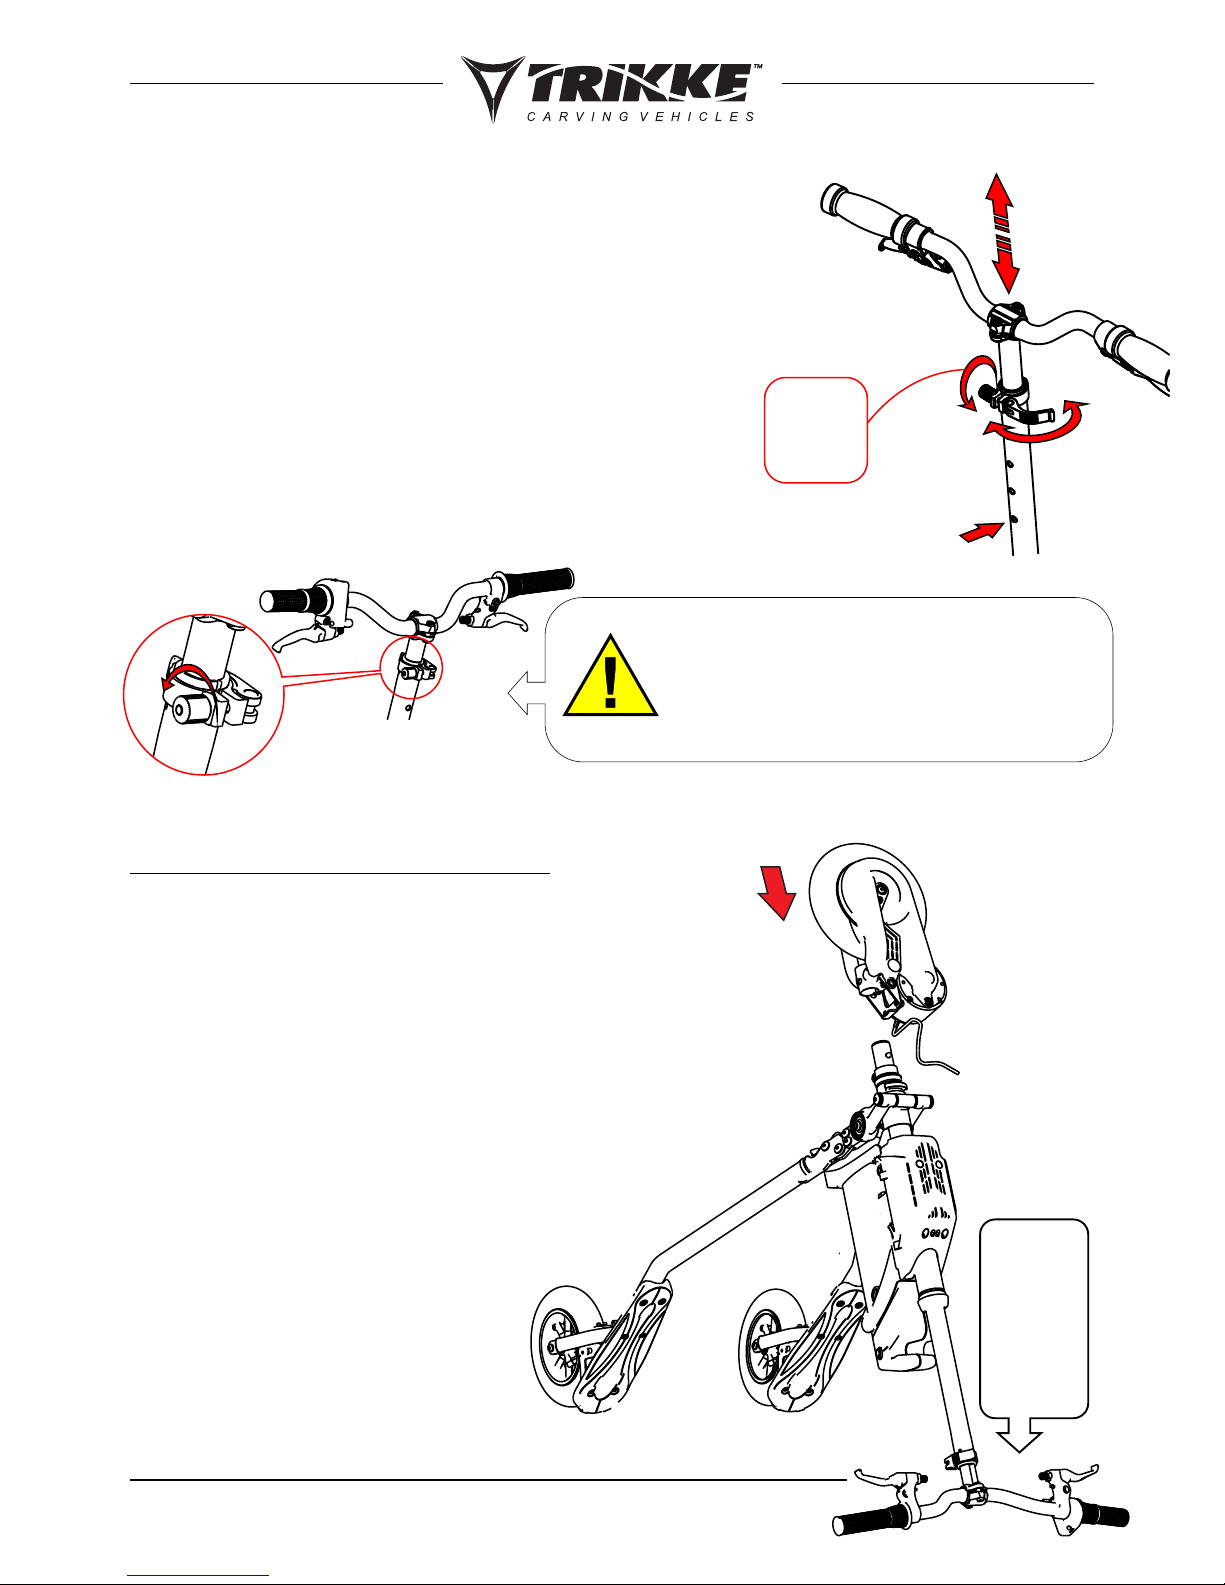
STEP 3
Adjusting Handlebar Height
Unlock the quick release lever to raise or lower the level
of the handlebar. Notice the round holes down the back
of the handle bar stem post, which provide a number of
height-locking positions. A spring loaded locking pin
snaps into these holes to provide a second level of safety
while riding. Push the locking pin IN to release the stem
post and telescope the handlebars to your preferred
riding height. Once the height has been set, make sure
to close the quick-release clamp.
The quick-release clamp must
feel tight when closing the
lever. If needed, the
tension can be adjusted
through the finger nut.
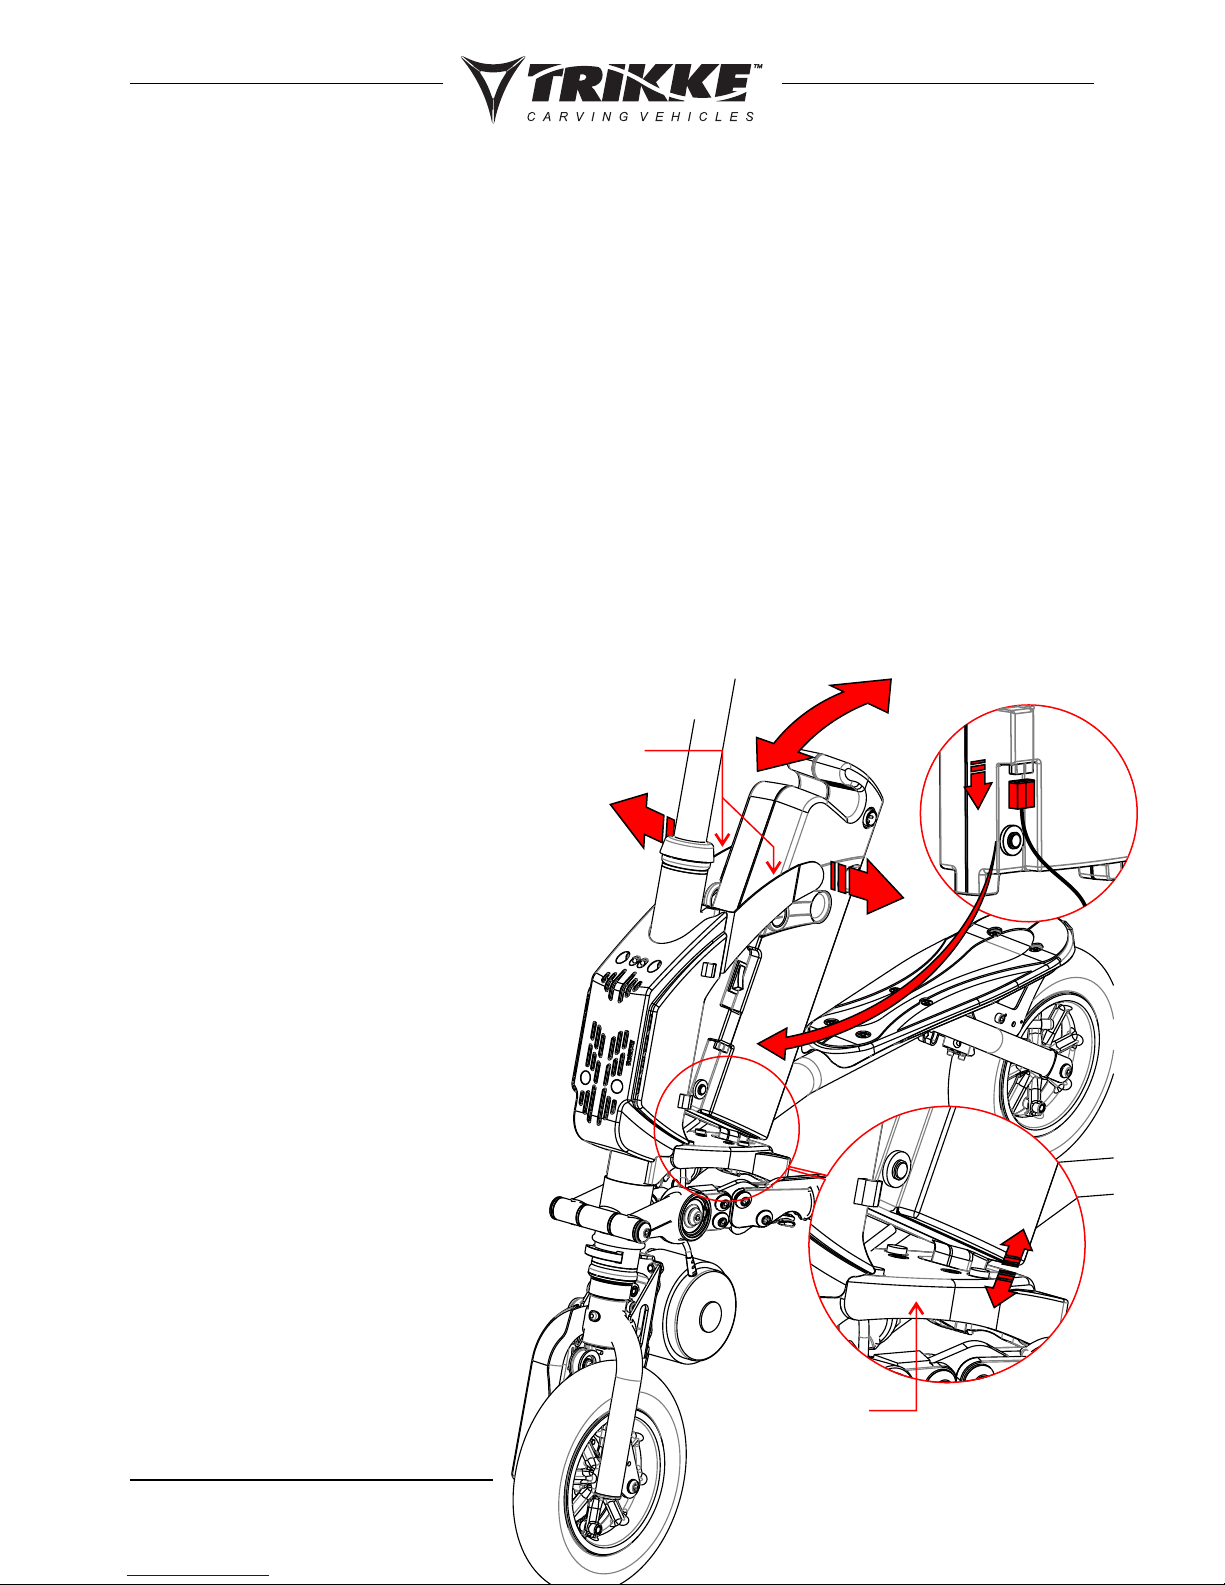
STEP 4
Attaching and Aligning
the Front Fork
Mounting the front fork assembly to the
steering axle requires a 5mm Hex wrench
(supplied). First, turn the vehicle upside down
so the fork post (arrow right) is aiming towards
the sky. You should do this procedure on a
carpet or soft surface to prevent scratching the
handlebars or damaging the throttle.
OPEN/
CLOSE
PUSH
Adjust
clamping
tension by
tightening
the nut.
4.1 - Inspecting the steering axle
you will find a spring loaded
locking pin. On the fork, you will
also find a slot to secure the
locking pin on the front face of it.
The
handlebar
resting on
the ground
provides a
good
support
for the
assembly.

Trikke Colt Owner’s Manual - V0 11/18/14 - page 10
4.2 - Fit the fork to the steering axle. The fork
assembly must be first positioned 90 degrees to the
working direction in order to slide it all the way in,
then be turned to the final position where the push-
pin will snap in the hole. See image below.
4.3 - Depress the locking pin and slide the fork the
final inch, rotating up to final position - until the
locking pin snaps into the slot. "Slightly tighten" the 2
bolts at the fork clamp.
4.4 - Alignment of front fork with handlebar:
4.4.1 - Flip the Trikke to riding position.
4.4.2 - Step on the vehicle, hold it with both
hands on the handlebars and look down
the front tube. Fine adjust the front fork
position by aligning the
tire 90 degrees to the
handlebar. You may ask
someone to hold the
front wheel while you
perform the alignment.
4.5 - Use the 5mm Hex
wrench to firmly tighten the
two bolts that secure the
fork to the steering axle.
STEP 5
Connecting the Motor Cable to the
Controller
5.1 - Route the motor cable and use the supplied
plastic tie to secure it to the frame as shown on the
image. This is very important in order to allow
enough slack on the cable while turning the wheel
left-and-right.
Allen
wrench
5mm
4.4
4.3
4.3
4.5
Cable slack
Plastic tie
(supplied)

Trikke Colt Owner’s Manual - V0 11/18/14 - page 11
5.3 - Connect the motor cable to the
controller.
5.4 - Tuck in the connectors inside the
controller box, so they are not exposed.
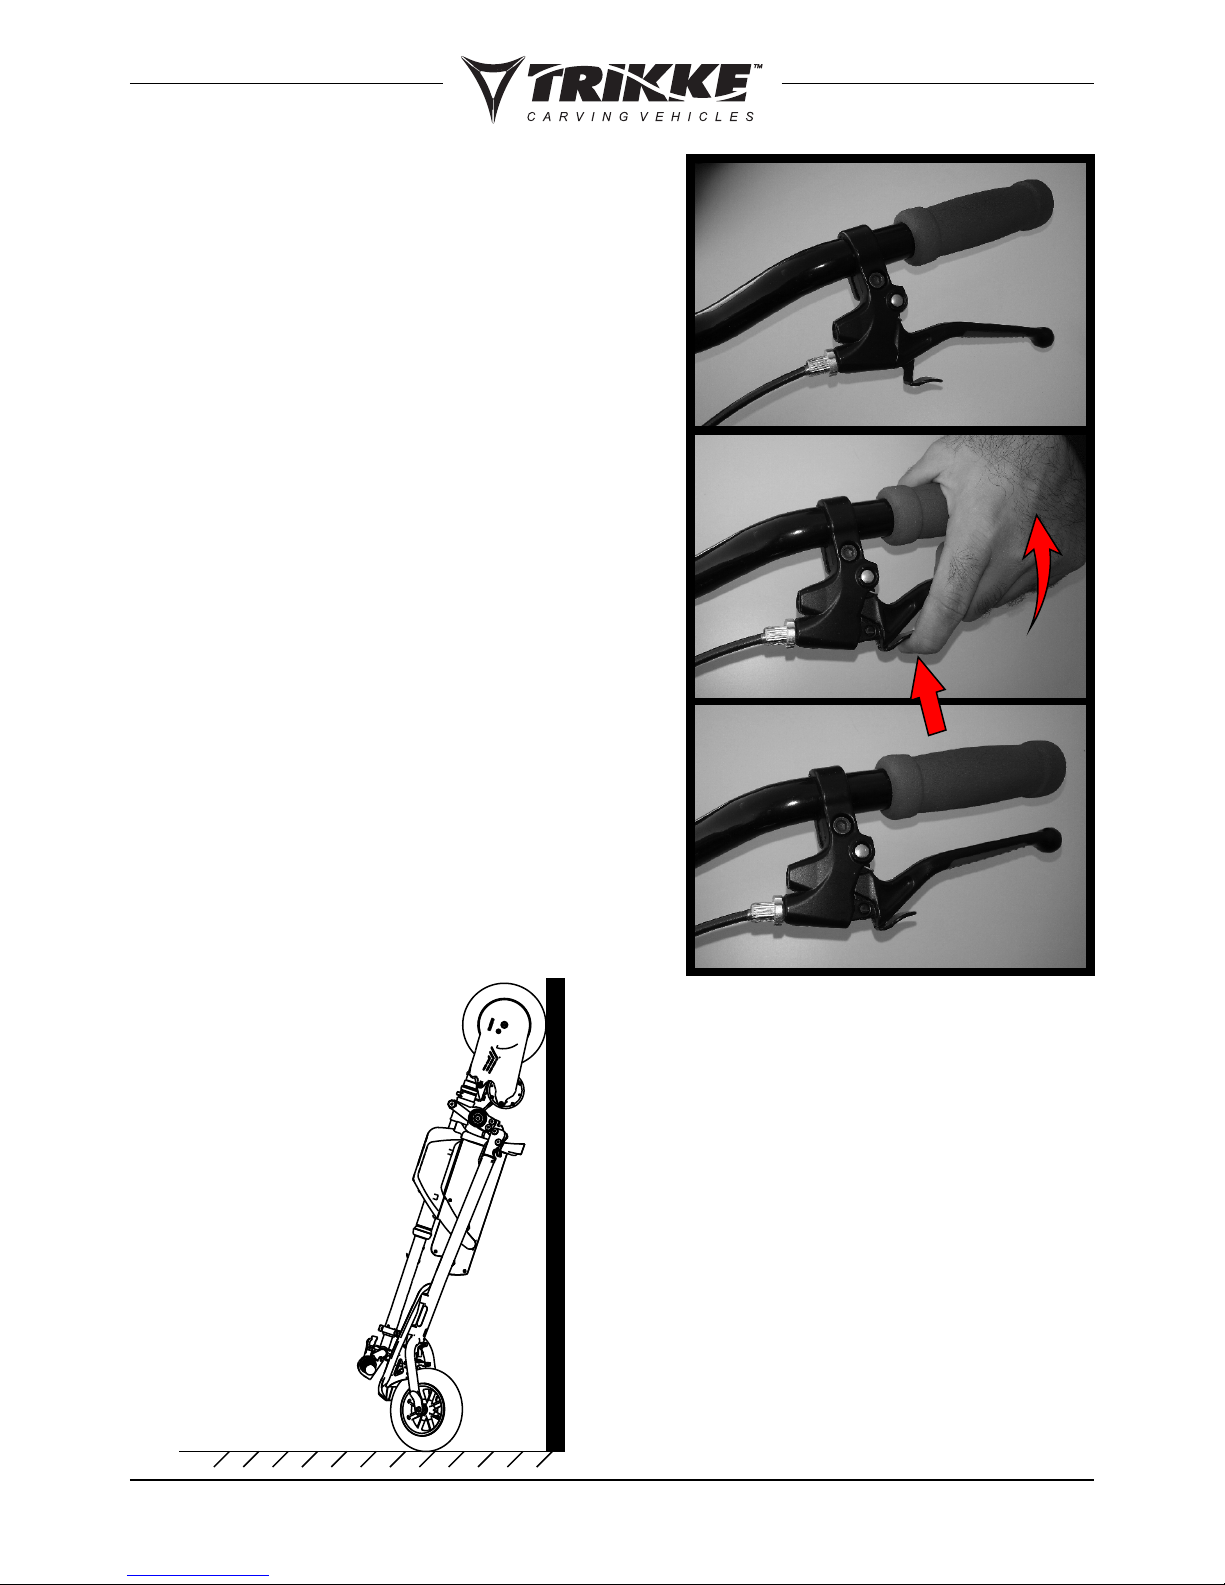
STEP 6
Adjusting Brakes
The brakes are pre-adjusted at
the factory. If additional
adjustment is needed, please
refer to BRAKE ADJUSTMENT on
page 21.
STEP 7
Pre-ride Check
· Make sure you correctly followed steps 1-6 for the proper assembly of your vehicle.
· Check all bolts that secure the fork and handlebars. Push forward and pullback on the
handlebars strongly to verify they're secured.
· Make a final check of the brake by spinning the rear wheels. They should rotate freely
until you apply the brakes. It must be possible to vigorously squeeze the brake levers
without the brake levers touching the handlebars.
· Check the folding mechanism to ensure that the arms are locked in the riding
position.
· Check the air pressure in all tires to meet the recommended levels (See page 20).
WARNING!
Before riding the first time, please take a few minutes and review the Safety Riding
Tips on pages 3-6 of this manual.
For the safety of friends and others who will try your new Colt it is your responsibility
to guide them how to ride safely. Make sure you have read and understood all
warnings and safety information contained in this owner's manual before riding.
Please wear a safety helmet for riding.
5.4
Trikke Colt Owner’s Manual - V0 11/18/14 - page 12
Vehicle
Operation
Parking
1. The Colt has parking brakes to keep
it still and balanced. In the two
manual brake levers there is a
trigger that locks the actuated lever.
Squeeze the brake lever all the way
and pull the trigger with the index
finger, then release the brake lever
so the tension of the cable will keep
the lock engaged. To release the
parking brake, squeeze the brake
lever and the trigger will jump and
release from the locked position.
2. Preferably, find a flat surface for
parking. If the parking spot is in an
incline, point the front wheel up or
down the slope. Do not park across
the ramp.
3. Try to find a shoulder or lip to rest
the front wheel against, in order to
prevent unexpected movement
due to the incline. Lock the parking
brakes for safety.
4. If the above methods do not work,
fold your Colt and rest it against the
wall or lay on the floor.
2
1
Operation
Trikke Colt Owner’s Manual - V0 11/18/14
page 13
Riding Range
A. The possible distance (miles) per ride of a Colt depends on many factors, including
the topography of the terrain, rider's weight, throttle usage, assistance with body
propulsion, tire type and pressure.
B. To extend the riding range of the Colt avoid long or steep climbing, help the vehicle
as much as possible with body propulsion and use the throttle sparingly and keep
tires inflated to the recommended pressure.
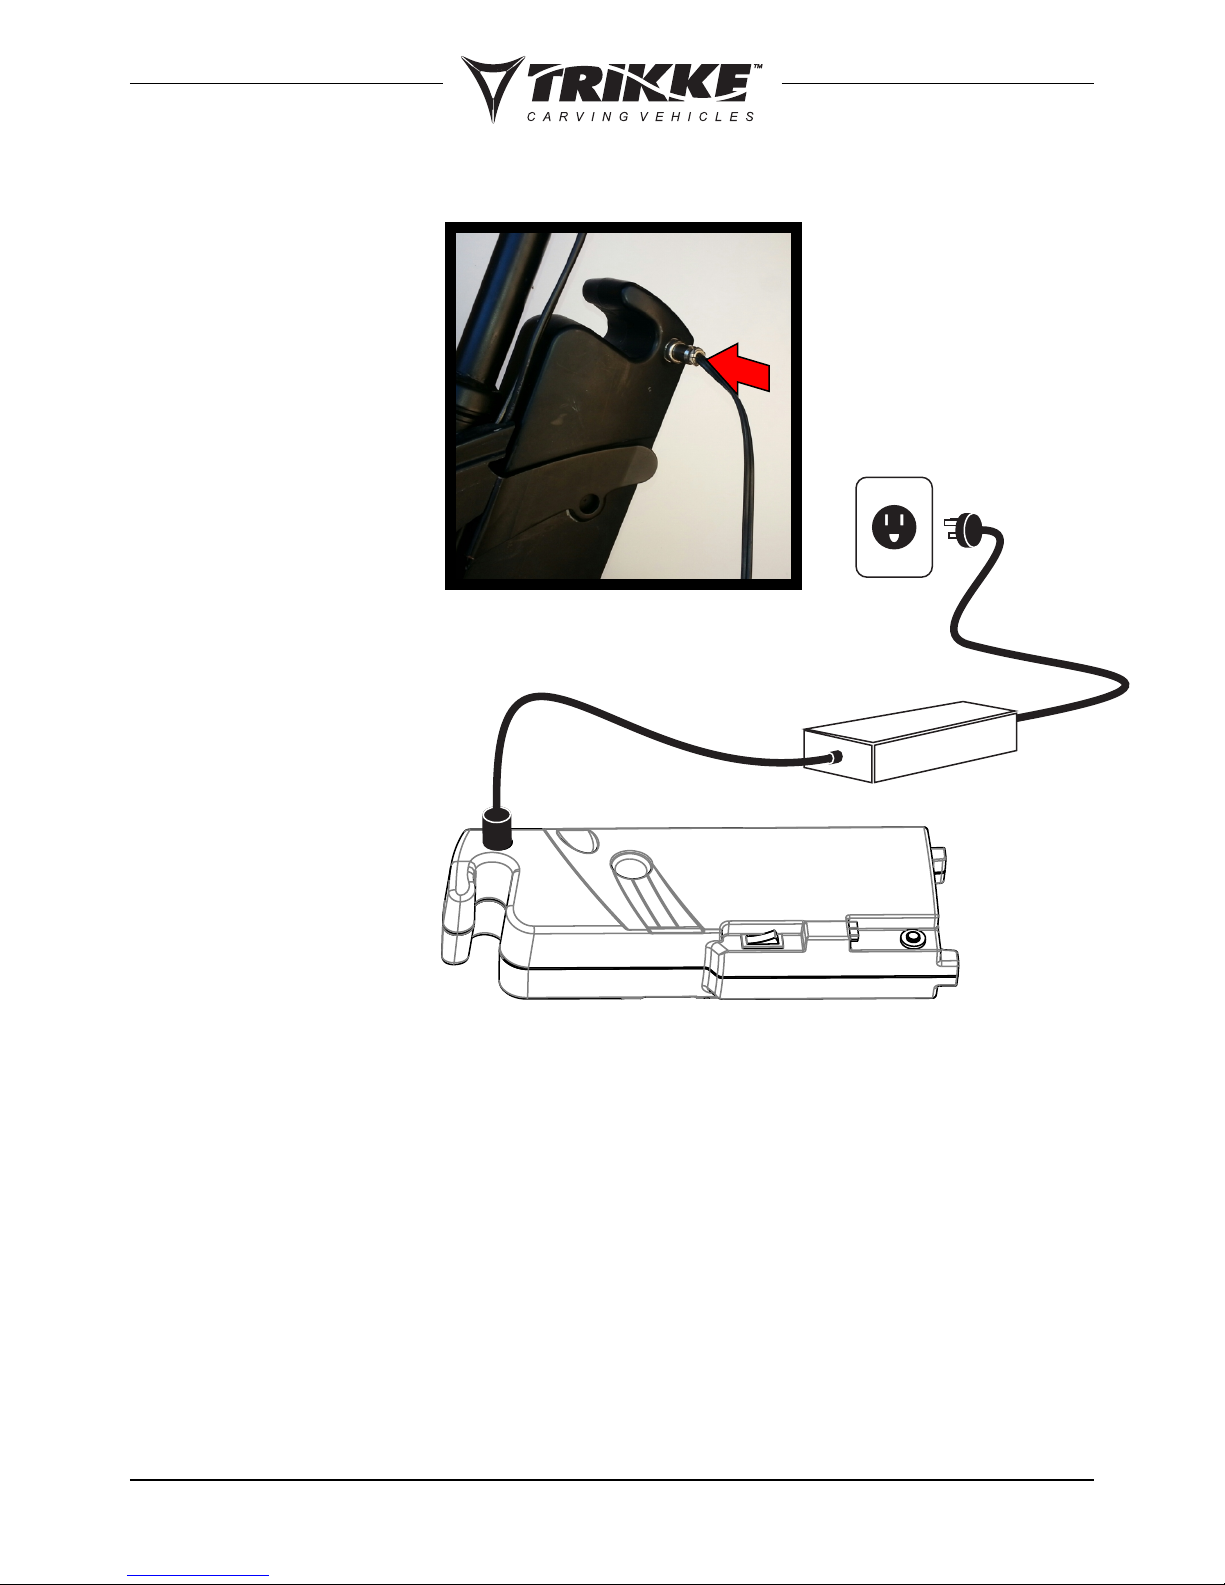
Installing/Removing the Battery
To install or remove the
battery from the Colt it is
necessary to identify the
components to disconnect.
A. Battery can remain installed
on the Colt or removed for
charging. Be careful to not
drop the battery on the
floor during installation and
removal.
B. On the bottom of the
battery case, just below the
ON/OFF switch is located
the battery power
connector. Carefully
connect/disconnect before
installing/removing battery.
C. Removal: spread both wing
brackets to disengage the
locks. Pull the battery back.
D. Instalation: Sit the battery
on the tray and slide it
forward to engage the wing
bracket to lock the battery
case in place.
Tray
Power
Connector
Wing
bracket
Ÿ First time charge:
charge for at least
12 hours.
Ÿ Usually, it will take 8
hours for a full
charge.
Ÿ Do not exceed 24
hour charging time.
Ÿ Always charge the
battery immediately
after riding.
Ÿ Fully charge battery
before storing for
extended periods of
time.
Ÿ Unplug charger
from the wall outlet
when not in use.
Ÿ Failure to recharge
battery periodically
may result in
permanent damage
and battery will no
longer accept
charge.
Charging
the Battery
Ÿ Make sure the power switch is turned OFF when unit is not in use. Battery charge
will drain when the switch is left ON and may discharge beyond a limit, and will not
recharge.
Ÿ Never store the product in freezing or below freezing temperatures! Freezing will
permanently damage the battery.
Ÿ Run time will vary with riding conditions: rider's weight, speed, tire pressure, wind,
flat or hilly terrain. Constant start stop will shorten the riding range.
Ÿ Average battery life for a properly maintained unit is approximately 250 full
charge/discharge cycles.
CHARGER
BATTERY
Trikke Colt Owner’s Manual - V0 11/18/14 - page 14

Trikke Colt Owner’s Manual - V0 11/18/14 - page 15
Once the baery is switched ON, the lights on the throle will light
up indicang the level of charge of the baery: full/half/low,
meaning that the vehicle is ready to work. Gently twist the throle
grip backwards and the front wheel will start the movement of the
vehicle. Control the amount of power to the motor by twisng the
throle back to increase power and returning it to decrease power.
If vehicle is le ON and inacve for over 5 minutes, the system will
me out and shut OFF (to save energy). Even with the baery
switched ON (red light on the baery ON), the throle lights will
turn OFF when system is med out, and there won't be power
delivered to the motor when twisng the throle. You will need to
reset the power by switching OFF and back ON to start the system.
When climbing inclines, if the speed becomes too slow (below
walking speed), it indicates that the load is too heavy for the motor.
Do not insist in riding in this condion as the motor will heat up and
possibly get damaged. Try helping the motor by tackling the hill with
side to side movements of the front wheel. Avoid any condion
where the motor stalls under throle.
In stall or overload condion the fuse may trip (the circuit will break
and turn OFF the power from the baery to the system). You will
have to wait for a while to allow the system to cool down and push
in the fuse buon to reset it.
When the charger is plugged to the wall outlet (120V) and
connected to the baery, the status light will be lit RED indicang
that the baery is charging up. When the baery becomes fully
charged, the status light will turn GREEN.
Charger
Riding With Electric Power

Care and Disposal
of the Battery
Do not store in freezing or below freezing temperatures.
Maintain your baery and ensure maximum baery life,
carefully read above the “Charging Baery” secon.
The baery casing contains sealed Lead Acid baeries
which must be recycled at their end life.
EXHAUSTED or DAMAGED baeries must be disposed in a
recycling center, or alternavely, in a local seller of
automove baeries.
DO NOT dispose the baery in a fire. The baery may
explode or leak corrosive acid.
DO NOT dispose the baery in your regular household
trash. The incineraon, land filling or mixing of sealed lead-
acid baeries with household trash is prohibited by law.
Trikke Colt Owner’s Manual - V0 11/18/14 - page 16
Avoid riding on wet or slippery surfaces (also surfaces covered by sand, gravel or mud)
because the wheels may skid and braking distance can be affected causing loss of control
and a possible crash. If necessary travel on slippery surface, try to travel in a straight line and
avoid leaning the vehicle to maximize stability and control.
Safety Warning 1: RIDING ON A WET OR SLIPPERY SURFACE
SAFETY WARNINGS
Safety Warning 2: WEIGHT DISTRIBUTION
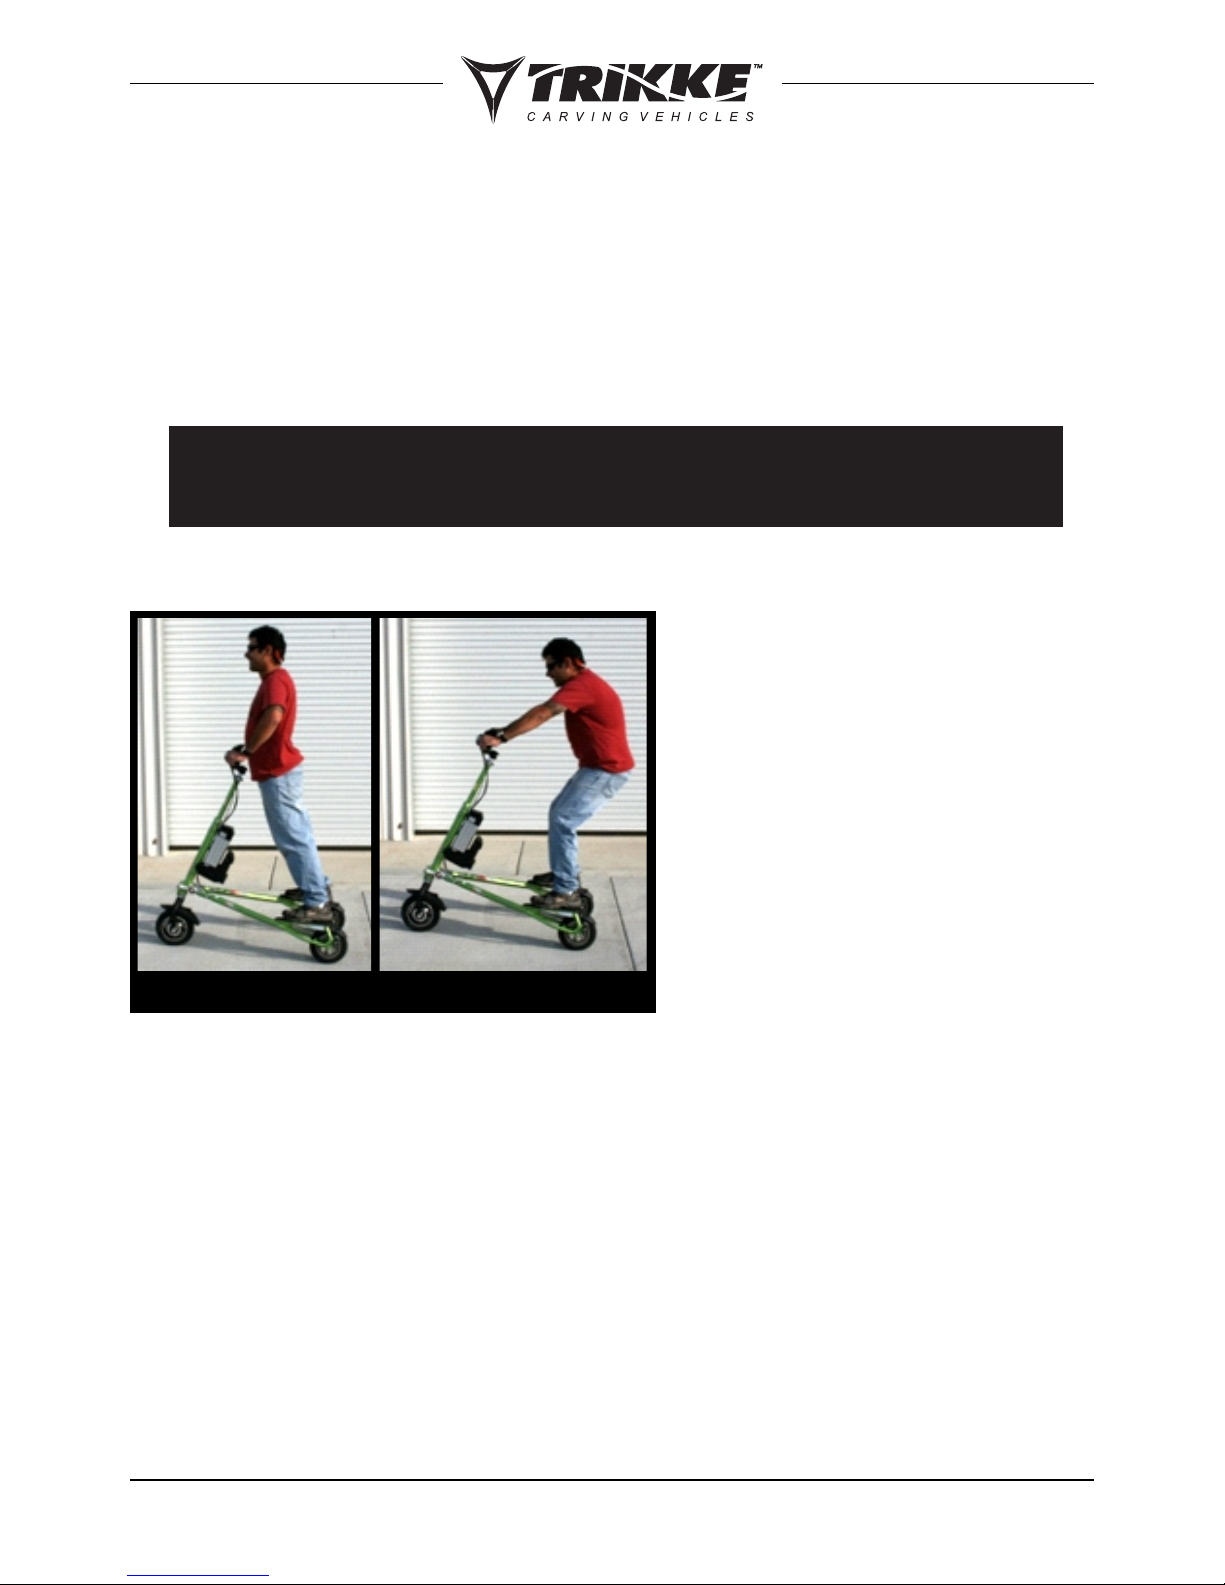
BrakingStarting
When accelerating, it is important to
place the weight on the front wheel, as
shown in the picture, keeping most of
your weight on your toes, feet
positioned in front of the platform. This
will ensure good traction of the front
tire.
Once you and your Trikke EV are in
motion, return to your normal posture.
Be careful not to lean too far back or
shift your weight behind the rear
wheels. This warning is especially
important for drivers who do not have good coordination, or are slow to react to an
unexpected event.
To brake more effectively, shift your weight back over your heels, over the rear wheels, as
shown in the picture, but be careful not to lean too far back. Apply both brakes
simultaneously (Trikke EV has independent brakes on rear wheels left and right
respectively actuated by levers on the handlebars left and right). Distributing your weight
evenly over each rear wheel is crucial for maximum braking efficiency. If you take the
weight off of the platforms during braking you will cause the wheel to lose contact with the
ground and lock.
The best way to ensure you are always well positioned and to minimize the risk of the
vehicle pull a wheelie, is to distribute your weight evenly between the front and rear
wheels, keeping your weight on your toes and putting your feet up to the front of the
Trikke Colt Owner’s Manual - V0 11/18/14 - page 17
Riding on wet surface, the braking distance will be increased
significantly. Travel at lower speed and consider a longer
distance and time to stop.

Proper use of the handlebars, and especially how to push it to the left and right is vital for
your safety. Because the front wheel is designed to trail the fork, the handlebar tends to turn
in the direction you tilt the vehicle. Unlike a bicycle, which tends to follow a straight line, the
front wheel will actually accentuate the turn. Because of this condition, less experienced
riders should pay special attention while driving. Turning the handlebars too far, and
allowing the front wheel to move quickly to the side, may cause the vehicle to stop suddenly
(“jack-knifing”), throwing the rider from the vehicle, which may cause injury. Always
maintain firm control over the handlebars with both hands, never drive with just one hand
or no hands. The Trikke EV requires both hands on the handlebars at all times.
Beginner riders have a tendency to apply excessive force on the handlebars, making sudden
movements, throwing their weight from one side to another. What propels the Trikke
forward manually is the leaning of the vehicle, a combination of turning and leaning of the
steering column, and not just pushing the handlebars from side to side. It is better to think in
terms of more leaning and less turning. Motion and trajectory in large ''S'' turns are best for
beginners.
Safety Warning 3: BEHAVIOR OF THE RIDER
Safety Warning 4: DOWNHILL
As the Trikke EV is a totally new machine, with a unique handling, we recommend that you
take time to familiarize yourself with the vehicle and to gradually explore the limits of
performance with each ride.
This is especially important before attempting climbs or steep descents. Riding uphill and
downhill are advanced and require you to be fully competent before even trying. On
descents, we strongly recommend that you only go down slopes on which you can
Avoid leaning too far over the handlebars - the rider must maintain balance on their feet, not
leaning on the handlebars. The legs should be slightly bent to absorb impact, balance the
body and ensure constant contact with the platforms.
Avoid leaning your body back, supporting yourself on your heels, stepping behind the center
of the rear wheels and pulling the handlebars back, because this way you will inevitably
reduce the weight of the front wheel losing traction and control, and you may fall back and
have an accident.
Another reason for a balanced weight distribution is to ensure a better use of traction (front
and rear tires) with no spinning or skidding during acceleration and braking.
Trikke Colt Owner’s Manual - V0 11/18/14 - page 18

Trikke Colt Owner’s Manual - V0 11/18/14 - page 19
Safety Warning 5: SAFETY EQUIPMENT
ALWAYS USE SAFETY EQUIPMENT, ESPECIALLY A HELMET. A helmet
is essential when riding a Trikke EV or any exposed wheeled vehicle.
We also recommend that you wear gloves, elbow and knee pads,
especially children and inexperienced riders. Although it is a stable
platform, there are always conditions that vary with the
environment, which may surprise you, such as cracks in the
pavement, sand, gravel, potholes, tree branches, people or other
vehicles. Falls and accidents can occur.
Driving at night should be avoided, but in case of night time use we
recommend the use of headlamps and signal lights on front and rear.
See and be seen.
Also the use of horn or bell helps you call attention and be noticed.
READ AND UNDERSTAND THE SECTIONS OF
ASSEMBLY, MAINTENANCE AND SAFETY MANUAL
BEFORE RIDING. ALWAYS FOLLOW THE INSTRUCTIONS
AND READ ALL WARNINGS.
Visit our website at www.trikke.com if you want to buy safety gear
(helmet, gloves, knee and/or elbow pads).
control the speed by turning. Riding on hills at speeds that require
constant braking are not recommended for three reasons: you can
reach speeds where the braking distances needed are too long to
stop you safely, and you may fall at high speed causing serious injury
or death, and you will simply wear out the brake pads and rear tires
long before their expected life expectancy.
The Trikke EV will accelerate quickly, so try to ride at speeds
appropriate to your skill level.
Table of contents
Other Trikke Scooter manuals

Trikke
Trikke uPT User manual

Trikke
Trikke E-Kit User manual

Trikke
Trikke T7 User manual

Trikke
Trikke T67s User manual

Trikke
Trikke eV5 User manual

Trikke
Trikke DEFENDER 48V 2WD User manual

Trikke
Trikke T5 JOGO User manual

Trikke
Trikke T8 User manual

Trikke
Trikke T5 JOGO User manual

Trikke
Trikke POSITRON 60V AWD User manual


