Xtreme XG-470 User manual

PLEASE BE SAFE WHEN RIDING
Page1
X-Treme TM
Gasoline Scooters
Model XG-470
Product Handbook

ALWAYS WEAR A HELMET AND OBEY ALL LAWS!
THIS IS A 2-CYCLE ENGINE
IT REQUIRES A MIXTURE OF GAS AND 2-STROKE
ENGINE OIL
1. You must always use a gas/oil mixture. FAILURE TO DO SO
WILL VOID YOUR WARRA TY!
2. Use 32:1 Gas/Oil Mixture. 4 oz. of oil for every gallon of High-
Octane gasoline.
3. Tanaka Perfect Mix, or similar quality 2-Cycle Engine Oil is
recommended. Oil can be purchased from your local X-Treme
Dealer, Outdoor Power Equipment Dealer, or a Power Sports
Dealer
4. High-Octane Fuel recommended. (90 octane or higher)
This PRODUCT IS NOT INTENDED FOR EXTREME or
OFF-ROAD Use! Please take care of your XG-470!
Page2
IMPORTANT
Failure to follow these INSTRUCTIONS will
VOID YOUR WARRANTY!

DO NOT JUMP or ABUSE THIS PRODUCT!
DO NOT RIDE IN WET/ICY CONDITIONS!
Failure to follow these instructions will
VOID YOUR WARRANTY!
If you have any questions, please contact X-Treme customer
service on the web at www.x-tremescooters.com
Page3
WARNING
This product does not conform to Federal Motor Vehicle Standards and is not
intended for operation on public streets, roads or highways. Serious injury can
result from the unsafe operations of this product. Operator can minimize these
risks by using certain safety equipment such as: safety helmet, goggles, gloves,
elbow and kneepads and appropriate footwear.
DO OT operate this product in traffic, on wet, frozen, oily or unpaved surfaces or
under the influence of drugs and/or alcohol. Avoid uneven surfaces, potholes,
surface cracks and obstacles.
DO OT use a water hose to clean this product. See Product Handbook for more
information.
This product is recommended for riders 16 YEARS OF AGE and older.
SAFETY
Persons without excellent vision, balance, coordination, reflex, muscle and
bone strength and good decision-making capabilities should not use this
product.
Minors without adult supervision should not use this product.
Persons unwilling or unable to take responsibility for their own actions should
not use this product.
The user of this product assumes ALL risks associated with its use. To
minimize these RISKS, the user must wear safety helmet, goggles, gloves,
elbow and kneepads and appropriate footwear.
ever start the engine inside a closed room or building. Breathing exhaust
fumes can be fatal.
IMPORTANT
PLEASE READ THIS BEFORE USING THIS PRODUCT
READ THIS FIRST!

Page4
Fuel Safety
Mix and pour fuel outdoors away from sparks or flames.
Only use a container approved for fuel
Do not smoke or allow smoking near the X-Treme XG-470 while working on the
engine, or while the engine is running.
Wipe up and clean all fuel spills before starting the engine.
Move at least 10 feet away from where you fueled before starting engine.
Stop engine before removing the fuel cap.
It is recommended that you empty the fuel tank prior to shipping or storage to
prevent fuel leaks.
Do not store your X-Treme XG-470 near open flames, furnaces, electric motors
or switches.
Maintenance
Maintain your X-Treme XG-470 as recommended in this Product Handbook.
Disconnect the spark plug cap before performing any engine maintenance,
except for carburetor adjustments.
Keep others away while making carburetor adjustments.
Use only quality replacement parts as recommended by the manufacturer.
Transportation and Storage
Allow the engine to cool, empty the fuel tank and fold the X-Treme XG-470
before carrying or storage.
It is recommended that you empty the fuel tank prior to shipping or storage to
prevent fuel leaks.
Clean the X-Treme XG-470 carefully and store in a cool, dry place.
Product Safety
Keep hands and feet away from moving parts.
Inspect the entire product prior to each use. Replace damaged parts. Check for
fuel leaks and make sure all fasteners are in place and securely fastened.
Replace all parts that are cracked, chipped or damaged before use.
Use only parts and accessories that are recommended by the manufacturer.
If a situation arises that is not covered in the manual,
proceed with caution and use good judgment.
Contact your dealer or X-Treme (www.x-tremescooters.com/support/)
if you need further assistance
QUICK REFERENCE
SAFETY GUIDE

TABLE OF CONTENTS
IMPORTA T I FORMATIO …………………………………….…..2
QUICK REFERE CE…………………………………………………4
TABLE OF CO TE TS……………………………….……………...5
GETTI G TO K OW YOUR X-TREME XG-470…………………..6
PACKI G CO TE TS……………………………………………….7
GETTI G STARTED………………..……………………………..…7
ASSEMBLY………………………………………………………..7
GAS TA K I STALLATIO ……………………………………..8
FUELI G…………………………………………………………..9
RIDI G/BRAKI G………………………………………………..9
TRA SPORTI G A D STORAGE………………………..………..9
OPERATI G PROCEDURES…………………………………….…10
STARTI G………………………………………………………..10
MAI TE A CE………………………………………………………10
RECOMME DED TOOLS……………………………………...10
CARBURETOR ADJUSTME T…………………………….….10
BRAKE SYSTEM………………………………………………..12
Page5

TIRES A D WHEELS…………………………………………..14
ADJUSTI G THE HEAD U IT…………….…………………..14
ADJUSTI G THE CHAI …..………..……………….………..14
MAI TE A CE SCHEDULE…………………………………….....15
OTHER QUESTIO S….……………………………………………..16
GE ERAL I FORMATIO /TECH SUPPORT……………………..16
GETTING TO KNOW YOUR X-TREME XG-470
Page6

PACKAGE CONTENTS
Your X-Treme XG-470 comes with the following items in the box. Please
locate all of the following:
1. The X-Treme XG-470 Gas Scooter
2. Seat/Seat Posts (2) and Clamps (2)
3. Trunk & Trunk Rack & Mounting Hardware
4. Battery Charger
Page7

5. Fuel Tank and lines
6. Tool Kit
7. Gas/Oil Mixing Bottle
8. 10Amp Fuse
9. Handlebar Clamp
10. User Manual
GETTING STARTED
Please read and understand these instructions and the
OPERATING PROCEDURES section, prior to starting or riding your
XG-470
Fig. 1
Fig. 2
Fig.3 Fig. 4
Page8
Assembly
1. Carefully remove the XG-470 from the box.
2. Locate the Handlebar Clamp. (Fig. 1) Slide
the clamp up onto the T-handlebar.
3. Insert the T-handlebar onto the front fork.
4. Line up the handlebar on the fork and Insert
the metal key into the back of the t-handlbar,
then slide the clamp down over the key and
secure the two bolts on the clamp until tight.

Fig. 5
Fig. 6
Fig. 6a
Fig. 7
Fig. 7a
Fueling
This is a two-stroke engine.
Page9
5. Install the enclosed Rear Fender bolts to secure
the fender to the frame. There will be one for
the rear of the fender, and two for the front.
6. ext, install the fuel tank and fuel lines. (Fig. 5)
First run the fuel lines from the right side of the
scooter under the fender to the left side of the
scooter to the engine and locate the carburetor.
Connect the clear line (return fuel line) to the
carburetor attaching it to L-shaped smooth
nipple. Attach the black line (feed fuel line) to
the carburetor attaching it to the ribbed nipple.
(Fig. 6)
7. ext mount the fuel tank to the scooter frame
using the two enclosed bolts. (Fig. 6a)
Disregard the top-mounting bracket on the fuel
tank, as it is not necessary for this model of
scooter.
8. Seat and Seat post mounting. Locate the upper
and lower seat posts as shown. (Fig. 7) Attach
the upper seat post (short post) to the seat and
tighten the seat-mounting bracket. (Fig. 7a)
9. Using one of the two enclosed seat post
clamps, slide the clamp over the seat post
receiver, then insert the lower seat post.
Tighten clamp as necessary.
10. Slide the second seat post clamp over the lower
seat post and insert the upper seat post with
seat attached. Adjust the seat to the desired
height, and tighten the clamp. (Fig. 8)
11. Attach the trunk rack to the seat post at the
desired height. Tighten the nuts/bolts. ext,
attach the trunk to the rack using the enclosed
rubber washers and nuts/bolts.
Fig. 8
Fig.10

Only run the engine using a mixture of gasoline and 2-cycle engine oil.
PLEASE READ OPERATING PROCEDURES BEFORE FUELING!
1. Mix fuel (minimum 90 octane) and 2-cycle engine oil in separate container.
Use Tanaka Perfect Mix or a quality 32:1 2-cycle oil. Make sure the fuel is
well mixed by shaking the container
2. Make sure that the engine is off!
3. Slowly open the GAS CAP, so that possible over-pressure disappears.
4. Clean the tank cap area to make sure that it is free from excess dirt and
debris.
5. *Make sure that no dirt falls into the gas tank.
6. Pour pre-mixed Gas/Oil mixture into the GAS TA K. *Do not overfill.
7. After fueling, replace the GAS CAP and tighten.
Riding
1. Make sure that all of the exposed bolts and screws are tightened.
2. Raise the kickstand to its upright position.
3. Make sure the engine is running.
4. Put one foot on the deck of the XG-470 while pushing off with the other
foot, gently rotate the THROTTLE GRIP, on the right side of the
handlebars. The XG-470 will begin to move on its own power.
5. Control your speed by rotating the accelerator grip. The more you rotate,
the faster you will go.
Braking
1. To brake, release the THROTTLE GRIP and depress the BRAKE LEVERS
(on the left/right side of the handlebars)
2. Gradually decrease the engine speed to idle and press the kill switch
button located just to the left of the throttle grip. This will turn the engine
OFF.
TRANSPORTING/STORAGE
Your XG-470 is easily disassembled for compact storage or transporting by
folding the handlebar and removing the seat post from the scooter.
Page10

OPERATING PROCEDURES
Starting
Push the primer bulb 3-5 times to ensure gas it reaching the
carburetor.
Set the CHOKE LEVER to the CLOSED (UP) position.
Pull the recoil starter handle briskly, making sure to keep the
handle in your grasp, and not allowing it to snap back.
Once the engine is running, move the CHOKE LEVER to the RU
(DOW ) position.
Note!
At this stage, if the engine does not start, repeat the starting procedure.
After starting the engine, allow the engine 2-3 minutes to warm up
prior to riding.
Stopping
Gradually decrease the engine speed to an idle speed and press
the stop switch on the handlebar tube.
MAINTENANCE
RECOMMENDED TOOLS
To adjust and service the X-Treme XG-470 you will need the following tools:
Allen Wrenches: 3/4/5/6 mm
Wrenches: 10/13 mm Open end wrench
Large Adjustable Crescent Wrench
Spark Plug Sockets
Philips Head Screwdrivers
Oil, Grease or Lubricant
CARBURETOR ADJUSTMENT
Page11
WARNING!
Never start the engine without the complete clutch cover assembled!
Otherwise the clutch can come loose and cause personal injuries.
In the Carburetor, fuel is mixed with air. When the engine is tested at
the factory, the Carburetor is basically adjusted. Further adjustment
may be required from time to time, depending on climate and
altitude.
The Carburetor has two possible adjustments:
1. Idle speed adjustment
2. Air/Fuel Mixture adjustments
WARNING!
When the engine is idling, under no circumstances should your XG-
470 be moving.
If the XG-470 continues to move after idle speed adjustment,
contact X-Treme or your local X-Treme service center.
Page12
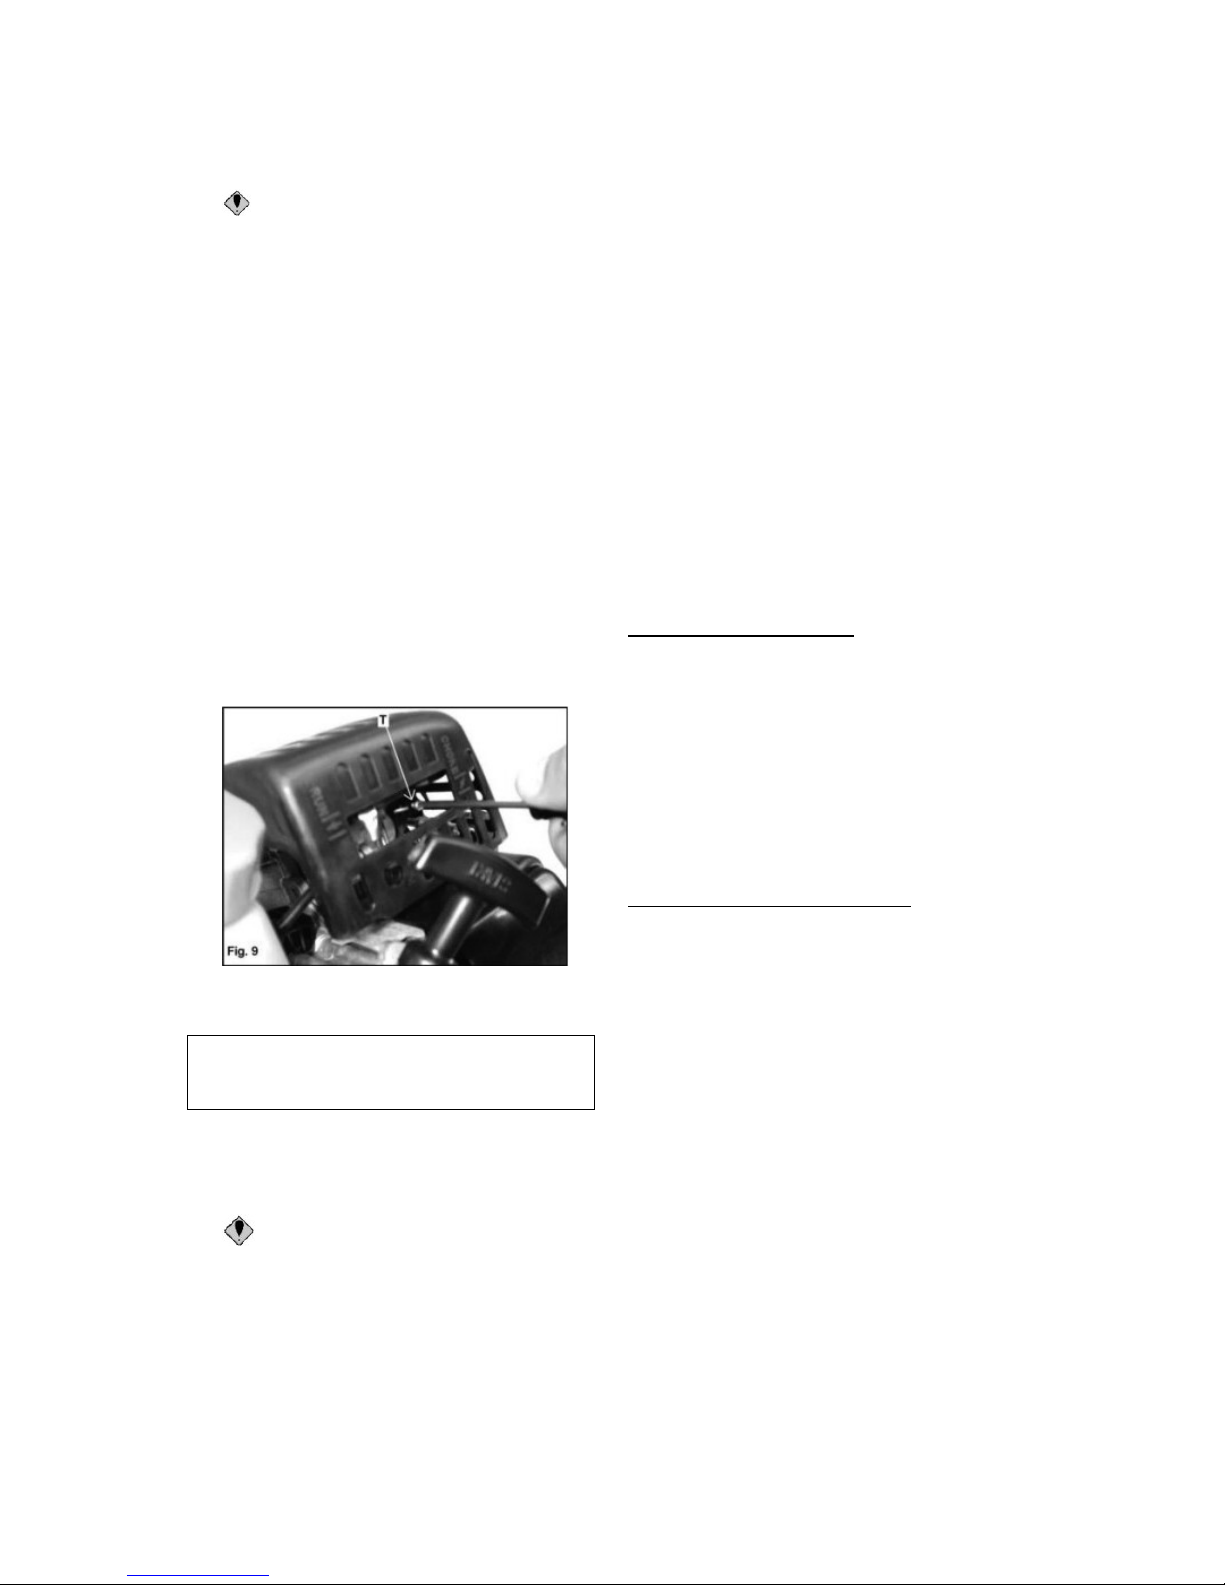
ote: Standard idle RPM is about
2500-3000 RPM.
Idle Speed Adjustment
1. Start the engine.
2. Using a long Philips head screwdriver,
gently turn the top screw clockwise until the
XG-470 starts to move forward. (Fig. 9)
3.Then back out by turning the screw
counterclockwise until the XG-470 stops.
*Correct idle speed is obtained when the
engine runs smoothly just below the RPM
when the XG-470 starts to move.
Air/Fuel Mixture Adjustment
1. Start the engine.
2. Using a long, standard screwdriver and
while holding the throttle wide open, turn the
bottom screw (with spring) clockwise as far as
possible, then back out 1 & ¼ to 1 & ½ turns
until the engine runs smoothly.

Cleaning the Air Filter
It is a good idea to occasionally clean the air filter to insure optimum
performance.
BRAKING SYSTEM
Page13
To clean the air filter:
1. Using a Philips head screwdriver, remove
the carburetor cover by turning the cover
screw counter-clockwise. (Fig.10).
2. Remove and clean the air filter (the spongy
material on top of the air intake), with a
damp rag. (Fig.11).
3. Put the air filter back into its original position
and replace the cover.
The XG-470 uses both front wheel and rear wheel Hub Brake systems
activated by hand levers (on either side of the handlebar). Squeezing the
BRAKE LEVER with your left hand activates the rear brake, and squeezing
the BRAKE LEVER with your right hand activates the front brake. Make sure
to release the THROTTLE GRIP when engaging the brakes.
Practice braking on a smooth, dry surface to get used to the feel of the
braking system. Braking distance is affected by wet conditions and loose and
uneven riding surfaces.
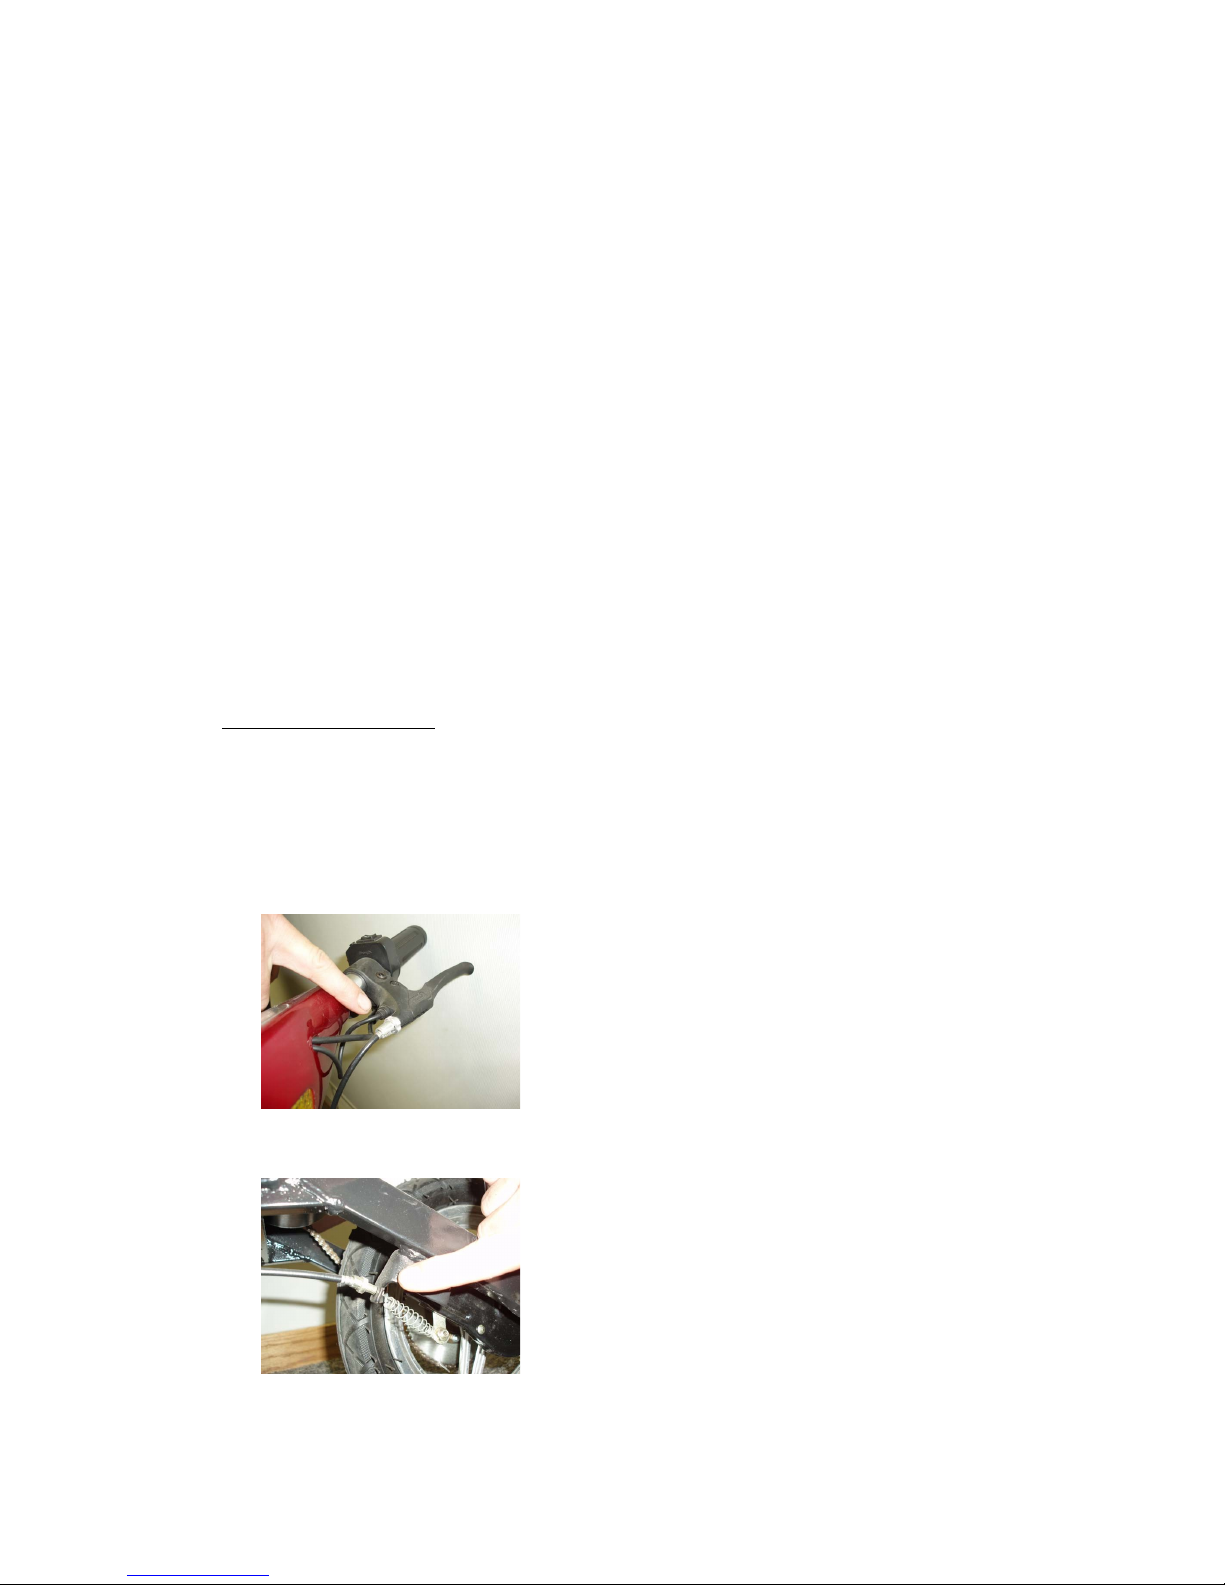
Adjusting the Brakes.
The Brakes on the XG-470 should come fully adjusted from the factory.
However, it may be necessary to adjust the brakes from time to time.
Fig. 12
Fig. 13
Page14
To adjust the brakes::
For brakes that are adjusted too tight:
1. Loosen the tension screw on the
left hand brake lever by rotating it
counter-clockwise until the wheel
spins freely. (Fig. 12)
For brakes that are adjusted too loose:
1. Tighten the tension screw on the
left hand brake lever by rotating it
clockwise until the wheel has a
slight drag. (Fig. 12)
For further adjustment, locate the
adjustment screw on the rear brake
hub located on the rear wheel.
For brakes that are adjusted too tight:
1. Loosen the tension screw on the
rear brake hub by rotating it
clockwise until the wheel spins
freely. (Fig. 13)
For brakes that are adjusted too loose:
Tighten the tension screw on the rear
brake hub by rotating it counter-
clockwise until the wheel has a slight
drag. (Fig. 13)

Squeaky Brakes
The brakes may squeak until they are broken in. This is normal and will not
affect the function or performance of the brakes. With continued use the
squeak should go away.
TIRE AND WHEELS
Tire Pressure
The tire must be inflated to a maximum of 50 P.S.I. It is also
recommended to use a tube additive like Slime purchasable from any
motorcycle shop, to avoid inconvenient punctures.
ADJUSTING THE HEAD UNIT
The head unit should come adjusted from the factory. However, riding on
rough terrain and general use may cause the head unit to become loose over
time. It may be necessary to adjust the head unit from time to time.
Page15
To adjust the head unit:
1. Rotate the handle bar to
expose the HEAD U IT.
2. Using a large adjustable
wrench, gently turn the
BEARI G LOCK clockwise to
tighten. *DO OT OVER
TIGHTE OR IT WILL
DAMAGE THE BEARI GS.

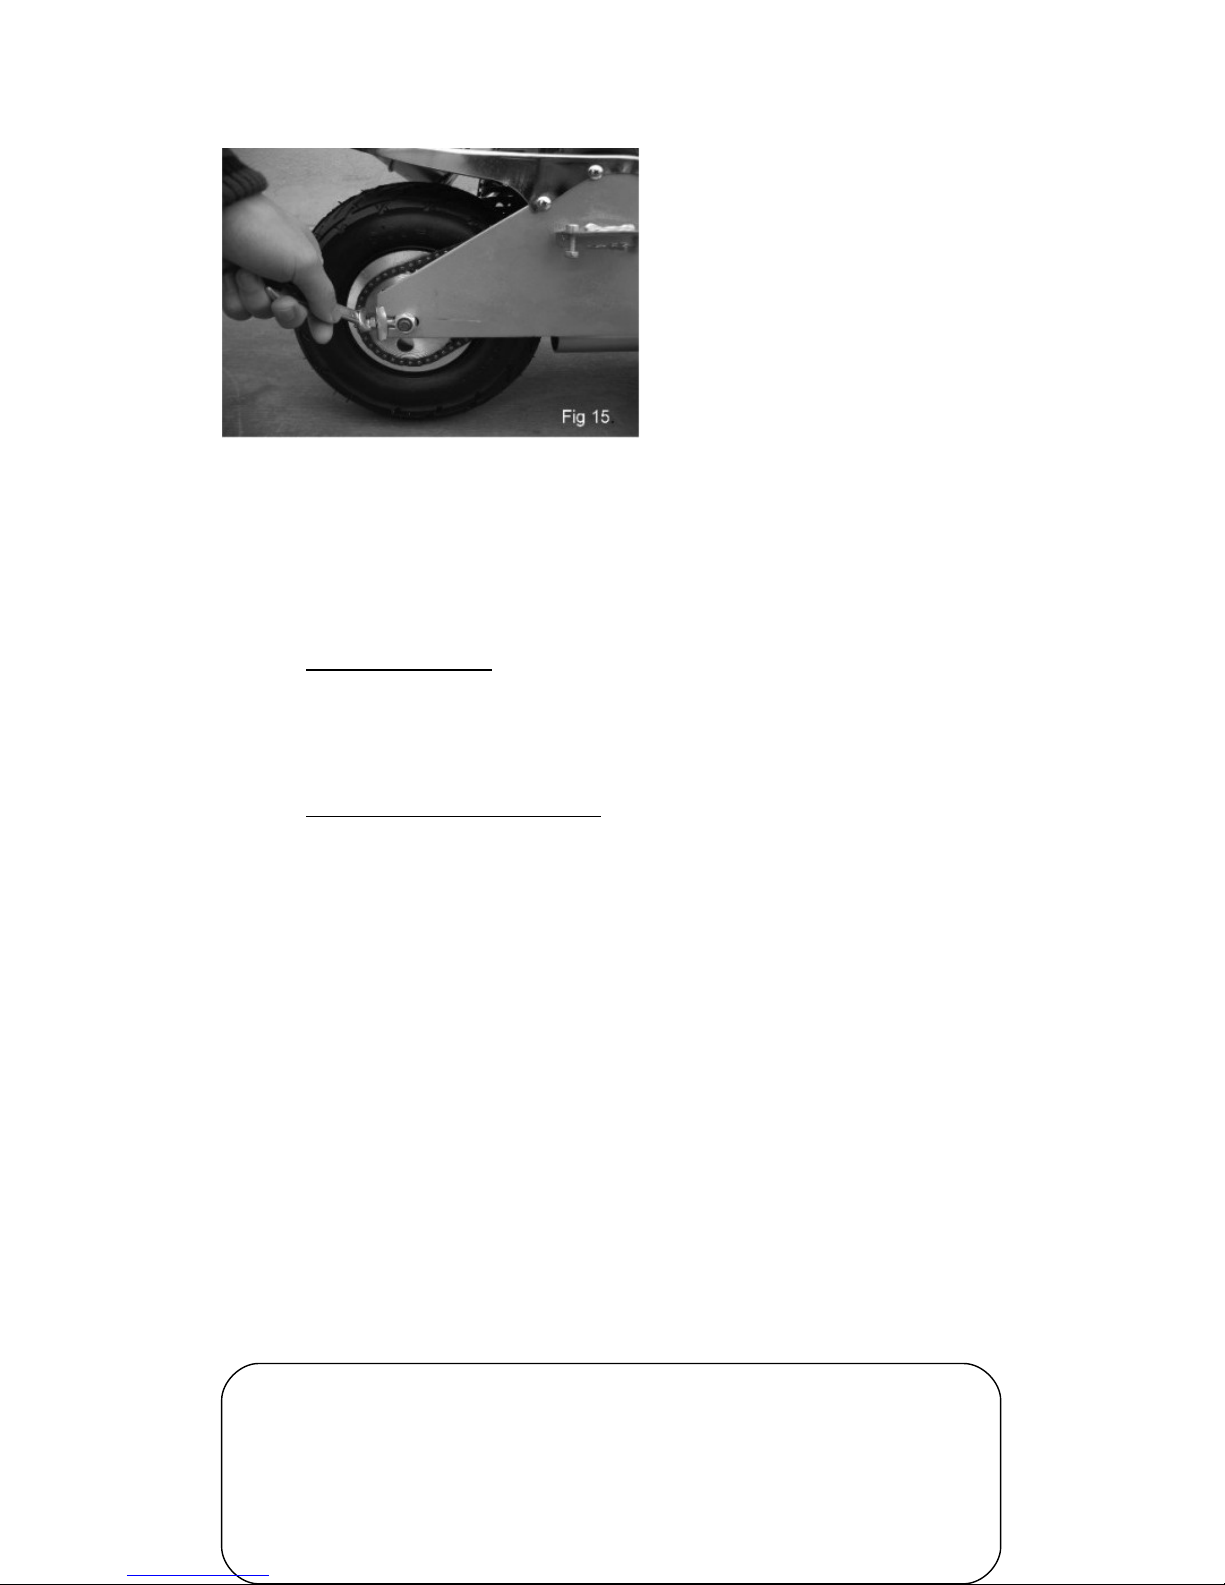
ADJUSTING THE CHAIN
The chain will come adjusted from the factory. However, it may be necessary
to adjust the sprockets from time to time. The chain must be well aligned onto
the sprockets in order to avoid uneven wear. This will result in shortened
chain life.
How tight should the chain be?
If the chain is skipping or jumping on the sprockets, this is too
loose and may be harmful.
If the chain is making a humming sound when the wheel is
turning, this is too tight and may cause the chain to snap.
The correct tension is achieved by adjusting the chain from its
loose position to when it becomes lightly tense.
Page16
To tighten the chains:
Slightly loosen the two axle bolts on both sides
of the rear wheel. (Fig.14). Then slowly adjust
the two adjusting screws on each side of the
rear tire (Fig.15) until chain reaches the proper
tension. (Photos vary)
MAINTENANCE SCHEDULE
Proper care of your X-Treme XG-470 will insure optimal performance and
longer life span. The following are a few maintenance suggestions that will
keep your X-Treme XG-470 running in top condition:
Daily Maintenance
Perform each time you ride your XG-470
Clean the exterior of the unit with a soft, damp rag.
Check that all nuts and bolts are securely tightened.
Weekly/Monthly Maintenance
Check the pull starter, especially the cord and return spring.
Remove the spark plug and check the electrode gap. Adjust it to
0.6mm, or change the spark plug.
Clean the cooling fins on the cylinder head and check that the air
intake at the starter is not clogged.
Clean the air filter.
OTHER QUESTIONS
For additional questions, service instructions, further information and important
phone numbers, please go to the X-Treme website at www.x-tremescooters.com
Thank you for purchasing an X-Treme XG-470 and please tell your friends how much fun
you’re having on the X-Treme XG-470
Page17
Occasionally rotate the rear wheel to
make sure chain is aligned.
Finally, lock and tighten the rear axle
bolts prior to riding.
(Photos vary)
For General Information or Parts Visit www.x-
tremescooters.com
For Technical Support or Assistance Visit
www.x-tremescooters.com/support/
Table of contents
Other Xtreme Scooter manuals

Xtreme
Xtreme XB-420M User manual

Xtreme
Xtreme X-500 User manual

Xtreme
Xtreme X-400 User manual

Xtreme
Xtreme X-010 User manual

Xtreme
Xtreme X-140 User manual

Xtreme
Xtreme X-360 User manual

Xtreme
Xtreme XB-500 User manual

Xtreme
Xtreme X-370 User manual

Xtreme
Xtreme XM-5000Li Troubleshooting guide

Xtreme
Xtreme XG-550 User manual

Xtreme
Xtreme X-600 User manual

Xtreme
Xtreme XM-3150 Troubleshooting guide

Xtreme
Xtreme XG-499 User manual

Xtreme
Xtreme XT300 User manual

Xtreme
Xtreme XB-420M User manual

Xtreme
Xtreme XG-565 A-Blaze Signature Series User manual

Xtreme
Xtreme XG-575DS User manual

Xtreme
Xtreme XB-300SLA User manual

Xtreme
Xtreme XMB-320 User manual

Xtreme
Xtreme XM-3100 Troubleshooting guide


