Trikke E-Kit User manual

1. Verify that your E-Kit contains all of the following materials for proper
installation:
•Wheel and motor assembly X1
•Battery pack controller bag and bracket assembly X1
•Throttle X1
•Full sized handle grip X1
•Half sized handle grip X1
•Throttle sleeve X1
•Circular half-brackets X3
•Circular T-shaped half-bracket X1
•5mm hex-bolts X6
•5mm Allen wrench X1
•3mm Allen wrench X1
•Zip-ties X2
•Trikke emblem badge X1
•Trikke Tribred front post sticker X1
•2” Clear alignment stickers X2
•1” Clear alignment sticker X1
•Clear wire bundler stickers X3
2. Remove the existing Trikke sticker from the front post. Also, remove
the water bottle cage from the front post if you have one installed.

3. Disassemble the brake cables from the brake handle.
•Align the brake cable adjustment screws (arrow) so that
the slot in the screws line up with the slot in the brake
handle. This will allow the brake cable to come free out
of the front of the brake handle.
•Squeeze the brake handle so that the small metal
cylinder attached to the end of the brake cable is visible.
•Align the brake cable and the metal cylinder with the
brake handle slot so that the cable can come free of the
brake handle completely.
•Repeat the above steps to disassemble the other brake
cable from the other brake handle.
4. Free the brake cables from the cable bracket at the lower end of
the front post so that the brake cables can be pulled to the rear
of the Trikke. This will allow installation of the E-Kit without
interfering with the brake cables.
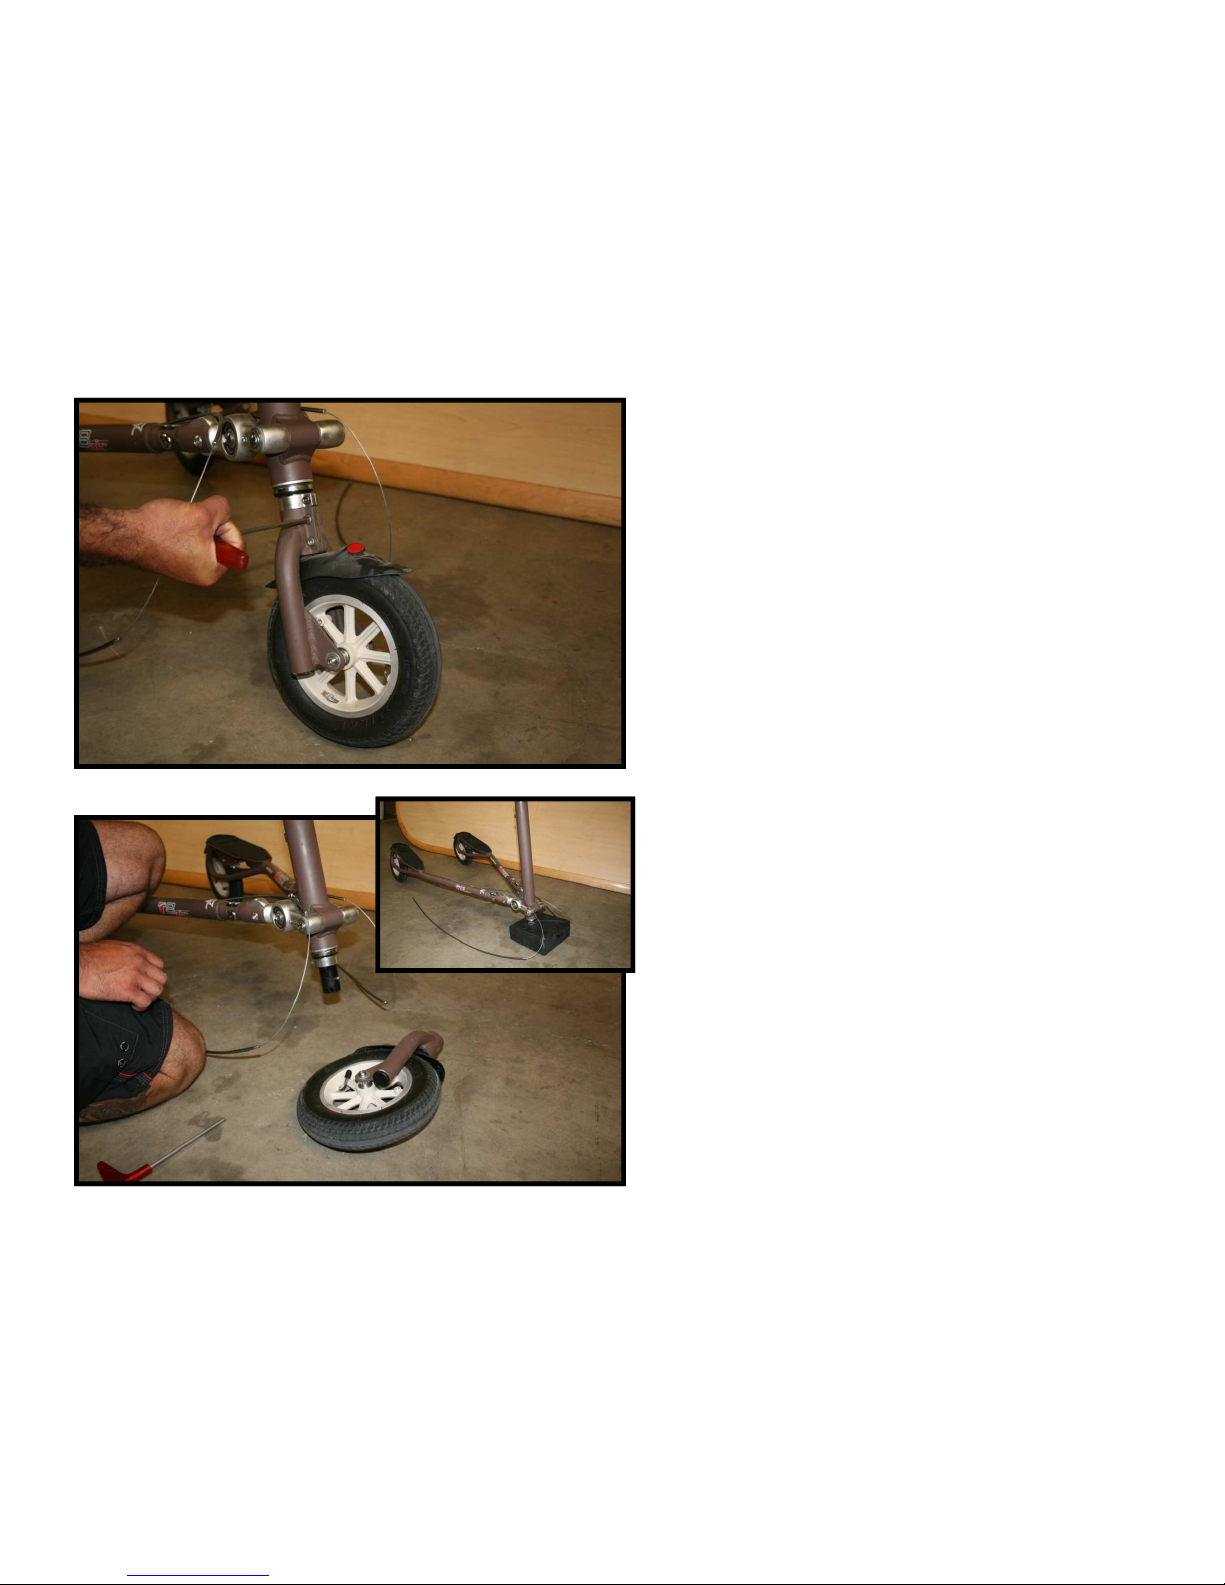
5. Loosen the two lower 5mm Allen socket bolts of the front wheel fork
where the fork attaches to the front post.
6. Press the alignment pin and remove the front wheel assembly. Note:
You may want to place the front post stem on a piece of wood or in
the plastic Trikke packaging block that originally came with the Trikke
to avoid damaging the Trikke or the floor.
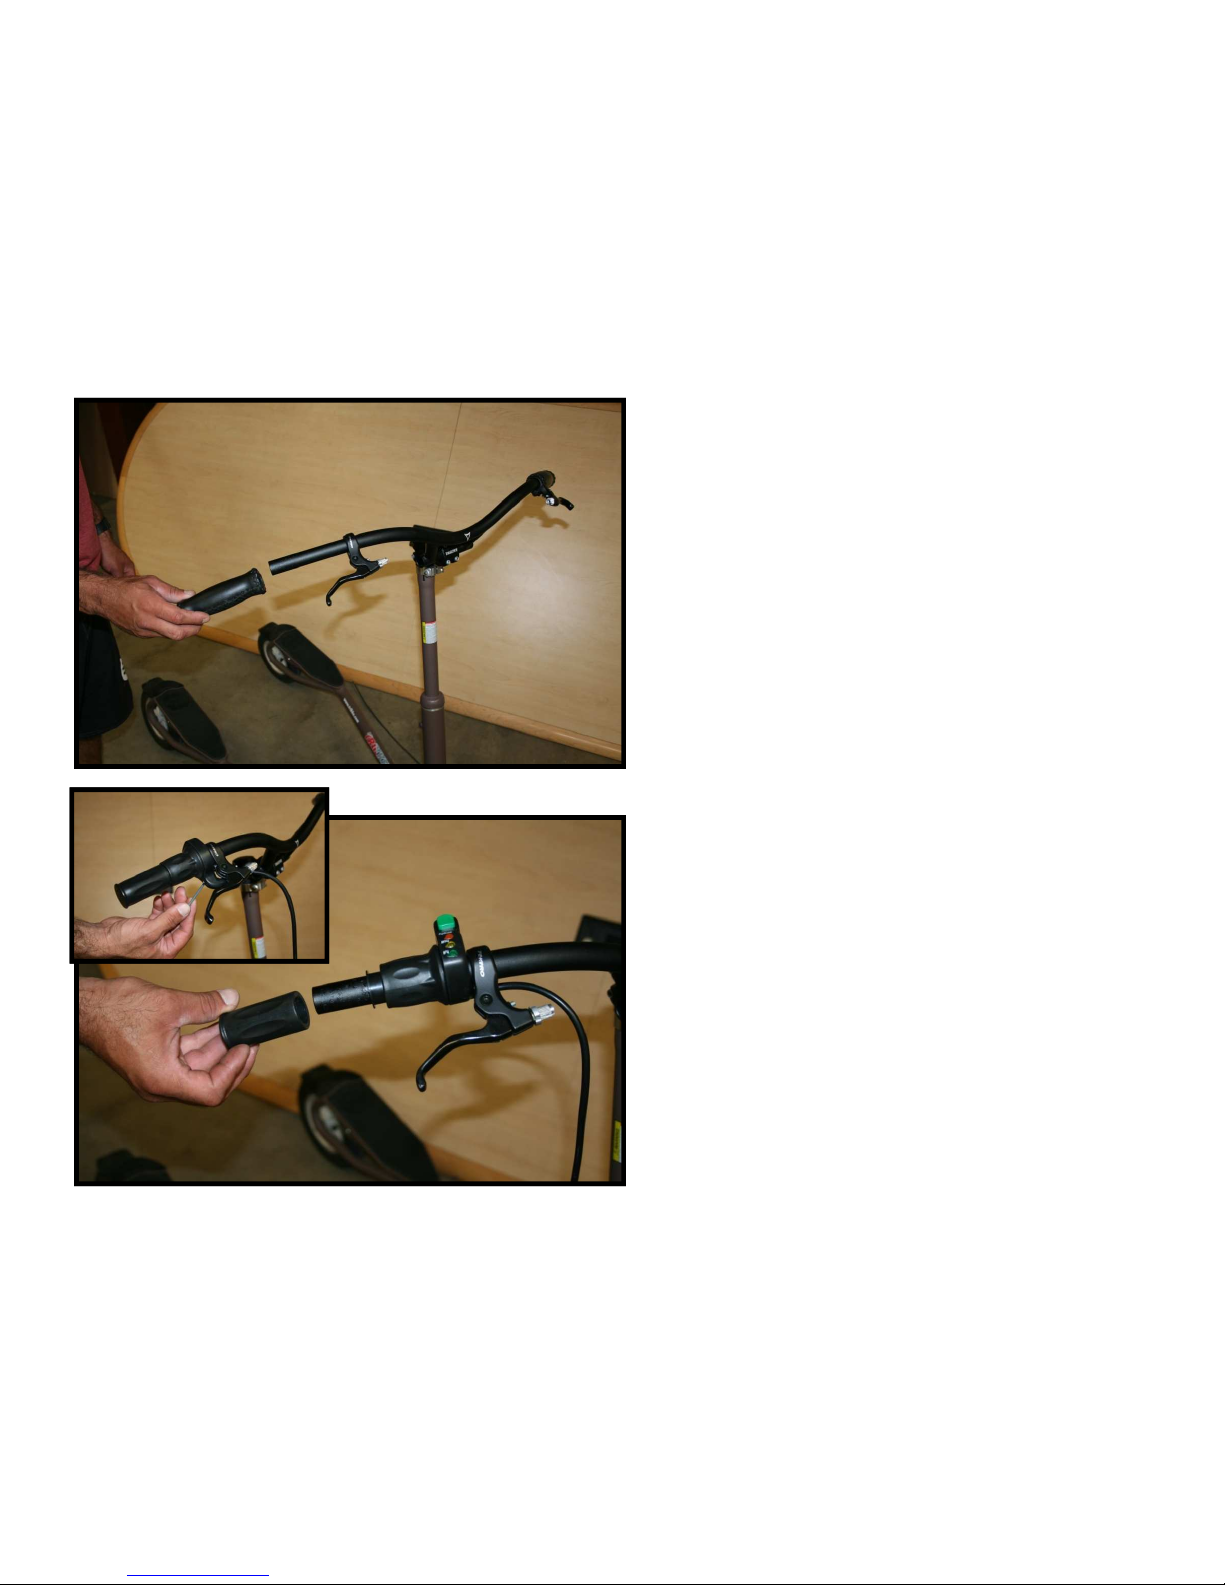
7. Remove both existing handle grips.
•Some handle grips require that a phillips-head screw be
removed prior to removing the handle grip. If this is the
case, remember to also remove the cap inside the
handlebar so that it does not fall inside the handlebar
and rattle around as you ride.
•Removal of the handle grips requires a lot of effort. You
may want to use a hot air blow gun to heat the material
before removing it. Use extreme caution as this may
melt the handle grip material and or cause a fire.
8. Install the Throttle on the right side of the handlebar.
•The throttle should slide all the way to the brake handle.
•Once the throttle is against the brake handle, rotate the
throttle until the stop located on the inner face of the
throttle is resting against the brake handle. This will
align the throttle to the proper position.
•Insert the plastic throttle sleeve over the handlebar so
that the sleeve slides inside the throttle. The sleeve
flange will stop the sleeve against the throttle.
•Install the half-sized handle grip over the remaining right
side of the handlebar.
•Tighten the 3mm Allen socket bolt located on the
underside of the throttle making sure to keep the
throttle aligned as described above.
9. Install the full-sized handle grip on the left side of the handlebar.

10. Place one of the 2” clear alignment stickers 0.5” below the
upper brake cable bracket.
11. Place the second 2” clear alignment sticker 0.75” below the
lower brake cable bracket.
0.5”

12. Install the bag and bracket assembly – Option A.
•Fold the Trikke into its closed and locked position. Place
the battery pack controller bag and bracket assembly
between the arms of the Trikke, but beneath the front
post.
•Align the bag assembly with the half-circle brackets
holding the front post and the exposed bracket toward
the hinge (the bottom when unfolded) of the Trikke.
•Align the brackets with the top of the brackets aligned
with the top of the clear alignment stickers.
•Install two half-circle brackets with four 5mm Allen socket
bolts to the bag assembly. Make sure to keep the spacing
between each side of the bracket the same. This will
ensure an even tension for each bolt and will prevent
stripping the brackets and bolts.
•Unfold the Trikke to its upright and locked position.
Allow the bag assembly to “seat” by pushing down on the
assembly. Make sure to keep the bag assembly centered
and aligned with the top edges of the clear alignment
stickers.
•
Finishing
tightening
the
Allen
socket
bolts
.
B
•
Finishing
tightening
the
Allen
socket
bolts
.
13. Install the bag and bracket assembly – Option B.
•This procedure is the same as Option A above except do
not fold the Trikke before installation. This will require
some strength and is possibly a two person installation.

14. Reassemble the brakes.
•Feed the brake cables through the spaces located in
the front center of each bracket. Do not set the brake
cables in the brake cable brackets on the front post
(arrows).
•Cross the brake cables once behind the post and once
more in front of the post. This will ensure the left
brake handle will apply the left brake and the same for
the right side.
•Reverse the brake cable detachment procedure of step
3 above. Note: if there is not enough brake cable
visible from the brake cable sleeve, just push the sleeve
down the cable until enough brake cable is showing.
This is why we do not set the brake cables into the
brake cable brackets until later.
•Set the brake cable sleeves into the brake cable
brackets on the front post (arrows).
•Squeeze the brake handle. There should be space
between the brake handle and the handle grip at
maximum
strength
.
The
adjustment
screws
located
on
maximum
strength
.
The
adjustment
screws
located
on
the brake handle can be used to add or remove tension
from the brake line (lower arrow).
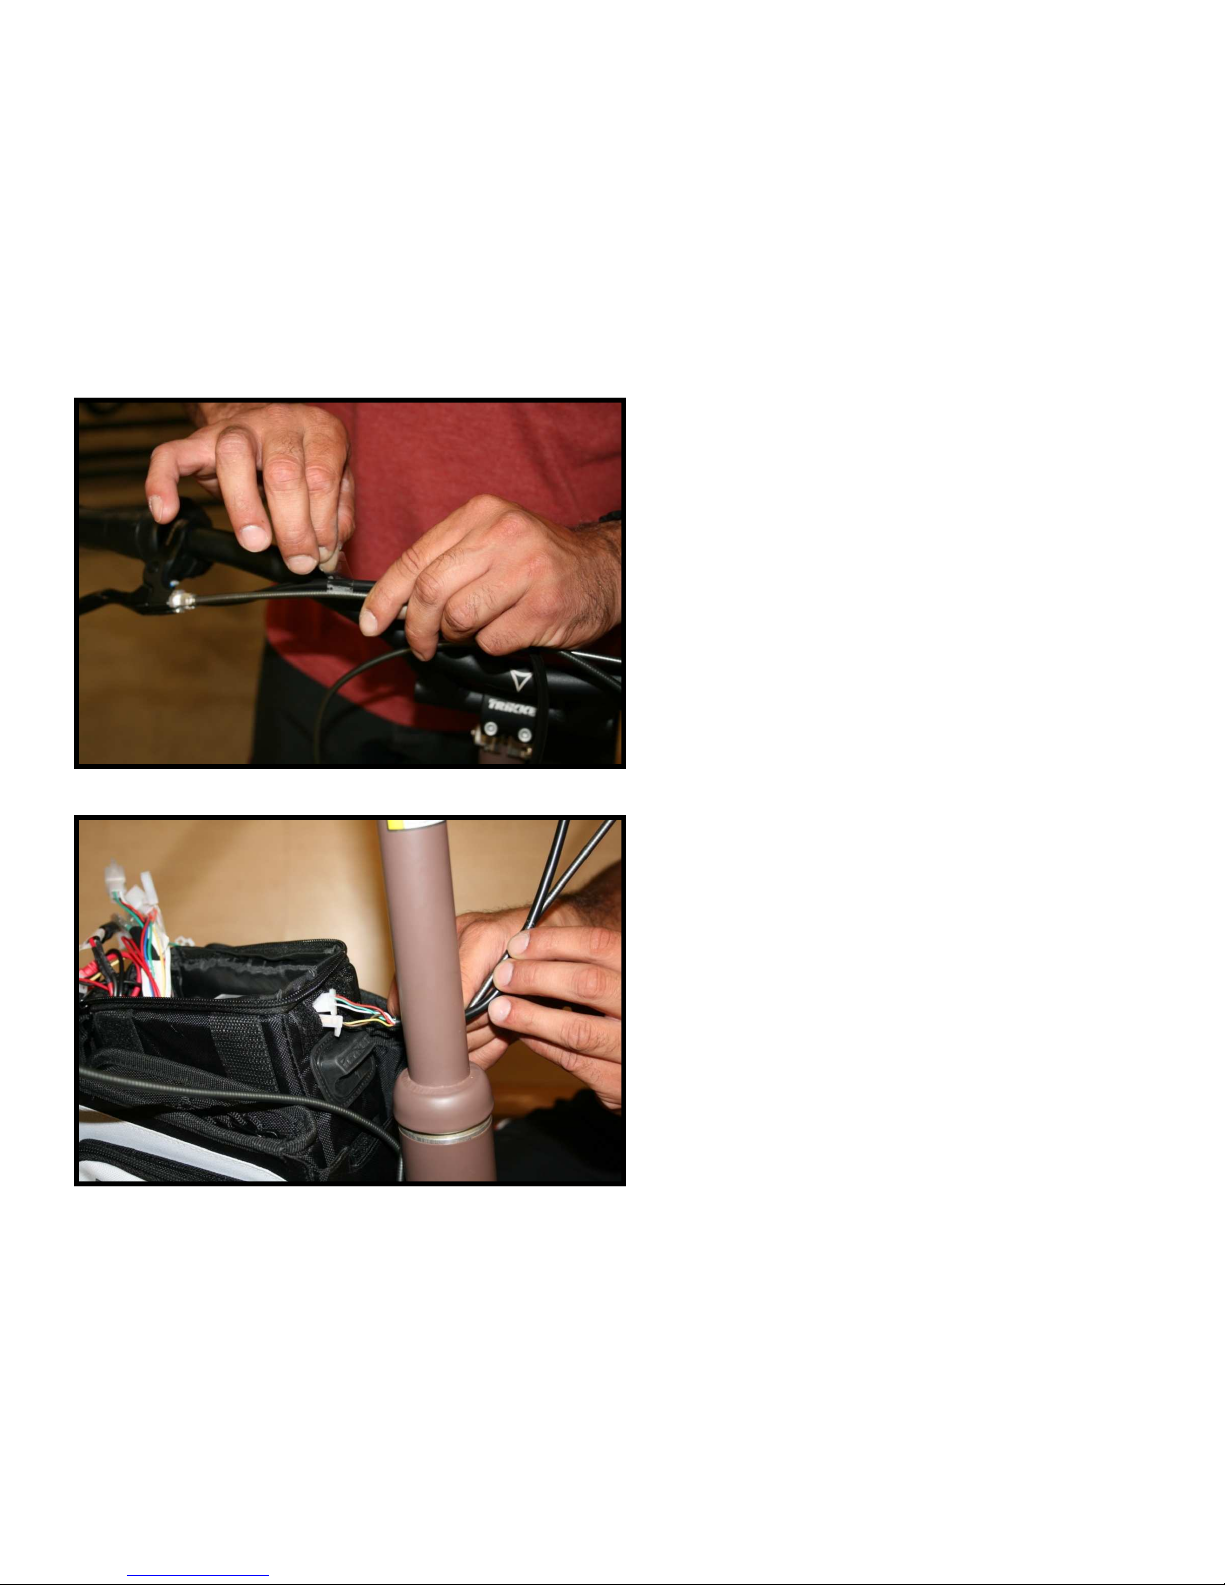
15. Tape the throttle cable to the brake cable using the three clear
cable bundling stickers provided.
16. Unzip the top flap of the bag assembly and feed the throttle
cable wires through the hole located at the top front center of
the bag assembly.
•Connect the two throttle cable connecters to the
controller wires which are labeled with a throttle tag.

17. Install the 1” clear alignment sticker.
•Turn the Trikke upside down and rest the Trikke on its
handlebar and foot rests.
•Remove the serial number sticker located on the
backside of the front post near the front wheel
assembly. Replace the sticker on the backside of the
front post just under the bag assembly bracket.
•Align the 1” clear alignment sticker with the bottom
edge of the front post and wrap around the front post.
18. Install the front wheel motor assembly turn-limiter bracket.
•Install the half-circle T-bracket and half-circle bracket
with the remaining Allen socket bolts.
•Align the half-circle bracket with the bottom edge of the
front post. The half-circle T-bracket should be on the
front side of the Trikke with the other bracket on the
backside. Make sure to center the brackets so that the
T-bracket is perfectly aligned with the front side of the
front post.

19. Install the front wheel motor assembly.
•Slide the motor assembly over the steering post.
•Press in the steering post pin and slide the motor
assembly over it until the pin snaps into place.
•Note: The front wheel motor assembly plastic fender may
be loose. If this is the case, try the following techniques:
i. Remove the fender and use superglue around
the base of the sleeve where the sleeve will
contact the inner tube of the motor assembly
fork. Quickly place the fender assembly in place
and allow the glue to set.
ii. Remove the fender assembly and expand the
outer radius of the fender sleeve by heating the
sleeve with a hot air blow gun. Use Caution with
this technique as the heat gun may melt the
fender material or cause a fire. Once the sleeve
is heated, use a socket from a socket-wrench set
that is one size larger than the current inner
radius of the sleeve and push the socket through
the sleeve. This will expand the radius of the
sleeve. Install the fender back into place.
•Tighten the 5mm Allen socket bolts.
i.

20. Install the front wheel motor assembly wire bundle – Part A
•From the front wheel motor, make sure the wire
bundle is behind the front fork. Also make sure the
wire bundle will not rub the motor or wheel by
adjusting the existing zip-tie and wire bundle around
the front fork.
•Allowing a little slack, use one of the zip-ties provided
to tie the wire bundle to the outside edge of the
cambering mechanism. Cut the excess zip-tie material.
•Using the second zip-tie, attach the wire bundle to the
outside edge of the lower bag assembly bracket. Cut
the excess zip-tie material.
•Open the outer flap and tuck the wire bundle inside.
•Feed the connecters of the wire bundle through the
hole located in the top front center of the bag
assembly.

21. Install the front wheel motor assembly bundle – Part B
•Connect the white plastic connecters from the
motor to the controller making sure to match the
wire colors along with the connecters.
•Connect the four individual wires from the motor
to the same colored individual wires from the
controller. Slide the clear rubber sleeve (arrow)
that covers the metal connector portion of the
wire down the wire to expose the metal. Connect
the wires together and slide the clear rubber
sleeve back over the connection. This will insulate
the connection as well as keep the connection
together.
•Connect the black connector from the motor to the
black connector from the battery. Note: You may
hear a pop sound when the connection is initially
made. This is normal.
•Check the fuse in the small red box attached to the
power cable that was just connected in step 20.h.
•Close the top flap of the bag assembly and close
the zippers so that the zipper tabs are located at
the front center of the bag assembly. Pull the
Velcro tab down over the hole in the front center
of the bag.

22. Install the Trikke Tribred sticker on the front post between
the bag assembly brackets.
23. Install the Trikke hybrid 3CV technology badge on the front
post above the upper bag assembly bracket (arrow).
24. This concludes the E-Kit installation.

E-Kit User’s Guide
The Trikke Tribred will need to charge for a minimum of 8 hours before
its first use. To charge the Trikke Tribred, first plug the charging unit
into a normal 110V socket. Note that there should be a green light on
the charging unit box. Connect the other cable of the charging unit to
the plug located on the backside of the bag assembly near the top. The
charging unit box light should turn from green to red. Once the charge
is complete, the light on the charging unit will turn from red to green.
To turn the Trikke Tribred on, press the green button on the throttle in
for 3-seconds, then release. The battery life indicators on the throttle
will illuminate – all the way green indicates a full charge.
There is a speed limiter switch next to the charger plug on the bag
assembly. When turned on, the switch will limit the speed of the Trikke
Tribred to 12mph.
To power the motor, simply turn the throttle. The throttle is sensitive to
the
amount
it
is
turned
and
will
increase
the
power
as
it
is
turned
E-Kit Trouble Shooting Manual
Make sure that the ends of the wires in the wire connecters are securely
in place. Sometimes the wires pop out which will result in a bad
connection and poor performance.
the
amount
it
is
turned
and
will
increase
the
power
as
it
is
turned
further.
To turn off the Trikke Tribred, press the green button on the throttle for
3-seconds. The battery life indicator lights on the throttle will turn off –
signaling that the Trikke Tribred is off.
Other Trikke Scooter manuals

Trikke
Trikke Bikke User manual

Trikke
Trikke T8 User manual

Trikke
Trikke Colt User manual

Trikke
Trikke eV5 User manual

Trikke
Trikke T5 JOGO User manual

Trikke
Trikke Pon-e 48V User manual

Trikke
Trikke T7 User manual

Trikke
Trikke FREEDOM User manual

Trikke
Trikke T67s User manual

Trikke
Trikke DEFENDER 48V 2WD User manual


