Trillium Talk To 1032 User guide

,,.,.
,.. - z : i
,; ;I ‘.,i’,, ?- .. _ .m ,VI
:. 5
5’ ... LJ
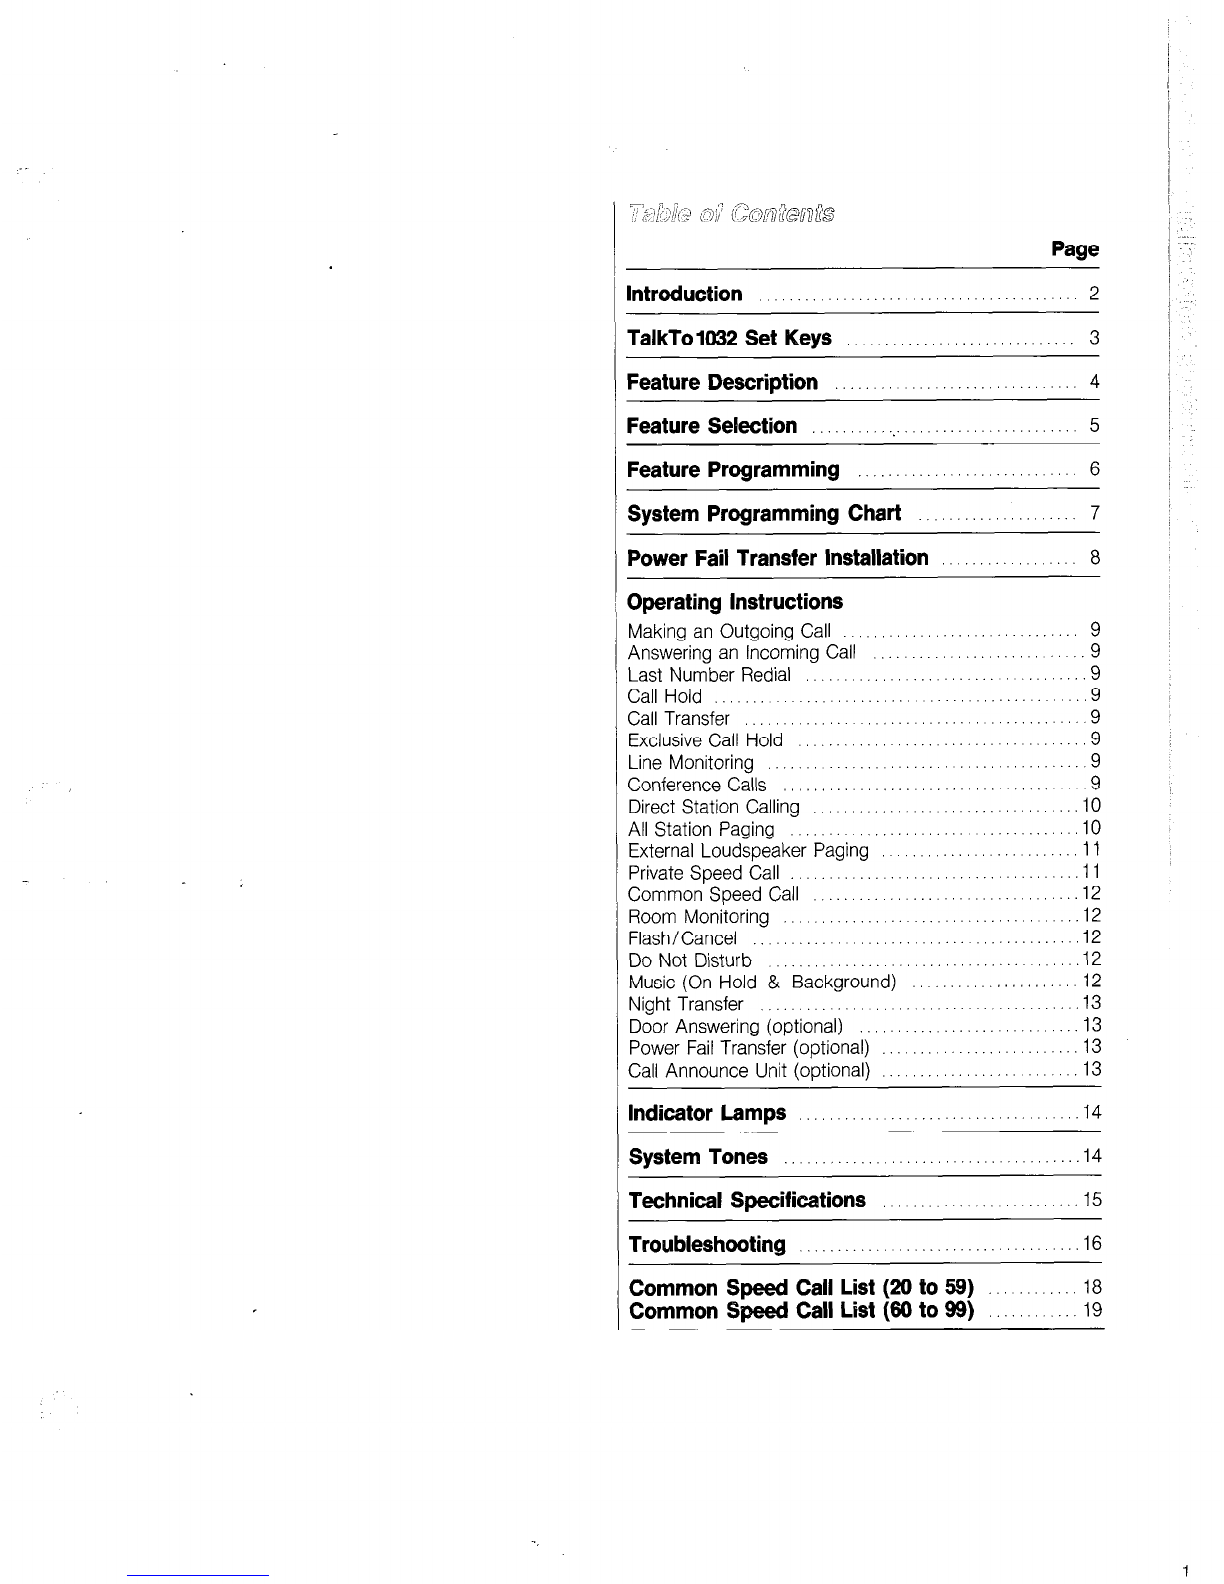
Page
Introduction
2
TalkTolO32 Set Keys ..............................
3
Feature Description ...............................
4
Feature Selection .................................... 5
Feature Programming .............................
6
System Programming Chart .....................
7
Power Fail Transfer Installation ................. 8
Operating Instructions
Making an Outgoing Call ........
Answering an Incoming Call ....
Last Number Redial .............
Call Hold .................. ..
Call Transfer .............. .. ..
Exclusive Call Hold .............
Line Monitoring .................
Conference Calls .............
Direct Station Calling ............
All Station Paging ....... ......
External Loudspeaker Paging
Private Speed Call ...............
Common Speed Call ...........
Room Monitoring ...............
Flash/Cancel ............ ......
Do Not Disturb ..................
Music (On Hold & Background)
Night Transfer ..................
Door Answering (optional) ......
Power Fail Transfer (optional) ...
Call Announce Unit (optional) ...
9
9
9
9
..9
9
9
.9
.I0
.lO
.I1
.I1
.I2
.I2
.I2
.I2
.I2
.I3
13
113
.I3
Indicator Lamps ................................... .I4
System Tones ......................................
.I4
Technical Specifications ..........................
15
Troubleshooting ............ ..................... .16
Common Speed Call List (20 to 59) ...........
18
Common Speed Call List (60 to 99) ............
19
Reprogramming Chart
................... (in pocket)
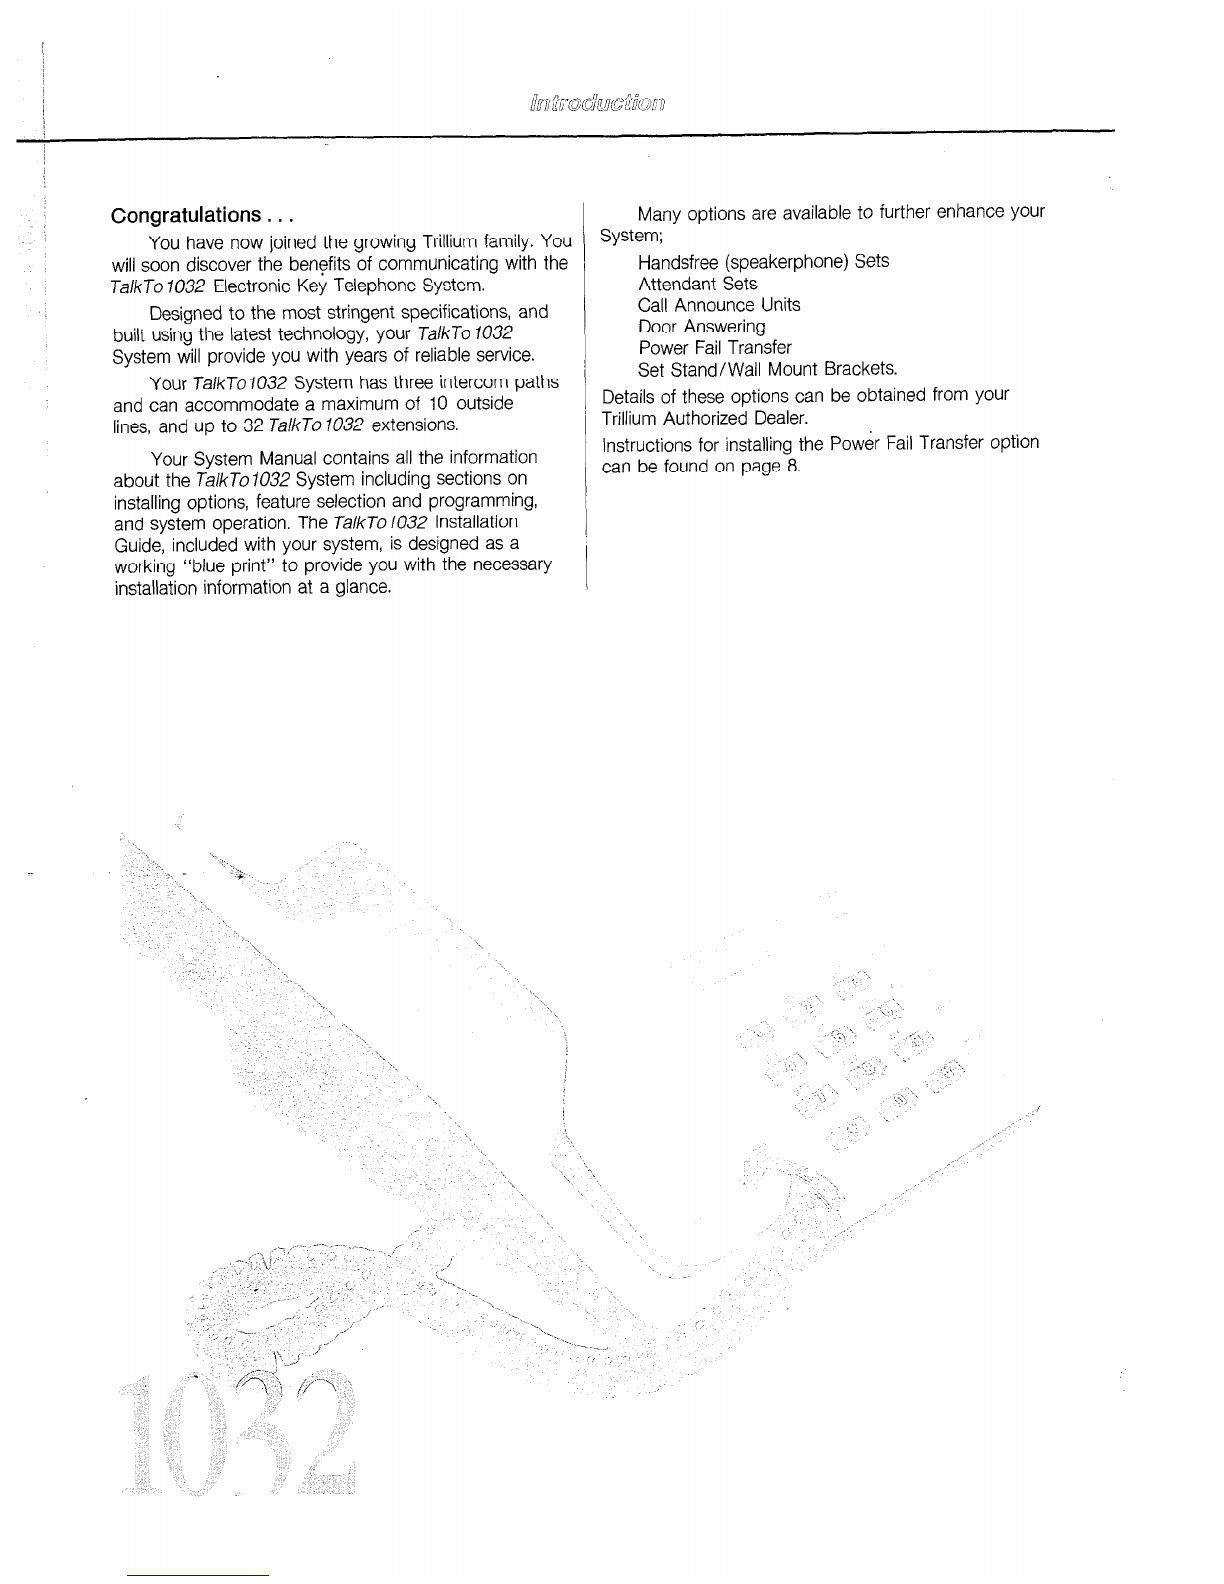
Congratulations. . .
You have now joined the growing Trillium family. You
will soon discover the benefits of communicating with the
J&Jo 7032 Electronic Key Telephone System.
Designed to the most stringent specifications, and
built using the latest technology, your JalkJo 1032
System will provide you with years of reliable service.
Your JalkJo7032 System has three intercom paths
and can accommodate a maximum of 10 outside
lines, and up to 32 TalkTo 1032 extensions.
Your System Manual contains all the information
about the TalkTo 1032 System including sections on
installing options, feature selection and programming,
and system operation. The Ta/kTo 1032 Installation
Guide, included with your system, is designed as a
working “blue print” to provide you with the necessary
installation information at a glance.
Many options are available to further enhance your
System;
Handsfree (speakerphone) Sets
Attendant Sets
Call Announce Units
Door Answering
Power Fail Transfer
Set Stand/Wall Mount Brackets.
Details of these options can be obtained from your
Trillium Authorized Dealer.
Instructions for installing the Power Fail Transfer option
can be found on page 8.

T
You may wish to familiarize yourself with the Set
keys before proceeding to the Operating Instructions.
Last Number &dial
When a line key is accessed the last number redial
key will redial the last number dialed.
Line Select
The ten line select keys are used to access any of
the outside lines, unless programmed otherwise. Line
select key ten is used to access the Door Answering
feature.
Conference
The conference key is used for setting up
three-party conference calls.
Flash/Cancel
The function of this key is programmable as a
calibrated hookswitch flash or cancel, but not both.
Flash provides a calibrated hookswitch flash for
PABX and Centrex applications, or to your telephone
exchange to access custom calling features.
Cancel used to cancel external calls and return dial
tone without hanging up the handset.
Hold
Outside calls are put on hold, or exclusive hold by
pressing -the hold key.
Speed
The speed key is used during the programming and
dialing of private and common speed call numbers.
Speaker
Used to turn the Set speaker on and off and to
terminate a handsfree call.
Microphone
Used to turn the microphone on and off.
Ringer Volume Control
Situated on the upper left side of the Set, controls
the volume of the tone ringer.
Speaker Volume Control
Situated on the left side of the Set, controls the
volume of the sound at the speaker.
Handsfree
If the model number of your Set is 90-0123, it is
equipped for your convenience with the handsfree
speakerphone option. This allows you to make and
receive calls completely handsfree, providing the
microphone and speaker are turned on.
RingerVolume Line Select
Microphone
Speaker
Speaker Volume
r
Hold
Conference
Flash/Cancel
Speed
Redial
la/&To 1032 Set Layout
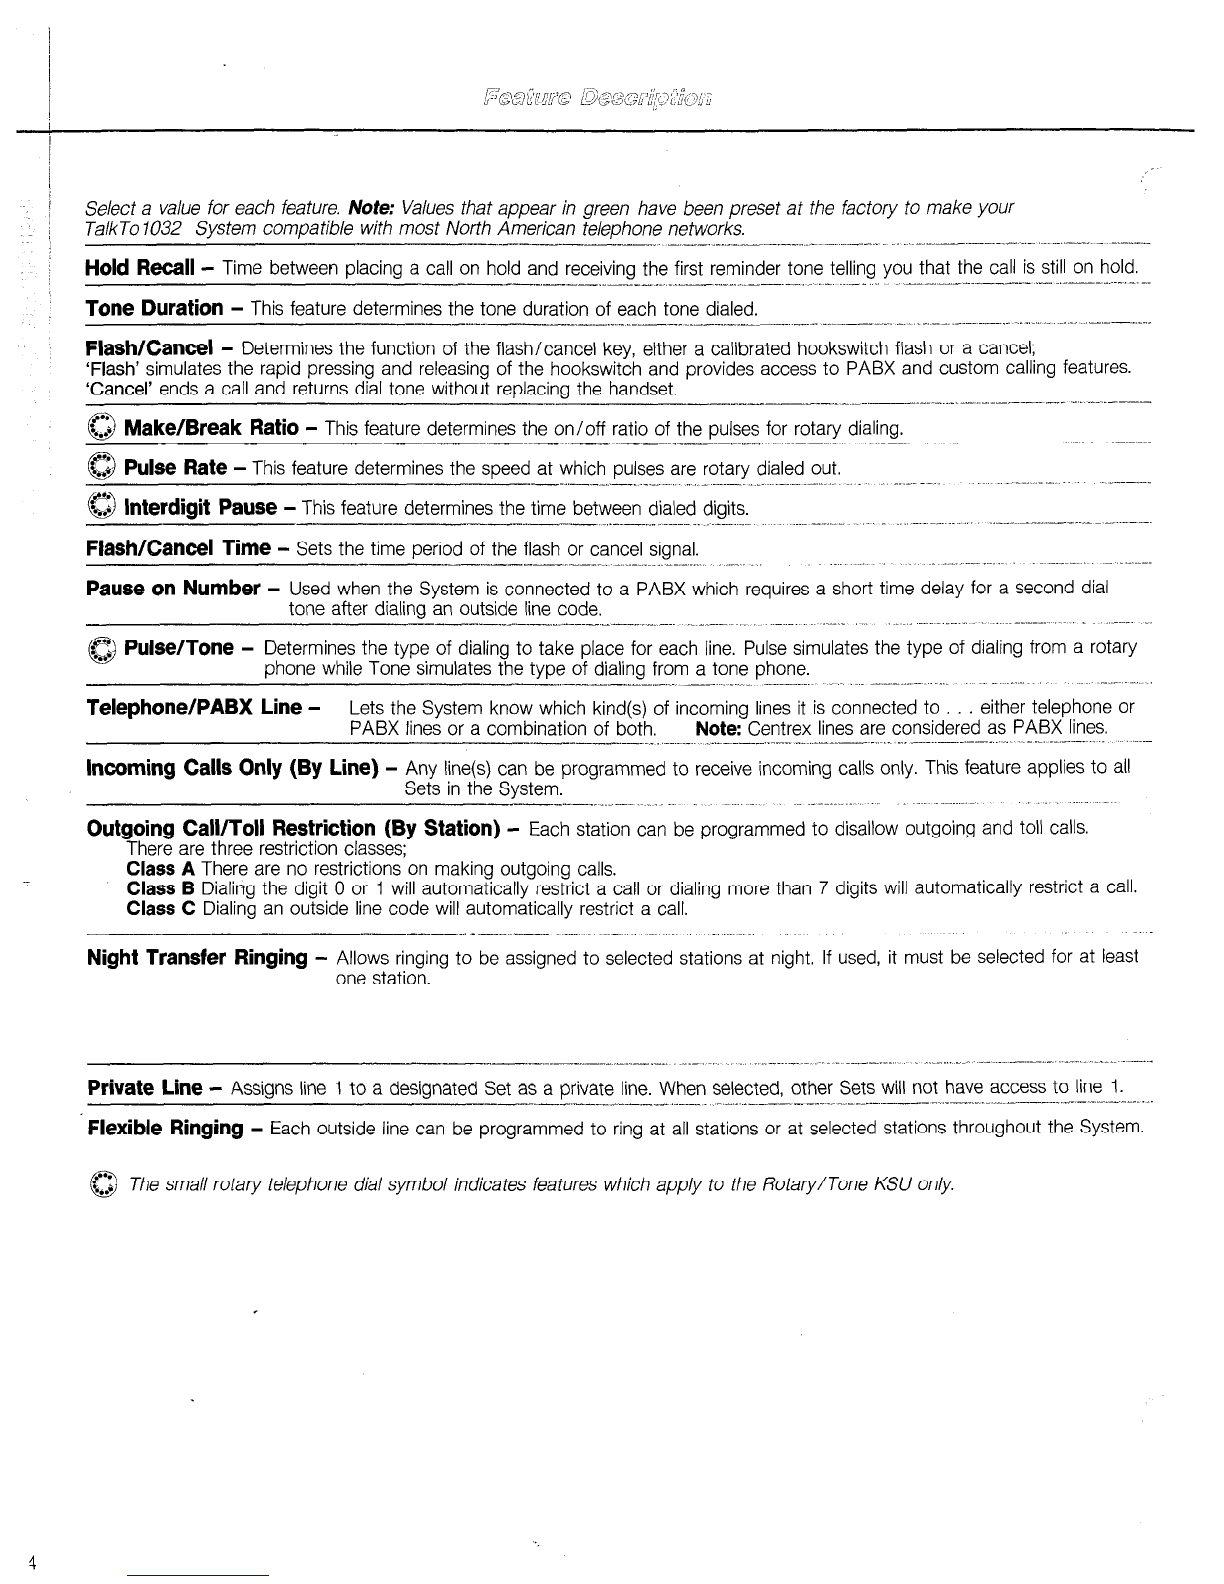
Select a value for each feature. Note: Values that appear in green have been preset at the factory to make your
TalkTo 1032 System compatible with most North American telephone networks.
-.~-_l-._ll----. - .__. __.._s_--_--_.- -.-. ---.. . __-. ---.-_,- ..-. ..-..-.-. - -.-_--
Hold
Recall - Time between placing a call on hold and receiving the first reminder tone telling you that the call is still on hold.
--.--.__--__~-__I” ._I.-II..I”. .~--.--. - ..-- ___I.__--._,-_._ __....---_ ---.x.-.
Tone Duration
- This feature determines the tone duration of each tone dialed.
Flash/Cancel
- Determines the function of the flash/cancel key, either a calibrated hookswitch flash or a cancel;
‘Flash’ simulates the rapid pressing and releasing of the hookswitch and provides access to PABX and custom calling features.
‘Cancel’ ends a call and returns dial tone without replacing the handset.
- ---.-__ _- ._- .--.__ .__.,__^__-.._--_---- --_ I. .-_.----
0
..P Make/Break Ratio
- This feature determines the on/off ratio of the pulses for rotary dialing.
-__-___ __-.- ---~~~ .--_--~~.~~..._-.-~~~----- ^--- -- .-.~..-----------, ,._
$$$
Pulse Rate
- This feature determines the speed at which pulses are rotary dialed out.
I __.I__._.__._._-, “__._._. .._.--.-..~ ...----..
a Interdigit Pause
- This feature determines the time between dialed digits.
Flash/Cancel Time
- Sets the time period of the flash or cancel signal.
Pause on Number -
Used when the System is connected to a PABX which requires a short time delay for a second dial
tone after dialing an outside line code.
---~--l_.--.l~l--.-.--..___-... _~_-- .-.... --_-.- -- -...--_
62
* Pulse/Tone -
Determines the type of dialing to take place for each line. Pulse simulates the type of dialing from a rotary
phone while Tone simulates the type of dialing from a tone phone.
_.__-_” ______._.__.__ ---.--.. ..-.--....- .-... ~---..---.
Telephone/PABX Line -
Lets the System know which kind(s) of incoming lines it is connected to either telephone or
PABX lines or a combination of both. Note: Centrex lines are considered as PABX lines.
Incoming
calls
Only (By
Line)
- Any line(s) can be programmed to receive incoming calls only. This feature applies to all
Sets in the System.
Outgoing Call/Toll Restriction (By Station) -
Each station can be programmed to disallow outgoing and toll calls.
There are three restriction classes;
Class
A
There are no restrictions on making outgoing calls.
Class B Dialing the digit 0 or 1 will automatically restrict a call or dialing more than 7 digits will automatically restrict a call.
Class
C Dialing an outside line code will automatically restrict a call.
__--... -.-.-_--- ..-. .-- -... .
Night Transfer Ringing -
Allows ringing to be assigned to selected stations at night, If used, it must be selected for at least
one station.
-- --.-.-.--_--...- ..__I”_. -.-. ~.
Private Line -
Assigns line 1 to a designated Set as a private line. When selected, other Sets will not have access to line 1.
_..__..__ _.--__ ._--__.
___._____.-___-__ I _,_.--__.- -_.II_. .~~.~-.-- .._.--_-_._-_--I-.-.
Flexible Ringing -
Each outside line can be programmed to ring at all stations or at selected stations throughout the System.
0 The small rotary telephone dial symbol indicates features which apply to the Rotary/Tone KSU only.

Hold Recall Time .
Tone Duration
Flash/Cancel
0 Make/Break Ratio
-____- ..___II__.__-
a Pulse Rate
_- .~.~.-._--- _..--- _ -.-_ .---.-..___-_--.,-__.
alnterdigit Pause
---.-__.- .---- -.-_~.---..l---.l_l_l--l_l^_
Flash/Cancel Time
._..__-_-__ __.._--.-.--- _.._.-.-____.___..__~..I
Pause on Number
-.-_.-....___ -.-._-----_-._~~..-.-____
‘;~>;,.;8“‘~
-1;:?‘I,,:&;”
I\
.ti.,;jor PABX(P)(By Line:
-- .. ._---- -- ~~-
Incoming Calls Only (By Line)
- - ...-. ..---- .____._.___..~..__.
Toll Restriction (By Station)
(** represents the station number)
f
Night Transfer (By Station)
._-- .-....-. . ----~ ___--- ..__^.__~ ._,.____-r_____
Private Line
‘Ringing Assignment (by Stn/Line)
010
020
030
040
050
060
070
1**
1min- 2min- 3min- Kl0 FkxeUU-
55 ms s5 KG- (ms is millisecond)
.--__I
;:“;z]c;p
- ,- Cancel-
33%-M%-
‘iil,qx~ 2Opps (pps is pulses per second)
-j q&&q a
/I-
800ms 700ms 500ms
-I_
Id.‘JLtUk:-
-I.’), 500ms/ 1OOOms 3000ms
Number 7- 8- 9- 0, GV0Rwse-
-
Line I- 2-3-4-m5,6-7,8-g-10-
Line I- 2-3-4-5-6-7,8-g-10-
-.“---
XISS GhlIB or C 1O- 1l_ 12- 13- 14- 15- 16- 17-
18- 19- 20- 21- 23 23- 24s 25-
26- 27- 28- 29- 30- 31- 33 33,
34- 35- 36- 37- 38,39- 40- 41-
,-:y<> j-&qj?&$
Yes Transfer lo- 1l- 12- 13- 14- 15- 16- 17-
18- 19- 20s 21- 23 23- 24- 25,
26-27-28-29-30,31-3333-
34- 35- 36- 37- 38- 39- 40- 41,
Yes at Station-
Yes . . StnlLine
5

Now that you have selected your System features it is time to actually enter the information into the KSU memory.
Remember, certain features, the ones in green type, have been preselected to make your system compatible with most
North American telephone networks. This means that it may only be necessary to change certain features to meet
your personal requirements.’
STEP 1) Programming the Factory Preset Features
I Go to the Key Service Unit (KSU) - the STATUS lamp should be flashing.
I Set the BATTERY switch to ON (using the tip of a pen).
I Set PROGRAM switches 1 and 2 to ON.
(Switch number 3 is not used)
I Press the RESET button - the STATUC lamp will turn OFF. You havenowprogrammed your System with the factory
preset features; you may proceed to step 2 and program features to meet your needs or proceed to step 3 and put
the system into operation.
STEP 2) Programming Features
Each feature is represented by a three-digit number known as an Access Code. This access code is listed beside
the name of the feature. When the access code is dialed at station 10 you will be able to program the feature to meet
your needs by turning the indicator lamps either On or Off as specified. (There is a slight delay from the time a key is
pressed until the indicator lamp changes). Access codes can be dialed in any order.
Set PROGRAM switch 2 to ON.
Ensure PROGRAM switch 1 is in the OFF position.
Press the RESET button.
At Station IO, press the Jc key - the internal indicator lamp will turn ON indicating the system is ready to be
programmed.
Use the System Programming Chart to determine the access code and the correct indicator lamp combination;
Line Indicator lamps are turned ON and OFF by pressing the corresponding line key; the Mic Indicator lamp is
turned On and Off by pressing the hold key.
When finished with the System Programming Chart, press the # key: all indicator lamps will turn OFF.
Note: If a power failure occurs during programming, repeat all of step 2.
STEP 3) Putting the System into Operation
n At the KSU, set PROGRAM switch 1 and 2 to OFF.
n Press the RESET button - the STATUS lamp will begin to flash after a few seconds indicating system operation.
Your TalkTo System is now ready to use. See the section entitled Operating Instructions for speed call
programming and operating instructions.
Reprogramming or Checking Features
To reprogram or check features at any time, repeat steps 2 and 3. (There is a reprogramming form in the back of
this manual).

Hold Recall Time ’
Tone Duration 010
~~-----___-=-~_
Flash/Cancel
0 Make/Break Ratio
--~__- __---_ _
0 Pulse Rate
---. _.__._ ___--.__
cQ Interdigit Pause
020
i.~~-.-~~~-~~ _
Flash Time
OR
Cancel Time
030
_..--.--__ -____
Pause on Number 040
_-~----...____-._I_.._-- -
Q
8” Pulse/Tone
(by line) 050
I;~-~__-___.
Telephone/PABX
(by line) 060
__I____ “_----
Incoming Calls Only 070
--
I' ;1fgQ Jca*T Off
800 ms on
700 ms
Off
500 ms on
..-
250 fj-j)iiiQ
500 ms
1000 ms
3000 ms
7 on
8
Off
9
Off
0
Off
iy/Qpo;J$$e
Off
7 ‘i!‘i>E
Off
Pulse on
=rd!ipCmne off
PABX on
___--
[?jO
Off
Yes on
G-i
on
-
Off
on
-
Off
on
-
Off
Off
on
on
Off
Off
Off
on
Off
The following features are programmable for each station, therefore you must dial the station number as part of the
access code. (** is the station number)
--- -.---.._-.- _-- .--_- .._-___c_~~ .-.--
Toll Restriction I** ~&V&~JLJ
Class B
Class C
_--.-. -II_.____~_
Night Transfer No -
Yes
Private Line No
(only one station)
c_q___
Ringing Assignment 2** lifer off off off off off off off off off off
Yes I I
on on on I on on on on on on on
Return 10 step 2 and continue.
7

-
Information on installing the main system
components is covered in the TalkTo 1032 Installation
Guide included with the key service unit.
transfer 8 lines to 8 telephones; one PFT will transfer 4
lines to 4 telephones.
Make the appropriate connections as shown on the
PFT installation diagram.
I
This section deals with the installation of the Power
Note:
In the event of an electrical power failure it is
FailTransfer option. The Power FailTransfer (PFT) unit possible to maintain full system operation by means of a
will transfer telephone lines to customer provided battery backup supply. For more information on battery
standard telephones in the event of a power failure; three backup supplies, see Trillium’s Technical Update
PFTs will transfer 10 lines to 10 telephones; two PFTs will “85/06” or contact your nearest authorized dealer.
Irwming Telephone Lines
I Female
50-Pin-to-Modular
Adapter c
-
2%Pair Cablt
50.Pin-to-Modular
Adauler 2 MOD V
SM 612
I)To KSU Jack
4-Conductor
Modular-to-Modular
Cables (not supplied
II II It ! Standard Telept
to Match Phone
y Service
! i.e.: Tone or Ro
I One Phone per
Special Cables
Supplied with
Each PFT CNK - To KSU Plug
Labeled COlllO
Note: If a line is not being
connected to a PFT, bridge
CNJ-1”
N/C N’clal T4T
Female
TalkTo 7U32 Power Fail Transfer Installation
3
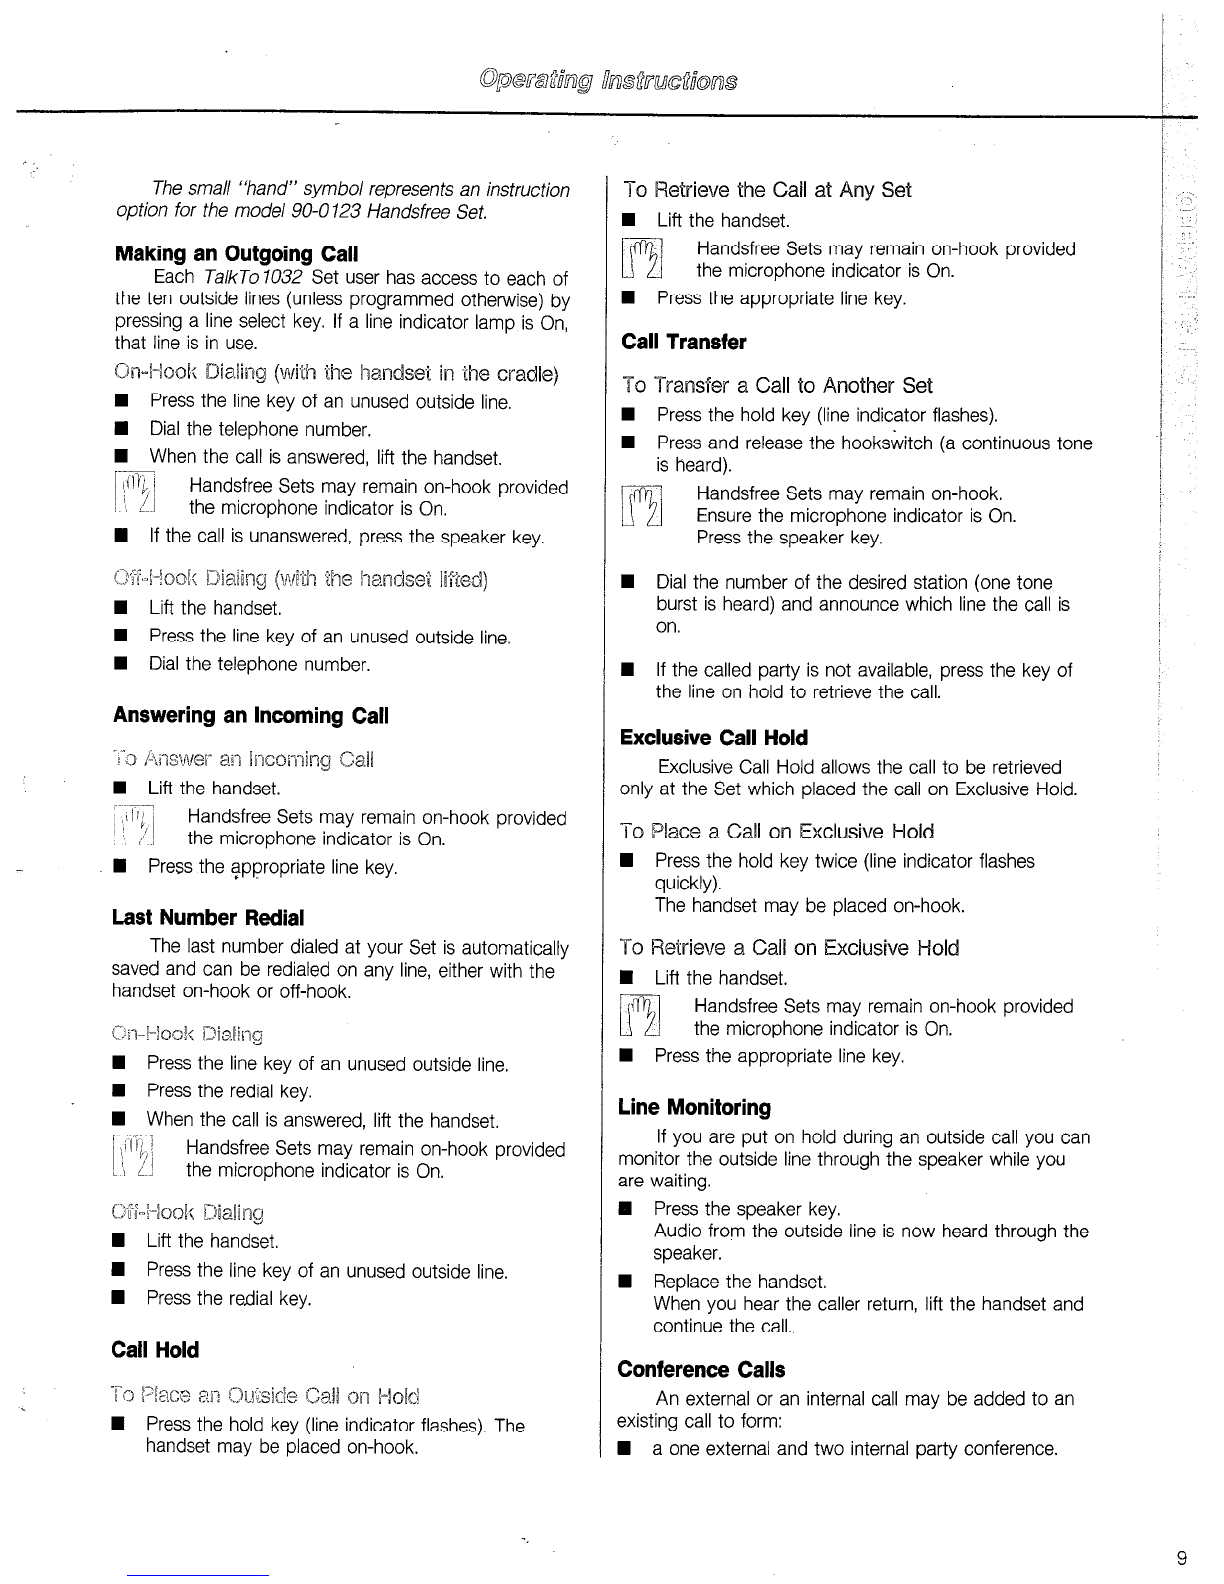
The small “hand” symbol represents an instruction
option for the model 90-0123 Handsfree Set.
Making an Outgoing Call
Each TalkTo 7032 Set user has access to each of
the ten outside lines (unless programmed otherwise) by
pressing a line select key. If a line indicator lamp is On,
that line is in use.
On-~-lool~ Dialing (with the handset in the cradle)
n Press the line key of an unused outside line.
n Dial the telephone number.
n When the call is answered, lift the handset.
I-
t:i11). j
~‘! ii! Handsfree Sets may remain on-hook provided
the microphone indicator is On.
n If the call is unanswered, press the speaker key.
o~~~~-i~osl;Diaiing (Ln.iEkhehe handsel liAed)
n Lift the handset.
n Press the line key of an unused outside line.
n Dial the telephone number.
Answering an Incoming Call
-1‘a Answer- ai7 hxming Call
n Lift the handset.
; ,t’ij Handsfree Sets may remain on-hook provided
the microphone indicator is On.
w Press the appropriate line key.
Last Number Redial
The last number dialed at your Set is automatically
saved and can be redialed on any line, either with the
handset on-hook or off-hook.
m+1690E( Dialiq-J
n Press the line key of an unused outside line.
I Press the redial key.
n When the call is answered, lift the handset.
Handsfree Sets may remain on-hook provided
the microphone indicator is On.
OM-I-IQ& Dialjng
n Lift the handset.
n Press the line key of an unused outside line.
n Press the redial key.
Call Hold
I-0 1’6ace ai? cJJ~,si& Call 012/-l&i
n Press the hold key (line indicator flashes). The
handset may be placed on-hook.
To Retrieve the Call at Any Set
n Lift the handset.
m Handsfree Sets may remain on-hook provided
the microphone indicator is On.
n Press the appropriate line key.
Call Transfer
To Transfer a Call to Another Set
n Press the hold key (line indicator flashes).
n Press and release the hook&itch (a continuous tone
is heard).
lT!il Handsfree Sets may remain on-hook.
Ensure the microphone indicator is On.
Press the speaker key.
n Dial the number of the desired station (one tone
burst is heard) and announce which line the call is
on.
H If the called party is not available, press the key of
the line on hold to retrieve the call.
Exclusive Call Hold
Exclusive Call Hold allows the call to be retrieved
only at the Set which placed the call on Exclusive Hold.
To Place
a Call on Exclusive Weld
n Press the hold key twice (line indicator flashes
quickly).
The handset may be placed on-hook.
T0 Retrieve a Call on Exclusive
Hold
n Lift the handset.
m Handsfree Sets may remain on-hook provided
the microphone indicator is On.
n Press the appropriate line key.
Line Monitoring
If you are put on hold during an outside call you can
monitor the outside line through the speaker while you
are waiting.
0 Press the speaker key.
Audio from the outside line is now heard through the
speaker.
n Replace the handset.
When you hear the caller return, lift the handset and
continue the call.,
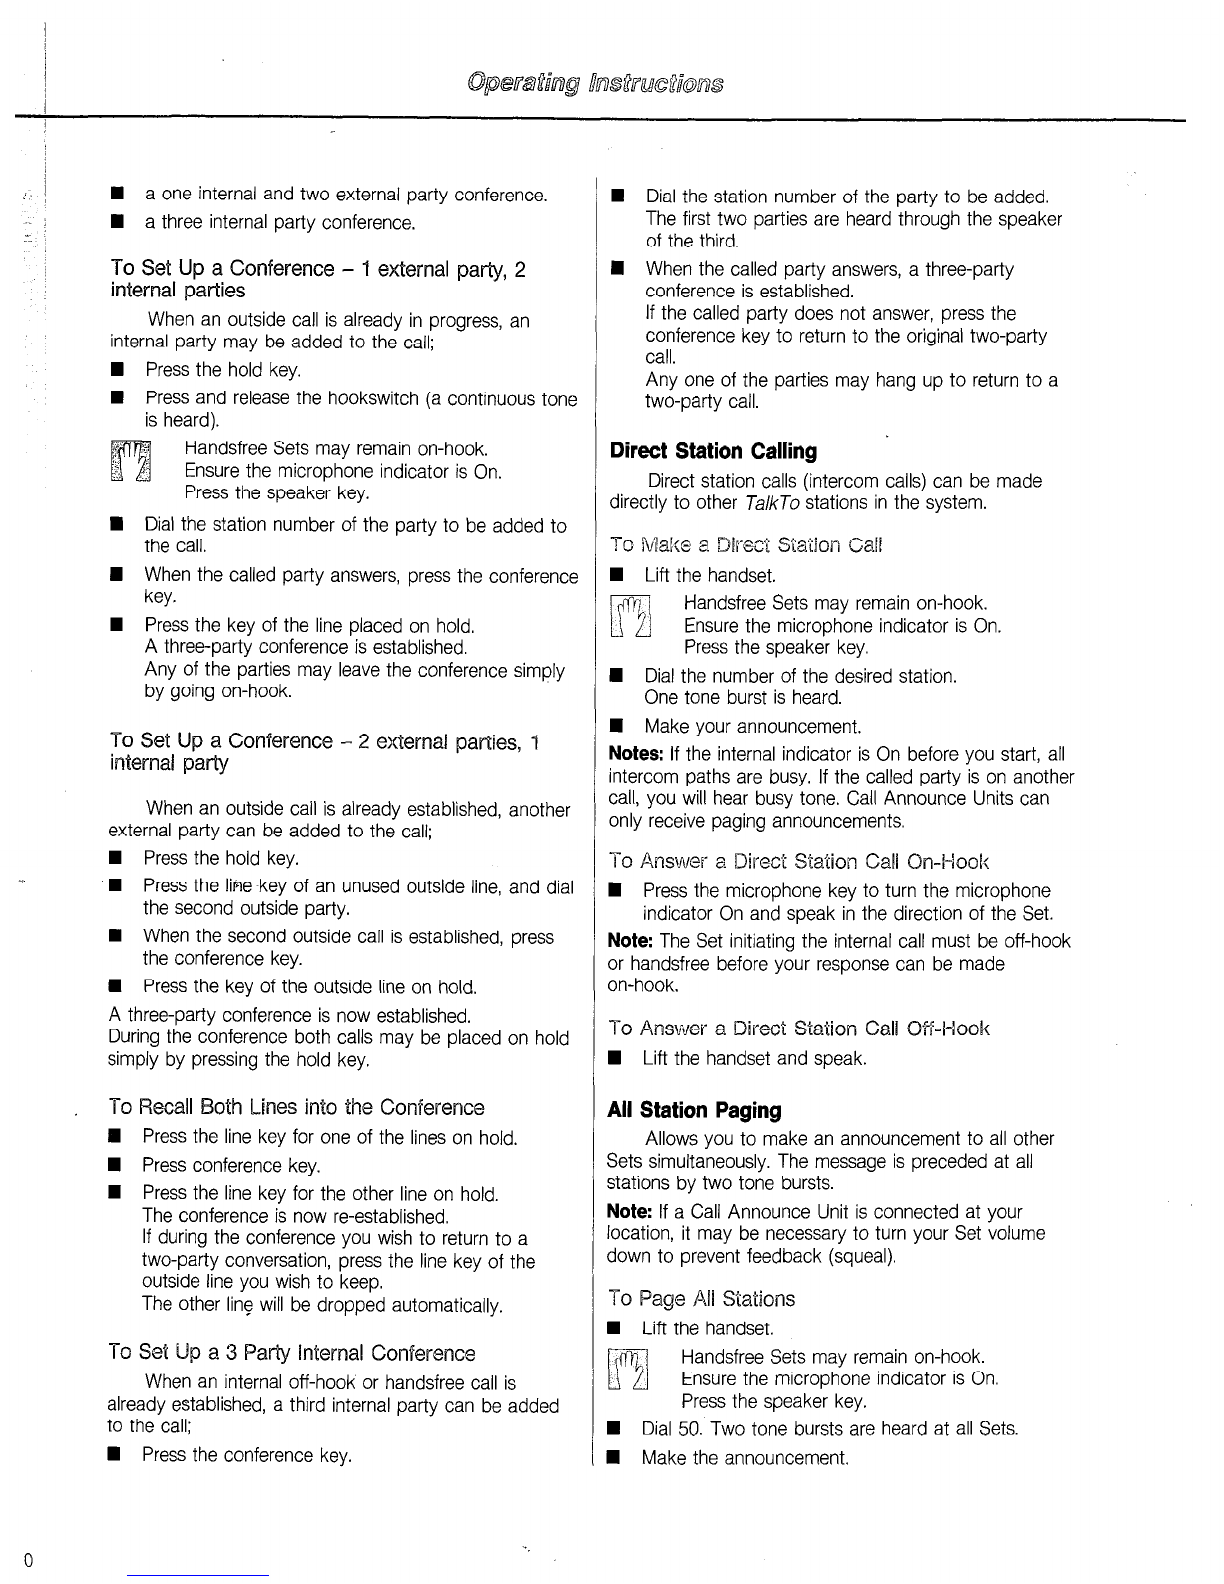
Conference Calls
An external or an internal call may be added to an
existing call to form:
n a one external and two internal party conference.
9
: !
n a one internal and two external party conference.
n a three internal party conference.
.:
To Set Up a Conference - 1 external party, 2
internal par-ties
When an outside call is already in progress, an
internal party may be added to the call;
n Press the hold key.
n Press and release the hookswitch (a continuous tone
is heard).
6’ :q
m Handsfree Sets may remain on-hook.
‘; , Ensure the microphone indicator is On.
Press the speaker key.
n Dial the station number of the party to be added to
the call.
I When the called party answers, press the conference
key.
n Press the key of the line placed on hold.
A three-party conference is established.
Any of the parties may leave the conference simply
by going on-hook.
To Set Up a Conference - 2 external par-ties, 1
internal party
When an outside call is already established, another
external party can be added to the call;
n Press the hold key.
n Press the limekey of an unused outside line, and dial
the second outside party.
n When the second outside call isestablished, press
the conference key.
w Press the key of the outside line on hold.
A three-party conference is now established.
During the conference both calls may be placed on hold
simply by pressing the hold key.
To Recall Both Lines info the Conference
1 Press the line key for one of the lines on hold.
n Press conference key.
n Press the line key for the other line on hold.
The conference is now re-established.
If during the conference you wish to return to a
two-party conversation, press the line key of the
outside line you wish to keep.
The other line will be dropped automatically.
To Set Up a 3 Party Internal Conference
When an internal off-hook or handsfree call is
already established, a third internal party can be added
to the call;
n Press the conference key.
w Dial the station number of the party to be added.
The first two parties are heard through the speaker
of the third.
n When the called party answers, a three-party
conference is established.
If the called party does not answer, press the
conference key to return to the original two-party
call.
Any one of the parties may hang up to return to a
two-party call.
.Direct Station Calling
Direct station calls (intercom calls) can be made
directly to other TalkTo stations in the system.
To Make ” DirKi Staiion Call
n Lift the handset.
m f Handsfree Sets may remain on-hook.
Ensure the microphone indicator is On.
Press the speaker key.
n Dial the number of the desired station.
One tone burst is heard.
1 Make your announcement.
Notes:
If the internal indicator is On before you start, all
intercom paths are busy. If the called party is on another
call, you will hear busy tone. Call Announce Units can
only receive paging announcements.
To Answer a
Direct Stalion Call
n Press the microphone key to turn the microphone
indicator On and speak in the direction of the Set.
Note:
The Set initiating the internal call must be off-hook
or handsfree before your response can be made
on-hook.
To Answer a Dim.3 Station Call 0%I-loobc
n Lift the handset and speak.
All Station Paging
Allows you to make an announcement to all other
Sets simultaneously. The message is preceded at all
stations by two tone bursts.
Note:
If a Call Announce Unit is connected at your
location, it may be necessary to turn your Set volume
down to prevent feedback (squeal).
To Page All Stations
n Lift the handset.
I+?
FE? Handsfree Sets may remain on-hook.
Ensure the microphone indicator is On.
Press the speaker key.
w Dial 50. Two tone bursts are heard at all Sets.
n Make the announcement.
0

To answer an All Stalioil Page - (Meet Me Answer)
n
Lift your handset.
n Dial* 1.
You are now connected to the calling party.
External Loudspeaker Paging
This feature allows any Set user to make an
announcement through a customer-provided external
paging system.
To Make an Announcement
H Lift the handset
m Handsfree Sets may remain on-hook.
Ensure the microphone indicator is On.
Press the speaker key.
n
Dial 59. A short tone is heard.
n
Make your announcement.
Private Speed Call
n
JalkJo1032 Sets and Attendant Sets can be
programmed by the user, to speed call 17 private
numbers, each up to 16 digits in length. On a
standard Set each private speed call number is
assigned a two-digit code from 00 to 16. On an
Attendant Set each private speed call number is
assigned to a specific key.
Numbers greater than 16 digits in length can be
entered and dialed using two access codes or two
keys. *
Feature access codes for PABX, Centrex, and
custom calling features can also be programmed as
speed call numbers.
Programmirlg (at Standard Sets)
Before programming check that the internal indicator is
Off.
To begin programming private speed call iaumbers
n
Press the speed key (a continuous tone is heard)
H Dial the appropriate two-digit code (00 to 16)
n
Dial the telephone number to be stored - maximum
16 digits.
Numbers longer than 16 digits can be entered by
programming the excess digits into the next speed
call code. I
Tocontinueprogramming,
n
Press the speed key.
n
Dial the next two-digit code.
n
Dial the telephone number to be entered.
To stop programming
Press the speaker key.
Programming (at Attendant Sets)
Before programming check that the internal indicator is
Off.
To begin programming private speed call numbers
n
Press the speed key (a continuous tone is heard).
n
Press the desired key on the display (10 to 26).
n
Dial the telephone number to be stored - maximum
16 digits.
Numbers longer than 16 digits can be entered by
programming the excess digits into the next key.
n
Fillout the directory card.
To continue programming
n
Press
the speed key.
n
Press the desired key on the Display.
n
Dial the telephone number to be entered.
To stop programming
n
Press the speaker key.
Dialing (at Standard Sets)
To
dial
private numbers on-hook
n
Press an unused line key.
n
Press the speed key.
n
Dial the appropriate two-digit code (00 to 16).
H When the call is answered, lift the handset.
m Handsfree Sets may remain on-hook provided
‘the microphone indicator is On.
w If the call is unanswered, press the speaker key.
To dial private numbers off-hook
n
Lift the handset.
H Press an unused line key.
W Press the speed key.
n
Dial the appropriate two-digit code (00 to 16).
Dialing (at Attendant Sets)
To dial private numbers on-hook
n
Press an unused line key.
W Press the appropriate key on the Display (10 to 26).
n
When the call is answered, lift the handset.
m Handsfree Sets may remain on-hook provided
the microphone indicator is On.
n
If the call is unanswered, press the speaker key.
11

To dial private numbers
off-hook
n Lift the handset.
n Press an unused line key.
n Press the appropriate key on the Display (10 to 26).
Common Speed Call
A maximum of 80 telephone numbers, each up to
16 digits in length can be programmed as common
speed call numbers. Programmed telephone numbers
may contain feature access codes for Centrex, PABX
and custom calling networks. Long distance telephone
numbers can be accessed by all Set users even if Class
B toll restrictions are programmed. Numbers are stored
using two-digit speed call codes from 20 to 99 inclusive
and are programmed from Set number 10.
Programming
Before programming check that the internal indicator
isoff. To begin programming a common speed call
number from Set number 10:
w Press the speed key (a continuous tone is heard).
n Dial the appropriate two-digit code (20 to 99).
n Dial the number to be programmed (16 digits
maximum).
n Press-the speed key.
n Dial another two-digit code (20 to 99).
n Dial another telephone number (16 digits maximum).
To slop programming
n Press the speaker key.
Biasing
TQ dial common numbers on-hook
n Press an unused line key.
n Press the speed key.
n Dial the appropriate two-digit access code (20 to
99).
n When the call is answered lift the handset.
LiTi Handsfree Sets may remain on-hook provided
the microphone indicator is On.
n If the call is unanswered, press the speaker key.
To dial common numkrs oi-&hosk
n Lift the handset.
4 Press an unused line key.
n Press the speed key.
n Dial the appropriate two-digit access code (20 to
99).
Room Monitoring
You can monitor any room where another TalkTo
Set is situated, provided the microphone at the Set to be
monitored is On and your microphone is Off.
To AcPivaPe Room ivkmitoring
n Press the speaker key (a continuous tone is heard).
n Dial the number of the Set to be monitored.
A single tone is heard at both Sets.
n Press your speaker key.
Flash/Cancel
The flash/cancel key of your Set has been
preprogrammed during the installation procedure to
function as a calibrated hookswitch flash or a cancel, but
not both.
Check to see which function your System has been
programmed for. The flash/cancel key can not be used
on an inside line.
Flash simulates the rapid pressing and releasing of the
hookswitch and provides access to PABX and custom
calling features.
Cancel ends an outside call and returns dial tone without
hanging up.
To use CasibraEed Flash
n While on an outside line, press the flash/cancel key
once. The preprogrammed flash time is generated
automatically.
To use Cancel
n While on an outside call, press the cancel key once.
The call is cut off and dial tone is returned.
Do Not Disturb
When activated, internal calls will not ring at your
Set and the party calling you will hear busy tone. Your
Set will still receive outside calls.
To Activate Do Not Disturb
n Lift the handset.
n Dial Jc6.
n Replace handset (internal indicator flashes).
To cancel Do Not Disturb repeat the above
procedure and the internal indicator will turn Off.
Music (On Hold and Background)
When a music source is connected to the system,

background music isavailable through the speaker of
your Set or through the external paging system (if
connected).
Calls placed on hold will hear the background music
automatically. .
n
Replace the handset.
To turn background music off repeat the above
procedure.
W Replace the handset.
To turn the external music off, repeat the above
procedure.
Night Transfer
The System has been preprogrammed during the
installation procedure, so that selected TalkTo 1032 Sets
will ring when Night Transfer isactivated.
;.. ,._l,.:. pj;,.lF1...-I‘:-
,“,;‘El,i? lAi.;;LI/ ~,;-&y!-
n
Lift the handset at Set number 10.
.m Dial Jt9.
H Replace the’ handset.
n
Dial Jc8.
n
Replace handset.
Door Answering (optional)
The TalkTo Door Answering feature, when
connected, allows one or two doors to be equipped with
intercom service. When a visitor presses the Door Module
button, distinctive tone ringing will be heard through all
Sets, allowing you to determine which module is active.
To Answer 8 Boor Call .
n
Lift the handset.
b7
Q Handsfree Sets may remain on-hook provided
il the microphone indicator is on.
n
Press line key “10”. ’
n
Speak with the visitor at the door.
The visitor at the door answers by speaking in the
direction of the Door Module.
n
To end the conversation, press speaker / hang up
To wace a-l lntsrcom Call to Door MockJle Pdumber
owe
n
Lift the handset.
ir
I3
1 Handsfree Sets may remain on-hook provided
the microphone indicator is on.
H Press line key “10”.
One ringing burst is heard.
n
At the end of the ringing burst, make your
announcement. The called party answers by
speaking in the direction of the Door Module.
n
To end the conversation, press the speaker key.
Power Fail Transfer (optional)
If your TalkTo System is equipped with the Power
Fail Transfer option, regular telephone service is made
available through standard telephones during an electrical
power failure.
You should familiarize yourself with the location of
these telephones. Programmed data are maintained
during an electrical power failure by a battery situated in
the KSU.
Full service will be restored to your TalkTo Set
automatically when electrical power is restored to the
System.
Call Announce Unit (optional)
The Call Announce Unit allows you to receive
paging announcements while busy on another call. See
“Direct Station Calling” for operation.
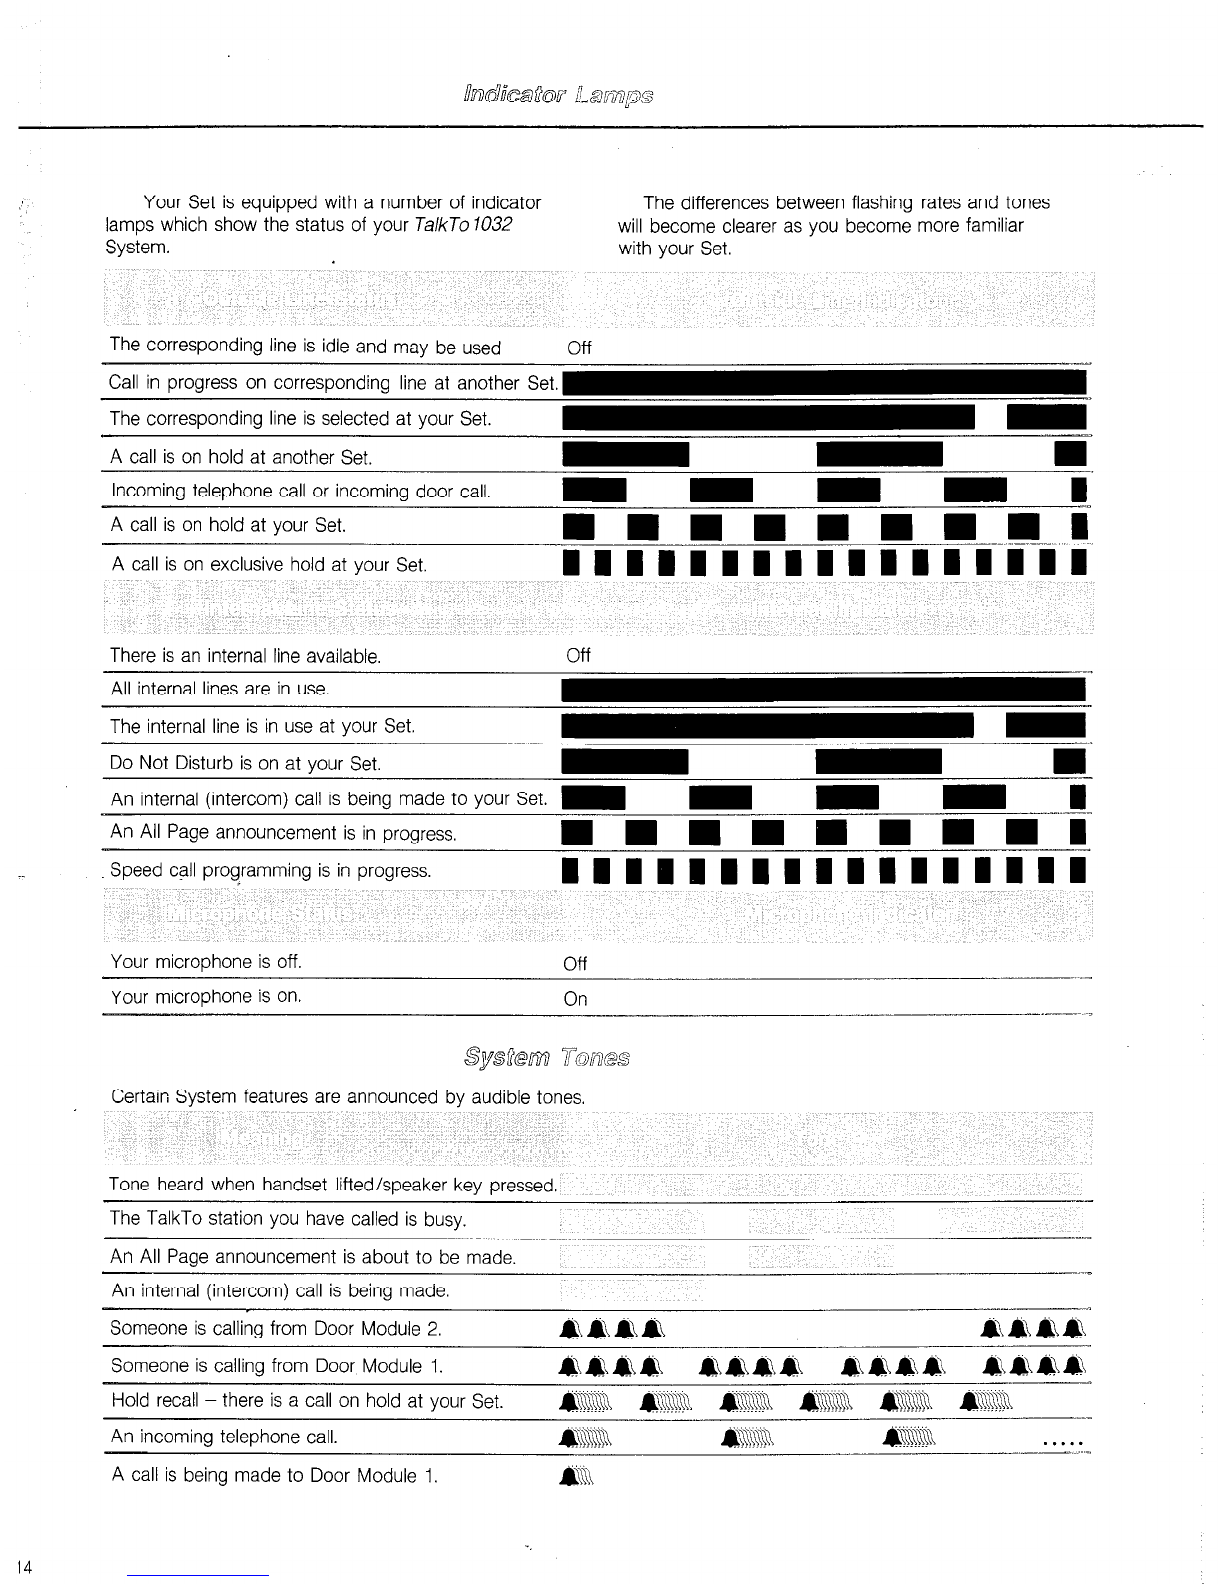
Your Set is equipped with a number of indicator
lamps which show the status of your Talk70 1032
System.
The differences between flashing rates and tones
will become clearer as you become more familiar
with your Set.
The corresponding line is idle and mav be used
Call in progress on corresponding line at another Set.
The corresponding line is selected at your Set.
A call is on hold at another Set.
Incoming telephone call or incoming door call. m m m m I
A call is on hold at your Set.
n n n n n n n we-.I
A call is on exclusive hold at your Set. 111111111111~1111
There is an internal line available.
All internal lines are in use.
The internal line is in use at your Set.
-a;
Do Not Disturb is on at your Set.
An internal (intercom) call is being made to your Set. m m m m I_
An All Page announcement is in progress,
n mmmmmmm1
_
Speed call programming is in progress. 11111111114111111
Your microphone is off. Off
Your microphone is on. On
Certain System features are announced by audible tones,
Tone heard when handset lifted/speaker key pressed. .-
The TalkTo station you have called is busy.
An All Page announcement is about to be made.
An internal (intercom) call is being made.
Someone is calling from Door Module 2.
Someone is calling from Door Module 1.
Hold recall - there is a call on hold at your Set.
An incoming telephone call.
A call is being made to Door Module 1.
14

Outside Lines IO (9 with Door Answer)
TalkTo Stations :. ,32
Intercom Speech Paths .3
Door Modules ,2
Power Fail Transfer .3 Units maximum:
1 Unit transfers 4 outside lines to 4 standard telephones.
2 Units transfers 8 outside lines to 8 standard telephones.
3 Units transfers 10 outside lines to 10 standard telephones.
AC Power Requirements 115 Volts-+ 10% @O/60 Hz) 1 Amp max.
Paging Output Level ,200 mV rms into 600 ohms
Music Input Level .50 mV rms max.
C.O. Loop Limit 1500 ohms
Station Loop Limit 150 ohms (equivalent to 2000’ 24AWG) All stations are
home run wired.
Operating Temperature .O”C to 40°C (32°F to 100°F)
Relative Humidity ,90 % or less, non-condensing
Signaling - Tone KSU Dual Tone Multifrequency (DTMF)
- - Rotary/Tone KSU DTMF and Pulses
Numbering Plan .Set numbers 10 to 41 (Control Set 10)
KSU C.O.lines - RJ21
Stations - RJ21 (X 4)
Door Answer Unit - RJ25
Attendant Set - RJ21
Power Fail Transfer - 2-pin
Sets, Call Announce Units
Door Answer Unit
Door Answer Module
Power Fail Transfer
Attendant Set
External Paging - mono l/8 inch mini jack
Music Input - Mono l/8 inch mini jack
RJ14
RJ 25
2 screw terminals
2-pin and RJ 14
RJ 14 and RJ 21
Design and Specifications subject to change without notice.
-. 15

This section assists in locating and correcting any
faults which may occur during the installation and
programming of your Ta/kTp 1032 System.
Probable Cause
Incorrect wiring.
Probable Solution
Make sure there are no open or short connections along
that run of station wiring. Refer to the station wiring
tables in the TalkTo 7032 Installation Guide.
Cable disconnected. Check to see that the Set’s modular cord is plugged into
the modular jack.
Main Distribution Frame connection Ensure that all RJ21 station connectors are properly
wired and connected from the main distribution frame to
the KSU as outlined in the TalkTo Installation
Guide.
Static discharge Unplug the Set from its modular jack and plug it back in
again. This resets the Set. If the problem persists, unplug
the KSU from the electrical outlet and plug it back in
again. This resets the KSU.
No electrical power to the KSU Plug the KSU into a grounded, unswitched 115 Vat
electrical outlet.
KSU is not in operational mode. Place the KSU into operation by following the Feature
(KSU Status lamp not flashing) Programming section of this manual.
Probable Cause Probable Solution
16
Incorrect KSU. Make sure you do not have a Tone KSU connected to
rotary lines.
Incorrect Rotary/Tone KSU programming. Ensure that each rotary line is programmed for rotary
dialing. See the Feature Programming section of this
manual under access code 050.
Make sure the make/break ratio and pulse rate are
properly set for your rotary telephone network. See the
Feature Programming section of this manual under
access code 020.
Ensure that the interdigit pause time is properly set for
your rotary telephone network. See the Feature
Programming section of this manual under access code
030.
Call restrictions. Check for. proper outgoing call and toll restriction
programming. See the Feature Programming section of
this manual under access code 1JCJC.

i
. i
. .
Probable Cause
Faulty telephone line connection to the KSU.
Probable Solution
Ensure that the RJ21 telephone line connector is properly
wired and firmly connected to the KSU as outlined in the
TalkTo Installation Guide. If the problem persists,
report the fault to the telephone company.
Probable Cause
KSU BATTERY switch is OFF.
Probable Solution
Set the KSU BATTERY switch to ON and r.epeat the
programming steps.
The # key was not pressed Make sure the # key is pressed after programming the
features. See the Feature Programming section of this
manual.
Probable Cause Probable Solution
Ringing assignment.
i Ensure that the Set(s) in question are programmed for
ringing. Remember, ringing must be programmed for
each line at each Set. See the Feature Programming
section of this manual under access code 2*X.
Probable Cause
Door Answer Unit Connection
Probable Solution
Make sure the Door Answer Unit isconnected to the
KSU exactly as outlined in the TalkTo 1032 Installation
Guide. Remember, there is a 6-conductor modular cord
which must be connected to the KSU.
Door Module connection. Ensure that the Door Module is connected to the Door
Answer Unit exactly as outlined in the TalkTo
Installation Guide.
Probable Cause Probable Solution ’
No ringing assignment for line IO. Make sure line IO is programmed for ringing at the
required Sets. See the Feature Programming section of
this manual under access code 2*cJc.
17

-. , ,‘f
..
20 1
18

I’
19
Other manuals for Talk To 1032
1
Table of contents
Other Trillium Telephone manuals

Trillium
Trillium Panther 612 User manual

Trillium
Trillium Talk To 616 Configuration guide

Trillium
Trillium Panther 306 Operating manual

Trillium
Trillium Talk To 308 User manual

Trillium
Trillium Panther II User manual

Trillium
Trillium Talk To 308 User guide

Trillium
Trillium Panther II 1032 User manual

Trillium
Trillium Talk To 616 User manual

Trillium
Trillium Panther II 820 User guide

Trillium
Trillium Talk To 1032 User manual


