Triminator Maker User manual

t
USER
GUIDE
V1.1

INTRODUCTION......................................................................................................................................... 3
SAFETY MESSAGE.......................................................................................................................................................3
DISCLAIMER..................................................................................................................................................................4
WARNING LABELS...................................................................................................................................................... 4
SERVICE AND REPAIRS............................................................................................................................. 6
WARRANTY................................................................................................................................................8
SAFETY PRECAUTIONS............................................................................................................................. 9
COMPONENTS.........................................................................................................................................10
EMERGENCY STOP (E-Stop)..................................................................................................................................11
HMI CONTROL OVERVIEW.....................................................................................................................................11
WASHING VESSEL TILT............................................................................................................................................15
DRAIN VALVES...........................................................................................................................................................17
SOAK WEIGHT............................................................................................................................................................17
BAG HOLDER..............................................................................................................................................................17
SETUP...................................................................................................................................................... 18
OPERATING CONDITIONS.......................................................................................................................................18
UNCRATING THE MAKER™.................................................................................................................................... 19
ASSEMBLY / DISASSEMBLY....................................................................................................................20
IMPELLER REMOVAL/INSTALLATION................................................................................................................ 20
FALSE BOTTOM REMOVAL.................................................................................................................................... 20
DRAIN VALVE(S) INSTALLATION / REMOVAL................................................................................................... 20
WATER PUMP INSTALLATION/REMOVAL.........................................................................................................21
THERMOMETER REMOVAL / INSTALLATION.................................................................................................. 23
WASH BAG HOLDER INSTALLATION...................................................................................................................24
SOAK WEIGHT INSTALLATION.............................................................................................................................. 24
OPERATION............................................................................................................................................. 26
BEFORE YOU START................................................................................................................................................ 26
MACHINE START-UP SEQUENCE.........................................................................................................................26
MACHINE STOP SEQUENCE.................................................................................................................................. 27
WASHING PLANT MATERIAL.................................................................................................................. 28

WASHING TIPS...........................................................................................................................................................31
PRE-LOADED SETTINGS.........................................................................................................................................31
CLEANING YOUR MAKER™......................................................................................................................32
HAND-CLEANING THE IMPELLER MOTOR AND WATER PUMP................................................................ 33
HAND-CLEANING THE HMI................................................................................................................................... 33
SERVICING YOUR MAKER™................................................................................................................................... 33
SAFETY PRECAUTIONS...........................................................................................................................................34
BREAKERS/FUSES................................................................................................................................................... 34
REMOVING OBSTRUCTIONS................................................................................................................................. 34
MAINTENANCE SCHEDULE................................................................................................................................... 35
TROUBLESHOOTING............................................................................................................................... 37

INTRODUCTION
Congratulations on your selection of the Triminator Maker™ commercial hash washer! We want to
help you to get the best results from your new hash washer and to operate it safely. This User Guide
contains information on how to do that; please read it carefully before you set up and use your hash
washer.
We suggest you read the warranty to fully understand coverage and your responsibilities of
ownership. Keep this User Guide handy, so you can refer to it at any time. This User Guide is
considered a permanent part of the Maker™ and should remain with the hash washer if resold. The
information and specifications included in this publication are those that were in effect at the time of
approval for printing. Eteros Technologies, (Eteros) reserves the right, however, to discontinue or
change specifications or design at any time without notice and without incurring any obligation. No
part of this publication may be reproduced without written permission.
SAFETY MESSAGE
To ensure operator safety while in use, this device includes decals, guarding, and other safety
features. Operators are encouraged to use caution and best judgment when using the equipment.
Equipment should be serviced when required.
To avoid possible damage to the machine and risk of injury to the operator, consult with an Eteros
Technologies representative to answer any questions.
This document refers to the Eteros Technologies hash washing machine, the Maker™. Careless or
improper use may cause serious injury. Please read and understand these precautions thoroughly
before using the machine.
All operators must read and understand this User Guide and be trained in the safe operation and use
of the Maker™ hash washer. We recommend the owner of this equipment develop a standard
operating procedure (SOP) specific to each worksite to address any local hazards or other conditions
not outlined in this User Guide. The Maker™ hash washer must be inspected regularly for damage,
component failure, and wear. The results of the inspection activity should be documented.

Eteros Technologies makes every effort to ensure the Maker™ hash washer is compliant with all
current safety standards. It is the responsibility of the owner to ensure all municipal, provincial, state,
county, territorial, federal codes, regulations, and standards have been met in each working location.
Do not lend or rent your machine without providing the User Guide. A first-time operator should
receive practical instruction before using the machine.
This machine is not to be used for any purpose other than those expressly stated in the User Guide,
advertising literature, or other Eteros Technologies written material pertaining to the Maker™ hash
washer.
Operators must be in good physical condition and mental health to operate this device. Under no
circumstances should the device be operated by any person under the influence of any substance,
including drugs or alcohol, which might impair vision, dexterity, or judgment. Do not operate the
Maker™ hash washer when fatigued. Be alert. If tired while operating the device, take a break. Fatigue
may result in loss of control. Working with any equipment can be strenuous. If you have any condition
that might be aggravated by strenuous work, check with your doctor before operating the device.
DISCLAIMER
Eteros Technologies recognizes that the Maker™ hash washer is a purpose-built machine for
processing cannabis by licensed producers. Please check all municipal, provincial/state, and federal
laws and regulations before using the Maker™ hash washer. Eteros Technologies does not promote or
condone the use of processing equipment in any way that may be deemed illegal.
Eteros Technologies recognizes that our equipment can be used for processing herbs, hops, flowers,
and many other products. It is not the responsibility of Eteros Technologies to confirm alternative
applications for our equipment.
WARNING LABELS
Your safety and the safety of others are very important. We have provided important safety
messages in this manual and on the Triminator Maker™. This information alerts you to potential
hazards that could hurt you or others. Please read these messages carefully. Of course, it is not
practical or possible to warn you about all the hazards associated with operating or maintaining a
hash washer. You must use your own good judgment.
You will find important safety information in a variety of forms:
●Safety Labels - located on the hash washer.
●Instructions - how to use this hash washer correctly and safely.
●Safety Messages - preceded by a safety alert; a symbol and one of three signal words:
DANGER, WARNING, or CAUTION.
DANGER:
Indicates a hazardous situation that, if not avoided, will result
in serious injury and/or death. This signal word is to be
limited to the most extreme situations; typically for machine
components that, for functional purposes, cannot be guarded.
WARNING:
Indicates a potentially hazardous situation that, if not
avoided, could result in serious injury and/or death. It includes
hazards that are exposed when guards are removed. It may
also be used to alert against unsafe practices.
CAUTION:
Indicates a potentially hazardous situation that, if not
avoided, may result in minor or moderate injury. It may also
be used to alert against unsafe practices.

Damage Prevention Messages - You will also see other important messages that are preceded by
the word NOTICE. This word means:
NOTICE Your hash washer or other property can be damaged if you don’t follow instructions.

SERVICE AND REPAIRS
Repairs may only be carried out by Eteros Technologies or a designated authorized agent (service
technician).
Should the need arise, please notify us:
Eteros Technologies
6175 South Sandhill Road, Unit 600,
Las Vegas, NV 89120
www.eteros.com
www.thetriminator.com
service@thetriminator.com
(530) 265 4277
Improper interfacing, improper repair, or an unauthorized modification could result in void warranty
claims.

WARRANTY
Thank you for your purchase of the Triminator Maker™.
The Triminator Maker™ is covered by our manufacturer’s warranty as follows:
●No warranty on consumable parts, including micron bags;
●Warranty coverage for one (1) year or 1,000 operating hours, whichever occurs first, on
motors, electrical components, and the remainder of machine components.
The warranty period begins on the date the equipment is received by the customer. Any damage that
occurs during shipping will be the responsibility of Triminator.
The above terms are valid if Triminator equipment is used and maintained as directed. If the
equipment is modified in any way, all terms of this warranty are void. This warranty does not apply to
cosmetic damage, such as scratches or general wear and tear.
Should you experience a technical problem with your equipment, please contact Eteros Technologies
at the email or phone number outlined in the Service and Repairs section.

SAFETY PRECAUTIONS
SAFETY INFORMATION
Read and become familiar with the entire User Guide. Learn the equipment applications, limitations,
and possible hazards.
TRAINED WORKERS ONLY
KEEP CHILDREN and BYSTANDERS AWAY from the device. Visitors should be kept at a safe distance
from the work area.
CHECK FOR DAMAGED PARTS PRIOR TO OPERATION
The equipment should be inspected prior to use to ensure proper operation in performing its intended
function. Check for alignment of moving parts, binding of moving parts, breakage of parts, mounting,
and any other conditions that may affect its operation. Any damaged part including guards should be
properly repaired or replaced.
POWER DOWN AND DISCONNECT
Power down and disconnect equipment before servicing and when changing accessories, such as
impeller, soak weight, and pump.
DON’T FORCE THE EQUIPMENT
It will operate optimally and safely at the rate for which it was designed.
USE THE RIGHT TOOL
Don’t force the device to do a job for which it was not designed.
WORK IN A SAFE ENVIRONMENT
DO NOT USE THE DEVICE IN A DANGEROUS ENVIRONMENT or damp or wet locations. Never expose
the control panel directly to rain or water. Keep the work area well-illuminated. DO NOT use the
device in the presence of flammable liquids or gasses.
KEEP THE WORK AREA CLEAN
Cluttered areas and workspaces invite accidents.

COMPONENTS

EMERGENCY STOP (E-Stop)
Pressing the emergency stop button will immediately shut down the machine, stopping the impeller
and water pump. When the emergency stop button is depressed, a visual cue will be displayed on the
HMI and the Maker™will not run.
NOTICE It is NOT recommended to use the emergency stop button to stop the machine in everyday
operation.
HMI CONTROL OVERVIEW
FORWARD
When selected, the unit will run in manual mode continuously at the set speed. Duration does not
apply when running in manual mode. Speed can be adjusted while running and will take effect
immediately. The FORWARD button will be highlighted in white with a red border when selected.

REVERSE
When selected, the unit will run in manual mode continuously at the set speed. Duration does not
apply when running in manual mode. Speed can be adjusted while running and will take effect
immediately. The REVERSE button will be highlighted in white with a red border when selected.
RUN CYCLE/AUTO
When RUN CYCLE is selected, the unit will run in auto mode. The cycle will alternate between forward
and reverse at the set speed and duration (seconds) for both directions. Pause time (seconds) and
duration (minutes) can be selected in the RUN CYCLE settings. Changes to duration and pause
changes will take effect on the following cycle of forward or reverse. Auto runtime cannot be adjusted
mid-cycle. The RUN CYCLE button will be highlighted in white with a red border and display AUTO
when selected.
STOP
The START/STOP button acts as a master switch, toggling the Maker™ between the stop/standby and
start/operational modes. Both modes allow for changes to the speed and duration settings. In
operational mode, the machine will run with all current settings. In standby mode, the machine will
turn off the motor. Toggling between standby and operational modes will not change individual motor
on/off or speed settings. Hitting STOP will also pause the WATER PUMP.
The STOP button will be illuminated red during operational mode and white during standby mode.
For normal day-to-day operations, the Maker™should be turned off using the STOP button instead of
the emergency stop.
WATER PUMP
Selecting the WATER PUMP button will energize the receptacle on the side of the control box. This
will cause the pump to run until the WATER PUMP button is pressed again or the STOP button is
pushed. The WATER PUMP button will be highlighted in white with a red border when selected.
NOTICE The power switch on the external water pump must be in the on position to run.

SAVE
This button can be used to save different preset recipes. Once selected there will be the ability to edit
all applicable settings (speed, duration, pause, and auto runtime). Once all settings are selected they
can be saved to memory (1-10) by selecting the desired location and a confirmation will be displayed
above the pause time. Close the window to proceed.

RECALL
This button can be used to retrieve saved recipes. Once selected there will be the ability to select the
desired memory slot (1-10) and a confirmation will be displayed above the pause time. Close the
window to proceed.
SOUND
An audible alert will sound once the auto cycle has completed. The silence button can be selected to
mute the alert.
INFO
When selected, a popup window will display a brief description of the settings/modes that can be
viewed.

SYSTEM USAGE
When selected, the HMI will display system usage information including run time. If is selected, it
will display the diagnostics screen. To return to the main menu, press .
WASHING VESSEL TILT
The pin can be turned to disengage the spring and allow the tank to turn freely. During normal use,
only the pin on the controller side (right) should be used to adjust the position of the washing vessel.
NOTICE Ensure pins are engaged during transport and operation.
CONTROLLER SIDE (Right)
Can lock the pin at 0, 45, and 90 degrees.
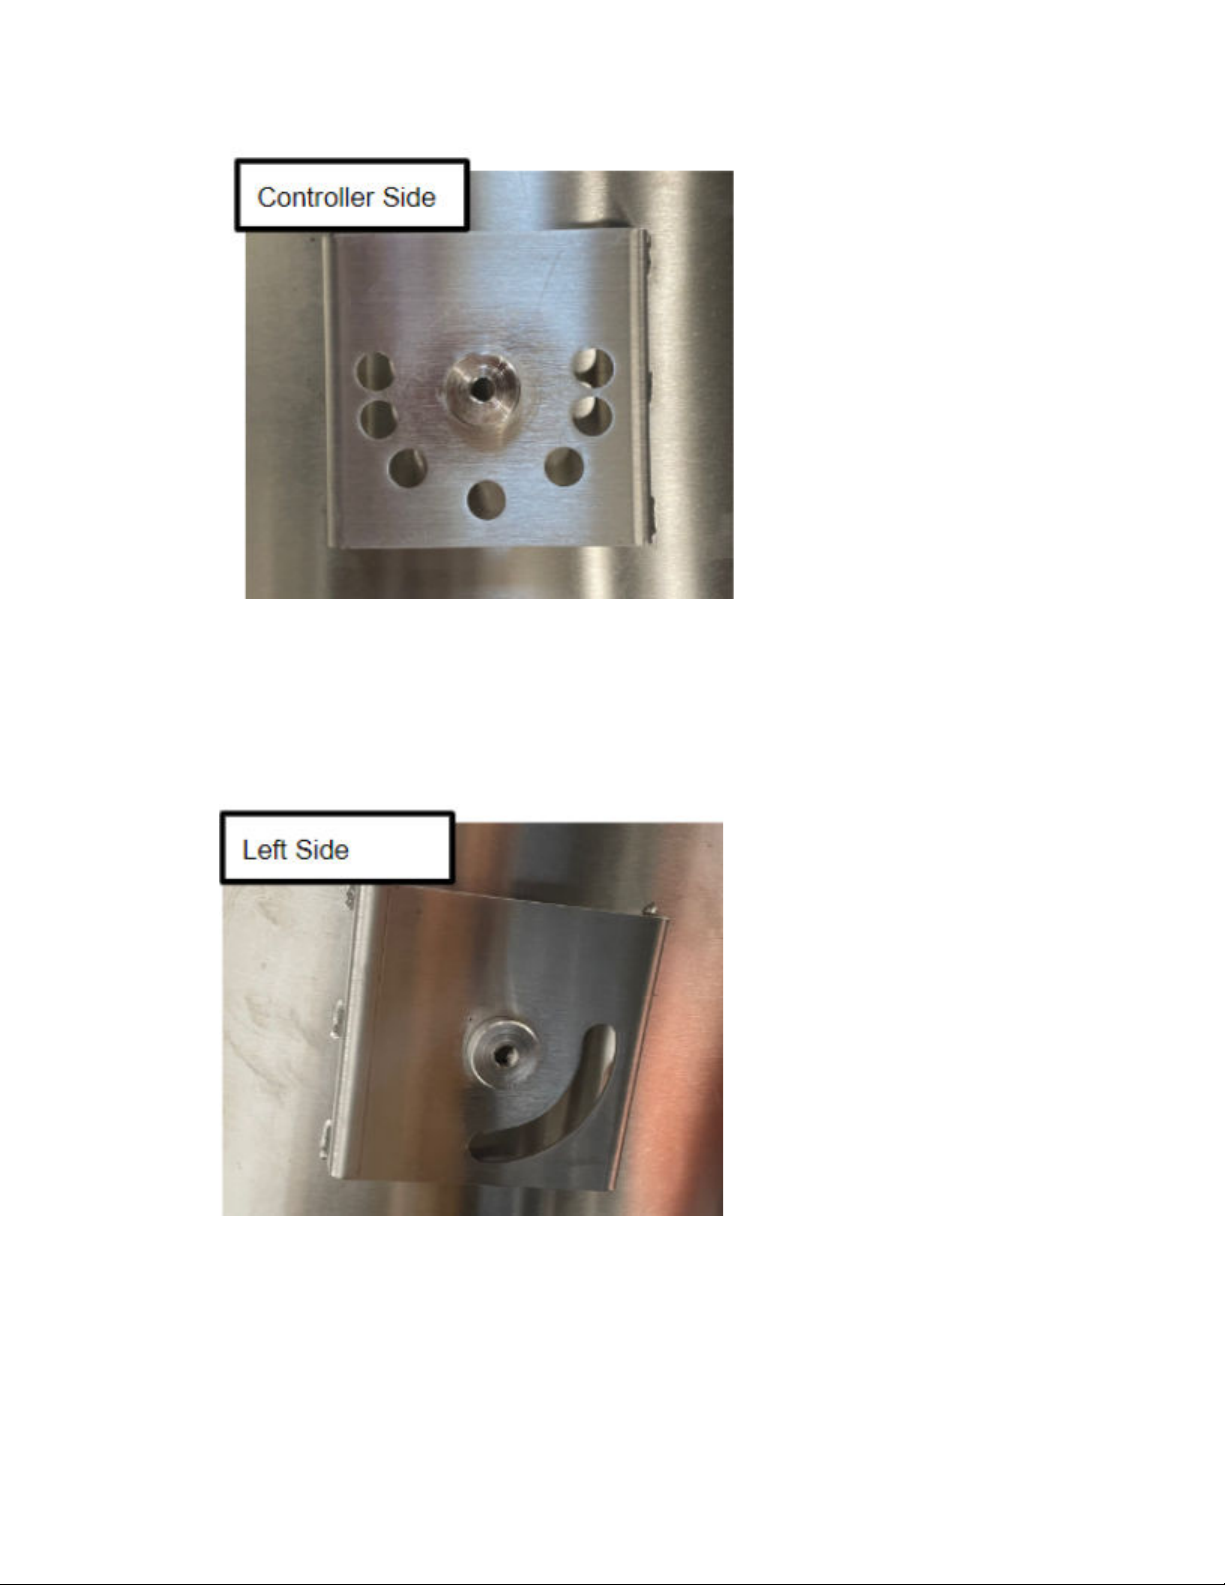
NON-CONTROLLER SIDE (Left)
Free spin (to tilt backward or more than 90 degrees).
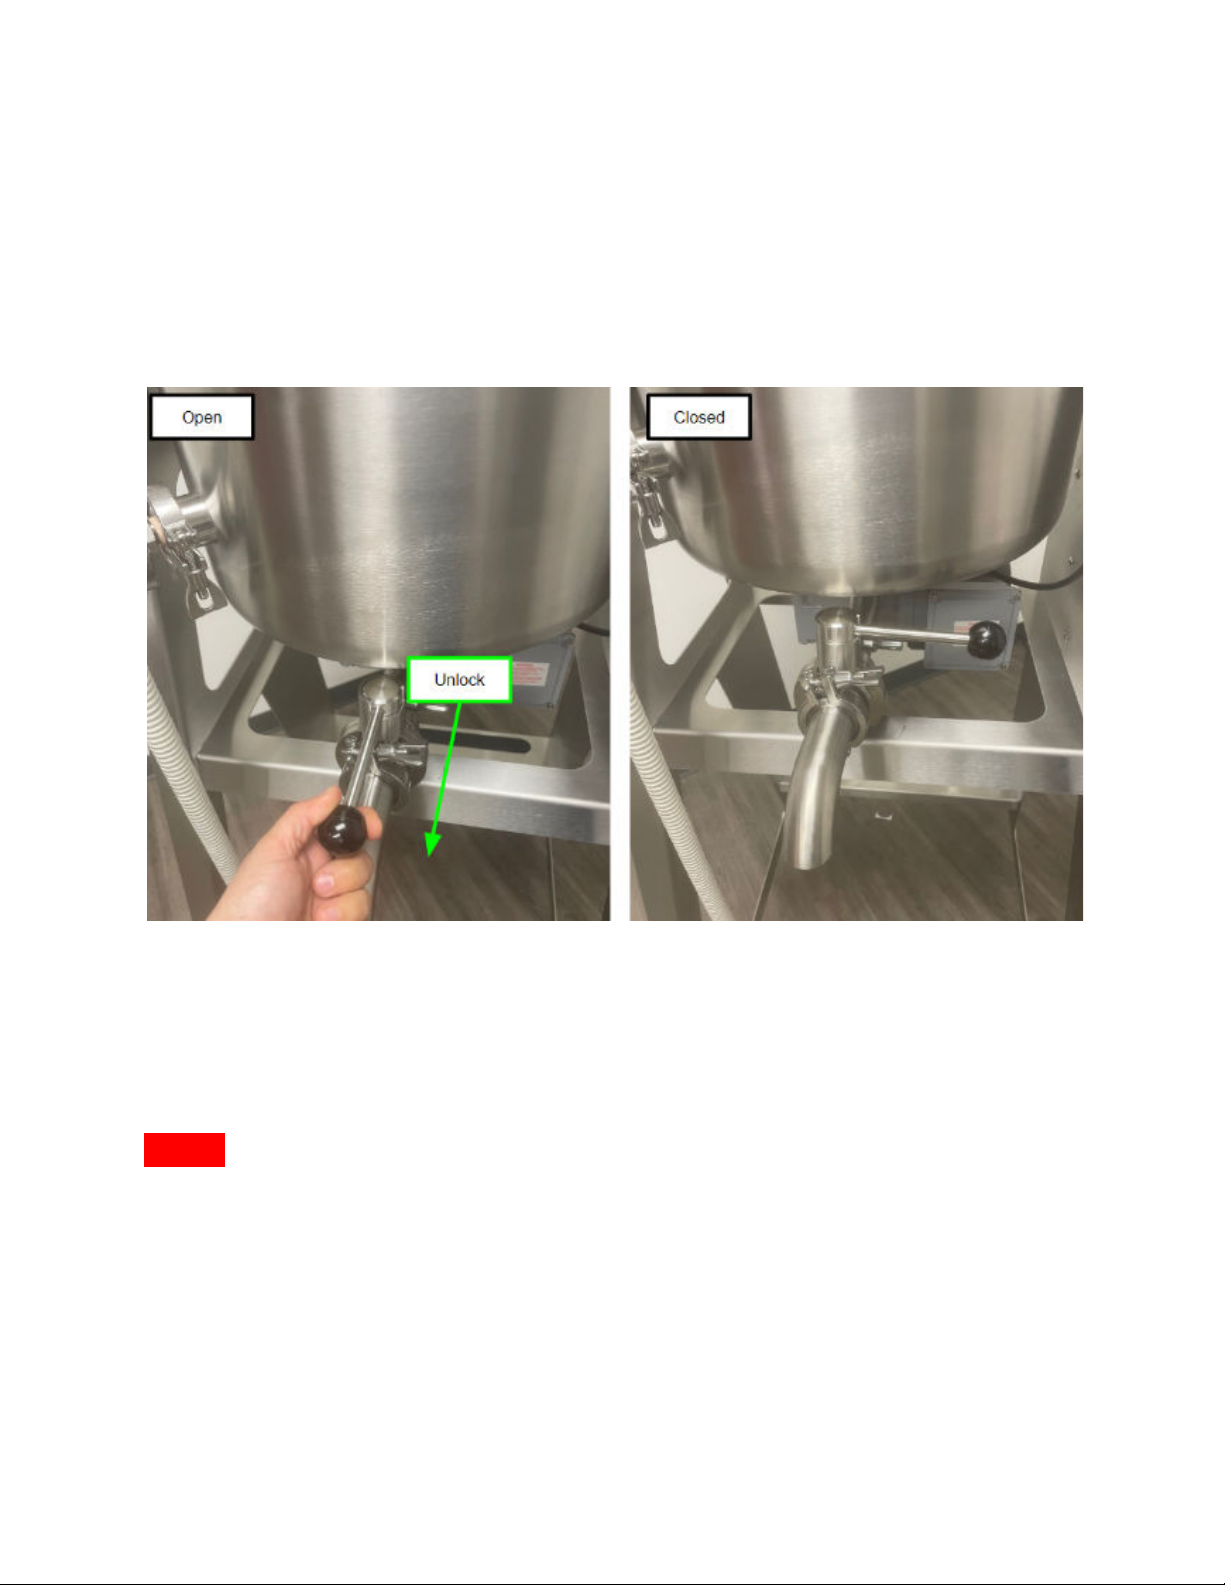
DRAIN VALVES
Used to control the flow of water from the washing vessel to the collection vessel and from the
collection vessel to the water pump. When the handle is parallel to the spout, the valve will be open
and is closed when perpendicular. To switch between positions the black knob must be pulled
outwards.
SOAK WEIGHT
If you want to rehydrate material you can use the rehydrating plate by placing it over the
material/water to submerge it and allow the dry material to rehydrate for approximately 20 minutes.
NOTICE Remove plate before washing.
BAG HOLDER
The bag holder sits on top of the collection vessel. Roll micron bag tops over the top of the bag holder.
Multiple bags can be nested inside each other. Be sure to sinch each bag’s drawstring snug to
prevent it from falling into the vessel.

SETUP
OPERATING CONDITIONS
Location
Indoor or covered outdoor
Altitude
0-2000 m (0-6500 ft) above sea level
Temperature (Ambient)
5°C - 40°C (40°F - 105°F)
Maximum Relative Humidity
80% at 31°C (88°F), decreasing linearly to 50% at 40°C (105°F)
Voltage and Current Rating
60 Hz: 120 V, 16 A | 50 Hz: 240 V, 8 A
Overvoltage Category
II
Environment: While the Maker™ can be used in a variety of conditions, the best results are achieved in
spaces with low humidity and cool temperatures.
NOTICE This machine should not be operated in conditions or orientations where accessing the
emergency stop would be difficult or impossible. Always ensure that any operators have clear access
to the power off and e-stop buttons.
NOTICE If this equipment is used in conditions outside the specified operating conditions, Eteros
Technologies cannot guarantee that the built-in safety functions of the Triminator Maker™ will
function as intended.

UNCRATING THE MAKER™
Your Triminator Maker™ will arrive with the
primary assemblies ready for operation.
1. Remove screws to open the front and
rear of the shipping crate.
2. Release the ratchet straps from the
collection vessel. Then remove 2x4
crosser boards to release all
components.
3. With the help of another person, lift
the collection vessel from the crate.
The stand assembly with the mixing
tank can now be removed using a
forklift beneath the upper cross
member.
4. Remove all packaging materials and
refer to Components page to ensure
all partss arrive in good condition and
begin assembly.
Table of contents
Other Triminator Industrial Equipment manuals


