Trine 3000 Series User manual

Model Number:
3478 - Fail Secure
3478RS - Fail Safe
Model Number:
3234W - Fail Secure
3234WRS - Fail Safe
Model Number:
3234 - Fail Secure
3234RS - Fail Safe
1440 Ferris Place · Bronx · New York· 10461-3699
TRINE 3000 SERIES ELECTRIC RELEASES
Congratulations on the purchase of this quality TRINE
security product.
This product has been designed to install easily, perform
reliably, and provide years of trouble free security.
In order for this product to fulfill its objectives, certain
steps must be performed by the installer, and certain site
conditions must be satisfied.
Before proceeding with your installation, please review
the following list of items. If you have any questions first
please finish reading this document to see if the
information you require is contained in this document,
otherwise please call:
TRINE TECH SUPPORT (718) 829-2332 EXT. 425,
or visit the TRINE Website www.TrineOnline.com.
The TRINE Model #3234, #3234W & Model #3478 are
designed for new installation or retrofitting into metal,
wood and aluminum door frames. Be sure that you have
ordered the correct TRINE strike for your application.
FINISHES
3234 3234W 3478
US3 (Polished Brass)
US4 (Satin Brass)
US10B (Dark Bronze)
US26 (Bright Chrome)
US26D (Satin Chrome)
US32D (Satin Stainless Steel)
STANDARD FEATURES
Face Plate - 3234, 2-3/4" x 1-1/8"
3234W, 3-3/4" x 1-1/4"
3478, 4-7/8" x 1-1/4"
Mortise Type - 1" backset (Smallest in the Industry)
Durability - 500,000 Life Cycles
Holding Force - 1,200 Pounds (Static Force)
- 70 ft-lb (Dynamic Force)
All stainless steel locking parts
Solid Cast Latch - Stainless Steel
Cavity: Width 5/8", Height 1-1/8", Depth 1/2"
Non-handed
Heavy-duty latch spring
Silent Operation
Intermittent Duty with the Standard versions
Intermittent and Continuous Duty with the LC versions
Micro Solenoid assembly
Fail-Secure:(standard action) unlocks with power
Fail-Safe: RS (reverse action) unlocks when power is off
RECOMMENDED INSTALLATION SEQUENCE:
1. Verify strike is proper for the door into which it is to be
installed.
2. Verify that you have all parts required to complete the
installation.
3. Verify that the new electric release operates with the
existing power supply/control circuit (retrofit
applications); or verify that the new power supply/
control circuit operates the new electric release (new
installations).
4. Locate and clearly mark the circuit breaker which
provides ac power to your transformer/ power supply
or that supplies power to the receptacle into which you
will plug your transformer/power supply. This will
enable you to safely cut power during installation, and
permit troubleshooting if required.
5. Verify that the receptacle or circuit providing power to
the electric release is not controlled by a wall switch,
time clock, or other external device.
6. Verify that the circuit/receptacle used for the locking
system is not powering any other equipment.
Remember that interruption of power to your locking
system could prevent access into the protected area,
or jeopardize the security/safety of the site's
occupants.
7. Verify that the door and associated components are in
good working order.
8. Install electric release as per attached guidelines.
9. Wire electric release as per attached guidelines.
10. Perform final test of completed installation.

LEFT HAND
(LH)
LEFT HAND
REVERSE BEVEL
(LRB)
RIGHT HAND
(RH)
RIGHT HAND
REVERSE BEVEL
(RRB)
OUTSIDE
OUTSIDE
DOOR HANDING GUIDE
HANDING OF DOOR IS ALWAYS DETERMINED
FROM THE OUTSIDE.
VOLTAGE DROP GUIDE
Length to Transformer 12V 24V
Up to 50 feet 18 AWG 20 AWG
50 to 150 feet 16 AWG 18 AWG
150 to 300 feet 14 AWG 16 AWG
300 to 600 feet 12 AWG 14 AWG
The TRINE MODEL # 3234, #3234W and #3478:
FAIL-SECURE "INTERMITTENT DUTY" units are designed for
momentary application of voltage for access control purposes,
and cannot be continuously powered without permanent and
irreversible damage to the electric strike's solenoid.
The TRINE MODEL #3234-RS, #3234W-RS and #3478-RS:
FAIL-SAFE "CONTINUOUS DUTY" versions may be used for
applications where the release must remain UNLOCKED for
extended periods. Please contact TRINE for other additional
TRINE electric release solutions for those applications requiring
a continuous duty FAIL-SECURE electric release that may be
powered for extended periods, commonly referred to as
CONTINUOUS DUTY.
The TRINE LC version of MODEL # 3234, 3234W, #3478, #
3234-RS, #3234W-RS and #3478-RS can be used for
"INTERMITTENT DUTY" AND "CONTINUOUS DUTY"
3000 SERIES ELECTRICAL CHARACTERISTICS CHART:
STANDARD MODELS
VOLTAGE CURRENT (AMPS)
COIL
RESISTANCE
(OHMS) DUTY AUDIBLE SOUND WIRE COLOR MODEL
12V DC 0.480 25 Int Silent Blue-Blue STD
24V DC 0.240 100 Int Silent White-White STD
LC & RS MODELS
VOLTAGE
CURRENT (AMPS)
PULL-IN/HOLDING
COIL
RESISTANCE
(OHMS) DUTY AUDIBLE SOUND WIRE COLOR MODEL
12V DC 0.743/0.298 13 Int./Cont. Silent Red-Red LC
12V AC 0.715/0.277 13 Int./Cont. Silent Red-Red LC
24V DC 0.397/0.170 13 Int./Cont. Silent Red-Red LC
24V AC 0.378/0.173 13 Int./Cont. Silent Red-Red
LC
Page 2
LUBRICATION: The TRINE Model #3234, #3234W & #3478
do not require lubrication. Lubricating these units will actually
hamper their performance by attracting dust and debris into the
tight tolerance precision Micro Solenoid assembly.
GETTING STARTED: Before proceeding with your
installation, verify that the door to which the electric release is
being applied is in good working condition.
These items are essential for either new installations or retrofits
Items which should be specifically checked prior to beginning
the installation include:
The hinges (or pivots) are in good condition
If your installation is a retrofit, that the existing latch
lines up perfectly with the existing strike plate.
The door is not rubbing on the saddle or anywhere on
the frame
The door closer is not leaking and is in good condition
and properly adjusted.
The door is not warped or otherwise damaged which
might hamper its operation or otherwise affect your
installation or the final system's performance.
That the door frame member into which the door
release is to be installed is deep enough (1 inch) for the
body of the electric strike, and that the wiring to
operate the electric release can be installed for your
application.
HANDING: The TRINE Model #3234, #3234W and #3478 are
non-handed.
DUTY & VOLTAGES: The TRINE Model #3234, #3234W &
Model #3478 are available as FAIL-SECURE (Normally Locked,
Power to Unlock), INTERMITTENT DUTY and are supplied in
two different operating voltage and the LC VERSION, suitable
for use in a range of voltages from 12V to 24V AC or DC. The
TRINE Model #3234RS, 3234WRS & Model #3478RS are FAIL-
SAFE (Normally Unlocked, Power to Lock), continuous duty and
are supplied with LC module.
LC units will operate on any input voltage from 12V to 24V AC
or DC, and offer both the benefits of reducing inventory by
enabling you to stock one strike. In addition, they offer both
surge suppression and inductive kickback protection.
Please refer to the accompanying VOLTAGE DROP CHART for
recommended wire gauges for various voltages and wire
lengths.
LOCK
LATCH
LOCK
SHIM
LATCH
LOCK - LATCH
ENGAGEMENT
LOCK - LATCH
ENGAGEMENT
FIGURE 4
Page 3
ELECTRICAL: If you are performing a new installation, be
certain that you make provisions for the proper voltage power
supply for your electric strike. If you are performing a retrofit
type installation, determine that the voltage present at the
location of the strike is appropriate for the TRINE strike you
have, that the circuitry supplying the voltage is operating
properly, and also verify that you are able to cut the power
completely to the door location so that you may perform the
installation safely without endangering yourself or causing
damage to the power supply or other devices connected to the
circuit. It is strongly recommended that you also test for high
voltages which may exist between each lead of the power wiring
to the electric release solenoid, and to the door frame which is
an earth ground. Dangerous voltages or currents may occur due
to a miswire or other pre-existing fault conditions in the system
you are servicing.
TESTING YOUR ELECTRIC STRIKE; POWER SUPPLY; &
SWITCHING CIRCUIT PRIOR TO FINAL MOUNTING OF THE
ELECTRIC RELEASE IS RECOMMENDED
POWER SOURCES:
The TRINE MODEL #5208 (12 VDC) or MODEL # 5209 (24
VDC) are suitable DC POWER SUPPLIES which are plug-in
and therefore do not require that the installer perform line
voltage wiring.
TRINE offers several low voltage transformers suitable for use
with the TRINE MODEL #3234, #3234W & #3478 electric
releases.
HARDWIRED POWER SUPPLY MODELS are also available -
see our website or call our Customer Support Line for details.
SILENT OPERATION: The TRINE #3234, #3234W & #3478 are
referred to as "Silent Operating"; unlike some types of AC
electric releases which make a "buzzing sound" when activated.
For some applications, such as entrances into apartment
buildings or storerooms, an audible sound is desirable, and
even expected. For other applications, such as offices, silent
operation is preferred because a buzzing sound is distracting or
disturbing. Verify with your client which they require, and if an
audible signal when the electric release is activated is desirable,
then add a sounding device as shown in the accompanying
wiring diagrams.
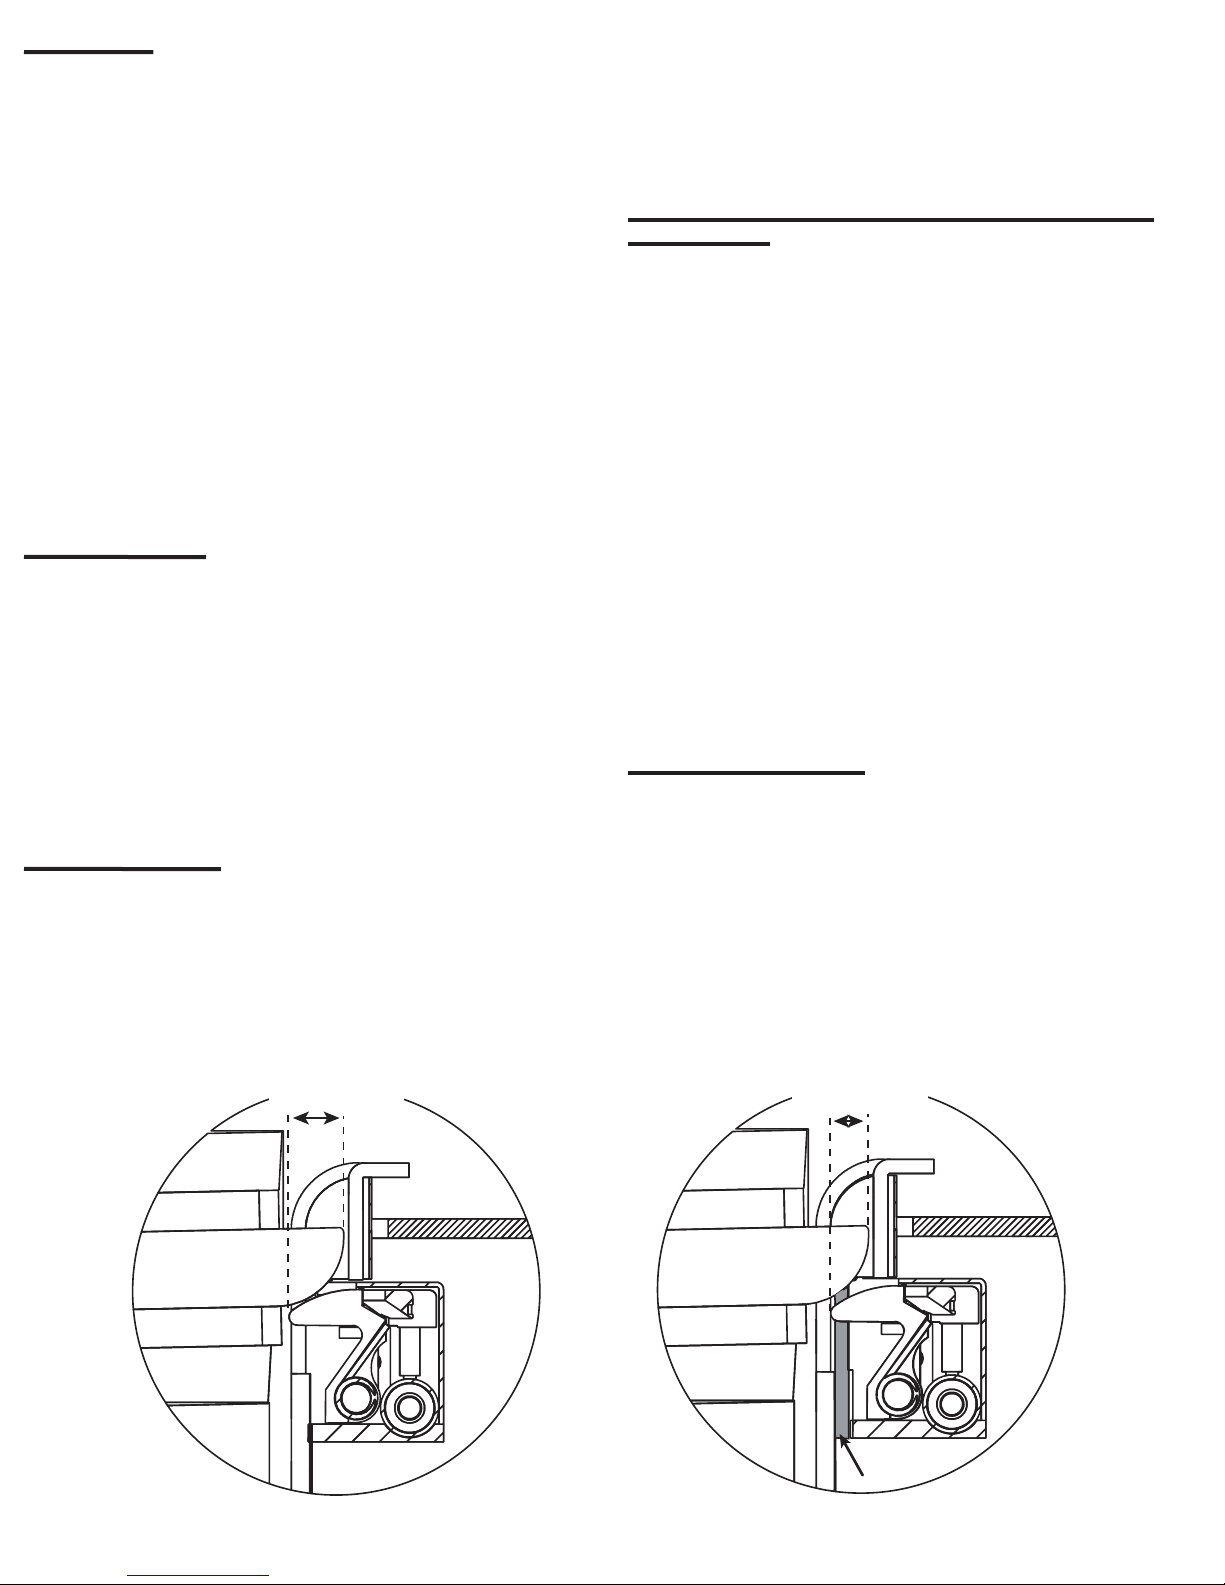
CONFIRMING PROPER LOCK-LATCH ENGAGEMENT &
CLEARANCES:
The latch and the lock must engage properly for the electric
strike to operate as intended. On doors where the gap between
the edge of the door and the jamb are within standard tol-
erances and the latch is the proper length, no adjustments will
be required and this is true for the majority of installations.
But too little lock-latch engagement will result in an installation
were the door may be easily spread; allowing the locked door to
be forced open.
Too much lock-latch engagement will result in a situation where
the door release will interfere with the door latch, causing
binding; improper operation and premature mechanical wear on
the latch and release.
Extended latch length (LL) minus the gap (G) between the edge
of the door and the edge of the jamb equals the amount of lock-
latch engagement.
"Lock-Latch Engagement = LL - G"
INSTALLATION OF SHIM:
An adequate amount of clearance must exist between the door
latch and the strike keeper so that they do not interfere or bind
when the door opens or closes. Two 1/16" thick shims are
supplied with the TRINE #3234, #3234W and #3478 which may
be installed as shown in the "Installation Drawings section" to
resolve this situation if this problem is encountered. (also See
Figure 4 below).

INSTALLATION DRAWINGS
WOOD FRAME INSTALLATION
The 3234W's 3-3/4" x 1-1/4" faceplate requires the
least amount of jamb preparation when compared
with other electric strikes.
3/32"
1 1/4"
1 11/16"
1 1/8"
7/16"
1 1/64"
1 1/16"
1 5/16"
3 3/4"
3 3/4"
1 11/16"
1 1/32"
1 1/4"
3 1/8"
1 1/8"
1 5/16"
9/16"
3/32"
5/16"
1"
OPTIONAL
1/16" THICK
SHIM
Page 4
4 7/8"
1 1/4"
1 7/8"
1 1/32"
1 11/16"
1"
3/32"
4 1/8"
3/4"
3 11/32"
5/8"
3/8"
OPTIONAL
1/16" THICK
SHIM
1 1/4"
4 7/8"
3/32"
1 1/16"
1 9/16"
1 1/4"
9/16"
1 3/4"
1 13/16"
1 1/4"
3 3/8"
3/4"
1 1/4"
4 7/8"
1 3/8"
1/8"
3 3/8"
7/16"
METAL AND WOOD FRAME INSTALLATION
The 3478's 4-7/8" x 1-1/4" faceplate
requires the least amount of jamb
preparation when compared
with other electric
strikes.

24V OR 12V AC/DC
TRANSFORMER
LC100
TO 120V AC LINE
FIGURE 2
FAIL-SAFE MODELS
PUSH
BUTTON
NORMALLY
CLOSED
+
-
FAIL-SAFE
ELECTRIC
STRIKE
OPTIONAL
LED
INSTALLATION DRAWINGS (Continued)
1 1/32"
1 11/16"
1"
1 1/8"
5/8"
1 7/16"
5/8"
2 1/8"
1 11/16"
2 3/4"
1/8"
9/16"
5/16"
OPTIONAL
1/16" THICK
SHIM
2 3/4"
1 7/16"
5/8"
1 1/8"
METAL FRAME INSTALLATION
The 3234's 2-3/4" x 1-1/4" faceplate requires the
least amount of jamb preparation when compared
with other electric strikes.
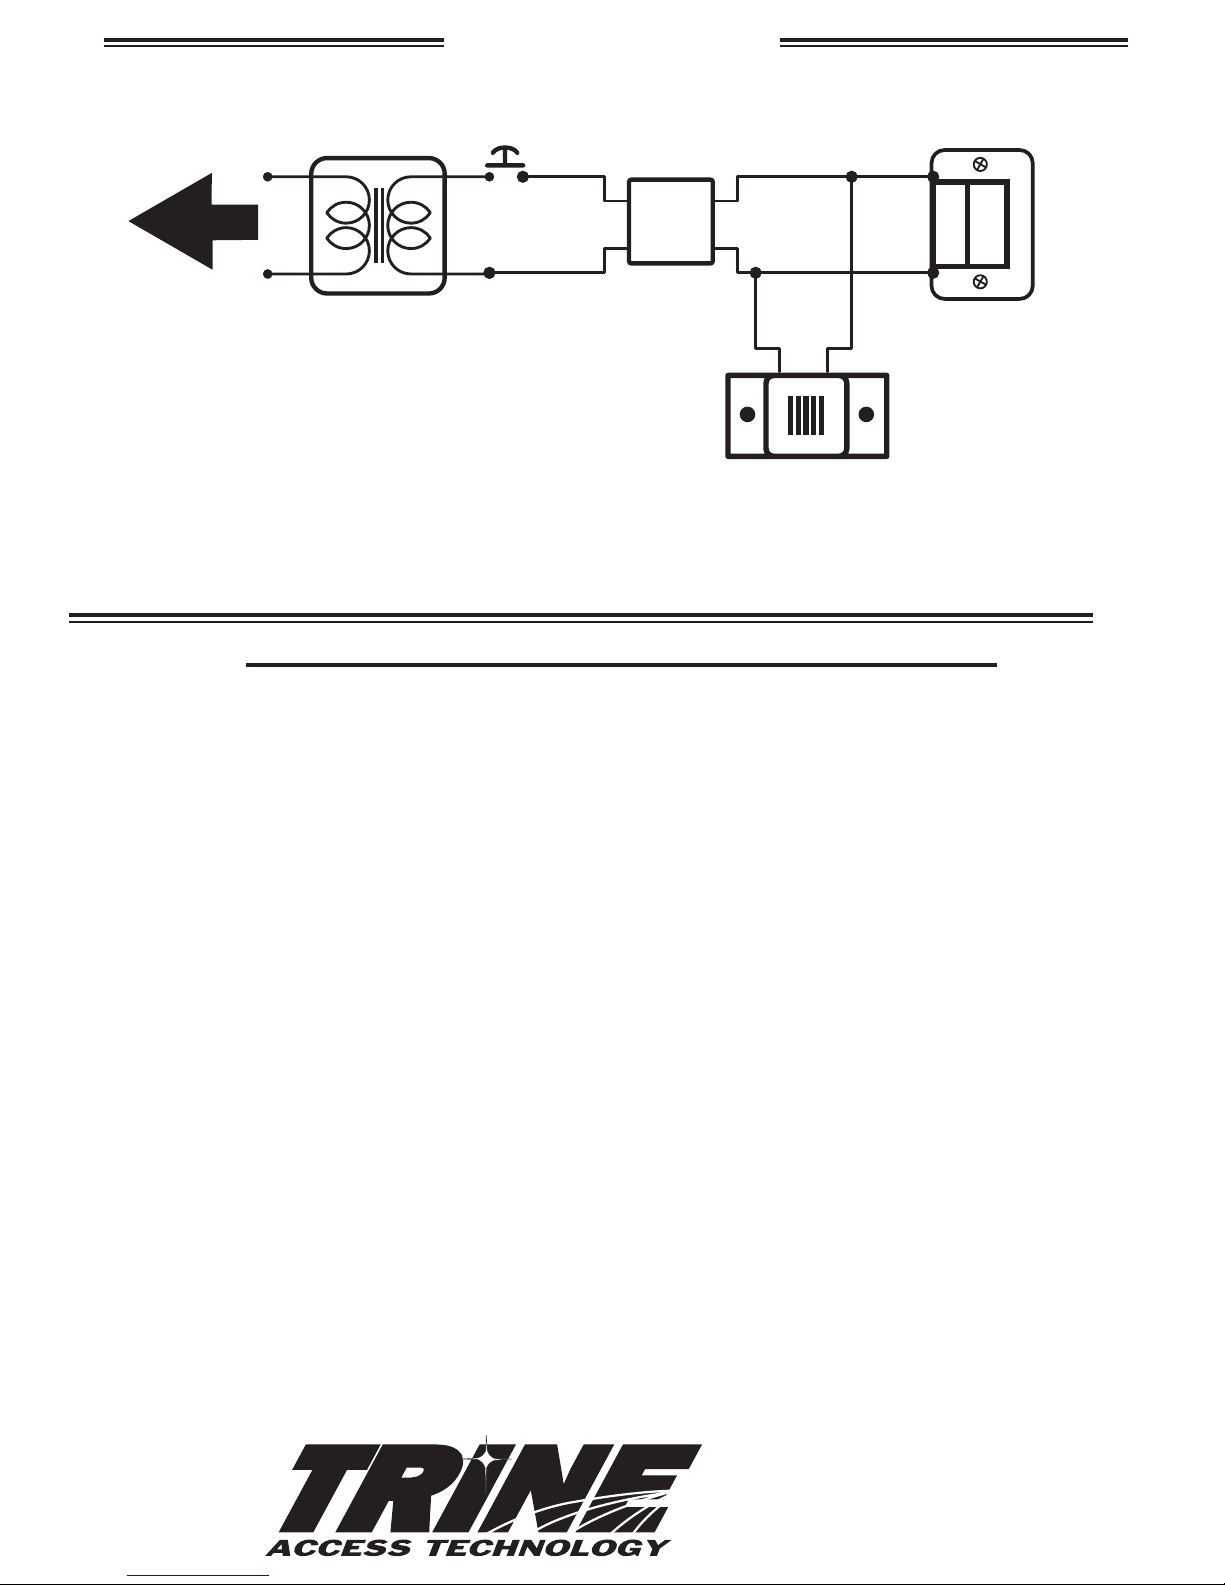
WIRING DIAGRAM
24V DC OR 12V DC
TRANSFORMER
OPTIONAL BUZZER
BZ-12 or BZ-24
TO 120V AC LINE
FIGURE 1
USING DC TRANSFORMER
PUSH
BUTTON
NORMALLY OPEN
** When wiring the optional buzzer, polarity must be
observed. Connect the (+ or RED) positive wire to the
(+) positive side of the circuit and the (- or BLACK)
negative side wire terminal to the negative side of the
circuit.
+
-
+
RED
-
BLACK
FAIL-SECURE
ELECTRIC
STRIKE
Page 5
Page 6
24V AC OR 12V AC
TRANSFORMER
OPTIONAL***
BUZZER
BZ-12
BZ-24
BZ-6 - for the LC Version
RECTIFIER*
or
LC100**
TO 120V AC LINE
FIGURE 3
USING AC TRANSFORMER
PUSH
BUTTON
NORMALLY OPEN
* The rectifier can be positioned before of after the push button in
the circuit. The LC module can ONLY be positioned after the push
button as shown above.
** The LC100 module is wired-in like a rectifier and the above
schematic will work also with a DC output transformer.
*** When wiring the optional buzzer, polarity must be observed.
Connect the (+ or RED) positive wire to the (+) positive side of the
circuit and the (- or BLACK) negative side wire terminal to the
negative side of the circuit.
+
-+
RED
-
BLACK
FAIL-SECURE
ELECTRIC
STRIKE
WIRING DIAGRAM (continued)
PHONE: (718) 829-2332 FAX: (718) 829-6405
1440 FERRIS PLACE
BRONX, NY 10461
email: CustomerService@TrineOnline.com
website: www.TrineOnline.com
TROUBLESHOOTING THE COMPLETED INSTALLATION:
SYMPTOM: Electric release is not actuating:
1. Verify proper voltage is present AT STRIKE. If voltage IS present: the strike may have been damaged
during the installation, or dirt or debris may be preventing proper operation.
2. Verify for proper electric release coil resistance (REFER TO COIL ESISTANCE CHART), for either a short
circuit or open circuit. Coil is NOT a serviceable part. Note that intermittent coils can only receive
power for 1 minute or less.
3. If voltage IS NOT present:
Verify Circuit breaker is on
Verify voltage at the transformer/power supply output.
Verify output from rectifier (if used)
Verify that there are no additional, unknown external switches or devices which may be interrupting
your circuit.
Check for damaged wiring or bad wire splices.
SYMPTOM: Door will not open but strike is working
Check for other locks on door
Check for proper lock-latch engagement (SEE SECTION: "CONFIRMING PROPER LOCK-LATCH
ENGAGEMENT & CLEARANCES").
Lock latch engagement may be not set correctly. (If proper clearance cannot be achieved by installing
a shim; a shorter lock latch may be required for your installation.)
Check for excessive backpressure on door release latch by following these steps:
While observing the electric release and latch; apply enough pressure on the door so that the lock's
latch does not press on the electric release's latch. If applying pressure as described does not cause
any movement of the lock away form the latch, then there may be too much pressure on the electric
release's latch. If electric release works properly while you are applying this pressure, then steps must
taken to relieve this pressure. Possible remedies include:
Re-adjust (or install) a door closer
Remove door silencers
Correct excessive door warpage
Re-center electric release in jamb
Remove or trim weather stripping around the door
This manual suits for next models
6
Table of contents
Other Trine Door Lock manuals


Popular Door Lock manuals by other brands

Assa Abloy
Assa Abloy mFlipLock standard Assembly and operating instructions

LOCKLY GUARD
LOCKLY GUARD ATHENA 228SL installation guide

CODELOCKS
CODELOCKS KL1200 Programming and operating instructions

Schlage
Schlage L9000 Series installation instructions

Philips
Philips EasyKey Alpha user manual

Schlage
Schlage S-260 Product Installation


