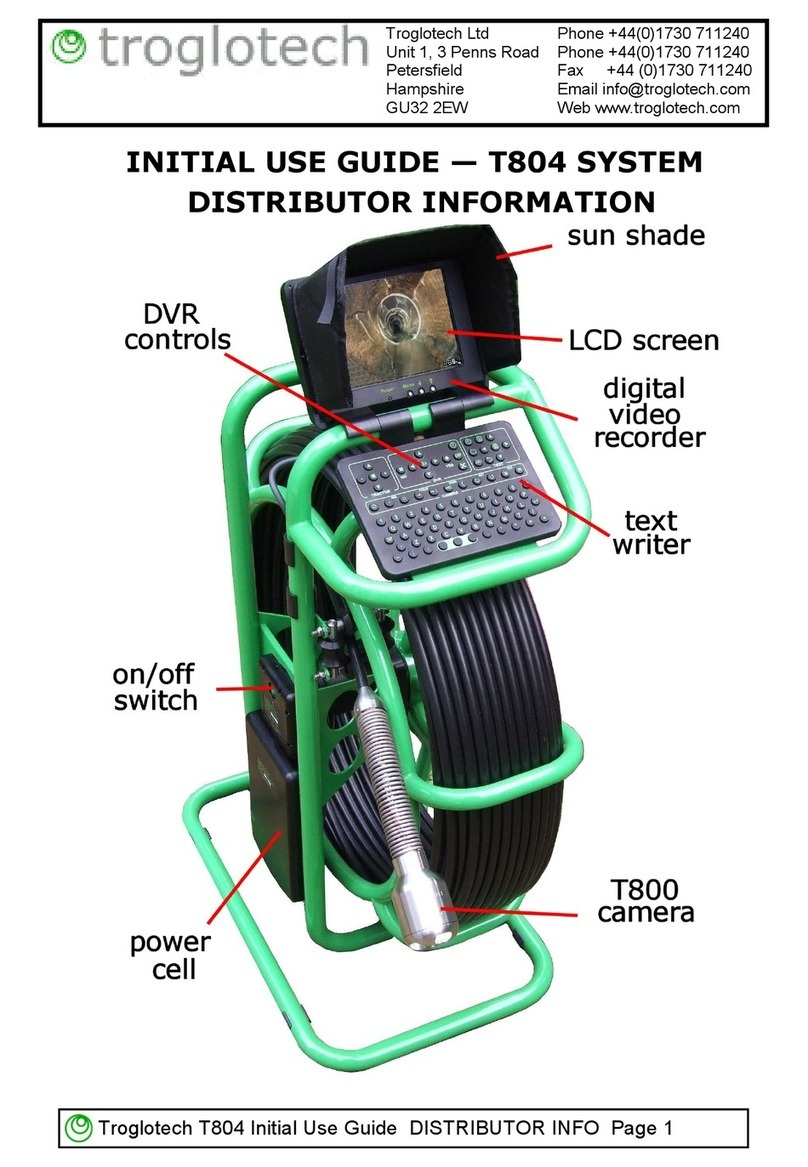
Troglotech T804 WiFi System User manual

Troglotech T804 User Manual SD VERSION Page 1
OPERATING INSTRUCTIONS—T804 SYSTEM
Troglotech Ltd Phone +44(0)1730 711240
Unit 1, 3 Penns Road Phone +44(0)1730 711240
Petersfield Fax +44 (0)1730 711240
Hampshire Email info@troglotech.com
GU32 2EW Web www.troglotech.com
These instructions are for SD-Card models (2018 and later)

Troglotech T804 User Manual SD VERSION Page 2
2) Fit camera to Rod Termination
QUICK START GUIDE
3) Fit Brush Skid set 4) Remove the SD card cover by
pulling the lanyard upwards and then
away from the unit
5) Fit SD Card with label upwards - it
will click into place. Refit cover
6) Switch unit ON - You are ready for
surveying
1) Slot Power Cell into frame and
push upwards to lock in place

Troglotech T804 User Manual SD VERSION Page 3
QUICK START GUIDE - TEXTWRITER + DVR
1) The Textwriter starts with the Rod
Counter, Time & Date and the Text
from Page 1 displayed
2) Use the keys shown here to hide
or display the Rod Counter, Time &
Date and the Text
4) Press RECORD (YES) to start a
recording
5) Ensure the LED is flashing to show
a successful recording
6) Press STOP (NO) to stop the re-
cording when finished.
3) After 15 seconds from switch-on
the ‘DVR READY’ message shows

Troglotech T804 User Manual SD VERSION Page 4
FITTING BRUSH SKID SET
Fitting Brush Skids
The T800 and T812 must always be used with the full skid set, whether or not
the brushes are fitted. Using the system without skids may damage the camera.
The Troglotech skids can be adjusted from 3” (no brushes fitted), through 4” to 6”
by selecting from the two brush sizes.

Troglotech T804 User Manual SD VERSION Page 5
2) Fold the sunshade flat, swivel Con-
trol Unit flat against keyboard
END OF DAY PROCEDURE
3) Fully apply the brake. The T804 is
ready for transportation
5) Connect the Mains Charger.
Charging will take 4—6 Hours.
6) The Power Cell can be charged
whilst fitted to the frame if preferred
DO NOT OPERATE DURING CHARGE
1) Press STOP (NO) if a recording is
in progress and then Switch unit OFF
4) Remove Power Cell by pressing
both buttons and lowering the Power
Cell

Troglotech T804 User Manual SD VERSION Page 6
USING THE WIFI ACCESSORY
As soon as the T804 is switched on it
will start transmitting a WiFi signal.
See WiFi Manual for more information
Connect the optional WiFi accessory
to the Ext Video socket and clip the
unit to the frame.
POWER
The T804 has an On-Screen display
on all models to show the current
Power Cell charge. The display will
inform you if charging is required by
flashing the ‘B’ symbol. This symbol
will also be shown during recording if
charging is required. The T804 can be
powered by the optional 12V lead
from a vehicle cigar socket. If the ‘*’
symbol appears the voltage is too
high and may cause damage, discon-
nect immediately
When using the optional 12V lead the
Power Cell will be charged at the
same time as the T804 is operated.
The rate of charge is dependant on
the vehicle’s battery condition, the
Power Cell has a charge processor
that will not allow the T804 to
completely drain the vehicle battery.
Full charge of the Power Cell from a
12V supply requires that the engine is
running. We recommend the Mains
Charger is used over-night for a
complete charge.

Troglotech T804 User Manual SD VERSION Page 7
Brightness, Contrast and Colour can
be adjusted to suit the conditions.
CONTROL UNIT DISPLAY
3) Lay the T804 on its side, fit Key-
board and then Control unit above the
Hub
The LCD brightness, contrast and
colour can be adjusted using the
‘Menu’ and ‘Select’ buttons
2) Remove Keyboard from frame
4) Connect Keyboard lead and Link
Cable, use the clips to position Link
Cable safely. Ready for operation.
1) Disconnect both cables, remove
Control Unit from frame
SIDE OPERATION

Troglotech T804 User Manual SD VERSION Page 8
Making accurate measurements. As
the Rod Counter relies on the rotation of
the coiler it is important that the coiler
brake is set correctly. When letting Rod
out from the T804, the coiler may not
rotate freely if the brake is set too
fiercely. Ensure that the brake is set so
that the coiler allows rod to be removed
smoothly but does not allow the coiler to
free wheel. Layering the rod neatly on
the coiler increases the accuracy and is
always good practice.
Measurements will not be accurate if
the calibration routine is performed
when the camera termination is not
next to the Rod Guide. This does not
have to be critically accurate; a leeway
of a few inches is acceptable.
USING THE ROD COUNTER
The Rod Counter can be operated in
Imperial (feet and 10ths of feet) or Met-
ric mode (Metres and 10ths of Metres).
To switch between the two modes
press the ‘C’ key when the Textwriter is
in VIEW mode, the display will change
from (‘) - Imperial to (m) Metric.
If a relative measurement needs to be
made between two points during a sur-
vey, press the Rod Counter. The Rod
Counter will now count up or down from
the point where the button was pressed
to give a relative measurement.
Version 4 software automatically cali-
brates the counter and allows the
counter to count in reverse if the T804
is switched ON when the rod is already
extended - previous versions will not
count in reverse in this situation

Troglotech T804 User Manual SD VERSION Page 9
USING THE TEXTWRITER-BASICS
The VIEW/EDIT key is used
when Text needs to be altered, this
button toggles between EDIT and
VIEW modes. The Text can be
cleared from the screen by us-
ing the CLEAR button, this tog-
gles between Text and No Text
modes.
When the Text
Writer is in
EDIT mode the
‘Upper case/
Lower case’ symbol appears at the
bottom of the screen next to the Page
number and the cursor will flash in the
TEXT area. When the Text Writer is in
the VIEW mode the ‘Upper case/
Lower case’ symbol will disappear
and the cursor will not be shown in the
TEXT area. The picture above shows
that the Text Writer is in EDIT mode. If
the Text Writer was in VIEW mode the
‘Upper/Lower case’ arrow would not
be shown. V4 only -The lower status
line will show ‘Textwriter VIEW
mode’ and ‘Textwriter EDIT mode’
The ‘Status line messages’ area is
used for giving the operator informa-
tion such as ‘Calibrate Counter’ and
‘Counter Calibrated’. This area is also
used to send messages to the opera-
tor when using the Text Writer.
The ‘Rod Counter’, ‘Time’ and ‘Date’
can be displayed or hidden using the
keys. These toggle the
display.
The position of these displays is fixed
and cannot be altered, they always
appear on the top line in the same
order.
The Textwriter starts with the Rod
Counter, Time & Date and the Text
from Page 1 displayed
Use the keys shown here to hide or
display the Rod Counter, Time &
Date and the Text

Troglotech T804 User Manual SD VERSION Page 10
USING THE TEXTWRITER-EDITING
There are 9 pages that are available to display text. The pages are useful for stor-
ing text that is often used such as your Companies Name and Address. To dis-
play a certain page of text put the Text Writer in VIEW mode (Upper/Lower case
symbol NOT displayed). Press keys 1 through 9 to display that page, or:
Pressing the button will increase the page number and display that page.
Pressing the button will decrease the page number and display that page.
Both buttons loop the page number, from 9 to 1 and from 1 to 9 respectively.
If no text needs to be displayed press the ‘CLEAR’ button, this will remove
the text from the screen (but will not delete it from memory), it will also remove the
‘Upper/Lower case’ indicator and the Page Number display.
Pressing the ‘CLEAR’ button again will display the text contained on the cur-
rent page and the Page Number display on the bottom of the screen. The Text
Writer will be in VIEW mode.
To edit text first choose a PAGE you want to edit as explained in the previous
section. Put the Text Writer in ‘EDIT’ mode as explained above, the ‘Upper/Lower
case symbol will be displayed in EDIT mode and the Page number will be dis-
played to the right of the symbol. You are ready to edit text.
Pressing any of the alphanumeric keys will now write to the screen. Each letter
you type is automatically saved so if power is removed you will not lose any work.
If you want to change to lower case press the ‘CAP’ button once.
To create spaces press the ‘SPACE’ button.
If you want to jump to the next line press the ‘ENTER’ button.
Use the and cursor buttons to move the cursor around the screen.
The cursor will jump from bottom to top, left to right and visa-versa when the ex-
tremes of the TEXT area are reached.
Press the ‘EDIT’ key to remove the cursor from the screen when you have
finished typing to put the Text Writer in VIEW mode.
NOTE SW Version 4 will show messages in the lower status line to indicate
Textwriter EDIT and VIEW modes

Troglotech T804 User Manual SD VERSION Page 11
TEXTWRITER-VARIOUS FUNCTIONS
To delete single characters, for instance when a mistake is made while typing,
press the ‘DELETE’ key while in EDIT mode. The DELETE key will delete the
character that is displayed above the flashing cursor. As the cursor moves when a
character is typed you will have to press the DELETE key twice, once to move the
cursor back to the character and once again to delete that character. Each press of
the DELETE key deletes the character above the cursor AND moves the cursor
back by one position. Use the cursor buttons to move the cursor around the screen
to select any character that needs deleting.
Whole pages of text can be deleted, for instance when a new survey is started and
the page contains old information. To delete a whole page of text put the Text
Writer in VIEW mode (no ‘Upper/Lower case’ arrow displayed) and use the
buttons or 1-9 keys to display the page of text you want to delete.
Then press the key once. The lower part of the screen will now display the
message ‘DELETE PAGE? Y or N’. Pressing the ‘Y’ key will now delete the current
page of text. Pressing any other key will NOT delete the page of text.
Display Modes:
The Text Writer can display the TEXT area in three differ-
ent modes as shown in the first three pictures.
To switch between the display modes, select VIEW mode
using the ‘EDIT’ key and then use the keys to switch be-
tween the three modes. The display modes
loop between PLAIN, BORDERED, BOXED
and then back to PLAIN again
To set the Time and Date press the ‘CHANGE’ key once.
The Hours display will turn black and the TEXT area will be cleared. The HOURS
value can now be changed, use the buttons to increase or decrease the
hours value.
Once the HOURS are correct press the ‘CHANGE’ key once, this locks the
new value. The MINUTES value can now be changed.
Use the same procedure for MINUTES, DAYS, MONTHS and YEARS.
A final press of the ‘CHANGE’ key will display the text again.
NOTE SW Version 4 will show ‘Time and Date Edit’ during clock setting

Troglotech T804 User Manual SD VERSION Page 12
T804 SD-CARD DVR - QUICK START
Switch on and RECORD
Lif he display o he uprigh posi ion and swi ch he T804 ON. Wai for
he ‘DVR READY’ message (15 seconds from swi ch-on).
Press he RECORD bu on on he keyboard (marked ‘YES’) o RECORD
The DVR will s ar o record immedia ely, he STATUS LED will flash RED,
and af er 12 seconds he screen will display he message ‘DVR RE-
CORDING O ’.
Press he STOP bu on (marked ‘NO’) o s op recording
While recording you can press he DISP
bu on o show he recording progress.
Press DISP again o re urn o he live pic-
ure.
The pic ure o he righ shows he
STATUS LED - his should rapidly
FLASH RED when recording
Only change he SD Card when he
T804 is swi ched OFF

Troglotech T804 User Manual SD VERSION Page 13
T804 SD-CARD DVR - SNAPSHOTS
Error Messages:
If he SD card is faul y, no fi ed correc ly or damaged, when a re-
cording is s ar ed you will ge an error message in he cen re of he
screen for 8 seconds. Af er 12 seconds messages a he bo om of he
screen will show DVR FLASH CARD ERROR - CARD FULL OR MISSING -
PRESS DISP TO CHECK. Pressing he DISP key will show he error as
repor ed by he DVR. Switch the system OFF, replace the SD card
and re-start the system
The screen will momen arily show a ‘RECORD’ message and he SNAP-
SHOT ICON will be shown in he op-righ of he pic ure as shown below.
Af er 1 second he screen will re urn o he live pic ure and READY will be
momen arily displayed.
The snapsho will be saved on he SD card in a JPEG forma
Take a SNAPSHOT while RECORDING:
A SNAPSHOT can be aken when making a recording using exac ly he
same process. Pressing he RIGHT ARROW key as shown above, his will
ermina e he curren recording, ake a snapsho and hen s ar a new
recording.
T804 SD-CARD DVR - OTHER FUNCTIONS
Take a SNAPSHOT:
A SNAPSHOT can be aken by pressing he RIGHT ARROW key as shown
below.

Troglotech T804 User Manual SD VERSION Page 14
PLAYING your recordings:
Af er recording, he video or snapsho can be checked by pressing he
PLAY bu on .
The screen will momentarily show ‘DVR PLAY MODE’ and he las
video or snapsho will be shown. Use he ‘Fas Forward’ and ‘Fas Re-
wind’ bu ons if required ( hese have no func ion when a snapsho is
shown).
Whils playing you can use he
‘Previous Recording’ and
‘Next Recording’ bu ons o
play any o her recordings and
snapsho s ha are already on
he SD card.
The files con ained on he card
are momen arily displayed as
shown on he righ - a video
will show ‘asf’ and a snapsho
will show ‘jpg’ on he lis .
Pressing ‘PLAY’ again will pause he video
Press ‘Stop’ to stop playing
T804 SD-CARD DVR - OTHER FUNCTIONS

Troglotech T804 User Manual SD VERSION Page 15
T804 SD-CARD DVR - OTHER FUNCTIONS
Check the SPACE left on an SD card:
When he DVR is idle he remaining space on he card can be checked
by pressing he ‘DISP’ bu on. The screen will show a ‘DVR EDIT MODE’
message while he DVR calcula es he remaining space - af er a few sec-
onds he screen below will be shown indi-
ca ing he remaining space on he card
T804 SD-CARD DVR - OTHER FUNCTIONS
Set DVR Time and Date:
When he DVR is idle he ime and da e can be se by pressing he ‘SET
TIME’ bu on. The screen will show a ‘DVR EDIT MODE’ for a few seconds
and hen will show he ime and da e as shown below. Use he cursor
keys (shown in red) o adjus he ime and da e and hen press he ‘EDIT
TIME’, ’YES’ or ’NO’ bu ons o save he new se ings and re urn o he
READY screen.

Troglotech T804 User Manual SD VERSION Page 16
FORMAT an SD card:
Forma ing he SD card will dele e all your recordings and snapsho s so
use his func ion wi h cau ion!
Press he ‘FORMAT CARD’
bu on once. The screen
will show ‘DVR EDIT
MODE’ a he bo om of
he screen.
Af er a few seconds he
screen will change o ha
shown below:
You now have he op ion
of pressing ‘YES’ o forma he card or ‘NO’ o re urn normal opera ion.
If ‘YES’ is pressed he card will be forma ed. This can ake up o 2 min-
u es depending on he card size and speed.
T804 SD-CARD DVR - OTHER FUNCTIONS
When forma ing is comple e he screen will momen arily show ‘Forma
OK’ and he sys em will au oma ically re urn o normal opera ion af er 2
minu es.
On smaller, fas er cards, when ‘Forma OK is shown you can press he
‘NO’ bu on o re urn o he normal screen.
FORMATTING ERASES ALL FILES ON THE SD CARD

Troglotech T804 User Manual SD VERSION Page 17
T804 SD-CARD DVR - VOICE RECORDING
To record audio when making a recording:
You can record voice messages while recording. By defaul he micro-
phone is swi ched OFF. To swi ch he microphone ON press he ‘M’ bu -
on on he Tex wri er (in VIEW mode, no cursor on screen). To swi ch i
OFF, press he ‘M’ bu on again. When he ‘M’ bu on is pressed he
s a us line will show he OFF symbol
Or he ON symbol
T804 SD-CARD DVR - SPECIFICATIONS
Recording Resolu ion D1 High Defini ion
Recording Type MPEG4 (ASF)
Snapsho JPEG (VGA)
Maximum card size 32GB
Card Usage 1GB - 1.5GB per Hour
Bi ra e Variable
SD Card Type HDSD
Environmen al Wa erproof o IP67

Troglotech T804 User Manual SD VERSION Page 18
Moving the video files to your computer
Many Laptop computers are supplied with a SD card-slot. In this situation the SD
card can be simply copied to a new folder on your machine. The card is usually
seen as a removable drive and will contain a number of folders.
The Video Files are contained in the folder: ‘Drive:\MP_ROOT\TV’ where ‘Drive:’ is
the letter allocated to the CF card by your computer. The Video Files all have the
extension ‘.ASF’, the snapshots will have the extension ‘.JPG’
These files can be found on the SD card in the folder DCIM/100VIDEO
The video and snapshot files that are created by the T804 are compatible with all
modern computers (PC and MAC) and don’t require any special video players to be
downloaded. On very old computers you may need our universal player which can
be downloaded from here:
http://www.troglotech-products.com/software/MP4/MP4.zip
If your PC or Laptop does not have a SD card slot then the use of a Card
Reader is recommended. This will be seen as an additional drive.
Please contact your Distributor for advice in your area
PLAYING VIDEO/SNAPSHOTS ON A COMPUTER

Troglotech T804 User Manual SD VERSION Page 19
MAINTAINANCE—T804 SYSTEM
When the Rod is returned to the coiler ensure that most debris is removed, although
the T804 is fully sealed to IP 67 the use of Jet Washers is strictly prohibited as the
pressure can exceed acceptable limits. Keeping the Rod clean as it is returned to the
coiler is the preferable method of keeping the T804 in good condition.
After each week’s operation ensure that the Rod Guide is clear of debris, clean if nec-
essary using warm water and a paintbrush to get into the inaccessible parts. Wipe
down the enclosures with warm water and a mild detergent using a cloth. Perform
cleaning operations with camera and accessories connected.
MAINTAINANCE—–T800 CAMERA
It is best practice to leave the camera and skids fitted to the T804 system. If you need
to remove the camera ensure that the Termination is clean before removal. When
replacing the camera ensure that the threads are clean and that the ‘O’ rings are well
lubricated with Silicone Grease. Never use solvents (such as Ambersil) to clean the
termination as this will damage the o-rings. Keep the windows clean with a damp
cloth and a small brush to remove debris from the front guard.
The Lens Window is the only user-replaceable part on the T800 camera, although the
surface is extremely hard it may become scratched over a period of time and this will
affect the picture quality. The replacement requires the purchase of a Lens Window
Kit which includes the Quartz window and the sealing ‘O’ ring. Before attempting the
replacement ensure that the camera is perfectly clean and there is no debris in the
window aperture. Please see the T800 User Manual for lens window replacement.
MAINTAINANCE—–T812 CAMERA
It is best practice to leave the camera and skids fitted to the T804 system. If you need
to remove the camera ensure that the Termination is clean before removal. When
replacing the camera ensure that the threads are clean and that the ‘O’ rings are well
lubricated with Silicone Grease. Never use solvents (such as Ambersil) to clean the
termination as this will damage the o-rings. Keep the windows clean with a damp
cloth (microfiber cloths are best for this practice).
REPAIRS/SERVICING
The T804 has no user serviceable parts. Please refer to your Distributor for repairs
and service.
MAINTAINANCE

Troglotech T804 User Manual SD VERSION Page 20
ACCESSORIES
T710 1” CAMERA AND 20M ROD
Extent the capabilities of your T804 system with
the addition of the T710 1" camera and 20M (66
feet) of highly-flexible rod. This upgrade
includes a smaller coiler cage that fits within the
T804 coiler cage.
When a survey is required of small pipework,
the T800 camera can be detached, and the
free-end of the 20M rod can be connected to
the termination. The 1" camera can now be
passed through the rod-guide and the survey
can begin. In some situations, the full 80M (262
feet) of rod can be utilised.
The T710 is the worlds most advanced 1"
camera. We have utilised the very latest in
CMOS sensor and LED technology to provide a
camera that out-performs all 1" cameras and
most larger cameras.
The rod is a new Troglotech design. It has a
high resin-content fibreglass core that provides
both flexibility and strength, the outer is highly
wear-resistant and low-friction.
WiFi - Direct-To-Customer Reporting
The WiFi Accessory clips to the frame of
the T804 System and transmits the live
picture directly to any smart device.
This allows immediate sharing of pictures
and video to the end customer. It also
allows storage of the survey on the smart
device.
The pictures and video are automatically
uploaded to the any cloud such as Google
Photo to be shared from any PC
Other manuals for T804 WiFi System
4
Table of contents
Other Troglotech Analytical Instrument manuals
Popular Analytical Instrument manuals by other brands
Keysight Technologies
Keysight Technologies B2900A Series Demo guide
Extech Instruments
Extech Instruments HDV-WTX2L quick start guide
geo-FENNEL
geo-FENNEL FVE 100 user manual
Sanyipace
Sanyipace 9300D user manual

CHALCO ELEVEN LIMITED
CHALCO ELEVEN LIMITED CC-M420-PH operating manual
Powerfix
Powerfix PEKK 4.3 A1 Operating Instruction and Safety Manual
