TRQ LYRA L-800 LED User manual

CARACTERÍSTICAS/CHARACTERISTICS
- Permanente - No permanente/Mantained - Non maintained.
- LED verde indica carga de la batería/Green LED indicates battery charging.
- Conexión mediante manguera de Ø16mm o Ø20mm/Connection via Ø16mm or Ø20mm cable.
- Protección: n de descarga de la batería y contra sobreintensidades/Protection: end of battery discharge and overloading.
- Tiempo de carga de batería: 24 horas/Battery charging: 24 hours.
EQUIPO AUTÓNOMO DE ALUMBRADO DE EMERGENCIA: LYRA L-800/1200 LED
SELF CONTAINED EMERGENCY LIGHT
DIMENSIONES/DIMENSIONS
REFERENCIAS/REFERENCES
Modelos
Models
Lámpara*
Lamp* CCT Batería Ni-Cd
Battery Ni-Cd
Autonomía
Autonomy
Lúmenes
Lumens
L-800 LED IP42 Tubo LED/LED Tube T5 3,6W (G5) 6000K - 7000K 7.4V 2.5Ah 1 hora/hour 900
L-800 LED IP65 Tubo LED/LED Tube T5 3,6W (G5) 6000K - 7000K 7.4V 2.5Ah 1 hora/hour 900
L-800 LED NM IP42 Tubo LED/LED Tube T5 3,6W (G5) 6000K - 7000K 7.4V 2.5Ah 1 hora/hour 900
L-800 LED NM IP65 Tubo LED/LED Tube T5 3,6W (G5) 6000K - 7000K 7.4V 2.5Ah 1 hora/hour 900
L-1200 LED IP42 Tubo LED/LED Tube T5 3,6W (G5) 6000K - 7000K 7.4V 2.5Ah 1 hora/hour 1200
L-1200 LED IP65 Tubo LED/LED Tube T5 3,6W (G5) 6000K - 7000K 7.4V 2.5Ah 1 hora/hour 1200
L-1200 LED NM IP42 Tubo LED/LED Tube T5 3,6W (G5) 6000K - 7000K 7.4V 2.5Ah 1 hora/hour 1200
L-1200 LED NM IP65 Tubo LED/LED Tube T5 3,6W (G5) 6000K - 7000K 7.4V 2.5Ah 1 hora/hour 1200
DIAGRAMA CÓNICO/CONICAL DIAGRAM FOTOMETRÍA/PHOTOMETRY
*Tubo LED patentado TRQ/*Patented TRQ LED tube.
230V - 50/60Hz
IP42/65-IK07 Clase II
Marcado CE
Class II
CE marked
LIGHTING TECHNOLOGIES TRQ, S.L.
TRQ se reserva el derecho de modicar las características de los productos sin previo aviso. Estos parámetros pueden ser modicados según necesidades del proyecto/TRQ reserves the right to modiy the characteristics of the products
without prior notice. These parameters can be modied according to project needs.
h(m)
1.50 6.19 2.32
*L-1200 LED
Según RBT y CTE/ According RBT and CTE
10 lux on oor/10 lux on oor.
- La batería debe ser reemplazada cuando su duración sea inferior a la autonomía asignada/Batteries should be changed once their duration gets inferior to the assigned.
- Las emergencias deben ser revisadas por lo menos una vez al año por personal cualicado/The luminaries should be checked at least once a year by qualied
technicians.
- Las baterías y PCB sustituidos deben ser reciclados de forma adecuada/Batteries and PCB should be re-cycled in adequate way.
- Asegurar que la red está desconectada/Make sure the main supply is switched o.
- IMPORTANTE: en caso de sustituir el tubo de Led, tiene que hacerse con la red y la batería desconectada, en caso contrario se puede dañar la electrónica del circuito.
Hay que montar el tubo con la polaridad adecuada/IMPORTANT: when replacing Led tube, it has to be done with the mains and the battery disconnected, otherwise it
can cause damage to the electronic component. The tube must be mounted with the correct polarity.
MANTENIMIENTO/MAINTENANCE
FUNCIONAMIENTO/FUNCTIONING
- Trabajar con la tensión de red apagada, conectar el bloque y aplicar después la tensión de red a la instalación/Switch o the mains power, install and connect the luminary
to mains supply.
- Comprobar que el LED verde se ilumina/Check that green LED go on.
- Las baterías se suministran descargadas/Batteries are supplied discharged.
Función AUTOTEST/SELF-TEST function:
La luminaria de emrgencia tiene un microcontrolador programado para ejecutar automáticamente PRUEBAS de vericación, para vericar el correcto funcionamiento del
dispositivo/ The Emergency light has a programmed microcontroller to execute automatically verication TESTS, to verify the correct working to the device.
- Batería (autonomía): Realiza un TEST automático una vez al año/Battery (autonomy): Runs an automatic TEST once a year.
* Se utiliza un patrón interno para la comprobación anual, por lo que no es tan preciso como la de un RTC (Real Time Clock)/The measure of time uses an internal pattern
and is not as accurate as that of a RTC (Real Time Clock).
Programación DE AUTOTEST/ SELF TEST programming:
Detalle del funcionamiento/ Function instruction:
- Transcurridas 48 horas de alimentación de red, se iniciará el TEST mensual y sincronización anual/ After 48 hours of mains power supply, the monthly and annual TEST
will start timing.
- La PRUEBA mensual se ejecutará el día 31 y tendrá una duración de 180 segundos y, si todo está bien, volverá a la etapa de carga/ Monthly TEST will be executed on
31st day and will last for 180 seconds and if all ok will return to charging stage.
- En caso de batería o cualquier otro fallo, el LED ROJO se encenderá indicando el fallo/ In case of battery or any other failure the LED lamp will turn on indicating the
failure.
- La PRUEBA anual se ejecutará el día 332 de la instalación y tendrá una duración de 30 minutos y, si todo está bien, volverá a la etapa de carga/ Annual TEST will be
executed on 332nd day of installation and will last for 30 minutes and if all ok will return to charging stage.
- En caso de fallo de la batería, el LED ROJO permanecerá encendido hasta que se reemplace la batería/ In case of battery failure the RED LED stay on, until the battery
is replaced.
Reiniciar/ Reset:
Una vez que se resuelva el fallo indicado, para restablecer la lámpara, apague la alimentación y ENCIENDA, y el indicador ROJO se volverá verde indicando que la
batería se está cargando/ Once the failure indicated is solved, to reset the lamp, pls switch OFF the power and SWITCH ON and RED indicator will turn green indicating
the battery charging.
Prueba manual/ Manual TEST:
El TEST manual se puede hacer presionando el botón TEST, la lámpara entrará en modo de emergencia/ Manual TES can be done by pressing the TEST button the lamp
will enter in emergency mode.
Resultados de la prueba y diferentes indicaciones de situación/ Test results and dierent situation Indications:
Dispositivo OK: LED VERDE ENCENDIDO/ Device OK: GREEN LED ON.
FALLO DE BATERÍA/ELECTRÓNICA: LED ROJO ENCENDIDO/ BATTERY/ELECTRONIC FAILURE: RED LED ON.
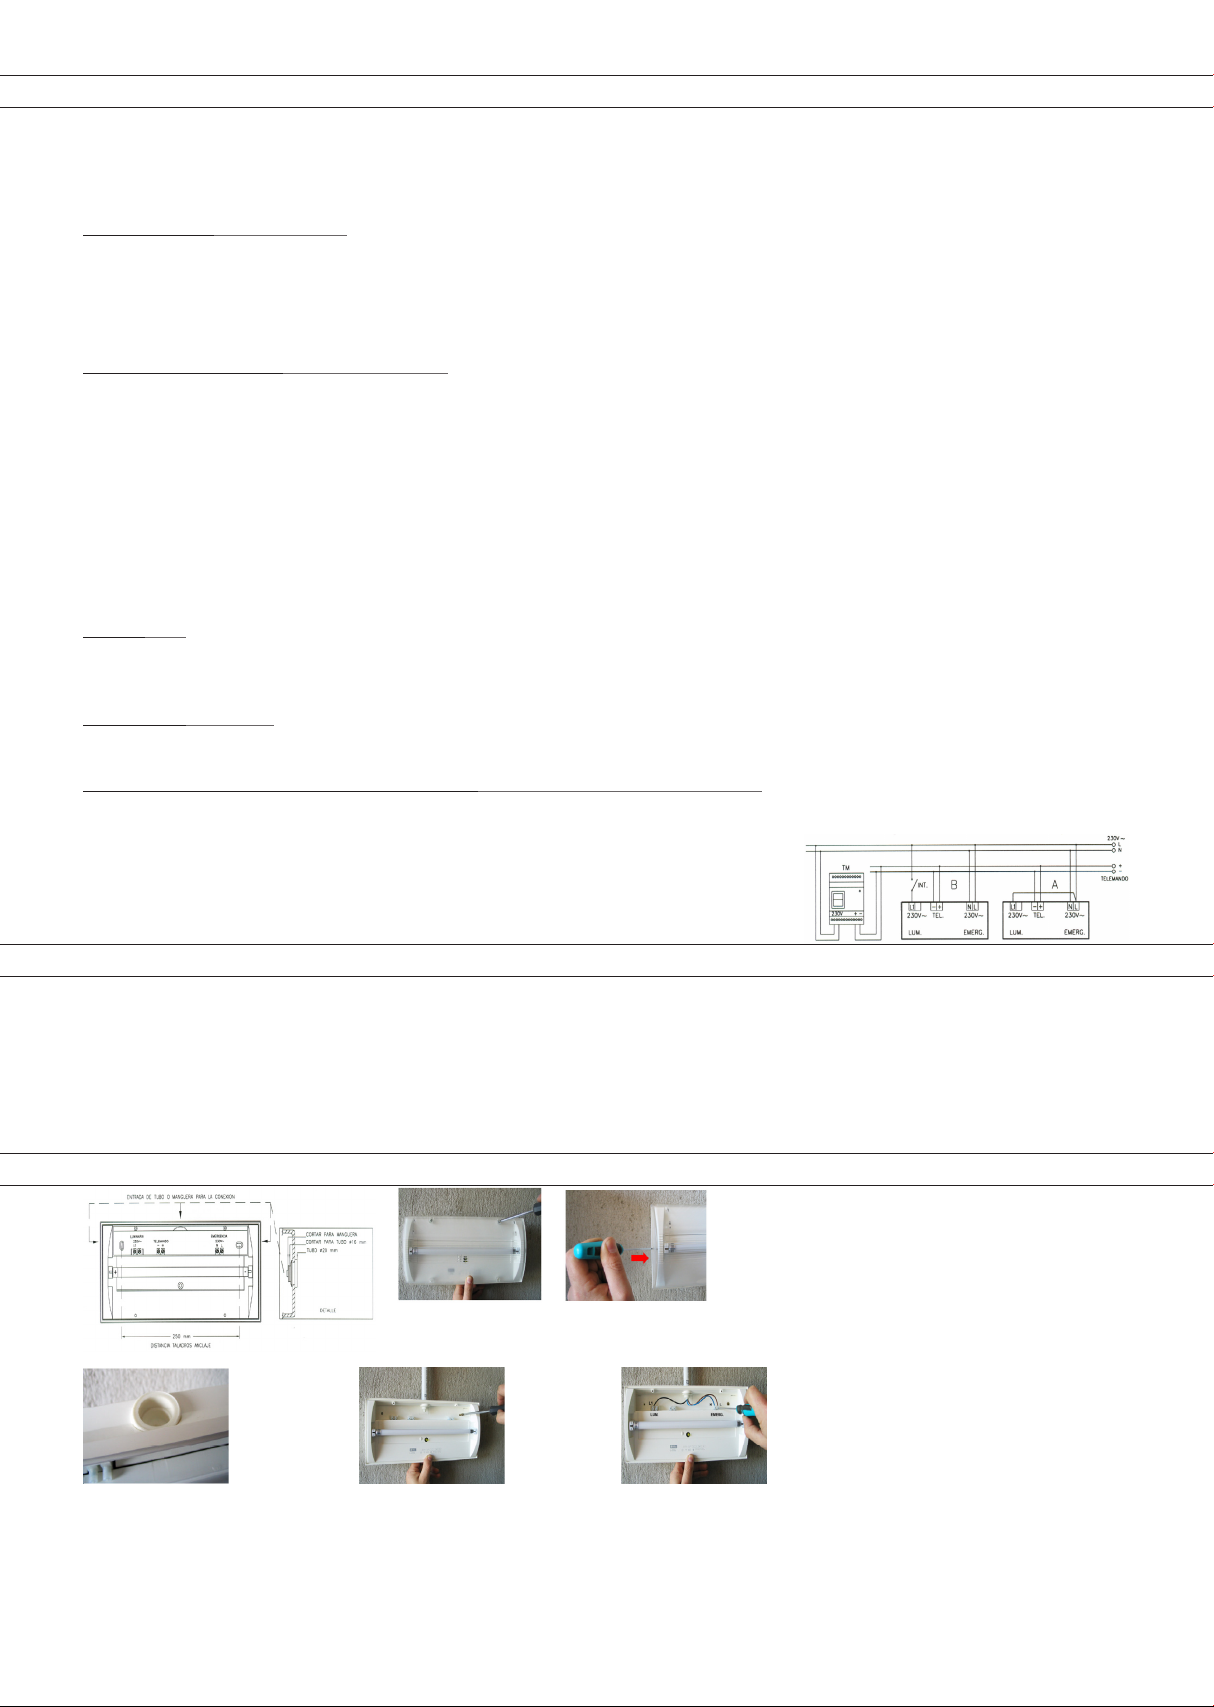
INSTALACIÓN/INSTALLATION
TRQ se reserva el derecho de modicar las características de los productos sin previo aviso. Estos parámetros pueden ser modicados según necesidades del proyecto/TRQ reserves the right to modiy the characteristics of the products
without prior notice. These parameters can be modied according to project needs.
Lighting Technologies TRQ, S.L. | Av. Pío XII, 38 | 12500 Vinaròs (Castellón), Spain | Tlf. +34 964 401 024 | www.trqsl.com
1. Retirar el cristal difusor desmontando los 4 tornillos (modelo IP65) o haciendo palanca hacia arriba con el destornillador
(modelo IP42)/Remove the cover by unscrewing the 4 screws (IP65 model) or introduce the screwdriver into the small
space on each side of the cover and lift up the
screwdriver to remove the cover (IP42 model).
2. Romper la zona redonda de la caja
e introducir la goma-cono pasacables/
Break the circular zone of the base
and
introduce the conical rubber.
3. Anclar el bloque en la pared
mediante 2 tornillos/Install the
luminary on the wall using 2 screws.
3. Conectar el cableado de la línea de alimentación de emergencia y de la luminaria
en las regletas de 230V, montar el cristal difusor y dar tensión de red a la instalación/
Make cable connections to the emergency and mains light by connecting the power
linte to the 230V connectors, mount
the cover and switch on the mains power suplly.
This manual suits for next models
9
Other TRQ Safety Equipment manuals


Popular Safety Equipment manuals by other brands

CRESTO
CRESTO SMARTLINE Instructions for use

OEZ
OEZ OD-FH00-KR Instructions for use

Safety 1st
Safety 1st SIMPLY PRESSURE XL manual

3M
3M DBI Sala Rollgliss User instruction manual

babcockdavis
babcockdavis BNT Installation, operation and maintenance manual

Safety 1st
Safety 1st OutSmart Flex Lock HS271 user guide

Tractel
Tractel travsafe tempo II Operating and maintenance instructions

Bornack
Bornack FS70 user manual

Scott
Scott RC PREMIUM ITD L user manual

Safety Rail Source
Safety Rail Source SecuRail Pro vertical user manual

valmont
valmont INGAL MashFlex MASH TL3 product manual

Kee safety
Kee safety Weightanka Assembly and operating instructions


