Tru-Test 702 User manual

WID70002 Model 702 User Manual Revision 2
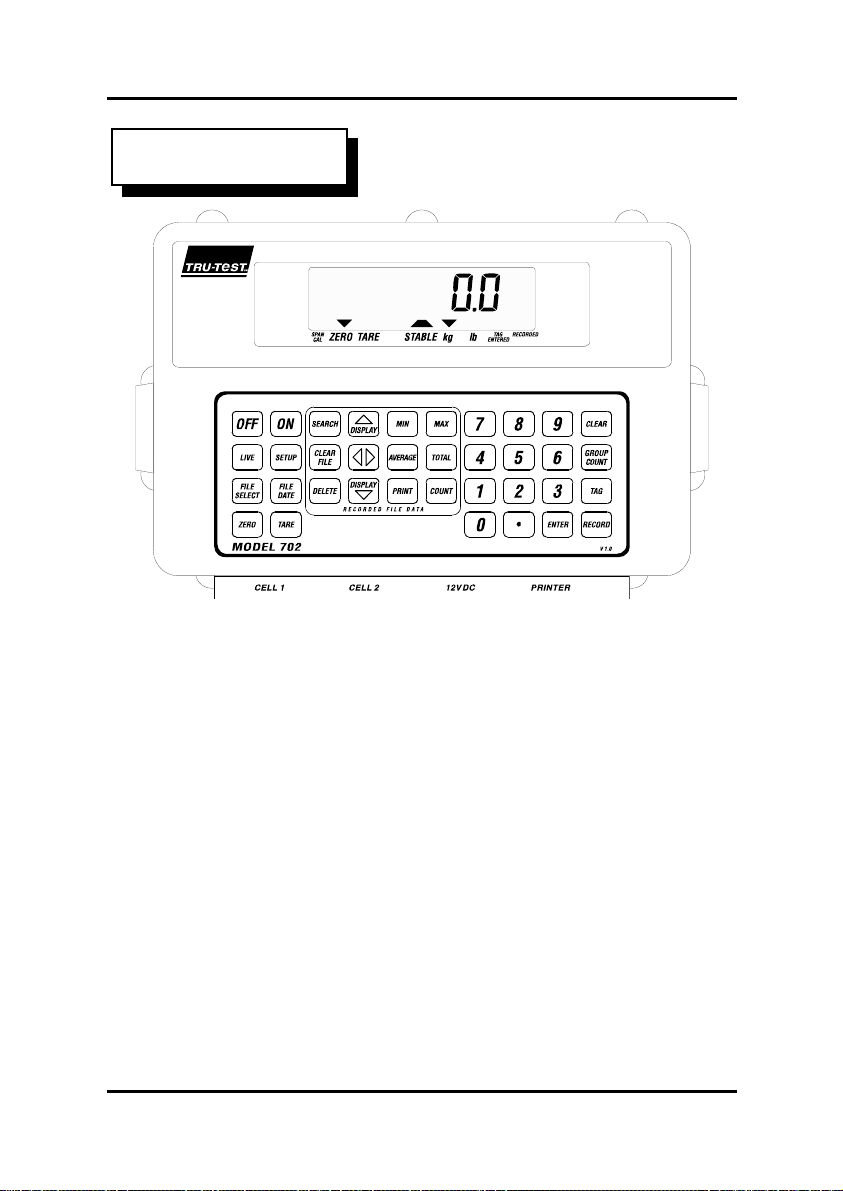
Tru-Test Model 702
User Manual

Copyright TRU-TEST Limited, 1997
No part of this document may be photocopied or reproduced
without the prior written consent of TRU-TEST Limited.

Contents
i
Contents
About This Manual...................................................1
System Overview.......................................................3
Installation.................................................................6
Calibration..............................................................7
Operation...................................................................8
Safety .....................................................................8
Keypad...................................................................8
Display...................................................................9
Switching On..........................................................9
Weighing..............................................................10
Switching Off.......................................................11
Automatic Power Off...........................................11
Changing Units of Measurement .........................11
Setup Mode..............................................................12
Zeroing.....................................................................16
Power Up Zero.....................................................16
Automatic Zero....................................................17
Manual Zero.........................................................18
Taring.......................................................................19
Example Use of Tare and Zero ............................20
Fleece (Fine Weight) Mode.....................................21
Setting Resolution....................................................22
Entering Tag (ID) Numbers...................................23

Contents
ii
Making Corrections..............................................25
Recording.................................................................26
Turbo Setting........................................................27
Displaying Statistics................................................29
Displaying Records..................................................30
Deleting Records......................................................31
Editing Records.......................................................32
Searching Records...................................................33
Searching for Minimum or Maximum Weight ....34
Multiple Files...........................................................35
Setting File Date...................................................36
Clearing File Date................................................36
Scanning Files......................................................36
Finding a File by Tag (ID) Search .......................37
Clearing Files.......................................................38
Clearing all of Memory........................................38
Printing Reports......................................................40
TRU-TEST MP400 Printer..................................41
TRU-TEST Citizen Model Printer.......................42
Group Weighing Mode ...........................................43
Accumulating Group Weights..............................43
Making Corrections..............................................44
Displaying Statistics.............................................44
Displaying Records..............................................45
Printing Reports ...................................................45

Contents
iii
Quick Reference Section.........................................46
Typical Weighing Session ...................................46
Keys .....................................................................47
Display Pointers...................................................50
Display Messages.................................................51
Care and Maintenance............................................57
Internal Battery ....................................................58
Internal Battery Charging.....................................59
Troubleshooting.......................................................61
Service Centres ....................................................70
Technical Information ............................................72
Communications Port...........................................72
Downloading to a Computer................................74
Remote Control by Computer..............................74
Printer Interfacing ................................................78
Electronic Tag (EID) Reading .............................80
Autoranging .........................................................81
USA Model Indicators ............................................83
FCC Warning.......................................................83
Weights and Measures Versions............................85
Model 702 Specifications ........................................86
Index.........................................................................91


About This Manual
1
About This Manual
About This Manual
This manual tells you how to operate the TRU-TEST Model 702
Indicator - the keyboard and display unit for the TRU-TEST
700 Series agricultural weighing system.
The TRU-TEST Model 703 Indicator which is a more advanced
model is described in a separate manual.
Operation of the Indicator is described in the main text of this
manual. Complete lists of keys, display pointers and messages
are given in the Quick Reference Sections at the end.
If you are setting up the system for the first time, read the
Installation section in this manual, also read the TRU-TEST
Loadbars Manual for instructions on installing the loadbars.
To gain the best possible performance from your Indicator and
especially if you have an internal battery installed, read the
Care And Maintenance section.
If problems arise, refer to Troubleshooting on page 61 before
contacting your TRU-TEST Service Centre.
Special versions of the Indicator are made which comply with
the regulations for "trade" use in particular countries.
Differences which may apply are noted at the end of sections
under the heading Weights And Measures Versions and
specifications for particular countries are given in Weights And
Measures Versions on page 85.
In this manual, the term "Loadbar" is used to mean "Loadbar,
Suspension Cell or Produce Platform".

About This Manual
2
TRU-TEST Model 702
Agricultural Weighing System

System Overview
3
System Overview
System Overview
The TRU-TEST 700 Series is an advanced and versatile
agricultural weighing system. It has been designed with the
benefit of many years of animal weighing experience and is
used by farm management professionals and agricultural
scientists the world over.
The system consists of a microprocessor controlled Indicator
(keyboard and display unit) and one or more Loadbars or
Suspension Cells. The Loadbars are fitted beneath a platform
or crate and the animal's weight is transmitted from the
Loadbars to the Indicator. The Indicator gives a digital readout
of the weight and, through the keypad, provides control over the
processing capabilities of the scale.
Weight data is recorded in a reliable solid state memory in the
Indicator and can be output to a printer at any stage during or
after weighing. Comprehensive reports including weights, tag
(ID) numbers, condition codes and statistics can be printed.
The data can also be directly downloaded to a computer via a
cable for permanent storage and further analysis.
A computer program, the TRU-TEST AgLinker, is available
from your TRU-TEST Dealer for easy transfer of data between
the Indicator and a PC computer.
Calibration
On power up, the Indicator automatically identifies and
calibrates itself to the Loadbars connected. The latest Indicators
operate (without re-calibration) with the complete range of
TRU-TEST Loadbars, Suspension Cells or Produce Platforms.
This is known as Standard Calibration and eliminates the need
for time consuming calibration using test weights.

System Overview
4
Applications using other manufacturers' Loadbars, which are
not pre-programmed, can be satisfied using Span Calibration
with known test weights.
Indicator Options
•The internal rechargeable battery option allows the
Indicator to be conveniently independent of any external
power supply.
•Models 702 and 703 can be connected to a printer to print
results or to a computer for storing and further processing
data.
Reliability
•The TRU-TEST Indicator is a rugged and robust product
designed to withstand the environment associated with
livestock handling. The case is made from extremely
tough, ultraviolet resistant polycarbonate. The keyboard
is completely sealed for all weather operation.
•The Indicator keeps three copies of calibration data in a
separate battery backed memory so that it can recover
automatically after a power failure or electrical
disturbance.
•The Indicator can be unplugged from the Loadbars and
taken indoors for you to study the data and recharge the
battery.
•For livestock weighing, animal movement can sometimes
be a problem with a digital scale. The Indicator
eliminates the problem using SUPERDAMP©- a
sophisticated statistical damping technique.
•The large digital display is easy to read. Stabilisation of
the display is usually extremely fast - within seconds.

System Overview
5
Main Features
Model 702 Features
•LIVE display mode.
•FLEECE (FINE WEIGHT) Mode for better precision at
low weights.
•Records TAG (ID) numbers along with animal weights.
•Stores up to 3500 animal records in up to 99 files.
•Provides statistics on recorded data.
•Prints reports.
•Computer interface to record weights.
•Span Calibration using known weights if required.
•Separate TARE and ZERO controls.
Model 703 Advanced Features
•Records a condition code for each animal.
•Reports on animal weight gain and drafting.
•Stores up to 7600 animal records in up to 99 files.
•Provides a range of different print reports.
•Provides automatic (hands off) weight recording.
Upgrading
The TRU-TEST Model 702 can be simply upgraded to the
advanced features of the Model 703. See your TRU-TEST
Dealer for details.
Weights And Measures Versions
Special versions of the Indicator are available which comply
with the regulations for "trade" use in particular countries.
(See Weights And Measures Versions on page 85).

Installation
6
Installation
Installation
In general, this section needs to be read only when setting up
your system for the first time.
When you unpack your new Indicator, complete and post the
guarantee card to ensure you receive the service you are entitled
to.
700 Series System
1. Unpack and install the Indicator mounting stirrup in a
convenient position. Ensure that it is located securely.
2. Install the Loadbars or Suspension Cells according to the
manual which comes with them (TRU-TEST Loadbars
Manual).
3. Run the Loadbar cables to the Indicator, making sure
they are protected from damage.

Installation
7
4. Unscrew the protection caps from the cable plugs and the
Indicator sockets marked CELL1 and CELL2. Insert
the plugs into the sockets and tighten the retaining collars
by hand only. The plugs can go into either socket.
Screw the protection caps together to keep out dirt and
moisture.
5. If an internal battery is installed, charge it by connecting
the Indicator to a good 12 volt DC source, either the
recommended power supply unit or a 12 volt car/bike
battery. Refer to Internal Battery Charging on page 59
for full details.
6. If no internal battery is installed, 12 volts must be
available where the Indicator is mounted. One of the
following options must be used:
•12 volt battery
Note: Red lead to positive terminal.
Black lead to negative terminal.
•Power Supply Unit
230 or 115 volts AC to 13.8 volts DC at 5 amps.
•AC Adaptor
230 or 115 volts AC to 13.8 volts DC at 600mA.
(NOT suitable if a 12V printer is connected.)
Use only the power cable supplied by TRU-TEST. Plug
it in to the socket marked 12V DC. on the Indicator and
tighten the retaining collar by hand only.
Calibration
The Indicator automatically identifies and calibrates itself to the
Loadbars connected. This is known as Standard Calibration.
Span Calibration with known weights can also be carried out.
(See your TRU-TEST Service Centre.)
Operation
8
Operation
Operation
Operating the TRU-TEST Model 702 is straightforward and
logical. Many functions are performed with a single key press.
Safety
To avoid damage, never load the scale further if the
overload message appears on the display.
Keypad
The Indicator comes ready to use with default options set by the
factory. However, you can use the keypad to set your own
preferred options, such as kilograms or pounds for the units of
measure. These options remain in memory until they are
changed, even when the Indicator is not connected to a power
supply.
The keys to use are listed in the instructions below.

Operation
9
A quick reference to all the keys is given on page 47.
Display
Normally the display shows the current live weight on the
platform.
When the Indicator is carrying out an operation, for example re-
setting zero, the display shows an appropriate message.
(If the weight is about half way between two values, it is normal
for the display to switch occasionally between the two, even
when the Stable pointer is On.)
Pointers
A row of triangular pointers at the bottom of the screen give
status information. The labels beneath them show their purpose.
Resolution
The resolution is the smallest weight change that can be
displayed at a particular time (also known as a division), for
example 0.5kg or 1.0kg division size.
The division size close to zero (base resolution) depends on the
Loadbars fitted. (See your TRU-TEST Loadbars Manual.)
The division size automatically changes at particular weight
limits to reflect the accuracy of the scale. (See Autoranging on
page 81.)
Switching On
1. If there is no internal battery, connect the 12 volt supply,
red lead to the positive terminal, black to negative.
2. Press , display shows:

Operation
10
Message showing that this is not a
Weights and Measures approved
version for trade use:
The scale zeroes itself automatically
(if Power Up Zero is On, see page
16).
Current weight:
If there is no Loadbar connected:
Weighing
Normally the display shows the current live weight on the
platform (Live Mode). The reading is called Live because it
never locks up - when the weight changes, the reading changes.
•To return to Live Mode at any time, press .
To weigh an animal:
1. Make sure the Indicator is displaying zero. If not, refer
to Zeroing on page 16. (If the display shows a negative
number and the Tare (Net) pointer is On, then a Tare has
been entered, see Taring on page 19.)
2. Move the animal onto the platform or crate, making sure
it does not lean on any other structure.
3. Wait for the Stable pointer to come On which shows that
the scale has settled and the reading is reliable.
4. Read the weight displayed.

Operation
11
Switching Off
1. Press .
2. Disconnect the external power supply if required.
Automatic Power Off
The Indicator automatically switches Off after 30 minutes if no
change in weight or key press is detected. This conserves
battery life when the scale is not being used.
Automatic Power Off can be disabled if required. Contact your
TRU-TEST Service Centre for details.
Changing Units of Measurement
Weights can be displayed in kilograms or pounds.
The kg and lb display pointers show which units are being
displayed.
•To change the units, see Setup Mode on page 12.
Weights And Measures Versions
•Units selection may be disabled.
(See Weights And Measures Versions on page 85.)

Setup Mode
12
Setup Mode
Setup Mode
Setup Mode allows you to change various parameters and
options which affect the operation of the Indicator, for example,
the units of measurement or the print option.
You can also display the battery voltage and the model number
of the Indicator.
To enter Setup Mode, press .
The first setup option is displayed for
2 seconds.
Then the current setting is displayed.
To change, press or .
To save the new value and move on to the next setup option,
press .
You can press at any stage to save the displayed value
and return to live mode.
After the last setup option, the Indicator automatically returns to
the first setup option.
The options available are as follows:

Setup Mode
13
Print (Report) Options
Tag / ID Report.
Cull Report.
See Printing Reports on page 40.
Diagnostic Information
Battery voltage.
See Battery Charging on page 59.
Model, language and software.
For detailed information see Service
on page 70.
Fleece (Fine Weight) Mode
Fleece (Fine Weight) Mode On.
(Also Off option.)
See Fleece (Fine Weight) Mode on
page 21.
Power Up Zero
Power Up Zero On. (Also Off
option.)
See Power Up Zero on page 16.

Setup Mode
14
Auto Zero
Auto Zero On. (Also Off option.)
See Auto Zero on page 16.
Group Mode
Group Mode On. (Also Off option.)
See Group Mode on page 43.
Turbo mode
Turbo setting 1 per cent (default
setting).
Available options are 0.5%, 1%, and 2%.
See Turbo Mode on page 27.
Resolution
Resolution 0.5.
See Resolution on page 22.
Table of contents
Other Tru-Test Test Equipment manuals


Popular Test Equipment manuals by other brands


Klein Tools
Klein Tools ET40 instructions

Maddox
Maddox MH20B-1 Owner's manual & safety instructions

ULTIMATE SPEED
ULTIMATE SPEED UAWSB 2 B1 Operation and safety notes

Extech Instruments
Extech Instruments RT30 user guide

Tintometer
Tintometer Lovibond TB 350 quick start guide

ModelCraft
ModelCraft 19 01 51 operating instructions


