UniPix ATMOS User manual

ATMOS Operation Manual page 2/24
Imprint
Information in this document is subject to change without notice. No part of this document may be reproduced
or transmitted without the express written permission of UniPix GmbH.
While every precaution has been taken in the preparation of this document, the publisher and the author
assume no responsibility for errors or missions, or for damages resulting from the use of information contained
in this document or from the use of programs and source code that may accompany it.
In no event shall the publisher and the author be liable for any loss of profit or any other commercial damage
caused or alleged to have been caused directly or indirectly by this document.
© 2023 UniPix GmbH. All rights reserved.
Printed: 02.08.2023
UniPix GmbH
Bei den Pferdeställen 3
72072 Tübingen
Germany
Phone +49-7071-777 2818
sales@unipix-atmos.com
www.unipix-atmos.com

ATMOS Operation Manual page 3/24
Contents
Imprint .................................................................................................................................................................. 2
Contents ............................................................................................................................................................... 3
General Information............................................................................................................................................. 5
About ATMOS................................................................................................................................................... 5
Using ATMOS........................................................................................................................................................ 6
Turning on ATMOS ........................................................................................................................................... 6
ATMOS Functions ................................................................................................................................................. 7
Accuracy Function ............................................................................................................................................ 7
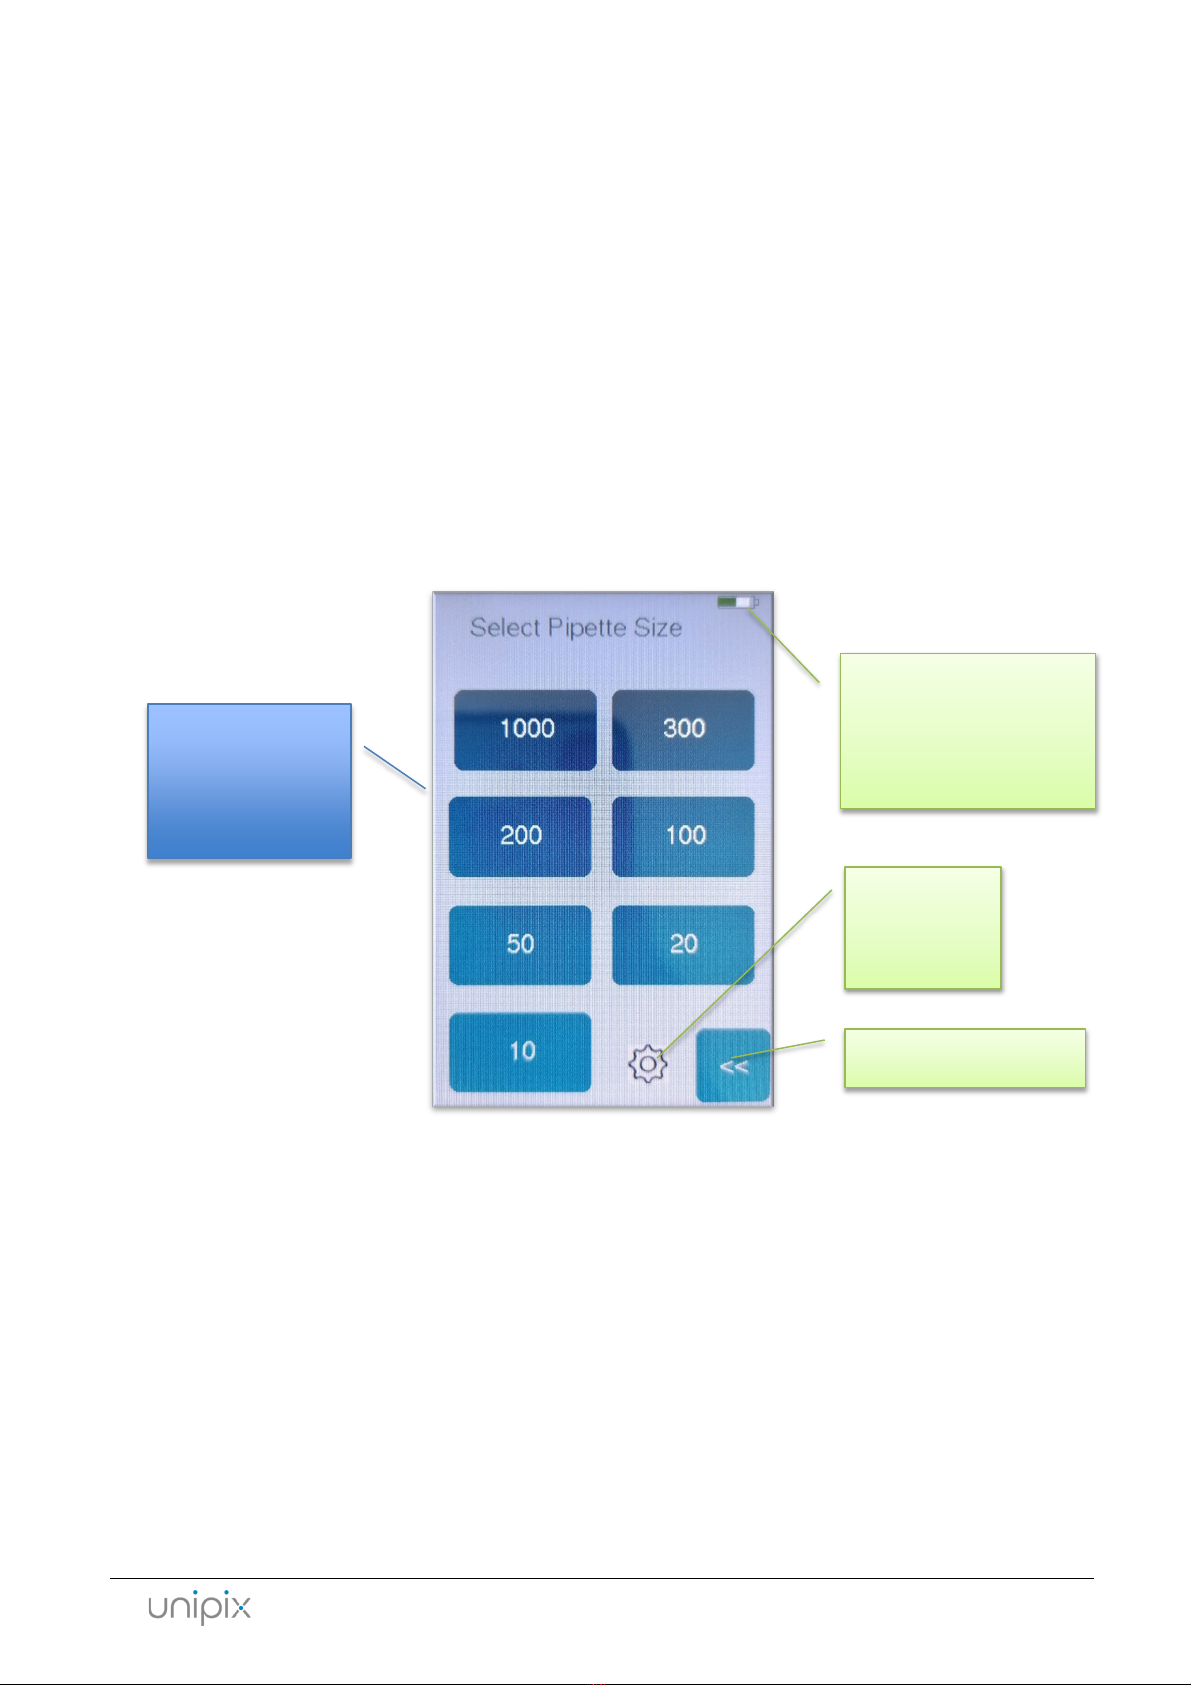
Pipette Size Selection Screen....................................................................................................................... 7
Measurement screen................................................................................................................................... 7
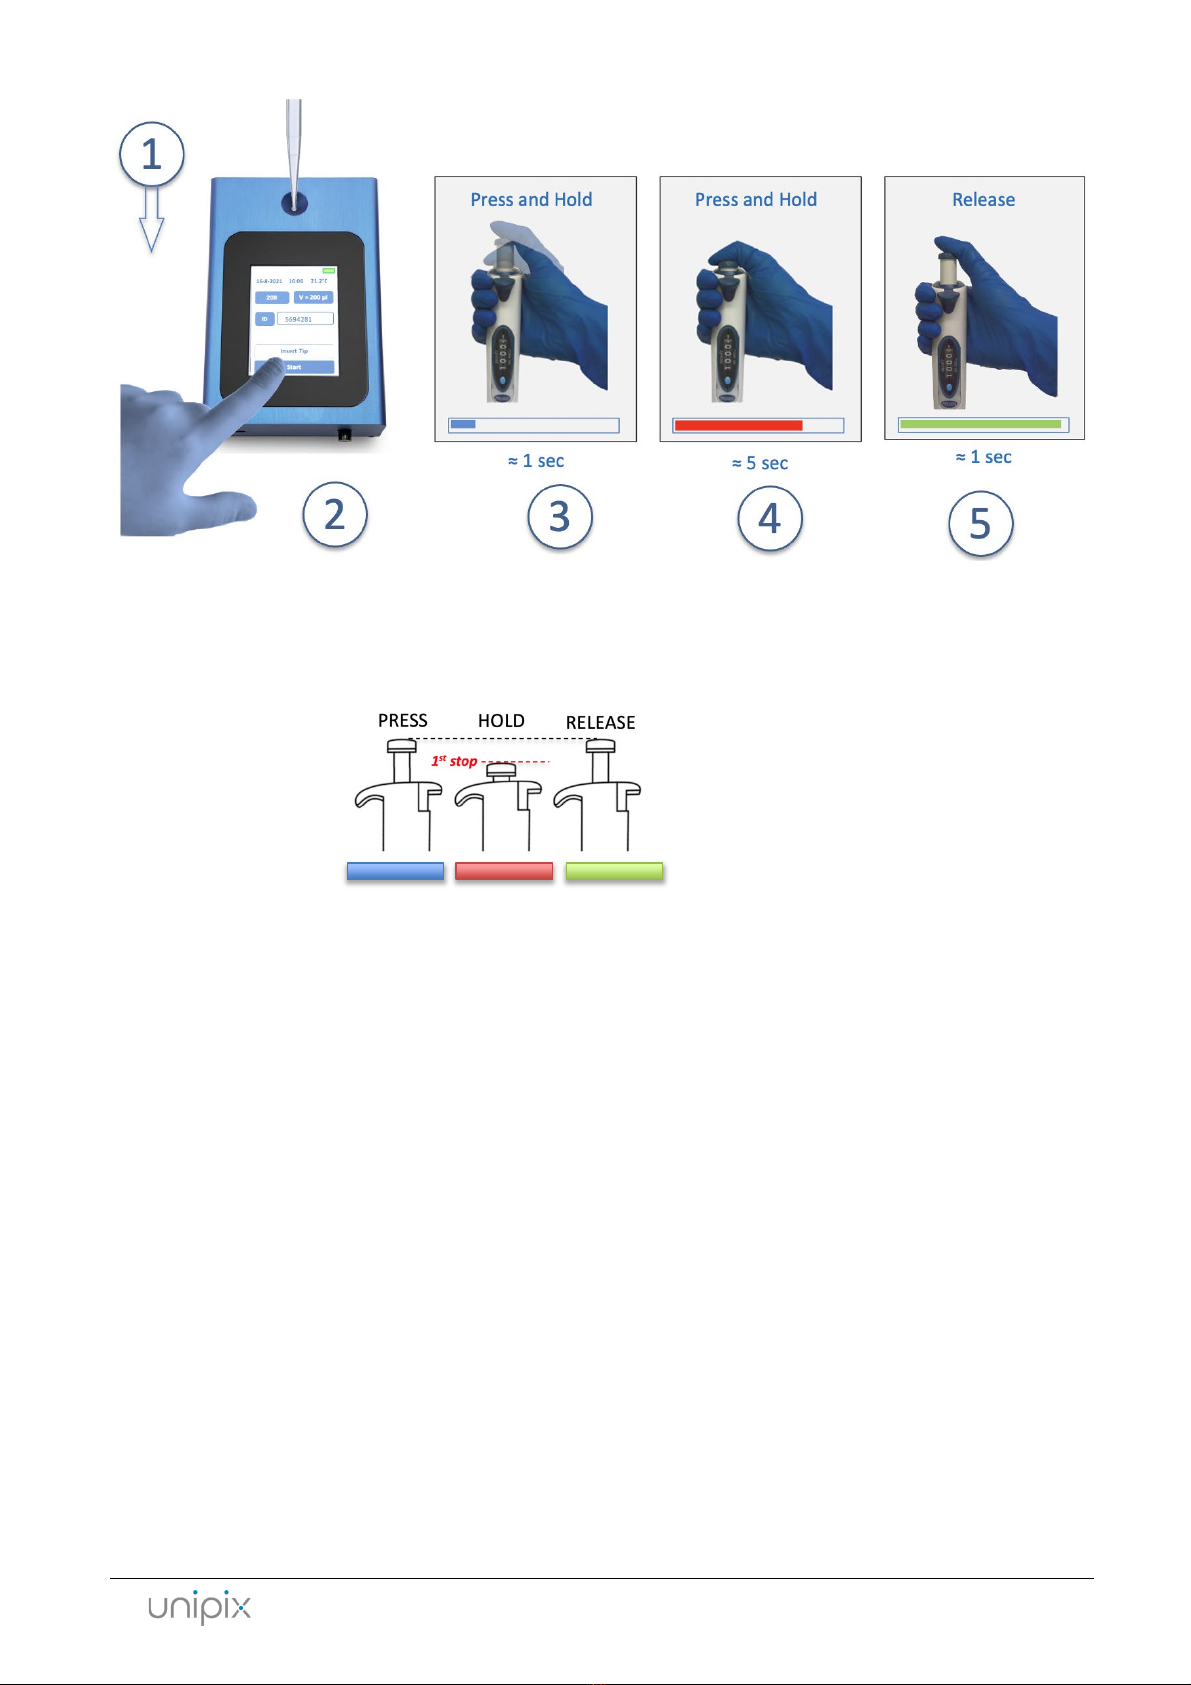
Measurement Procedure............................................................................................................................. 8
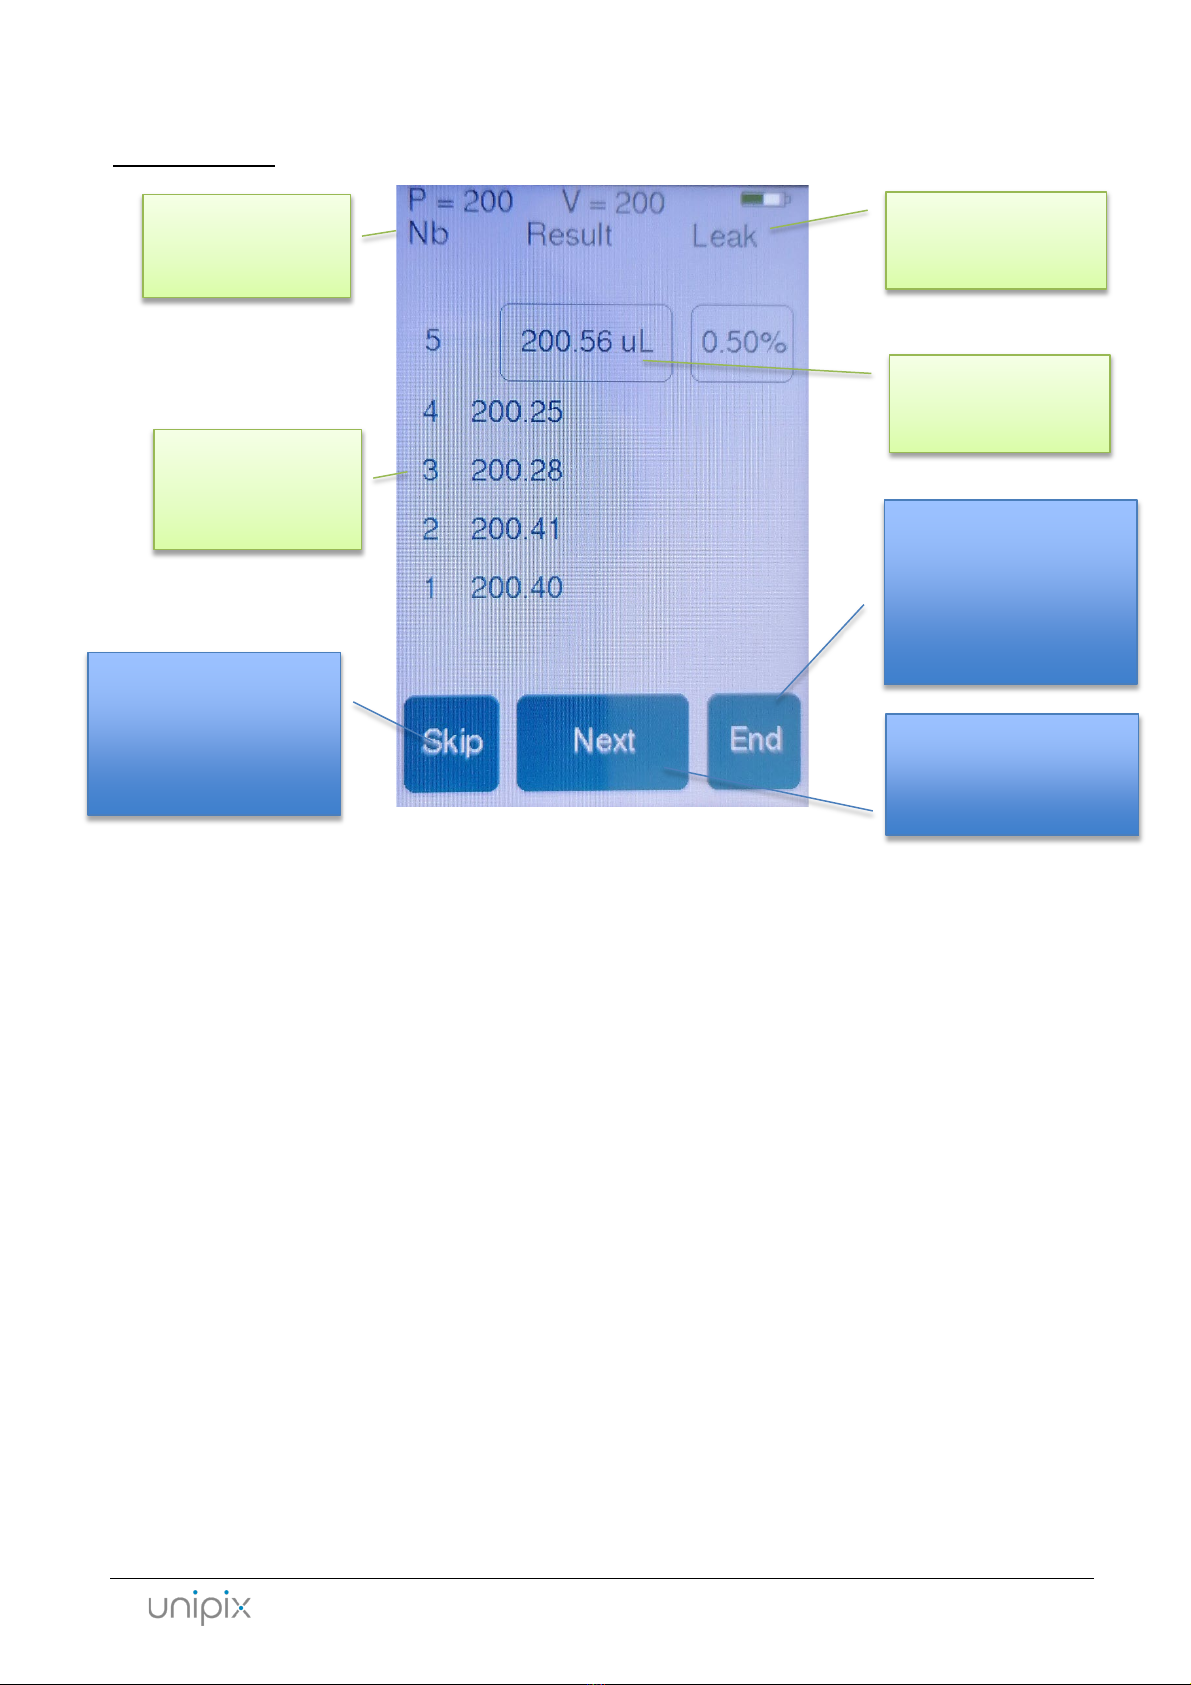
Results Screen............................................................................................................................................ 10
Statistics Screen ......................................................................................................................................... 11
Molarity Function........................................................................................................................................... 12
Dilution Function............................................................................................................................................ 13
Serial Dilution Function.................................................................................................................................. 14
Calculator Function ........................................................................................................................................ 15
Settings Screen............................................................................................................................................... 16
“ReadATMOS” program...................................................................................................................................... 19
Firmware V2023-V3.0 and above................................................................................................................... 19
All other firmware versions............................................................................................................................ 20
ATMOS Technical Specifications......................................................................................................................... 22
Technical Specifications ................................................................................................................................. 22
Troubleshooting ................................................................................................................................................. 23
Further Information............................................................................................................................................ 24
Warranty ........................................................................................................................................................ 24
Disposal .......................................................................................................................................................... 24

ATMOS Operation Manual page 4/24
Disclaimer
•The Pipette Accuracy Tester ATMOS is designed for the specific use of testing and calibrating air displacement
laboratory pipettes and no other use is recommended.
•The user must read and understand this manual before operation.
•This instrument should only be used in a laboratory environment.
•Do not open or attempt to repair the instrument without expressed and explicit instructions from UniPix.
•Do not use the instrument in an atmosphere with a danger of explosion.
•Do not allow unauthorized and/or untrained operators to use this device.
•Do not recharge the instrument in a liquid or humid environment.
•Any misuse will be the sole responsibility of the user/owner and UniPix assumes no implied or inferred liability
for direct or consequential damages from this instrument if it is operated or used in any way other than for
which it was designed.

ATMOS Operation Manual page 5/24
General Information
About ATMOS
The UniPix ATMOS Pipette Accuracy Tester is an instrument for precise measurement of air displacement pipettes,
without need of liquid. It is based on comparison with a calibrated internal reference cavity in the instrument. It
also measures the leak rate of pipettes.
Never use the instrument with liquid in the pipette tip.
This will permanently damage the instrument (no repair is possible)!
Allow the internal temperature to stabilize during at least 30 minutes after
unpacking or moving the instrument from another room.
•It is recommended to verify that the instrument battery is well charged or to use the instrument with the
external power supply connected via the USB cable.
•The instrument is powered by an internal Lithium-Polymer battery which allows continuous operation for
more than 3 hours and several weeks with short daily testing sessions.

ATMOS Operation Manual page 6/24
Using ATMOS
Turning on ATMOS
•Press the main switch on the front of the instrument to power on.
•After powering on, the instrument runs a self-test procedure for about 10 seconds.
•The home screen then shows all available functions:
oAccuracy: Precise measurement of air displacement pipettes,
in absence of liquid.
oMolarity: Calculator for molar concentration for your
customizable values.
oDilution: Calculator for dilution of your solution.
oSerial dilution: Calculator for serial dilution by pre-defined or
customized factors.
oCalculator: Standard calculator.
oSettings (gear symbol): See/change basic settings like
version/serial number, date/time.
•Select the function you want to use by touching the respective button on the screen. For detailed
description on each function, please see below.
•When not operated, the instrument automatically turns OFF after 5 minutes.
•To shut down manually, press the main switch on the front of the instrument.

ATMOS Operation Manual page 7/24
ATMOS Functions
The ATMOS device offers various functions for daily laboratory work.
Apart from the pipette accuracy measurement, it can also support the user with molarity/dilution/serial
dilution calculations and offers a standard calculator.
All functions are described below.
Accuracy Function
The accuracy function will measure the accuracy of your pipette.
Click the button “Accuracy” on the main screen.
Pipette Size Selection Screen
Select the pipette size you are testing:
Measurement screen
After pipette selection or after measurements, you will see the measurement screen.
Select the nominal
volume of the
pipette
Battery status (it is
recommended to keep
ATMOS in charge when
not in use)
Go to settings
screen
Return to main screen

ATMOS Operation Manual page 8/24
From this screen, you can reach the following functions:
•The Start button will initiate the measurement procedure. Please insert the tip (WITHOUT LIQUID) and be
ready to actuate the piston BEFORE touching the button.
•The Pipette size button allows you to select a new pipette model. It will bring you back to the selection
screen.
•The Pipette ID button allows you to enter a numeric ID that will be stored with the measured data.
•The Volume button allows the selection of sub-volumes of the pipette in the case of variable volume
pipettes.
Measurement Procedure
1. Insert the pipette tip firmly in the center port. Hold the pipette vertically and steady.
NO LIQUID IN THE PIPETTE TIP! (liquid will permanently damage the instrument)
2. Press the Start button, without moving the pipette.
Start the
measurement
(insert tip BEFORE
pressing “Start”)
Selected volume (for
variable volume
pipettes)
Pipette nominal
volume. Click to change
volume and return to
previous screen.
Date & time (touching on
date & time line will bring
you to the settings screen)
Pipette ID (touch inside
the frame to set a new
pipette ID)

ATMOS Operation Manual page 9/24
3. Push the piston to the first stop, while firmly keeping the tip inserted in the port. Movement should be done
during the BLUE phase of progress bar.
4. The progress bar at the bottom indicates that the instrument is measuring. The pipette and the piston should
be kept steady when the progress bar is RED.
5. Release the piston, when the progress bar is GREEN.

ATMOS Operation Manual page 10/24
Results Screen
1-channel version
The result screen shows the following data:
Nb: Measurement number. Up to 10 measurements can be shown.
RESULT: Measured volume displacement of each measurement.
Leak rate:Expressed in volume loss per second. A leak above 0.5%/sec of test volume indicates a leaky pipette, or
leaky tip connection (or a bad insertion of the tip into ATMOS port).
The following actions are possible:
SKIP: This will remove the current measurement. It will not be stored in the memory.
NEXT: This will start the next measurement. The current measurement will be stored in the memory.
END: This will stop the series and display statistics (possible only after 3 measurements). Usually, 3 measurements
are enough to get a good estimate of pipette performance.
Leak rate (in volume
loss per second)
Measurement
number
End: Stop the series
(current data will be
stored. Average value
and STDEV will be
displayed)
Next: Start the next
measurement (current
data will be stored)
Skip: This will remove
the current
measurement (data will
not be stored)
Measured volume
displacement
List of previous
measurements
(up to 10 values)

ATMOS Operation Manual page 11/24
The reasons for bad results can be:
•Bad insertion of the tip into the port.
•User not following instructions during the calibration process.
•A totally non-functional pipette.
•A very leaky pipette or tip connection.
Statistics Screen
1-channel version
This screen is shown after clicking the “END” button after min. 3 measurements.
It shows:
•Current date, time, and ambient temperature
•Information on the pipette (P and volume) pre-defined by user
•ID: numeric ID pre-defined by user
•Average volume of the series of n measurements and standard deviation (STDEV) of the measurement
series
The New measurementsbutton will go back to the main screen and you can start a new series of measurements or
select another function of ATMOS (molarity, dilution, serial dilution or calculator).
Date, time and
ambient temperature
New measurements:
This will go to the main
screen to start a new
series (or choose
another function)
Standard deviation
(STDEV) of the
measurement series
Average of the series
of n measurements

ATMOS Operation Manual page 12/24
Molarity Function
This tool is designed to support you in calculating the molar concentration of your solution.
Click on the button “Molarity” on the main screen to start a calculation.
To enter the desired values, click in the field and type in your numbers (a number keyboard is displayed).
Please note: the “Enter” button is: <<.
The green frame indicates the value that is calculated. To move it (and change the value you want to calculate),
press the button “R” on the lower left side of the screen.
Measurement unit of any of the values can be adjusted by clicking on the respective unit (e.g. click on “mL” to
change to “µL”).
Weight of
compound
Molecular weight
Solution
concentration
Volume of final
solution
Return to main
screen
Move green
frame

ATMOS Operation Manual page 13/24
Dilution Function
The dilution function will support you in calculating the values for diluting a solution.
Click on the button “Dilution” on the main screen to start a calculation.
In the example on the screen above, you want to compute the required volume of your stock solution.
Click in the field you want to modify. A number keyboard opens, and you can insert your numbers.
Please note: the button << is “Enter”.
The green frame indicates the value that is calculated. To change the value you want to calculate, press the
button “R” on the lower left side of the display.
The button “AC” will reset all values.
The button “<<” returns to main screen.
You can change the measurement unit of all 4 values by clicking on the unit (e.g. click on “mL” to change to
“µL”).
Concentration of
stock solution
Stock solution Volume of stock
solution
Target solution
Concentration of
target solution
Volume of target
solution
Return to main
screen
Move green
frame
Reset all

ATMOS Operation Manual page 14/24
Serial Dilution Function
This function is designed to simplify the preparation of a serial dilution.
Click on the button “Serial Dilution” on the main screen to start a calculation.
The serial dilution calculator helps you calculate up to 6 concentrations.
The left, pink column shows the dilution factors. On the right, you see the volumes of compound + solvent.
The default final volume is 1500µL. To change this value, click in the number (“1500”). A number keyboard
opens and you can insert your custom volume.
Please note: the button << is “Enter”.
The default calculation is a dilution by 3. By clicking on the pink button on the bottom of the display, you can
select other default factors (by 10 or by 2). If you want to use customized values, click on the pink numbers in
the left column. A number keyboard will show up and you can overwrite the default values.
The button “AC” will reset all values.
You can change the measurement units by clicking on the unit (e.g. click on “mL” to change to “µL”).
Factors of dilution
series
Volume of final
volume
Go back to main
screen
Reset all values
Select other default
values for factors
(by 10, by 2)
Volume of solvent
Volume of
compound

ATMOS Operation Manual page 15/24
Calculator Function
The calculator function offers a standard calculator.
Click on the button “Calculator” on the main screen to start the tool.
A standard numbers keyboard shows up and you can calculate:
/ Divide
X Multiply
- Subtract
+ Add
= Result
The button “AC” resets all values.
The button “<<” returns to the main screen.
Reset all
Return to main
screen
Divide
Multiply
Subtract
Add
Result

ATMOS Operation Manual page 16/24
Settings Screen
The Settings screen can be reached by touching the gear symbol on the lower right corner of the main screen.
Date
To change the date, click on the button “Date”. You will be asked to type in the date in the following order:
1. Year
2. Month
3. Day
Please note: Each value has to be entered with 2 digits (YY MM DD). There is no need to confirm the values. Typing
the second digit will automatically confirm your input.
Time
To change the time, click on the button “Time”. You will be asked to type in the time in the following order:
1. Hour
2. Minute
Please note: ATMOS runs on 24h. Each value has to be entered with 2 digits (hh mm). There is no need to confirm
the values. Typing the second digit will automatically confirm your input.
Info
Clicking on the button “Info” will give you information on your instrument.
Firmware
Serial Number
VRef & VInt Calibration values (pre-defined by UniPix)
Click to change time
Click to change date
Pressure test
Information on the
instrument
Go back to main
screen

ATMOS Operation Manual page 17/24
Test
To perform a self test of the instrument, please click on the button “Test”.
You will see the following screen:
P= measured pressure
Pref= reference pressure
T1: temperature on sensor 1
T2: temperature on sendor 2
The values of P and Pref should be similar.
Now insert a tip and press the piston to the first stop. The measured pressure will increase.

ATMOS Operation Manual page 18/24
Press the button “Open Valve”. You will hear a click.
Both pressure values will approach each other again. They should be very similar. If this is the case, the self
test of the device was successful and it runs correctly.
If the values differ, please run the test again, maybe with a different pipette.
If the test is still unsuccessful, please contact UniPix or your local sales person.

ATMOS Operation Manual page 19/24
“ReadATMOS” program
ReadATMOS is a program which allows downloading data from the ATMOS instrument via a USB cable.
Download the “ReadATMOS” program from the website https://www.unipix-atmos.com/atmos/downloads/ .
!! Make sure to download the correct version corresponding to the firmware of your device!!
The firmware version is shown on the starting screen in the lower left corner when the ATMOS device is switched
on. It can also be found under “Info” (Gear symbol on the main screen, then “Info”).
Firmware V2023-V3.0 and above
Verify that your ATMOS device is connected to the computer and turned on. Then start “ReadATMOS” (V3.0) on
your computer. The following window appears.
Click the “Read ATMOS” button.
A new window will show up and you will be asked for a name and location for your Excel file. Please select the
storage location and enter a file name. Then click “Save”.
After pushing the “Save”.button, the “ReadATMOS”.program will download data from ATMOS. The blue bar
shows the progress.
When the download is finished, you can quit the program and open the Excel sheet.
Data will be presented like the following example:

ATMOS Operation Manual page 20/24
All other firmware versions
Verify that your ATMOS device is connected to the computer and turned on. Then start “ReadATMOS” on your
computer. The following window appears.
First click the button “update ports” to identify the port connected to ATMOS.
Select the appropriate COM port. Usually it is the top one in the column.
Then click “Read ATMOS” button.
Other manuals for ATMOS
1
Table of contents
Other UniPix Test Equipment manuals
Popular Test Equipment manuals by other brands

Wetekom
Wetekom VT-603 instruction manual

Steril-Aire
Steril-Aire Enhanced UVC Kit Installation and operation instructions

Cadex
Cadex BatteryStore C5100B quick start guide

METREL
METREL AutoPAT MI 2143 instruction manual

EXFO
EXFO Optical Explorer OX1 Important information

palintest
palintest DigiPAsS Operation manual