Tru-Test 700 User manual

WID70008 Model 700 User Manual Revision 1
Tru-Test Model 700
User Manual

©1997 TRU-TEST Limited
No part of this document may be photocopied or reproduced
without the prior written consent of TRU-TEST Limited.

Contents
Contents
About This Manual...................................................1
System Overview.......................................................3
Installation.................................................................6
Calibration..............................................................8
Operation...................................................................9
Safety .....................................................................9
Keypad.................................................................10
Display.................................................................10
Switching On........................................................11
Weighing..............................................................11
Switching Off.......................................................12
Automatic Power Off...........................................12
Changing Units of Measurement .........................13
Zeroing.....................................................................14
Power Up Zero.....................................................14
Automatic Zero....................................................14
Manual Zero.........................................................15
Recording Statistics.................................................16
Viewing Statistics ................................................17
Clearing Statistics ................................................18
Fleece (Fine Weight) Mode.....................................19
Quick Reference Section.........................................20
i

Contents
Keys .....................................................................20
Display Pointers...................................................22
Display Messages.................................................23
Care and Maintenance............................................26
Internal Battery ....................................................27
Internal Battery Charging.....................................28
Troubleshooting.......................................................30
Service Centres ....................................................36
Technical Information ............................................38
Autoranging .........................................................38
USA Model Indicators ............................................39
FCC Warning.......................................................39
Model 700 Specifications ........................................40
Index.........................................................................43
ii

About This Manual
About This Manual
About This Manual
This manual tells you how to operate the TRU-TEST Model 700
Indicator - the keyboard and display unit for the TRU-TEST 700
Series agricultural weighing system.
Models 701, 702 and 703 are more advanced Indicators which
are described in separate manuals.
Operation of the Indicator is described in the main text of this
manual. Complete lists of keys, display pointers and messages
are given in the Quick Reference Sections at the end.
If you are setting up the system for the first time, read the
Installation section in this manual, also read the TRU-TEST
Loadbars Manual for instructions on installing the Loadbars.
To gain the best possible performance from your Indicator and
especially if you have an internal battery installed, read the
Care And Maintenance section.
If problems arise, refer to Troubleshooting on page 30 before
contacting your TRU-TEST Service Centre.
In this manual, the term "Loadbar" is used to mean "Loadbar,
Suspension Cell or Produce Platform".
1

About This Manual
TRU-TEST Model 700
Agricultural Weighing System
2

System Overview
System Overview
System Overview
The TRU-TEST 700 Series is an advanced and versatile
agricultural weighing system. It has been designed with the
benefit of many years of animal weighing experience and is
used by farm management professionals and agricultural
scientists the world over.
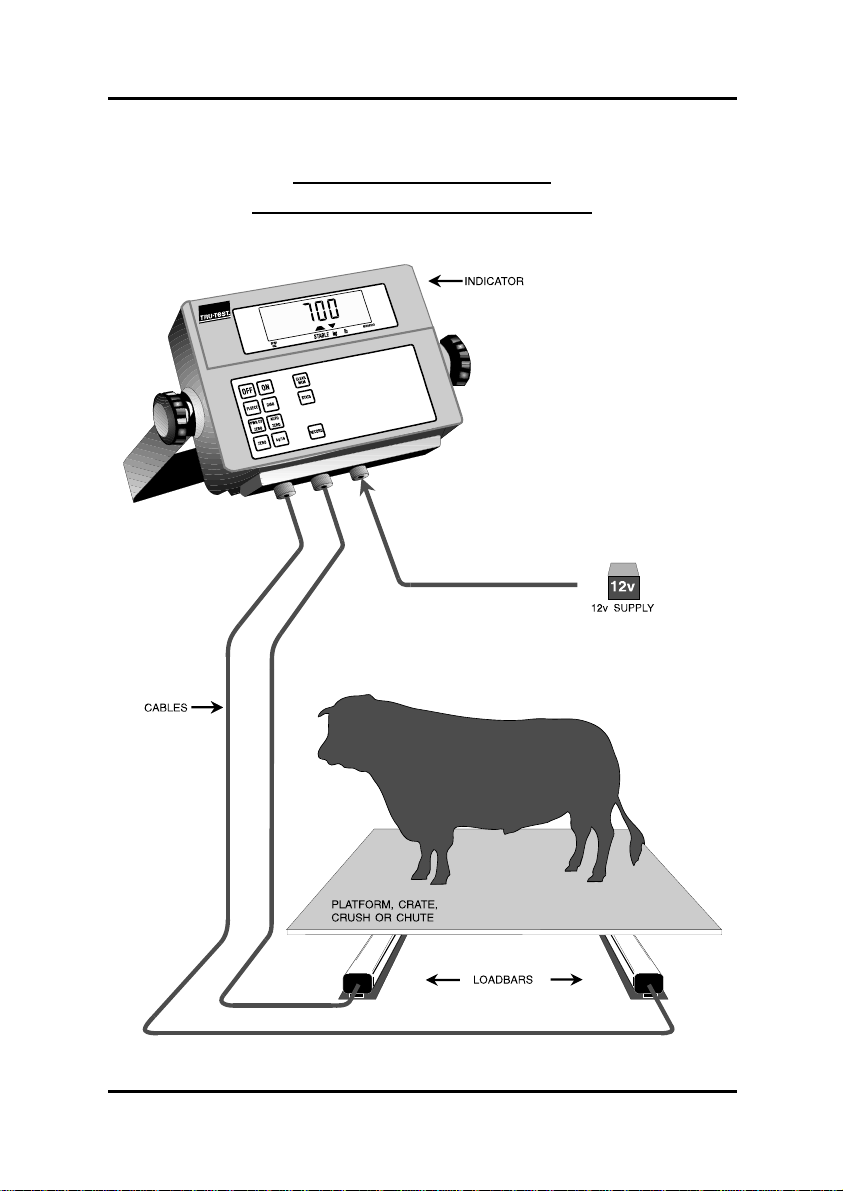
The system consists of a microprocessor controlled Indicator
(keyboard / display unit) and one or more Loadbars or
Suspension Cells. The Loadbars are fitted beneath a platform
or crate that holds the animal, and the weight is transmitted
from the Loadbars to the Indicator. The Indicator gives a
digital readout of the weight and, through the keypad, provides
control over the processing capabilities of the scale.
Weight statistics can be recorded for later analysis.
In the more advanced Models, 702 and 703, weight data is
recorded and retained in the Indicators memory and can be
output to a printer at any stage during or after weighing.
Comprehensive reports including weights, tag numbers,
condition codes and statistics can be printed. The data can be
directly transferred to a computer via a cable for permanent
storage and further analysis.
Calibration
On power up, the Indicator automatically identifies and
calibrates itself to the Loadbars connected to it. The latest
Indicators operate with the complete range of TRU-TEST
Loadbars, Suspension Cells or Produce Platforms. This is
known as Standard Calibration.
There is no need for the operator to calibrate the Indicator when
starting up or even when swapping from one set of TRU-TEST
Loadbars to another. Standard Calibration eliminates the need
for time consuming calibration using test weights.
3

System Overview
Applications using other manufacturers' Loadbars, which are
not pre-programmed, can be satisfied using Span Calibration
with known test weights.
Indicator Options
•An internal rechargeable battery is available which
allows the Indicator to be conveniently independent of
any external power supply.
•The two more advanced models (702 and 703) can be
connected to a TRU-TEST printer to print results, or to a
computer for storing and further processing data.
Reliability
•The TRU-TEST Indicator is a rugged and robust product
designed to withstand the environment associated with
livestock handling. The case is made from extremely
tough, ultraviolet - resistant polycarbonate. The
keyboard is completely sealed for all - weather operation.
•For livestock weighing, animal movement can sometimes
be a problem with a digital scale. The Indicator
eliminates this problem using SUPERDAMP©- a
sophisticated statistical damping technique.
•The large digital display is easy to read. Stabilisation of
the display is usually extremely fast - within seconds.
4

System Overview
Main Features
•LIVE Weighing Mode.
•Provides STATISTICS on recorded data.
•FLEECE (FINE WEIGHT) Mode for better precision at
low weights.
•ZERO controls.
•Span Calibration using known weights if required.
5

Installation
Installation
Installation
In general, this section needs to be read only when setting up
your system for the first time.
When you unpack your new Indicator, complete and post the
warranty card to ensure you receive the service you are entitled
to.
700 Series System
1. Unpack and install the Indicator mounting stirrup in a
convenient position. Ensure that it is located securely.
6

Installation
2. Install the Loadbars or Suspension Cells according to the
manual which comes with them (TRU-TEST Loadbars
Manual).
3. Run the Loadbar cables to the Indicator, making sure
they are protected from damage.
4. Unscrew the protection caps from the cable plugs and the
Indicator sockets marked CELL1 and CELL2. Insert
the plugs into the sockets and tighten the retaining collars
by hand only. The plugs can go into either socket.
Screw the protection caps together to keep out dirt and
moisture.
5. If an internal battery is installed, charge it by connecting
the Indicator to a good 12 volt DC source, either the
recommended power supply unit or a 12 volt car/bike
battery. Refer to Internal Battery Charging on page 28
for full details.
6. If no internal battery is installed, 12 volts must be
available where the Indicator is mounted. One of the
following options must be used:
•12 volt battery
Note: Red lead to positive terminal.
Black lead to negative terminal.
•Power Supply Unit
230 or 115 volts AC to 13.8 volts DC at 5 amps.
•AC adaptor
230 or 115 volts AC to 13.8 volts DC at 600mA.
Use only the power cable supplied by TRU-TEST. Plug
it in to the socket marked 12V DC on the Indicator and
tighten the retaining collar by hand only. The cable may
be permanently attached to the Indicator.
7

Installation
Calibration
The Indicator automatically identifies and calibrates itself to the
Loadbars connected to it. This is known as Standard
Calibration.
Span Calibration with known weights can also be carried out.
(See your TRU-TEST Service Centre).
8

Operation
Operation
Operation
Operating the TRU-TEST Model 700 is straightforward and
logical. Many functions are performed with a single key press.
Safety
To avoid damage, never load the scale further if the
overload message appears on the display.
9

Operation
Keypad
The Indicator comes ready to use with default options set in the
factory. However, you can use the keypad to set your own
preferred options, such as kilograms or pounds for the units of
measure. These options remain in memory until they are
changed, even when the Indicator is not connected to a power
supply.
A quick reference to all the keys is given on page 20.
Display
Normally the display shows the current live weight on the
platform.
When the Indicator is carrying out an operation, for example re-
setting zero, the display shows an appropriate message.
(If the weight is about half way between two values, it is normal
for the display to switch occasionally between the two, even
when the Stable pointer is on.)
Pointers
A row of triangular pointers at the bottom of the screen give
status information. The labels beneath them show their purpose.
Resolution
The resolution is the smallest weight change that can be
displayed at a particular time (also known as a division), for
example 0.5kg or 1.0kg division size.
The division size close to zero (base resolution) depends on the
Loadbars fitted. (See your TRU-TEST Loadbars Manual.)
The division size automatically changes at particular weight
limits to reflect the accuracy of the scale. (See Autoranging on
page 38.)
10

Operation
Switching On
1. If there is no internal battery, connect the 12 volt supply,
red lead to the positive terminal, black to negative.
2. Press . Display shows:
The scale zeroes itself automatically
(if Power Up Zero is On, see page
14)
Current weight:
Weighing
Normally the display shows the current live weight on the
platform. The reading is called Live because it never locks up -
when the weight changes, the reading changes.
To weigh an animal:
1. Make sure the Indicator is displaying zero. If not, refer
to Zeroing on page 14.
2. Clear existing memory data (if
required).
Press . Press again to confirm.
3. Move the animal onto the platform or crate, making sure
it doesn't lean on any other structure.
4. Wait for the Stable pointer to come on which shows that
the scale has settled and the reading is reliable.
11

Operation
5. Read the weight displayed.
6. If required, press to add the weight to the statistics.
See Recording Statistics on page 16.
7. Move the animal off the platform.
The indicator normally automatically zeroes itself ready
for the next animal (see Automatic Zero on page 14).
Switching Off
If the power supply is disconnected while the Indicator is
On, the statistics data in memory will be lost.
To switch off:
1. Press .
2. Disconnect the power supply if required.
Automatic Power Off
The TRU-TEST Model 700 automatically switches Off after
30 minutes if no change in weight or key press is detected. This
conserves battery life when the scale is not being used.
The data in memory is retained if the Indicator automatically
powers off.
Automatic Power Off can be disabled if required. Contact your
TRU-TEST Service Centre for details.
Changing Units of Measurement
Weights can be displayed in kilograms or pounds.
The kg and lb display pointers show which units are being
displayed.
12

Operation
•To change the units, press .
13

Zeroing
Zeroing
Zeroing
The TRU-TEST Model 700 has three methods of zeroing the
scale:
•Power Up Zero
•Automatic Zero
•Manual Zero
Power Up Zero
The scale normally zeroes itself on power up, ie. when it is
turned On. The weight of the platform or crate on the Loadbars
is zeroed. In some situations, it may be desirable to turn this
feature Off.
To change the Power Up Zero status (On or Off):
•Press .
The new setting is displayed for about 1 second.
A typical situation where Power Up Zero should be turned Off
is when wool bales are being filled and the scale has been
zeroed for the wool press.For the displayed weight after turn
On to be the same as when the Indicator was turned Off (eg.
overnight break or power failure), ensure Power Up Zero is set
to Off.
Automatic Zero
The TRU-TEST Model 700 normally re-zeroes when a load is
taken off.
This feature can be set to Off.
14

Zeroing
To change the Automatic Zero setting (On or Off):
•Press .
The new setting is displayed for about 1 second.
If Automatic Zeroing is On, Manual Zeroing is usually
unnecessary, unless the weight being zeroed is relatively large
and is outside the range for Automatic Zeroing (6 divisions
maximum). See Specifications on page 40.
If Power Up Zero is set to Off, Automatic Zero is locked Off.
In some situations this feature should be turned Off. For
example, when weighing animals in certain crates where
opening and closing the doors may cause the Indicator to zero
incorrectly.
Manual Zero
If Automatic Zeroing is Off, the scale should be manually
zeroed occasionally.
To manually zero the scale:
1. Remove load.
2. Press .
Waiting for a stable zero reading:
Zero weight is displayed when
the scale has settled.
See Troubleshooting on page 30 if "Zero OL" is displayed.
15

Recording Statistics
The TRU-TEST Model 700 has the ability to record and display
statistics during the weighing session.
Ensure that previous statistics are cleared before starting a
weighing session (see Clearing Statistics on page 18).
As each animal moves onto the platform:
1. Wait for the Stable pointer to
come on.
2. Press to add the weight
to the statistics.
To avoid accidental recording of the same animal twice, if you
press RECORD a second time before the current animal has left
the platform, the Indicator doesn't save the weight again but
displays "No Rec'd".
However, if you are weighing animals fairly fast, it can happen
that the indicator fails to sense the change of animal and
displays "No Rec'd". In this case, press RECORD again to
override the safety feature and record the current animal.
16
Table of contents
Other Tru-Test Test Equipment manuals
Popular Test Equipment manuals by other brands

Chauvin Arnoux
Chauvin Arnoux C.A 1510 quick start guide

Bosch
Bosch EPS 610 Original instructions

National Instruments
National Instruments NI PXI-5124 Getting started guide

DYNAPAR
DYNAPAR max jr speed 1 Technical manual

Extech Instruments
Extech Instruments CT70 user manual

YOKOGAWA
YOKOGAWA DL1735E user manual

Daewoo
Daewoo SCAN-200 Diagnostic manual

Steren
Steren BL-526-108 user manual

Monacor
Monacor img Stage Line STROBE-192 manual

R&S
R&S CMW-KM5 Series user manual

Keysight Technologies
Keysight Technologies E6640A Getting started guide

PCB Piezotronics
PCB Piezotronics 8159-0013A Installation and operating manual