True & Tidy STM-500 User manual

HEAVY DUTY STEAM MOP
STM-500
USE & CARE MANUAL
www.trueandtidy.com

TRUE & TIDY
One Year Limited Warranty
True & Tidy products are warranted for 1 year from the date of purchase if the appliance
is defective in materials or workmanship. True & Tidy will repair or replace (at our option)
your unit during this period. Any replacement product will carry the remaining warranty
of the original product.
True & Tidy is not liable for any incidental, misuse, negligence or failure to follow True &
Tidy’s Use & Care manual.
To obtain a repair or replacement under the terms of this warranty, contact customer
service for return authorization. After receiving authorization, carefully pack your unit
and return to the service center. Please enclose a note or letter explaining the issue
along with proof of purchase and $9.95 for shipping and handling. Please provide your
name, phone number, and complete address.
If you have any questions regarding this warranty, you may contact us through our
website: www.trueandtidy.com
Customers located outside of the continental US will be responsible for all international
shipping charges for your return or replacement.

IMPORTANT SAFEGUARDS
At True & Tidy, safe performance is our top
priority with any consumer product, so that you can use and trust our products
confidently. Please use and operate product with due care and attention placed
on the following operating instructions and precautions.
Carefully read all instructions before operating the steam mop for the first time.
This appliance is not intended for use by children or persons with physical, mental or
sensory capabilities, or lack of experience and knowledge without the supervision or
instruction concerning the use of the appliance by a person responsible for their
safety.
Ensure the steam mop is properly assembled before use.
Only use attachments or accessories provided and specified in this instruction
manual.
Do not place the appliance in the same spot for more than 10 seconds to avoid
damage from heavy heating.
Never use the appliance without the mop pad.
Allow the steam mop to cool down completely before storing.
Store the appliance indoors in a cool, dry place.
Do not touch the bottom of the appliance during operation.
Do not leave appliance unattended while it is in operation or connected.
Do not use steam mop if it shows visible signs of damage or if there is leaking.
Do not use the appliance if the power cord is damaged.
Do not tilt or turn the appliance over when in use. Only use on flat, horizontal
surfaces.
Do not fill the water tank with hot water or corrosive cleaning agents. Distilled or
filtered water is strongly recommended.
Only connect to 120V power outlet.
Do not use on any unsealed hard floor surfaces. Additionally, on surfaces that have
been treated with wax or some no-wax floors, the sheen may be removed by the
heat and steam action. It is always recommended to test an isolated area of the
surface to be cleaned before proceeding. We also recommend end that you check
the use and care instructions from the floor manufacturer.
Do not immerse the appliance, plug, or power cord in water to reduce the risk of
electric shock.

PARTS & ACCESSORIES
PARTS & ACCESSORIES
A Handle
B Handle Bar
C Main Body
D Steam Head
E Mop Pad
F Carpet Glider
A B C
D
E
F
COMPONENTS
1 Handle
2 Cord Hooks
3 Handle Bar
4 On/Off Power Button
5 Steam Control Knob
6 Water Tank Release Button
7 Water Tank
8 Water Tank Cap
9 Water Filter
10 Power cord
11 Steam Head Joint
Model: STM-500
Water Tank Capacity: 450 ml
Steam Ready Time: 30 seconds
Input Voltage: 120v
Output Power: 1500 Watts
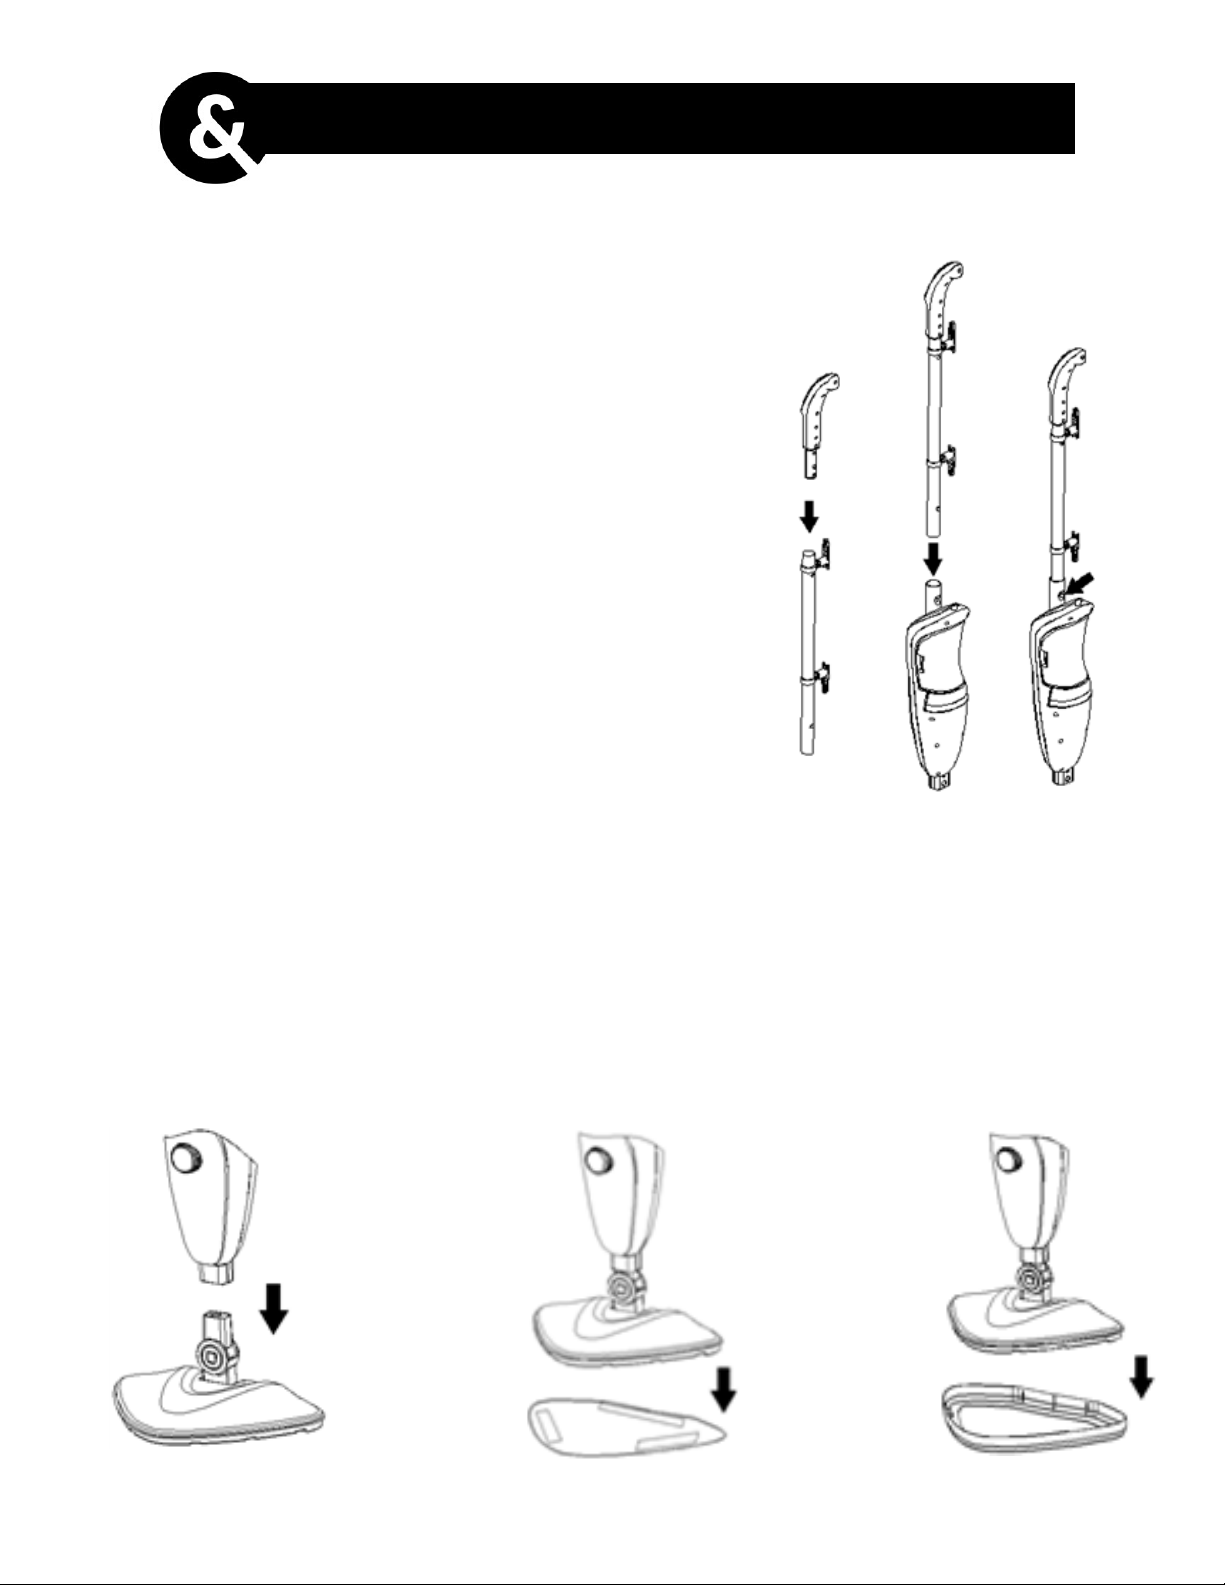
1. Attach the Handle to the Handle Bar:
Press down on the circle release button located on
the bottom of the handle and slide the handle in to
the handle bar until the release button locks into
place.
2. Attach the Handle Bar in to the Main Body:
Press down on the circle release button located on
the bottom of the handle bar and slide the handle
bar in to the main body until the release button locks
into place.
3. Make sure the release button is securely locked
into place.
ASSEMBLY INSTRUCTIONS
1 2 3
4. Attach the Steam Head:
Slide the bottom of the the main
body on to the steam head joint
until it locks into place.
5. Attach the microfiber
mop pad by lining up the
Velcro attachments &
triangular shape.
6. Line up the triangle
steam head with the carpet
glider and press the steam
mop in to the carpet glider.
USING YOUR STEAM MOP
1. Remove the
Water Tank
Press down on
the water tank
release button
and gently
remove the water
tank.
2. Open the water
tank by unscrewing
the water tank cap.
3. Fill the water tank with
water. Screw the water cap
back on and insert water tank
in to the body of the steam
mop.
FILLING THE WATER TANK
POWERING ON YOUR STEAM MOP
Plug in the appliance. Since this is a powerful 1500 watt appliance,
please make sure your outlet and circuit can handle the wattage.
Press the On/Off Power Button. The indicator lights will turn red, it
indicates preheating. If the lights does not illuminate, please check
the "troubleshooting" section for more details.
The appliance warm-up time is 25seconds. When steam mop is ready
to steam the indicator lights will turn blue.
Adjust the level of steam to your desired amount. Max is suggested
for heavy duty tile and carpet. Min is suggested for fabricated and/or
coated surfaces such as vinyl or laminate.
1.
2.
3.
4.

Make sure your steam mop is cooled down
before attempting to replace the filter.
Press the water tank button and remove the
water tank from main body.
Pull up firmly on the filter until it is released
from the main body.
Place the new filter securely in to the main
body of hte steam mop.
It is recommended that the water filter is
changed every 6 months
1.
2.
3.
4.
5.
The Microfiber mop pads are machine washable.
Wash with warm water and detergent of your choice.
Do not use fabric softener or bleach.
Lay flat to dry.
1.
2.
3.
4.
CARE & CLEANING
REPLACING THE WATER FILTER
CLEANING THE MICROFIBER MOP PADS
After each use, once the steam mop is cooled down, empty the water tank and clean the
external surface of the steam mop with a damp cloth.
Use the cord wrap to safely & securely wrap & store the power cord.
Remove the mop pad and wash it following the instructions below.
Store you steam mop in a dry area.
1.
2.
3.
4.
STORING YOUR STEAM MOP
You can find replacement parts, extra mop pads and water filters at
www.trueandtidy.com
IMPORTANT
:
Allow the steamer to fully cool down before
performing any care & cleaning
Prepare a solution of 1/3 white distilled vinegar and 2/3 tap water and add to the water
tank.
Plug in the cord and turn on the steam mop.
Let the steam mop produce steam until the vinegar/water solution runs out.
Repeat the above procedure as needed until a normal steam flow rate is achieved.
Fill the water tank with distilled water to clean.
Run the distilled water until it runs out.
DESCALING INSTRUCTIONS
1.
2.
3.
4.
5.
6.
WARNING
Do not leave the appliance unattended during the descaling process and/or while in use.
CARE & CLEANING
IMPORTANT
:
Allow the steamer to fully cool down before performing
any care, cleaning & troubleshooting
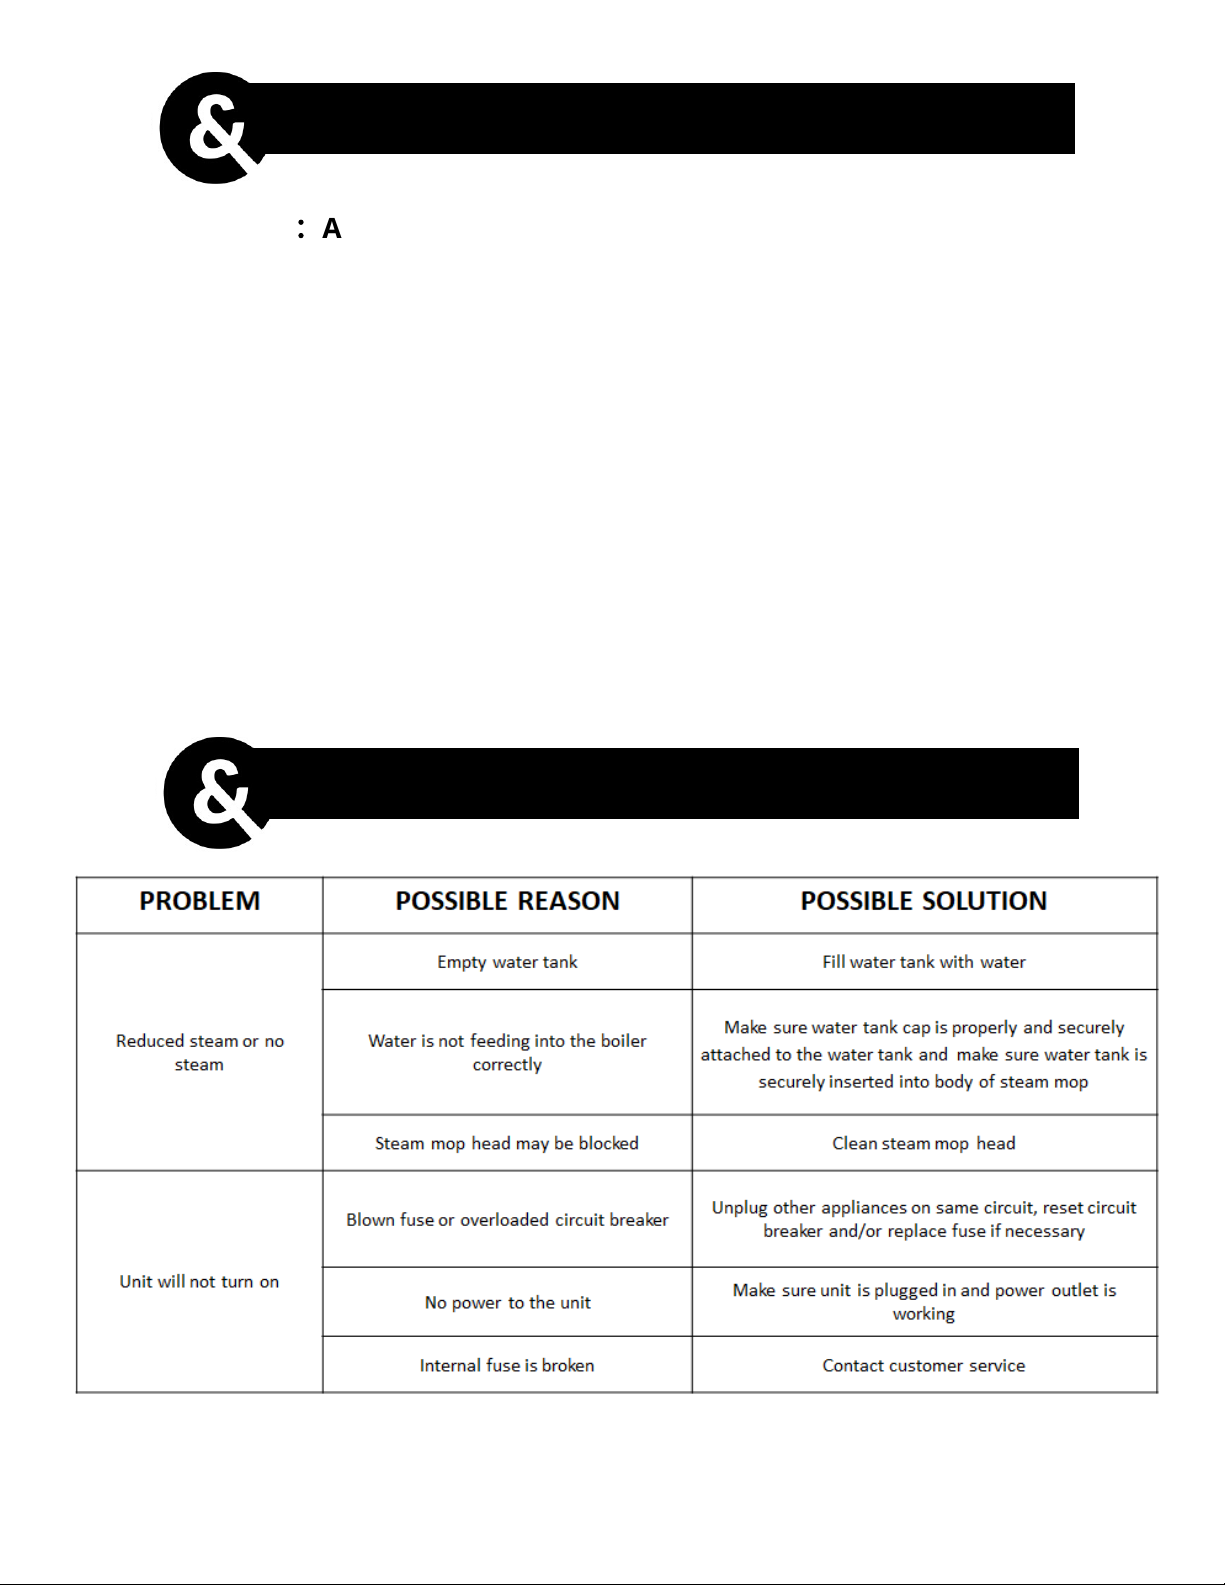
TROUBLESHOOTING
Visit www.trueandtidy.com for more troubleshooting, cleaning tips,
FAQ and customer service
Table of contents
Other True & Tidy Steam Cleaner manuals


