TrueCam A7 User manual

● 2304x1296@30FPS
● GPS Logger & Speed Camera Detector
● Lighting Keyboard
● CPL & UV Lens available
Car DVR with GPS Logger
& Speed Camera Detector
User manual


3
Product Picture & Function..........................................................................................2
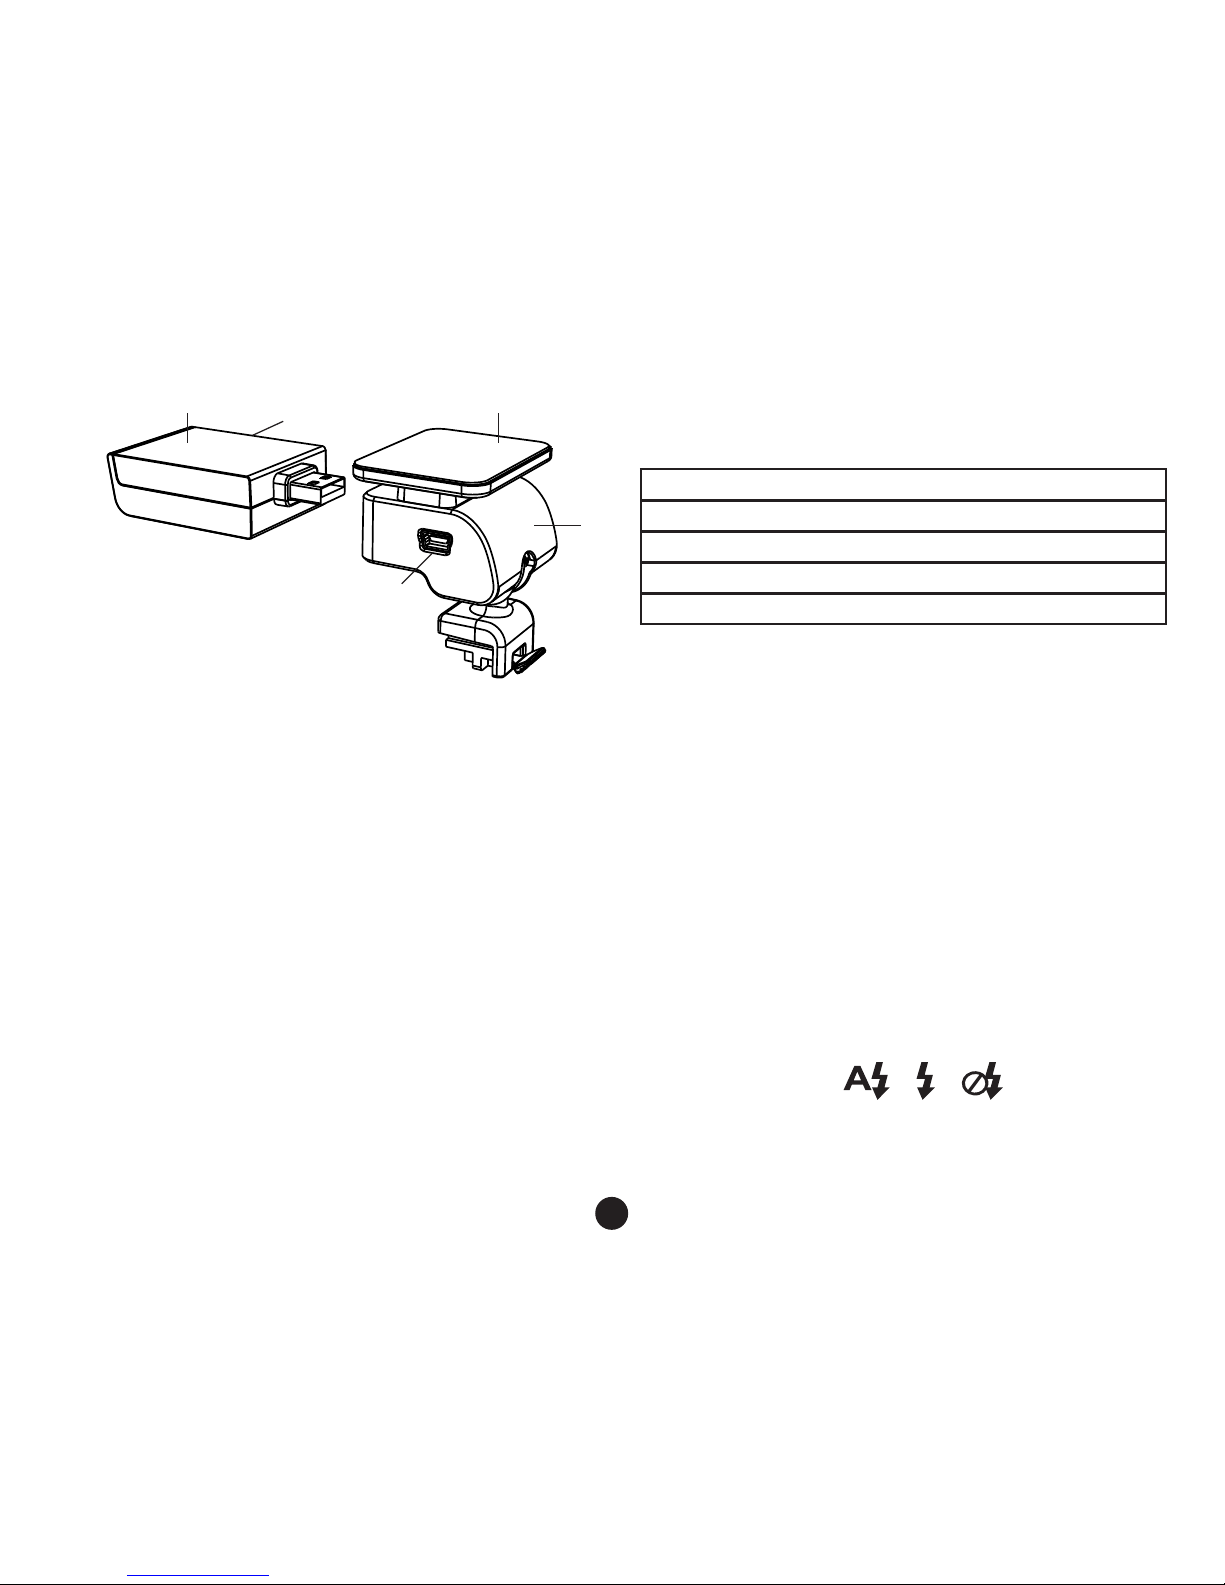
a) Device Introduction...................................................................................................................2
b) Button Function.........................................................................................................................3
c) LED Light Status List ...............................................................................................................5
d) Product Accessoris...................................................................................................................5
Basic Operation............................................................................................................5
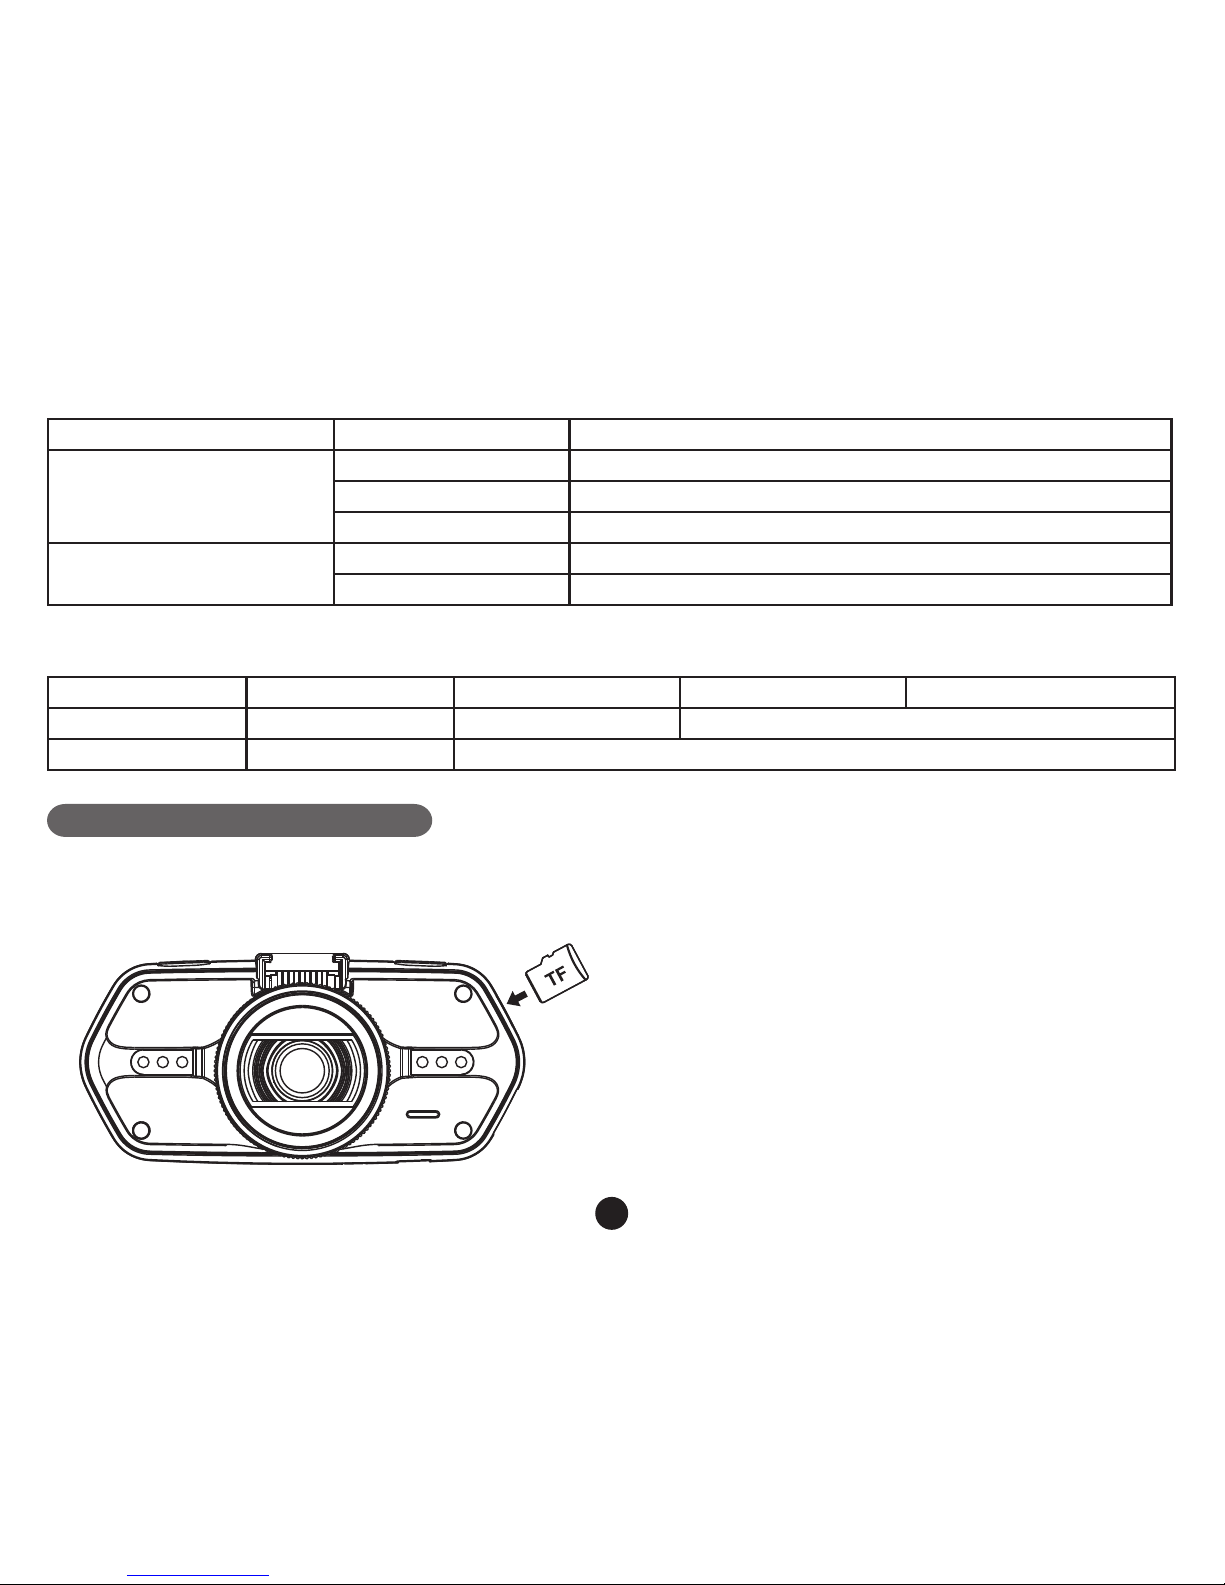
a) TF Card Installation...................................................................................................................5
b) GPS/Speed Camera Detector Installation................................................................................6
c) Power Supplied..........................................................................................................................6
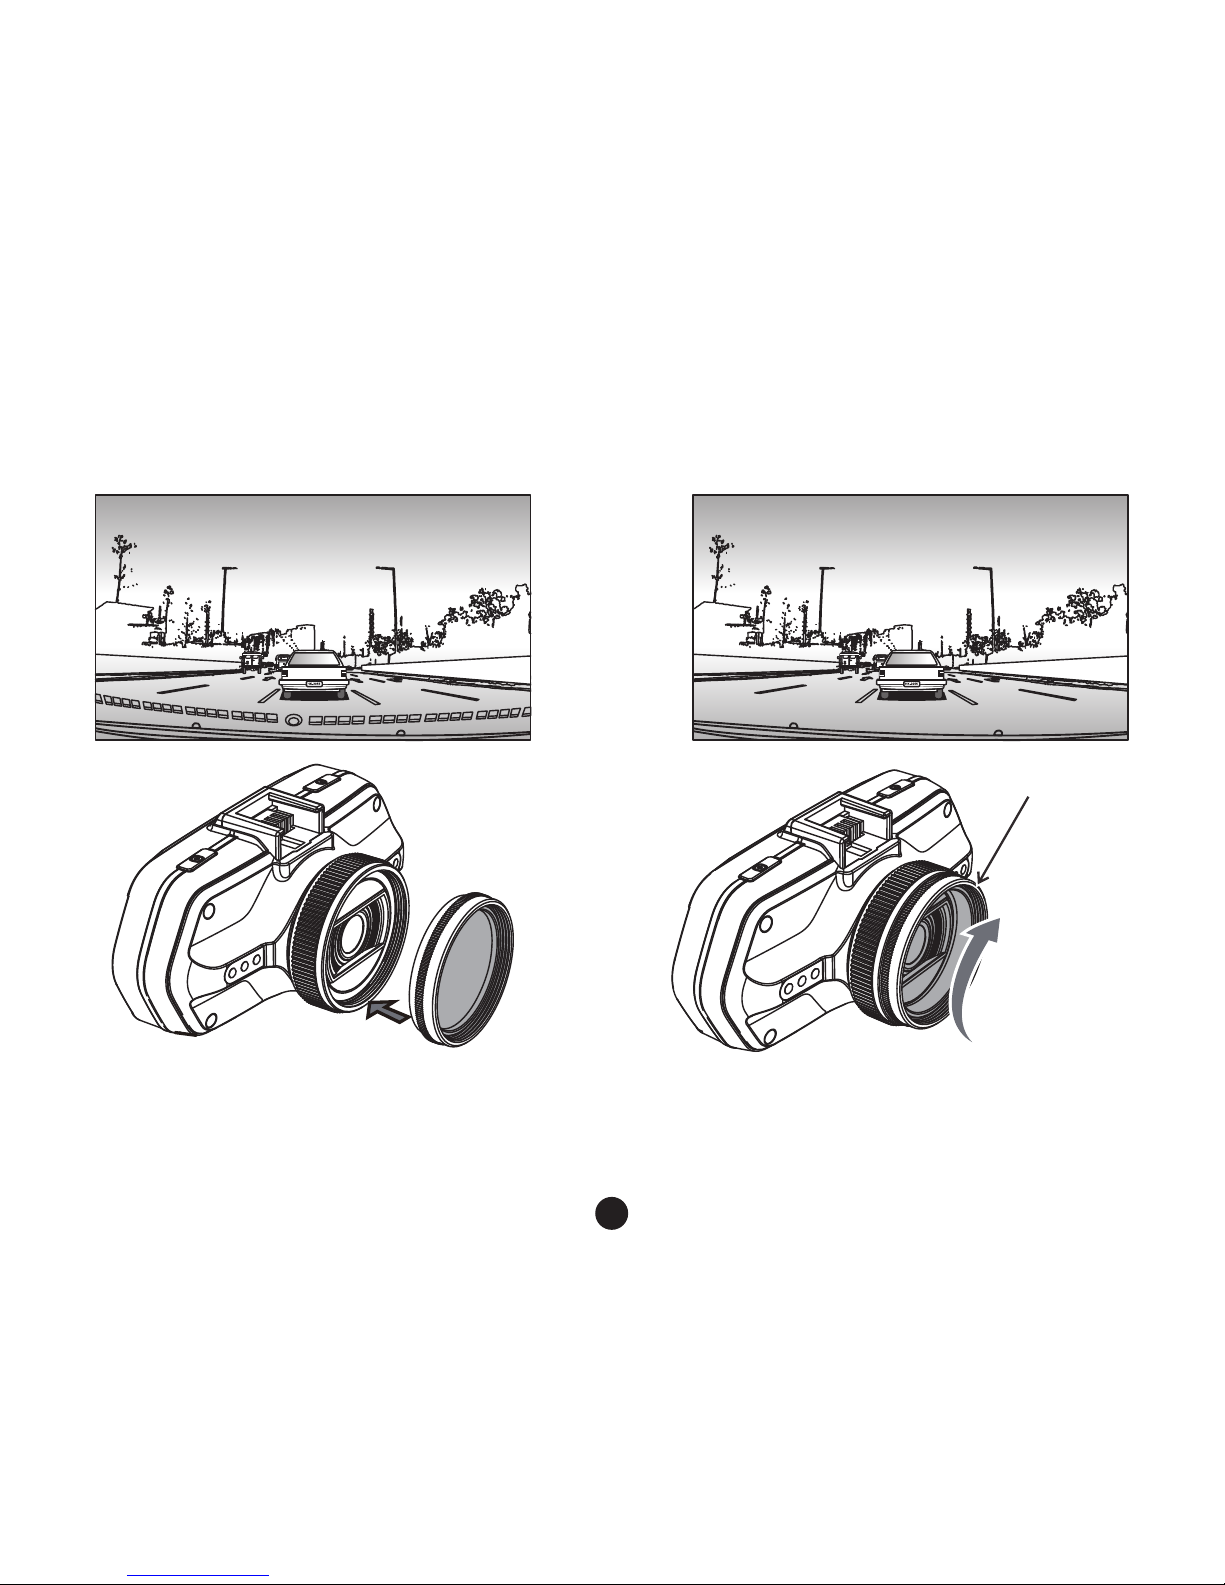
d) CPL Installation (Optional).........................................................................................................7
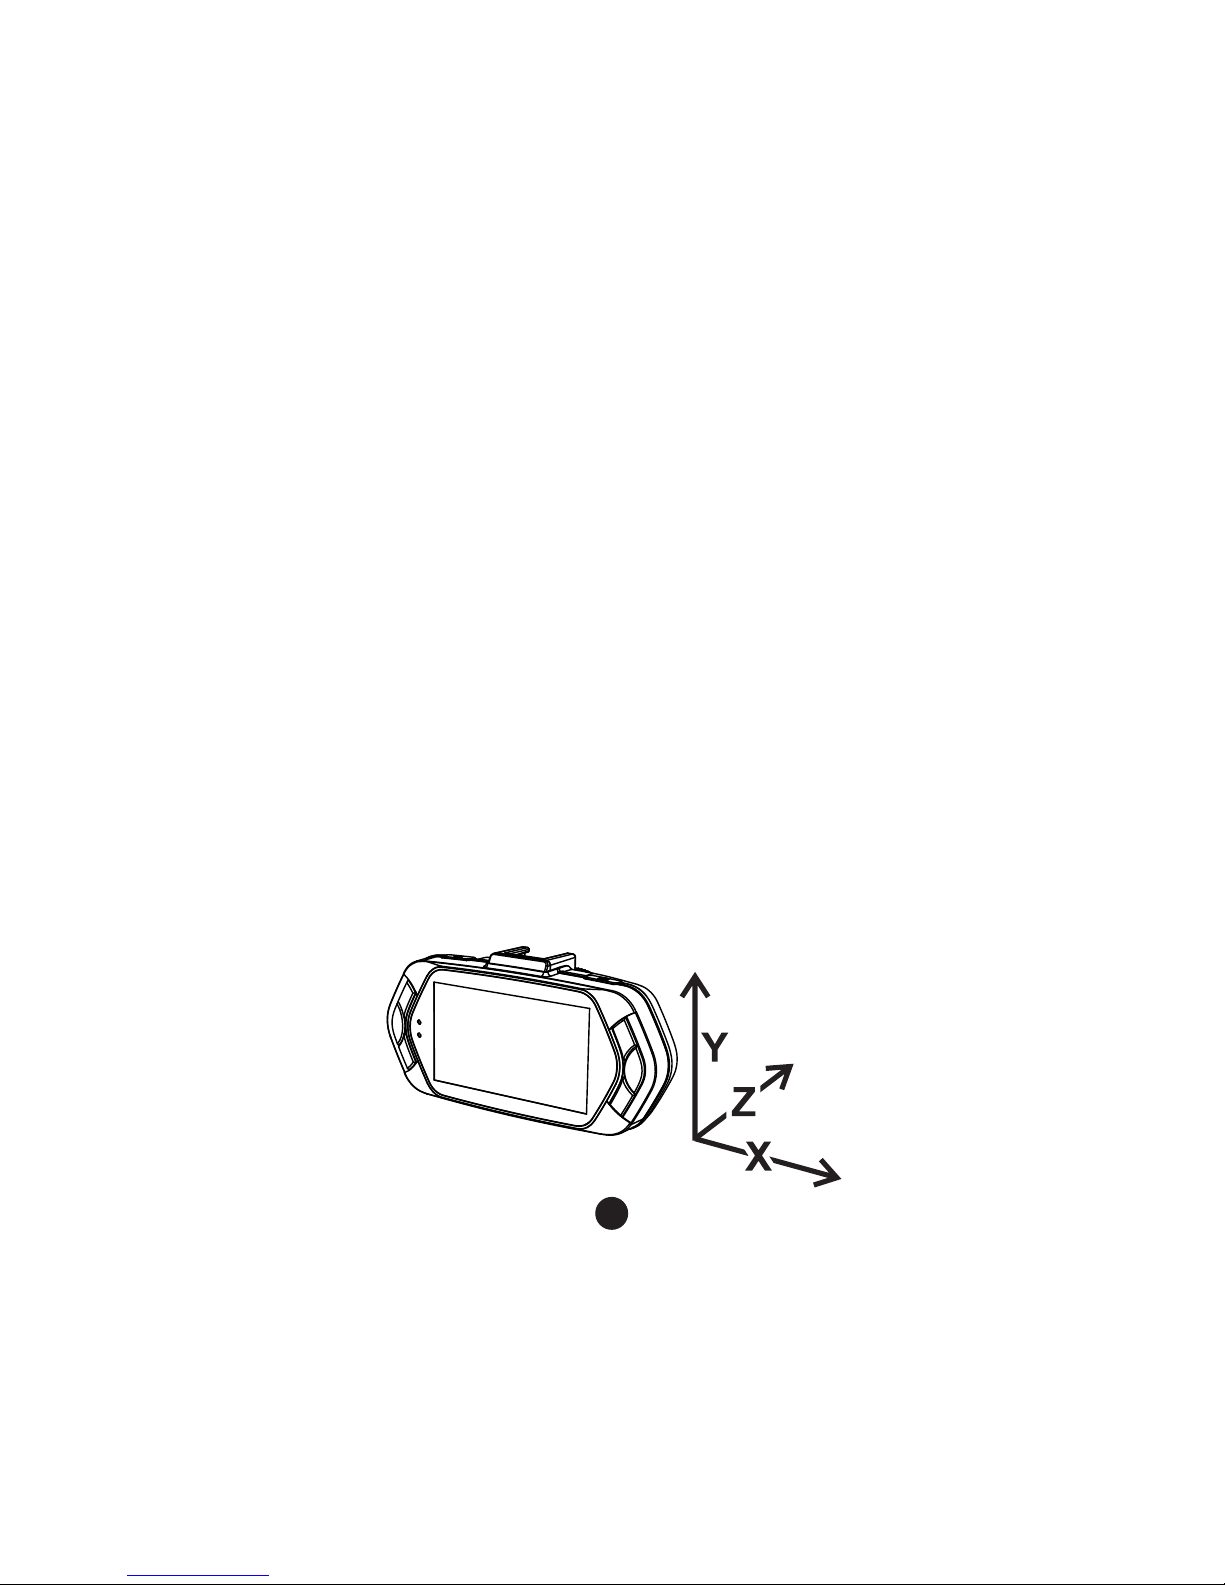
e) G-sensor Function...................................................................................................................8
f) Video Mode................................................................................................................................9
g) Take Picture............................................................................................................................10
h) Playback Mode......................................................................................................................11
Menu Setting........................................................................................................12
a) Video Mode............................................................................................................................12
b) Playback Mode..................................................................................................................13
Connection..........................................................................................................14
a) Connect to TV.........................................................................................................................14
b) Connect to Computer...............................................................................................................14
DVR Player..................................................................................................................15
Product Specication................................................................................................16

4
Product Picture & Function
a) Device Introduction
15 16 17
2
45
18 19 20
8
9
10
13
14
11
6
7
1
3
12
1. TF Card Slot 2. HDMI Port 3. LED Light
4. Lens 5. Speaker 6. Status Light (Blue)
7. Charging Light (Red) 8. Menu Button 9. File Protection Button
10. Mode Button 11. LCD Display 12. Up Button
13. OK Button 14. Down Button 15. Power Button
16. Holder Connector 17. Photo Button 18. USB Port
19. Reset Button 20. Microphone

5
21 22
23
24
25
b) Button Function
Power Button
Press this button for 2~3 sec. to turn on/off the device.
Photo Button
In video mode, in any time, press this button to take picture.
Reset Button
When the device crashed, press this button to shut down the device.
Menu Button
Press this button during standby status or playback mode, menu list of current mode will appear.
When the device is in recoding, press this button to change the ash light status " ", " ", " ".
File Protection Button
In video mode, when device is in recording, press this button to set the recording video to be protected manually,
21. GPS/Speed Camera Detector Module
22. Voice Switch for Speed Camera Detector
23. Power Input
24. Sticker for Holder
25. Camera Holder

6
so as to prevent it from being overwritten by loop recording.
In playback mode, press this button to lock or unlock the video le.
When le protection is active, the icon “ ” will appear on LCD display.
Mode Button
The device only has two mode, video mode and playback mode.
Press this button during standby status, can switch device in video mode and playback mode.
When the device is in recording, there is no effect to press this button.
Up Button
In video mode, press this button to turn on/off LCD display.
In menu setting, press this button to up item.
In playback mode, press this button to choose previous le.
OK Button
In video mode, press this button to start/stop recording.
In playback mode, press this button to play/pause video le.
In menu setting, press this button to conrm the menu setting.
Down Button
In video mode, press this button to start/stop sound recording.
In menu setting, press this button to next item.
In playback mode, press this button to choose next le.
Audio Switch
This button is only for Speed Camera Detector.
Push this switch to turn on/off the voice of Speed Camera Detector.

7
c) LED Light Status List
LED Light Status Meaning
Status Light (Blue)
Flash Device is in Recording
On Device is in standby or Playback Mode
Off Device is off
Charging Light(Red) On Charging Battery
Off Charging nish
d) Product Accessories
1. Car DVR x1 2. Car Charger x1 3. Camera Holder x1 4. Sticker x1 5. Sucker x1
6. HDMI Cable x1 7. USB Cable x1 8. User's Manual x1 9. GPS/Speed Camera Detector Module x1
10. CD 11.UV Len (
Optional)
11.CPL Len (
Optional)
Basic Operation
a) TF Card Installation
Install the TF card into TF Card Slot as picture shown.

8
b) GPS/Speed Camera Detector Installation
Insert GPS/Speed Camera Detector module into camera holder, as below picture:
Install the device on the wind shield with sticker or sucker.
When power on, Speed Camera Detector will have voice from Speed Camera Detector Speaker, and the device
will automatically start to catch GPS signal.
If doesn't catch the GPS signal, GPS icon " " will be shown on LCD display.
If successfully catching the GPS signal, GPS icon " " will be shown on LCD Display.

9
c) CPL Installation
CPL:Circular-Polarizing Filters, could reduce the reection of inner car on the car window.
Without CPL With CPL
Install CPL onto device thru screw on device camera. And after install CPL onto device and install device onto
car window, rotate the adjustment circle ring on CPL to
get the good Polarized effect to car window reflection.
adjustment circle ring

10
d) Power Supplied
Connect USB port and car cigarette with car charger, then start engine, the device will automatically power on
and recording.
Note: There is two Mini USB port, one is on device, another is on Camera Holder.
If connect car charger with Mini USB port on device, power supply to device only.
If connect car charger with Mini USB port on Camera Holder, power supply to device and GPS/Speed
Camera Detector Module both.
So if want to work with GPS/Speed Camera Detector Module, Car Charger need connect with Mini USB port
on Camera Holder.
e) G-sensor Function
When there is a collision, Gravity Sensor(G Sensor) can get the direction and exact data of collision.
Meanwhile, according to setting value in G sensor sensitivity, the device determine whether set current recorded
video to protection mode or not, which will not be overwritten by loop recording.
G-Sensor direction as below picture.

11
f) Video Mode
In video mode, in standby status, LCD display will be shown as below:
LED Light Off
LED Light ON LED Light Auto
2013/10/05 12:00
4M
0.0 EV
000:07:20
2304x1296 30P
5
Motion Detection
GPS icon
Mic Indicator
Available Recording time
(Estimate from TF Card available space)
Date and time
Video Resolution
Video mode
Power Indicator
TF Card Indicator
Photo size
Loop setting
EV Value
Take picture
Mic off

12
In video mode, in recording status, LCD display will be shown as below:
2013/10/05 12:00
4M
0.0 EV
000:00:42
A456T7S
2304x1296 30P
5
Motion Detection
Recording status
Recording Time
File Protection
Mic on
Date and time
Video Resolution
Video mode
Power Indicator
TF Card Indicator
Photo size
Loop setting
EV Value
GPS icon
Take picture Mic off
LED Light Off
LED Light ON LED Light Auto
g) Take Picture
In video mode, in any time, press photo button to take picture.

13
h) Playback Mode
Press Mode Button to enter playback mode, then press Menu Button to choose preview video/picture le. Use the
direction button to control playback operation.
Preview in six grids
Up Button Previous le
Down Button Next le
OK Button Conrm
Menu Button Enter menu list
File Protection Button Lock/unlock video/picture le
Mode Button Change mode
Play
OK Button Play/pause
Mode Button Back to six grids preview

14
Menu Setting
The device has two mode, Video Mode and Playback Mode.
a) In Video Mode:
Setup Menu Item
Video Resolution 2560x1080@30fps/ 2304x1296@30fps/ 1920x1080@45fps
1920x1080@30fps/ 1280x720@60fps
Loop Setting Off/1min/3 min/5 min
Motion Detect Off / On
Sensor Flip Off / On
Flicker Auto/50HZ/60HZ
White Balance Auto/ sunny/ cloudy/ Tungsten/ uorescent
Contrast Standard / High / Low
Sharpness Standard / High / Low
EV -2/-1.7/-1.3/-1/-0.7/-0.3/0/0.3/0.7/1/1.3/1.7/2
Quality Super ne/ ne/ normal
Auto Power Off Off/ 1 min/ 3 min/ 5 min
Time Setup Time Zone/ Year/Month/ Day/ Hour: Minute
G-sensor Sensitivity Off/ 2G/ 2.5G/ 3G/ 3.5G/ 4G/ 4.5G
Key Light Auto/ Open/ Close
Fill Light Auto/ Open/ Close

15
Language English / German / Czech / Polish / Hungarian / Russian / Chinese
Default Setting No/ yes
Format No/ yes
Software Version TRCMA7_50_V1.9.9
b) In playback mode:
Back to Previous Level
File Protection Operation Protect Current File/Protect All File/
Unprotect Current File/Unprotect All File
Auto Play Video Play One/ Video Play All/ Video Repeat One/ Video Repeat All
Delete le No/ Delete this le/ Delete All les
Format No/ Yes

16
Connection
a) Connect to TV
The device can output the video to Video equipment (TV or Monitor) to playback the data or adjust the setting.
1. Insert TF card to device.
2. Connect HDMI cable to the video equipment (TV or Monitor) and the device.
3. Power on the device.
4. Adjust the channel of the video equipment to HDMI input.
5. Installation completed.
b) Connect to Computer
1. Insert SD card to device.
2. Connect USB cable to device and computer, “USB connection” will be shown on screen, and removable disk
will be shown on computer.
3. Enter the removable disk, you could replay picture le or video le.
4. Copied le from another card will be stored in specic folder ” 999PROTE ”.

17
DVR Player
When visit TF card on computer, the DVR player will be in TF card.And the DVR player will be shown as below.
Pressing this button,
video file can copy to any folder
★ means video is locked
★means video has GPS file
The captured picture will be stored in “DVRPlayer_Images” folder.
Note: Before use the player, please install Apple QuickTime, Microsoft DirectX 9.0C and IE7.0 or higher version.

18
Product Specication
Camera
Resolution 1/3" 4.0 Mega CMOS Sensor, OV4689, good night vision performance
Lens F/NO=2.0, 110° Horizon Angle in 1080P
Video
Standard Mov le, H.264 Compression
Resolution 2560x1080@30fps/ 2304x1296@30fps/ 1920x1080@45fps
1920x1080@30fps/ 1280x720@60fps
WDR Function Wide Dynamic Range, Good Night Recording
Audio Built-in Microphone, could be turn off by menu or button
Still Image 2688x1512 (4M)
LCD 2.7inch 16:9 LCD Display
GPS Logger(Optional)
Modulization GPS Logger as optional accessories
GPS Logger for path, position, speed and time record
Replay path, position information on Google Map
Speed Camera Detector Work with speed camera database, when near any speed camera, it will
alarm with sound
G-Sensor When encounter heavy hit,
the device will automatically protect the latest les, so they can't be deleted.

19
Filter Lens (Optional)
CPL: Circular-Polarizing Filters, could reduce the reection of inner car on
the car window
UV Lens: Protect the DVR lens
Other Function
Lighting Keyboard for Night Operation
Uninterrupted Cycle Recording:
Over-write rst le if memory is full, no interruption between Video File
File Protection Function: Once File is protected, it wouldn’t be delete during
cycle recording
Automatically Recording after Car power on
SD card Slot Support up to 32 GB Micro SD card
OSD Language English / German / Czech / Polish / Hungarian / Russian / Chinese
Interface USB USB 2.0
AV Terminal HDMI
Battery Built-in 400 mAh Battery
Power 12-24V Car Charger
Color Black
Size 103x51x40 mm
Made in China.

20
Precautions and notices
- For your own safety, do not operate the controls of the product while driving.
- A window mount is needed when using the recorder in a car. Make sure that you place the recorder in an appropriate place, so
as not to obstruct the driver’s view or deployment of airbags.
- Make sure that no object is blocking the camera lens and no reective material is placed near the lens. Please keep the
lens clean.
- If the car’s windscreen is tinted with a coating, it may impact the recording quality.
Safety precautions
- Use only the charger supplied with your device. Use of another type of charger may result in malfunction and/or danger.
- Do not use the charger in a high moisture environment. Never touch the charger when your hands or feet are wet.
- Allow adequate ventilation around the charger when using it to operate the device or charge the battery. Do not cover the charger
with paper or other objects that will reduce cooling. Do not use the charger while it is inside a carrying case.
- Connect the charger to a proper power source. The voltage requirements are found on the product case and/or packaging.
- Do not use the charger if it is visibly damaged. In case of damage do not repair the equipment yourself!
- In case of device overheating, immediately disconnect the power connections.
About GPS
- GPS is operated by the United States government, which is solely responsible for the performance of GPS. Any change to the
GPS system can affect the accuracy of all GPS equipment.
- GPS satellite signals cannot pass through solid materials (except glass). When you are inside a tunnel or building, GPS
positioning is not available. Signal reception can be affected by situations such as bad weather or dense overhead obstacles
(e.g. trees, tunnels, viaducts and tall buildings).
- The GPS positioning data is for reference only.
Caring for your device
- Taking good care of your device will ensure trouble-free operation and reduce the risk of damage.
- Keep your device away from excessive moisture and extreme temperatures and avoid exposing your device to direct sunlight or
strong ultraviolet light for extended periods of time.
- Do not drop your device or subject it to severe shock.
- Do not subject your device to sudden and severe temperature changes. This could cause moisture condensation inside the
unit, which could damage your device. In the event of moisture condensation, allow the device to dry out completely before use.
- The screen surface can easily be scratched. Avoid touching it with sharp objects.
Other manuals for A7
1
Table of contents
Languages:
Other TrueCam Dashcam manuals

TrueCam
TrueCam A4 User manual

TrueCam
TrueCam H25 GPS 4K User manual

TrueCam
TrueCam M9 GPS User manual

TrueCam
TrueCam A7 User manual

TrueCam
TrueCam H7 User manual

TrueCam
TrueCam A7s User manual

TrueCam
TrueCam H5 User manual

TrueCam
TrueCam A5 User manual

TrueCam
TrueCam A5s User manual

TrueCam
TrueCam M7 GPS Dual User manual