TrueCam A5s User manual

1
● 1080P Full HD
● GPS logger
● Speed camera detector
● Illuminated keyboard
● CPL & UV lens available
Car DVR with GPS logger
& Speed camera detector
User manual
TRUECAM A5s

3
Product picture & function..........................................................................................2
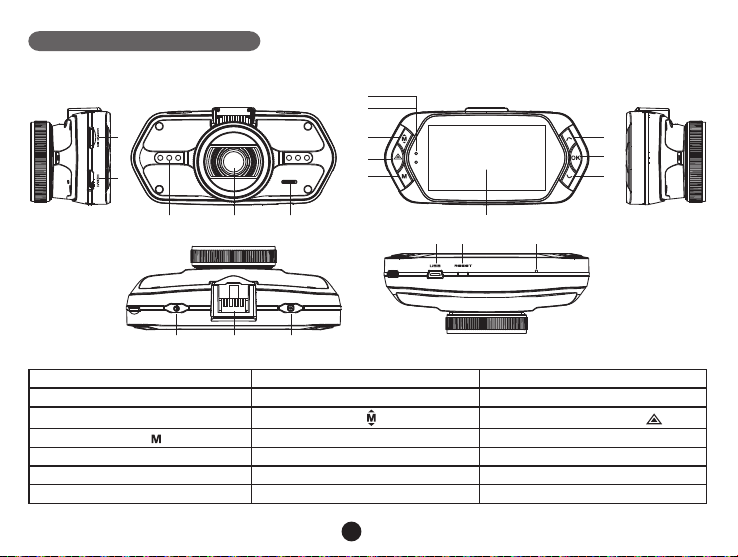
a) Device introduction...................................................................................................................2
b) Button function.........................................................................................................................3
c) LED light status list...............................................................................................................5
d) Product accessories..................................................................................................................5
Basic operation............................................................................................................5
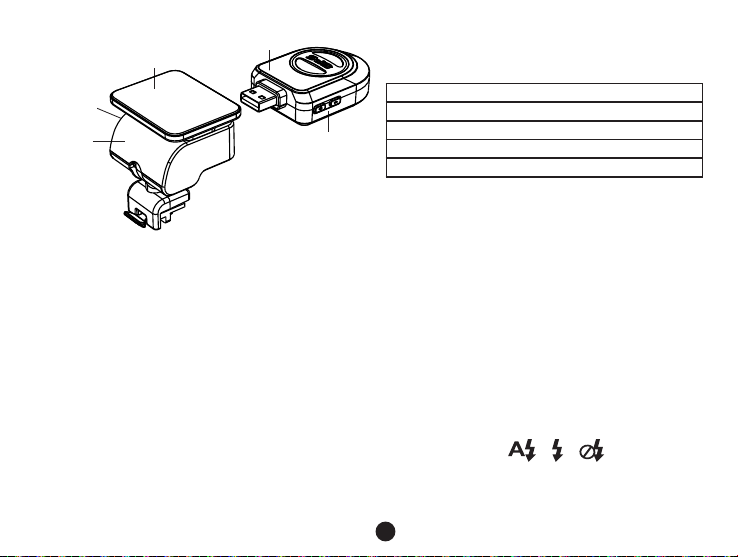
a) TF card installation...................................................................................................................5
b) GPS / Speed camera detector installation................................................................................6
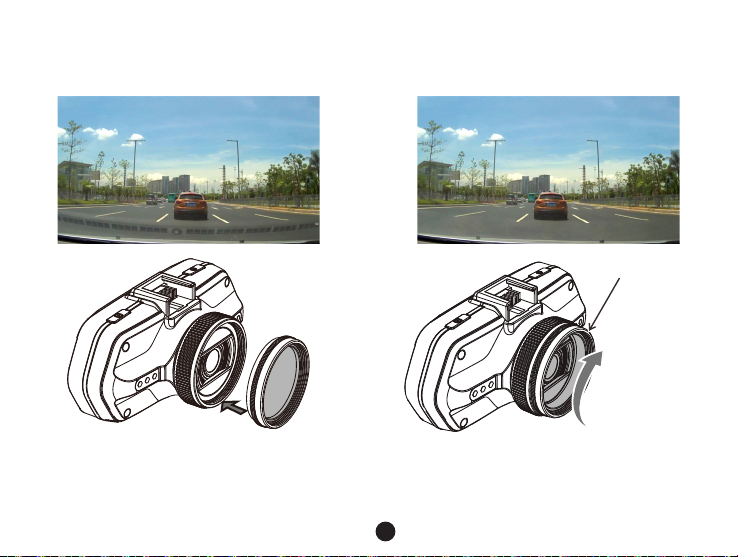
c) CPL installation (optional)............................................................................................7
d) Power supply..........................................................................................................8
e) Motion detection..........................................................................................................8
f) G-sensor function...................................................................................................................8
g) Video mode............................................................................................................9
h) Photo mode............................................................................................................................10
i) Playback mode......................................................................................................................10
j) Other functions........................................................................................................................11
Menu setting..............................................................................................................12
a) Video mode............................................................................................................................12
b) Playback mode..............................................................................................................16
Connection..........................................................................................................17
a) TV or monitor connection.......................................................................................................17
b) Computer connection.............................................................................................................17
DVR player..................................................................................................................18
Product specication................................................................................................19

2
Product picture & function
a) Device introduction
15 16 17
2
45
18 19 20
8
9
10
13
14
11
6
7
1
3
12
1. TF card slot 2. HDMI port 3. LED light
4. Lens 5. Speaker 6. Status light (blue)
7. Charging light (red) 8. Menu button 9. File protection button
10. Mode button 11. LCD display 12. Up button
13. OK button 14. Down button 15. Power button
16. Holder connector 17. Photo button 18. USB port
19. Reset button 20. Microphone

3
21
22
23
24
25
b) Button function
Power button
Press this button for 2~3 sec. to turn on / off the device.
Photo button
In video mode, in any time, press this button to take a photo.
In playback mode, when replaying video, press this button to take a photo of the current video.
Reset button
If the device crashes, press this button to reset the device.
Menu button
Press this button during standby status or playback mode, menu list of current mode will appear.
File protection button
In the video mode, when the device is recording, press this button to set the recording video to be protected
21. GPS module/Speed camera detector module
22. Voice switch for speed camera detector
23. Power input
24. Sticker holder
25. Camera holder

4
manually, so as to prevent it from being overwritten by loop recording.
” will appear on LCD display.
Mode button
The device has only two modes, video mode and playback mode.
When this button is pressed during standby, the device will switch between these two modes.
When the device is recording, the button is not functional.
Up button
In video mode, press this button to turn on / off LCD display.
In menu settings, press this button to move up.
OK button
In video mode, press this button to start / stop recording.
Down button
In video mode, press this button to start / stop voice recording.
In menu settings, press this button to move down item.
Audio switch
This button is only for speed camera detector.
Push this switch to turn on / off the voice of the speed camera detector.

5
c) LED light status list
LED light Status Description
Status light (blue)
Flash Device is recording
On Device is in standby or playback mode
Off Device is off
Charging light (red) On Charging battery
Off
d) Product accessories
1. Car DVR x1 2. Car charger x1 3. Camera holder x1 4. Sticker x1 5. Sucker x1
6. HDMI cable x1 7. USB cable x1 8. User's manual x1 9. GPS module x1
12. GPS / Speed camera detector module x1
Basic operation
a) TF card installation
Insert the Micro SD card into the slot so that the connectors on the card are facing towards the camera display.
When inserting or removing the SD card, keep your camera turned off.

6
b) GPS / Speed camera detector installation
Insert GPS / Speed camera detector module into the camera holder, as in the picture bellow:
Install the device on the windshield with the sticker or the sucker holder.
When the device is powered, speed camera detector speaker will provide voice instructions from the speed camera
detector speaker, and the device will automatically start to receive GPS signal.
Note: GPS module works properly only when it is plugged into the DVR mount adapter that is connected
to a power into the car lighter.
When you want to change the voice alert setting, the GPS module must be connected to power into the car lighter
according to the notes above.

7
c) CPL installation (optional)
Without CPL With CPL
Install the CPL by screwing the filter ring on the
camera's lens.
After installing the CPL on the lens, rotate the CPL
adjustment ring to get an ideal polarized effect.
adjustment circle ring

8
d) Power supply
Connect the USB port and the cigarette lighter socket with the car charger, then start the engine, the device will
automatically power on and start recording.
Note: There are two mini USB ports, one is on the device, another is on the camera holder.
When the charging USB cable is connected to the camera, only the camera will by powered.
When the charging USB cable is connected to the camera holder, both the camera and the GPS/Speed
camera detector will by powered.
e) Motion detection
1. In the recording mode, press the Menu button to enter the settings, then select Motion Detection.
” will appear on the display and
the device will begin recording.
Once there are no moving objects detected, the device automatically stops recording.
The intensity of movement depends on the selected motion detection sensitivity. Users must know that selecting high
sensitivity may soon lead to a full memory card.
Note: It is not recommended to use the motion detection and loop recordings together.
f) G-sensor function
In case of an accident, the gravity sensor (G-sensor) can gather direction and other important data of the collision.
According to the value set for the G-sensor sensitivity, the camera will determine whether to turn the protection
mode on or not. If the protection mode is not turned on, the current video may be overwritten by loop recording. Be
G-sensor directions are shown in the picture bellow:

9
g) Video mode
In the standby status of the video mode, LCD display will be shown as below:
Power indicator
Available recording time
(Estimate from TF card available space)
Date and time
Photo mode
Driver's name
Video mode Video resolution GPS satellite connected
GPS satellite not connected
TF card icon
Photo size
Auto loop setting
LED light Off
LED light ON LED light auto

10
In the recording status of the video mode, LCD display will be shown as bellow:
Flashing red dot indicates that the device is recording.
Recording time
File protection
Mic off
Motion detection
TF card icon
h) Photo mode
Anytime in the video mode, press the photo button to take a photo.
In the playback mode when a video is playing, press the photo button to take a snapshot of the current video.
i) Playback mode
Press the mode button to enter the playback mode, then press the menu button to choose a preview of

11
Preview in six image grid
Up button
Down button
OK button
Menu button Enter menu list
File protection button
Mode button Change mode
Play
OK button Play / Pause
Menu button Delete menu
File protection button
Mode button Back to six image grid preview
Photo button Take snapshot of current video
j) Other functions
GPS coordinates view - allows to display GPS position within the video. Location is display in the form of
coordinates.
Current speed view - allows to display current speed within the video, usable for future reference.
LED illumination - can be set to automatic or continuous. LED illumination is primarily used for situations such as
monitoring of an accident in the dark, where the device can be used as a still camera.

12
Video lock
lock the videos either in the recording mode or in the playback mode.
Menu setting
The device has two modes, the video mode and the playback mode.
a) In video mode:
Video Menu item Remark
Video resolution 1080P / 720P Set video resolution.
Photo size 0.9M / 2M / 3M / 3.7M Set photo resolution.
Loop setting Off / 1 min / 3 min / 5 min / 10 min Set loop recording time.
Record audio Off / On Set record audio or not.
Motion detection Off / Low / Middle / High Set motion detection or not.
Off / On
If this feature is on, the menu will turn upside down
whenever the camera is turned. The device can also
Effect Menu item Remark
Flicker 50HZ / 60HZ
Auto exposure Auto / Landscape / Portrait
/ Sports / Night scene
These settings can be adjusted for the shooting to be
more conformed to the surroundings and to achieve
optimal shotting results. Select [AUTO] to let the device
choose the value automatically.

13
AE ISO Auto / 100 / 200 / 400 According to the brightness during the recording,
selecting [AUTO] will choose the optimal ISO sensitivity.
White balance Auto / Sunny / Cloudy /
Fluorescent / Incandescent
Select [AUTO] under normal conditions. If the camera
does not produce natural colors, please select the
settings manually according to the current light
conditions.
Sharpness Standard / Hard / Soft
This feature indicates the contours' degree of
sharpness during recording. Select higher sharpness
for better capturing of details and face recognition.
AE bias
-2 / 1.7 / -1.3 / -1 / -0.7 / -0.3
/ 0 / 0.3 / 0.7 / 1 / 1.3 / 1.7 / 2
automatically brighten the picture to avoid under-
exposure. If the values are set to negative numbers, the
picture will be automatically darkened to avoid over-
exposure.
Quality

14
Setup Menu item Remark
Power off delay Off / 10 s / 20 s / 30 s If this function is set, the camera will turn off after the
selected time period.
Auto power off Off / 1 min / 3 min / 5 min
When this setting is activated, the camera will turn off
after the selected amount of time whenever it is in a
standby mode.
Power off screen Off / 30 s / 1 min / 3 min
The screen is turned off and the camera enters a sleep
mode after the selected amount of time, when this
feature is activated.
Time setup
Setting time and time zone.
Note: please set your local time zone according to
The GPS may not work properly in case of incorrect
settings.
Time stamp On / Off To set the time stamp on video.
Velocity stamp On / Off To set the speed stamp on video.
GPS stamp On / Off To set the GPS stamp on video.
Driver num stamp On / Off To set the car plate number on video.
Driver number - - - - - - - - - To set the car plate number.

15
G-sensor X
sensitivity Close / Low / Middle / High
G-sensor Z
sensitivity Close / Low / Middle / High
LED illumination Auto / Close / Open It sets the the LED illumination function.
Key light Auto / Close / Open
To set the key illumination.
When set to [AUTO], keys become illuminated every
time the LCD screen in on.
When set to [OPEN], the keys will be illuminated
whenever the camera in on.
When set to [CLOSE], the keys will not be illuminated at
any time.
Beep sound High / Low / Off To set the button sound.
TV mode NTSC / PAL It selects the recording mode.
Language
English / Russian / Czech /
German / Polish / Hungarian
/ Serbian / Lithuanian /
Bulgarian
To set the language.
E-Dog Voice
Setting
English / German / Polish /
Lithuanian / Czech 1 /
Czech 2 / Hungarian / Serbian
To set speed camera alert voice.
Default setting This function will reset all settings on the device to
default factory settings.

16
Format To erase and format the memory card. All content will
be deleted.
Firmware version TRCM_A5S_V2.4
b) In playback mode:
Only this / All / No
Only this / All / None / No
Auto play Off / On
If set this item, in video playback mode, the video will
automatically play one after one.
If this feature is set, the recorded photos and videos will
be played automatically, one by one.

17
Connection
The camera can be set to output video to another device (TV or a computer monitor) and start the playback
or adjust the settings.
a) TV or monitor connection
1. Insert SD card to the camera.
2. Connect HDMI cable to a TV and your camera.
3. Turn on both devices.
4. Set the input channel to HDMI on a TV or a monitor.
5. Installation completed.
Note: Connection to a TV automatically turns off the LCD screen on your camera.
Connect the camera to a TV to watch a live video feed.
b) Computer connection
1. Insert SD card to the camera.
on the screen.

18
DVR player
The DVR Player software can be found on the enclosed CD. The DVR Player for Windows only (an alternative program
for MAC is on the CD).
The player automatically saves onto the memory card. Search the memory card on the computer where it can be found
under DVR player. DVR Player will be displayed like this:
This button will copy the files
to any folder.
★ This button indicates that
the file is locked.
★This button indicates that the
file contains GPS coordinates.
The captured picture will be stored in “DVRPlayer_Images” folder.
Note: Before using the player, please install Apple QuickTime, Microsoft DirectX 9.0C and Internet Explorer 7.0
or higher.

19
Product specication
Camera Resolution 2 mega CMOS sensor, OV2710, good night vision performance
View angle 130° in 1080P
Video
Standard
Resolution 1920x1080@30fps
1280x720@30fps
Audio Built-in microphone, could be turned off by the menu or the button.
Photo resolution 2560x1440, 2304x1296, 1920x1080, 1280x720
LCD 2.7inch LCD display
GPS logger GPS logger for path, position, speed and time record.
Replay path, position information on Google Maps.
Speed camera detector Work with speed camera database, when near a speed camera, the driver
will be alerted.
G-sensor In case of an accident, the camera will automatically lock and protect the
Filter lens (optional)
Table of contents
Languages:
Other TrueCam Dashcam manuals

TrueCam
TrueCam H25 GPS 4K User manual

TrueCam
TrueCam M7 GPS Dual User manual

TrueCam
TrueCam A4 User manual

TrueCam
TrueCam H25 GPS 4K User manual

TrueCam
TrueCam A7 User manual

TrueCam
TrueCam H7 User manual

TrueCam
TrueCam M5 WiFi User manual

TrueCam
TrueCam A5 User manual

TrueCam
TrueCam A7 User manual

TrueCam
TrueCam A7s User manual