TTBIO TTcare 100+ User manual
Thank you for purchasing the TTcae 100+, a dental handpiece maintenance unit.
The TTcae 100+ lubricates and internally cleans dental handpieces easily and effectively.
For optimum safety and performance, read this manual thoroughly before using the unit and pay close attention to the warnings and notes.
Keep this manual in a handy place for future reference.
感謝您購買TTcae100+牙科手機自動保養機。
TTcae100+ 能有效的清潔與潤滑牙科手機的內部結構。
為了獲得最佳的安全性和性能,使用本機前請閱讀本手冊,並密切注意所有的警告符號和意義。�
請將本手冊放在一個方便拿取的地方,以利隨時參考。
感謝您購買TTcae100+牙科手機自動保養機。
TTcae100+ 能有效的清潔與潤滑牙科手機的內部結構。
為了獲得最佳的安全性和性能,使用本機前請閱讀本手冊,並密切注意所有的警告符號和意義。�
請將本手冊放在一個方便拿取的地方,以利隨時參考。
Instruction Manual
雷虎生技股份有限公司
Manufactured by
TTBIO CORP.
台中巿40755工業區六路7號2F
2F.,NO.7, 6TH ROAD INDUSTRY PARK
TAICHUNG. TAIWAN 40755
TEL:886-4-23595958
FAX:886-4-23596893
E-mail:[email protected]
Website:www.ttbio.com
許可證字號:衛署醫器製壹字第004431號
售后服務:上海漢瑞祥貿易有限公司
地址:上海市延安西路1358號4B-1室
電話:021-32231198
傳真:021-32231196
生產商:雷虎生技股份有限公司
註冊地址:台中市西屯區協和里
工業區六路七號2F
生產地址:台中市西屯區工業六路七號2F
電話:886-4-23595958
傳真:886-4-23596893
網址:www.tbio.com
EC REP
CMC MEDICAL DEVICES & DRUGS S.L.
C/ Horacio Lengo N18.
CP29006,Málaga Spain
Content are subject to change without prior notice. 0JL0138V2
Automatic Handpiece Maintenance Unit
手機自動保養機操作說明書
2016.12
01
CONTENTS
PRECAUTIONS
DISCLAIMER
1. Warnings, Cautions and Notes
2. Specifications
3. Parts Identification
4. Setup
5. Operation
6. Maintenance and Replacement Parts
7. Maintenance and Inspection
8. Trouble shooting and Error Code
9. Tools and Consumables
10. Service Contacts
11. Information on Electromagnetic Compatibility
01
02
02
03
06
08
10
13
16
17
19
20
21
PRECAUTIONS
Most operation and maintenance problems result from insufficient attention being paid to basic safety
precautions and not being able to foresee the possibilities of accidents. Problems and accidents are
best avoided by foreseeing the possibility of danger and operating the unit in accordance with the
manufacturer’s recommendations. First thoroughly read all precautions and instructions pertaining to
safety and accident prevention; then, operate the equipment with the utmost caution to prevent either
damaging the equipment itself or causing injury.
Note the meaning of the following symbols and expressions:
■Note
This alerts the user of important points concerning operation.
The user (i.e. clinic, hospital etc.) is responsible for the management, maintenance and use of
medical devices. Also this equipment must not be used by anyone except legally qualified dentist or
doctors.
■Caution:
Federal law restricts this device to sale by or on the order of a dentist (for U.S.A.).
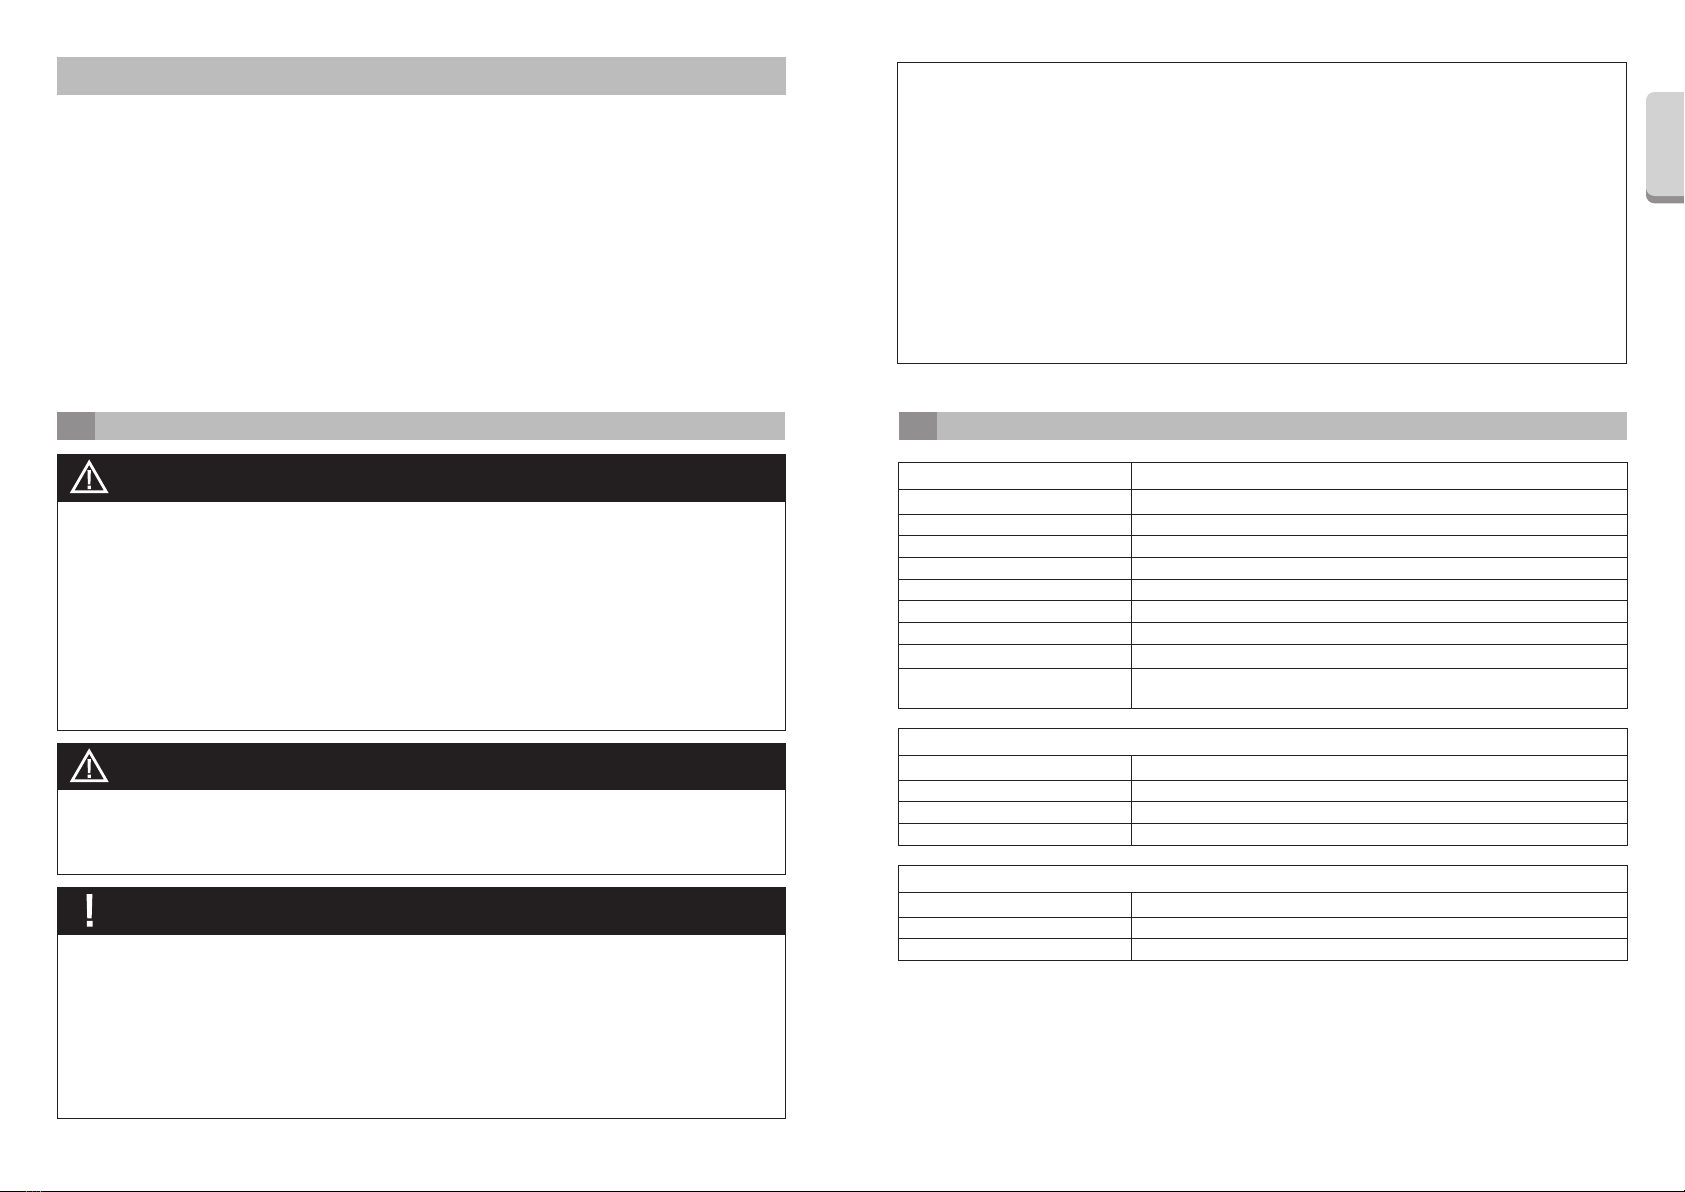
WARNINGS
CAUTIONS
NOTES
This warns the user of danger of death, serious injury or total equipment
damage and failure or fire.
This identifies methods not to be used or purposes which the instrument
is not suited for.
This alerts the user to the risk of light to medium injury or equipment
damage.
Do not use this equipment for anything other than its specified purpose.
English
02 03
• Explosion Hazard. Do not use near open flames or other ignition sources.
• Health Hazard. The area must be well ventilated. Breathing fumes could damage your health.
• The equipment must be properly grounded.
• Make sure the ground is properly connected.
• To prevent the spread of grave, life-threatening diseases like HIV and hepatitis B, autoclave
handpieces after performing regular maintenance using the TTcare 100+.
• Avoid the risks of electrical shock, equipment damage and fire during an electrical storm: Turn the
TTcare 100+ off and do not touch it or its cord.
• Wear surgical gloves, mask and protective eyewear to operate and clean the TTcare 100+.
WARNINGS
Electromagnetic wave interference caused by cellular phones, transceivers, remote controls and
similar transmission devices could cause the equipment to operate randomly. All devices which
transmit electromagnetic waves located near the work area should be turned off.
CAUTIONS
• Set the TTcare 100+ on a level and stable surface.
• Depending on the type of handpiece and coupling, there could be a release of oil mist. In this
case, lower the pressure to 4 bar.
• Oil will leak or spray out if the cans are not properly installed.
• Make sure the head is flat against the nozzle guide. If it is tilted, the nozzle might be bent or oil
might spray out.
• Oil will spray out of the chuck nozzle if the handpiece is removed too soon (before the beep).
NOTES
ATTENTION
TTBIO CORP. will not be responsible for accidents, instrument damage, or
(1) repairs made by personnel not authorized by TTBIO CORP.
(2) any changes, modifications, or alterations of its products.
(3) maintenance or repairs using parts or components other than those specified by TTBIO CORP. and
other than in their original condition
(4) operating the instrument in ways other than the operating procedures described in this manual or
resulting from the safety precautions and warnings in this manual not being observed
(5) workplace conditions and environment or installation conditions which do not conform to those
stated in this manual such as improper electrical power supply
(6) fires, earthquakes, floods, lightning, natural disasters, or acts of God.
1. Warnings, Cautions and Notes
• For some handpieces, an oil mist may be released if a burr is not inserted.
• Do not damage the o-ring on the coupling when attaching a handpiece. This could result in oil
spraying out or poor performance.
• Do not select a coupling that does not have a handpiece attached to it. This would result in oil
spraying out when the Start Switch is pressed.
• If the unit will not be used for a while, unplug it and close the main air valve.
• Please insure you use the correct adaptor for the instrument.
• Do not use couplings made for maintenance equipment other than the TTcare 100+. This could
result in release of oil mist or poor handpiece maintenance.
• Dispose of used oil pads according to regulations for medical waste.
• Do not fail to push the tray all the way in. Otherwise, oil could leak out or oil mist might be
released.
2. Specifications
Name TTcare 100+
AC 100-240 V 50/60 Hz
60VA max.
250V 2A Slow Blow Type
4~6 bar
4 bar
40 NL/ min
Approx. 9 kg
Width 295 × Height 385 × Depth 295 mm
Rating
Power Consumption
Fuse
Air Pressure
Recommended Air Pressure
Air Flow Rate
Weight
Size (including regulator)
Protection category (Dust-proof;
water-proof) IP20
Operating environment
Permitted in interior rooms
15 to 40°C (59 to 104°F)
25 to 90 %
2000 m (6560 feet)
Ambient temperature
Temperature
Humidity
Max. altitude
Transportation and storage conditions
-20 to 70°C (-4 to 158°F)
5 to 95 %
700 to 1060 hPa
Temperature
Humidity
Atmospheric pressure
English

04 05
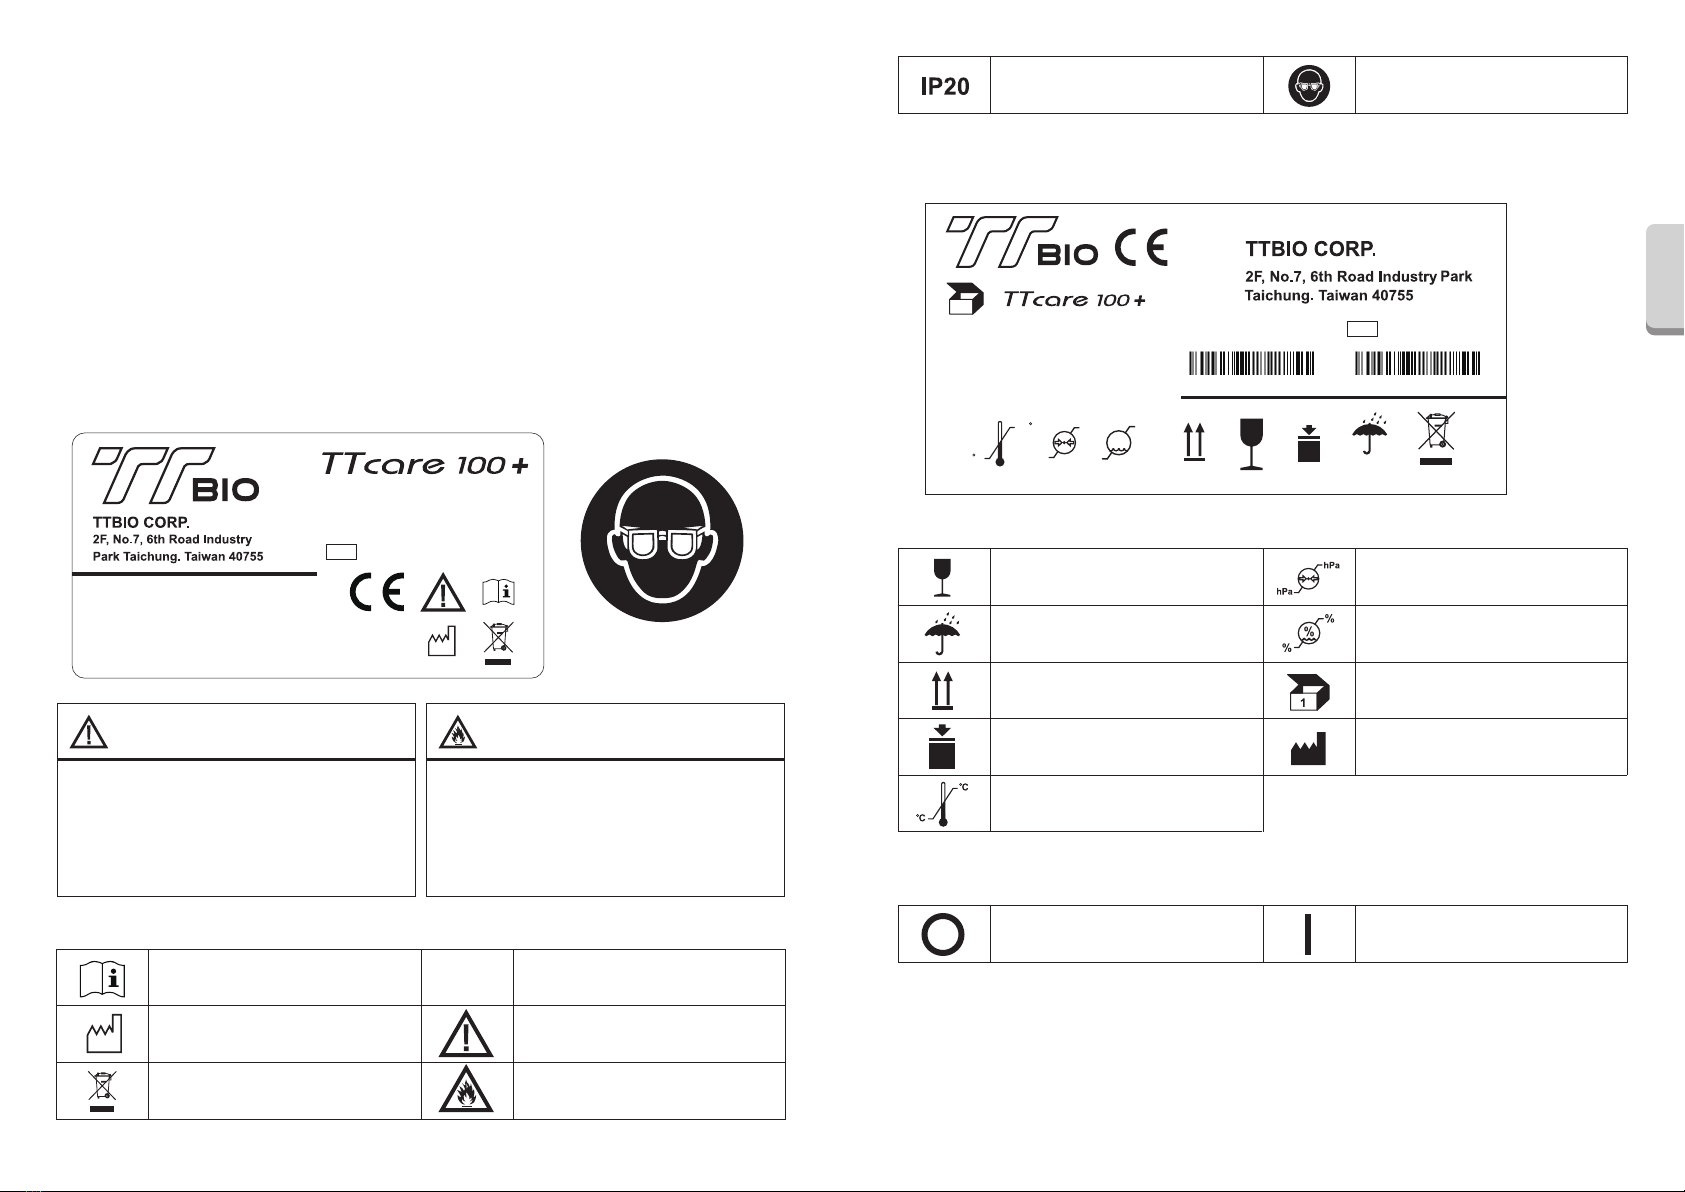
■Meaning of the Symbols
• Device Label
WARNING
• The blister can be cleaned with 30˚C±5˚C tap
water or 60% to 70% alcohol,
non-high-temperature cleaning.
• The blister can be used repeatedly, but
should be changed once broken.
FLAMMABLE
• Spray cans will explode if they get too hot.
• Do not expose the spray cans to heat.
• Only use approved spray can.
*PREVENT EXPLOSION AND
IGNITION OF SPRAY CANS!
• Appearing on the device
Observe operator’s manual
Date of manufacture
Disposal information, see
important information “ Disposal”
Serial Number
Warning
Flammable
SN
■Product Description
Used to maintain optimum performance and prolong working life of dental handpieces.
Delivers oil and air automatically to handpiece.
Used after dental treatment and before autoclaving.
■Disposal
The wastes incurred are to be recycled or disposed of in a way that is harmless for human beings
and the environment; in doing so, the national valid regulations are to be observed.
Disposal of equipment and accessories at the end of their service lives:
On the basis of EC Directive 2002/96/EC on Waste Electrical and Electronic Equipment, we would
like to point out that this product is currently in compliance with the labelling requirements but is not
yet subject to the disposal requirements of this Directive. However, the unit may be disposed of in
Europe in special waste management centers. Additional information can be obtained from the
manufacturer or your dental supplier.
Automatic Handpiece
Maintenance Unit
Product code : 08090012XXX
XXXXXXXXXXX
SN
INPUT :AC 100~240V 50/60 Hz
60VA max.
AIR PRESSURE: 4~6 bar
FUSE: 250V 2A Slow Blow Type YYYY-MM
IP20
Protection category
Dust-proof; water-proof Eye protection must be worn
• Appearing on the packaging
Fragile
Keep dry
Transport upright
Air pressure
Humidity
Quantity
Manufacturer
Stacking restrictions
Temperature range
■Main Switch
OFF ON
• Carton Label
20 kg
95%
5%
%
700
1060
hPa
hPa
70 C
-20 C
0473
Temperature range Air Pressure Humidity Fragile Keep dry
Transport
upright
Stacking
restriction
Waste
Disposal
Storage and transport requirements
1
Automatic Handpiece
Maintenance Unit
Product Code:
08090012
XXXXXXXXXXX
SN
English
06 07
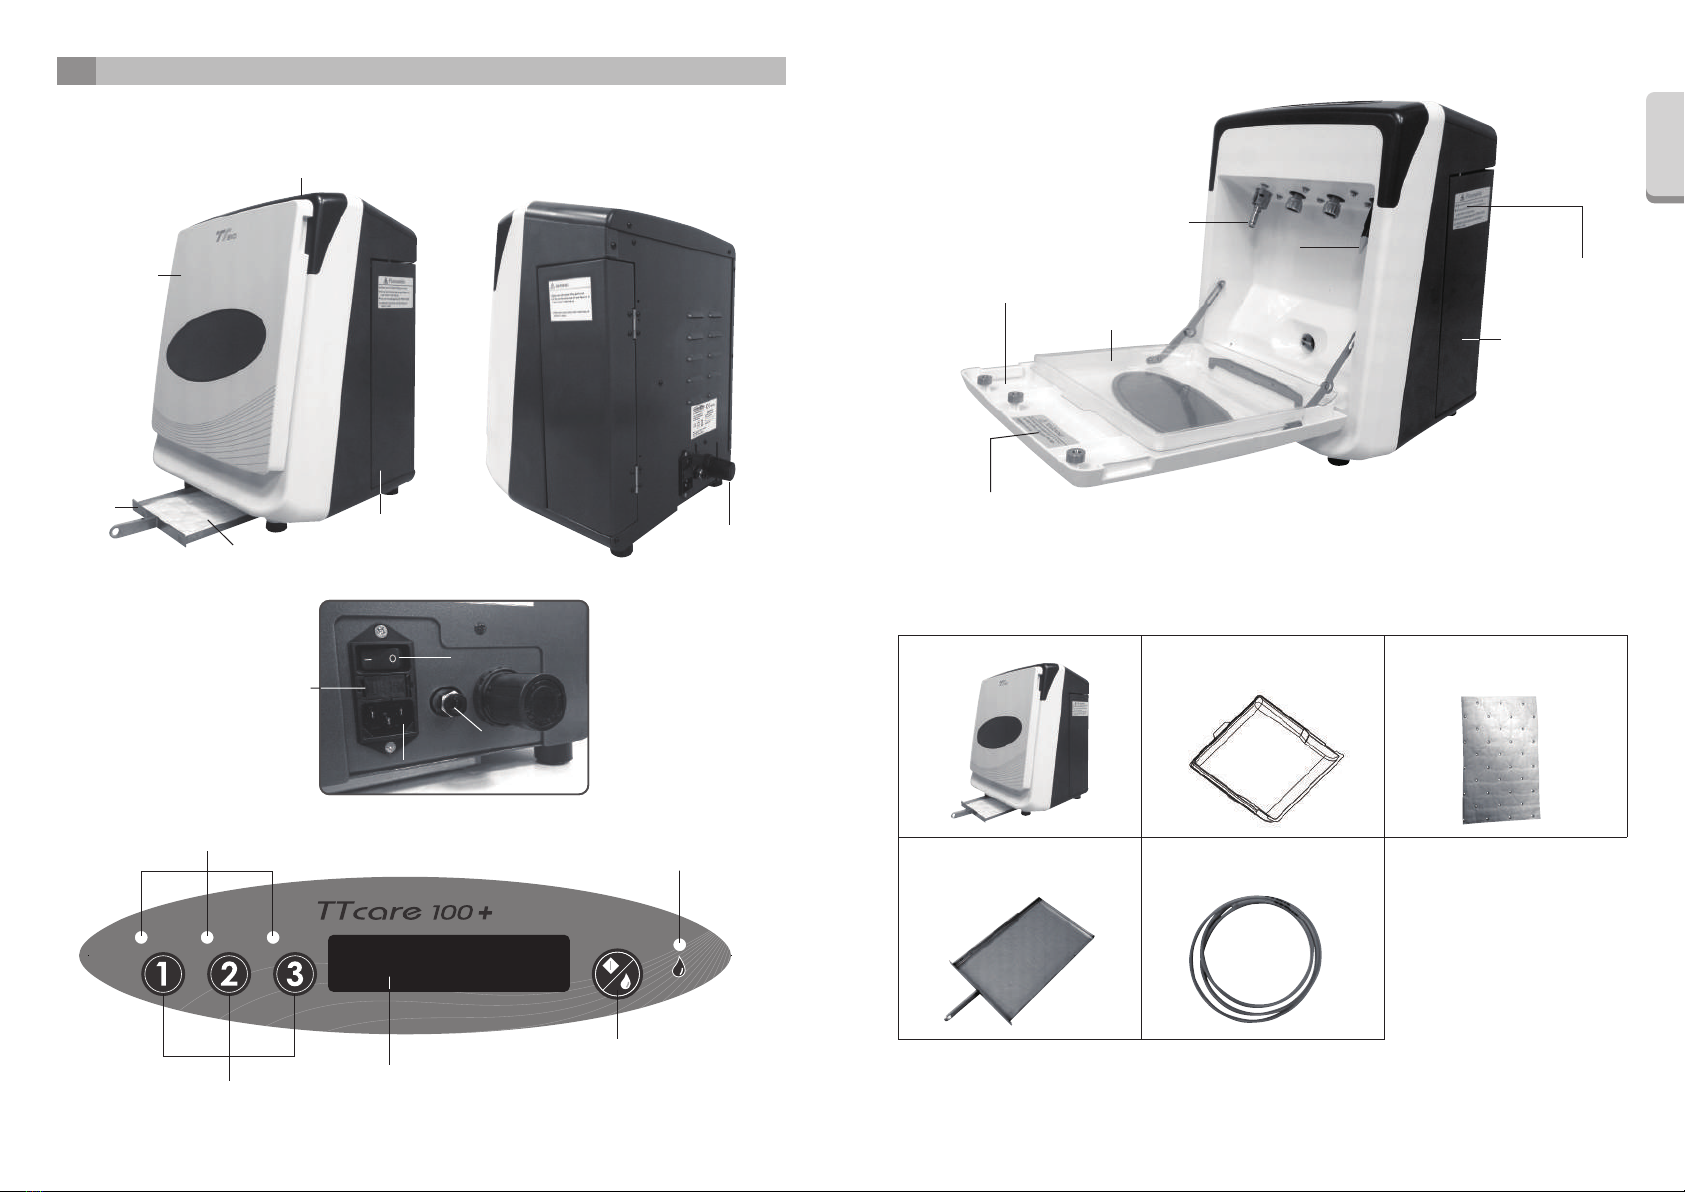
3. Parts Identification
■Introduction
Front Door
Tray
Absorption pad
Operation Panel
Side Door Air Regulator
Power Swtich
Power Cord Connection
Air Connection
Fuse Holder
Selector Lamps Empty Spray Can Indication
Start / Set /
Chuck Maintenance Switch
LCD Display
Selector Switches
Blister
Front door
Connection Nut
Chuck Nozzle
Side door
See Chapter2
See Chapter2
■Components
Main Unit Blister
(CODE No. 0PL0350)
Absorption pads
(CODE No. 0PL0351)
Oil Tray
(CODE No. 0PL0359)
Air Tube
(CODE No. 0PL0360)
*TTcare 100+ contains above standard components.
*Optional components see chapter 9.
English
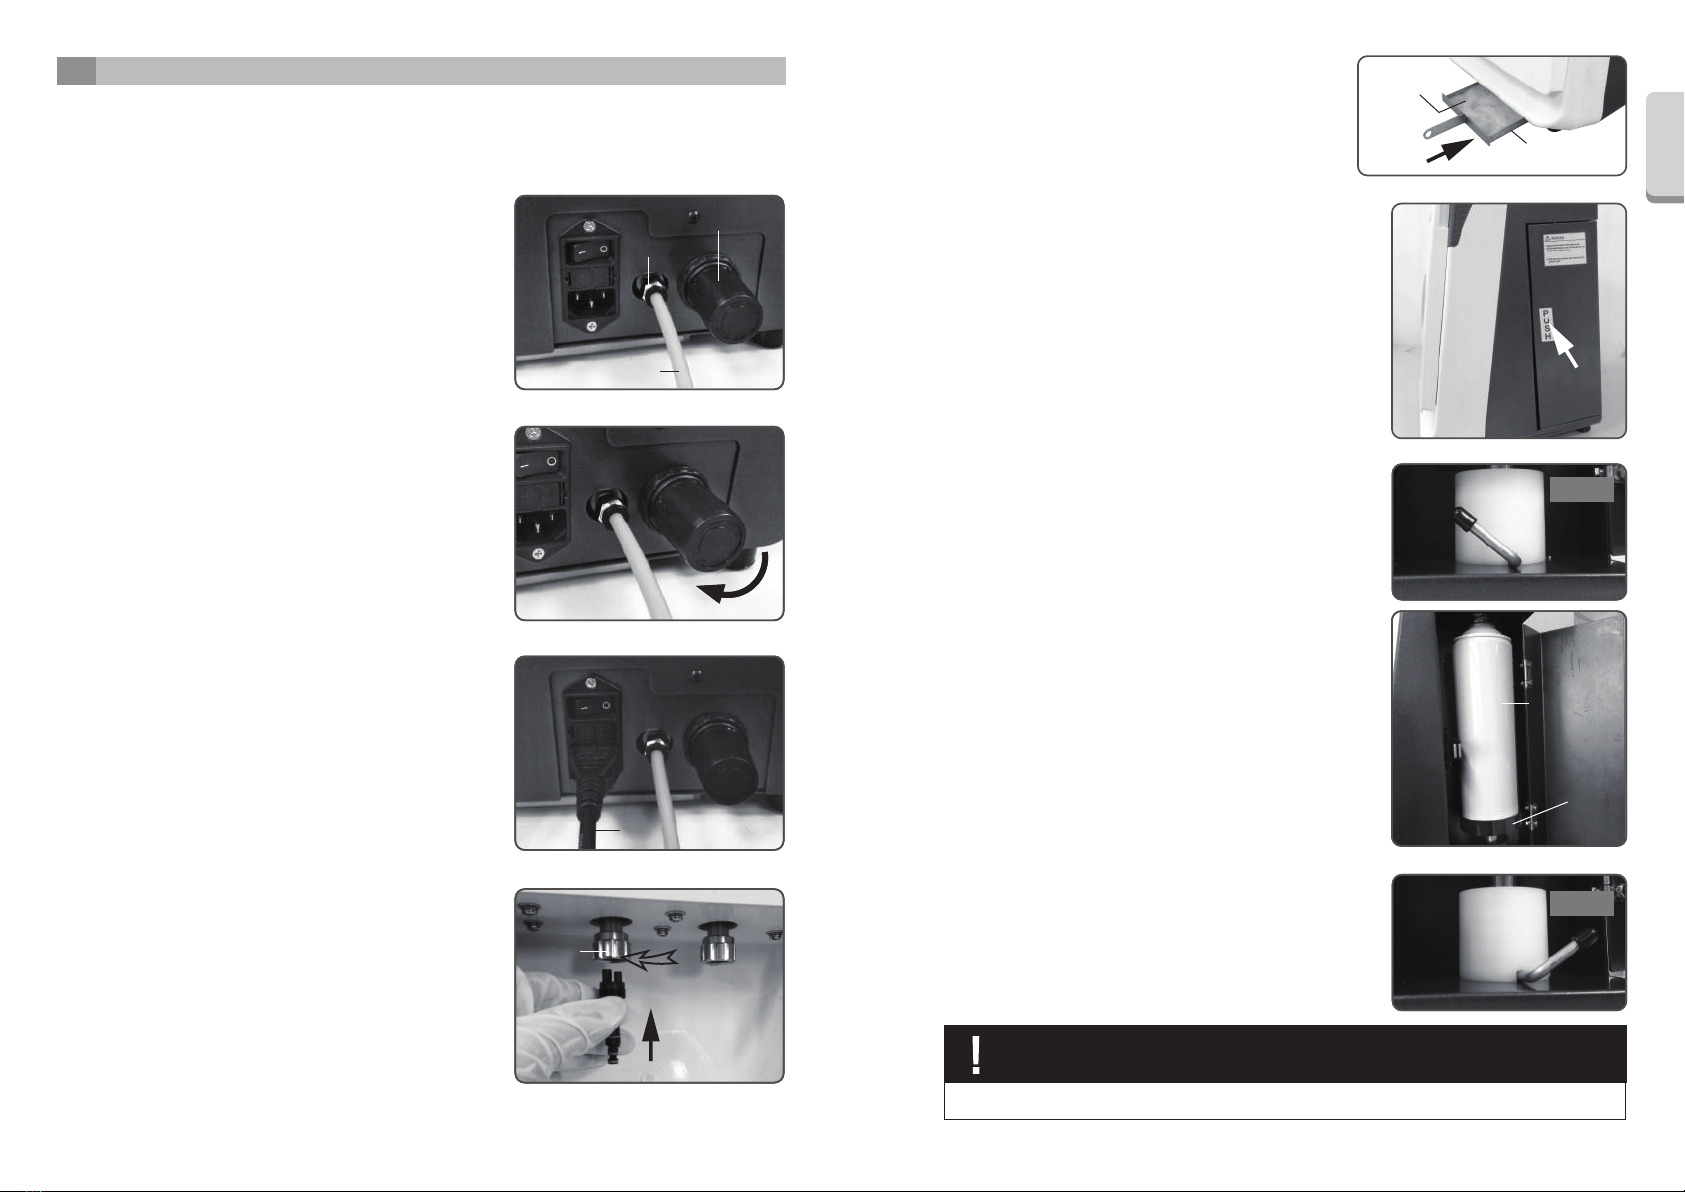
(2) Power Cord
Connect one end of the power cord to the main unit
and plug the other end into the electrical supply.
Power Cord
08 09
4. Setup
■Note
Leave at least 5 cm (2 in) of free and open space around the TTcare 100+.
(1) Air Connection
1. Connect the air tube to the air connection
and the main air supply.
Turn on the valve for the main air supply.
■Note
The main air supply must be clean and oil-free.
Make sure the tube is securely connected.
2. Set the air regulator dial between 4 and 6 bar.
Recommended Air Pressure is 4 bar.
■Note
Less than 4 bar or higher than 6 bar will result in an
error code.
(3) Adapter
Fit the adapter into the nozzle and fasten the nut.
Nut
■Note
Make sure the nut is securely tightened. Otherwise oil
and air will escape and cause incorrect maintenance.
2. Ensure the lock lever is on the left, place the spray
can on the stand shown in the photo.
Spray can
Stand
Unlock
3. Shift the lock lever to the right to secure the spray can.
Lock
■Note
Ensure the nozzle is properly connected.
Make sure the lock lever is all the way to the right,
otherwise the oil will not come out.
Gently pull the spray can to ensure it is secured.
Oil will leak or disperse if the cans are not properly installed.
NOTE
(5) Spray Cans
1. Open the side door.
Press the PUSH sign indicated in the photo to open the
door.
PRESS
■Note
Do not use Acidity Cleaner which is used for air
bearing handpieces only. It could damage both the
TTcare 100+ and the handpiece.
(4) Tray
Place two Absorption pads in the tray and slide it into
place.
Absorption
pad
Tray
■Note
Slide the tray all the way in; otherwise, it might leak.
Air Connection
Air Tube
Air Regulator
English
10 11
Spray can
stand
Adjust screw
5. Use a hex wrench to adjust the screw on the spray can
stand, if necessary.
■Note
This can make up for a difference in height of 5mm.
6. Close the side door.
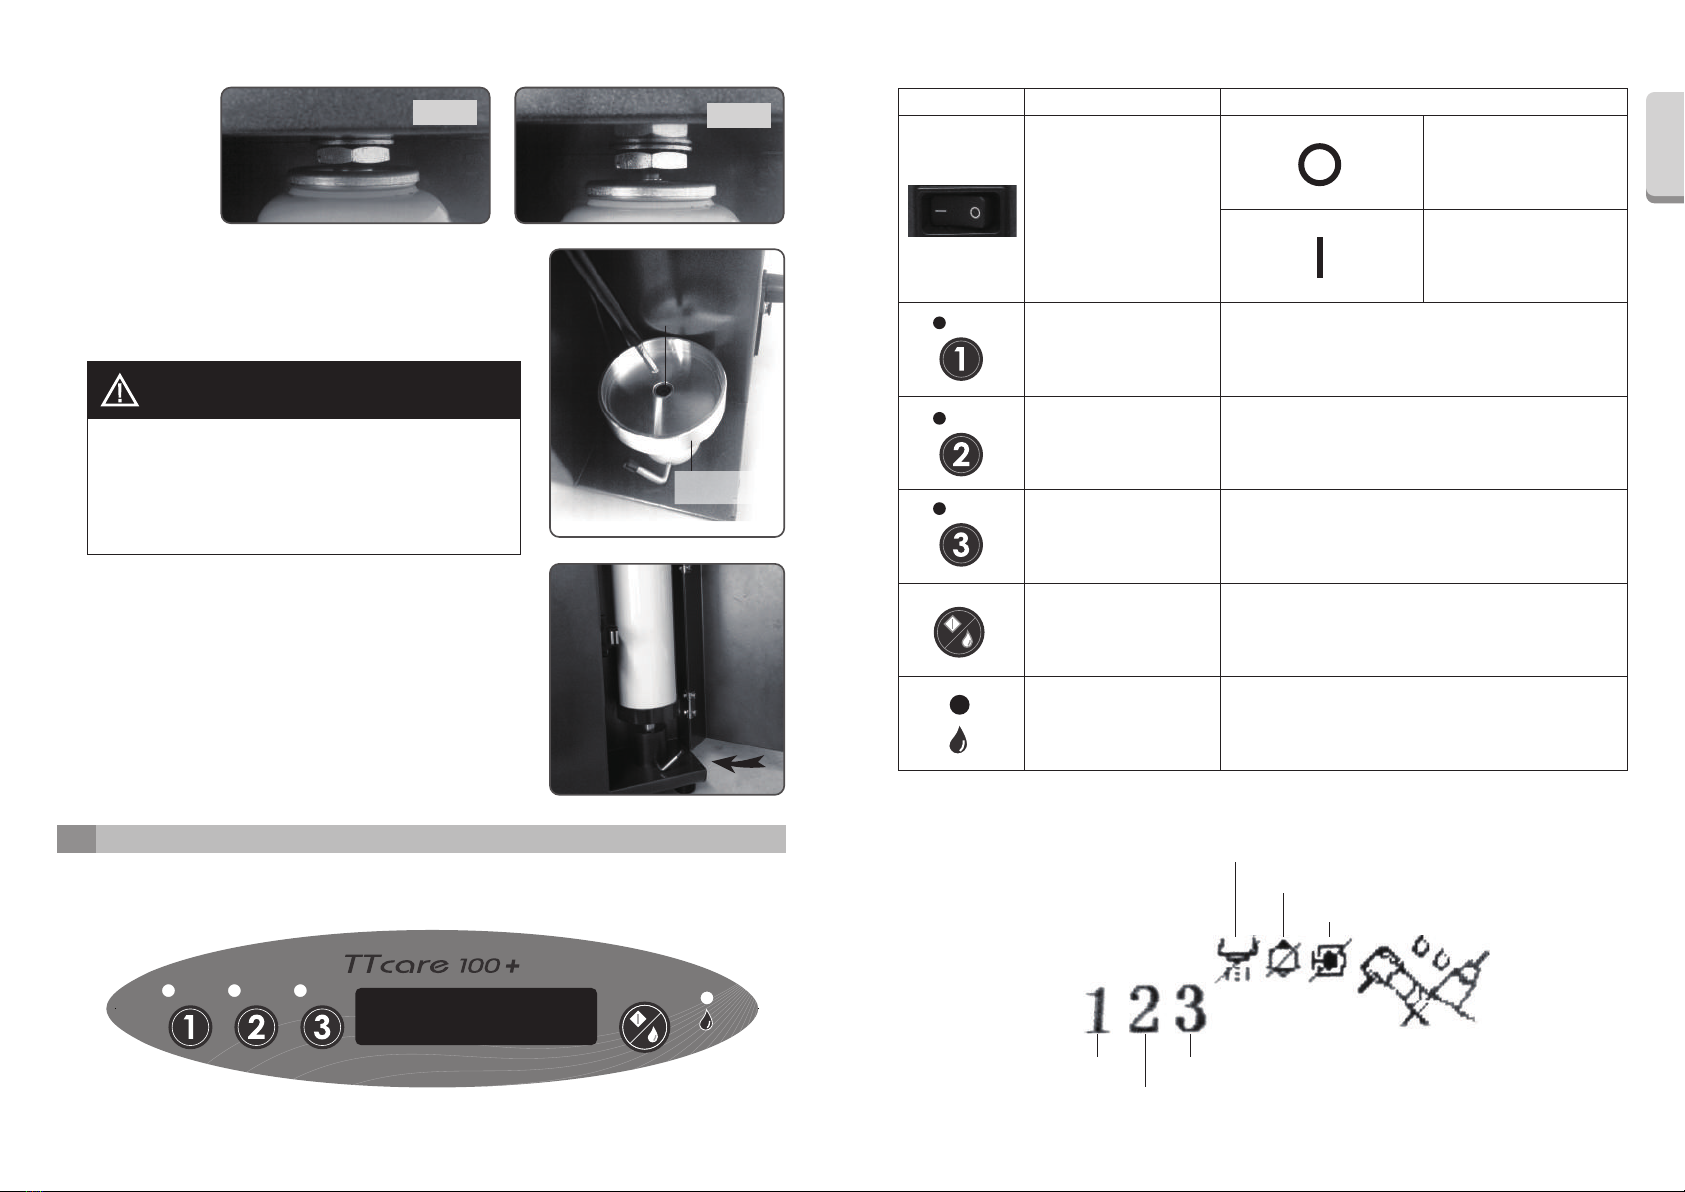
4. Gently lift the spray can and ensure the nozzle is secured.
OK NG
5. Operation
■Panel display:
■Operating instruction:
■Operating instruction:
Icons Functions Illustration
Power On/Off
Selection of handpiece 1
Selection of handpiece 2
Selection of handpiece 3
Handpiece 1 is selected when the lamp lights up.
Handpiece 2 is selected when the lamp lights up.
Handpiece 3 is selected when the lamp lights up.
Replace spray can when lamp lights up
1. Handpiece maintenance when door is closed
2. Chuck maintenance when door is open
3. Function setting by long press and wait for the beep
Start / Set / Chuck
maintenance switch
Spray can change
OFF
ON
Handpiece 1
Handpiece 2
Handpiece 3
Turn compressed air off
Turn buzzer sound off
Turn auxiliary motor off
• It is recommended to use TTBIO of TTlube spray can
for the TTcare 100+.
•The spray can nozzle and spray can stand are
designed to offer compatibility with other spray can
brands but dose not mean all applicable.
NOTE
English

12 13
■Operation maintenance:
■Note
● Air Turbine and Contra Angle :
Remove the test bur from the handpiece.
● Straight Handpiece :
Insert the supplied test bur into the handpiece and locking. (5) will show on LCD Display by pressing shortly. Press / /
to select handpieces which are connected to run optional auxiliary rotation.
(6) will show on LCD Display by pressing shortly.
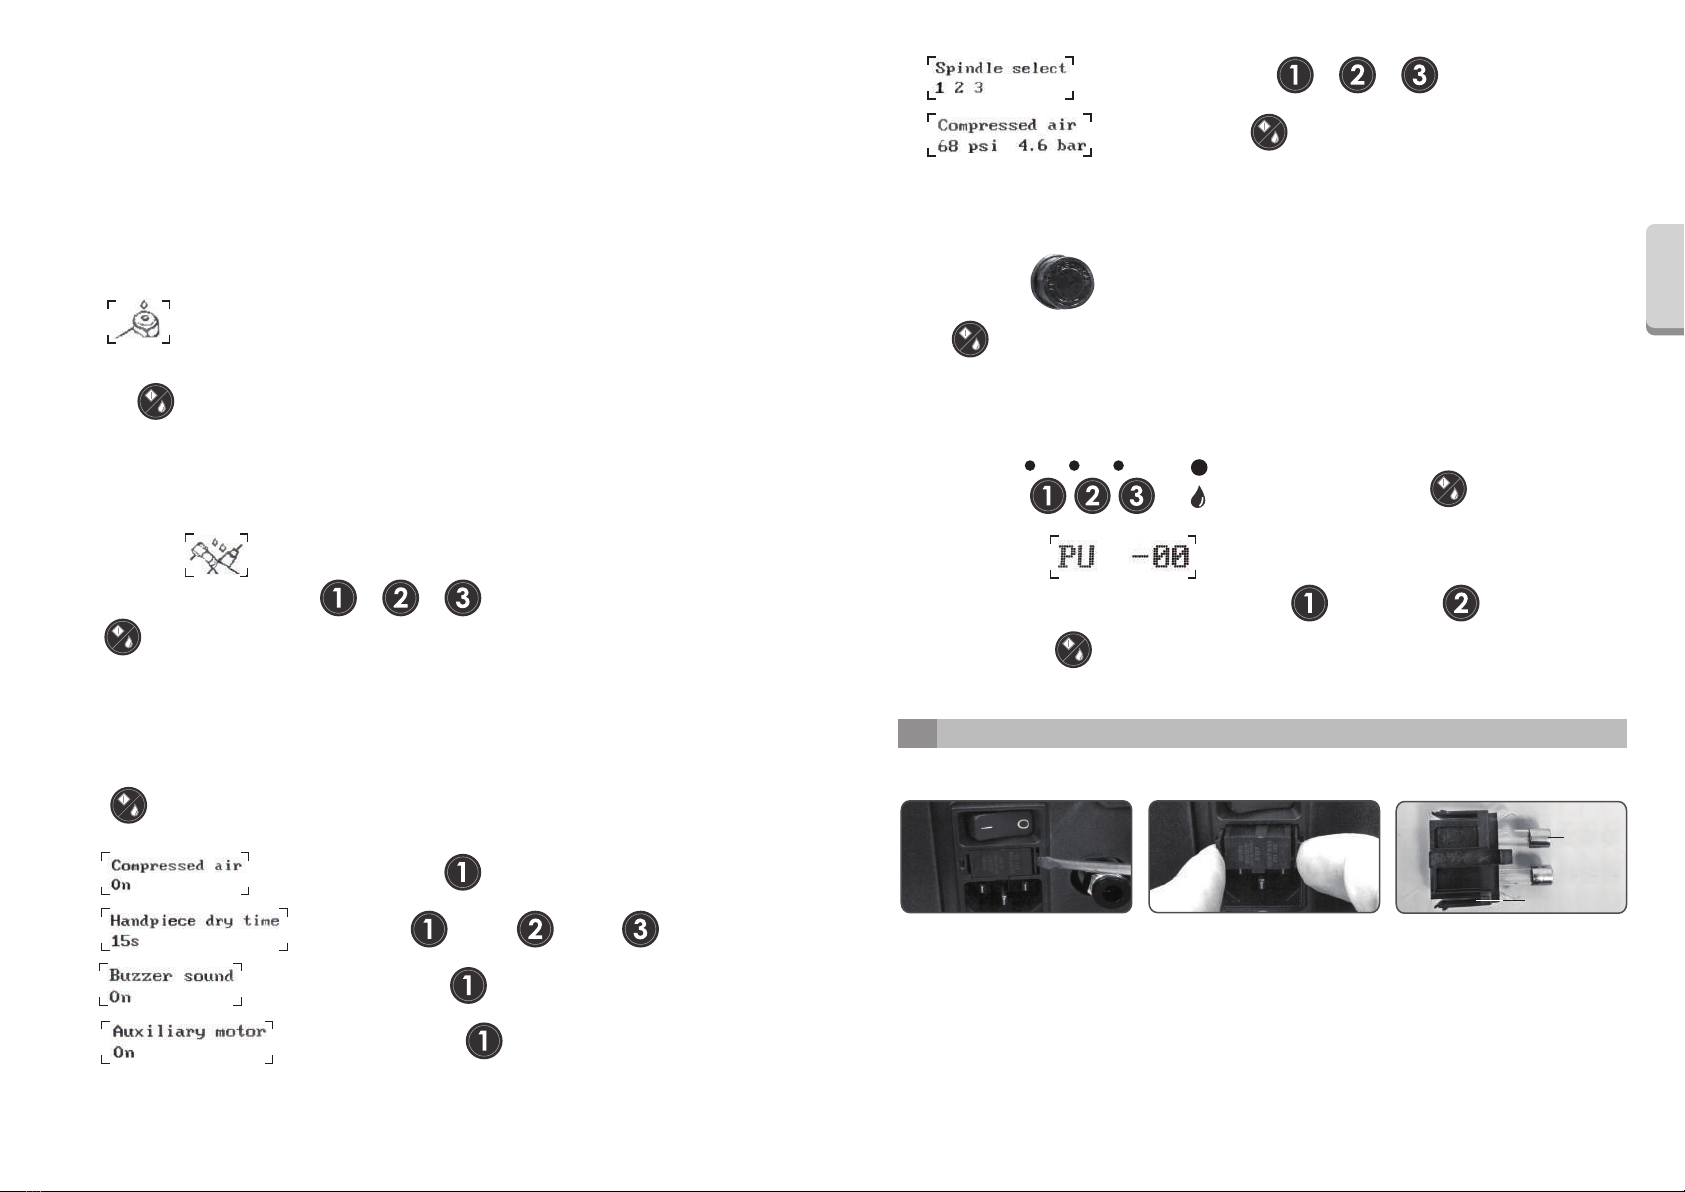
■Compressed air setting:
Adjust air pressure by turning between 4.0-6.0 bars. Recommend to set air pressure at
4.0bars for TTcare 100+. Save and leave functional setting mode by pressing shortly.
6. Maintenance and Replacement Parts
■Replace Fuse
(1) Press fuse holder by slotted wrench to loose the holder.
(2) Remove fuse holder.
(3) Replace new fuse (250V2A Slow-Blow type) into fuse holder
(4) Insert fuse holder.
Fuse
Fuse holder
■Oil amount adjustment :
(1) Indicator lights and are on when the Lubrication Unit is turned on. Press
for three seconds until it enters Oil amount adjustment mode, LCD will display:
(2) There are 11 adjustable oil amount from PU-00 to PU-10. Press for increasing or for
decreasing. PU-00 is the default setting, PU-10 has the largest oil amount.
Choose the PU value required, press button to complete setup. Lubrication unit will
automatically reboot after setting adjustments.
(1) Chuck maintenance:
Turn on the power switch. Open the front door.
will show on LCD Display during process.
Place the chuck side of head to the chuck nozzle.
Press to begin cleaning and lubricating the chuck .
A beep sound meaning the procedure is completed.
(2) Handpiece maintenance:
Turn on the power switch.
Open the front door.
Connect the handpiece to its coupling with the chuck facing back.
Make sure the handpieces are connected to the adapter until it clicks into place.
Close the front door.
will show on LCD Display during process.
Press / / to select handpieces which are connected.
Press to lubricate the handpieces in sequence order.
A beep sound meaning the procedure is completed.
(1) will show on LCD Display meaning compressed air is on.
Turn compressed air On/Off by pressing .
(2) will show on LCD Display by pressing shortly.
Maintenance time setting:
Select 15 sec by pressing /Select 20 sec by pressing / Select 30 sec by pressing .
(3) will show on LCD Display meaning buzzer sound is on by pressing shortly.
Select buzzer sound On/Off by pressing .
■Note
Pressing any button or opening the front door will immediately stop the maintenance procedure.
■Functional setting:
Select functional setting mode by pressing for approx 2 sec.
(4) will show on LCD Display meaning auxiliary motor is on by pressing
shortly. Select Auxiliary motor On/Off by pressing .

14
■Remove and Clean Front Door:
(1) Push left pivot upward and inward.
(2) Push right pivot upward and inward.
Left Pivot
Front Door
Front Pin
(3) Pull front pin in the direction of arrow shown in the
photo.
(4) Remove front door.
The front door can be cleaned with 30 ° ± 5 ° C tap water or 60% to
70% alcohol, non-high-temperature cleaning.
Nut
15
■Cleaning Couplings :
Loosen the nut and take the coupling off.
Clean it with ethanol 60 to 70 vol%
■Note
(1) Remove it carefully without damaging the o-ring.
(2) Couplings cannot be autoclaved.
■Note
Do not connect handpiece to the coupling when
o-ring is not properly fitted in its groove. Possible
damages to the o-ring and stuck in the coupling
may make it difficult for disassembling handpiece.
An o-ring could slip out of its groove.
Make sure all o-rings are properly seated in their
grooves before attaching a handpiece.
NG
OK
Upward
Blister
• The blister can be cleaned with 30˚C±5˚C tap water or 60% to 70% alcohol,
non-high-temperature cleaning.
• The blister can be used repeatedly, but should be changed once broken.
WARNING
■Remove and Clean Blister
Remove it upward.
Tray
■Cleaning the Tray:
(1) Take the tray out in the direction of arrow shown in the photo.
(2) Clean and replace new absorption pad.
• The tray cannot be autoclaved.
• Autoclaving will cause it to rust.
• Do not use disinfectants that contain
chlorine-based cleaners or benzalkonium
chloride or chlorinated aromatics.
• If this tray is not cleaned, oil will overflow
from the tray.
CAUTION
• Dispose of used absorption pad according to
regulations for medical waste.
• Push the tray all the way in, otherwise, oil
may leak and oil mist might be dispersed.
NOTE

16 17
7. Maintenance and Inspection 8. Trouble Shooting and Error Code
■Trouble Shooting
Breakdown Reason Solution
Main power lamp does not light up
Does not start when Start Switch is
pressed.
(1) Double beep sound
(2) Spray can Empty Lamp is
blinking
Unusual odor.
Surfaces are unusually dirty.
Cannot install spray can.
Oil leaks from spray can.
Power supply cord not properly
plugged into supply socket
Power supply cord not properly
plugged into TTcare100+
Front door may be open
Empty can
Can is not properly installed
Compressor air is not connected
Air regulator is not set properly
Close front door
Replace can
Properly install the can
Connect air
Set regulator properly
Use without connecting handpiece
Absorption pads is saturated
Can is not properly installed
Air regulator is not set properly
Select only couplings that have a
handpiece connected
Clean TTcare100+ and replace
filter
Properly install the can
Set regulator properly
Bent spray can nozzle pin
Wrong stand for spray can
Replace can
Use proper stand for can
Air pressure too high Reduce air pressure, but not less
than 4 bar
No burr inserted in straight
attachment.
Refer to the user instructions for
the handpiece. For some
handpieces, an oil mist may be
released if a burr is not inserted
Oil mist is released.
Equipment surfaces get oily
Type of handpiece or coupling
Depending on the type of
handpiece and coupling, there
could be a release of oil mist. In
this case, lower the pressure to 4
bar
Plug in properly
*Send the product every 2 years for a service check.
The safety checks in different countries can vary in compliance with country specific
regulations and requirements for medical devices. The national valid regulations are to be
observed.
*Repair and maintenance work- part from the activities described in these operating
instructions-may be performed only by qualified technical staff.
*Expected service life 5 years.
• In the event of modification by third parties, existing medical device licences become null and
void.
• Only use original parts and spare parts.
• The user( i.e. clinic, hospital etc.) is responsible for the management, maintenance and use of
medical devices.
■Regular Inspection
*Maintenance and inspection are generally considered to be the duty and obligation of the user, but
if, for some reason, the user is unable to carry out these duties, they may rely on a qualified
medical device serviceman. Contact your local dealer or the TTIBO CORP. for details.
• Regularly Required Replacement Parts
Fuse
• Other Replacement Parts
Absorption pads, Blister
(1) Power Supply Cord
Inspect visually for wear and broken wires.
(2) Main and Operation Switches
Turn on main switch and ensure main lamp lights up.
Check that the unit operates correctly.
(3) Absorption pads
Replace absorption pads(when the tray is filled by oil)..
English

18 19
9. Tools and consumables
■Error Code
Presentation Material summary Part No.
KaVo service adapter
W&H service adapter
NSK service adapter
Bien-Air service adapter
SIRONA service adapter
E-Type adapter
Spray can
Blister
Absorption pads
0PL0345
0PL0346
0PL0344
0PL0348
0PL0347
0PL0349
08090011
0PL0350
0PL0351
Error Code ReasonDescription Exclusion
Error 01
Error 02
Error 03
Error 04
Error 05
Error 06
Error 07
Error 08
Error 09
Error 10
Keyboard Error
Oil supply motor Error
Pressure input too low
Pressure input too high
Oil empty
Circuit is over temperature
Circuit detect Error
Auxiliary rotation motor
Error
Function Memory Access
Error
Electromagnetic valve Error
Faulty Motor
or internal circuit
Function keypad Error
Faulty Motor or internal
circuit
Air pressure lower than
preset
Air pressure higher than
preset
Faulty Main IC
Oil empty
Faulty Electromagnetic
valve
Faulty Motor or internal
circuit
Faulty Main IC
Contact your dealer
Contact your dealer
Contact your dealer
Increase air pressure
renew air setting(refer to
chapter 4)
Decrease air pressure
renew air setting(refer to
chapter 4)
Contact your dealer
Replace a new can of oil or
Contact your dealer
Contact your dealer
Contact your dealer
Contact your dealer
English

10. Service Contacts
■For repair or other types of service contact your local dealer or TTBIO CORP.
■Disposal of Medical Devices
Any medical devices which could possibly be contaminated must be first decontaminated by the
responsible doctor or medical institution and then be disposed by an agent licensed and qualified to
handle medical and industrial waste.
11. Information on Electromagnetic Compatibility
Emission Test Compliance
Group 1
Group B
Group A
Compliance
Electromagnetic environment-guidance
The TTcare 100+ is intended for use in the electromagnetic environment specified below.
The customer or the user of the TTcare 100+ should assure that it is used in such an environment.
Guidance and manufacturer’s declaration-electromagnetic emissions
RF emissions
CISPR 11
RF emissions
CISPR 11
Harmonic emissions
IEC 61000-3-2
Voltage fluctuations
/flicker emissions
IEC 61000-3-3
The TTcare 100+ uses RF energy only for its internal
function. Therefore, its RF emissions are very low and
are not likely to cause any interference in nearby
electronic equipment.
The TTcare 100+ is suitable for use in all
establishments, including domestic establishments
and those directly connected to the public low-voltage
power supply network that supplies buildings used for
domestic purposes.
20 21
English

22 23
English
Immunity test IEC 60601
test level
Compliance level
Electromagnetic
environment-guidance
The TTcare 100+ is intended for use in the electromagnetic environment specified below.
The customer or the user of the TTcare 100+ should assure that it is used in such an environment.
Guidance and manufacturer’s declaration-electromagnetic immunity
Electrostatic
discharge(ESD)
IEC 61000-4-2
Floors should be wood, concrete or
eramic tile. If floors are covered
with synthetic material, the relative
humidity should be at least 30%
± 6 kV contact
± 8 kV air
± 6 kV contact
± 8 kV air
Electrical fast
transient/burst
IEC 61000-4-4
Mains power quality should be that
of a typical commercial or hospital
environment.
± 2kV for power
supply lines
Not applicable
± 2kV for power
supply lines
± 1kV for
input/output lines
Surge IEC 61000-4-5
Mains power quality should be that
of a typical commercial or hospital
environment.
± 1kV differential
mode
Not applicable
± 1kV line(s) to
line(s)
± 2kV line(s) to
earth
The TTcare 100+ power frequency
magnetic fields should be at levels
characteristic of a typical location
in a typical commercial or hospital
environment.
3 A/m
3 A/m
Power frequency
(50/60 Hz)
magnetic field IEC
61000-4-8
Mains power quality should be that
of a typical commercial or hospital
environment. If the user of the
TTcare 100+ requires continued
operation during power mains
interruptions, it is recommended
that the TTcare 100+ be powered
from an uninterruptible power
supply or a battery.
<5% UT(>95%
dip in UT) for 0,5
cycle 40%
UT(60% dip in
UT) for 5 cycles
70% UT(30% dip
in UT) for 25
cycles <5%
UT(>95% dip in
UT) for 5 s
<5% UT(>95% dip
in UT) for 0,5 cycle
40% UT(60% dip
in UT) for 5 cycles
70% UT(30% dip
in UT) for 25
cycles <5%
UT(>95% dip in
UT) for 5 s
Voltage Dips, short
interruptions and
voltage variations
on power supply
input lines IEC
61000-4-11
■Note: UT is the a.c. mains voltage prior to application of the test level.
Immunity test IEC 60601
test level
Compliance
level
Electromagnetic
environment-guidance
The TTcare 100+ is intended for use in the electromagnetic environment specified below.
The customer or the user of the TTcare 100+ should assure that is used in such and environment.
Guidance and manufacturer’s declaration-electromagnetic immunity
Portable and mobile RF communications
equipment should be used no closer to any
part of the TTcare 100+ including cables,
than the recommended separation distance
calculated from the equation applicable to
the frequency of the transmitter.
Recommended separation distance:
d = 1,2 √P
d = 1,2 √P 80MHz to 800 MHz
d = 2,3 √P 800MHz to 2,5 GHz
Where P is the maximum output power
rating of the transmitter in watts (W)
according to the transmitter manufacturer
and d is the recommended separation
distance in metres (m).
Field strengths from fixed RF transmitters,
as determined by an electromagnetic site
survey, ashould be less than the compliance
level in each
frequency range.b
Interference may occur in the vicinity of
equipment marked with the following
symbol:
Conducted RF
IEC 61000-4-6 3 Vrms
3 Vrms
150 KHz to 80 MHz
Radiated RF
IEC 61000-4-3 3 V/m
3 V/m
80MHz to 2,5 GHz
■a: Field strengths from fixed transmitters, such as base stations for radio (cellular/cordless)
telephones and land mobile radios, amateur radio, AM and FM radio broadcast and TV
broadcast cannot be predicted theoretically with accuracy. To assess the electromagnetic
environment due to fixed RF transmitters, an electromagnetic site survey should be
considered. If the measured field strength in the location in which the TTcare 100+ is used
exceeds the applicable RF compliance level above, the TTcare 100+ should be observed to
verify normal operation. If abnormal performance is observed, additional measures my be
necessary, such as re-orienting or relocating the TTcare 100+.
■b: Over the frequency range 150 kHz to 80 MHz, field strengths should be les than 3 V/m.
■Note1: At 80 MHz and 800 MHz, the higher frequency range applies.
■Note2: These guidelines may not apply in all situations. Electromagnetic propagation is affected
by absorption and reflection from structures, objects and people.

24 25
Rated maximum output
power of transmitter
W
Separation distance according
to frequency of transmitter
M
150 kHz to 80 MHz
d =1,2√P
80 MHz to 800 MHz
d =1,2√P
800 MHz to 2,5 GHz
d =2,3√P
The TTcare 100+ is intended for use in an electromagnetic environment in which radiated RF
disturbances are controlled. The customer or the user of the TTcare 100+ can help prevent
electromagnetic interference by maintaining a minimum distance between portable and mobile RF
communications equipment (transmitters) and the TTcare 100+ as recommended below, according
to the maximum output power of the communications equipment.
Recommended separation distance between
portable and mobile RF communications equipment and the TTcare 100+
0.01
0.1
1
10
100
0.02
0.38
1.2
3.8
12
0.12
0.38
1.2
3.8
12
0.23
0.73
2.3
7.3
23
For transmitters rated at a maximum output power not listed above, the recommended separation
distance d in metres (m) can be estimated using the equation applicable to the frequency of the
transmitter, where p is the maximum output power rating of the transmitter in watts (W) according to
the transmitter manufacturer.
■Note1: At 80 MHz and 800 MHz, the separation distance for the higher frequency range applies.
■Note2: These guidelines may not apply in all situations. Electromagnetic propagation is affected
by absorption and reflection from structures, objects and people.
注意事項
免責聲明
1. 警告,注意和提醒
2. 規格
3. 零件說明
4. 設定
5. 操作
6. 維修和更換零件
7. 保養和檢查
8. 異常排除和故障碼
9. 工具和消耗品
10. 服務聯繫
11. 電磁相容性資訊
25
26
26
27
30
32
34
37
40
41
43
44
45
注意事項
大多數操作和維護問題都是因為忽略最基本的安全預防措施,並且沒有能夠預見到事故的問題和事故的
可能性。要避免問題產生與危險的可能性請按照製造商的建議操作。首先仔細閱讀所有有關安全和事故
預防和注意事項;然後在操作上需謹慎,以防止設備損壞或造成人身傷害。
注意下列符號和用語的含義:
■提醒:
此提醒用戶相關的操作要點。
用戶(即診所,醫院等)負責管理,維護和使用此保養設備。除非具有專業資格的牙醫或護士,其餘人
都不適合操作此設備。
■注意:
美國聯邦法律規定,此設備只能出售於有合格專業證書的牙醫。
警 告
注 意
提 醒
嚴重受傷或設備損壞或故障或引起火災的危險
使用不適當的方法或工具來操作設備
設備損壞或中等傷害
切勿把此設備用於非預期用途。
目 錄 繁體中文

26
注 意
TTBIO對於從事下面事項而造成設備損壞,將不負責任
(1) 由未經TTBIO授權的人員進行維修。
(2) 任何變更,修改或改變此產品。
(3) 維護或修理使用非TTBIO生產的零件或部件,而導致原始設定條件失效。
(4) 使用非此手冊提到的操作程序或沒有遵守本手冊中提到安全注意事項和警告。
(5) 工作場所的條件和環境,或安裝條件不符合本手冊中所規定的條件。
(6) 火災,地震,洪水,雷電,自然災害,或不可抗力之因素。
• 爆炸危害。使用時不要靠近火源或其他點火源。
• 健康危害。通風必須保持良好。因為吸入過多的煙霧可能會損害您的健康。
• 設備電源必須正確的連接。
• 電源接地需正確且妥善的連接與建立。
• 為了防止危及生命的疾病或病菌蔓延,如愛滋病和B型肝炎,在使用TTcare100+後,牙科手機需進
行高溫滅菌消毒。
• 避免觸電的風險。設備損壞和火災與雷電期間:關閉TTcare100+電源,且不要觸摸它或電源線。
• 操作或清潔TTcare100+時,請戴上手套,口罩和防護眼鏡。
警 告
手機,收發器,遙控器和類似的裝置有可能會引起電磁波干擾,造成設備錯誤。在靠近工作區會發射
電磁波的相關裝置都必須被關閉。
注意
• 不同的牙科手機和快速接頭,所釋放的油霧會不一樣。減少油霧的產生可調降壓力為最低的設定值
4bar。
• 保養油罐安裝不正確,會導致保養油洩漏或是無法順利出油。
• 筒夾保養時需確定牙科手機的筒夾有對準噴噴嘴。如果傾斜,會導致保養油噴射出來。
• 在保養未完成(蜂鳴聲)前,就把牙科手機從接頭拆下,會導致保養油從接頭噴射而出。
提醒
1. 警告,注意和提醒
繁體中文
27
• 對於某些牙科手機,在鑽針沒有安裝的情況下,油霧可能會被散出。
• 將牙科手機安裝到設備的接頭時,請不要損壞上面的O型環。這會導致保養油洩漏而使保
養效果不佳。
• 不要選擇一個跟手機不相配的的快速接頭,這會導致在按下啟動開關後保養油洩出。
• 如果一段時間不使用此設備,請將連接此設備,診所內的主空氣閥關閉。
• 請確認您使用正確的電源供應於TTcare100+。
• 不要使用非TTBIO生產的快速接頭於TTcare100+,這可能會導致釋放油霧過多 或牙科手機保養不
佳。
• 根據當地醫療廢棄物法規處置用過的吸油墊。
• 請將集油盤完全推入,否則過多的油與油霧可能洩漏。
2. 規格
產品名稱 TTcare 100+
AC 100-240 V 50/60 Hz
60VA max.
250V 2A Slow Blow Type
4~6 bar
4 bar
40 NL/ min
9 kg
295 ×385 ×295 mm
電壓與頻率
電力消耗
保險絲
壓力需求
建議壓力
空氣流量
重量
尺寸(寬/高/深)
保護等級(防塵防水) IP20
工作環境要求
只允許在室內使用
15 to 40°C (59 to 104°F)
25 to 90 %
2000 m (6560 feet)
位置
環境溫度
相對溼度
最大海拔高度
儲存及運輸環境
-20 to 70°C (-4 to 158°F)
5 to 95 %
700 to 1060 hPa
環境溫度
相對溼度
大氣壓力
繁體中文
28
■符號的意義
• 設備標籤
WARNING
• The blister can be cleaned with 30˚C±5˚C tap
water or 60% to 70% alcohol,
non-high-temperature cleaning.
• The blister can be used repeatedly, but
should be changed once broken.
FLAMMABLE
• Spray cans will explode if they get too hot.
• Do not expose the spray cans to heat.
• Only use approved spray can.
*PREVENT EXPLOSION AND
IGNITION OF SPRAY CANS!
• 設備上的符號
注意操作手冊
生產日期
廢棄資訊
參照重要資訊”廢棄物處置”
產品序號
注意
易燃
SN
■產品說明
用於保持牙科手機最佳性能和延長工作壽命。
自動提供保養油和空氣於潤滑清潔牙科手機。
用於牙科治療後,滅菌前。
■廢棄物處置
廢棄物必須在不傷害人類和環境的方法下回收處理;請遵照當地國家的法規進行。
到了壽命使用期限時,設備和配件的處置:
根據2002/96/EC的廢電氣電子設備指令,指出本產品標籤目前遵守其規定,但未受限於此指令處置要
求,然而,本產品可能由歐洲特殊廢棄物管理中心處理,其他的資訊可透過製造商或牙科供應商取得。
Automatic Handpiece
Maintenance Unit
Product code : 08090012XXX
XXXXXXXXXXX
SN
INPUT :AC 100~240V 50/60 Hz
60VA max.
AIR PRESSURE: 4~6 bar
FUSE: 250V 2A Slow Blow Type YYYY-MM
IP20
29
保護等級(防塵防水) 護目鏡佩戴
• 包裝上的符號
易碎
保持乾燥
垂直運輸
氣壓
溼度
數量
製造商
疊放規定
溫度範圍
■主電源開關
關 開
• 外箱標籤
20 kg
95%
5%
%
700
1060
hPa
hPa
70 C
-20 C
0473
Temperature range Air Pressure Humidity Fragile Keep dry
Transport
upright
Stacking
restriction
Waste
Disposal
Storage and transport requirements
1
Automatic Handpiece
Maintenance Unit
Product Code:
08090012
XXXXXXXXXXX
SN

繁體中文
30
3. 零件說明
■介紹
前門
集油盤
吸油棉
操作介面
油罐側門 氣壓調整閥
電源開關
電源接口
氣壓連接孔
保險絲座
手機選擇燈號 保養罐無油
啟動/設定/
筒夾保養
顯示屏
手機選擇鍵
31
泡殼
前門
手機連接頭
筒夾接嘴
油罐側門
見第2章
見第2章
■內容物
保養機 泡殼
料號:0PL0350
吸油棉
料號:0PL0351
集油盤
料號:0PL0359
氣壓管
料號:0PL0360
*TTcare 100+ 包含上述標準配備。
* 選購配件,請參閱第9章。

繁體中文
(2) 電源連接
將電源線的一端插入主機,另一端插入電源插座。
電源線
32
4. 設定
■注意
TTcare100 + 安置至少要離牆面5公分(2英吋)的距離,不可緊貼牆面。
(1) 氣壓連接
1. 將氣壓管連接到氣壓連接孔。打開診所內的供氣閥。
■注意
供給的氣必須是清潔不含油的。
請確保牢固地連接氣壓管。
2. 調整氣壓調整閥,將氣源設定4~6 bar。推薦的氣壓
為4 bar。
■注意
氣壓小於4bar或高於6 bar將會發生錯誤,會產生錯誤
代碼並顯示於顯示屏。
螺帽
■注意
確保螺帽是有旋緊的。否則,油和空氣會洩漏,而導致
保養不完全。
氣壓連接孔
氣壓管
氣壓調整閥
33
2. 確定如左圖中所示的固定桿,它是往左邊的,然後放
入保養油罐。
保養油罐
油罐座
未鎖固
3. 將固定桿往右邊推,使得油罐被固定,如右圖所示。
已鎖固
■注意
確定油罐噴嘴與保養罐是對正的。
確定固定桿如右圖所示,是往右的,否則油會出不來。
可輕輕拉一拉噴霧罐,確定它是穩固不會晃動的。
若是油罐沒被正確的安裝,它將會造成洩漏。
注 意
(5) 噴罐
1. 打開油罐側門。
按下PUSH標誌,如右圖所示。
壓
■注意
不要使用含有酸性或鹼性的清潔劑,它會損壞
TTcare100+和牙科手機。
(4) 集油盤
放入兩個吸油墊並往後推到底。
吸油棉
集油盤
■注意
集油盤需正確放入,否則,它會導致洩漏。

繁體中文
34
油罐座
調整螺絲
5. 如果油罐是鬆動的,可使用六角板手調整如右圖所示的
螺絲。
■注意
可調整的高度距離約5mm.。
6. 關上油罐側門。
4. 輕輕抬起噴霧罐,確認油罐噴嘴是否被固定,如下圖所示。
OK NG
5. 操作
■面板顯示
• 建議使用TTBIO生產的 TTlube保養罐。
• 油罐噴嘴和油罐座的設計可相容於某些品牌的保養油罐,
但不代表所有的保養油罐都可用。
注 意
35
■操作指令
■操作顯示說明
圖示 功能 操作指令
電源開關
1號手機
2號手機
3號手機
當選擇1號時燈會亮起
當選擇2號時燈會亮起
當選擇3號時燈會亮起
當燈號亮起代表油罐無油請更換
1.門關閉時,進行牙科手機保養
2.門打開時,進行筒夾保養
3.無任何燈號亮起時,長按進入功能設定
開始 / 設定 / 筒夾保養
保養油耗盡
關
開
1號手機
2號手機
3號手機
氣源 開/關
蜂鳴器 開/關
輔助馬達 開/關
繁體中文
36
■保養操作
■注意
● 高速手機與彎手機
保養時移除手機上的鑽針
● 直手機
保養時手機上插入鑽針並鎖上
(1) 筒夾保養:
打開電源,打開前門。
此符號將會顯示於顯示屏上。
將筒夾對準於設備噴嘴的出口。
按下 進行保養,發出”嗶”聲代表完成保養。
(2) 手機保養:
打開電源,打開前門。
將手機連接到設備的保養接頭上,請確認連接是有牢固的。
關上前門, 此符號將會顯示於顯示屏上。
選擇有接手機的位置,並按下 / / 進行保養,
發出”嗶”聲代表完成保養。
■注意
保養過程中,按下任意鍵或打開前門,保養將馬上停止。
■功能設定:
長按 鍵約2秒,進入設定功能。
(1) 氣源輸入 ON/OFF ,按下 可做切換。
(2) 保養吹氣時間, :15秒, :20秒, :30秒。
(3) 蜂鳴器響聲ON/OFF ,按下 可做切換。
(4) 輔助馬達 ON/OFF ,按下 可做切換。
37
6. 保養和更換零件
■更換保險絲
(1) 使用一字起子壓住保險絲座。
(2) 拉起保險絲座。
(3) 更換保險絲 (規格:250V 2A Slow-Blow type)
(4) 將更換完畢的保險絲座插回。
保險絲
保險絲座
■氣源輸入調整:
拉起壓力調整閥 然後轉動,調整壓力在4.0~6.0 bars。建議壓力為4.0 bars。
按下 鍵確定。
■保養油量調整:
(1) 開機後,在 和 的指示燈號一起全亮時,按下 鍵,
直到螢幕出現 。
(2) 總共有PU-00到PU-10共11段油量可供調整。按下 為增加,按下 為減少,選擇你所需
的油量後,按下 鍵確定儲存便會自動回到主畫面。
(5) 輔助馬達運轉選擇 ,按下 / / 來各別選擇需要啟動的手機。
(6) 氣源輸入顯示,按下 確定。
Table of contents


