Tulmar TYPE 1 PBE User manual

MANUAL P/N 6408-006, REV B
TYPE 1 PBE USER MANUAL
FOR P/N: 6408-005
TULMAR SAFETY SYSTEMS Inc.
1123 Cameron Street
Hawkesbury, Ontario
Canada K6A 2B8
Tel: 1-613-632-1282
Fax: 1-613-632-2030
www.tulmar.com

Manual P/N 6408-006, REV BPGE Page 2
TABLE OF CONTENTS
0. Revisions register..................................................................................................................... 2
1. Equipment Overview............................................................................................................... 3
1.1. Product Description ...........................................................................................................................3
1.2. Parts and Features .............................................................................................................................3
2. Safety Precautions................................................................................................................... 4
3. Operation................................................................................................................................. 4
3.1. Removal from Storage and Donning..................................................................................................4
3.2. Operation...........................................................................................................................................5
4. Care and Basic Maintenance ................................................................................................... 5
4.1. Care after Use ....................................................................................................................................5
4.1.1. Disinfection .................................................................................................................................5
4.1.2. Storage........................................................................................................................................5
4.2. Cleaning..............................................................................................................................................9
4.2.1. Disassembly.................................................................................................................................9
4.2.2. Cleaning and Drying ..................................................................................................................10
4.2.3. Reassembly ...............................................................................................................................10
4.2.4. Repairs ......................................................................................................................................11
5. Components .......................................................................................................................... 12
6. Warranty................................................................................................................................ 13
6.1. Warranty Policy................................................................................................................................13
6.2. Limitations........................................................................................................................................13
6.3. Remedy ............................................................................................................................................13
0. REVISIONS REGISTER
Revision A
2016-12-08
Initial Revision
Revision B
2019-01-22
Added Table of Content, Contact information update

Manual P/N 6408-006, REV BPGE Page 3
1. EQUIPMENT OVERVIEW
1.1. Product Description
The Type 1 protective breathing equipment (PBE) is designed to feel and operate like the real
device in order to train for emergencies in a safe, controlled classroom environment. The
training PBE includes a simulated pull cord, nose cone, head band, and weighted pouch for
realism. The hood is similar in shape, colour, and weight to the OEM PBE.
This PBE is designed with durable materials in order to withstand the wear and tear it will
experience during repeated use in a training environment. The device can be completely
dismantled for easy cleaning between uses or for replacement of parts. Tulmar Safety Systems
is also able to provide repairs to the textile portion of the PBE and replace parts that experience
wear through repeated use.
The neck seal for this unit is available in latex free EPDM material or latex based variants.
1.2. Parts and Features
Nose Piece
Neck Seal
Weighted bag
Visor
Pull Cord
Waist Strap
Figure 1: PBE Type 1 6408-005 front and rear views

Manual P/N 6408-006, REV BPGE Page 4
2. SAFETY PRECAUTIONS
This device is intended for training and simulation purposes under the supervision of a trainer
knowledgeable in its use only, and will not provide protection from smoke inhalation or toxic
gases in the event of a real emergency. Do not block or cover ventilation holes during training
exercises.
3. OPERATION
3.1. Removal from Storage and Donning
1. If the PBE is stored in a box assembly, open the box by pulling outwards on the longer
end of the metal latch and remove the PBE from the box (Figure 2).
Figure 2: Removal of latch on box assembly
2. If the PBE is in the re-useable pouch, open the pouch by pulling the white ‘PULL’ label on
the Velcro strip along the top of the pouch, then remove the hood.
Figure 3: Opening re-useable pouch

Manual P/N 6408-006, REV BPGE Page 5
3. Hold the smoke hood in front of you, stretching the neck seal open with both hands
(Figure 4).
Figure 4: Neck seal stretched open
4. Pull the hood over your head, making sure to align the nose cone with your nose and
mouth.
5. Tie the waist strap around your torso to hold the front portion in place.
6. The pull cord at the bottom of the hood can be used to simulate activation of a
functional PBE.
3.2. Operation
1. Once the user is wearing the hood, you can follow your standard training procedure.
2. After your training exercise is complete, undo the waist strap and remove the device by
grabbing the back of the hood and pulling forwards off your head.
4. CARE AND BASIC MAINTENANCE
4.1. Care after Use
4.1.1. Disinfection
The nose cone, neck seal, and facial contact area in the front of the hood should be disinfected
with alcohol between uses to ensure the health of the trainees.
4.1.2. Storage
The PBE should be stored in a protective container to prevent damage when not in use. If you
have the re-useable pouch and/or the box assembly, the device can be stored within by
following the instructions below. If your kit does not include the re-useable packaging, the PBE
can be folded in half and stored in a 16” by 20” re-sealable plastic bag.

Manual P/N 6408-006, REV BPGE Page 6
1. Place the device on a flat surface with the rear facing upwards.
2. Fold the sides of the device inwards (Figure 5).
Figure 5: Folding PBE to proper width
3. Roll the bottom of the PBE upwards (Figure 6) in order to match the size of the re-
useable pouch and box assembly (Figure 7).

Manual P/N 6408-006, REV BPGE Page 7
Figure 7: Completely folded PBE
Figure 6: Rolling PBE upwards

Manual P/N 6408-006, REV BPGE Page 8
4. Insert the folded hood into the re-useable pouch and seal the Velcro strip (Figure 8).
Figure 8: Inserting folded hood into re-useable pouch
5. Insert the hood and pouch into the box assembly and close the lid. Fasten the lid by
pushing the metal latch on to the front edge (Figure 9).
Figure 9: Closing latch on box assembly

Manual P/N 6408-006, REV BPGE Page 9
4.2. Cleaning
4.2.1. Disassembly
1. Remove the neck seal by undoing the Velcro strip used to fasten it in place.
2. Hold the PBE with the opening facing upwards. Grasp the front of the nose cone firmly
in one hand and unscrew the black retaining ring (Figure 10) on the inside of the nose
cone assembly counter-clockwise. Remove the rubber nose protector.
3. Carefully undo the 4 snaps attached to the plastic nose cone and remove the remainder
of the nose cone components.
4. Remove the weighted bag from the unit by unfastening the two Velcro straps holding it
in place (Figure 11).
5. Undo the bowline knot in the pull cord and detach the pull cord.
Velcro
Bowline
Figure 11: Fastening mechanisms for weighted bag
Retaining
Ring
Snaps
Figure 10: Fastening mechanisms for nose cone

Manual P/N 6408-006, REV BPGE Page 10
4.2.2. Cleaning and Drying
1. If any stains, oil, or grease are present, treat the affected area with a concentrated
solution of wash detergent to remove the stain. Thoroughly rinse with water before
cleaning the entire unit.
2. All components can be cleaned by hand with a solution of mild soap and water, rinsing
thoroughly with water. If necessary, the main body of the hood can be washed in a
standard washing machine on delicate cycle.
3. Allow components to air dry fully. The main body of the hood can be dried in a dryer on
delicate cycle.
4.2.3. Reassembly
Once completely dry, the unit can be reassembled.
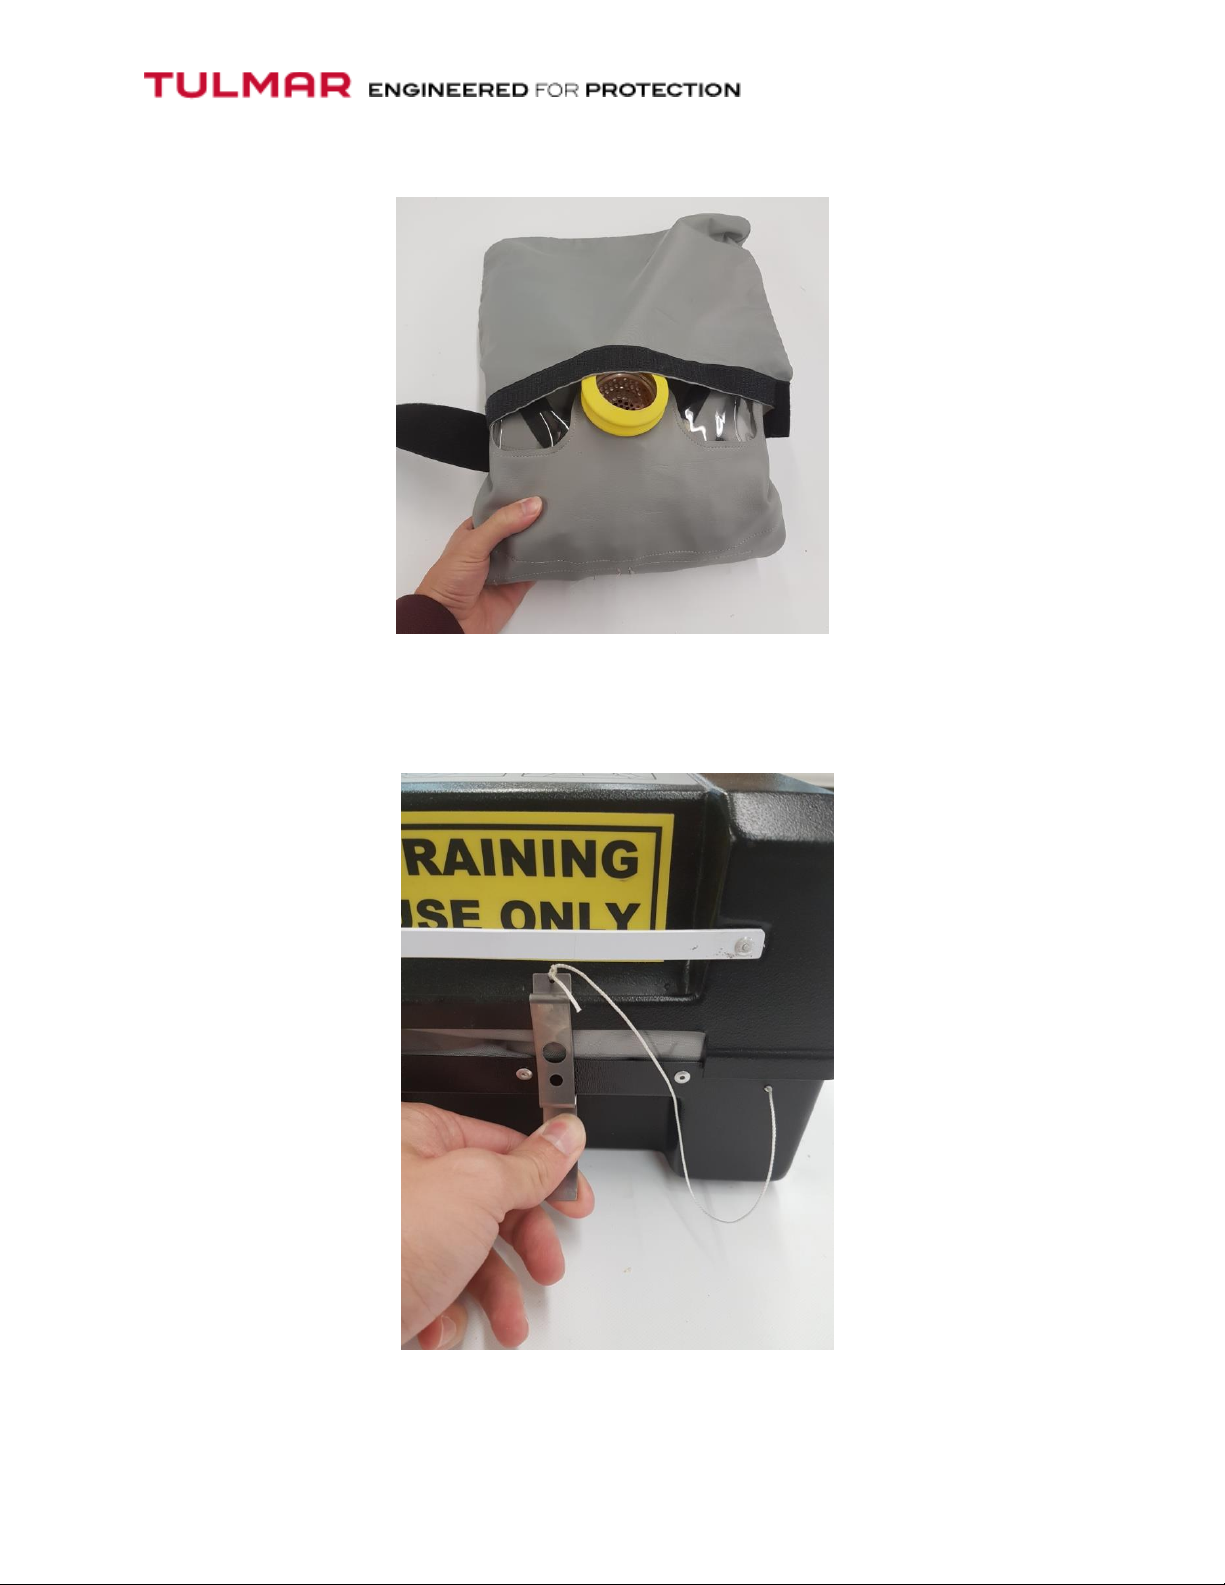
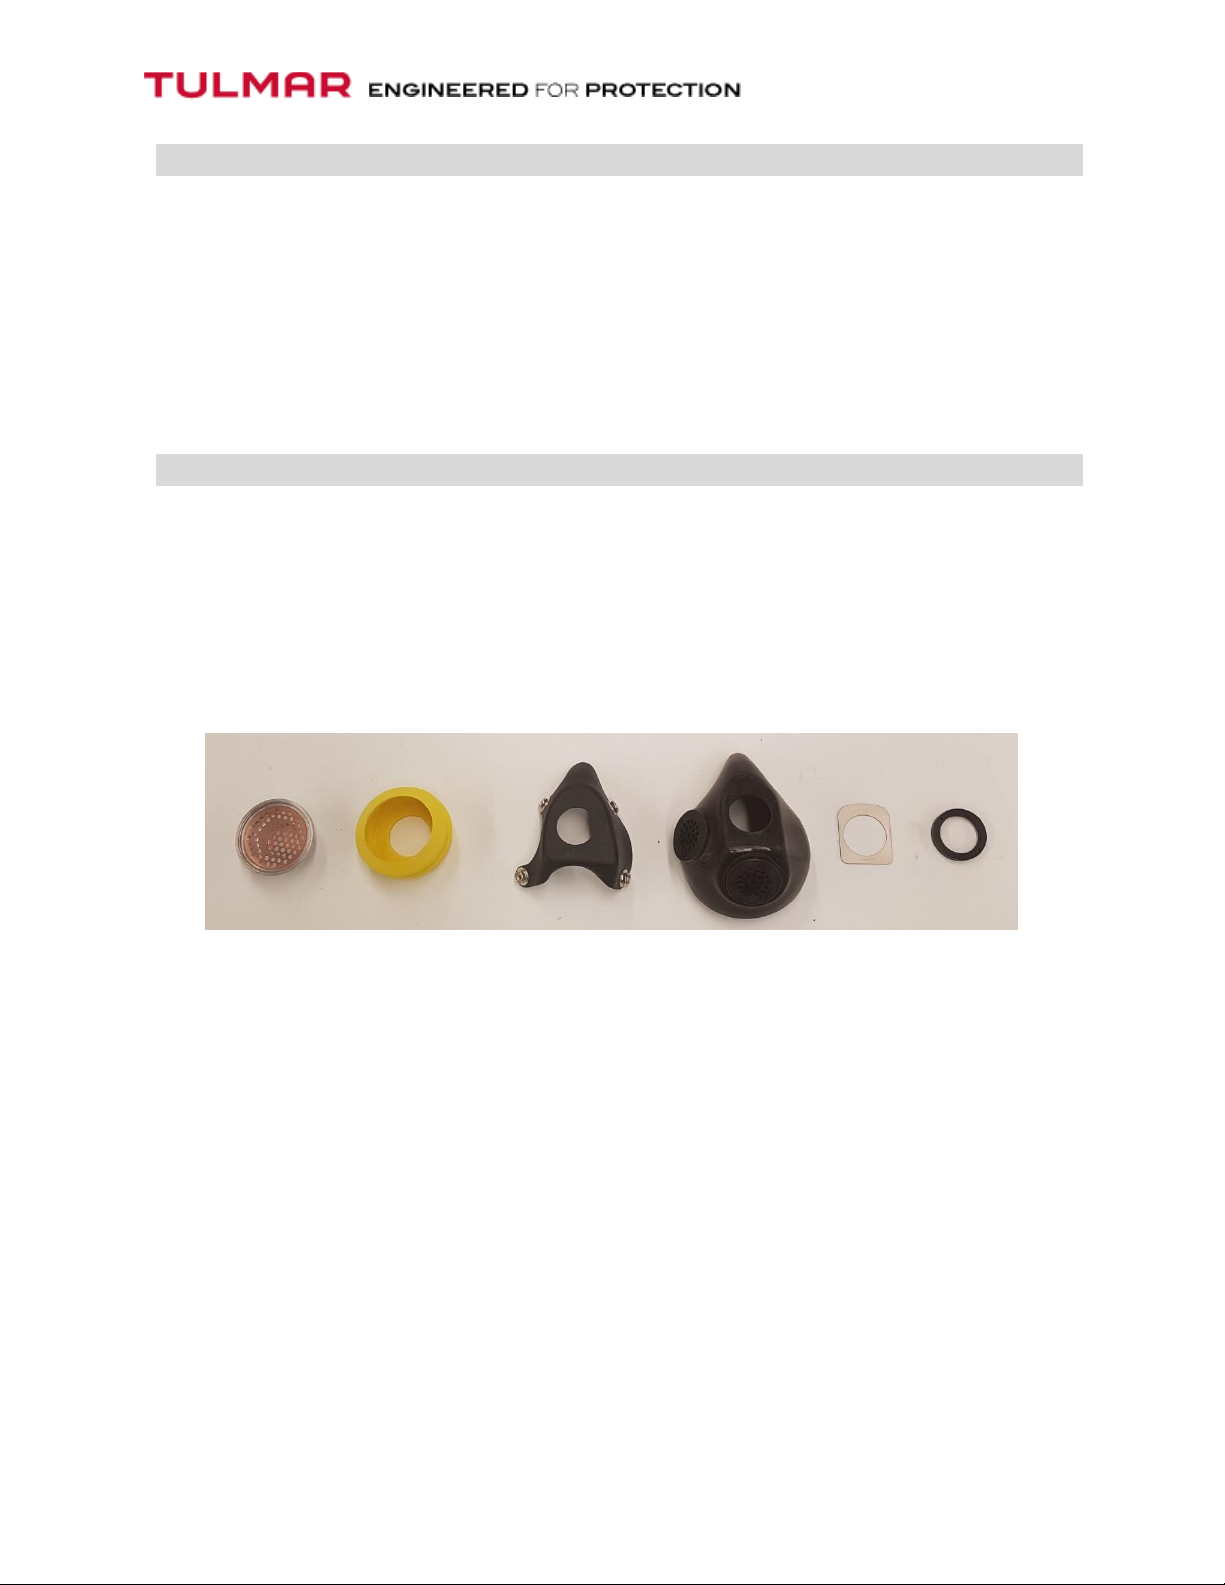
1. Reassemble the nose cone on to the smoke hood in the order shown below, with the
yellow voice transmitter boot and the metal voice transmitter on the outside of the
hood, and all other components on the inside (Figure 12). With the voice transmitter
assembled into the yellow rubber boot, insert the threaded end of the voice transmitter
into the opening of the smoke hood.
Figure 12: Nose cone components ordered left to right from outermost to innermost components
2. Slide the plastic nose cone over the threaded end of the voice transmitter, ensuring the
nose cone is oriented correctly.
3. Fasten the four snaps holding the nose cone in place.
4. Insert the rubber nose protector onto the threaded end of the voice transmitter, aligned
with the orientation of the plastic nose cone.
5. Slide the metal washer onto the threaded end of the voice transmitter and fasten the
black retaining ring.
6. Hand tighten the retaining ring while firmly holding the base of the plastic nose cone.
7. Reattach the weighted bag using the two Velcro straps.
8. Thread the pull cord through the grommet at the bottom of the PBE, tying it to the
weighted bag.
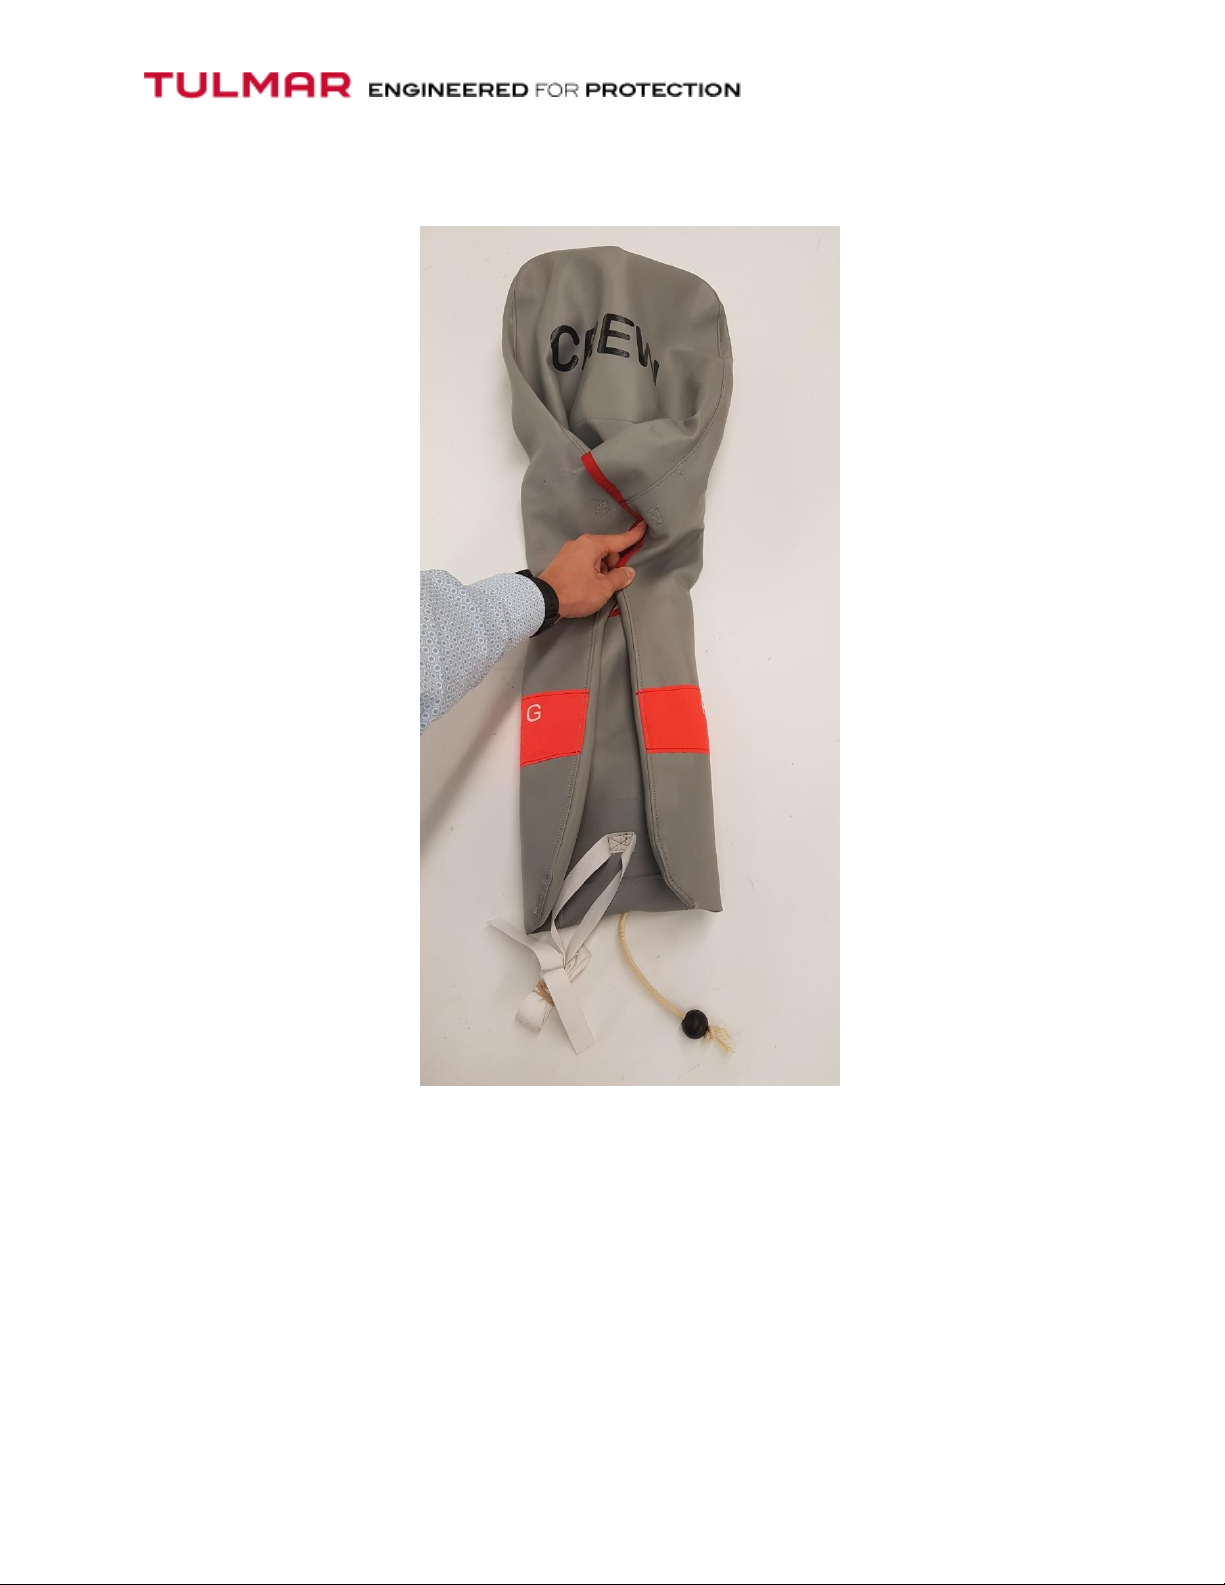
9. Place the smoke hood upside down with the front (face) pointed towards you. Position
the neck seal over the opening with the red strip facing up towards you and the hole of
the neck seal nearest the rear of the smoke hood. The Velcro strip on the neck seal

Manual P/N 6408-006, REV BPGE Page 11
perimeter should be facing in towards the smoke hood. Working around the perimeter,
firmly mate the hook and loop fastener together. Note: Installing the neck seal in the
wrong direction can cause it to detach during operation (Figure 13).
Figure 13: Latex free neck seal oriented with opening closest to rear of hood and Velcro strip facing downwards
4.2.4. Repairs
More thorough cleaning and/or repairs of the PBE are handled by Tulmar Safety Systems.
Please contact our customer service department for more information. Contact details can be
found on the cover of this manual.

Manual P/N 6408-006, REV BPGE Page 12
5. COMPONENTS
The following table lists components available for the Type 1 PBE. If you are looking to replace
a part that is not listed below, please contact Tulmar Safety Systems.
Part No.
Description
Image
6412-NP
Latex neck seal
Not pictured, similar to 6412-001
2144
Pull cord
Figure 14, item 1
5667-001
Plastic nose cone
Figure 14, item 2
6423-302
Re-Useable Pouch. PBE Type 1
Figure 14, item 3
6423-300
Box Assembly, PBE Type 1
Figure 14, item 4
6408-203
Voice transmitter, training only
Figure 14, item 5
6408-201
Rubber voice transmitter boot
Figure 14, item 6
6408-200
Rubber nose protector, black
Figure 14, item 7
6412-001
Non-latex neck seal
Figure 14, item 8
Table provided for reference only, information may change without notice
1
2
3
4
5
6
7
8
Figure 14: PBE Components

Manual P/N 6408-006, REV BPGE Page 13
6. WARRANTY
6.1. Warranty Policy
Tulmar training PBEs are guaranteed for 90 days from the date of shipment to the customer
against defects in materials or workmanship. If a product is found to be defective within the
warranty period, the product will be repaired or replaced without charge for parts or labour.
6.2. Limitations
The warranty is limited to the original purchaser of a new product, and is valid only if the
product was purchased from Tulmar or an authorized distributor. This warranty does not cover
routine maintenance or damage resulting from the failure to maintain the product in
accordance with instructions provided in the User Manual. This warranty also does not cover
damage during transport of the product, ordinary wear and tear arising from use of the
product, or damage that may arise from accidental or intentional misuse or abuse, alteration or
customization, or repair by unauthorized persons.
6.3. Remedy
If a defect arises within the warranty period, contact Tulmar customer service at +1 (613) 632-
purchase order. Product may only be returned after a Return Material Authorization (RMA)
number is issued.
The cost and liability of delivering the damaged product to Tulmar or an authorized Tulmar
repair facility are the responsibility of the customer. The documentation, packaging and the
enclosed item must be clearly identified with the RMA number. Tulmar, at its sole discretion,
will either repair or replace the product with one of functional equivalence. Repaired or
replacement products will be returned to the customer’s original order destination on a carrier
and service of Tulmar’s choice.
This manual suits for next models
1
Table of contents
Other Tulmar Safety Equipment manuals
Popular Safety Equipment manuals by other brands

Capital Safety
Capital Safety Tank Pod system Operator's manual

Petzl
Petzl EN 564 Instructions for use

Clevertronics
Clevertronics LP Ultrablade Pro CUBPRO Series Installation & maintenance instructions

Amplicon Liveline
Amplicon Liveline 232i9 quick start guide

Safety 1st
Safety 1st SIMPLY PRESSURE XL manual

NANHUA
NANHUA ABC3Pro quick start guide