TurboAnt M10 Lite User manual

0201
Thank you for purchasing this product. To avoid injury to the user and others, be sure to
observe the following safety instructions and guidelines. Keep this information for future
reference.
Introduction
Featuring 10'' inflatable tires, this scooter gives you a smooth riding experience. Its
powerful 350 watt motor and 36 V battery enable a speed of up to 20 mph with a
range of up to 18 miles. The reinforced frame reliably supports a body weight of
between 44-220lb (20-100kg).
Important Safety Instructions and Guidelines
Safety Checks
• Follow the left and right markings on the handlebars to ensure proper installation.
• Make sure that no parts are damaged or have been modified.
• Make sure that the stem has been secured properly.
• Make sure that the Hall cable under the brake lever is connected correctly and the
brakes operate properly.
• Make sure that the tires are fully inflated.
• Make sure the battery is fully charged (the indicator light turns green).
• Test whether the scooter can be turned on/off.
• Make sure that the front and rear lights function properly in the dark.
• Children under 14 years old should be supervised by an adult.
WARNING! RISK OF BATTERY EXPLOSION!
Do not use the battery if it is damaged or has been modified.
Do not expose to heat exceeding 95 °F (35 °C).
Only use the original charging adapter.
Wear protective gear such as a helmet.
Do not ride the scooter in wet conditions.
Do not ride under the influence of drugs or alcohol.
The load is between 44-220lb (20-100kg).
Do not call or listen to music when riding the e-scooter.
Turn on the lights in the dark.
Package Contents
The scooter is only suitable for driving by a single person.
Safety Guidelines
Check your local traffic regulations whether driving an
e-scooter in traffic is legal or not in your area.
1 × Folding Electric Scooter
1 × Charging Adapter
2 × Handlebars
1 × Brake Lever
1 × Allen wrench
1 × User Manual
1 × Warranty Card

0403
Product Information
Unfolded Size 42.1 × 17.7 × 46.1 in
(1070 × 450 × 1170 mm)
42.1 × 17.7 × 15.5 in
(1070 × 450 × 393 mm)
Folded Size
Technical Specifications Battery Specifications
Ground Clearance
Product Weight
Adapter Input Voltage
Motor
Tire (Front & Rear)
Max Speed
Range
Max Climbing Capability
Load
Foldable Stem
Battery Pack
Speed
Illumination
Warning Function
IP Rating
Operating Temperature
Storage Temperature
32 to 113 °F (0 to 45 °C)
-4 to 140 °F (-20 to 60 °C)
Yes
Non-detachable
3 settings
LED headlight + taillight
Bell
IP54
4.1 in (105 mm)
29.8 lb (13.5 kg)
100-240 V AC, 50/60 Hz
36 V, 350 W
10-inch inflatable tires
20 mph (32 km/h)
18 miles (29 km)
15°
44-220 lb (20-100 kg)
Drive System
Functions
Operating Conditions
Brake System Electronic throttle control and
rear disc brake
Notes
1. Max speed values stated in the user manual depend on the road conditions and the load.
Values stated on the rating label are related to average conditions.
2. Mileage is tested under the following conditions: the scooter is driven with the second speed
level, 41.8 V full power battery, a load of 165 lb (75 kg), temperature of 77 °F (25 °C), humidity
of 70%, mild wind, tire pressure of 36 psi (248 kPa), and flat, dry road conditions. Actual results
may vary. If the load exceeds 220 lb (100 kg), the mileage and speed may be decreased,
which can affect the riding experience.
3. Please drive safely within the maximum speed limit set by local traffic officials. Everyone
should strictly abide by all traffic rules and regulations.
Model
Manufacturer
Input
Output
CP4215
Dongguan Powsun Electronic Co., Ltd.
100-240 V AC, 50/60 Hz
42.3 ± 0.3 V, 1.4-1.6 A
Type
Charging Time
Voltage
Capacity
Operating Temperature
Charging Temperature
Max Charging Voltage/Current
Storage Temperature
Storage Time
Li-ion
5-8 hours
36 V
7.5 Ah, 270 Wh
32 to 113 °F (0 to 45 °C)
42 V, 2 A
-4 to 113 °F (-20 to 45 °C)
3 months (after a full charge)
Charger Specifications

Control
Brake Lever
Throttle
Power Button
Light Button
Cruise Mode
Operation
Low Level: 1
Medium Level: 2
Sports Level: 3
Product Overview Controls Description
Brake Lever
Display
LED Headlight
Stem
Folding Spanner
Stem Safety Latch
10-inch Front Inflatable Tire
Throttle
Light Button
Handlebar
Power Button
Locking Latch
Locking Hook
LED Taillight
10-inch Rear Inflatable Tire
Charging Port
Kickstand
Power Button
Battery Charging Icon Speed Unit Icon
Light Button
Throttle
Speed Level Icon Light Icon
Cruise Mode Icon
Anti-skid Deck
Controls Overview
Squeeze the brake lever to stop the scooter. When the brake
lever is fully depressed, the scooter will come to a complete
stop. After that, it will have to be manually started (see the
General Troubleshooting and Solution Guide section).
Hold for one second or longer to turn on/off the headlight
and taillight.
Reach the desired cruise speed (must be at least 3.7 mph or
6 km/h to activate cruise mode) and keep this speed
constant. Then, hold the throttle in the same position for six
seconds to enable cruise control. Exit cruise mode by using
the brake lever.
Quickly press the button
twice to adjust the speed
level.
0605
Note: If there is no operation within 10 minutes, the display will automatically turn off with a "beep" sound.
Squeeze the throttle to accelerate.
Press once to turn the scooter on and hold for one second or
longer to turn off.

Operating Instructions
Assembly
1. Unfold the scooter by pulling up on the stem from the rear fender.
Check the packaging contents carefully to make sure that all parts are in good
condition, then take the scooter out of the box in the folded position with the kickstand
down.
2. Attach the brake lever with the Allen wrench.
3. Install the right handlebar by rotating inwards. Note that the handlebars are marked
“L” and “R”.
0807
4. Loosen the screw on the bell with a screwdriver and attach it to the left handlebar.
Then, tighten the handlebar by rotating inwards. Make sure the bell stays on top when
tightening the handlebar.
5. Tighten the screw holding the bell in place with a screwdriver.

Unfolding the Scooter
1. Lift the handlebar up slightly and slide it out of the locking hook until it is detached
from the locking hook on the rear fender.
2. Place a foot on the anti-skid deck and push the stem into the upright position. You
should hear a “click”.
3. Secure the handlebar by rotating the stem safety latch clockwise.
1009
Locking Hook
A
C
B
D
Folding the Scooter
1. Release the stem safety latch by rotating it counterclockwise.
2. Press the folding spanner and lower the stem.
3. Align the locking latch with the side of the locking hook.
4. Lock the stem with the locking hook.
Locking Hook
A
C
B
D

Riding the Scooter
Battery Charging
1. Wear protective gear such as a helmet.
2. Press the power button once to turn on the scooter.
3. Place the foot of your weaker leg on the middle of the deck.
4. Build up sufficient momentum with your stronger leg.
5. Place the toes of the other foot onto the rear of the deck and the
heel onto the mudguard.
6. Gently press down the throttle to accelerate.
7. Step down onto the mudguard to break and assist the breaking
by pressing the brake lever.
Charging Safety Tips
1. First time charging requires 5-8 hours.
2. To maximize battery life, please charge the battery at least every
month or two days after the last ride.
3. The battery must be charged periodically to maintain its charging
ability. Neglecting to do so may cause the battery over-discharge which can lead to
severe damage to the battery.
4. Only use the original charging adapter to charge the scooter.
5. Charging must be conducted in a dry and well ventilated area.
Make sure charging port dry and do not touch charging port with wet hands.
Disc-Brake Distance Adjustment
If the braking distance exceeds 16.4 ft (5 m), the brake cable tension level can be
adjusted manually. After adjustment, tighten the brake cable and ensure the disc brake
works properly.
2. Adjust the brake cable to a suitable length.
1. Unscrew the fixed screw on the brake shaft.
3. Retighten the fixed screw on the brake shaft.
1. Remove the charging port cover at the bottom of the stem. Make sure the charging
port is dry and free of dust.
2. Connect the charging adapter.
3. The battery is fully charged when the indicator light of the charging adapter turns from
red to green.
4. Close the charging port cover after charging the battery.
1211

General Troubleshooting and Solution Guide
Maintenance
Storage
1. Make sure the scooter is turned off and the power adapter is disconnected.
2. Wipe clean the scooter with a damp cloth. Never use lubricating oil on the body
and do not immerse it in water.
1. Fully charge the scooter before storing, and charge it at least once a month to prevent
premature decay of the battery capacity.
2. Do not charge the battery if the temperature is below 32 °F (0 °C).
3. Keep the scooter in a dry, ventilated area away from direct sunlight, rain, and high
humidity, and cover the scooter to protect it from dust.
4. When not in use, regularly check the battery level to ensure that the battery is fully
charged. Avoid over-discharge.
5. The kickstand is designed to provide structural support, so avoid standing on the
scooter while the kickstand is down, as this can cause the kickstand to crack or brake.
Problem Cause Solution
The scooter
will not
turn on.
The battery
will not
charge.
Cruise
control
cannot be
activated.
The battery has run out. Recharge the battery.
1. Connect the adapter to an AC power
source. If the indicator light turns on, the
adapter is in good working condition. Then,
connect the adapter to the charging port.
2. If the indicator light does not turn on, the
adapter has broken down. Replace the
adapter.
The charging adapter is
not properly connected
to the charging port.
The battery power is full
or the battery has
failed.
The current speed is
below the minimum
speed required for
cruise control.
Cruise control can only be activated when
travelling at speeds greater than 3.7 mph
(6 km/h). Increase speed to enable cruise
control.
The current speed is not
constant.
Keep the current speed constant. Then, hold
the throttle in the same position for 6 seconds
to enable cruise control.
Check whether the connector of the charging
cable is fully inserted into the charging port.
1. If it is fully connected, then connection is
normal.
2. If it is not fully connected, please unplug the
cable and re-connect the cable to the
charging port.
After confirming that the charging adapter is
functioning, connect the charging adapter to
the AC power source and the charging port.
1. If the indicator light turns red, then charging
is normal and the battery is in good working
condition.
2. If the indicator light turns green, then the
battery is full or has reached failure. In case
of failure, replace the battery.
1413
The charging adapter
is not connected to an
AC power source, or
the charging adapter
is damaged.
The stem
is loose.
The screws on the stem
folding spanner are
loose.
Tighten the screws on the stem folding spanner.

Frequently Asked Questions (FAQs)
1. What is the optimum tire pressure when riding this scooter?
The recommended tire pressure is between 34-36 psi (234-248 kPa). Please pump up
the tires to this pressure.
2. The headlight cannot be turned on or is abnormally lit. How can I solve this problem?
If the headlight won’t turn on, please verify that the scooter is turned on. When the
scooter is turned on, hold the light button over 1 second to see whether the headlight
functions. Also, check to ensure that the lamp holder is not clogged with dust. If the
lamp holder is not clogged with dust, and the headlight still will not turn on, it may
need to be replaced. Please contact our customer support center for help.
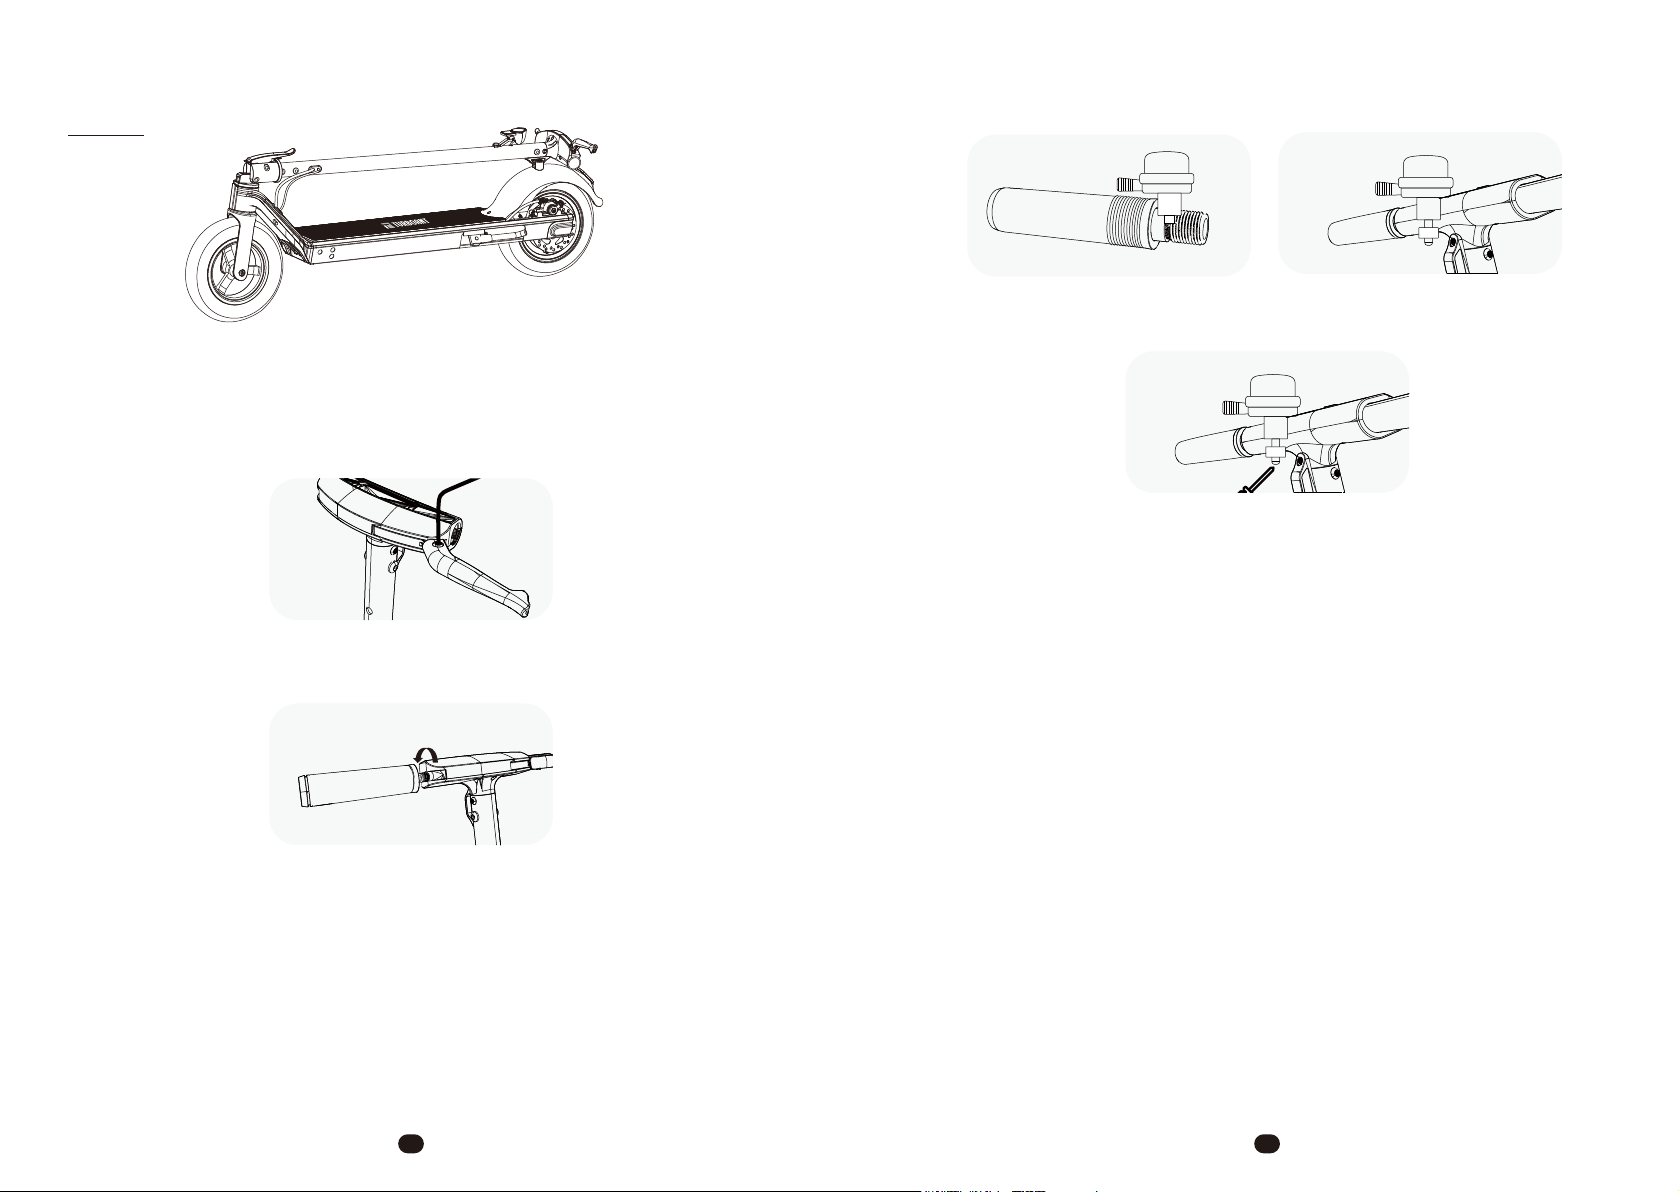
3. What should I do if the scooter’s stem is swaying while riding the scooter?
Immediately stop riding the scooter. Verify that the screws that connect to the folding
spanner and other screws on the stem are well tightened. If not, tighten the screws
using the hexagonal wrench. Periodically tightening the screws on the scooter may
be necessary.
4. What should I do if the brakes are not functioning properly?
a. Turn on the scooter. Do not stand on the deck. Tilt the scooter up using the
kickstand so that the rear wheel can rotate freely. Press down on the throttle, and the
rear wheel should rotate normally. Next, gently squeeze the brake lever. If the rear
wheel stops rotating but rotates when pushed forward, the Electronic Braking System is
functioning properly. If the rear wheel does not stop, the EBS may be faulty.
b. Turn off the scooter and tilt the scooter so that the rear wheel can rotate freely.
Then, press down on the brake lever. If there is no grinding noise and the rear wheel
stops rotating when pushed forward, the disc brake is functioning properly. If there is
grinding noise and the rear wheel starts to rotate when pushed forward, the disc
brake may be faulty.
5. The battery is not charging. What’s the problem?
Verify that the charging adapter is in good condition. Plug the charging adapter into
an AC power source without connecting to the scooter. If the indicator light turns on
green, the charging adapter works normally. If the indicator light does not turn on or is
lit red, the charging adapter is faulty. If the battery still cannot be charged with a
normal charging adapter, the battery may have an over-discharge. Please contact
our customer support center for help.
6. Why can’t the throttle function properly, even when pressed down fully?
Make sure the scooter’s initial speed is above 1.9 mph (3 km/h). If the speed is not
above 1.9 mph (3 km/h), the scooter will not accelerate. If the scooter still cannot
accelerate, please contact our customer support center for help.
7. Can I replace the tires on my own if I have a flat tire?
If you have a flat tire, please contact our customer support center for help and repair.
It is not easy to replace on your own, and faulty installation may damage other parts
of the scooter, which can nullify our limited warranty. Seek help via our customer
support center or take the scooter to an automobile or motorbike repair center and
ask the professionals for assistance.
1615
The scooter
cannot
accelerate.
The tire has
an air leak.
The scooter is set at
“non-zero” start and
has not been manually
started.
The tubed pneumatic
tires may have an air
leak if they are stored
for a long period. This is
normal, as most air tires
require pumping
periodically.
Ride the scooter for a short distance while
powering manually. When the scooter’s speed
reaches 1.9 mph (3 km/h), the scooter can be
accelerated.
The throttle is not
released.
Normal tire pressure is between 34-36 psi (234-248 kPa). It is necessary to periodically
check the scooter’s conditions to make sure it is in safe operating mode, including
the throttle, remaining power, tire pressure, and more.
The throttle is equipped with an electric lock, so
it is required to completely press down the
throttle in order to accelerate the scooter.
Pump up the tires by taking the scooter to an
automobile or motorbike repair center, or any
location with a proper air compressor.
Common bicycle pumps can be used to pump
scooter tires.

Environmental Protection
Waste electrical products should not be disposed of with household waste. Please recycle
where facilities exist. Check with your Local Authority or retailer for recycling advice.
8. Why does the battery life decrease over time?
The lithium-ion battery will naturally degrade its maximum capacity after 500 charge/
discharge cycles. The battery performs better when within the normal temperature
range of 32 to 95 °F (0 to 35 °C) and performs worse when below 32 °F (0 °C). For
instance, when the temperature is below -4 °F (-20 °C), the actual mileage will only be
half or less than listed.
9. Why has my motor suddenly stopped working?
The reason may be that the controller has malfunctioned, which may require a new
replacement. Please contact our customer support center for help and repair.
10. When I press down the throttle, why doesn’t the motor function properly?
It could be that there is a Hall wire malfunction with the Electronic Braking System.
Please check to see if the wire terminals of the brake lever and the LCD panel are
loose, and whether the brake lever has been damaged.
11. Why can’t my mileage reach 18 miles?
The max listed mileage is 18 miles, which is measured under the following conditions:
the scooter is driven with the second speed level, 41.8 V full power battery, a load of
165 lb (75 kg), temperature of 77 °F (25 °C), humidity of 70%, gentle wind, tire pressure
of 36 psi (248 kPa), and flat, dry road conditions. Please note that the tire is a type of
tubed pneumatic tire, so fully inflating the tires can help extend your mileage.
1817
Other manuals for M10 Lite
1
Table of contents
Other TurboAnt Scooter manuals