Tynetec ZXT478 User manual

DocNo.FM0626issueBPage1
169MHzTelecareDevices
PropertyExitSensor
__________________________________________________________________________________________________________
CompatiblewithReachat‐homealarmsand
AltecResponselocalcareralarms
PIRdetector,wallbracket,doorcontact&magneticexitfob
Adjustablealarmdelay:10secondsto90minutes
Userreplaceable9VPP3Lithiumbattery
Lowbatterywarning
PIRdimensions:114mmx70mmx76mm(HxWxD)
PIRweightincbattery&bracket:280grams
ProductCode:ZXT478
WhatcanthePropertyExitSensorbeusedfor?
Thepropertyexitsensorisusedtoraiseanalarmifaresidentleavestheirhomeoriftheyaccidentlyleavetheirfrontdooropen.
Itworksbymonitoringacombinationofthefrontdoorbeingopened/closedandmovementinthehallway.
Scenario1:ifthedoorisopenedandclosedfollowedbymovementinthehallwayitisassumedavisitorhasenteredorthe
residenthasansweredacallatthedoorandnoalarmisraised.
Scenario2:ifthedoorisopenedandclosedfollowedbynomovementinthehallwayitisassumedtheresidenthaslefttheir
homeanda“doorexit”alarmwillberaised.
Scenario3:ifthedoorisopenedandleftopenfollowedbynomovementinthehallwayitisassumedtheresidenthaslefttheir
homeanda“doorexit”alarmwillberaised.
Scenario4:ifthedoorisopenedandleftopenfollowedbymovementinthehallwayitisassumedtheresidenthaslefttheirdoor
openanda“dooropen”alarmwillberaised.
ForavisitortoleavewithoutraisinganalarmtheymustfirstopenthedoorthenswipethePIRdowntherighthandsidewiththe
magneticfobthenclosethedoorbehindthem.
ThePIRonlybeginstolookforactivityAFTERthedoorisopened‐thetimeperiodthePIRisactiveforis
adjustablefrom10secondsto90minutes.IfthePIRisnotactivatedduringthisperiodanalarmcallisraised.
WhereshouldthePropertyExitSensorbefitted?
UsethewallmountingbracketprovidedandfixthePIRapprox2metreshighandapprox1metreinsidethefrontdoor.
ThePIRshouldbeadjustedtopointdownthehallwayAWAYfromthedoor,seebelow;
IftherearepetsinthehomethePIRshouldbemountedatlowlevel(1m)andthePCBshouldbesettothePETALLEYposition.
ThedoorcontactshouldbefittedonthefrontdoorandwiredbacktothePIRusingthecableprovided.
AvoidplacingitemsinfrontofthePIRdetector
whichmayrestrictitsfieldofview
DonotexposethePIRdetectortowind,air
conditioningorheating
DonotexposethePIRdetectortodirectsunlight
orpowerfullights
DonotdropthePIRdetectororexposetohigh
vibrationorshock
DonotexposethePIRdetectortorapidvariation
intemperature
Tynetec andAidcallare businessunitsofLegrandElectricLtd
Unit10CowleyRoad,BlythRiversideBusinessPark,Blyth
Northumberland,NE245TF.Tel:01670352371Fax:01670362807
Email:[email protected]Web:www.tynetec.co.uk

DocNo.FM0626issueBPage2
Door Frame
Door
HowtousethePropertyExitSensor
Theresidentdoesnotneedtodoanything,allvisitorsincludingcarers,familyorfriendsneedtobeawarethatthesensoris
installedandtheymustfollowtheprocedurebelow;
1.Enterthehomeandspendtimewiththeresidentasnormal.
2.Whenleaving,firstOPENTHEDOORthenSWIPEthePIRdetector
downtheRIGHTHANDSIDEwiththemagneticfob.
3.ThePIRwillsoundadouble“BEEP”whenswipedcorrectly,youcan
nowleaveandclosethefrontdoorbehindyou.
NOTE:failuretoswipethePIRbeforeleavingwillresultinafalsealarmcall.
Themagneticfobcanbelefthiddeninthehallwayforallvisitorstouseoradditionalfobsareavailable
separately–orderPartNo.YW9970
TypicalToolsRequired
AmediumsizedPoziscrewdriverisrequiredtofixthePIRanddoorcontacts.
Electricianssidecuttersarerequiredtocutandstripthedoorcontactwire.
Asmallflatbladedscrewdriverisrequiredtoterminatethedoorcontactwiring.
Installation
Choosea
locationfor
thePIRsothe
righthandside
canbeeasily
reachedand
swipedwith
themagnetic
f
ob.
BEEP
BEEP
SWIPEPIRDOWN
THERIGHTHANDSIDE
DOORFRAME
Fixthecontacttotheframe
withthescrewsprovided.
Fixthemagnettothedoor
withthescrewsprovided.
Note:thereshouldbeno
morethan10mmgap
betweenthemagnetand
theswitchwhenthedoor
isclosed.
Fixthewirewiththeself
adhesiveclipsprovided.
FITMAGNET
ONDOOR
FITSWITCH
ONFRAME
Undo
SCREW“A”
fromthe
bottomof
thePIRand
removethe
frontcover.
Undo
SCREW“B”
andremove
themain
bodyofthe
PIRfromthe
backbox.
“B”
“A”
Passashort
lengthofthe
doorcontact
wirethrough
themiddle
ofthePIR
wallbracket.
“C”
“C” Usethe2whiteheaded
screwsprovidedtofix
thePIRbrackettothe
wallusingHOLES“C”.
LoosenSCREW“D”and
adjusttheangleofthe
PIRbracket.Retighten
whensetasrequired.
Passthedoorcontactwire
throughtheknockouthole
inthePIRbackbox.
Usethe2smallcountersunk
headscrewsprovidedtofix
thebackboxtothePIRwall
bracketusingHOLES“E”.
“E”
“D”
Connectthedoorcontact
tothePIRasshown;
Connectthebatteryleadand
placeinsidethebackbox.
SeetheSettingtheAlarmDelaysectionbelow
beforerefittingthemainbodyandthefrontcover.
SeetheTesting&Registeringsectionbelowforhowto
learnthePIRontotheReachat‐homealarmunit.
DOORCONTACT
PIR
WIRE
WIRE
Note:ifthebatteryisdisconnectedallowthePIRto
dischargefor30secondsbeforereconnecting.

DocNo.FM0626issueBPage3
PetAlleyMode
Topreventpetscausingfalse
activationsthePIRmustbe
fittedatlowlevel(1m)and
haveitsinternalPCBsetto
thePETALLEYposition.
UndoscrewandslidethePCB
downintothePETALLEYposition.
Whenfittedinthismodeany
movementbelowthe1mlevel
willgoun‐detected.
SettingtheAlarmDelay
Turntherotaryswitchtosetthedelaybeforealarm.WithDILswitch1OFFtheLEDwillFLASHGREENtoindicatethenumberof
minutesdelay,withDILswitch1ONtheLEDwillFLASHREDtoindicatethenumberofminutesdelayx10.Position0=testmode.
Testing&RegisteringaPropertyExitSensor
A“doorexit”and“dooropen”alarmmustbetransmittedwhenlearningthepropertyexitsensorontotheReachat‐homealarm
ortheAltecResponselocalcareralarm,seepages4&5forhowtoputtheseproductsinto“LearnMode”.
WiththefrontdoorCLOSEDswipethePIRdowntheRIGHTHANDSIDEwiththemagneticfob,witheachswipethePIRwill
alternatebetweentransmitting“doorexit”(code34)and“dooropen”(code58)alarms.
Therangeofallradiodevicescanbeaffectedbytheworkingenvironment‐alwaystakecareduringinstallationand
performseveraltestcalls.
Maintenance
Noroutinemaintenanceisrequired;howeverawalktestshouldbeperformedonceayeartoverifyoperation.
PIR’sarenotassusceptibletodustandcontaminationassomedetectorsbutitisstillrecommendedtocleanthemperiodically.
PIR’scanbedustedorwipedcleanwithadampcloth,neverusedetergentsorpolish.
Decorating
NeverpaintthePIRdetectoritself.
Unlikesomedetectors,PIR’sarenotsusceptibletocontaminationfrompaintfumes
thereforenospecialprecautionsneedtobetaken.
BatteryLife
ThePIRbatteryischeckedonceaday,ifthevoltagefallsandstaysbelowapresetlevelfor7consecutivedaysalowbatteryalert
isautomaticallytransmitted.Oncealowbatterycallisreceivedthebatteryshouldbereplacedwithin7days.
DetailedinformationonbatterymanagementforallTynetec/Aidcallproductsisavailable‐requestDocNo.FM0630.
NORMALDETECTIONPATTERN
(SIDEVIEW)
PETALLEYDETECTIONPATTERN
(SIDEVIEW)
NORMALANDPETALLEY
DETECTIONPATTERN
(TOPVIEW)
ROTARYSWITCH
DILSWITCH 1
RotarySwitchPositionDILSwitch1OFFDILSwitch1ON
010Seconds10Seconds
11Minute10Minutes
22Minutes20Minutes
33Minutes30Minutes
44Minutes40Minutes
55Minutes50Minutes
66Minutes60Minutes
77Minutes70Minutes
88Minutes80Minutes
99Minutes90Minutes
LED INDICATOR

DocNo.FM0626issueBPage4
RegisteringaPropertyExitSensorontoaReachat‐homealarmunit
1.PuttheReachunitintoradiodevicelearnmode…
2.Activatethepropertyexitsensor…
3.Exitradiodevicelearnmode…
4.CheckwiththeControlCentrethatitisconvenienttoperformatestcall.Turntherotaryswitchtothe“0”position,openand
closethefrontdoor,donottriggerthePIRandchecka“doorexit”alarmisreported.Openthefrontdoor,leaveitopenthen
triggerthePIRandchecka“dooropen”alarmisreported.Remembertoresettherotaryswitchaftertesting.
DeletingaPropertyExitSensorfromaReachat‐homealarmunit
Enter1670usingthekeypadontherearoftheReachunit–thefrontlightwillFLASHFASTGREENandtheunitwillannounce
“ProgramMode‐Ready”.
Enter#041andtheReachwillannounce“DeleteRadioDevice”followedbya“Beep”.
Enterthe8digitdoorexitIDtobedeletedandwaitforthe“Beep”
Enterthe8digitdoorcontactIDtobedeleted,afterthe“Beep”press#toexit.
PressthekeytoexitProgramMode;theunitwillsounda“Double‐Beep”andthefrontlightwillreturntoSTEADYGREEN.
Both8digitID’scanbefoundonalabelonthebackofthepropertyexitsensor–theywillalwaysstartwith34xxxxxx(doorexit)
and54xxxxxx(doorcontact).
TheinstructionsgivenaboveforthestandardReachproductalsoappliestotheReachPlus,ReachPlusGSM
andReachUltramodels.Refertotheinstructionbookletsprovidedwiththeseproductsformoreinformation
onprogrammingandtestingradiodevices.
“Trigger
Radio
Device”
PressandHOLDtheGREENbuttonontheReachunit.
WhenthefrontlightFLASHESFASTGREENreleasethe
buttonandtheReachwillannounce“TriggerRadioDevice”.
Younowhave1minutetoactivatethepropertyexitsensor.
PresstheGREENbuttonontheReachunit.
ThefrontlightwillreturntoSTEADYGREENandtheReach
isbackinnormaloperatingmode.
Withthedoorclosed,swipethePIRdowntherighthandside
withthemagneticfobandtheReachwillannounce“DoorExit”.
SwipethePIRdowntherighthandsideagainandtheReachwill
announce“DoorContact”.
Note:the2alarmsalternatewitheachswipeandtheymay
transmitinreverseorder.

DocNo.FM0626issueBPage5
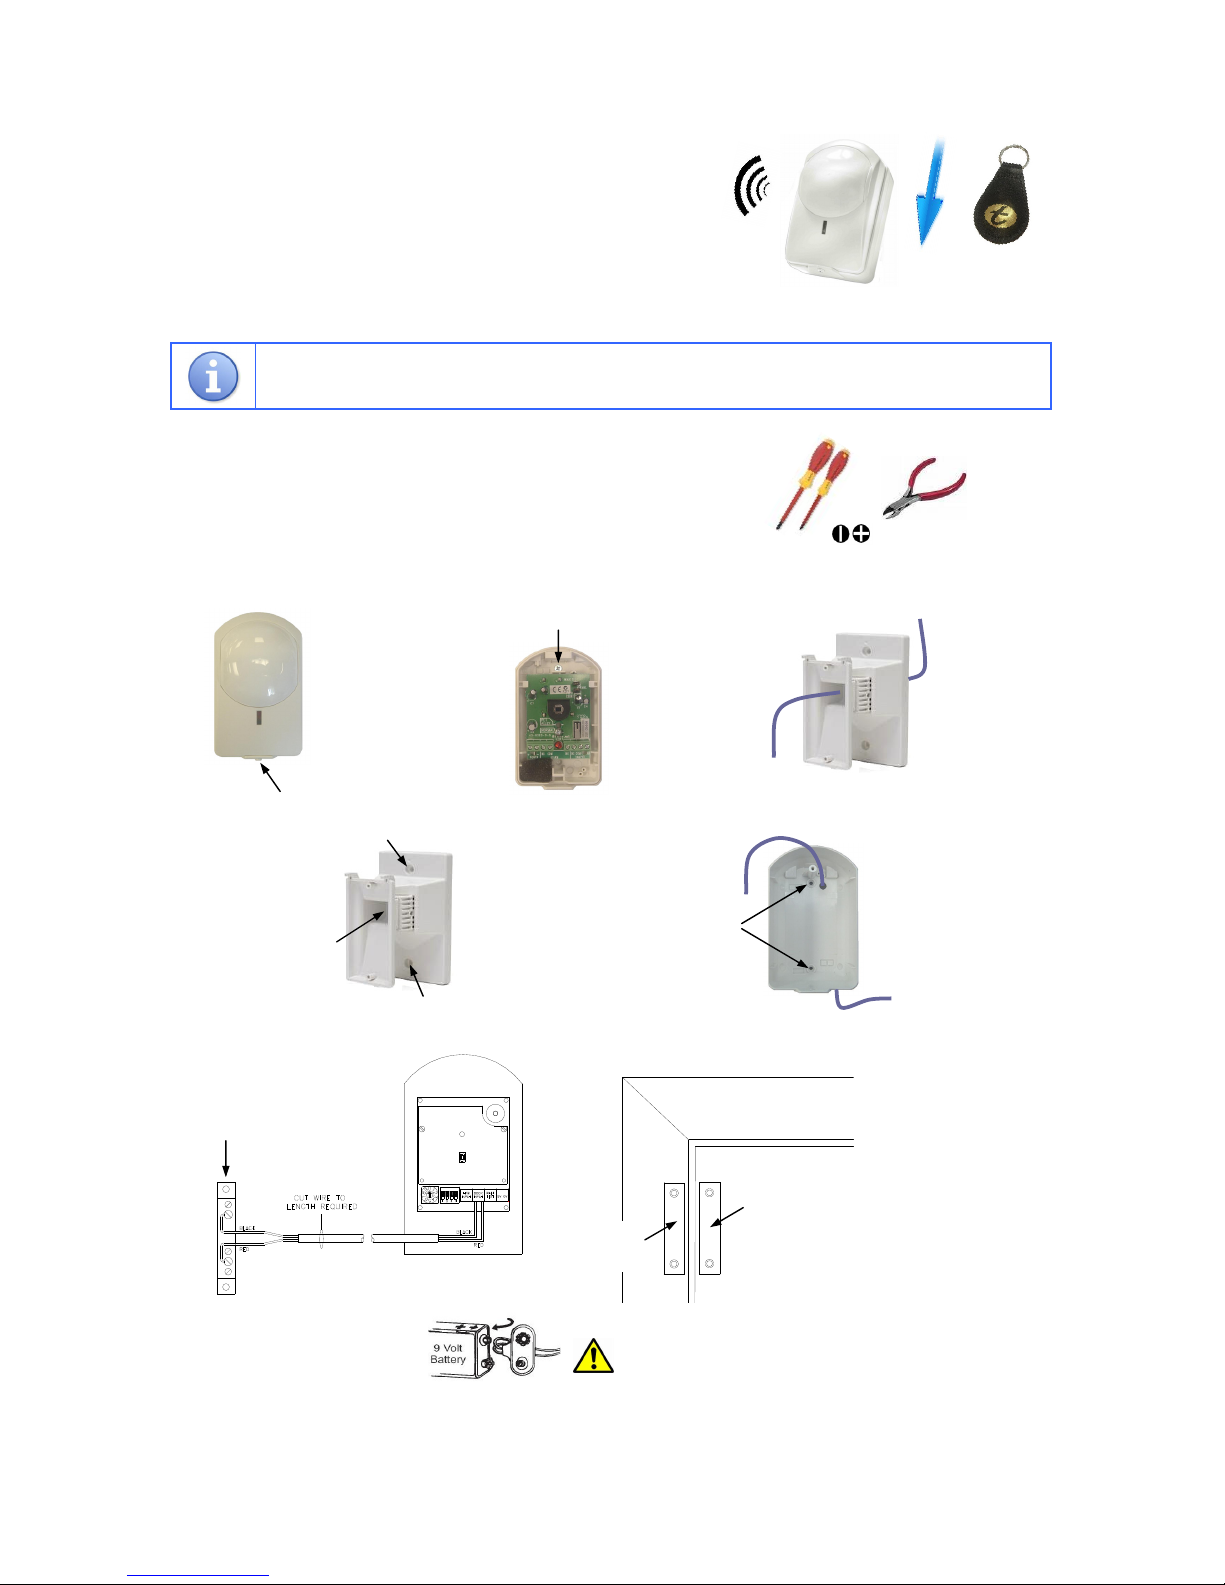
RegisteringaPropertyExitSensorontoanAltecResponselocalcareralarmunit
1.PuttheAltecResponseunitintoradiodevicelearnmode…
2.Activatethepropertyexitsensor…
3.ExittheAltecResponseradiodevicelearnmode…
4.Turntherotaryswitchtothe“0”position,openandclosethefrontdoor,donottriggerthePIRandchecka“doorexit”alarmis
displayedontheAltecResponseunit.Openthefrontdoor,leaveitopenthentriggerthePIRandchecka“dooropen”alarmis
displayedontheAltecResponseunit.Remembertoresettherotaryswitchaftertesting.
DeletingaPropertyExitSensorfromanAltecResponselocalcareralarmunit
PressENTERtoactivatethewake‐updisplaythenENTERagaintodisplaythemainmenu
PressENTERtoselectRadioDevices
PressthekeytoselectDeleteDevicethenpressENTER
Thedisplaywillpromptyouto“TriggertheSensor”
Withthedoorclosed,swipethePIRtobedeleted‐thedisplaywillshowthedevicetypeandits8digitID
IfthisisthedeviceyouactivatedpressthekeytoselectDeletethenpressENTER
Withthedoorclosed,swipethePIRagain,thedisplaywillshowthedevicetypeandits8digitID
IfthisisthedeviceyouactivatedpressthekeytoselectDeletethenpressENTER
Note:iftheIDisNOTthedeviceyouactivatedpresstheENTERkeytoselectRejectthentryagain
ToexitthemodeselectExitthenpresstheENTERkey.
RefertotheAltecResponseinstallationguide(DocNo.FM0548)providedwiththeportablealarmunitfor
moreinformationonprogrammingandtestingradiodevices.
TynetecandAidcalloperateapolicyofcontinuousimprovementandreservetherighttochangeproductspecificationswithoutnotice.
IfanyvariationtothedetailscontainedinthisdocumentaresuspectedpleasecontactTynetec’scustomersupportdepton01670352371.
Withthedoorclosed,swipethePIRdowntherighthandsidewiththemagneticfob.
ThedisplaywillshowClientWanderingandthesensor8digitIDnumber(34xxxxxx).
ChecktheIDiscorrect,pressthekeytoselectAcceptthenpressENTER.
Note:ifanotherdevicehasbeenpicked‐uppressENTERtoRejectandtryagain.
ThedisplaywillshowFlat,usethe&keystochoosethedwellingtype.
PressthekeytoselectNo:000000thenpresstheENTERkey.
Usethe&keystoselecteachdigitoftheflatnumberandthe&keysto
movebetweendigitsthenpresstheENTERkey.
PresskeyseveraltimestoselectExitthenpresstheENTERkey.
Thedisplaywillpromptyouto“TriggertheSensor”again.
SwipethePIRagainandthedisplaywillshowDoorContactsandthesensor8digitID
number(58xxxxxx).Repeatthesameprocedureasabove.
Note:the2alarmsalternatewitheachswipeandtheymaytransmitinreverseorder.
PressENTERtoactivatethewake‐updisplaythenENTERagaintodisplay
themainmenu.
PressENTERtoselectRadioDevices
PressENTERtoselectLearnDevice
Thedisplaywillpromptyouto“TriggertheSensor”.
Younowhave20secondstoactivatethepropertyexitsensor.
FromtheLearnDevicemenuselectExitthenpressENTER.
FromtheRadioDevicesmenuselectExitthenpressENTER.
Thedisplaywillreturntothewake‐upscreenandgoblankafter10seconds.
TheAltecResponseisnowbackinnormaloperatingmode.
tynetec
tynetec
Table of contents
Other Tynetec Accessories manuals
Popular Accessories manuals by other brands

Ecolink
Ecolink H114101 installation instructions

British General
British General FBS28G Technical data

Stramatel
Stramatel Multisport Compact Series TECHNICAL DATA - INSTALLATION INSTRUCTIONS

Honeywell
Honeywell GENT S-Quad Data and Installation

Sunx
Sunx SF1-F Series instruction manual

Lufft
Lufft ARS31-UMB operating manual

Baumer
Baumer UNDK 20P7912/S35A quick start guide

Haws
Haws 7501BL Installation, operation & maintenance instructions

HBK
HBK HBM Bruel & Kjaer MCS10 Mounting instructions

AmazonBasics
AmazonBasics AB 20 manual

Dutch originals
Dutch originals DO-CE-WDB1R1CAA Series user manual

Comelit
Comelit SD01A quick start guide