Tysso PRP-100 User manual

User Manual
Thermal Receipt Printer
Ver. 1.0
2019
Please keep this manual in a safe place for futurereference.

Index
A.
IMPORTANT SAFETY NOTIFICATION................1
B.
PRODUCT OVERVIEW.........................................3
Main Features................................................................3
Package.........................................................................4
Specifications ............................................................... 5
Part Description............................................................ 7
Product Views .......................................................7
Control Buttons & Indicators..................................8
I/O Ports..............................................................10
C.
INSTALLING YOUR PRINTER...........................11
Connecting Your Printer............................................. 11
Install/Replace the Paper Roll.................................... 12
Installing the Driver of the Printer............................. 14
Examine Your Port Setting................................... 19

D.
APPENDIX...........................................................20
Self-Test........................................................................... 20
Baud Rate Setting......................................................... 21
Code Page Setup ......................................................... 22

- 1-
A.
Important Safety Notification
Read the instruction manual carefully before use.
Save the manual in the near location for further
reference.
Use only parts or accessories, especially power adapter,
recommended by the manufacturer; unapproved parts
may be hazardous and cause injures to the product or
human.
WARNING:
IF ANY FUNCTIONAL PROBLEMS OR DEFECTS
OCCUR WHICH ARE ATTRIBUTABLE TO
IMPROPER USE OF THE PRODUCT SHALL
VOID THE WARRANTY.
Refer servicing to qualified personnel only.
Do not attempt to repair or dissemble the product on
your own. Opening or removing cover can expose you
to dangerous voltage or other hazards.
Before plugging the power cord into the AC inlet of the
power supply unit, make sure that the voltage applied to
the power outlet is within the specified range
(100VAC ~240VAC). Improper power source voltage
range will cause damage to the power supply unit.
Power off the product and remove the power adapter
while cleaning the system.
Before powering on the product, make sure all the
connectors, cables are firmly installed.

- 2-
Important Safety Notification
Do not expose the product to rain or moisture, such as a
bathtub, a washbowl, a kitchen sink, a laundry tub, and
a swimming pool.
Do not expose the machine under direct sunlight, and
keep it away from any heat source.
Do not place the product on an unstable location, stand
or table. If the machine falls, it may injure a person or
cause serious damage to the appliance.
Do not allow anything to rest on the power cord.
Do not locate the product where people may walk on the
cord.
Do not make the power outlet and extension cords
overload. Overload can result in fire or electricshock.
If any of the following situations occurs, unplug the
product from the power outlet immediately and consult
with a qualified service person:
1.
The power cord or plug is damaged or frayed.
2.
Liquid is spilled into the system.
3.
The product is dropped and damaged.
Use a soft cloth to clean the product when it is dirty. In
case the dirt is hard to remove, use a mild detergent and
wipe the product gently.
Turn OFF and unplug the product before cleaning.
When the product is not in use, clean and stores it with
care.

- 3-
B.
Product Overview
Main Features
Print Speed: 180 mm/sec
Paper Auto-Cutter
Multi I/O Interface: (Serial DB9, USB)
Cash drawer connection port(RJ-11)
Ethernet (RJ-45) model available
Compatible with ESC/POS print command sets
Various Drivers available
User friendly, drop-and-print paper installation, simple
paper jam elimination
Multiple Language fonts selectable

- 4-
Package
Printer Unit
Power Adaptor
*Power Cord
**Printer Cable
Quick
Installation
Guide
Paper Roll
* Power Cord is selectable depending on the types of electrical plug.
** Printer cable is selectable depending on the interface required.
Please refer to the nearest local representatives for further
information.

- 5-
Specifications
Model No.
PRP-100
Print Method
Thermal line printing
Print Speed
180mm/sec
Print Life
100 Km
Print Font
(ASCII Mode)
ANK Font.
Font A: 12 x 24 dots,
Font B: 9 x 17 dots
(Graphic Font)
Chinese Character: 24 x
24 dots
Print Resolution
576 dots/line or 512
dots/line
Print Font Character
Support
International Font, Big 5
Chinese,
GB Chinese
Character Per Line
48 (Font A) / 64(Font B)
Effective Print Width
72mm
Paper Width
79.5mm± 0.5mm
Paper Roll Diameter
≦
83mm
Paper Thickness
0.06~0.08mm
Driver
Win 7/Win 8/Win 10,
Compatible with EPSON
Print Command
Compatible with ESC/POS
command sets

- 6-
Interface
I/O Interface
Multi I/O Interface
(1 x DB-9 Serial, 1 x USB type B)
Cash Drawer
+24VDC/1A, 6-Wire RJ-11
Notification
Indicator
Audio and LED Indicators
Auto Cutter
Partial
Paper End Notice
Yes
Over-Heat
Halt-on
Protection
Yes
Others
Power Input
+24VDC/2.5A
(External Adapter: 100~240VAC
50/60Hz)
Color
Black
Compliance
FCC / CE / WEEE / RoHS
Weight
1012 g
Dimension (mm)
140 x 202 x 149
Operating
Temperature
0°C ~ 45°C
Operating
Humidity
10% ~ 80% RH, non-condensing
Storage
Temperature
-10°C ~ 60°C
Storage Humidity
10% ~ 90% RH, non-condensing
* All specifications are subject to change without prior notice.
- 7-
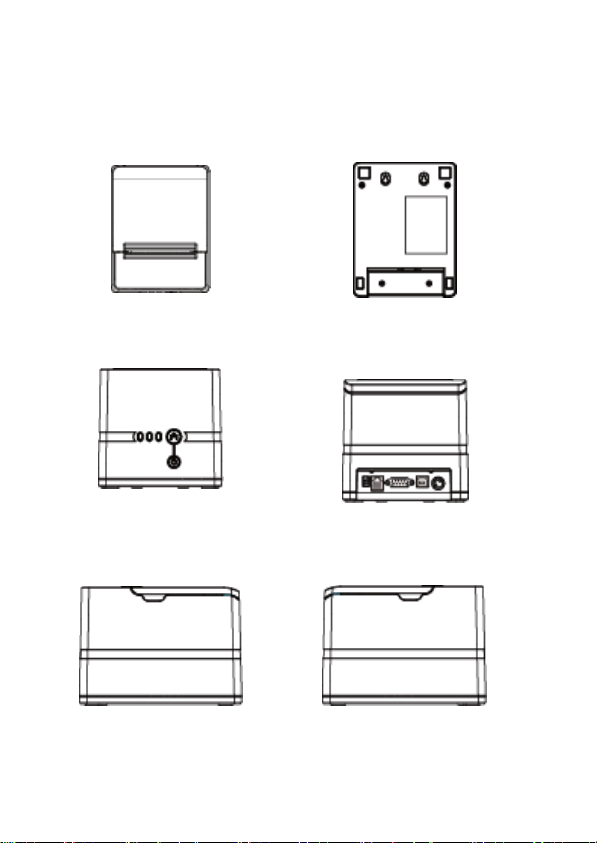
Part Description
Product Views
Top
Bottom
Front
Rear (Serial/USB)
Right
Left
Table of contents
Other Tysso Printer manuals

Tysso
Tysso PRP-300 User manual

Tysso
Tysso PRP-076N User manual

Tysso
Tysso PRP-188 User manual

Tysso
Tysso PRP-300 User manual

Tysso
Tysso PRP-350 User manual

Tysso
Tysso PRP-350 User manual

Tysso
Tysso PRP-250 User manual

Tysso
Tysso PRP-250 User manual

Tysso
Tysso PRP-058-S User manual

Tysso
Tysso PRP-085 Series User manual


