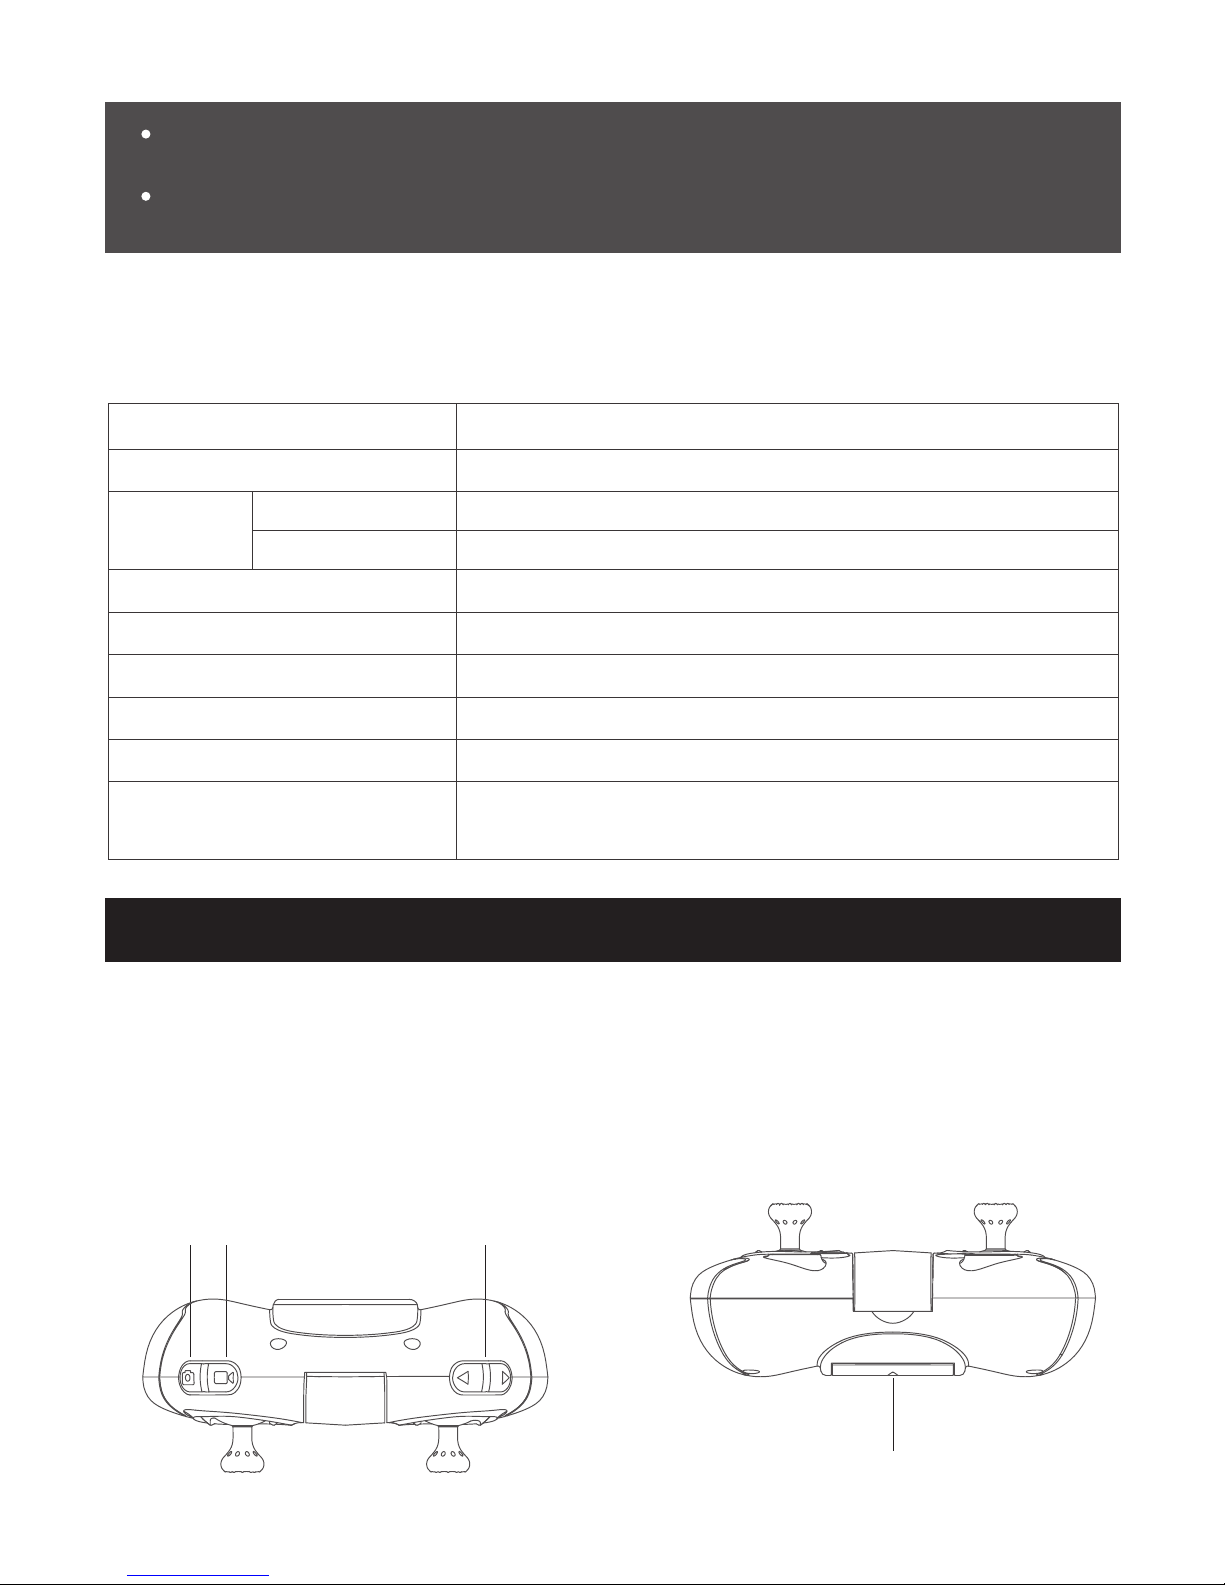
UBSAN H216A X4 STAR PRO User manual

®
H216A X4 STAR PRO
《H216A User Manual》
Version 1.0

01
1. Aircraft + mobile device (phone/tablet)
H216A Mobile device (phone/tablet)
H216A HT009
Mobile device (phone/tablet)
2. Aircraft + HT009 Transmitter + mobile device (phone/tablet)
2 Different Ways to Fly, 2 Configurations

Important safety information
《Quick Start Guide》
《Disclaimer and Safety Guidelines》
Symbol explanation:
USAGE ADVICE (Hubsan has created the following operational and safety materials)
- Do not fly in bad weather conditions.
- Do not attempt to catch the aircraft while it is in flight.
- This product is intended for experienced pilots over the age of 14.
- After every flight, completely disarm the aircraft motors and disconnect the
aircraft from power. Then, you may power off the remote control.
Operation:
Maintenance:
Battery:
Flight:
Prohibited operation Important Notice
Instruction Explanation/reference
Read the Disclaimer and Safety Guidelines first before use.
Do not try to open or repair the units by yourself. Please contact Hubsan or
Hubsan authorized dealers for service. For more information, please visit
the official website at www.hubsan.com.
Do not disassemble, squeeze, impact, burn, drop or trample the battery. Do not
short-circuit or put the battery terminal in contact with metal.
Do not expose the battery to temperatures above 60 ° C.
Charge the aircraft battery prior to flight. Use a Hubsan dedicated charger for
charging. Keep the battery out of the reach of children and away from any kind of
moisture.
Please be mindful of personal safety and the safety of others while flying.
Be extremely careful and responsible when using the quad. Small electronic
components can be damaged due to crashes or exposure to moisture/liquid. To
avoid any injuries, do not use the quad with broken or damaged components.
02

03
Safety Advisory Notice for Lithium-Polymer (LIPO) Batteries
LiPo batteries are different from conventional batteries in that their chemical contents are encased in a
relatively lightweight foil packaging. This has the advantage of significantly reducing their weight but it
does make them more susceptible to damage if roughly or inappropriately handled. As with all batteries,
there is a risk of fire or explosion if safety practices are ignored:
1. Do not disassemble or reassemble the battery.
2. Do not short-circuit the battery.
3. Do not use or charge near sources of heat.
4. Do not put the battery in contact with water or any kind of liquid.
5. Do not charge batteries under sunlight or near fire.
6. Do not puncture or subject the battery to force of any kind.
7. Do not throw or manhandle the battery.
8. Never charge a battery that has been damaged, become deformed or swelled.
9. Do not solder on or near the battery.
10. Do not overcharge or over discharge the battery.
11. Do not reverse charge or reverse the battery polarities.
12. Do not connect the battery to a car charger/cigarette lighter or any kind of unconventional
power source.
13. This battery is prohibited for non-designated devices.
14. Do not touch any kind of liquid waste or byproduct from batteries. If skin or clothes come in
contact with these substances, please flush with water!
15. Do not mix other types of batteries with lithium batteries.
16. Do not exceed the specified charging time.
17. Do not place the battery in a microwave or in areas of high pressure.
18. Do not expose the battery to the sun.
19. Do not use in environments with high static electricity (64V and above).
20. Do not use or charge in temperatures below 0 ℃and above 45 ℃.
21. If a newly purchased battery is used, leaking, possesses a bad smell or other abnormalities,
return immediately to the vendor.
22. Keep away from the reach of children.
23. Use a dedicated battery charger and follow all charging requirements.
24. Minors who use the battery and its dedicated unit must be supervised by an adult at all times.
● If you do not plan to fly the quad for a long time, store the battery ~50% charged to
maintain battery performance and life.
● Please use Hubsan chargers for battery charging.
● Discharge the battery at 5C current or below. To avoid discharge related battery damage,
do not prolong the discharge time.
● Do not charge on carpet to avoid fire.
● Batteries need to be recharged if unused for over 3 months.

Important safety information
Symbol Explanation
Usage Advice
1. The H122D Aircraft
1.1 Aircraft component breakdown
1.2 The aircraft battery
1.3 Installing and Removing
the propellers
1.4 Aircraft LED indications
2. The HT009 Remote
Control/Transmitter
2.1 The HT009 Remote
Control/Transmitter
2.2 Remote control components
and functions
2.3 Battery installation
3. X-Hubsan APP
3.1 APP Overview
3.2 Downloading the APP
3.3 APP Interface Guide
4. Flying with the APP
4.1 Pairing the aircraft and
mobile device
4.2 Compass calibration
4.3 Takeoff/Landing
4.4 Joystick mode settings
Table of Contents
2
2
2
5
5
5
6
8
8
8
9
10
10
10
10
11
11
11
12
12
14
4.5 Horizontal calibration
4.6 Headless mode
4.7 Waypoints
4.8 Follow me
4.9 Orbit mode
5. Flying with the remote
control/transmitter
5.1 Flight environment
requirements
5.2 Pre-Flight Checklist
5.3 Binding the aircraft and
transmitter
5.4 Compass calibration
5.5 Takeoff/Landing
5.6 Basic flight operation
Failsafe modes
Frequently Asked Questions
H216A Accessories
14
14
15
15
15
23
16
22
16
17
17
21
18
24
19
04

1.1 Aircraft component breakdown
1 The H216A Aircraft
1.2 The aircraft battery
The H216A aircraft is paired with a rechargeable 7.6v, 750mAh Li-Po. Be sure to use the provid-
ed Hubsan dedicated charger for charging. Fully charge the battery before flight.
1. Installation: Push the battery into its compartment with its lines facing away from the unit
(shown in the below figure). Connect it to the drone's power line (correctly match the polarities)
and coil the power line into the compartment.
05
Propeller B
Battery
compartment
LED indicators
TF (Micro SD) slot
Body shell (top)
1080P HD camera head
Body shell (bottom)
Propeller A
Motor
LED indicator
7.6V 750mAh 15C

2. Connect the battery to the USB charging cable. Then, connect the USB charging cable to a
computer or wall adapter. When charging, the charger will flash red; after charging is finished, the
charger will stay solidly lit. Please remove the battery from the charger promptly when charging
has finished. Full charging time is around 150 minutes.
750mAh/7.6/15C/5.7Wh
1.3 Installing and Removing the propellers
The X4 aircraft uses 5.3-inch propellers. Each is marked with either an A or a B. Please replace
damaged propellers. Before installing the propellers for the first time, please check whether the
propeller and motor arm read "A" or "B”. The two letters should match.
06
Make sure the battery is fully charged before each flight.
Please do not leave unattended while charging.
When charging is complete, disconnect the charger and battery from power immediately.
Propeller A
Propeller B
Propeller B
Propeller A

Notice:
Mind the differing colors
of the A and B propeller
screws!
Propeller B Propeller A
“D” shaft
Figure 1
“ ”symbol
Installation: Before installing propellers for the first time, please check that each Propeller A is matched
with motor A and each Propeller B is matched with motor B. Align the "I" with the flat side of the "D"
shaped motor shaft. Then use the provided screws and screwdriver to secure each propeller. Propeller
A’s are paired with black propeller screws and are tightened counterclockwise. Propeller B’s are paired
with silver propeller screws and are tightened clockwise. (as shown below)
Counterclockwise
Clockwise
07
Propeller A
Propeller B
Propeller B
Propeller A
Clockwise
Counterclockwise
If propellers need changing, please use a screwdriver to loosen the screw clockwise on Propeller A.
To remove the screw on Propeller B, loosen its screw counterclockwise.

2 The HT009 Remote Control/Transmitter
1.4 Aircraft LED indications
The H216A has 4 LEDs; the fore/frontal LEDs are blue and the rear LEDs are red. The LED
status indications are defined as follows:
2.1 The HT009 Remote Control/Transmitter
The HT009 is a Bluetooth transmitter fully outfitted for use with the H216A aircraft and its various
functions. Experience real-time video transmission through the X-Hubsan app on a mobile device
equipped with a high definition screen.
08
Compass
Calibration
Calibrate Compass 1
Calibrate Compass 2
All 4 LEDs flash clockwise
LEDs flash in vertical pairs, alternately
Horizontal Calibration
Flight mode
Return to Home
Low power
All 4 LEDs flash simultaneously
All 4 LEDs are solidly lit
Headless mode Fore LEDs slowly flash blue and rear LEDs are solid red.
Fore LEDs are solid blue and rear LEDs slowly flash red.
Fore/frontal blue LEDs stay solidly lit and the rear red LEDs flash rapidly
Function
Power on and start up All 4 LEDs flash simultaneously
LED status indication
Flight control connection status
When the aircraft is not connected to a transmitter or has been disconnected
from a transmitter, the fore LEDs will flash blue. Upon connection with a
transmitter, the fore LEDs will turn solid.
Make sure that the propellers are installed in the correct positions (A to A, B to B). Otherwise,
the aircraft will not be able to fly normally.
Since the propeller blades are thin and somewhat sharp, it is recommended that users wear
gloves during installation to prevent accidental injury.
8 Photo
key
9 Video
key
Battery compartment
10 Camera head adjustment key
(Temporarily no function)

2.2 HT009 key functions
No.
1
(1)
(2)
2
3
4
5
6
7
8
9
10
Key/button/Switch Function
Throttle/Rudder stick
Throttle/Aileron stick
Elevator/Rudder stick
09
Elevator/Aileron stick
Power
Return to Home
Auto Takeoff/Auto Land
Transmitter status LED
Bluetooth status LED
Photo
Video
Camera head adjustment key
Mobile Device frame
2 Elevator/Aileron
(2) Throttle/Aileron
5 Auto Takeoff/Land
1 Throttle/Rudder
(1) Elevator/Rudder
3 Power
4 Return to Home
6 Transmitter status LED 7 Bluetooth status LED
Push the stick forward or backward and the quadcopter will ascend or
descend (respectively). Push the stick left or right and the quadcopter will
rotate counterclockwise or clockwise (respectively).
Push the stick forward or backward and the quadcopter will fly forwards or
backwards (respectively). Push the stick left or right and the quadcopter
will fly left or right (respectively).
Push the stick forward or backward and the quadcopter will ascend or
descend (respectively). Push the stick left or right and the quadcopter will
fly left or right (respectively).
Push the stick forward or backward and the quadcopter will fly forwards or
backwards (respectively). Push the stick left or right and the quadcopter
will rotate counterclockwise or clockwise (respectively).
Push the stick forward or backward and the quadcopter will fly forwards or
backwards (respectively). Push the stick left or right and the quadcopter
will rotate counterclockwise or clockwise (respectively).
Long press for 1.5 seconds and the quadcopter will perform a Return to
Home. To terminate Return to Home, short press for 0.5 seconds.
Long press for 1.5 seconds and the quadcopter will perform an Auto
Takeoff or Auto Land (if the unit is airborne).
When the transmitter is powered on, the LED should be solidly lit. If the
transmitter is low on power, the LED will flash rapidly.
When the transmitter is powered on, the LED should be solidly lit. If the
transmitter is low on power, the LED will flash rapidly.
Short press the key to take a photo.
Short press once to start the recording; short press again during the
recording to stop the recording.
Temporarily no function.

3 X-Hubsan APP
3.1 APP Overview
X-Hubsan is a flight control APP designed for HUBSAN WIFI enabled aircraft. Users can control flight,
camera, video and flight parameters with the APP. It is recommended to use a large screened
smartphones or tablets for the optimal visual experience.
10
3.2 Downloading the APP
Before flying, users must download the X-Hubsan APP.
Download the APP for free by scanning the below code or by downloading it via the App Store (iOS) and
Google Play (Android).
Do not mix new and old batteries
Do not cross-use different types of batteries at the same time
2.3 Battery installation
Remove the compartment screw.
Slide open the compartment hatch.
Insert 4 AAA batteries into the battery
compartment. Take note to make sure
you have correctly matched the polarities.
Slide the compartment hatch
to close it; screw it shut.
PULL PUSH

4 Flying with the APP
4.1 Pairing the aircraft and mobile device
Connect the aircraft to its battery and power it on. Go to your mobile device's WIFI settings and pair the
device with the aircraft. Then, run the X-Hubsan APP.
3.3 APP Interface Guide
11
Name: HUBSAN_H216A_XXXXXX Password: 12345678
T
E
FPV (Video) signal Remote
Control
Signal
Aircraft
GPS
signal
Aircraft Power/
Battery Level
Home Page Settings
Flight mode
Virtual Joysticks On/Off toggle
Auto Return to Home
Auto Takeoff/Land
Heading Aircraft Location
Map Mode
Map calibration
Settings WIFI
Wi-Fi
HUBSAN_H216A_XXXXXX
CHOOSE A NETWORK......
Cancel
Enter the password for”Hubsan_h216a_XXX”
JoinEnter Password
Password 12345678

4.2 Compass calibration
The compass must be calibrated every time the aircraft is powered on. The compass is
susceptible to interference by other electronic equipment, magnetic interference and metal,
which can lead to erratic behavior and loss of control. Regular calibration helps keep the
compass and its readings accurate.
4.3 Takeoff/Landing
Takeoff
a) Simultaneously pull the virtual joysticks diagonally down-out to arm the motors (as shown in the
below figure). Slowly push the throttle stick up; the aircraft will ascend and takeoff.
b) Auto Takeoff: First, confirm that take-off
conditions are safe and clear. Tap the Auto Takeoff
icon; the aircraft will automatically takeoff and
hover at a height of ~2 meters from the ground.
Note that the Auto Takeoff key will turn into an Auto
Land key after the aircraft begins to fly.
12
Arming the motors Pushing the throttle for ascent (Mode 2/American hand)
(1) Enter the X-Hubsan flight interface. Follow
the APP’s on-screen instructions.
(2) Complete Calibrate Compass 1 and 2.
Once both steps are completed, the calibration
window will disappear.
Auto
Takeoff
Not connected

Landing
a) Manual landing (with the virtual joysticks): Slowly push down the throttle stick until the copter has
completed its descent to the ground. Disarm the motors by simultaneously pulling both sticks
diagonally down-out. When the motors have completely stopped, release the joysticks.
b) Auto Land: Tap the Auto Land icon and the aircraft will slowly descend to the ground. (Figure 1)
Return to Home: Tap the Return to Home icon and select whether you would like the aircraft to
return to its takeoff point, or to the mobile device's current position. (Figure 2)
13
Pushing the throttle down and descending
(Mode 2, American hand)
Disarming motors
Before taking off, make sure that there are no obstructions in the flight route or
environment. Be sure to choose a flat, open area when landing.
To ensure safe flight, do not use your mobile device for other purposes or pair your
unit with another mobile device during operation. If you wish to use another device
to fly the aircraft, please power the unit off before re-initiating a new pairing.
Figure 1 Figure 2
Auto
Land
Return to
Home

4.4 Transmitter mode settings
Enter the X-Hubsan home interface and tap the Settings cog, followed by the Controller tab. You
may then adjust joystick settings.
4.5 Horizontal Calibration
If during takeoff or flight the aircraft drifts, lifts off unevenly, perform a horizontal calibration. Tap
the Settings cog, followed by "Other". Select "Horizontal Calibration" and allow the aircraft to
calibrate itself. Calibration is complete when all 4 LED indicators stop flashing. It is recommended
that users wait for 15-20 seconds after the calibration is completed before flying again.
4.6 Headless mode
Tap the compass icon to activate Headless mode.
The aircraft will set the direction its head is
pointing at the time of activation as the default
"forward" direction in Headless mode.
14
Parameters Controller
GPS accuracy test
Timeout GPS accuracy test
Bind aircraft to current device
Novice guide
新手指引
(5~30s) 10
Headless
mode
Virtual joystick shows fixedly on off
Joystick Mode mode2 mode1
Controller Map
Map Relay Others
Parameters OthersRelay

4.7 Waypoints
While motors are completely disarmed, tap the Flight mode icon and select the Waypoint mode
icon. You can custom set each Waypoint altitude, travel speed and other parameters before
uploading your Waypoint mission. After takeoff, the aircraft will fly its specified route.
4.8 Follow Me
Tap Flight mode icon and select Follow Me. The aircraft will now follow the mobile device.
4.9 Orbit mode
Tap the Flight mode icon and select Orbit/Circle fly. The aircraft will fly in a circle around the
mobile device. Orbit is only usable when the aircraft is at least 3 meters away from the mobile
device.
15
Waypoint mode Following mode Orbit mode VR mode

5 Flying with the remote control/transmitter
It is recommended that users implement some kind of flight training (i.e using a simulator for
flight practice, seeking professional guidance, etc.) before flying the aircraft. Please select an
appropriate environment for flight.
5.1 Flight environment requirements
(1) Select an open environment devoid of high rise buildings and tall obstructions (such as trees
and poles). Near buildings and obstacles, flight control signals and GPS signals can be severely
weakened; GPS functions such as GPS mode and Return to Home may not function properly.
(2) Do not fly in bad weather conditions (such as in wind, rain or fog).
(3) Fly the drone in ambient temperatures of 0-40 ℃.
(4) When flying, please stay away from obstructions, crowds, high voltage lines, trees, water, etc.
(5) To avoid remote control signals interference, do not fly in electromagnetic environments (such
as venues with radio stations, power plants and towers).
16
Waypoint mode Following mode Orbit mode VR mode
Please begin flight only when you have 6 or more GPS satellites. Waypoint/Return to
Home/Orbiting/Follow Me modes are then accessible. Note: GPS cannot be accessed
indoors.

Name: HUBSAN_H216A_XXXXXX Password: 12345678
5.2 Pre-Flight checklist
(1) Make sure the aircraft battery and mobile device are charged and have adequate power.
(2) Confirm that propellers and screws are properly installed.
(3) If you are taking pictures, insert the Micro-SD card required for taking pictures and videos
before power on.
(4) Verify that the motors arm and spin smoothly.
(5) Ensure the camera lens is clean.
5.3 Pairing the aircraft and transmitter
Connect the aircraft to its battery and power it on. Go to your mobile device's WIFI settings and
pair the device with the aircraft. Then, run the X-Hubsan APP.
17
(6) The aircraft cannot be used in or near the Arctic circle or Antarctica.
(7) Do not fly in no fly zones.
(8) Do not operate the aircraft near high pressure lines, airports or areas with severe magnetic
interference.
Settings WIFI
Wi-Fi
HUBSAN_H216A_XXXXXX
CHOOSE A NETWORK......
Cancel
Enter the password for”Hubsan_h216a_XXX”
JoinEnter Password
Password 12345678

5.4 Compass calibration
The compass must be calibrated every time the aircraft is powered on. The compass is
susceptible to interference by other electronic equipment, magnetic interference and metal,
which can lead to erratic behavior and loss of control. Regular calibration helps keep the
compass and its readings accurate.
18
Power the transmitter on; pair the mobile device and transmitter on the Bluetooth menu.
1. Enter the main app interface and tap the
Settings cog on the upper right-hand corner.
2. Tap “Controller” and then “Using remote control”.
3. The device will request permission
to use Bluetooth. Tap “Allow” to continue.
4. The interface will then show the “Bluetooth connection settings”
menu. Select the HUBSAN HT009_XXXXXX and confirm to connect.
Settings
Not connected
Parameters Map RelayController
Using remote control
Junior Senior
Joystick operating mode
Turn on Bluetooth
DENY ALLOW
An app on your device wants to
turn on Bluetooth and make your
device discoverable by other
devices for 250 seconds. Allow?
Bluetooth connection settings
Refresh
Open the remote control switch, click “Refresh” button
to refresh the Bluetooth list
Connect
HUBSAN HT009_XXXXXX
Parameters Map Relay OthersController
When the Bluetooth connection is successful, the interface will say, "Bluetooth connection
successful". The HT009 transmitter will beep; the Bluetooth connection LED will turn solid.

(1) Enter the X-Hubsan flight interface.
Follow the APP’s on-screen instructions.
(2) Complete Calibrate Compass 1 and 2.
Once both steps are completed, the
calibration window will disappear.
19
5.5 Takeoff/Landing
Takeoff
Manual takeoff: To start/arm the motors, please be sure that the joystick setting is activated.
Simultaneously pull both joysticks diagonally down-out as shown in the right hand figure.
Slowly push the throttle stick up; the aircraft will ascend and takeoff.
Landing
Manual landing: Slowly push down the throttle stick until the copter has completed its
descent to the ground. Disarm the motors by simultaneously pulling both sticks diagonally
down-out. When the motors have completely stopped, release the joysticks.
Auto Takeoff: Press the Auto Takeoff button
(right hand figure). The aircraft will take off
and hover at a height of around 2 meters. Note
that the Auto Takeoff key will turn into an Auto
Land key after the aircraft begins to fly.
Other manuals for H216A X4 STAR PRO
1
Table of contents
Other UBSAN Quadcopter manuals

UBSAN
UBSAN ZINO MINI SE User manual

UBSAN
UBSAN Q4 FPV User manual

UBSAN
UBSAN ZINO MINI PRO User manual

UBSAN
UBSAN ZINO MINI SE User manual

UBSAN
UBSAN ZINO PRO+ User manual

UBSAN
UBSAN ZINO PRO+ User manual

UBSAN
UBSAN ZINO MINI SE User manual

UBSAN
UBSAN H501A User manual

UBSAN
UBSAN H507A User manual

UBSAN
UBSAN Q4 User manual
Popular Quadcopter manuals by other brands

devention
devention Scout X4 Quick start guide and systems flowchart

Lumenier
Lumenier Hydra Edition QAV210 quick start guide

Lynx
Lynx SPIDER 73 user manual

Jamara
Jamara MiCoSpy WiFi 2,4 GHz Instruction

Globe Flight
Globe Flight Black Snapper L Pro Assembly manual

Reely
Reely Foldable Drone G-Sense quick start guide