UBSAN ZINO MINI PRO User manual

ZINO MINI PRO
User Manual • Uživatelský manuál •
Užívateľský manuál • Használati utasítás •
Benutzerhandbuch

Dear customer,
Thank you for purchasing our product. Please read the following instructions carefully
before first use and keep this user manual for future reference. Pay particular attention
to the safety instructions. If you have any questions or comments about the device,
please contact the customer line.
✉www.alza.co.uk/kontakt
✆+44 (0)203 514 4411
Importer Alza.cz a.s., Jankovcova 1522/53, Holešovice, 170 00 Praha 7, www.alza.cz

Disclaimer & Warning
All users must read product operating instruction and liability disclaimer before using
and operating any HUBSAN products. By using a HUBSAN product(s), user accept the
terms and condition of HUBSAN liability and operational guidelines. This product is not
suitable for minors under 14 years of age. When operating a HUBAN product(s), users
also accept all liability and responsibility for their own behaviors, actions as well as any
consequences resulting thereof while using a HUBSAN product(s). These products may
only be used for purposes that are in accordance with local laws and regulations, and
any applicable policies / guidelines HUBSAN may make available. Users agree to comply
with these terms and conditions, along with all relevant policies / guidelines set forth by
HUBSAN. Part of the details of this document may change with the upgrade of the
product software version. Please read the upgrade details carefully before upgrading
the software version.
Instructions
Some of the product flight functions are restricted in certain areas. Once you use this
product, you must strictly read and follow the relevant ICAO regulations, local airspace,
and UAV regulations. You are liable for any non-compliance with the foregoing and are
responsible for the consequences of your actions as well as any indirect and / or direct
liability that arises because of these limitations.
Flight environment requirements
1) Select on open area to fly. Avoid high rise buildings and tall obstacles (such as trees
and poles). Near buildings and obstacles, flight control signals and GPS signals are
severely affected; GPS functions such as GPS mode and Return to Home may not
function properly.
2) Do not fly in bad weather conditions (such as in wind, rain, or fog).
3) Fly the aircraft in ambient temperatures of 0-40°C.
4) When flying, please stay away from obstacles, people and crowds, high voltage lines,
trees, water, etc.
5) To avoid remote control signal interference, do not fly in strong electromagnetic
environment (such as venues with radio stations, power plants and Phone Antenna and
TV towers).
6) The aircraft cannot be used at or near Arctic circle or Antarctica.
7) Do not fly in no-fly zones.
8) Do not operate the aircraft near high pressure lines, airports, or areas with severe
magnetic interference.

Important safety information
Operation
Be extremely cautions and responsible when using the aircraft. Small electronic
components can be damaged due to crashes or exposure to moisture / liquid. To avoid
any injures, do not use the aircraft with damaged components.
Maintenance
Do not try to open or repair the units by yourself. Contact HUBSAN or HUBSAN
authorized dealers for service. For more information, please visit the official website at
www.hubsan.com.
Battery
Do not disassemble, squeeze, impact, burn, drop, or trample the battery. Do not short-
circuit or put the battery terminal in contact with metal. Do not expose the battery to
temperatures above 60°C. Fully Charge the aircraft battery prior to flight. Use only
HUBSAN dedicated supplied charger for charging. Keep the battery out of the reach of
children any away from kind of moisture.
Flight
Please be mindful of personal safety and the safety of others when operating and flying
your drone.
•Do not fly in bad weather conditions.
•Do not attempt to catch the aircraft while it is in flight.
•This product is intended for experiences pilots over the age of 14.
•After every flight, completely disarm the aircraft motors and power off the drone.
Then, power off the remote control.
Read the disclaimer and safety guidelines first before use.
Symbol Explanation:
Prohibited Operation Instruction
Important Notice Explanation / Reference

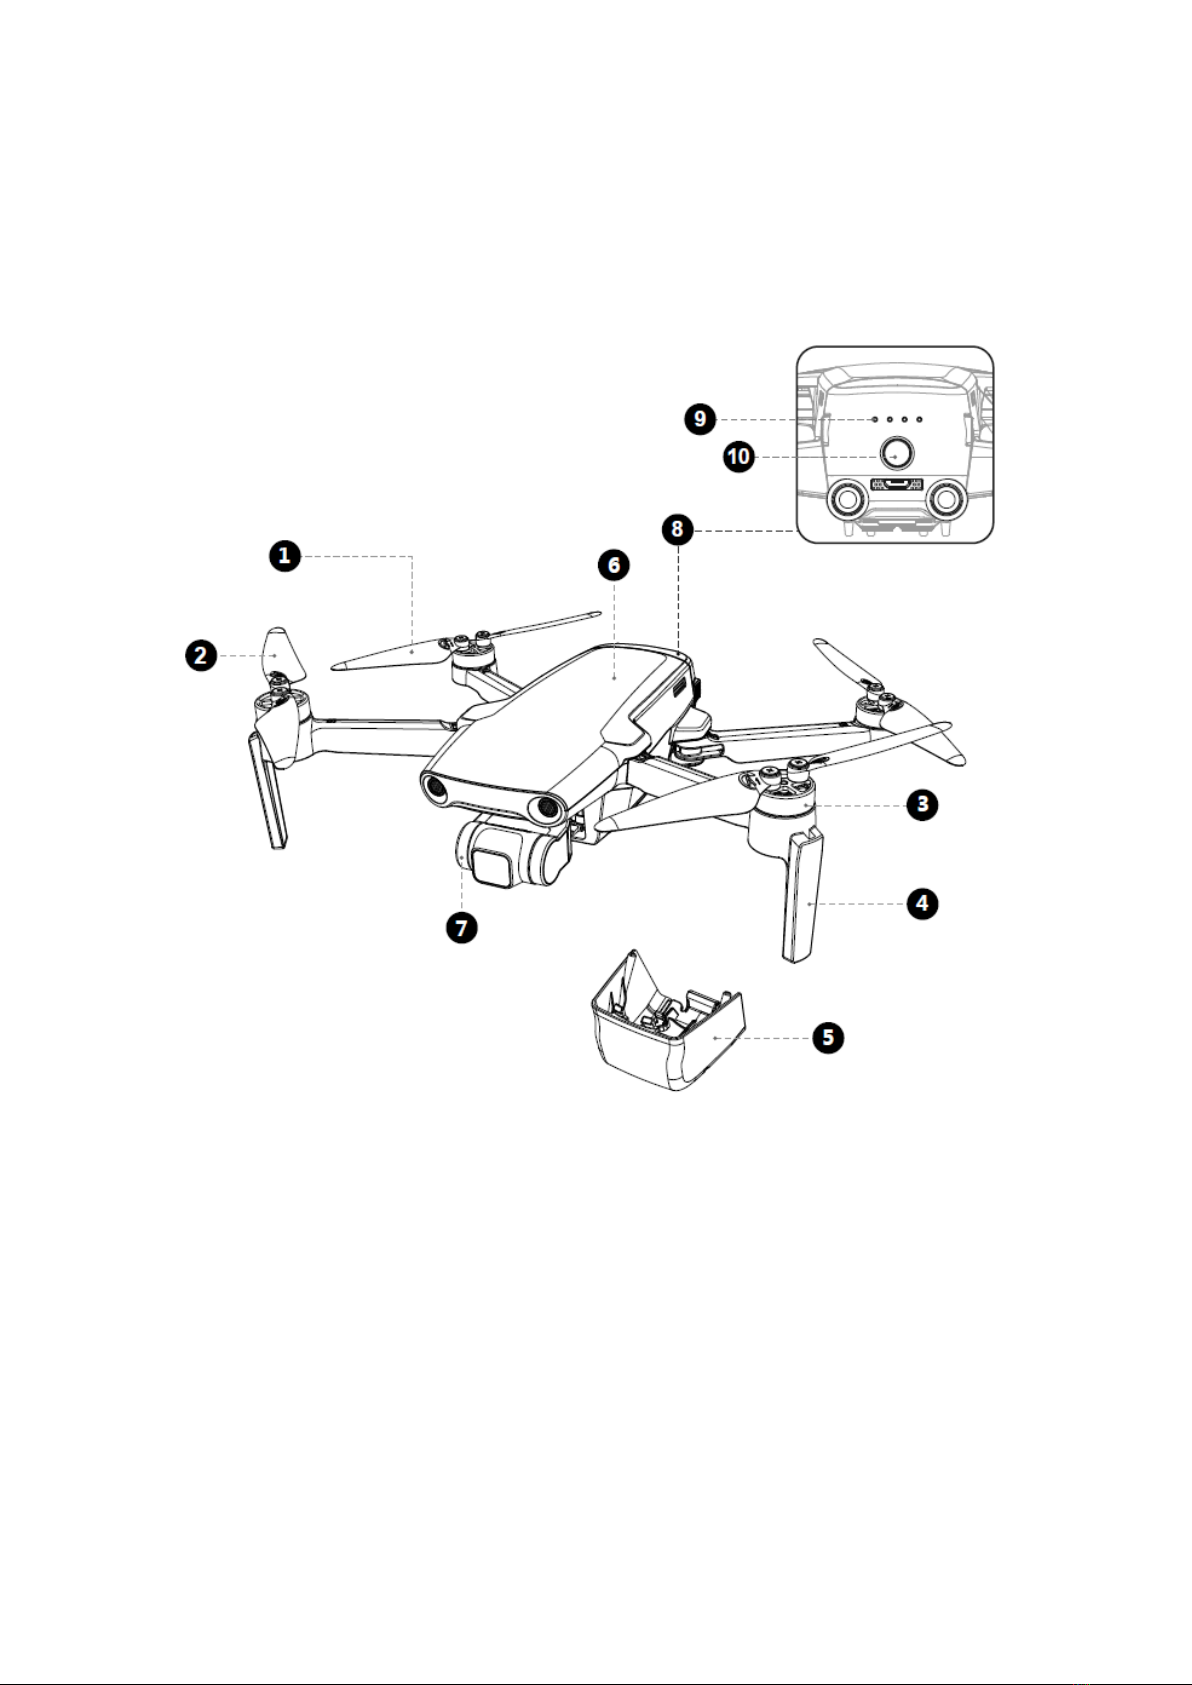
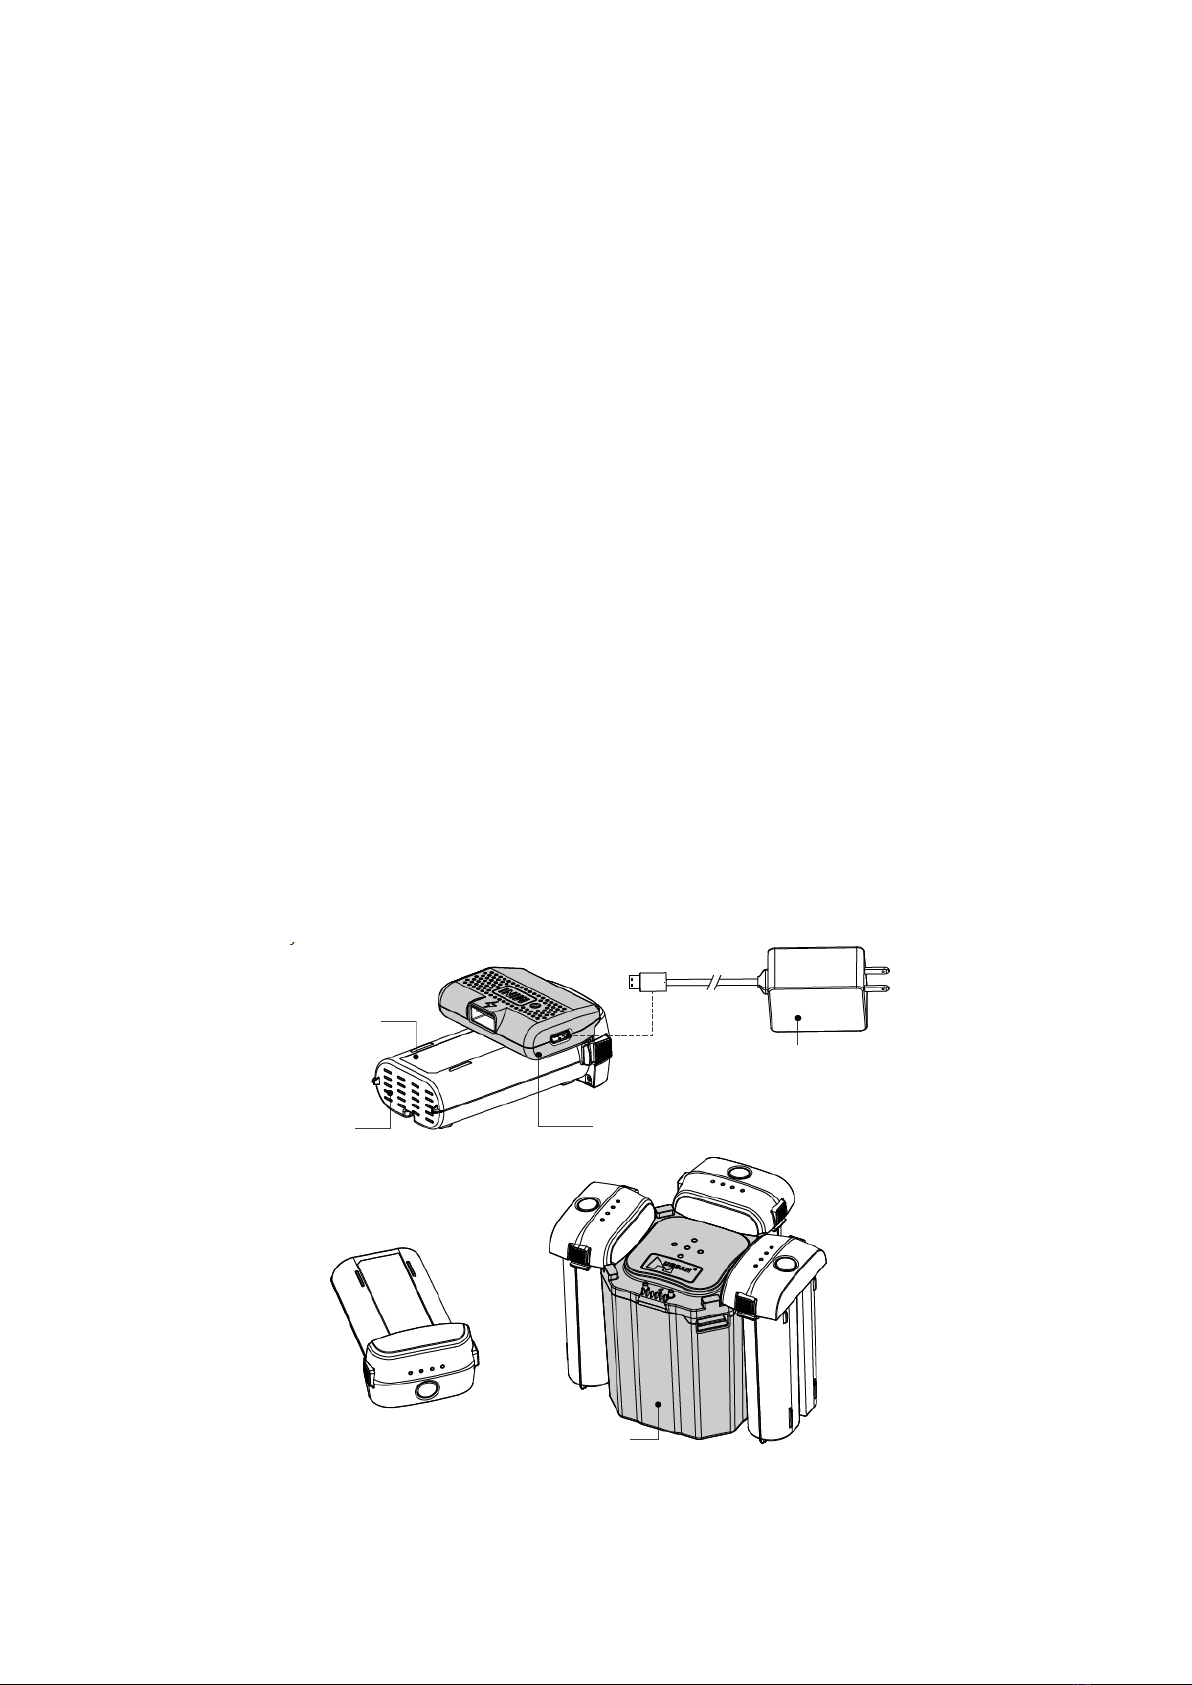
HUBSAN Safety Notice for Intelligent battery
•If you do not plan to use the product for a long period of time, make sure to
discharge the battery to 60% power. If the battery is more than 60%, the battery
will automatically discharge to 60% after a week. Maintaining and storing the
battery with 60% power can increase battery life.
•Please use only HUBSAN chargers or HUBSAN Charging Hub for battery
charging.
•Discharge the battery at 5C current or below. To avoid discharge related battery
damage, do not discharge for longer period than advised.
•Do not charge in a flammable and explosive environment to prevent fire.
•Batteries need to be recharged if unused for over 3 months.
1. Do not disassemble or reassemble the battery.
2. Do not short-circuit the battery.
3. Do not use or charge near sources of heat.
4. Do not put the battery in contact with water or any kind of liquid.
5. Do not charge batteries under sunlight or near fire.
6. Do not puncture or subject the battery to force of any kind.
7. Do not discard unused batteries to regular trash.
8. Never charge a battery that has been damaged, become deformed or swollen.
9. Do not solder on or near the battery.
10. Do not reverse charge or over discharge the battery.
11. Do not reverse charge or reverse the battery polarities.
12. Do not connect the battery to a car charger / cigarette lighter or any kind of
unconventional power source.
13. This battery is prohibited to use with non-designated devices.
14. Do not mix other types of batteries with lithium batteries.
15. Do not exceed the specified charging time.
16. Do not place the battery in a microwave or in areas of high pressure.
17. Do not expose the battery to the sun or excessive heat.
18. Do not fly in places with strong interference (high-voltage line, power stations, base
stations, high-speed rail lines, signal towers, etc.)
19. Do not use or charge in temperatures below 0°C and above 45°C.
20. In a newly purchased battery showing, leaks, possesses a bad smell or other
abnormalities, contact, and return the battery immediately to the vendor.
21. Keep away from the reach of children.
22. Use a dedicated battery charger only and follow all charging guidelines.
23. Adults must supervise minors, if allowed to charge the batteries even when using
dedicated HUBSAN chargers.

Aircraft
1. Aircraft Spare Part
1) Propeller A 6) Body Shell
2) Propeller B 7) 3-axis gimbal
3) Motor 8) Intelligent Battery
4) Tripod (With Antenna) 9) Battery level indicator
5) Gimbal Protection Guard 10) Battery power switch

11) Bind Button 12) Battery buckle
13) Low-altitude infrared altitude hold system
14) Downward Vision System
15) Aircraft flashlight
NOTE: The aircraft will generate heat when it is running, after the flight, please Avoid
direct skin contact with the bottom heat sink and the metal motor housing.

2. Aircraft Battery
•Aircraft Battery Charging
Aircraft Lithium Battery Capacity: 2400mAh, 7.2V lithium 2S intelligent battery, the
standard version does not come with a charger, so consumers can charge it with an
ordinary cell phone charger, and the charging time with a 9 V / 2 A charger is about 2.5
hours.
1) With the intelligent flight battery off, plug the charging adapter into the intelligent
battery connector.
2) Connect the power adapter to AC power and then connect the adapter to the
charging head with the Micro USB cable.
3) Intelligent Battery Level indicator will flash and indicate the current battery level
under charging,
4) Intelligent Battery is fully charged when power indicator lights are all off. Please
remove the Intelligent Battery and power adapter.
5) Please make sure to charge the battery at an ambient temperature between 0-40°C.
NOTE: After using the battery, please recharge it full in time to maintain a good battery
life.
(NOTE: The adapter and charging manager are only available in the portable package
version, not in the standard version.)
Intelligent Battery
Vents
Intelligent Charger Head
Adapter
Charge Manager

•Aircraft Battery Installation
1) Take a fully charged battery
2) Insert the battery into battery compartment,
while pressing the left and right edges behind of
the battery (As shown in illustration) push in,
until the battery buckles are fully locked. You
should hear buckle locking sound.
3) Battery top should be flush with aircraft back
that confirms battery is in place.
•Intelligent Battery Functions
1) Power display: The battery has a power indicator, which can display the current batter
power levels.
2) Auto-Discharging Function: To prevent swelling, the full battery automatically
discharges to 96% battery level when it is idle for 1day. It takes approximately five to six
days to discharger the battery to 60%. It is normal to feel moderate heat being emitted
from the battery during the discharging process.
3) Balanced Charging: During charging, the voltages of the battery cells are automatically
balanced.
4) Overcurrent Protection: The battery stops charging if an excess current is detected.
5) Overcharge Protection: The battery stops charging automatically once fully charged.
6) Over-discharge Protection: Discharging stops automatically to prevent excess
discharge.
7) Short Circuit Protection: The power supply is automatically cut if a short circuit is
detected.
8) Battery Cell Damage Protection: HUBSAN App displays a warning message when a
damaged battery cell is detected.
9) Hibernation Mode: When the battery is on and is left unused for over 20 minutes, the
battery will turn off the output after 20 minutes and will enter into a non-working state
to maintain the power. If the battery is left in the drone powered on, the battery will
automatically shut down once battery power drops below 5%. If the drone is turned off,
the battery will automatically enter the sleep state to prevent over-discharge. AT this
time, short pressing the battery switch will not display battery power, the battery can
wake up by charging again.
10) Communication: Information about the battery’s voltage, capacity, and current is
transmitted to the aircraft.

Battery switch
Short press to check the battery level, it
will turn off after 3 seconds.
Short press first and then long press to
turn on / off, the indicator light turns on /
off.
•Precautions for Low Temperature
1) If the battery is used in a low-temperature environment (-10°C to 5°C), please fully
charge the battery and keep it warm (over 10°C).
2) Using the battery in an environment below -10°C ma have unpredictable results.
3) In a low-temperature environment, the actual discharge of the battery is likely to be
different than the theoretical discharge capacity. It is recommended to stop flying and
land immediately when the APP prompts a “low battery alarm”.
4) In a low-temperature environment, due to the limitation of battery output power, the
wind resistance of the aircraft will be reduced. Please fly with caution.
•Precautions for Battery
Be sure to fully charge each time before using the Intelligent Battery. Charge the
intelligent battery only with HUBSAN supplied power adapter and intelligent charging
modules.
1) After each flight, battery temperature may be higher. Allow Intelligent Battery to cool
down to normal room temperature before charging.
2) The charging temperature range of intelligent battery is 5°C to 40°C. If the
temperature of the battery cell is not in this range, the battery management system will
stop charging. The optimal charging temperature range is 25 ± 3°C. Charging in this
temperature range can extend the battery life.

3. Propellers
Before installing the propeller, please carefully check the letters by the aircraft motors
and the letters on the propeller. You must match those letters when installing
propellers; If the blade is damaged or needs to be replaced, unscrew the screw counter-
clockwise to remove the propeller.
Be sure to replace the propeller together with the original new propeller screws to
prevent accidental screw and propeller loss. (HUBSAN Standard accessories come with
original screws.)
HUBSAN brand new propeller screws

Remote Controller (America Mode 2)
1. Names of Remote Controller Components
1) Smartphone / Device holder 7) Photo
2-1) Throttle / Rudder Stick 8) Video
2-2) Forward / backward / left / right 9) Gimbal Pitch Control dial
Control levers 10) Custom button
3) Return to Home 11) Antenna
4) Power 12) Remote control extension cable
5) F / N / S mode: Movie mode / 13) Charging / Adapter Port
Normal mode / sport mode 14) Lanyard hole of transmitter
6) Display 15) Rocker storage slot
16) Cable storage slot

2. Remote Controller Features
S/N
Key / Switch
Function
(1)
Throttle / Rudder Stick (Mode 1)
Move the stick forward to backward to
ascend or descend the drone. Move the
stick lift or right to rotate the drone
Clockwise or counterclockwise.
(2)
Elevator / Aileron Stick (Mode 1)
Move the stick forward or backward to fly
the drone forward or backward. Move the
stick left of right to fly drone left and
right.
1
Throttle / Aileron Stick Move the stick forward or backward to
ascend or descent the drone. Move the
stick left or right to fly the Drone left and
right.
2
Elevator / Aileron Stick (Mode 1)
Move the stick forward or backward to fly
the drone forward or backward. Move the
stick left or right to rotate the drone
clockwise or counterclockwise.
3
Return to Home
Long press the button to activate Return
to home mode. Remote control will beep
every 3 seconds during return to home
flight.
Short press to cancel return to home.
4
Power switch
Short press, then press hold to power on
or off.
5
F / N / S mode (Movie / Normal /
Sport mode)
Movie mode: Flying speed of the drone is
limited to 1 m/s.
Normal mode: The maximum speed of
the flying machine set by APP Flight,
maximum 10 m/s.
Sport mode: The maximum flight speed
of the aircraft 16 m/s.
6
Display
Displays the flight parameters.
7
Photo
Short press to take photos.
8
Video Long press to start recording video.
Short press to stop recording video.
9
Gimbal Pitch control dial
Controls the pitch angle of the gimbal.
10
Custom keys Long press the Fn+ wheel to adjust the
zoom function.
Press and hold Photo+ wheel to adjust
the brightness of the remote-control
screen.
The remote-control buzzer beeps when a
low battery is triggered or Return to

home is activated. Press the Fn button for
1.5 seconds, to stop beeping prompts.
Custom keys, set the function on the APP
and save it when the APP is not
connected, (short press) Fn will not work.
Function one: Exit the current flight
mode.
In this mode, short press Fn to exit the
current flight mode and the aircraft will
hover.
Function two: short press Fn to execute
gimbal return to normal state.
Function three: no function (factory
default function).
11
Charging /Adapter Port
Charge the remote control or connect
with a mobile device.
12
Low Battery Warning
Low battery warning for the aircraft or
remote control: Remote control “Beeps”
once every second.
13
Standby Protection
If Remote controller is left on and unused,
t will start beeping once every 3 seconds
and switch to stand by mode. After 3
minutes of beeping, remote control will
automatically shut down.
3. Charging the Transmitter Battery
The remote is charged using the Micro USB cable as shown:
The remote-control charging time is about 2.5 hours. The remote-control battery
indicator light flashes during charging. When charging is complete, the LED’s will stay on
solid. The use time after fully charged is about 1.5 hours.

4. Remote-control Diagram
1) Aircraft Battery level 8) Character Area
2) RC Battery level 9) Flight Height
3) Propellers Status 10) Flight Distance0
4) Aircraft Mode 11) Compass Calibration / Headless
Mode
5) Aircraft GPS Satellite 12) Aircraft speed
6) Aircraft Signals 13) Photo / Video
7) Heading Angle
5. Remote-control Antenna Angle
1) Adjust the angle of the remote-control antenna and try to face the flight direction of
the aircraft as much as possible.
2) Long-distance state, the distance between the two antennas is properly tightened to
maintain the antenna directivity.
3) Closer Sate, the two antennas are properly separated to maintain a wide receiving
range.
4) Do not Form an occlusion or cross between the antennas.

6. Transmitter Calibration
Start Calibration: Push and hold both sticks to the upper left corner as shown in picture
below, and power on the transmitter, the transmitter will enter calibration state and
start Beeping; release the power button and sticks.
Calibrate Sticks: Rotate both sticks in circles to their maximum travel for at least three
times and release the sticks.
Exit and save calibration: long-press any button except the power button until the
remote controller stops beeping and the screen lights on.
Flight
1. Download the X_HUBSAN 2.0 App
Before flying, download and install the X_HUBSAN 2.0 PP. Download the App for free by
scanning the code or search in APP Store (iOS) or Google Play.

2. Main Interface Guide
3. Pairing the Aircraft
To use the aircraft for the first time, you need to activate the aircraft first:
1) Press battery switch to power on the aircraft.
2) Press the remote-control switch to connect to the mobile phone and wait for the
remote control to connect the aircraft in success.
3) Open the mobile phone X_HUBSAN 2.0APP, it will automatically jump out of the
activation interface.
4) The new user can register an account as the activation account, and the old user who
has logged in to the APP before can directly enter the password to activate it.
Home page
Take Photo/Video
Gallery
Distance
Altitude
Transmitter
GPS
Altitude Ball
Gimbal Pitch
Location
zoom
Haedless On/Off
Auto Takeoff / Auto
RTH
Flight Mode
Aircraft GPS
Aircraft Speed
Setting
Camera Setting
Photo/Video
Switch
Flight Status
Motor
Status
FPV
(Video)
SIgnal
Remote
control
Signal
Aircraft
GPS
Signal
Aircraft
Battery
Level
Sport Mode
Switch

•Run X_HUBSAN 2.0 APP and select the aircraft model.
•Short press, the aircraft power button, then press and hold for a few seconds to
turn it on.
•Short press the transmitter power button, then press and hold for a few seconds
to turn it on, connect the transmitter to your mobile device with the RC cable.
•Start binding (This step is only required when first binding or replacing the
transmitter, you need to do it manually.)
Long press the aircraft bind button to enter the binding mode.
Press and hold the FN + Photo key combination to enter the binding mode, put
the aircraft close to the remote-control to complete the bind.
TIPS:
The binding process has been completed in the factory. The aircraft can take off directly.
After entering binding mode, all LEDs flash rapidly and become solid after binding is
successful.
Please keep the remote controller at least 1 meter away from drone during binding
mode.
4. Aircraft Calibration
•Horizontal Calibration
During the flight, if the drone shows a significant horizontal deviation, please land, and
disarm the drone. Place the drone on a perfectly leveled horizontal ground. Enter the
APP setting interface, select horizontal calibration. Drone will automatically perform the
calibration, the four heading lights will flash, and it will stay on after the calibration is
completed.
Do not move the aircraft during calibration.
Before Pairing
After Pairing

•Compass Calibration
When using the drone for the very first time, the compass calibration message will pop
up before takeoff. Follow the instructions on the screen, rotate the drone horizontally,
then point the drone nose to ground and rotate it clockwise. The compass calibration
message will disappear once it is completed. You must complete the compass
calibration before flying the aircraft for the first time.
The compass is susceptible to interference from other electronic devices, resulting in
abnormal flight data. Regular calibration helps to keep the compass and its readings
accurate. Select “Compass Calibration” under APP setting interface.
Compass1 Compass 2
•Starting/Stopping the Motors
Motor starting condition
1) The aircraft, remote-control, and mobile phone have been connected successfully.
2) The aircraft compass has been calibrated (APP does not prompt to calibrate the
compass).
3) The aircraft must be placed on a horizontally leveled ground.
4) Aircraft has not locked sufficient GPS satellites for positioning. Please do not force
take-off.
5) The power of the drone should be ≥15%.

Starting the Motors
Push both stick down and outwards as shown in picture to start the motors. One the
motors start spinning, release both sticks.
Stopping the Motors
When the motors are running, push both stick down and outwards again to stop the
motors. Release both sticks once motor stop.
Forced Motor Stop
When flying in the air, the motors can be forced to stop in 2 seconds by push both sticks
down and outwards. Use this function with caution, as it can cause the aircraft to fall
and may endanger personal safety.
Aircraft Functions
1. Flight Control Mode
Flight Control Mode
(The flight controller monitors the GPS signals and switches to the
corresponding flight modes)
GPS Mode
Use GPS and downward vision positioning system to achieve
precise hovering, stable flight, intelligent flight mode, etc. The
vision system work in a well-lit environment.
Optical flow
mode
This mode works indoors only if the altitude is less than 5 meters.
More than 5 meters altitude the GPS mode or Attitude mode. In
optical flow mode, the maximum flying speed of the aircraft is 2
m/s.
Attitude mode
The aircraft automatically changes to Attitude (ATTI) mode when
the Vision System are unavailable or disabled and when the GPS
signal is weak or the compass experiences interface. It only
supports manual flight and prohibits smart flight modes. In
Attitude mode, the aircraft will not hold position itself, fly with
caution (this mode is only for experienced Drone pilots).
Flight Speed
Movie Mode
Maximum speed 1 m/s
Normal Mode
Maximum speed is 10 m/s, adjustable in APP settings from 10 –
100%
Sport Mode
The maximum speed is 16 m/s, the sport mode is only available
in the GPS mode. Visual obstacle avoidance is not supported in
sports mode.
Other manuals for ZINO MINI PRO
1
Table of contents
Languages:
Other UBSAN Quadcopter manuals

UBSAN
UBSAN ZINO MINI SE User manual

UBSAN
UBSAN H501A User manual

UBSAN
UBSAN ZINO MINI PRO User manual

UBSAN
UBSAN ZINO PRO+ User manual

UBSAN
UBSAN Q4 FPV User manual

UBSAN
UBSAN H216A X4 STAR PRO User manual

UBSAN
UBSAN ZINO MINI SE User manual

UBSAN
UBSAN Q4 User manual

UBSAN
UBSAN ZINO PRO+ User manual

UBSAN
UBSAN ZINO MINI SE User manual
Popular Quadcopter manuals by other brands

Propel Trampolines
Propel Trampolines X04 Instruction booklet

TOZO
TOZO Q1012 manual

MOTA
MOTA Jetjat nano owner's manual

DELTA-SPORT
DELTA-SPORT 345898 2004 operating instructions

Carrera RC
Carrera RC HD Next FPV Assembly and operating instructions

RC Logger
RC Logger NovaX 350 89132RC installation instructions