UCHIDA AeroDieCut User manual

OPERATION MANUAL
UCHIDA YOKO CO., LTD., TOKYO, JAPAN
79-231 V1.02

AeroDieCut OPERATION MANUAL
1
・Use machine only after reading the "Safety Instructions" given below carefully.
・These safety instructions are given to ensure that the machine will be used safely and
properly and to prevent operators from sustaining harm and injuries.
・This equipment is not suitable for use in locations where children are likely to present.
Explanation of markings
Marking
Meaning of marking
Warning
This symbol stands for immediate danger threatening the life and health
of persons. Disregarding these instructions may cause severe damage
to health and even serious injuries.
Caution
This symbol stands for an endangering situation that may occur.
Disregarding these instructions may lead to slight injuries or damage to
property.
Definition of Symbols and Notes
In this manual the following names and signs stand for possible dangers.
Caution
This symbol stands for an endangering situation that may occur.
Disregarding these instructions may lead to slight injuries or damages
to property.
Note
This symbol stands for notes, operational hints, and other useful
information.
They are convenient for exploiting the machine’s functional abilities.
SAFETY INSTRUCTIONS
Explanations of the illustrations used in the Safety Instructions are given as follows:
Warning
1. Don’t put hands inside work area. May result in severe injury.
2. Don't touch any rotating part. There is a danger of receiving an injury.
3. Don't open the cover of the equipment. There is a danger of receiving an injury or
electric shock.
4. Be sure to connect the power cord to a grounded outlet. If the ground is not securely
connected, it could lead to electric shock or fire.
5. Don’t disassemble gas spring. There is a danger of receiving an injury.

AeroDieCut OPERATION MANUAL
2
Caution
1. Don't put a hand into the cover or a clearance between parts.
There is a danger of receiving an injury.
2. Don't bring a hand, face, hair, sleeves of clothes and the like close to the rotating parts
of the machine.
There is a danger of receiving an injury.
3. Do not exceed the MAX level when stacking the paper.
Exceeding it may cause a mechanical failure.
4. When you put a machine into operation, please change into the state where all covers
were closed.
If it works where a cover is opened, there is fear of an injury.
Before use
Read this "Operation Manual" carefully before use. In particular, be sure to read "Safety
Instructions" (page 2 to page 3) to ensure that the machine will be used properly.
Keep the manual at an appointed place with care so that it may be accessible whenever
necessary.
The specifications of this product are subject to change for improvement. Therefore, don't
mistake the "Operation Manual" of one product of the same model for that of another because
descriptions in the "Operation Manual" of products of the same model may differ.

AeroDieCut OPERATION MANUAL
3
Contents
1Introduction.......................................................................................................................5
1.1. Names of parts..........................................................................................................5
1.2. Paper weight / quality................................................................................................6
2. Operating instructions ......................................................................................................7
2.1. Turning the power on ................................................................................................7
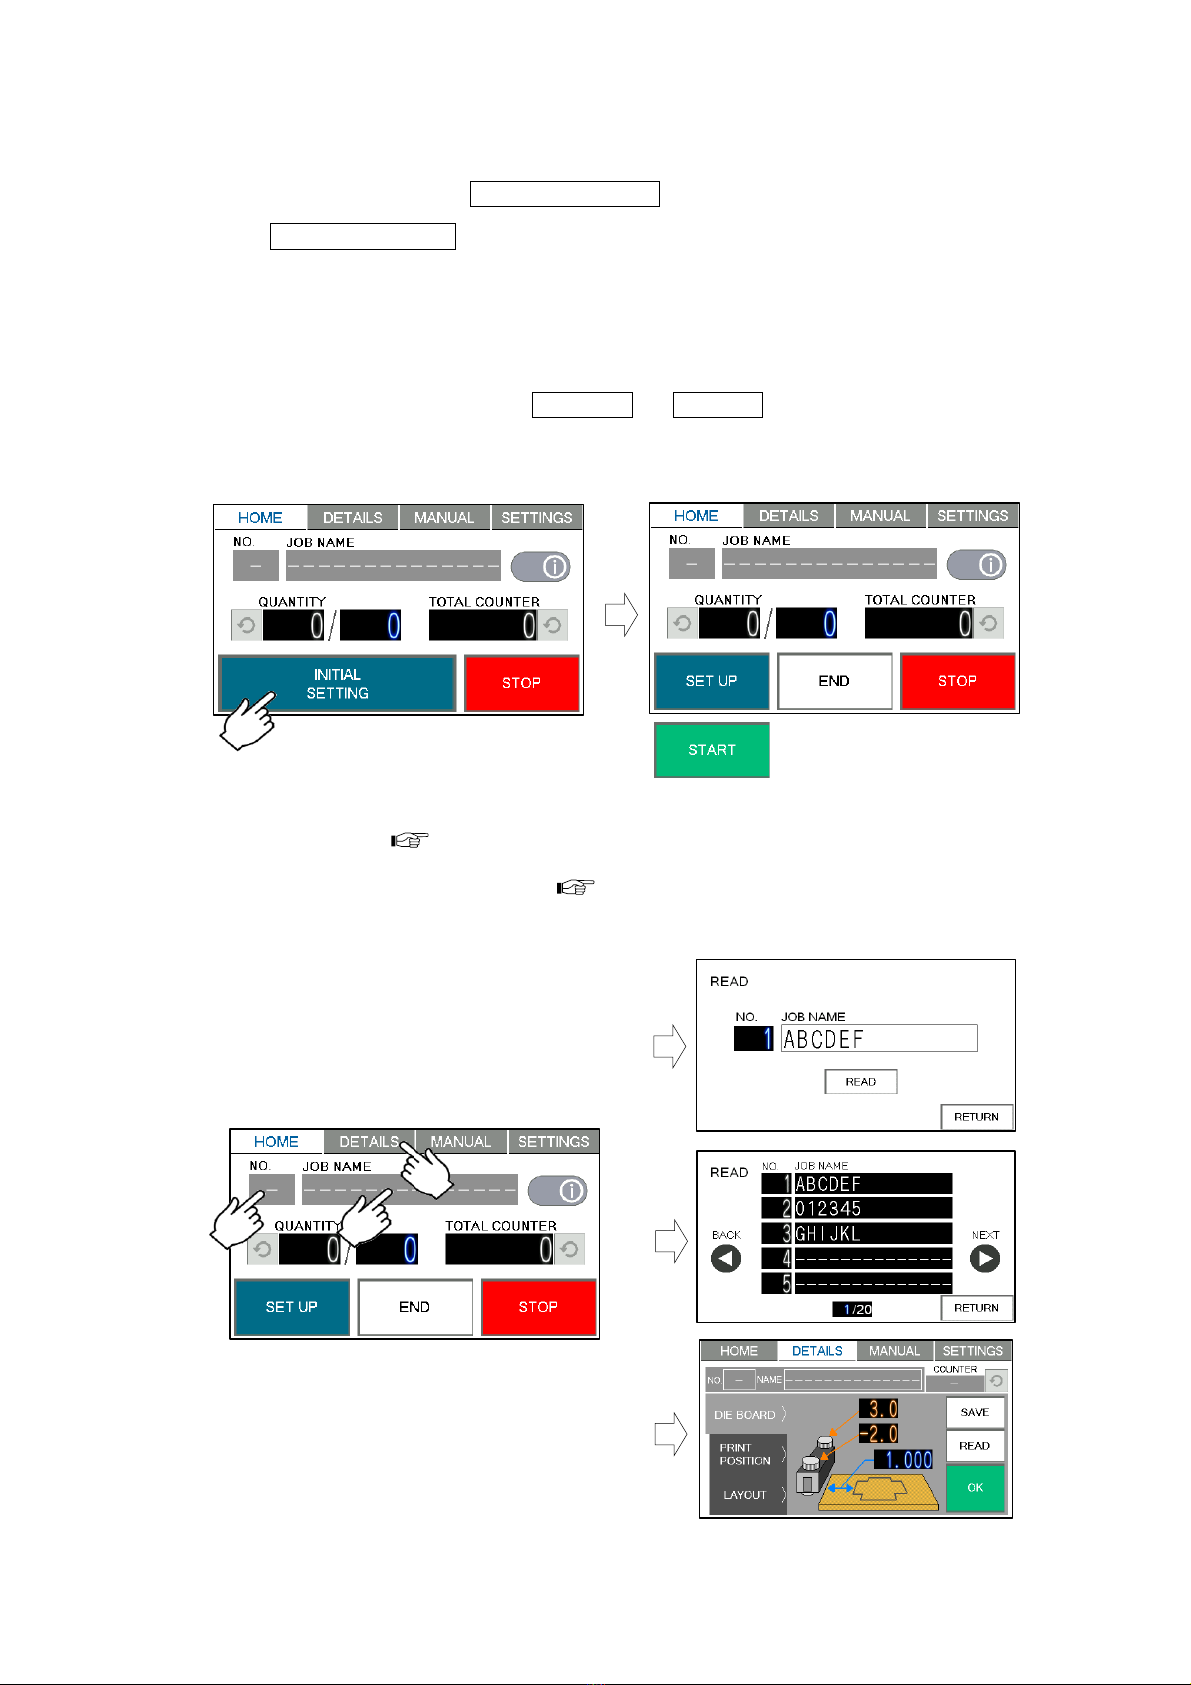
2.2. Initial setting ..............................................................................................................8
2.3. Job select ..................................................................................................................8
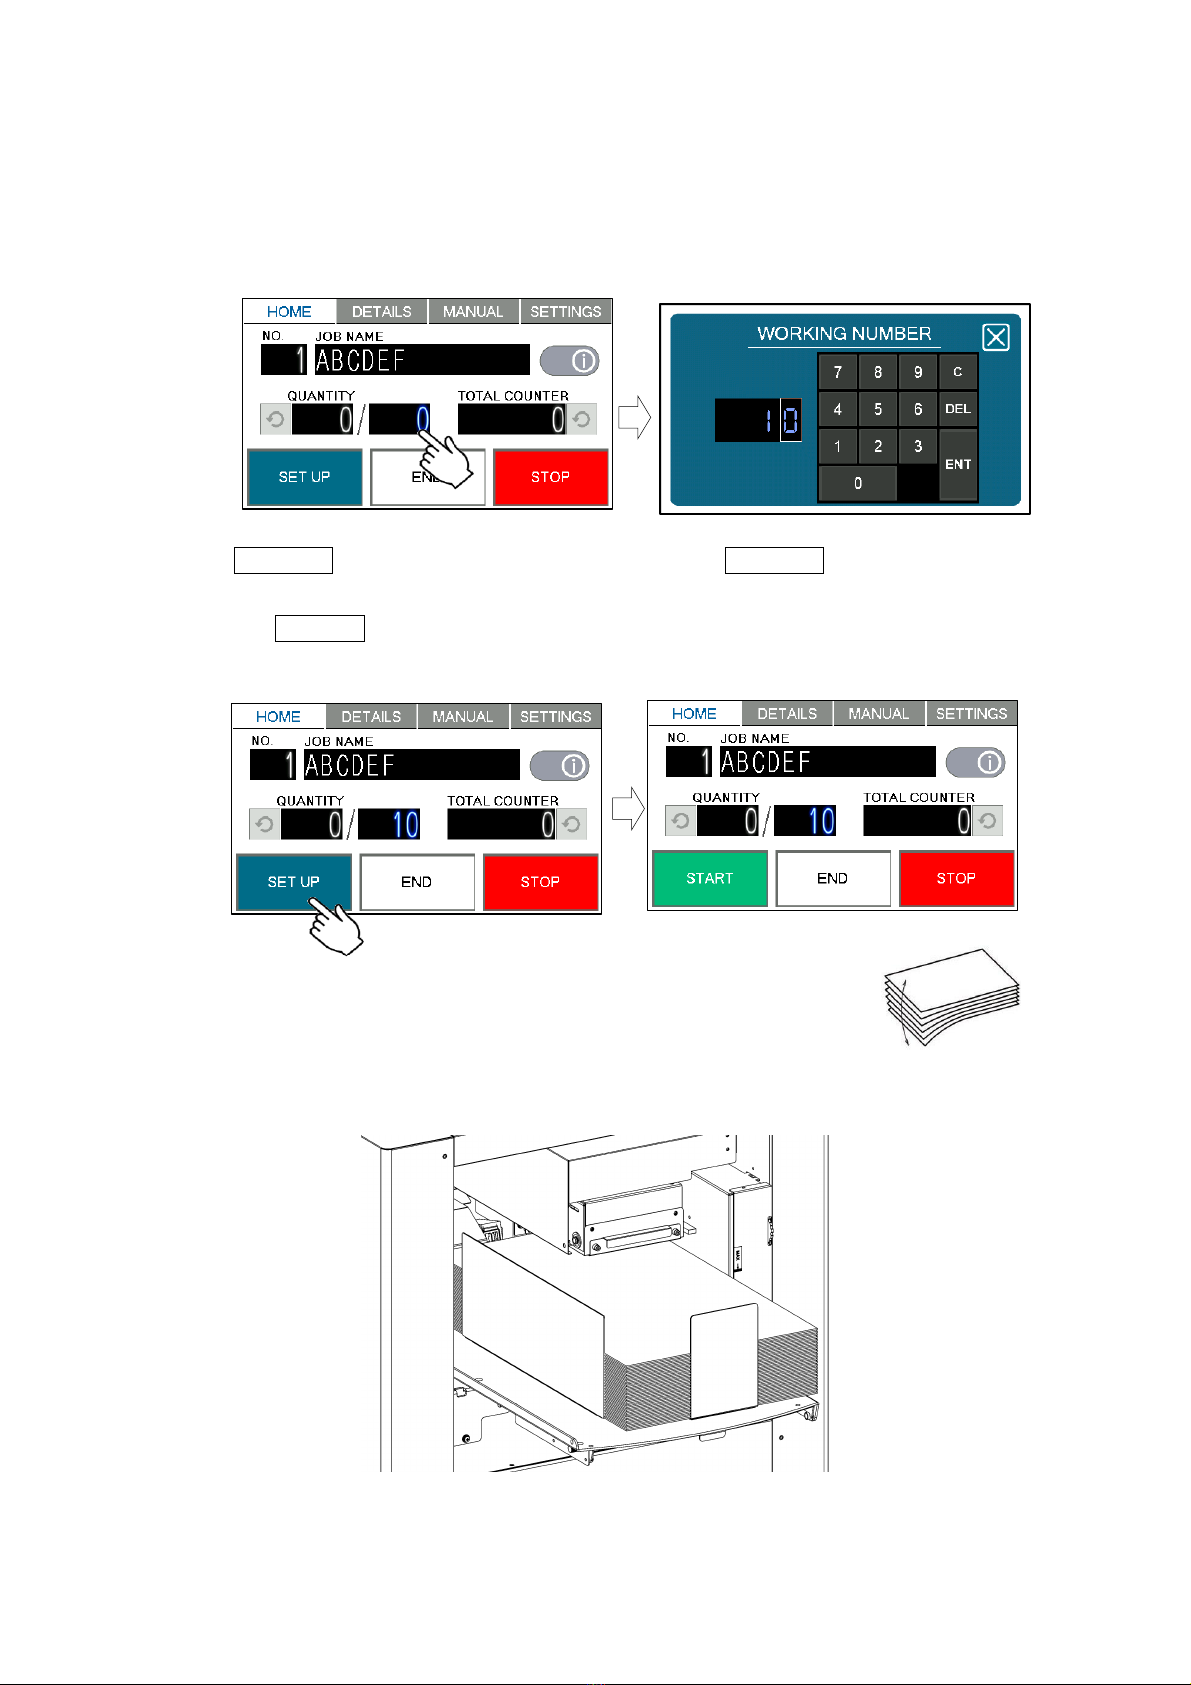
2.4. Paper setting .............................................................................................................9
2.5. Check the condition of the Press plate .................................................................. 10
2.6. Job start ..................................................................................................................11
2.7. Interruption ............................................................................................................. 12
2.8. Power off ................................................................................................................ 12
3. Job data......................................................................................................................... 13
3.1. Details screen ........................................................................................................ 13
3.2. Imposition control screen ....................................................................................... 14
3.3. Data inputs ............................................................................................................. 15
3.3.1. Explanation of each data inputs ..................................................................... 15
3.3.2. Inputs .............................................................................................................. 16
3.4. Data save ............................................................................................................... 18
3.5. Data read ............................................................................................................... 20
3.5.1. Read from Job No........................................................................................... 20
3.5.2. Read from Job-data list .................................................................................. 21
3.5.3. Read input data .............................................................................................. 22
3.6. Change saved data................................................................................................ 22
3.7. Delete saved data .................................................................................................. 23
4. Die board setting ........................................................................................................... 24
4.1. Die board Changing ............................................................................................... 24
4.2. Adjustment of the level of pressurization............................................................... 27
5. Manual control............................................................................................................... 28
5.1. Manual control screen............................................................................................ 28

AeroDieCut OPERATION MANUAL
4
6. Settings.......................................................................................................................... 30
6.1. Settings screen ...................................................................................................... 30
6.1.1. Speed.............................................................................................................. 30
6.1.2. Double feed check .......................................................................................... 31
6.1.3. Paper feed work time...................................................................................... 31
6.1.4. Table position after work................................................................................. 31
6.1.5. Tri-suction ....................................................................................................... 31
6.1.6. Press Conditions............................................................................................. 32
7. Adjustment .................................................................................................................... 34
7.1. Respond for Feeding direction shift ....................................................................... 34
7.1.1. image shift compensation screen................................................................... 34
7.1.2. Cutting position adjustment ............................................................................ 35
7.1.3. Stretch/Shrink adjustment .............................................................................. 36
7.2. Respond for shift of depth direction ....................................................................... 37
7.3. Respond to printing skew....................................................................................... 38
8. Message dialog ............................................................................................................. 39
9. Maintenance .................................................................................................................. 43
10. Troubleshooting ......................................................................................................... 44
11. Product specifications................................................................................................ 46

AeroDieCut OPERATION MANUAL
5
1 Introduction
1.1. Names of parts
No.
Name
No.
Name
01
Feed unit
10
Press plate
02
Feed table
11
Protective plate
03
Depth adjustment handle
12
Die board
04
Joint cable
13
Paper carrying belt
05
Press unit
14
Cutting plate
06
Top cover
15
Plate holder
07
Front cover
16
Press roller
08
Touch screen
17
Caster
09
Ejection table
18
Adjuster

AeroDieCut OPERATION MANUAL
6
Warning
Don’t put hands inside work area.
May result in severe injury.
Don't touch any rotating part. There is a danger of receiving an injury.
Don't open the cover of the equipment. There is a danger of receiving an injury
or electric shock.
1.2. Paper weight / quality
Use suitable paper stocks which weight is 120 to 400gsm (0.005” – 0.016”).
These paper stocks are not suitable in use.
・Papers that has heavily electric static charged. It may cause miss-feed, double feed or
paper jam.
・Papers that are more than 0.125” curled or waved. It may cause miss-feed, double feed
or paper jam.
・Papers that have ink or toner not fused properly. It may cause contaminating the work
and the machine.
・Papers that are too slippery. It may cause miss-feed or inaccurate results.
・Prints that are shrank, stretched or skewed inconsistently. It may cause inaccurate
results.

AeroDieCut OPERATION MANUAL
7
2. Operating instructions
2.1. Turning the power on
Warning
Be sure to connect the power cord to a grounded outlet.
If the ground is not securely connected,
it could lead to electric shock or fire.
ON
OFF
Electric power cord
AC 110-120V
50/60Hz
400W
Opening screen
Home screen
Power on

AeroDieCut OPERATION MANUAL
8
2.2. Initial setting
①After turning on the power , INITIAL SETTING is displayed on the Home screen.
②Press INITIAL SETTING .
③Initial setting starts by automatically.
・Press roller moves to Home position。
・Hold to up the Die board.
④After initial setting is completed , SET UP or START is displayed on the Home
screen.
2.3. Job select
①Set the job data. (Page20)
②Set the Die board on the machine. (Page24)
Home screen Home screen
Home screen

AeroDieCut OPERATION MANUAL
9
2.4. Paper setting
①Enter the number of sheets for operation.
All the sheets on the feed table will feed in case 0 is entered in Quantity.
②If SET UP is displayed on the Home Screen, press SET UP .
③Feed table goes down. when it reaches the bottom, it automatically stops and changes
to the START display.
④Flip through the sheets well before you put them on the feed table.
⑤Set the sheets on the feed table.
Use the paper guide (Large) and paper guides (Small) to fix the sheets.
Home screen
Home screen

AeroDieCut OPERATION MANUAL
10
Note.
・Paper loading capacity is 4.00”.
・Make sure that the paper stack does not exceed the MAX label.
・It affects finishing accuracy if there is a gap between the side guide and the sheets.
Warning
Don’t put hands inside work area.
May result in severe injury.
2.5. Check the condition of the Press plate
・Clean the Press plate and Base plate with a parts cleaner before starting work one day.
・After cleaner, wipe them with a cloth soaked in oil (machine oil) and refuel.
Note.
Insufficient lubricant will lead to increased wear and ultimately failure.
Keep the paper carrying belt without oil.
正:
誤:
Press plate
Base plate (Underside)
Oil viscosity:ISO VG68

AeroDieCut OPERATION MANUAL
11
・Do not place anything on the Press plate as it may cause a malfunction.
2.6. Job start
①Press START to start an automatic operation. The display will change to
RUNNING .
②After processing the entered number of sheets in QUANTITY, the machine stops
automatically.
Home screen
NG

AeroDieCut OPERATION MANUAL
12
2.7. Interruption
・Press STOP and the machine will make an EMERGENCY stop even if the operation
is underway.
・Press END if you wish to stop the machine when the current sheet is completed.
・QUANTITY indicates the number of finished sheet when the machine is stopped with
STOP or END button.
・Press to reset the counter to 0.
・TOTAL COUNTER of processed sheets are counted.
・Press and hold to clear the number.
・Can be change the total number.
2.8. Power off
・Make sure that the machine is stopped.
・Turn off the Power switch.
Home screen
Home screen
Home screen

AeroDieCut OPERATION MANUAL
13
3. Job data
3.1. Details screen
・Press DETAILS on the tab switch to display the Details screen.
・Press the tab in the Details screen to switch the input item.
・The Job NO & NAME and COUNTER are displayed while selecting the saved data.
Details screen-2
Home screen Details screen
Details screen-1
Details screen-3

AeroDieCut OPERATION MANUAL
14
Save the current job data.
Read the stored job data for reference.
Decide the current job data.
Switching the cut marks ON or OFF.
The counter the Die board has been used for each saved data is
displayed.
If the job data has not been saved ― is displayed.
Clear the counter for each job data.
3.2. Imposition control screen
・Press IMPOSITION CONTROL on Details screen-3 to display Imposition control screen.
~
Select the number of times for multifaceted control.
The value input in pitch 1 is copied to pitches 2, 3 and 4.
Returns the screen to Details screen-3.
Details screen-3
Imposition control screen

AeroDieCut OPERATION MANUAL
15
3.3. Data inputs
3.3.1.Explanation of each data inputs
・Can be change the value by touching each number.
No.
Explanation
①
The level of pressurization on the opposite side press roller.
Input the level after pressure adjustment.
②
The level of pressurization on the operation side press roller.
Input the level after pressure adjustment.
③
The counter the Die board has been used for each saved data.
Counts up with every pressurization.
④
Position of the blade on the Die board.
Input the dimension from the left edge of the Die board to the blade.
⑤
Printing position. Input only when cut marks are nothing.
Input the dimensions from the edge of the paper to the left edge of the job design.
⑥
Printing position. Input when cut marks are on.
Input the dimensions from the edge of the cut mark position to the left edge of the
job design.
⑦
Paper size.
⑧
⑨
⑩
⑪
The number of times for multifaceted control.
Even if enter the number of times for the pitch that has nothing to do with the number,
it does not affect the operation.
1
2
5
7
6
8
9
10
11
3
4

AeroDieCut OPERATION MANUAL
16
3.3.2. Inputs
◆Case of single cutting
①Measure and input the dimension from the left end of the Die board to the blade.
②Input the layout of the design.
・When cut marks are nothing.
Input the dimension from the left edge of the paper to the cutting position.
・When cut marks are on.
Input the dimension from the left edge of the cut mark position to the cutting position.
③Input the paper feed length.

AeroDieCut OPERATION MANUAL
17
◆Case of multiple cutting
①Measure and input the dimension from the left end of the Die board to the blade.
②Input the layout of the design.
・When cut marks are nothing.
Input the dimension from the left edge of the paper to the first cutting position.
・When cut marks are on.
Input the dimension from the left edge of the cut mark position to the first cutting
position.
③Input the paper feed length.

AeroDieCut OPERATION MANUAL
18
④Select the number of times for multifaceted control.
⑤Input each pitch according to the number of times for multifaceted control.
3.4. Data save
・Up to 100 data can be saved.
①Press SAVE on the Details screen. Job-data list screen is displayed.
②Select any data on the Job-data list screen. Save confirmation screen is displayed.
Details screen Job-data list screen
Job-data list screen
Save confirmation screen

AeroDieCut OPERATION MANUAL
19
③Input the JOB NAME of NEW DATA and press OK to overwrite.
Job-data list screen
Moves to the next page.
Moves to the previous page.
Return to the Details screen.
Save confirmation screen
Select SAVED DATA to the next data.
Select SAVED DATA to the previous data.
Copy the JOB NAME of SAVED DATA to the JOB NAME of NEW
DATA.
Decide the job by overwrite the data.
Return to the Job-data list screen.
Save confirmation screen
Table of contents
Other UCHIDA Cutter manuals
Popular Cutter manuals by other brands

Stiga
Stiga 95 COMBI owner's manual

Silca
Silca Twister II NA operating manual

Greenlee
Greenlee GATOR CSG45GL instruction manual

Clarke
Clarke ETC7 Operating & maintenance instructions

Parkside
Parkside PSFS 250 A1 Operation and safety notes

Logan Graphic Products
Logan Graphic Products 301-S Instruction and operation manual