Ude GD-37 Quick guide

211
610.608C
rev.0
EQUIPOS Y SISTEMAS MEGAFONÍA / INTERCOM PUBLIC ADDRESS SYSTEMS
Tel.: +34 934 772 854 / +34 609 914 787
GD-37 Installation,
configuration and
user manual

212
610.608C
Rev.0
GD-37
Índice
1. Description
2. Front and rear panel
3. Technical characteristics
4. Start-up prodedure
5. Basic operation
5.1. Digital audio storage
5.2. Front keys
5.3. Operating indicator lights
5.4. Functions management
5.5. Ethernet configuration
5.5.1. Patch CableRJ-45
5.5.2. RJ-45 Crossover Cable
6. Webserver
6.1. System Status
6.1.1. Display GD-37
6.1.2. Player control
6.1.3. Time to next calendar event
6.1.4. Music list
6.1.5. Message list
6.1.6. Program list
6.1.7. Outputs
6.1.8. Inputs
6.1.9. Others
6.1.10. Power
6.2. System network
6.3. System time / date
6.3.1. Date and hour
6.3.2. Summer time
6.3.3. RTCC
6.3.4. General volume
6.3.5. Language
6.4. Calendar events
6.4.1. Once
6.4.2. Daily
6.4.3. Weekly
6.4.4. MON - FRI
6.4.5. Weekend
6.4.6. Direct play
6.4.7. Days
6.4.8. Date to date
6.5. Remote Events
6.5.1. Activation mode
6.5.2. Priority mode
6.6. Change password
6.7. Restore to default
6.8. Supervisor Menu
6.8.1. Inhibition input remote control
6.8.2. Messages supervisor
7. FTP Server
8. ANNEX 1. Advanced date
8. ANNEX 2. Delayed date
3
3
4
5
5
5
6
6
7
7
7
7
8
9
9
10
10
10
10
10
10
10
10
10
11
12
12
12
12
13
13
13
14
14
14
14
14
15
15
15
15
16
16
16
17
17
17
18
18
20
21

213
610.608C
Rev.0
GD-37
1. Description
The GD-37 is a programmable and manageable pre-recorded messages and background music player over Ethernet via a
built-in webserver.
Suitable for commercial uses as well as for security sound systems in venues with large numbers of people, where the
broadcast of automatic, emergency and evacuation notices (among others) is required.
The GD-37 digital recorder allows you to digitally record and play an unlimited number of and background music (depending
on the capacity of the SD).
From the front USB it also allows the broadcas of background music (BGM), having 2 play / pause and stop buttons on the
front panel.
Scheduled playback of messages via webserver through an internal calendar creating a series of events called "Programs" in
which the characteristics associated with the message are registered as per: Start Time, End Time, Cadence, Repetition,
Activation of remote control outputs, etc.
The Webserver installed in the equipment allows functionalities such as: complete supervision of operation, activation/stop of
messages, music and programmes, programming, calendar events, programming of remote events (remote controls),
configuration of operating parameters (day and time, volume, IP-Ethernet mode, on/off, etc.).
It includes 10 programmable GPIs to associate with events or programs and launch messages automatically. It also has 10
GPOs to associate with external equipment such as UDE amplifiers to trigger warning priorities or interact with the building
control system, etc.
The GD-37 incorporates two supervised security messages, which in case of failure the equipment indicates it visually via a
Fault indicator on the front, at the same time as it closes a fault contact on therear, which can be integrated in other control and
signalling equipment.
The power supply redundant to 230Vac (others on request) and 24Vdc, allowing it to remain operational even during power
cut-offs in the main power supply system.
INPUT TL
GND
INH
FAULT POWER
24 VDC
ON
FUS DC
F 1A
OFF
10 10
OUTPUT TL
0 dB OUTPUT
LR
SD CARD
9 98 87 76 65 54 43 32 21 1
GND
TM
24VDC
24VDC
MADE IN
SPAIN 230 VAC
50/60 Hz
FUS
T 0,5A
¡ATENCION! DESCONECTAR LA RED ANTES DE ABRIR¡CAUTION! DISCONNECT FROM POWER SUPPLY BEFORE OPENING
1. STANDBY / ON indicator
9. ETHERNET Connector (RJ-45)
10. SD CARD slot
11. XLR Connector - 0dB Output signal.
13. RCA Connector - STEREO Output signal
14. Output remote controls (GPO)
and auxiliary power supply output (24 Vdc) max. 100mA
15. Input remote controls (GPI)
16. FAULT contact
17. 24Vdc power supply input
19. 230Vac power supply input
18. DC Fuse (T1A)
20. AC Fuse(T0,5A)
21. ON / OFF Switch
2. FAULT indicator
3. MUSIC on broadcast Indicator
4. MESSAGE on broadcast indicator
5. Headphones
6. USB connector for music playback
7. Music PLAY / PAUSE
8. Music STOP
9 10 11 13 14 15 16 17 18 19 20 21
21 3 4 567
8
2. Rear and Front Panel

Output signal 0dBu (0,8Vrms/600 Ω)
Output type XLR (Balanced: MONO), RCA (L,R: STEREO)
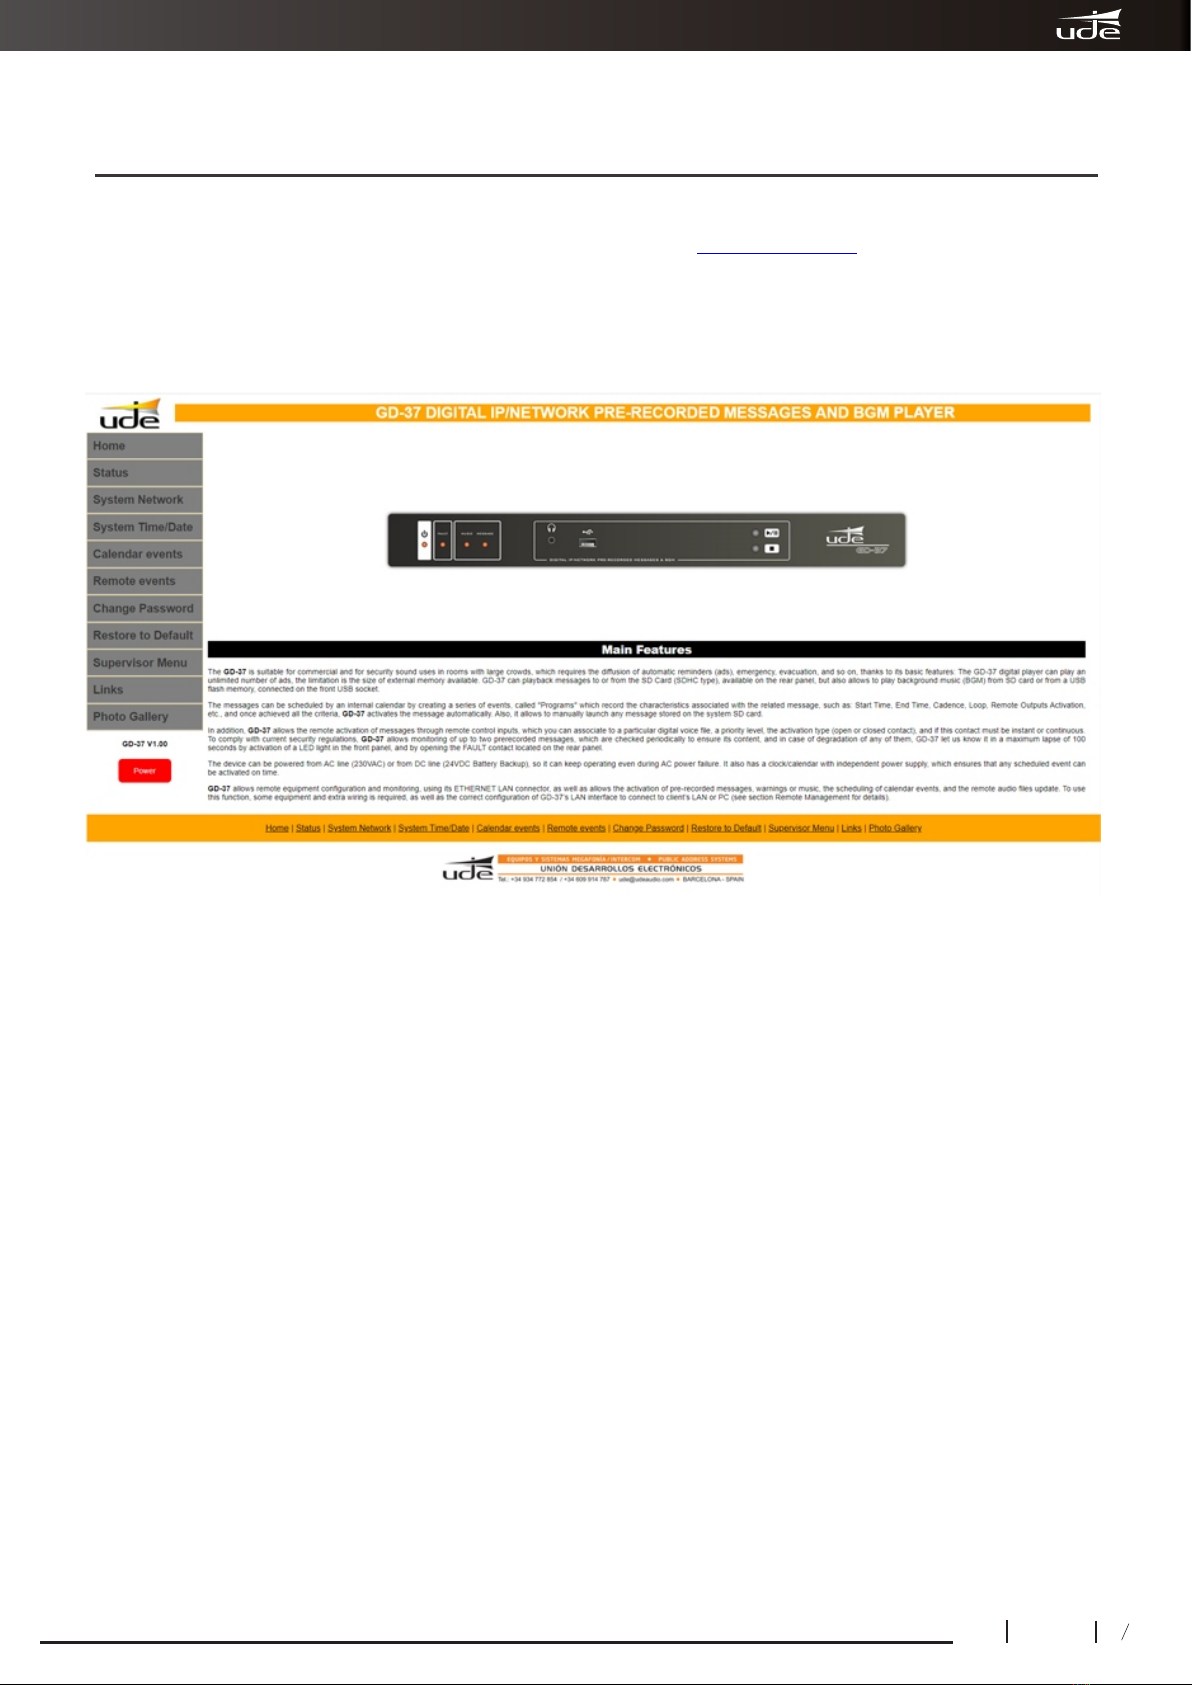
Number of announcements unlimited (100 pre-programmed max.)
Number of programs (Calendar) 100
Number of tracks Unlimited (the duration depends on the capacity of the SD card or USB device.)
Clock and Calendar Support Power Supply Lithium battery 3V CR2025 ( Non-rechargeable)
Supported files • Voice: WAV (PCM/ADPCM/OGG)
• Music: MP3.
Audio format (player) Mp3 Files:
MPEG 1.0 Sample rate (Hz): 48.000, 44.100, 32.000 Bitrate (kbit/s):
32, 40, 48, 56, 64, 80, 96, 112, 128, 160, 192, 224, 256, 320.
MPEG 2.0 Sample rate (Hz): 24.000, 22.050, 16.000 Bitrate (kbit/s):
32, 40, 48, 56, 64, 80, 96, 112, 128, 160, 192, 224, 256, 320.
MPEG 2.5 Sample rate (Hz): 12.000, 11.025, 8.000 Bitrate (kbit/s):
32, 40, 48, 56, 64, 80, 96, 112, 128, 160, 192, 224, 256, 320.
RIFF WAV (1 or 2 channels)
Format 0x01: PCM, 8 o 16 bits, Sample rate <= 48.000Hz.
Format 0x11: IMA ADPCM, 8 bits, Sample rate <= 48.000Hz
Orbis OGG (1 or 2 chanels) Block size: between 64 and 4096 bytes.
Quality: 8 y 16 bits.
Sample rate <= 48.000Hz.
Bit rate <= 500 kbit/s
Maximum Message Recording Duration: Limited by SDCARD capacity (typically: 66 hours / 1GB card)
Messages activation Momentary (Push button) or Remote control (Switch)
Activation mode Contacts: Normally Open or Normally Closed
Priority Hierarchy Geographic (IN1 > IN2 >...> IN10) or Numerical Priority (independent for each input).
Auxiliary outputs 11 Normally Open or N.O. contacts (TL1 to TL10, TM)
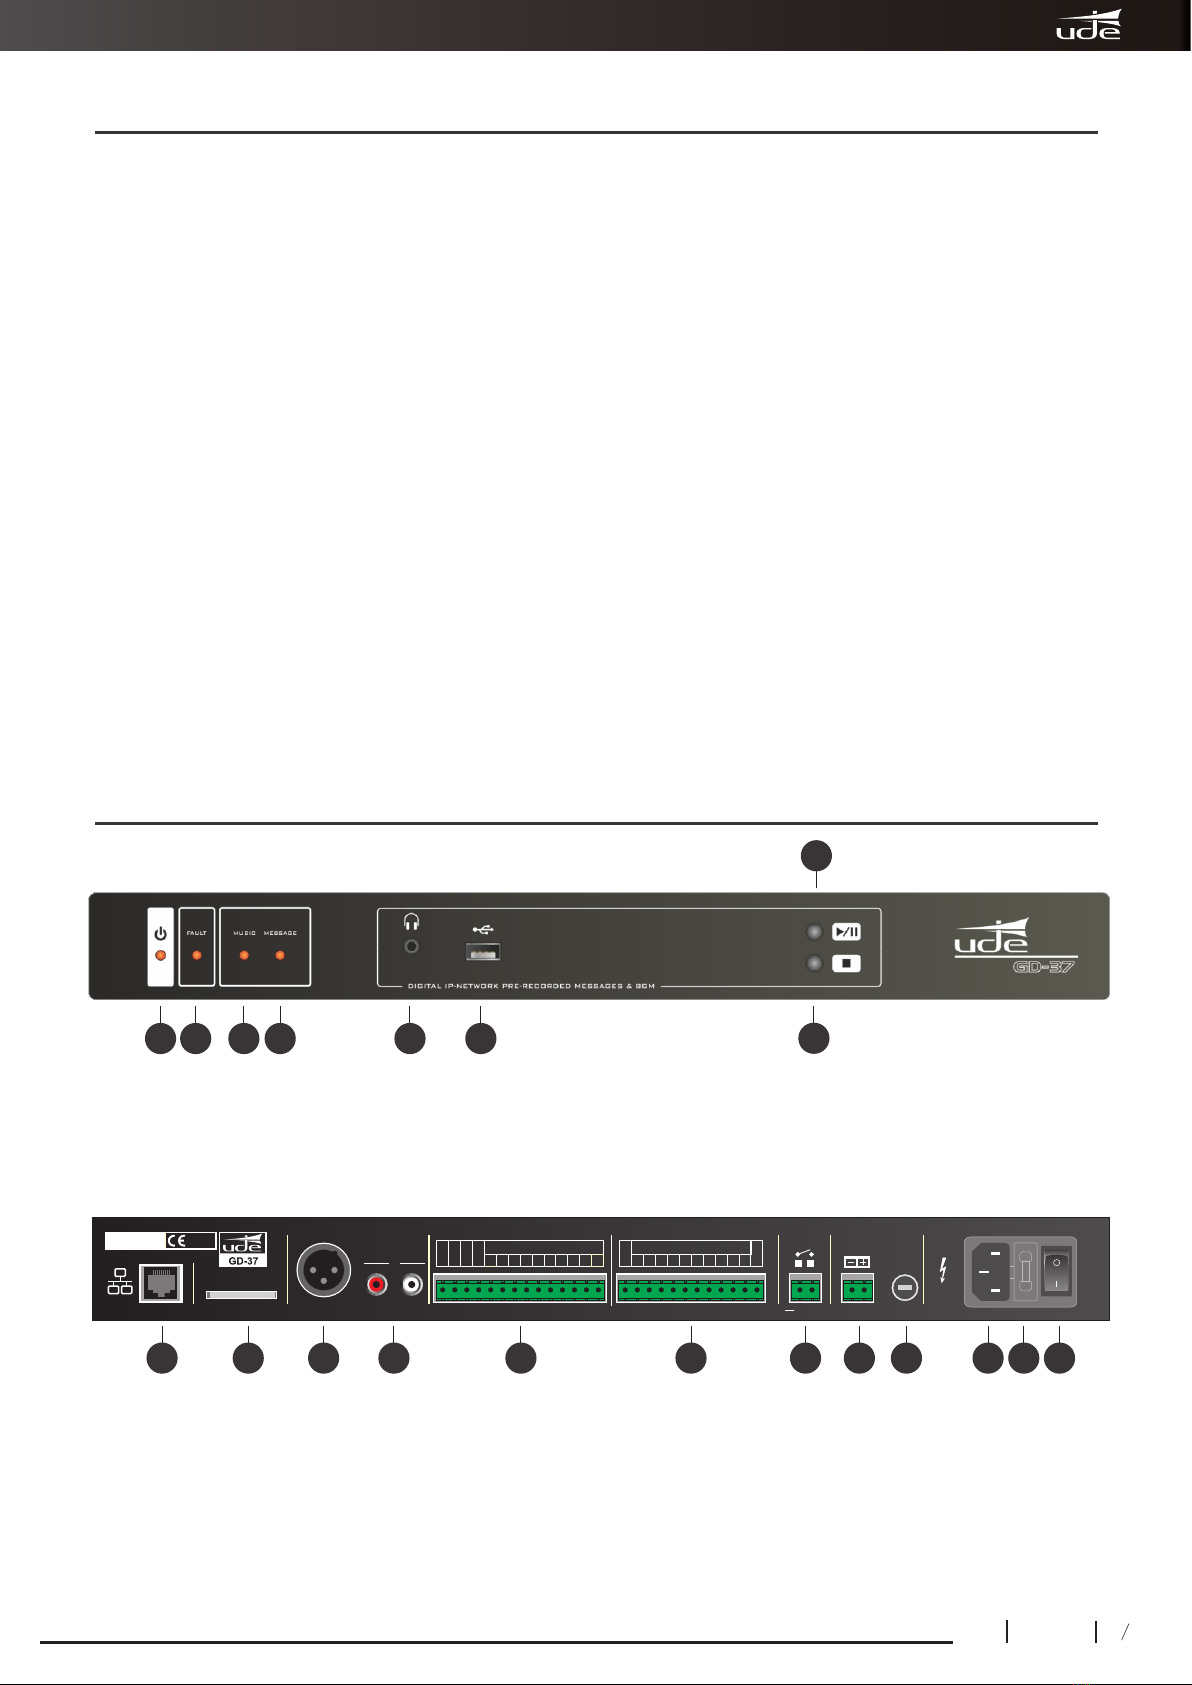
Audio Monitoring Output Headphones: dim: 3,5 mm, 32 Ω, Front panel
Keys Shorcuts: 3 functions (PLAY/PAUSE, STOP)
Multimedia Connections • SD Card (Messages and Music): Rear panel
• USB 2.0 Type A (Music): Front panel
Multimedia support - SD Card (CAT 10 recommended): 4GB or higher, FAT32 formatted.
MicroSDHC type cards are not compatible with GD-37, even if a size adapter is used.
- USB Flash Memory: Type 2.0, FAT32 formatted.
Conexión Remota LAN Ethernet type, RJ-45 connector (8-pin). IPV4-only support.
- 10/100 Mbps mode (compatible).
- Auto IP (DHCP) or Manual IP
1 Configurable by Menu, but common option for all external inputs (IN1 to IN10).
2 Assignable to any message or activation entry by Menu.
3 Configurable via Menú.
214
610.608C
Rev.0
GD-37
3. Technical characteristics
1
2
3

215
610.608C
Rev.0
GD-37
Operations The following remote functionality is available via the Webserver installed:
- Complete supervision of the operation.
- Activation/Stop of messages, music and programmes.
- Programming of Calendar Events.
- Programming of remote events (remote controls).
- Configuration of operating parameters (day and time, volume, IP-Ethernet mode, on/off ...).
Through the FTPServer installed in the equipment, the remote update function of the audio files
(Mp3 and WAV) and the configuration file (SETTINGS.BIN) is available.
Security 4-digit numeric password
FAULT indicator Luminous: Red light on Front panel (Fault condition)
Contact: Normally closed. Opens in case of fault
Supervised messages 2 (100s max. reaction time)
Power Supply Main: 230Vac (50/60Hz), 1 Amp Fuse.
Secondary (buffer): 24Vdc, 1 Amp Fuse.
Auxiliary power supply output 24Vdc / 100mA max
Operation temperature +5 to +40ºC
Storage temperature -5 to +50ºC
Humidity 5% to 95%, without condensation
Dimensions 428 x 57 x 330 mm (1 U)
Weight 4.25 Kg
Color Black
4
GD-37 basically acts as a background music player (BGM), but it allows interrupting the music broadcast to emit a
prerecorded warning, message or sound, either activated manually from the Webserver or automatically from a remote
control input or programmed through a calendar event.
5.1. DIGITAL AUDIO STORAGE
The audio content (music or messages/warnings/sounds) that the equipment plays is by default stored on an SDCARD of
type HC (CAT 10 recommended) located in the back of the equipment, previously formatted under the FAT32 system, which is
provided with the following directory structure:
• MUSIC. Contains the music files or songs in MP3 format.
• SOUND. Contiene los archivos de sonidos, alarmas, etc…, en formato WAV.
• VOICE. Contiene los archivos de mensajes de voz WAV.
• SETTINGS. It is a system folder that should not be modified that includes
the settings.bin file, the basis of all the programming and configuration of the equipment.
The front of the GD-37 has a USB 2.0 port that allows music to be broadcast, after
connecting a USB flash memory. The USB flash memory must be formatted under the
FAT32 file system. The music files to be played must be stored in a folder called "MUSIC"
which will be located at the root of the directory structure of the Flash Memory.
Before inserting the flash memory, it is essential to turn off the GD-37, connect the USB
memory and restart the GD-37, the content of the memory will be analyzed by the GD-37
and when it detects the music files the GD-37 will select them in order to be able to be
reproduced whenever the user wishes.
4. Start-up procedure
The start-up of the GD-37 is via the start-up switch, which is located on the rear of the GD-37. The start-up switch affects both
the 230VAC input and the 24V DC input.
With the equipment switched on, the GD-37 starts a start-up protocol that basically consists of a start-up of the different parts
that make up the equipment. This process can last between 20 and 30 seconds, after which the GD-37 will be available for
use.
5. Basic operation
4 The FPTServer installed in the GD-37 requires a standard ftp client that works under command line and that is usually included
in the most common operating systems (Windows includes ftp.exe).

216
610.608C
Rev.0
GD-37
NOTES:
Do not connect or disconnect the USB memory while the GD-37 is running, irreparable damage may occur to the USB memory or to
the GD-37 itself.
Do not connect or disconnect the SD card with the GD-37 running, irreparable damage may occur to the SD card or to the GD-37
itself.
For the correct operation of the GD-37, it is essential that the audio directories on the SD card contain at least one correct file, that is,
a “.mp3” file in the “MUSIC” folder, a “.wav” file. in the “VOICE” folder and a “.wav” file in the “SOUND” folder.
It is necessary to turn off the GD-37 before inserting a USB memory; When the equipment is turned on again, the memory content
will be analyzed and when the GD-37 detects music files, these will be selected to be played whenever the user wishes.
While the GD-37 is playing Music from a USB memory placed on the front of the equipment, the Music content present on the SD
card connected on the back will not be available.
The file system used by the GD-37, to save the information in the SDCARD and USB memory units, does not support the name of
files of more than 8 characters, so it is required that the name of the files, .WAV , .MP3, and .BIN, be limited to 8 characters as the file
name and the typical 3 characters for the extension, plus the separation period. Additionally, the GD-37 supports the use of the ID3
tag related to the song name in all .MP3 files, in order to display long names on the computer screen.
5.2. FRONT KEYS
IMPORTANT NOTE:
The PLAY / PAUSE shortcut key affects only the playback of background music, while the STOP key additionally affects
externally triggered messages (remote controls), those triggered by calendar events, etc.
5.3. OPERATING INDICATOR LIGHTS
The GD-37 has various indicator lights in the front panel that give us the following information:
1. Stand by / ON
It tells us if the equipment is operational (GREEN) or off (RED).
2. Fault
When lit (RED) indicates general failure condition of the unit or degradation of the audio files supervised (Security installations). This
indication implies the opening of the FAULT contact located on the rear side of the GD-37.
3. Music ON
When lit (RED) indicates that the music playback mode is active.
4. Message ON
When lit (RED) indicates that the message playback mode is active.
On the front of the GD-37 there are two direct access keys to music playback (PLAY / PAUSE and STOP). To play the audio files
stored in the SD card or in the USB device, it is not necessary to connect the PC to the GD-37. By manipulating the PLAY / PAUSE
keys and the STOP key, you can start, pause and stop the playback of the music files on the SD card. In the case of having a USB
device connected, the audio files on the USB device will be the ones that can start, pause, and stop playback.

217
610.608C
Rev.0
GD-37
5.5.2. Crossed Cable or "Crossover Cable". It is used to connect the GD-37 directly to a computer that has
an Ethernet RJ-45 connection from the GD-37 connector marked ( ). The cable can be shielded, although it is not
essential.
RJ-45
5.4. GD-37 FUNCTIONS MANAGEMENT
Control, programming, verification, etc. of the GD-37 is carried out by means of a computer accessing the Webserver that the
GD-37 itself incorporates.
5.5. ETHERNET CONFIGURATION
The GD-37 can be connected to a local network using two types of connection:
5.5.1. Cable or "Patch Cable". It is used when the GD-37 joins the local network through a router / switch /
hub or an ADSL modem / router, present in the installation and acting as Access Ports (Gateway).
This cable will be connected between the connector ( ), placed on the GD-37 rear panel, and a free Ethernet port
on the router.
RJ-45
12345678
RJ45
CONNECTOR
1
2
3
4
5
6
7
8
1
2
3
4
5
6
7
8
12345678
RJ45
CONNECTOR
BLUE
BLUE-WHITE
BLUE
BLUE-WHITE
BROWN
BROWN - WHITE
BROWN
BROWN-WHITE
GREEN-WHITE
GREEN
GREEN
GREEN-WHITE
ORANGE
ORANGE-WHITE
ORANGE-WHITE
ORANGE
12345678
RJ45
CONNECTOR
1
2
3
4
5
6
7
8
1
2
3
4
5
6
7
8
1 2 3 4 5 6 7 8
RJ45
CONNECTOR
BLUE
BLUE-WHITE
BLUE
BLUE-WHITE BROWN
BROWN-WHITE
BROWN
BROWN-WHITE
GREEN
GREEN-WHITE
GREEN
GREEN-WHITE
ORANGE
ORANGE-WHITE
ORANGE-WHITE
ORANGE
Cable RJ-45 cruzado (Crossover cable)
RJ-45 patch cable
Crossover RJ-45 cable

218
610.608C
Rev.0
GD-37
The computer and the GD-37 are connected in accordance with the provisions of point 5.5 of this manual.
The IP address associated with the GD-37 that is configured at the factory is .
To access WEBSERVER, all you have to do is open your computer's web browser and write down http: // gd37 or the IP
address associated with your GD-37 device (which by default is http://192.168.0.200) in the address bar of your computer.
After a few seconds the “HOME” start screen will appear:
http://192.168.0.200
6. Webserver
NOTAS:
Para que el explorador muestre la aplicación del GD-37, la conexión de red local (Ethernet) ha de estar configurada.
Revise este manual para realizar dicha configuración (véase apartado 5.5 Configuración Ethernet). Si duda, contacte
con el administrador de su red local. Ha de tener en cuenta de que para poder acceder al GD-37 desde Internet (no
necesario para redes locales) hay varias consideraciones importantes a cumplir. Además se requerirá de personal
cualificado para realizar algunas tareas:
- Es conveniente contratar un servicio de IP Fija con su proveedor de Internet, para asegurar que el GD-37 se
encuentre siempre disponible en la misma dirección IP EXTERNA. Si ya dispone de servicio de Internet, pero es del
tipo IP Dinámica, será preciso contratar un servicio de DNS DINÁMICA. Para más detalles consulte con su
administrador de red.
- Se ha de configurar el GD-37 en modo IP MANUAL. Consulte con su administrador de la red local para que le facilite
una dirección de IP libre.
- Se deberán redirigir los puertos externos TCP (80, 1998 y 1999) hacia los puertos internos TCP (80, 1998 y 1999) en
la dirección IP con la que ha configurado previamente en el GD-37. Para realizar esta tarea será necesario contactar
con el administrador de su red local.
- El acceso desde teléfonos móviles no está garantizado.
- Dependiendo del tráfico de datos existente en la red local o del ancho de banda contratado, la carga de contenido de
datos desde el Webserver en el ordenador remoto puede verse ralentizada.

6.1. SYSTEM STATUS
The WEBSERVER has a menu option called "STATUS" which allows you to monitor the status of the GD-37 and, in some
aspects, to interact with it:
219
610.608C
Rev.0
GD-37
6.1.1.- Display GD-37
This space provides an overview of some basic aspects of the GD-37's functionality.
12:03:55
12
6
7
3
4
5
1.- Clock/Calendar.
2.- Logo.
3.- Status line.
4.- Song or announcement title
5.- Playback mode
6.- Playback time
7.- Percentage progress.
1. Clock/Calendar.
It always indicates the current time and day. Remember to set it before starting to use any timer function, otherwise
malfunctions may occur, and check it regularly.
2. Logo.Logo of UNION DESARROLLOS ELECTRONICOS, S.A.
3. Status line
This line will display information related to the operation of the equipment at any given moment, such as: WAITING..., PAUSE,
REPROD. MUSIC, REPROD. MESSAGE, REPROD. SCHEDULE, SUPERVISED, etc.
4. Song or announcement title
This area will display the song title (extracted from the ID3 tag found in most MP3 encoded audio files, if present), or the name
of the MP3 or WAV file. If the file or song name is larger than the associated screen area, it will be displayed in scroll or roll
mode.
5. Playback mode
The active music playback mode is always repetitive, but there are two possibilities: NORMAL or RANDOM.
The NORMAL playback mode consists of a sequential playback of the songs stored in the "MUSIC" directory of the SD card
and/or USB device, while in the RANDOM mode the GD-37 will play the songs in random order, with the aim of not repeating
songs.
6. Playback time
This area will display the playing time of the current song or message in the reduced format of minutes and seconds (mm:ss).
7. Percentage progress
This area will display the % played of the current song or message.

2110
610.608C
Rev.0
GD-37
6.1.2.-Player Control
In this section it is possible to start, in the GD-37, the music playback by pressing the "PLAY" button, skip to the next track by
pressing the "NEXT" button, select random or normal playback by using the "RANDOM" button and stop music playback by
pressing the "STOP" button.
NOTES: The "STOP" button in this space is also effective to stop any other playback in progress on the GD-37
To broadcast a new song, a new message or run a programme, it is an essential condition to stop the current playback by
pressing the "STOP" stop key and then press the "PLAY" button of the area associated to the desired operation.
6.1.3.- Time to next calendar event
It indicates the time remaining to activate the broadcast of the next scheduled event.
6.1.4.- Music list
The music playback is always repetitive, although the song selection can be set as random "RANDOM" or sequential
"NORMAL". It is possible to switch between the two playback modes by pressing the "RAMDOM" button on the player. To
select the next song, simply press the "NEXT" button. To select a song from the available songs, press "DOWN" or "UP" in the
"MUSIC LIST" section, when the title of the song is the desired one, press the "PLAY TRACK" button. On screen 6.1.1 the title
of the selected song appears, the player mode changes to "REPROD.MUSIC" and the playback progress bar, the playback
time and the % progress in relation to the total of the song are updated. It is possible to stop music playback by pressing the
"STOP" button in the "PLAYER CONTROL" section 6.1.2.
6.1.5.- Message list
Once a message has been selected by "UP" and "DOWN" from the list of voice messages or sounds, it will be activated by
pressing the "PLAY MESSAGE" button. The message will start playing and will stop playing at the end of the message. During
the time the message is playing, the status screen will show the "PLAY MESSAGE" mode, the name of the audio file, the
progress bar and its respective percentage (%), as well as the playing time of the message. It is possible to stop the message
playback by pressing the "STOP" button of the "PLAYER CONTROL" section. 6.1.2.
6.1.6.- Program List
The user can select any program (from program 00 to program 99) that has been previously configured, using the "UP" and
"DOWN" buttons in the "PROGRAM LIST" area. The list shows the selected programme number and the total number of
programmes stored in memory. Once the desired programme has been selected, it will be activated after pressing the "PLAY
PROGRAM" button. Programmes that have the special "DIRECTPLAY" mode (which does not have an associated time
event) can only be run manually from this list. During the time the programme is active, the status display will show the
"SCHEDULE" mode and the name of the programme being broadcast. It is possible to stop the message playback by
pressing the "STOP" button in the "PLAYER CONTROL" space 6.1.2.
6.1.
By means of simulated LED indicators, it indicates the status of the 10 output remote controls and the general remote control
of the GD-37. The illuminated LED indicates active remote control, the LED off indicates remote control at rest.
6.1.8.- Inputs
By using simulated LED indicators, it indicates the status of the 10 output remote controls and the general remote control of
the GD-37. The illuminated LED indicates active remote control, the LED off indicates remote control at rest.
6.1.9.- Others
It simulates the LED indicators located on the front of the GD-37: FAULT, MESSAGE and MUSIC, having the same
functionality.
6.1.10.- Power (ON/OFF)
The GD-37 has been designed for continuous operation, however,
in certain circumstances it may be necessary to switch it off. The
GD-37 can be switched off (standby) and on remotely using the
"POWER" button.
When the equipment is in standby mode, the STANDBY LED on the front panel of the GD-37 will illuminate red and the remote
display will appear:
7.- Outputs

2111
610.608C
Rev.0
GD-37
6.2. SYSTEM NETWORK
Esta página permite la configuración de la interfaz de red del GD-37.
When the GD-37 is connected to a router (Gateway), the default configuration of the Local Network (IP) should be AUTO. This
configuration is based on the automatic network address assignment, following the standard DHCP protocol, every time a
new element wants to connect to the network. This is the easy configuration mode (valid for most installations) and does not
require to consult with your local network administrator.
In complex installations, the network administrator may require the use of specific IP addresses, called fixed addresses, for
each of the devices that want to connect to the network. In this case, the GD-37 must be configured in "MANUAL" mode.
The "MANUAL" mode must also be used when you wish to connect the GD-37 directly to a computer using a "Crossover
Type" cable (See section 5.5 Ethernet Configuration).
When the manual mode is selected, you must specify the rest of the parameters and press the "SAVE NETWORK" button to
save; if you do not have enough information, it is recommended to contact your local network administrator to provide them
(See section 5.5 Ethernet Configuration).
Don't forget to press the "SAVE NETWORK" button to save the changes you have made. The changes will take effect the next
time the GD-37 is started up.
CAUTION: Incorrect settings may cause the GD-37 to lose network connectivity. If you are in doubt about the settings, do
not hesitate to contact your network administrator.

2112
610.608C
Rev.0
GD-37
6.3.- SYSTEM TIME/DATE
6.3.1 Date and time
This section allows you to enter, modify and update the time and date data:
The clock/calendar must be reset on some occasions, e.g. when it is first put into service or after changing the lithium battery
that powers it and keeps it on time when the main and secondary power supply fails.
It is essential that, once the desired date and time parameters have been updated, the "SAVE TIME/DATA" button is pressed
to update the internal data of the GD-37.
6.3.2 Summer time
It is possible to set the automatic time change setting mode according to summer/winter time.
This time adjustment takes place in Spain and in most European countries, at 02:00 on the last Sunday in March, when the
clock is set forward one hour (02:00 becomes 03:00) and on the last Sunday in October, the operation is carried out in reverse,
setting the clock back one hour (03:00 becomes 02:00). To activate this function, simply select the "AUTO 2AM-3AM" option
in the "SETUP" drop-down panel.
There are other time change options that depend on the country where the GD-37 is installed. If this is your case, select
"AUTO OTHERS" in the drop-down menu and fill in the different sections of the date and time designation in which the
changes are to be made. Once the desired time parameters have been updated, it is essential to press the "SAVE
SUMMERTIME" button to update the internal data of the GD-37.
6.3.3 RTCC
GD-37 microcontroller time deviation correction:
Systems that use microcontrollers to manage internal clocks usually have a small time deviation.
In the GD-37 it is possible to correct the possible time deviation of its controller. To do this, using a reliable standard, the
amount of the deviation must be calculated. If the result is that the GD-37 clock is ahead, consulting the table in annex 1, the
value obtained, preceded by the + symbol, shall be entered in the RTCC correction box in this section. If the result is that the
GD-37 clock is slowed down, referring to the table in Annex 2, the value obtained, preceded by the symbol -, shall be entered
in the RTCC correction box of this section.
It is essential that, once the desired time deviation correction parameters have been updated, the "SAVE RTCC" button is
pressed to update the internal data of the GD-37.

21
13
610.608C
Rev.0
GD-37
6.3.4 General Volume
Allows adjustment of the overall audio output level between 064, which is the minimum, up to a maximum of 128.
6.3.5 Language
Allows you to select the language of the information displayed on the "DISPLAY GD-37" that appears in the "STATUS" section
of the Web Server itself. It has three options, English, French and Spanish.
It is essential that, once the desired language parameters have been updated, the "SAVE LANGUAGE" button is pressed to
update the internal data of the GD-37.
6.4 CALENDAR EVENTS
The complete calendar events configuration screen can be seen below; depending on the activation mode selected, some or
all of the boxes/zones will disappear.
The GD-37 supports the management of up to 100 different programmes, based on events linked to the calendar. For
each programme, it is possible to control which auxiliary outputs will be activated during playback of the message
associated with the programme in question, when the message will be activated automatically and at what rate it will be
repeated in 5-minute intervals.
It is worth mentioning that a programme number "PROGRAM", an audio file "MESSAGE FILE" must always be specified,
using the "UP" and "DOWN" buttons located to the right of each of the elements and an activation mode "ACTIVATION
MODE", by means of the corresponding drop-down menu. The rest of the parameters are optional. The different
activation modes are detailed on the following page:
It is essential that, once the desired volume parameters have been updated, the "SAVE VOLUME" button is pressed to
update the internal data of the GD-37.

2114
610.608C
Rev.0
GD-37
6.4.1 Once
This programming mode allows you to specify a specific (single) date but at the same time a time range starting at "START
TIME" and ending at "STOP TIME", being able to repeat the message with the interval marked by "REPEAT PERIOD" (in
multiples of 5 minutes).
In addition, you can select the output remote controls that will be activated when this message is activated. To select an
output, press on the "OUT" label of the output to be activated and the corresponding indication will light up. Any combination of
outputs can be activated.
Remember that after modifying parameters that have an associated "SAVE CHANGES" button, this button must be pressed
to make the changes effective in the GD-37.
6.4.2 Daily
With this programming mode, the selected audio message will be broadcast every day in the time slot starting at "START
TIME" and ending at "STOP TIME", and may include repetitions of the message with the interval marked by "REPEAT
PERIOD" (in multiples of 5 minutes).
Additionally, you can select the output remote controls that will be activated when this message is activated. To select an
output, press on the "OUT" label of the output to be activated and the corresponding indication will light up. Any combination of
outputs can be activated.
Remember that after modifying parameters that have an associated "SAVE CHANGES" button, this button must be pressed
to make the changes effective in the GD-37.
6.4.3 Weekly
With this programming mode, the selected audio message will be broadcast only on the day selected in "START DATE", in the
time slot starting at "START TIME" and ending at "STOP TIME", being able to include repetitions of the message with the
interval marked by "REPEAT PERIOD" (in multiples of 5 minutes). To set a day of the week, click on the text of the desired day
and the associated indicator light will illuminate.
Additionally, you can select the output remote controls that will be activated when this message is activated. To select an
output, press on the "OUT" label of the output you wish to activate and the corresponding indication will light up. Any
combination of outputs can be activated.
Remember that after modifying parameters that have an associated "SAVE CHANGES" button, this button must be pressed
to make the changes effective in the GD-37.
6.4.4 MON-FRI
With this programming mode, the selected audio message will be broadcast only from Monday to Friday, in the time slot
starting at "START TIME" and ending at "STOP TIME", and may include repetitions of the message with the interval marked
by "REPEAT PERIOD" (in multiples of 5 minutes).
Additionally, you can select the output remote controls that will be activated when this message is activated. To select an
output, press on the "OUT" label of the output you wish to activate and the corresponding indication will light up. Any
combination of outputs can be activated.
Remember that after modifying parameters that have an associated "SAVE CHANGES" button, this button must be pressed
to make the changes effective in the GD-37.
6.4.5 Weekends
With this programming mode, the selected audio message will be broadcast only on Saturday and Sunday, in the time slot
starting at "START TIME" and ending at "STOP TIME", and may include repetitions of the message with the interval marked by
"REPEAT PERIOD" (in multiples of 5 minutes).
Additionally, you can select the output remote controls that will be activated when this message is activated. To select an
output, press on the "OUT" label of the output you wish to activate and the corresponding indication will light up. Any
combination of outputs can be activated.
Remember that after modifying parameters that have an associated "SAVE CHANGES" button, this button must be pressed
to make the changes effective in the GD-37.

2115
610.608C
Rev.0
GD-37
6.4.6 Directplay
This mode is special and allows a programme number to be linked to a voice file, without the need to specify an actual
calendar event (day and time of activation).
This programme will appear in the programme list and can only be executed from the programme list manually.
Additionally, you can select the output remote controls that will be activated when this message is triggered. To select an
output, press on the "OUT" label of the output to be activated and the corresponding indication will light up. Any combination of
outputs can be activated.
Remember that after modifying parameters that have an associated "SAVE CHANGES" button, this button must be pressed
to make the changes effective in the GD-37.
7.4.7 Days
With this programming mode, the selected audio message will be broadcast only on the days selected in "REPEAT ON
DAYS", in the time slot starting at "START TIME" and ending at "STOP TIME", being able to include repetitions of the
message with the interval marked by "REPEAT PERIOD" (in multiples of 5 minutes). To set a day of the week, click on the text
of the desired day and the associated indicator light will illuminate.
Additionally, you can select the output remote controls that will be activated when this message is activated. To select an
output, press on the "OUT" label of the output you wish to activate and the corresponding indication will light up. Any
combination of outputs can be activated.
Remember that after modifying parameters that have an associated "SAVE CHANGES" button, this button must be pressed
to make the changes effective in the GD-37.
7.4.8 Date to date
This mode allows the message to be broadcast between two specific dates, starting on "START DATE" and ending on "END
DATE", from the time "START TIME" to the time "END TIME". In this case, the message repetition period (in multiples of 5
minutes) must also be activated by modifying "REPEAT PERIOD". If the message repetition period is not set in "REPEAT
PERIOD", the programme will not be broadcast.
6.5 REMOTE EVENTS
This screen is used to configure common parameters for all the remote control inputs of the GD-37 (IN1 to IN10 and INH).

2116
610.608C
Rev.0
GD-37
6.5.1 Activation mode
En el menú desplegable correspondiente, seleccione entre Contacto Abierto, “OPEN CONTACT” o Contacto Cerrado,
“CLOSED CONTACT”.
Si se selecciona “OPEN CONTACT”, el mensaje empezará a reproducirse después de abrir el contacto correspondiente que
hasta ese momento permanecía cerrado.
Si se selecciona “CLOSED CONACT”, el mensaje empezará a reproducirse después de cerrar el contacto correspondiente
que hasta ese momento permanecía abierto.
6.5.2 Priority mode
In the corresponding pull-down menu, select between Geographical "GEOGRAPHICAL", (the highest priority is IN1 and the
lowest priority is IN10), or by numerical value "NUMERICAL", (priority 1 is the highest and priority 10 is the lowest).
Parameters must be specified for each of the "REMOTE INPUT" inputs, such as the audio file name "MESSAGE FILE" and
the priority "PRIORITY LEVEL". It is necessary to specify, at each "INPUT" input, whether the message playback activation
shall be triggered by an edge ("EDGE" or "push-button" type), or by a level change ("LEVEL" or "Switch" type).
If triggered by an edge, the message shall be played only once from beginning to end. If the activation is by level change, the
message shall be played sequentially as long as the level change is maintained.
Additionally, you can select the output remote controls that will be activated when this message is activated. To select an
output, press on the "OUT" label of the output to be activated and the corresponding indication will light up. Any combination of
outputs can be activated.
Remember that after modifying the parameters that have an associated "SAVE CHANGES" button, this button must be
pressed to make the changes effective in the GD-37.
6.6 CHANGE PASSWORD
This page allows us to change the Password:
To change the password it will be necessary to enter the current password in the "OLD PASSWORD" box (4 numeric digits),
enter the new password in the "NEW PASSWORD" box (4 numeric digits), repeat the new password in the "REPEAT NEW
PASSWORD" box.
Do not forget to press "SAVE PASSWORD" to make the changes effective in the GD-37.
NOTE: Remember that the default password is 1234.

2117
610.608C
Rev.0
GD-37
6.7 RESTORE TO DEFAULT
This page allows you to reset to factory settings.
Remember that if you reset to factory defaults, all your configuration data will be lost and cannot be recovered.
6.8 SUPERVISOR MENÚ
Advanced settings can be made on this page.
6.8.1 Inhibition remote control input
The equipment has a rear panel input "INH". When this input is enabled and active, it prevents or inhibits the emission of
messages activated by the input remote controls. The activation mode of the inhibit input can be either normally closed contact
opening or normally open contact closing. This option is selectable as described in section 6.4.4.
To enable or disable this function, simply select the desired option from the drop-down menu under "INHIBITION INPUT".
Do not forget to press "SAVE" to make the changes effective in the GD-37.

2118
610.608C
Rev.0
GD-37
6.8.2 Supervisor message
In this section, the monitoring of up to two audio files is activated.
To activate the monitoring of an audio file, simply select it in the "SUPERVISED MESSAGE 1" or "SUPERVISED MESSAGE
2" box, using the respective "UP" and "DOWN" buttons, and confirm your choice with the "ACTIVATE #1" or "ACTIVATE #2"
button, as appropriate.
NOTES:
- In case supervision is not necessary, it is recommended to keep these boxes empty. When a supervised message is
activated by pressing the corresponding "ENTER" button, the GD-37 will take some time to analyse the file and calculate
the internal supervision data; during this time, which basically depends on the size of the file (usually a few minutes) the
equipment may respond slowly or temporarily stop responding.
- The "SUPERVISOR MODE" factory settings can be restored by pressing the "RESTORE" button in the "RESTORE
SUPERVISOR" section.)
To stop the playback of a supervised message, press the "STOP" button on the GD-37 and enter the requested password.
The GD-37 allows the audio and data files to be updated remotely by accessing the FTP server included in the GD-37.
To perform the update you will need to familiarise yourself with the FTP client available on your operating system (Windows
includes the ftp.exe software).
During the update configuration process, you will be asked for the IP address of the server or HOST, i.e. the GD-37. This
address when working in AUTO mode (DHCP) is \GD37 or \GD37, or in MANUAL mode 192.168.0.200 (or the one that
appears in the configuration).
The FTP server is linked to 4 different users (MUSIC, VOICE, SOUND and SETTINGS), which correspond to the destination
folders where the selected files will be stored:
If the MUSIC user is selected it will be to store a music file in "MP3" format, if the VOICE or SOUND users are selected it will be
to upload a voice file in "wav" format, if the SETTINGS user is selected it will be to upload a file of the "bin" format.
The FTP server included in GD-37 only responds to a limited number of commands which makes it not fully compatible with
some available FTP clients. The use of command line based FTP clients is recommended.
The available commands and a brief description of how to use them are listed below.
OPEN <dirección HOST GD37>
USER <MUSIC, SOUND, VOICE o SETTINGS>
PASSWORD <1234 O Password de servicio Nivel 1>
PUT <Ruta\Nombre_de_Archivo.Extensión>
CLOSE (Close connection without exiting the FTP client program)
QUIT (Close connection and Exit the FTP client program)
6. FTP Server

2119
610.608C
Rev.0
GD-37
Below is the process of updating a "wav" voice file corresponding to the
message "Welcome.wav". To do this, we must open the command line
window in Windows or "Command Prompt", available in the Accessories
menu and follow the steps:
If an error occurs when entering the password, as in this example:
The current session of the VOICE user has to be closed, and a new session has to be opened by repeating the whole process
again.
The GD-37 server has a reduced number of functions, it is not allowed to delete, list, rename or retrieve remote files.
If the selected file already exists in the GD-37, it will be replaced without prior confirmation from the user.
NOTES:
When using the FTP server the GD-37 must be in STOP mode. It will prevent errors during data update and will not slow
down the data update speed.
In order to perform a remote update from the Internet (outside the local network), the external TCP ports (20, 21) must be
redirected to the internal TCP ports (20, 21) at the MANUAL IP address with which the GD-37 was previously configured
and the FTP protocol must be enabled in the FIREWALL/Antivirus. To perform this task it will be necessary to contact your
local network administrator.
It is not allowed to upload files with a name longer than 8 characters excluding the 4 characters of the extension (.mp3,
.wav or .bin).
For MP3 files, the GD-37 will use the ID3 data and display the name of the song in an extended size on the display of the
device.
The GD-37 needs to refresh the data after finishing the updates for them to take effect; for this the GD-37 must be
switched off and on again locally. It can be done remotely by logging out of the FTP client using the CLOSE or QUIT
commands.
When you execute one of these commands, the GD-37 will automatically reset and your new data will take effect. You can
also wait 3 minutes (approx.) since the last update operation and the update system will shut down completely, and the
new data will take effect.

2120
610.608C
Rev.0
GD-37
30 DAYS (SEC) 60 DAYS (SEC) 90 DAYS (SEC) 360 DAYS (SEC)
0 0,00 0,00 0,00 0,00
+1 2,64 5,27 7,91 31,64
+2 5,27 10,55 15,82 63,28
+3 7,91 15,82 23,73 94,92
+4 10,55 21,09 31,64 126,56
+5 13,18 26,37 39,55 158,20
+6 15,82 31,64 47,46 189,84
+7 18,46 36,91 55,37 221,48
+8 21,09 42,19 63,28 253,13
+9 23,73 47,46 71,19 284,77
+10 26,37 52,73 79,10 316,41
+11 29,00 58,01 87,01 348,05
+12 31,64 63,28 94,92 379,69
+13 34,28 68,55 102,83 411,33
+14 36,91 73,83 110,74 442,97
+15 39,55 79,10 118,65 474,61
+16 42,19 84,38 126,56 506,25
+17 44,82 89,65 134,47 537,89
+18 47,46 94,92 142,38 569,53
+19 50,10 100,20 150,29 601,17
+20 52,73 105,47 158,20 632,81
+21 55,37 110,74 166,11 664,45
+22 58,01 116,02 174,02 696,09
+23 60,64 121,29 181,93 727,73
+24 63,28 126,56 189,84 759,38
+25 65,92 131,84 197,75 791,02
+26 68,55 137,11 205,66 822,66
+27 71,19 142,38 213,57 854,30
+28 73,83 147,66 221,48 885,94
+29 76,46 152,93 229,39 917,58
+30 79,10 158,20 237,30 949,22
+31 81,74 163,48 245,21 980,86
+32 84,38 168,75 253,13 1012,50
+33 87,01 174,02 261,04 1044,14
+34 89,65 179,30 268,95 1075,78
+35 92,29 184,57 276,86 1107,42
+36 94,92 189,84 284,77 1139,06
+37 97,56 195,12 292,68 1170,70
+38 100,20 200,39 300,59 1202,34
+39 102,83 205,66 308,50 1233,98
+40 105,47 210,94 316,41 1265,63
+41 108,11 216,21 324,32 1297,27
+42 110,74 221,48 332,23 1328,91
+43 113,38 226,76 340,14 1360,55
+44 116,02 232,03 348,05 1392,19
+45 118,65 237,30 355,96 1423,83
+46 121,29 242,58 363,87 1455,47
+47 123,93 247,85 371,78 1487,11
+48 126,56 253,13 379,69 1518,75
+49 129,20 258,40 387,60 1550,39
+50 131,84 263,67 395,51 1582,03
+51 134,47 268,95 403,42 1613,67
+52 137,11 274,22 411,33 1645,31
+53 139,75 279,49 419,24 1676,95
+54 142,38 284,77 427,15 1708,59
+55 145,02 290,04 435,06 1740,23
+56 147,66 295,31 442,97 1771,88
+57 150,29 300,59 450,88 1803,52
+58 152,93 305,86 458,79 1835,16
+59 155,57 311,13 466,70 1866,80
+60 158,20 316,41 474,61 1898,44
+61 160,84 321,68 482,52 1930,08
+62 163,48 326,95 490,43 1961,72
+63 166,11 332,23 498,34 1993,36
+64 168,75 337,50 506,25 2025,00
TIEMPO A COMPENSAR MEDIANTE REGISTRO
REG Value
6. ANNEX 1. ADVANCE TIME
Table of contents