UDI R/C UD1201 User manual

Important
Notice
FULL PROPORTIONAL REMOTE CONTROL UDIRACING SERIES
1/12 UDISPORT 4X4 OFFROAD TRUCK
UD1201 / UD1202
Our company's products are improving all the time,design and specifications are subject to
change without notice. All the information in this manual has been carefully checked to ensure
accuracy, if any printing errors, our company reserve the final interpretation right.
This product is suitable for users over 14 years old.
Please read this instruction manual carefully befores use.
OPERATING
INSTRUCTIONS
V1.0

02
NO!
THANK YOU
●Thank you for choosing this product. The remote control model is designed to be fun to drive and uses high quality parts to
improve durability and performance. The instruction manual you are reading is to make the product easier to understand and
explain more thoroughly. We hope you enjoy this remote control model car. If you have any problems or need help, please call
us and we will try our best to help you. You can also contact us through the following website: www.udirc.com.
●This is a radio control model product, not a toy! which needs regular maintenance to obtain the best performance. If you
don't do regular maintenance, it can affect performance. We have all the necessary parts and accessories to ensure that
your vehicle maintains its best performance.
●The warning or attention symbol will alert you to potentially dangerous steps. Please read and understand the instructions
carefully before proceeding.
●The model must stop immediately and check for the reasons when it is operating abnormal.
●Keep in mind that people around you may also operate a radio control model.
●The motor is a heating part, please do not touch it.
● If you don't use the model for a long time, please raise the chassis to let the wheels hang in the air.
●Please keep the package or instructions as they contain important information.
WARNING
Failure to follow these instructions may result in injury to
yourself or others. You may also cause property damage
or model damage.
WARNING ATTENTION
● Please don't reverse contact
or disassemble the battery,
as this way will cause the
battery to explode.
●DO NOT put the model in high
temperature, humidity and
direct sunlight.
●Cutters, nippers and
screwdrivers need
careful handling.
●The product contains small
and sharp parts. Keep away
from children.
● DO NOT operate in public
streets or crowded places
to avoid accidents.
● Be sure to read the instruction manual
in detail, or ask for the person with
experience in operation, and read
with the guardian if necessary.

03
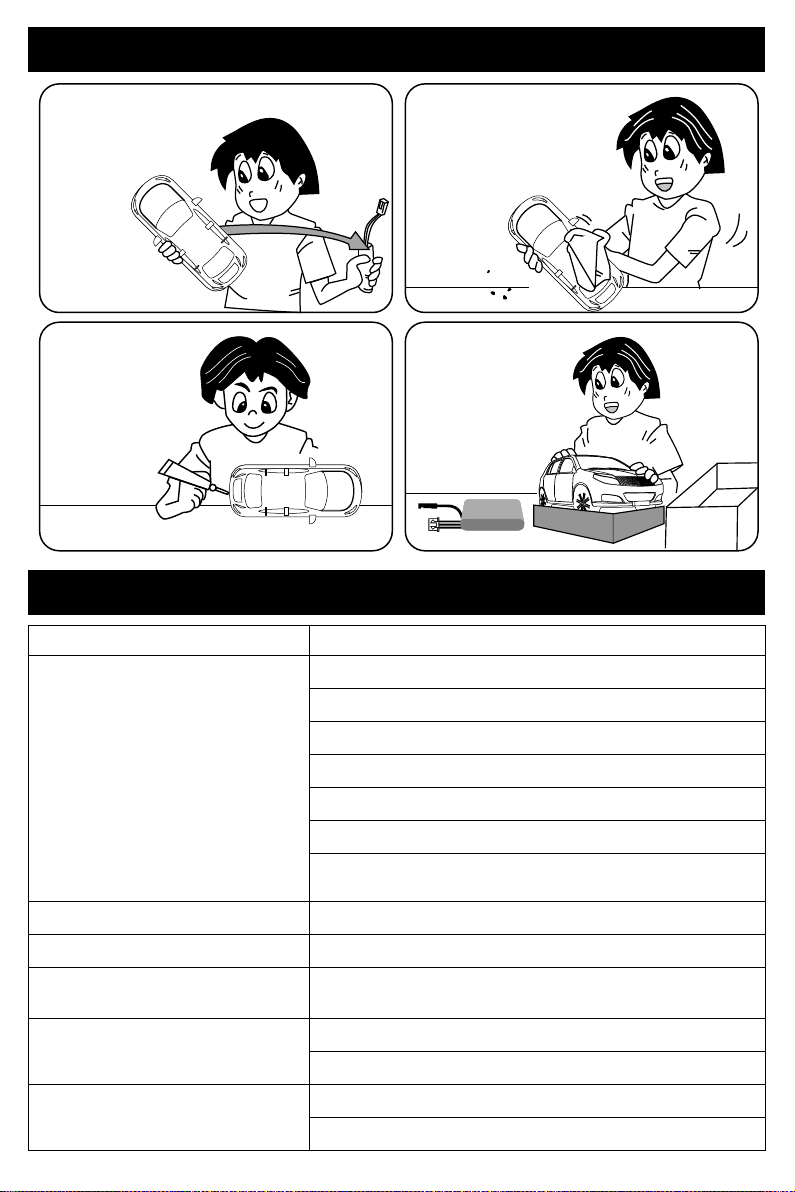
●Read the instruction manual in detail, or ask for the person with experience in operation, and read
with the guardian if necessary.
●Make sure all screws and nuts are properly tightened.
●The remote control and the vehicle should always use the battery with saturated power to avoid
losing control of the model.
●Please make sure that the throttle trigger is in the center position.
●First turn on the power of the remote control, and then turn on the power of the model.
●Use this product only in open areas (>4x4m) without pedestrians.
●DO NOT put fingers or any objects inside rotating and moving parts.
●First turn off the model power, then turn off the remote control power. And take out the battery.
●Daily maintenance is required after the model is used.
WARNING
●Please read and observe all precautions before use. Improper use of battery may cause danger.
●It is normal for the battery to heat up after operation. Please be careful when handling the battery.
If the wire is worn, it is easy to short circuit and cause fire.
●Wasted li-ion battery must not be placed with household trash. please contact local environmental or
waste agency or the supplier of your model or your nearest li-ion battery recycling center.
1) After use, please disconnect the power supply and pull out the plug;
2) Remove the battery from the model before charging;
3) DO NOT charge the battery when it is bulging or expanding;
4) Keep away from damp, corrosive environment and heat source;
5) Please charge the battery under adult supervision;
6) Pay attention to the polarity of the battery when installing or replacing the battery;
7) Different types of batteries or old and new batteries should not be mixed;
8) DO NOT short circuit any terminals;
9) DO NOT short circuit, decompose or put the battery into fire;
10) Please use the attached special charger to charge the battery.
Battery
safety
Before Operation
During Operation
After Operation
DANGER!
Only suitable
for age 14+
Warning: The product should only be used by adults and children over 14 years.
Adult supervision is required for children under 14 years.
Hinweis: Dieses Produkt ist für die Erwachsene und die Kinder ab 14 Jahren.
Die kinder unter 14 Jahren müssen von Erwachsenen beaufsichtigt werden.
Avertissement: Ce produit est destiné aux adultes et aux enfants de plus de 14 ans.
Les enfants de moins de 14 ans doivent être surveillés par des adultes.
Avvertimento: Questo prodotto è destinato all'uso per i adulti e bambini di età superiore ai 14 anni.
I bambini di età inferiore ai 14 anni devono essere sorvegliati da un adulto.
Advertencia: Este producto es para adultos y niños mayores de 14 años.
Los niños menores de 14 años deben ser supervisados por adultos.
警告:この製品は、大人と14歳以上の子供には使用対象です。
14歳未満の子供は大人の監視が必要です。
WARNING
ﺕﺡﺫﻱﺭ: ﻱﺝﺏ ﺍﺱﺕﺥﺩﺍﻡ ﺍﻝﻡﻥﺕﺝ ﻑﻕﻁ ﻡﻥ ﻕﺏﻝ ﺍﻝﺏﺍﻝﻍﻱﻥ ﻭﺍﻝﺃﻁﻑﺍﻝ ﻑﻭﻕ ﺱﻥ 14 ﻉﺍﻡًﺍ.
ﺇﺵﺭﺍﻑ ﺍﻝﻙﺏﺍﺭ ﻡﻁﻝﻭﺏ ﻝﻝﺃﻁﻑﺍﻝ ﺩﻭﻥ ﺱﻥ 14 ﻉﺍﻡًﺍ.

04
Model Battery
Product maintenance
Troubleshooting
Apply lubricating
oil to external
metal parts.
Please separate
the car and battery
when not in use.
Please remove the sediment
and dirt on the car
completely and must be kept
dry after play.
When not in use, remove
the battery from the
model and transmitter.
Cause Solution
Remote control car
doesn't work
Restart the transmitter
Please make sure the battery is installed correctly or replace it with a new one.
If the transmitter doesn’t work,please replace it with a new one.
Increase the percentage of steering.
Please make sure the steering is it include the sundries or some parts damaged.
When the battery is low, charger it in time or replace it with new battery.
Please make sure the wheel or drive shaft is entangled by debris and remove it.
The motor may have reached the expiration date, replace with the same motor.
Please keep the car within effective control distance.
When the battery of the transmitter in low battery, please replace it in time.
Check whether all parts of the model car are damaged and replace them.
High temperature protection is triggered when the ESC’s temperature is too high,
Please pause for 10 minutes before using.
The signal is disturbed, restart the car and the transmitter.
Please make sure there are obstacles or interferences.
Long frequency matching time
Operation delay
The vehicle moves forward (backward)
automatically or makes a sound of "en...."
The indicator of the transmitter
is not bright
The steering of the model car
has no force or function

05
P12-040
P12-001
P12-024
P12-040
P12-002
P12-025
Model Car Summary

06
M02-003
P12-003
P12-005
P12-006
P12-006
P12-007
P12-008
P12-009
P12-011
P12-012
P12-013
P12-017
P12-019
P12-020
P12-022
P12-023
P12-026
P12-034
P12-035
P12-036
P12-042
P12-043
P12-029

07
Power switch Jack
Fan expansion jack
CH2 expansion jack
CH4 expansion jack
Antenna
Power input
Steering gear jack
Heating plate Front &Rear lights jack
Top lights jack jack
Electronic speed controller
Preparation of transmitter
Power switch
Motor
Transmitter function main interface
CH1, Steering wheel
CH2, Throttle trigger
Forward / Backward / Brake
Turn left / Turn right
Car lights control
button
The car lights color
mode can be switched
and the car lights can
be switched off.

08
Forward
Backward
Backward
Forward
Turn left
Turn right
Turn right
Turn left
Electronic stability system (ESP) gyroscope
action ratio adjusting knob Steering trim knob
Throttle reverse
Car status indicator (green)
When the battery of cars is in low battery, the indicator
light will flash. It remind operator to replace the battery
as soon as possible to avoid accidents.
Transmitter indicator (red)
When the signal is weak or interrupted, the indicator will
flash quickly. When the power of the transmitter is low,
the indicator light will flash slowly. The above situation
should be handled as soon as possible to avoid accidents.
Steering reverse
Steering range
adjustment knob
Low Min Max
High
1) There is no ESP function when the remote control car retreats.
2) When the remote control car is moving forward, it is necessary to pull the throttle trigger
backward to reach more than 30% of the stroke before the gyroscope starts to work.
3) With the increase of car speed, the gyroscope action ratio also increases synchronously.
ATTENTION
Note Direction.
Open battery cover at the bottom of transmitter. Install batteries.
Follow the direction of batteries designated in the inside of the battery box.
1.5V×4 AA Alkaline Batteries(not included)
Battery Cover
Assembly of the transmitter battery

09
This product has the function of ESP car stability system, which can effectively correct the car attitude and direction when the car skids
or loses control. The function and sensitivity of the car gyroscope sensor can be adjusted through the ESP knob of the transmitter.
Adjustment of gyroscope action ratio
Steering trim
Steering range adjustment
When the steering wheel is in the center position, if the car can not drive in a straight line, please use the steering trim knob to adjust
and correct the left and right directions of the front wheels.
The steering range adjustment knob can be used to adjust the left and right steering angle of the car.
The action ratio
decreased
The action ratio
increases
When the front wheel
is left, the knob rotates
to the right.
Minimum
steering
angle
Maximum
steering
angle
When the front wheel
is right, the knob
rotates to the left.

10
1) 2)
②
①
3)
4) Reset the bodyshell
Battery charging
Assembly of model battery
Remove the body
Pull out the
body clips
Put the battery into the battery
compartment, bind the Velcro
and then connect with the ESC.
Connect the attached charger with the model battery charging
input port, and then connect other USB output ports. When
charging, the charging indicator is flashing, and the indicator is
always on after charging. Do not put the battery in the model
when charging. The battery must be cooled before charging.
The battery contains less power when leaving the factory,
so it must be charged and saturated before use.
Battery
input port
ESC
input port
Model Battery
Charger
output port
Output port
Charging
Charger box
Power
USB adapter (not included)
▲ Please use the charging box provided with the product and make sure it is connected properly.
Warning: someone must be watching while charging.
Model Battery
Bind Velcro

11
2)
1>
2>
1)
Operational guidance
Frequency matching
Place the model on level ground
Consistent direction
Do not touch the
throttle trigger when
turning on thepower
of the transmitter.
Turn on the power of
the transmitter, and
the red indicator light
will flash quickly.
After the car power is turned on, the transmitter and the car will carry out automatic frequency matching. When the indicator light of the
transmitter and the car lights are always on, the frequency matching is successful. In the process of frequency matching, the car lights
will flash rapidly. At this time, the gyroscope is being calibrated automatically. Please place the car on the level ground to complete this
operation. After calibration, the car lights return to normal.
Manipulation method
Go forward Go backward
Throttle trigger Throttle trigger
Press for 2 second to turn on the power. The lights
flash and enter the frequency matching state. Press for
2 second to turn off the power.

12
Turn left Turn right
Steering wheel Steering wheel
Turn leftGo backward Turn rightGo backward
Turn left and move backward Turn right and move backward
Turn leftGo forward Turn rightGo forward
Turn left and move forward Turn right and move forward
Steering wheelThrottle trigger
Steering wheelThrottle trigger Steering wheelThrottle trigger
Steering wheelThrottle trigger
Low speed High speed Brake/Backward
Pull the throttle trigger back
gently and the car will move
forward slowly.
The throttle trigger is pulled to
the maximum, and thecar moves
forward quickly.
When the car is moving forward, the throttle trigger
is pushed forward and the car stops moving. After
the throttle trigger returns to the middle position,
it pushes forward again, and the car moves backward.

13
M06-010
P12-003
P12-035
M02-003
Installation of wheels
Use the hexagon nut wrench to take out the nut fixing the tire(M02-003) and remove the old tires.
Put on new tires.
Hexagon nut wrench
Parts exploded view

14
M01-013
M01-013
M03-007
M03-007
M03-007
M03-007
P12-007
P12-007
P12-008
P12-008
P12-009
P12-009
P12-036
P12-037
P12-042
Assembly of front suspension arm
Assembly of rear suspension arm
M01-035
M01-035

15
Assembly of steering servo
M01-017
M01-033
M05-035
M05-035
M03-007
M03-007
M03-007
M03-007
M01-019
M05-035
M05-032
M01-022
P12-010
P12-010
P12-010
P12-014
P12-017
P12-018
P12-018
M01-033
M01-032
M01-032
M01-032

16
M01-016
P12-022 M01-003
M01-003
P12-011
P12-011
M01-013
P12-030
Assembly of front(rear) differentials
Assembly of front bumper

17
M01-004
P12-020
P12-038
P12-015
M01-030
M01-010
P12-021
Assembly of rear bumper
Assembly of motor
M01-003
M01-034
M01-034
M01-013
M01-003
M01-003
P12-013
P12-013
M01-016
P12-023
M01-003
P12-012
P12-012

18
Front and rear shock absorbers
Assembly of chassis
P12-029
M01-012
P12-005
P12-005
P12-031

19
Installation of Bracket and Bulkhead tie bars
P12-006
P12-005
P12-032
P12-033
P12-007
M06-011
M01-036
P12-007
M01-012
M01-004

20
Wheel × 4 Wheel × 4 Chassis
P12-001A P12-001B P12-002A P12-002B
P12-003 P12-004 P12-005 P12-006
P12-007 P12-008 P12-009 P12-010
P12-011 P12-012 P12-013 P12-014
P12-015 P12-016 P12-017 P12-018
Body assembly Body assembly Body assembly Body assembly
Buyable accessories
Front & Rear shock
tower assembly
Suspension arms (front) Suspension arms (rear) Front & Rear wheel
carriers assembly
Front bumper assembly
Gear cover Steering link
Steering mechanism
Rear bumper assembly Rear wheel Upper chassis
Steering servo Servo arm set
This manual suits for next models
1
Table of contents
Other UDI R/C Motorized Toy Car manuals
Popular Motorized Toy Car manuals by other brands

Traxxas
Traxxas Slash 4x4 6808 owner's manual

Kyosho
Kyosho MINI-Z Racer MR-02 RM Type instruction sheet

Carrera RC
Carrera RC Nintendo Mario Kart Bumble V Assembly and operating instructions

HPI Racing
HPI Racing Vorza Flux HP instruction manual

Jamara
Jamara Akron BL RTR 2,4 GHz instructions

ECX
ECX TORMENT ECX03026 instruction manual

Famosa
Famosa Feber Adventurer Tandem Car quick start guide

DF-models
DF-models 10 Years DF-4J Crawler manual

Tamco
Tamco Ranger Instruction manual & parts catalogue

Silverline
Silverline SLK 112 Assembly instructions

Rollplay
Rollplay FLEX KART XL PEDAL Owner's manual and assembly instructions

Spec-R
Spec-R R2 instruction manual