UDI R/C UD1601 User manual

UD1601 UD1602
Important
Notice
1/16 Full proportion high-performance 4WD racing car
Our company's products are improving all the time,design and specifications are
subject to change without notice. All the information in this manual has been
carefully checked to ensure accuracy, if any printing errors, our company reserve
the final interpretation right.
This product is suitable for users over 14 years old.
Please read this instruction manual carefully befores use.
Operating
Instructions

02

03
THANK YOU
● Thank you for choosing this product. The remote control model is designed to be fun to drive and uses
high quality parts to improve durability and performance. The instruction manual you are reading is to
make the product easier to understand and explain more thoroughly. We hope you enjoy this remote
control model car. If you have any problems or need help, please call us and we will try our best to
help you. You can also contact us through the following website: www.udirc.com.
● This is a high-performance radio control model product, which needs regular maintenance to obtain
the best performance. If you don't do regular maintenance, it can affect performance. We have all the
necessary parts and accessories to ensure that your vehicle maintains its best performance.
● The warning or attention symbol will alert you to potentially dangerous steps. Please read and
understand the instructions carefully before proceeding.
● The product contains small and sharp parts. Keep away from children.
● Cutters, nippers and screwdrivers need careful handling.
● DO NOT put the model in high temperature, humidity and direct sunlight.
● The model must stop immediately and check for the reasons when it is
operating abnormal.
● Keep in mind that people around you may also operate a radio control model.
● The motor is a heating part, please do not touch it.
● Please keep the package or instructions as they contain important information.
Failure to follow these instructions may result in injury to
yourself or others. You may also cause property damage
or model damage.
● Read the instruction manual in detail, or ask for the person with experience in
operation, and read with the guardian if necessary.
● Make sure all screws and nuts are properly tightened.
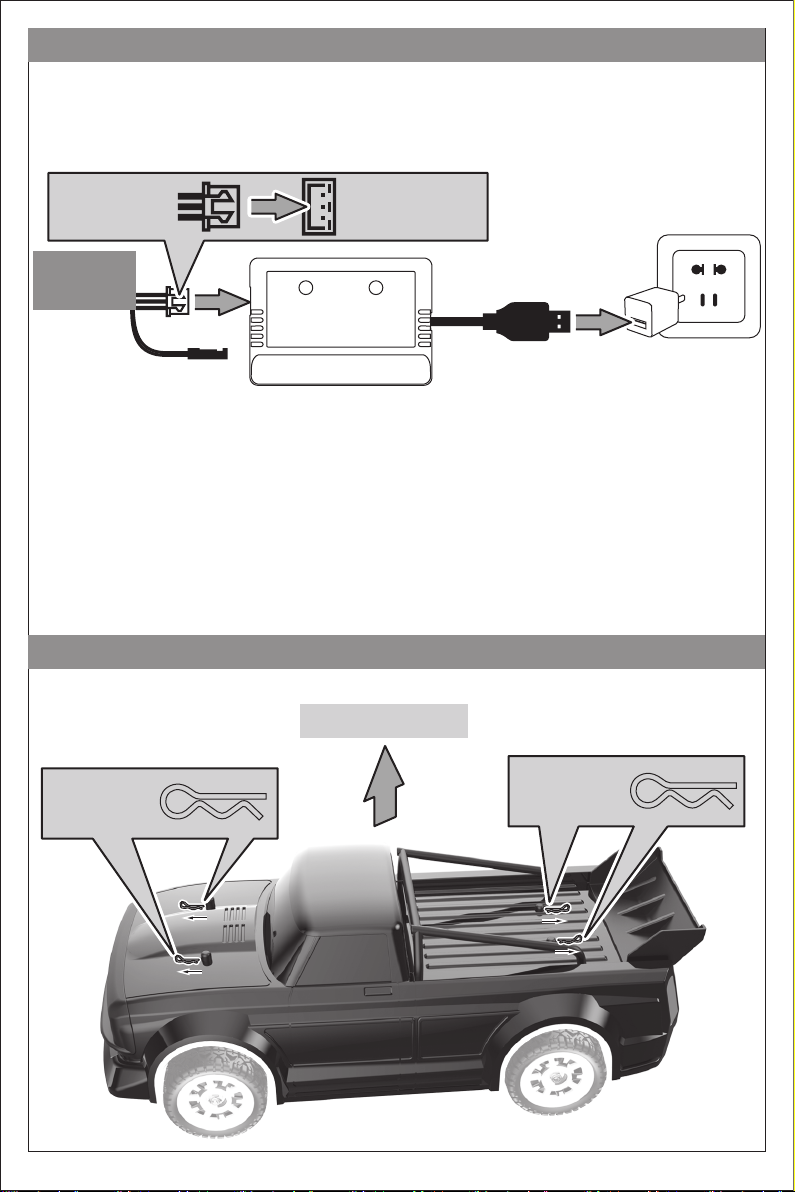
● The remote control and the vehicle should always use the battery with
saturated power to avoid losing control of the model.
● Please make sure that the throttle trigger is in the center position.
● First turn on the power of the remote control, and then turn on the power of
the model.
● DO NOT operate in public streets or crowded places to avoid accidents.
● Use this product only in open areas (>4x4m) without pedestrians.
● DO NOT put fingers or any objects inside rotating and moving parts.
● First turn off the model power, then turn off the remote control power.
And take out the battery.
● Daily maintenance is required after the model is used.
WARNING
WARNING
WARNING
ATTENTION
Before Operation
During Operation
After Operation

04
UD1601 UD1602UD1601 UD1602
Steering linkage
Product Configuration
● Please read and observe all precautions before use. Improper use of battery may
cause danger.
● It is normal for the battery to heat up after operation. Please be careful when
handling the battery. If the wire is worn, it is easy to short circuit and cause fire.
● Wasted li-ion battery must not be placed with household trash. please contact
local environmental or waste agency or the supplier of your model or your
nearest li-ion battery recycling center.
1) After use, please disconnect the power supply and pull out the plug;
2) Remove the battery from the model before charging;
3) DO NOT charge the battery when it is bulging or expanding;
4) Keep away from damp, corrosive environment and heat source;
5) Please charge the battery under adult supervision;
6) Pay attention to the polarity of the battery when installing or replacing the battery;
7) Different types of batteries or old and new batteries should not be mixed;
8) DO NOT short circuit any terminals;
9) DO NOT short circuit, decompose or put the battery into fire;
10) Please use the attached special charger to charge the battery.
Body
(Subject to the actual product)
Chassis
(Subject to the actual product)
BATTERY
SAFETY
Operating Instructions
Body
(Subject to the actual product)
Lithium-ion Battery pack
Hexagon nut wrench Hex wrench
Cross screwdriver
Charger
Drift tires
Chassis
(Subject to the actual product)
Transmitter

05
1
1>
Body assembly
1601-001
1601-002
1601-003
1603-005
1603-004
1601-011
1601-012
1601-013
1601-014
1601-009
1601-008
1601-016
1601-006
1601-009
1601-010
1601-007
1601-008
Tire
Motor
3mm Locknut
Headlight group
Body clips
Front shock
tower
Rear shock
tower
Steering
servo
Rear bumper
Battery hold-down
Front shock
Rear shock
Upper
chassis
Front bumper
assembly 2.4GHz Integrated
ESC
Li-ion Battery
Guidance before operation
Preparation of remote control model
UD1601 Summary

06
Body assembly
1602-001
1601-005
Tire
1601-006
Motor
1601-004
3mm Locknut
1601-003
Headlight group
1601-002
Body clips
1602-008
Front shock
tower
1602-008
Rear shock
tower
1602-014
Rear bumper
1601-013
Battery hold-down
1601-007
Steering
servo
1602-009
Front shock
1602-009
Rear shock
1601-016
Upper
chassis
1601-010
Front bumper
assembly
1601-011
2.4GHz Integrated
ESC
1601-012
Li-ion Battery
UD1602 Summary

07
1>-1
1>-2
1) 1)
2)
②
①
Battery charging
Remove the body
Remove the body
Pull out the
body clips
Pull out the
body clips
The battery contains less power when leaving the factory, so it must be charged and saturated before use.
Connect the attached charger with the model battery charging input port, and then connect other USB output ports. When
charging, the charging indicator is flashing, and the indicator is always on after charging. Do not put the battery in the
model when charging. The battery must be cooled before charging.
Battery input port
Li-ion Battery
Charger output port
Charging
Charger box
Power
USB adapter (not included)
▲Please use the charging box provided with the product and make sure it is connected properly.
Warning: someone must be watching while charging.

08
1>-3
2)
4)
5)
6)
7)
3)
Assembly of model battery
1) Pull out the
clips
Remove the battery
hold-down
Battery hold-down reset
Clips reset
The battery output port and
the ESC input port are
correctly connected.
Press for 1 second to turn on the power.
The lights flash and enter the frequency
matching state. Press for 2 second to turn off
the power.
After the battery is assembled, reset the body.
Put the battery in the slot

09
2>
Note Direction.
Open battery cover at the bottom of transmitter. Install batteries.
Follow the direction of batteries designated in the inside of the battery box.
1.5V×4 AA Alkaline Batteries
Battery Cover
2>-1
Preparation of transmitter
Assembly of the transmitter battery
(Summary)
Power switch
Transmitter function main
interface
Default steering
wheel direction
Default throttle trigger
direction
Backward
Forward
Turn
right
Turn
left
Throttle speed limit
switch Car lights control
button
The car lights color
mode can be switched
and the car lights can
be switched off.

10
2
Turn left
Go forward Go backward
Turn right
1>
2>
Operational guidance
Frequency matching
Manipulation method
Place the model on level ground
Consistent direction
Do not touch the
throttle trigger when
turning on thepower
of the transmitter.
Steering wheel
Throttle trigger Throttle trigger
Steering wheel
Turn on the power of
the transmitter, and
the red indicator light
will flash quickly.
After the car power is turned on, the transmitter and the car will carry out automatic frequency matching. When the
indicator light of the transmitter and the car lights are always on, the frequency matching is successful. In the process
of frequency matching, the car lights will flash rapidly. At this time, the gyroscope is being calibrated automatically.
Please place the car on the level ground to complete this operation. After calibration, the car lights return to normal.

11
Turn left
Turn left
Go forward
Turn rightGo forward
Go backward Turn rightGo backward
Turn left and move forward
Turn right and move forward
Turn left and move backward
Low speed High speed Brake/Backward
Turn right and move backward
Steering wheelThrottle trigger
Pull the throttle trigger
back gently and the car
will move forward
slowly.
The throttle trigger is
pulled to the maximum,
and thecar moves
forward quickly.
When the car is moving forward, the throttle
trigger is pushed forward and the car stops
moving. After the throttle trigger returns to the
middle position, it pushes forward again, and
the car moves backward.
Steering wheelThrottle trigger

12
Turn left
Go forward
Go backward
Turn right
3>
4>
Model car speed control
Introduction of main interface function
Electronic stability system (ESP)
gyroscope action ratio adjusting
knob Steering trim knob
Throttle
reverse
Car status
indicator (green)
Transmitter
indicator (red)
Steering
reverse
Steering range
adjustment knob
Low Min Max
High
Low speed mode:
Throttle output limited to 50%.
By switching the three gears of the throttle speed limit switch, three different maximum speeds of the
car can be set.
Medium speed mode:
Throttle output limited to 75%.
High speed mode:
100% throttle output.

13
This product has the function of ESP car stability system, which can effectively correct the car attitude
and direction when the car skids or loses control. The function and sensitivity of the car gyroscope
sensor can be adjusted through the ESP knob of the transmitter.
Adjustment of
gyroscope action
ratio
Steering trim
Steering range
adjustment
When the steering wheel is in the center position, if the car can not drive in a straight line, please use
the steering trim knob to adjust and correct the left and right directions of the front wheels.
The steering range adjustment knob can be used to adjust the left and right steering angle of the car.
The action ratio
decreased
The action ratio
increases
When the front wheel
is left, the knob rotates
to the right.
Minimum
steering
angle
Maximum
steering
angle
When the front wheel
is right, the knob
rotates to the left.
1. There is no ESP function when the remote control car retreats.
2. When the remote control car is moving forward, it is necessary to pull the throttle
trigger backward to reach more than 30% of the stroke before the gyroscope starts
to work.
3. With the increase of car speed, the gyroscope action ratio also increases
synchronously.
ATTENTION

14
3
Note Direction.
Electronic equipment connection diagram
When the battery of the transmitter is low, the red indicator of the transmitter will flash slowly. When the
car battery is low, the transmitter green indicator light flashes. The battery should be replaced as soon
as possible to avoid accidents.
When the signal is weak or the signal is interrupted, the red indicator of the transmitter will flash quickly.
Please operate within the effective control distance to avoid accidents.
6>
5>
1>
Replacement of parts
Low battery alarm
Replace the ESC
Weak signal alarm
Pull out all the plugs and remove the ESC upward. Replace with a new ESC.
Front
Steering servo
Li-ion battery
Integrated ESC
Power switch
Headlight
Taillight
Motor
Front

15
1601-004
1601-005
1601-016
1601-019
1601-020
1601-018
1601-017
1601-021
1601-022
1601-023
1601-024
1601-026
1601-025
2>
Left(Right) front wheel component
Replace the tires
Parts exploded view
Use the hexagon nut wrench to take
out the nut fixing the tire and remove
the old tires. Put on new tires.
Hexagon nut wrench
1601-050

16
1601-051
1601-050
Left (right) rear wheel components
Differential assembly
1601-004
1601-005
1601-016
1601-017
1601-018
1601-021
1601-027 1601-029
1601-029
1601-027
1601-022
1601-024
1601-026

17
1601-057
1601-030
1601-030
1601-007
1601-032
1601-033
1601-024
1601-033
1601-048
1601-019
1601-009 / 1602-009
1601-031
1601-019
1601-024
Front (rear) shock absorber components
Steering system components

18
1601-054
1601-054
1601-054
1601-054
1601-054
1601-054
1601-055
1601-054
Screws assembly diagram
Bottom view
Top view
Front view Rear view
1601-055
1601-053
1601-053
1601-054
1601-024
UD1601
1601-024
1601-024
1601-019
1601-019
1601-024
1601-024
1601-024
1601-024
1601-024
1601-054
1601-062
1601-062
1601-060
1601-056 1601-056
1601-054 1601-054 1601-056
1601-049
1601-054

19
Top view
1601-055
Front view Rear view
1601-055
Screws assembly diagram UD1602
1601-019
1601-019
1601-024
1601-024
1601-024
1601-024
1601-054
1601-062
1601-062
1601-060
1601-054
1601-054
1601-054
1601-054
1601-054
1601-054
Bottom view
1601-053
1601-053
1601-054
1601-024
1601-024
1601-024
1601-024
1601-054
1601-056 1601-056
1601-056
1601-056
1601-054 1601-054 1601-056
1601-049
1601-054

20
4
5
Situation description Cause Solution
Product maintenance
Troubleshooting
Apply lubricating oil to external metal parts.
Remote control car
doesn't work
Remote control car battery low Remove the battery and charge it
Replacement of new batteries
Remove debris
Replace the same motor of this model
Restart the car and transmitter power
Suspend operation for a few seconds.
Avoid obstacles or interferences
Restart the transmitter
Transmitter battery low
Motor reaches the effective service life
Signal interference exists
Encounter obstacles or
interferences
Potentiomer is not in the center
The wheel or transmission shaft
is entangled with foreign matters
Long frequency matching time
Operation delay
The vehicle moves forward
(backward) automatically or
makes a sound of "en...."
Please separate the car and battery when
not in use.
Please clean the sediment and dirt on the car
before entering the
warehouse.
When not in use, remove the battery from the
model and transmitter.
This manual suits for next models
1
Table of contents
Other UDI R/C Motorized Toy Car manuals
Popular Motorized Toy Car manuals by other brands

Yokomo
Yokomo BD7 2014 Assembly manual

Lori
Lori Go Everywhere! Convertible Car LO37083 quick start guide

Jamara
Jamara Tiger EP RTR 2,4 GHz Instruction

REVELL
REVELL ‘70 Boss 429 Mustang 2 ‘n 1 user guide

Mattel Wheels
Mattel Wheels Tyco R/C STUNT PAK BARREL BLAST instructions

HOMCOM
HOMCOM 370-220V70 Assembly instruction