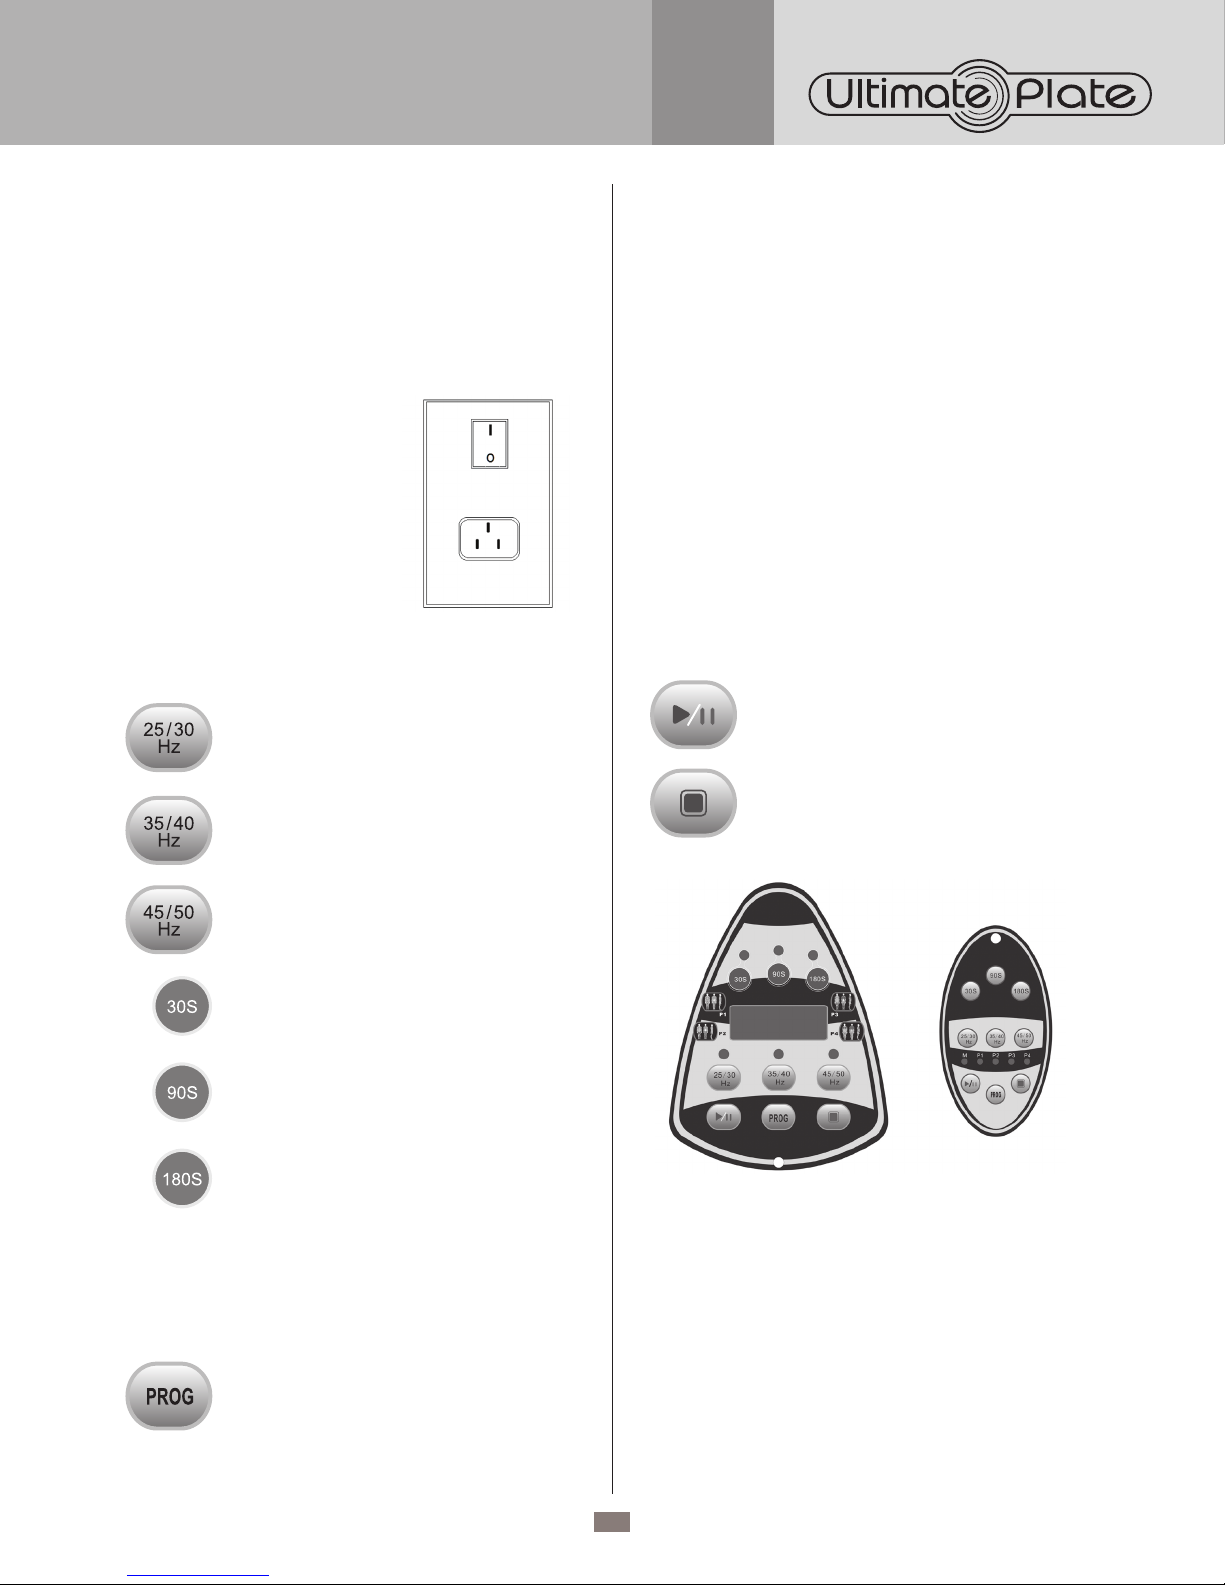
Ultimate Plate 250 User manual

IMPORTANT:
PLEASE NOTE: WHEN YOU OPEN THE CARTON, CAREFULLY CHECK THE UNIT AND MAKE SURE THERE IS NO DAMAGE. IF YOU HAVE
ANY PROBLEMS WITH ASSEMBLING THE UNIT, WITH HOW THE VARIOUS FUNCTIONS WORK OR WITH DAMAGE OR MISSING PARTS,
PLEASE CALL 1-800-459-4409 (8:30 AM - 5:00 PM EST) IMMEDIATELY FOR SERVICE.
NOTE:
DO NOT RETURN UNIT TO THE STORE BEFORE CALLING THE TOLL FREE NUMBER.
DO NOT DISPOSE OF YOUR CARTONS UNTIL YOU ARE COMPLETELY SATISFIED WITH YOUR NEW ULTIMATE PLATE.
INSTRUCTION MANUAL
Model: 2YUPL250WBL
250

2
ATTENTION:
1. Find a location for the Ultimate Plate that is
protected from direct sunlight.
2. Do not plug the unit into the power outlet
before reading all instructions.
IMPORTANT SAFETY
INSTRUCTIONS
WHEN USING THE ULTIMATE PLATE,
BASIC PRECAUTIONS SHOULD
ALWAYS BE FOLLOWED INCLUDING
THE FOLLOWING:
Read and understand all instructions before using
Ultimate Plate.
DANGER – To reduce risk of electric shock:
Always unplug the Ultimate Plate from the electrical
outlet immediately after using and before cleaning.
WARNING – To reduce the risk of burns, fire,
electric shock or injury:
1. The Ultimate Plate should never be left
unattended when plugged in. Unplug from
outlet when not in use and before putting on
or taking off parts.
2. Do not operate under a blanket or pillow.
Excessive heating can occur and cause fire,
electric shock or injury to persons.
3. Close supervision is necessary when the
Ultimate Plate is used by, on, or near children
or individuals with disabilities.
4. Use the Ultimate Plate only for its intended
use as described in this manual. Do not
use attachments not recommended by the
manufacturer.
5. Never operate the Ultimate Plate if it has a
damaged cord or plug, if it is not working
properly, if it has been dropped or damaged, or
dropped into water. Call our customer service
toll free number, 1-800-459-4409 (8:30 am to
5:00 pm EST) for examination and/or repair.
6. Do not carry the Ultimate Plate by the electrical
cord or use cord as a handle.
7. Keep the cord away from heated surfaces.
8. Never operate the Ultimate Plate with the air
openings blocked. Keep the air openings free
of lint, dust and hair.
9. Never drop or insert any object into any
opening.
10. Do not use outdoors.
11. Do not operate where aerosol (spray) products
are being used or where oxygen is being
administered.
12. To disconnect, turn all controls to the off
position, then remove plug from outlet.
13. Connect the Ultimate Plate to a properly
grounded outlet only. See grounding
instructions. Use the Ultimate Plate only as
described in this manual. Any other use not
recommended by the manufacturer may cause
fire, electric shock, or injury.
14. To reduce the risk of injury, place the Ultimate
Plate on a flat, horizontal and stable surface.
Do not place or use the Ultimate Plate on a
slippery surface.
15. To reduce the risk of injury, do not use the
Ultimate Plate with wet shoes, wet feet or wet
socks.
16. To reduce the risk of injury, do not use the
Ultimate Plate if the surface is wet. If the
Ultimate Plate surface becomes wet, dry the
surface before using.
17. The Ultimate Plate shall be set up in an area
free of obstructions within at least 3 feet from
the platform.
WARNING: DO NOT EXCEED THE
MAXIMUM LOAD OF 150 KGS
(331 LBS).
QUALITY CRAFT ASSUMES NO RESPONSIBILITY
FOR PHYSIOLOGICAL EFFECT, PERSONAL
INJURY OR PROPERTY DAMAGE SUSTAINED BY
OR THROUGH THE MISUSE OF THIS PRODUCT.
HOUSEHOLD USE ONLY.
SAVE THESE INSTRUCTIONS
FOR FUTURE USE.
GROUNDING INSTRUCTIONS
This product is for use on a nominal 120V circuit
and has a grounding plug that looks like the
plug illustrated on next page. Make sure that the
product is connected to an outlet having the same
configuration as the plug. No adaptor should be
used with this product.

3
GROUNDED
OUTLET
GROUNDING
PIN
GROUNDED
OUTLET BOX
This product must be grounded. If it should
malfunction or breakdown, grounding provides a path
of least resistance for electric current to reduce the
risk of electric shock. This product is equipped with
a cord having an equipment-grounding conductor
and a grounding plug. The plug must be plugged
into an appropriate outlet that is properly installed
and grounded in accordance with all local codes and
ordinances.
DANGER – Improper connection of the equipment-
grounding conductor can result in a risk of electric
shock. Check with a qualified electrician or
serviceman if you are in doubt as to whether the
product is properly grounded. Do not modify the plug
provided with the product. If it will not fit the outlet,
have a proper outlet installed by a qualified electrician.
HEALTH WARNINGS
1. Consult a physician for physical examination
and clearance before engaging in an exercise
program.
2. If you have any physical limitation or medical
condition, seek the advice of a physician
before using the Ultimate Plate in order to
avoid personal injury.
3. If you experience any dizziness, faintness,
shortage of breath or pain, you must stop
using this machine immediately and consult a
physician.
4. Wear rubber-soled shoes when standing on the
machine.
5. Do not lean back on your heels or “lock” your
joints or straighten your legs when standing
upright on the machine.
6. It is important to maintain balance while on the
machine. User shall not hang on the handles in
order to maintain balance. It is recommended
that the user shall keep his/her knees directly
above the toes.
7. User is not recommended to employ weights
while using the machine unless being coached
by exercise professionals or have experience
with weight training.
8. Incorrect ways to stand on the machine are
shown in the following 3 diagrams:
A. You always need to maintain balance when
standing on the Ultimate Plate. Never
hang on to the handle. Use the handle to
maintain balance only.
B. Do not lean on your knees too much.
Balance your weight predominantly on the
front of your feet.
C. Do not lock any joints such as knees or
elbows but keep them bent slightly.
9. Before and after each exercise/training
session on the Ultimate Plate, maintain
hydration by drinking at least 300 ml water.
10. Pay attention to your body reaction when using
Ultimate Plate. Do not over-exert yourself or
work to exhaustion, or personal injury could
result.
11. To avoid personal injury, the user shall stop
exercising immediately and consult a physician
if user experiences any dizziness, faintness,
shortage of breath, or any pain.

4
INSTALLATION
INSTRUCTIONS
WARNING: BEFORE ASSEMBLING THE
UNIT, MAKE SURE THE MAIN ON/OFF SWITCH
IS IN THE OFF POSITION AND THE UNIT IS NOT
PLUGGED IN.
PARTS LIST
1) Base � � � � � � � � � � � � � � � � � � � � � � � � � � � � � � � 1
2) Column � � � � � � � � � � � � � � � � � � � � � � � � � � � � � 1
3) Power cord (not shown) � � � � � � � � � � � � � � � � � � 1
4) Top control panel � � � � � � � � � � � � � � � � � � � � � � 1
5) Bottom control panel � � � � � � � � � � � � � � � � � � � � 1
6) Bottom cover � � � � � � � � � � � � � � � � � � � � � � � � � 1
7) Screws � � � � � � � � � � � � � � � � � � � � � � � � � � � � � 6
8) Resistant bands (not shown) � � � � � � � � � � � � � � 2
9) Comfort mat � � � � � � � � � � � � � � � � � � � � � � � � � � 1
10) Washers � � � � � � � � � � � � � � � � � � � � � � � � � � � � 4
11) Bolts � � � � � � � � � � � � � � � � � � � � � � � � � � � � � � � 4
12) Socket spanner � � � � � � � � � � � � � � � � � � � � � � � 1
13) Allen wrench � � � � � � � � � � � � � � � � � � � � � � � � � 1
2
1
5
4
6
10
9
7
11
12
13
ASSEMBLY
Step 1: Put the column [2] onto base [1] as shown in Fig� A�
Fig. A
2
1

5
Step 2: Attach 4 bolts [11] to the screws underneath the
column� Tighten the bolts with the socket spanner [12]� See Fig� B�
Fig. B
11
Step 3: Connect the 2 signal cables from the base to the
2 plugs located at the bottom of column� See Fig� C�
Fig. C
Step 4: Attach the bottom cover [6] to base with 6 screws
[7]� See Fig� D�
7
6
Fig. D
ACCESSORIES
COMFORT MAT
Put the comfort mat [9] on the top
surface of base before seated or
floor exercises�
9
The comfort mat provides soft padding for additional
comfort when performing seated or floor exercises� It also
dampens the level of vibration, which helps to adjust the
intensity for the individual user�
RESISTANT BANDS
According to your exercises,
attach the resistant bands [8]
to the attachments located at
2 sides of base� See Fig� E� 8
STRAP
STRAP
Fig. E

6
After completely reading instructions, confirm that
the main switch is in the OFF position. Plug the unit
into a 15 amp, 120 volt outlet.
OPERATION
Attach the power cord to the receptacle located at the
back of the unit�
Main switch: Turn the main
switch to “I” position� The
indicator light will be “ON”�
MANUAL SETTING
Press to select vibration frequency of
25 or 30 Hz.
Press to select vibration frequency of
35 or 40 Hz.
Press to select vibration frequency of
45 or 50 Hz.
Press to select 30 second time�
Press to select 90 second time�
Press to select 180 second time�
PROGRAMMED SETTING
Press to select the program from
P1 to P4:
P1 – Strength exercise
Program P1 consists of
12 pre-programmed segments�
P2 – Stretch exercise
Program P2 consists of
9 pre-programmed segments�
P3 – Massage
Program P3 consists of
9 pre-programmed segments�
P4 – Balance exercise
Program P4 consists of
6 pre-programmed segments�
Between each segments, a 30-seconds idle
time is set to provide as the rest period of
exercises�
Refer to Exercise instructions in the following
section for the pre-set time, frequency and
exercise pose of each program�
For manual or programmed setting, press the
following buttons to start, pause or stop the
machine�
Press to Start / Pause.
Press to Stop.
Top control panel Bottom control panel
EXERCISES
As a basic rule, choose a training session that depends on
your individual fitness level and build up your training gradually�
For beginners, start the exercises in a static position and
choose a low time and vibration setting� Gradually increase
the time and vibration level� Once you are comfortable, you
can continue with more dynamic movements�
For exercise information see poster.

7
EXERCISE PROGRAMS
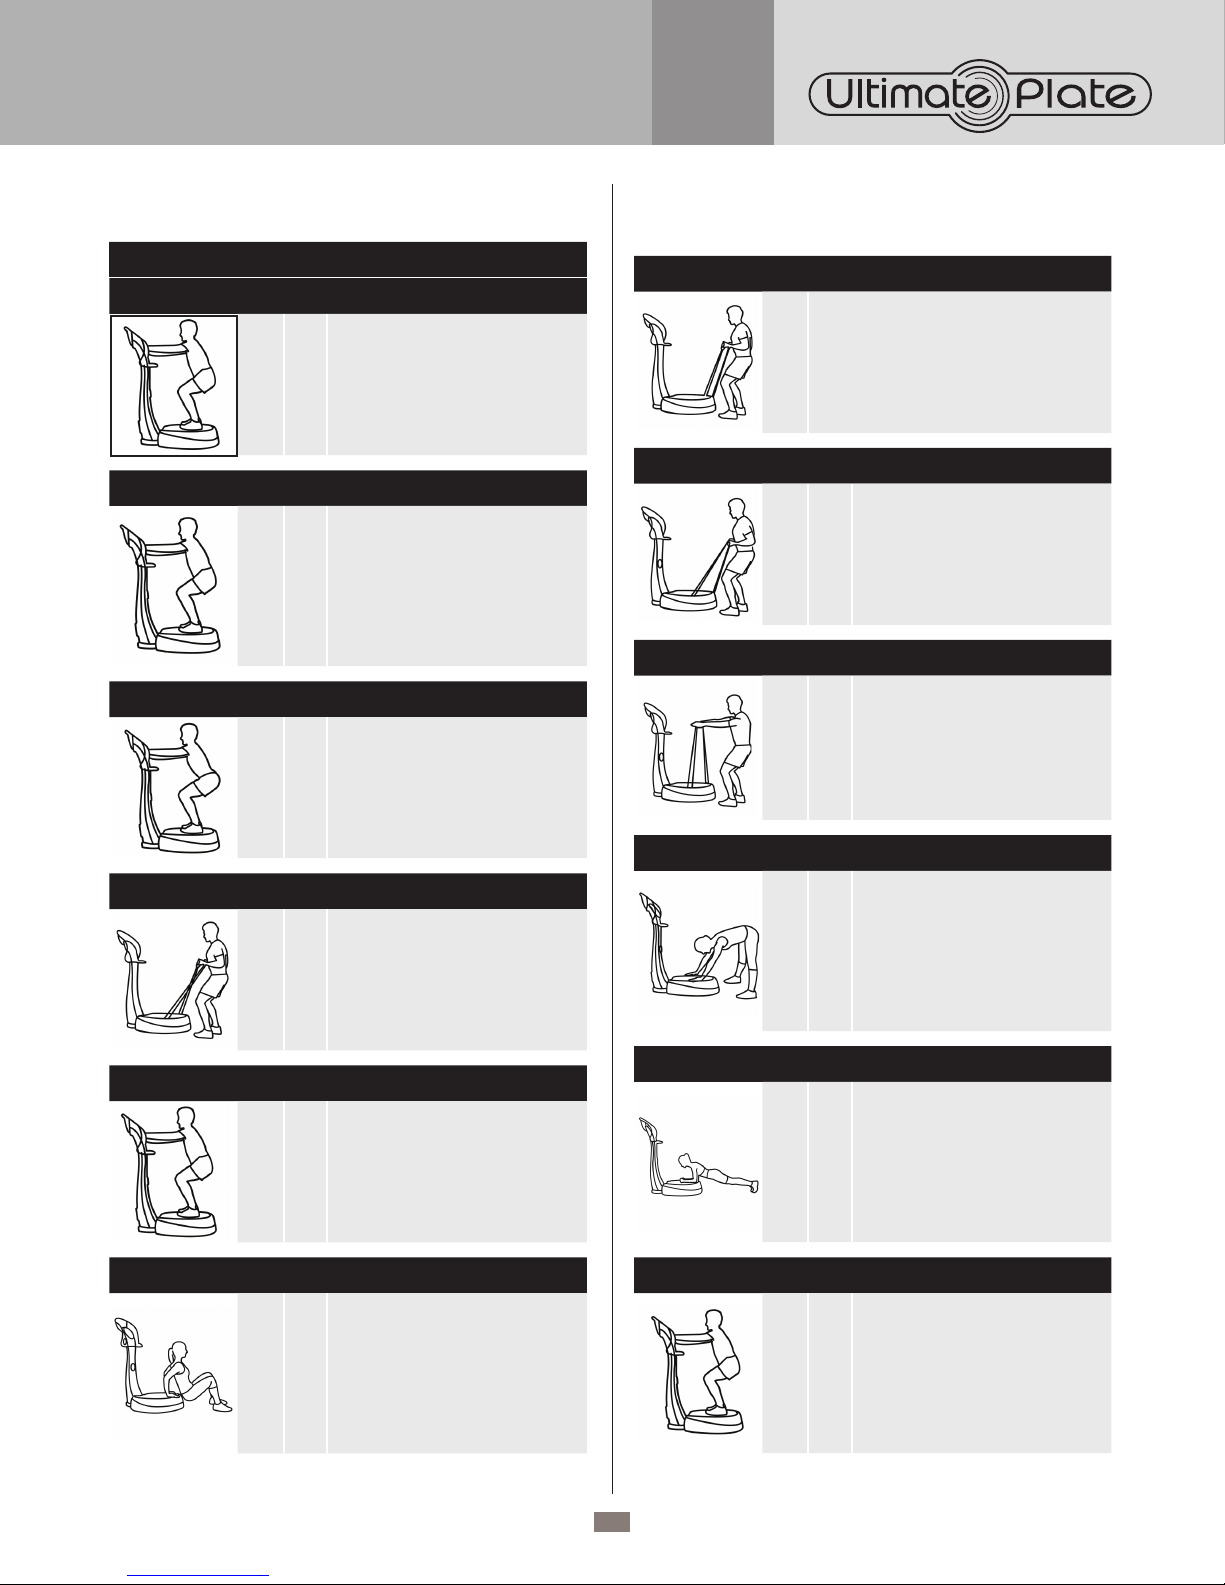
P1 STRENGTH EXERCISES
1 Squat Time
(S)
Freq
(Hz) Description
60 25
Stand on the Vibration plate with feet
shoulder width apart� Keeping the
back straight and knees slightly bent,
gently squeeze the leg muscles� You
should feel tension in your quadriceps,
buttocks and back�
2 Deep Squat Time
(S)
Freq
(Hz) Description
45 25
Stand on the Vibration plate with feet
flat and shoulder width apart� Keeping
the knees directly above the feet at
a 100 degree angle, gently bend the
legs and squeeze the leg muscles�
Keeping the back straight, bend the
upper body forward� This exercise
aims to strengthen the back, buttocks
and legs�
3 Wide Stance
Squat
Time
(S)
Freq
(Hz) Description
45 30
Stand on the Vibration plate with legs
wide apart and toes turned outward�
Keeping the knees directly above the
feet at a 100 degree angle, gently
bend the legs� You should feel tension
in the back, buttocks, quadriceps and
inner thigh area�
4 Row Time
(S)
Freq
(Hz) Description
30 30
Facing machine, stand on floor
& cross straps in front of you with
neutral grip� Pull straps and hold,
maintaining tension� Keep chest
up and elbows bent�
5 Calves Time
(S)
Freq
(Hz) Description
30 35
Standing in the centre of the Vibration
plate, rise up on to the balls of the
feet� Keeping your back straight and
abdomen tight, you should begin
to feel tension in your calf muscles�
To add variation to the exercise, try
bending your knees to 90 degrees�
6 Triceps Dip Time
(S)
Freq
(Hz) Description
45 40
Facing away from the Vibration
plate, firmly grip the edge and push
upwards� Now bend the arms slightly
and lower the hips toward the plate,
squeezing the shoulder blades
together� You should feel the tension
in your upper arms and shoulders� For
variation, repeat the exercise with your
legs straight�
7 Biceps Curl Time
(S)
Freq
(Hz) Description
45 40
Position your toes slightly under the
edge of the unit for support and hold
the straps tightly at waist height�
Knees should be slightly bent, back
and wrists kept straight� Pull your
arms upward� You should feel tension
in the shoulders and biceps�
8 Bent Over Pull Time
(S)
Freq
(Hz) Description
30 35
Stand in front of the Vibration plate�
Pull the belts upward on the side of
your body� Push your chest out and
shoulder-blades together� Pull your
arms backwards in a smooth motion
and you should feel tension in your
upper back and shoulder area�
9 Front Raise Time
(S)
Freq
(Hz) Description
45 40
Stand in front of the Vibration plate,
legs shoulder width apart and raise
both arms horizontally in front of your
torso� Keeping your back straight
and abdomen strong, pull the straps
upward� For variation, perform the
same exercise from a standing
position on the Vibration plate�
10 Shoulder
Press
Time
(S)
Freq
(Hz) Description
45 30
Position the body in a horizontal line
parallel with the Vibration plate� Hands
should be shoulder width apart, legs
and back straight, head raised� Using
slow and controlled movements push
your slightly bent arms toward the
Vibration plate, then return to the
starting position� This exercise is perfect
for shoulders and upper arms�
11 Lower
Abdominals
Time
(S)
Freq
(Hz) Description
30 25
Brace yourself on your elbows and
hold onto the front edge of the
Vibration plate� Now, with a straight
back, pull your buttocks up slowly as
if you wanted to pull the Plate toward
your feet� You should feel tension in
your abdominal region� To vary the
routine, perform the same exercise
from a kneeling position�
12 Standing
Abdominals
Time
(S)
Freq
(Hz) Description
30 25
Stand in the center of the Vibration
plate, feet shoulder width apart,
holding the railing at chest height�
Keeping the back straight and legs
slightly bent, push your upper torso
down� Immediately you’ll begin to feel
tension in your abdominal muscles�
To vary the exercise simply bend your
arms further�

8
P2 STRETCH EXERCISES
1 Push Up Time
(S)
Freq
(Hz) Description
60 25
Kneel in front of the Vibration plate,
placing hands on the plate shoulder
width apart with fingers facing inward�
With a straight back and strong
abdomen, push off the Vibration plate
platform� This exercise will strengthen
chest, shoulder muscles and triceps�
For variation, try straightening your
legs and lifting your knees�
2 Lateral
Abdominals
Time
(S)
Freq
(Hz) Description
30 30
With one foot directly behind the
other, place one elbow on the
Vibration plate and lean sideways�
Keeping your head, torso and legs
straight, push your shoulders down
and tighten your torso simultaneously�
This exercise works the lateral
abdomen� To add variation try pushing
your hips upward at the same time�
3 Abdominal
Crunch
Time
(S)
Freq
(Hz) Description
60 35
Place a pillow under the small of your
back, raise your legs and place your
hands under your head for support
making sure to keep your elbows
parallel with the floor� Crunch your
upper body toward your legs and feel
the tension in the abdominals� Ensure
your buttocks and lower back do not
lose contact with the mat� To vary the
routine, place your feet on the step�
4 Lattisimus Dip Time
(S)
Freq
(Hz) Description
60 40
Place the hands on the mat shoulder
width apart� Keeping wrists and
forearms straight, gently push off the
hands� It is important to keep the hips
straight and to push the shoulders
downward� This exercise promotes
muscular arms, shoulders and
abdomen� Try doing the same exercise
but this time keep your legs straight�
5 Hamstring Time
(S)
Freq
(Hz) Description
30 30
Face machine & place right heel on
surface� Keep leg straight, toe flexed
and chest up� Lean out toward toes�
Repeat with other leg�
6 Quadriceps
Stretch
Time
(S)
Freq
(Hz) Description
30 35
Place one shin on the Vibration plate
- ensuring the foot remains off the
Plate! Keeping the upper body and
back straight, tense your stomach�
By pushing your pelvis forward you’ll
be stretching your quadriceps� Vary
this exercise by pulling the rear leg
forward�
7 Shoulder Press Time
(S)
Freq
(Hz) Description
60 40
With right side facing machine, place
right knee on floor� Adjust strap length
to be taut when elbow is bent just
below 90 degrees� Use overhand grip
and press up toward ceiling� Hold�
Repeat on other side�
8 Inner Thigh Time
(S)
Freq
(Hz) Description
30 30
With right side facing machine, place
right foot on platform� Keep leg
straight� Bend into slight squat with
left leg� Keep chest up & hold� Repeat
with other leg�
9 90/90 Time
(S)
Freq
(Hz) Description
30 25
Place right glute and leg, bent at a
45 degree angle, across platform�
Use left leg for support� Lean into
machine and keep chest up� Repeat
with other leg�
P3 MASSAGE EXERCISES
1 Calf Massage Time
(S)
Freq
(Hz) Description
60 25
Lie in front of the unit with both calves
resting on the Vibration plate, toes
pointing toward the ceiling� The rest
is easy, simply relax and enjoy an
invigorating calf massage�
2 Upper Arm
Massage
Time
(S)
Freq
(Hz) Description
60 25
Lie sideways facing the unit, with
legs slightly bent� Ensure the frontal
mat extends slightly over the edge�
Rest one arm on the Vibration plate
and relax�
3 Adductor
Massage
Time
(S)
Freq
(Hz) Description
60 30
Lie on your side facing the Vibration
plate� Slightly bend one leg and rest
it on the Vibration plate� Making sure
your body does not touch the Plate�
Now repeat the massage with the
other leg�

9
4 Abductor
Massage
Time
(S)
Freq
(Hz) Description
45 30
Lie sideways on the Vibration plate,
with your legs pulled up to your hips�
Use your elbow to support your upper
body� Your back must be straight�
You should feel the massage on the
outside of your leg and hip� Repeat
the same massage on your other side�
5 Shoulder &
Neck Relaxer
Time
(S)
Freq
(Hz) Description
30 35
Kneel down in front of the Vibration
plate with your arms outstretched�
Keep your back and neck straight�
Now pull your upper body back while
resting your arms on the plate� This
exercise will relax your neck and
shoulder area�
6 Calf Time
(S)
Freq
(Hz) Description
30 35 Lie face-up on floor/step� Place lower
half of legs on machine and relax�
7 Pectoral
Stretch
Time
(S)
Freq
(Hz) Description
30 40
Sit with your back to the Vibration
plate� Now hold the Vibration plate
behind your back so that your fingers
grip the edges� By pushing your
shoulders down you’ll stretch your
chest and shoulders� You may also
gently pull the straps on either side for
optimum results�
8 Lower Back
Relaxer
Time
(S)
Freq
(Hz) Description
60 40
Sit on the floor facing away from the
Vibration plate with your legs apart�
Place the mat between your body
and the Vibration plate and hold the
edge’s for support� Relax during the
vibration, targeted primarily in the
lower back� As an alternative, angle
your legs and push your body harder
against the Vibration plate�
9 Upper Body
Relaxer
Time
(S)
Freq
(Hz) Description
60 30
Sit facing away from the Vibration
plate, with your legs bent� Using your
elbows for balance, raise your upper
body off the Vibration plate� Keeping
your neck and back straight, pull your
shoulders back� The vibration will relax
your upper body�
P4 BALANCE EXERCISES
1 Single Arm
Plank
Time
(S)
Freq
(Hz) Description
60 25
Place forearms on platform, with
arms and feet shoulder-width apart�
Make fists and press down through
forearms, not elbows� Tuck left arm
under chest, hold 2 seconds, return to
start position & alternate� Repeat�
2 V-Sit Time
(S)
Freq
(Hz) Description
30 30
Facing away from machine, sit on
platform with arms crossed and lean
back� Focus on keeping chest up
while stabilizing� Lift feet off floor for
added challenge� Hold for duration of
exercise�
3 Single Leg RDL Time
(S)
Freq
(Hz) Description
20 40
Keep right leg in soft-lock position on
platform� Pivot so chest is parallel to
floor & raise left leg� Reach out with
arms to challenge movement� Repeat
with other leg�
4 Single Leg
Balance with
Reach
Time
(S)
Freq
(Hz) Description
30 30
Stand on platform & bend right knee�
Lift left leg and slowly reach down
with both hands� Bend at waist, not at
knee� Repeat with other leg� Muscles
targeted: hamstrings, glutes�
5 Lats Time
(S)
Freq
(Hz) Description
20 40
Face machine and kneel on floor�
Place arms straight across the
machine’s surface and lie back onto
heels� Sink toward floor� Muscles
targeted: lats�
6 Side Plank Time
(S)
Freq
(Hz) Description
60 30
With right side facing the machine,
place left forearm on floor� Stack feet
on platform and make a fist with left
hand� Keep body straight and hips up�
Hold� Repeat on other side� Muscles
targeted: shoulders, abdominals�

10
CLEANING
To clean unit first turn off controls on unit and unplug unit
from power source�
Clean the surface with clean damp cloth� Do not use
abrasive cleaners or spray liquids�
MAINTENANCE
Do not open the unit� Any servicing or repair shall not
be performed by the user� Call our customer service
hotline 1-800-459-4409 (8:30 AM to 5:00 PM EST) for
immediate assistance�
STORAGE
When the Ultimate Plate is not in use, store in a dry
location away from possible damage� The power cord
should be stored properly to avoid contact with hot or
sharp objects�
WARRANTY
Every Ultimate Plate is tested before it leaves the factory
and it is guaranteed for one year� If the unit should fail
to operate correctly within one year from the date of
purchase, call customer service at 1-800-459-4409
(8:30 am - 5:00 pm EST)� We will, at our discretion
either repair or replace the unit� It will have to be returned
to us freight prepaid and we will return the repaired or
replaced unit to you freight prepaid� The company’s sole
obligation is to repair or replace the unit�
This warranty is void if, in the opinion of Quality Craft, the
unit has been tampered with, altered, misused, damaged
or abused� The warranty is for homeowner use only and
does not cover units used in commercial situations�
WARRANTY CLAIM PROCEDURE
If a claimable defect occurs, please fill out a claim form
through our website at: www�qualitycraft�com or contact
our customer service department at 1-800-459-4409
(Monday to Friday, 8:30 am to 5:00 pm, EST)�
Before you make your claim call, please make sure you
have:
1. The description of the Ultimate Plate
2. Proof of sale
3. Details regarding the defect
Claims must be filled out in writing and returned within six
(6) months of appearance of defect� Failure to comply with
this stipulation will make the warranty null and void� We
reserve the right to a thirty-day (30) delay following receipt
of claim in which to inspect the product� We assume no
responsibility for labor costs, transportation or return of a
product�
Imported by
Quality Craft
Laval, Quebec, Canada H7S 2G7
1-800-459-4409 (EST)
www�qualitycraft�com
Made in China
This manual suits for next models
1
Table of contents
Popular Power Tools manuals by other brands

PANHANS
PANHANS Ultimo-Touch 245/100 operating manual

Stanley
Stanley FATMAX KFFMES340 Original instructions

Albert Roller
Albert Roller Rotaro instruction manual

Ingersoll-Rand
Ingersoll-Rand 100PQ1 Operation and maintenance manual

General integration
General integration 75-030 Setup & operation manual

Weller
Weller SP 15N manual