UMI EL12 User manual


INSTRUCTION MANUAL
Masticating Juicer
PRESERVE ALL NUTRITION GIVE YOU AN EASY
& HEALTHY LIFE

Content
Specifications ....................................................
Important Safeguards ....................................
Parts Diagram ...................................................
Using for First Time ........................................
Assembling Method .......................................
Operation Instruction ....................................
Disassembling Method .................................
Cleaning & Maintenance ..............................
Storage ................................................................
Trouble Shooting .............................................
Useful Tips ..........................................................
Warranty ..............................................................
Page
You have made an excellent choice with the purchase of this quality
product! Please read all the instructions carefully before using and
please retain this instruction manual for further reference.
02
02
04
05
06
07
08
09
09
10
11
11

SPECIFICATIONS
IMPORTANT SAFEGUARDS
IMPORTANT :
Specifications
Rated Voltage
Frequency
Wattage Max
Juice Container
Residue Container
Unit Size
Bare Weight
1. The unit is designed for household use only.
2. This is not a toy. Please do not let children play with it or use it.
3. Read all instructions before use carefully.
4. Keep this instruction forever.
1. Make sure the electricity supply is suitable for this unit.
2. This unit is intended for household use only. Do not use the unit at
outdoors or for another purpose than intended.
3. Use the unit only as described in this manual.
4. To prevent electrical shock, do not immerse the unit, cord set and
plug into water.
5. This is not a toy and not to be used by children. Close supervision is
required when the unit is used near children.
6. Ensure to unplug the unit when not in use, assembling or
disassembling, and before cleaning.
7. The continuous operation time of this product should be within
20 minutes.
8. No-load or overloaded operation of machine is prohibited.
9. Do not touch or move any moving parts during operation of machine.
120V
60Hz
200W
800ML
600ML
178*152*450 MM
2.75KG
220-240V
50-60Hz
200W
800ML
600ML
178*152*450 MM
2.75KG
240V
50-60Hz
200W
800ML
600ML
178*152*450 MM
2.75KG
100V
50-60Hz
200W
800ML
600ML
178*152*450 MM
2.75KG
North America European UK Japan
02

10. Do not use finger, spoon or chopsticks to push fruits or vegetables
into the chute of machine. Only pusher is allowed.
11. Do not open the unit when it is operating.
12. Do not place the unit near any explosives, heated oven or hot surfaces.
13. Operate the unit only on flat surface.
14. Do not let the cords hang over the edge of table or the like.
15. Please hold the plug to disconnect from the power socket.
16. If the parts of the product structure are found to be damaged
(especially the safety device and power cord), please stop using and
send it to service centre to be repaired by qualified technician.
17. If the screw press should get obstructed, please hold the "R" button
for about 2 to 3 seconds to let it turn in the opposite direction. After t
his, try to let the screw turn in the right direction again.
18. Don’t use the water that is warmer than 40℃/ 140°F to rinse the
appliance parts.
19. Never fill the appliance with unknown foods.
20. Make sure that the base of the unit does not get wet.
21. This appliance is suitable to be used in a household environment and
in similar surroundings.
such as: kitchen for personnel of shops, offices, hotel or motel rooms
and farms.
Attention: This appliance cannot be used with an external timer or a
separate remote control.
NOTE: To avoid the hazard of electric shock, unplug the unit from the
power outlet when not in use or before cleaning. If the supply
cord is damaged, stop using it immediately and bring it back to
service centre for repair.
03

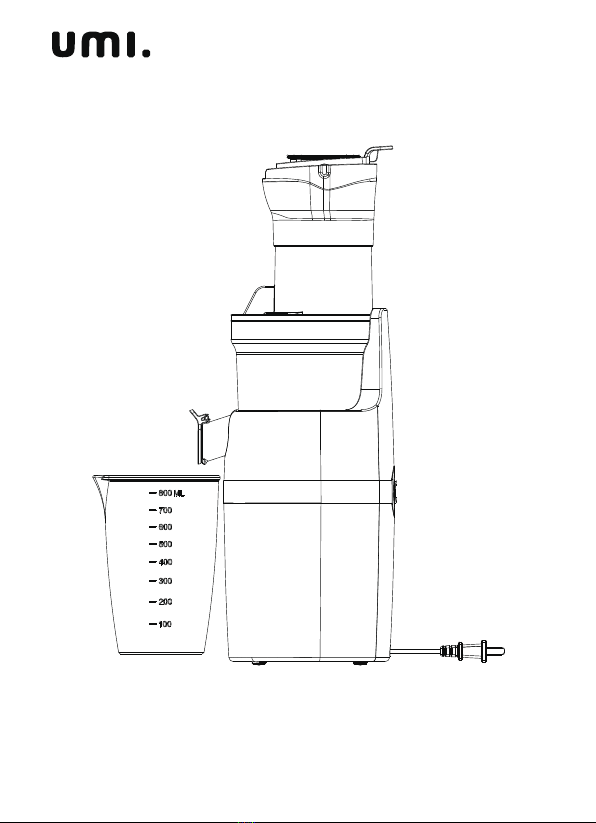
Lid
Squeezing Auger
Juicing Bowl
Power Base
1
2
3
4
5
6
7
8
Juice Container
Pulp Container
Pusher
Cleaning Brush
04
PARTS DIAGRAM
1
2
3
4
5678

1. Remove all packaging materials, plastic bags and labels.
2. Please make sure that the electricity supply follows the specifications.
3. Clean the Lid/Squeezing Auger/Juicing Bowl/Juice Container/Pulp
Container/Pusher with Soapy water. Then rinse and dry thoroughly.
4. Assemble the parts per the instruction in the assembling method
section.
5. Connect the power cord to the power source. The unit is ready
to use now.
"━" Button: gently press this key down, the product starts to work. If you
need to stop halfway, gently press the "R" button down.
"R" Button: When the slag discharge is not smooth or the rotor is
blocked, gently press and hold the "R" button for 2-3 seconds, and the
squeezing auger will start to reverse. Release the button to stop the
reverse rotation. At this time, press the "━" key again to resume normal
operation.
NOTE : DO NOT IMMERSE THE POWER BASE UNIT IN WATER.
05
USING FOR FIRST TIME
R
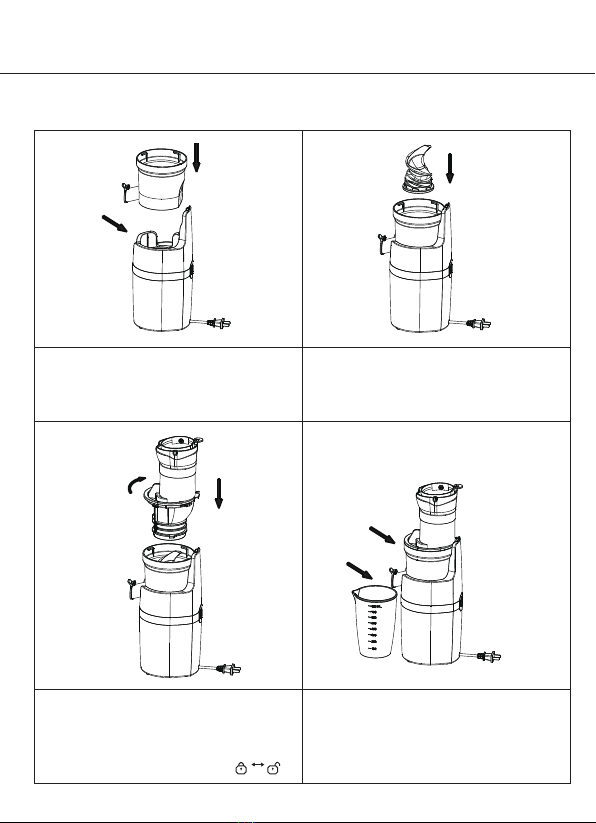
Please make sure the unit is not plugged and the switch is turned to “O”
setting prior to assembling the machine.
1. Position the Juicing Bowl on the Power
base aligning the position of the spouts
and the axle.
2. Push the Squeezing Auger firmly into
the center of the bowl, making sure that
it touches down the bottom, or else the
cover cannot be closed.
3. After the second step, the raised part
of the bottom of the Juicing Bowl is aligned
with the recessed part of the Power Base;
then gently press down and rotate the
cup cover clockwise until it locks.
4. Place the Juice Container and the Pulp
Container under the relevant spouts.
06
ASSEMBLING METHOD

07
1. Connect the unit with Power.
2. Check and make sure all parts are well assembled in the correct position.
3. Make sure the machine is at “O” position.
4. Make sure the juice and pulp containers are in position.
5. Make sure the juice spout cover is closed.
6. Prepare the fruits or vegetables and cut them into pieces max
5 cm x 10 cm / 1.97 x 3.94 inches strips or 5 cm x 5cm / 1.97 x 1.97
inches cubes. Remove hard pits or seeds prior to pressing to prevent
possible damage to the squeezing auger.
7. Put fruit strips/cubes into the chute.
8. Press the switch to setting "━" to start the juicing operation.
9. Push the food down with the pusher only.
10. In case of food stuck inside the Bowl, please switch to “R” reverse
function instantly.
NOTE : Please do not use the juicer continuously longer than 20 minutes.
1. To stop dripping at the end of juicing.
2. To mix the juice with different fruits and veggies.
1. Remove hard pits or seeds prior to pressing to prevent possible damage
to the squeezing auger.
2. If mixed juices are to be made, please begin with harder fruit, and then
squeeze the soft fruit.
3. Please let the juicer run for 30 seconds after the last ingredient was fed.
The juicer is not suitable for juicing very hard or fibrous and starchy fruits or
vegetables such as Sugar Cane. There are some fruits which contain too
much starch to juice, for example Bananas, Mango, Strawberry etc. They
will clog up the stainless steel sieve.
Open & Close of Juice Spout Cover:
Benefits of Drip-stop Cover:
Usage Tips:
Attention:
Juicer spout
is opened Juicer spout
is closed
OPERATION INSTRUCTION
Table of contents
Languages:


