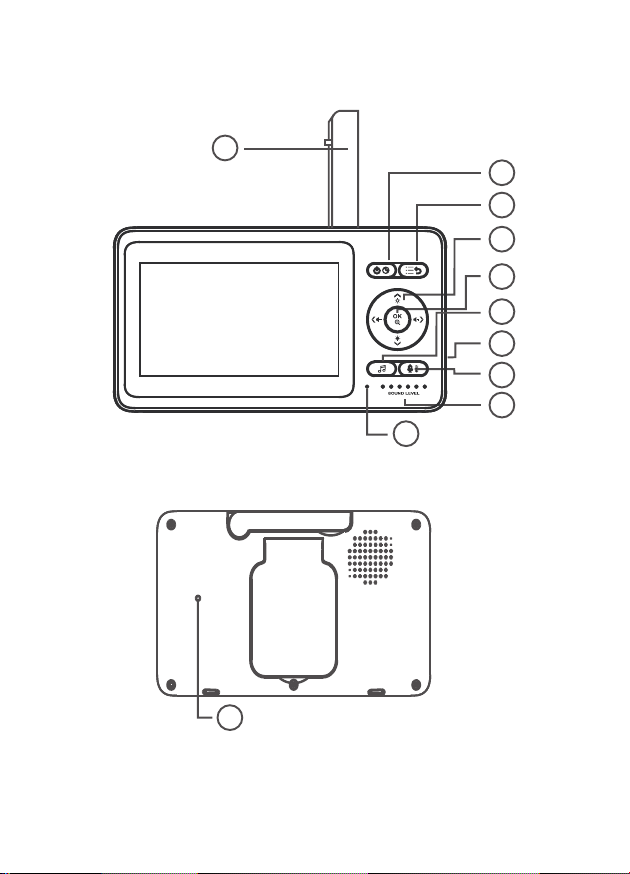
Uniden BW4151 User manual

1
BABY MONITOR
BW4151
For more exciting new products please visit our website:
Australia: www.uniden.com.au
OWNER’S MANUAL

2
This manual contains important information about this product’s
operation. If you are installing this product for others, you must leave this
manual or a copy with the end user.
When using your equipment, always follow basic safety precautions to
reduce the risk of fire, electric shock and injury to persons, including the
following:
• This unit is NOT WATERPROOF. Never submerge the devices in
water or rinse them in running water.
• Always position the device and power cord out of the reach of children.
The power cord could result in strangulation or cause injury to
children.
• Keep small parts out of the reach of children (risk of swallowing).
• Keep packaging material away from children (risk of suffocation).
• Never place the Baby Unit in the cot or within the reach of your child.
• Make sure that cables are out of the reach of your child (risk of electric
shock).
• Always make sure that the devices are fully functioning before use.
• Only use the AC adaptors included with the unit.
• Do not use the cable to pull the AC adaptor plug out of the socket.
• Disconnect the AC adaptor plug from the mains when the device is not
in use.
• The device and the AC adaptor should not come into contact with hot
surfaces or sharp objects.
• Do not use any additional parts that are not recommended by the
manufacturer or offered as equipment.
• After use, before cleaning and changing any accessory parts, the AC
adaptor should always be disconnected.
IMPORTANT SAFETY INSTRUCTIONS

3
Failure to follow these warnings and the assembly instructions could
result in serious injury or death. This product is not designed or intended
for use as a medical monitor, nor should this product be used as a
substitution for medical or parental supervision. Always be sure that both
the transmitter and monitor are working properly, and are within range of
each other.
STRANGULATION HAZARD. Keep the adaptor cords out of the reach
of children.
WARNING: KEEP OUT OF THE REACH OF CHILDREN.
Allow for proper ventilation when units are in use. Do not cover the
camera or monitor with any object such as a blanket. Do not place it in a
drawer or in any location which would muffle the sound or interfere with
the normal flow of air.
Warning to Parents and Other Users
To avoid damage to your equipment, follow these simple precautions:
• Do not drop, puncture or disassemble any part of the equipment.
There are no user-serviceable parts inside.
• Do not expose the equipment to high temperatures, and avoid leaving
the equipment in direct sunlight for more than a few minutes. Heat can
damage the case or electrical parts.
• Do not place heavy items on top of the equipment or expose the
equipment to heavy pressure.
• Remove the power adaptor during long periods between usages.
• Clean only with a dry cloth.
Failure to follow the instructions in this operating manual will void
the warranty. Uniden assumes no liability for damages to property
or injury to persons caused by improper handling or failure to
comply with these safety instructions.
SAVE THESE INSTRUCTIONS!
For best results

4
CONTENTS
IMPORTANT SAFETY PRECAUTIONS .....................................2
CONTENTS ..................................................................................4
WHAT’S IN THE BOX? ................................................................5
GETTING STARTED ................................................................ 6
INSTALLATION ...................................................................... 10
General Placement Considerations ....................................... 10
Mounting the Camera on the Wall .......................................... 10
Powering the Camera ............................................................ 11
Powering the Camera ............................................................ 12
SYSTEM MENUS .............................................................13
Monitor Function Settings ................................. ....................... 13
Camera Settings ............................................... ....................... 14
Alert Settings ........ ............................................ ....................... 16
System Settings ........ ....................................... ....................... 17
TROUBLESHOOTING .................................................... 20
SPECIFICATIONS ........................................................... 21
TWO-YEAR LIMITED WARRANTY................................ 22

5
• Image may vary slightly from the actual product.
• If any item is missing or damaged, contact your place of purchase
immediately. Never use damaged products!
• Need help? Get answers at our website:
www.uniden.com.au for Australian model.
All trademarks are registered trademarks of their respective owners.
WHAT’S INSIDE THE BOX
Camera
Micro USB Cable x 2
USB Power
Adaptor x 2
Monitor

6
1
3
2
4
6
8
7
5
GETTING STARTED
1
3
2
4
6
8
7
5
CAMERA

7
Item What it does
1 Light sensor: Measures light intensity on the camera side.
2Camera lens.
3 Microphone: Receives sounds for the area near the camera,
and transmits sound from the camera to the monitor.
4 Pairing Indicator: Flashing when in pairing mode. At any
other time is disabled, the LED indicator is disabled.
5 Temperature sensor: Detects temperature at camera side
and displays it on the monitor LCD.
6 Speaker
7 DC 5V Power: Plug in the USB cable.
8PAIR: Pairs the camera to the monitor.

8
11
12
13
14
15
16
18
9
10
19
17
MONITOR

9
Item What it does
9 Antenna: Receives video and audio signals from the camera.
10 POWER: Press and hold to switch on/off the monitor. Press
once to wake up/ turn off the screen.
11 MENU/BACK: Press to display the menu options. In menu,
press to return to previous page. If two cameras are paired,
press to return from single channel view to two channel view.
12 Press the button #16 first to adjust the screen brightness or
the monitor volume.
In two channel view, press the ◄ or ► button to select the
camera and press OK to view the camera in single view.
▲: • In Live View: Tilt up.
• Increase screen brightness.
◄: • In Live View: Pan left.
• Decrease speaker volume.
• In Menus: Scroll left.
▼: • In Live View: Tilt down.
• Decrease screen brightness.
►: • In Live view: Pan right.
• Increase speaker volume.
• In Menus: Scroll right.
13 OK:
• In Menus: Press down to select a menu or accept a setting.
• In Live view: Press to zoom in/out.
14 LULLABY: Press this button to enter lullabies selection.
15 DC 5V Power: Plug in the USB cable.
16 TALK: Press and hold to activate Intercom function.
BRIGHTNESS & VOLUME: Press once to activate screen
brightness and volume button.
17 LED light bar. The LEDs indicate sound level. The most right
LED indicate the battery is charging or the device is powered
by an external source.
18 Microphone: Receives sounds for the area near the monitor,
and transmits sound from the monitor to the camera.
19 Reset

10
General Placement Considerations
The camera can be placed on a shelf or other flat surface.
• The camera included is NOT weatherproof; it is an indoor camera.
• The clearest line-of-sight between the camera and the monitor is
best. Walls, especially brick and concrete, can affect connection
quality.
• Avoid having a direct light source in view of the camera (ceiling or
floor lamps).
• Carefully plan where and how the camera will be positioned, and
where you will route the cable that connects the camera to the power
adaptor.
• Do not cover or obstruct the inlet holes for the temperature sensors
and leave the sensor horizontal for more accurate reading. The
temperature reading is for reference only and there may be some
variance between the actual temperature and the temperature
reading.
INSTALLATION

11
Powering the Camera
1. Insert one end of the micro USB cable to the micro USB port on the
camera (at the back of the camera).
2. Connect the other end of the USB cable into the USB power adaptor.
3. Connect the USB power adaptor into a 240 volt AC (standard indoor)
power outlet.
4. Switch on the plug and allow the camera to power up. The pairing
indicator will flash momentarily.

12
Powering the Monitor
1. Place the monitor in a location with clear reception from your
camera(s).
2. If you are using the monitor as a stand-alone
unit, flip out the stand on the back of the
monitor and extend the antenna.
3. Insert one end of the micro USB cable to the
micro USB port on the side of the monitor.
4. Connect the other end of the USB cable into
the USB power adaptor.
5. Connect the USB power adaptor into a 240
volt AC (standard indoor) power outlet.
6. Press and hold the POWER button to turn
the unit on or off. Let the monitor charge for 6 hours prior to first time
use so the built-in rechargeable monitor battery is fully charged. DO
NOT remove the charging cable from the monitor during the initial
charge process. After the initial charge, recharge the monitor as
needed.
7. Out of range displays until you turn on the camera.
#You can install additional cameras (maximum of 2 cameras). When
adding cameras that were not included in the original box, you will need
to pair the cameras with the monitor.

13
Monitor Function Settings
Functions of the Babysitter is user definable, to best satisfy your
demands. Temperature alerts may offer automatic notification to you.
This chapter will introduce the user-definable settings item by item.
Access Monitor Menu
In states of live view, press MENU button on the monitor can enter into
MENU list; In states of non-live view, press MENU button on the monitor
can return to previous interface level.
OK:SelectMENU:Return
Access receiver menu Camera settings
OK:SelectMENU:Return
1 2
Start pairing, please press
the SET button on the camera.
OK:SelectMENU:Return
1 2
Alarm settings
Camera settings
Lullabies settings
OK:SelectMENU:Return
OK:SelectMENU:ReturnOK :SelectMENU:Return
0 9 :0 0 >
1 2 :0 0
1 5 :0 0
1 8 :0 0
OK:SelectMENU:ReturnOK :SelectMENU:Return
≤14 ≥29
ON
OFF
°c
°F
Middle
LowHighOff
OK:SelectMENU:Return
System settings
O S D:
YYYY-MM-DD:
HH-MM-SS:
OK:SelectMENU:ReturnOK :SelectMENU:Return
YESNO
Restore to default settings?
OK:SelectMENU:ReturnOK :SelectMENU:Return
OFF
20s40s60s
OK:SelectMENU:ReturnOK :SelectMENU:Return
Firmware settings
Rx:
Rx Date:
Tx :
Tx Da t e :
Tx :
Tx Da t e :
OK:SelectMENU:Return
1
2
MENU:Return
SYSTEM MENUS

14
Camera Settings (camera pairing and
deletion)
Add camera
1. Select Camera, and press OK to enter the function.
2. Select the channel to be paired, and press OK to confirm. Then
select “Add Camera” and press OK to confirm.
3. When the device prompts “Start pairing, please press the SET button
on the camera.”, press the SET button on the camera, and at this
point, the device enters pairing mode. After pairing succeeds, the
screen will jump to a real-time monitoring screen.
OK:SelectMENU:Return
Access receiver menu Camera settings
OK:SelectMENU:Return
1 2
Start pairing, please press
the SET button on the camera.
OK:SelectMENU:Return
1 2
Alarm settings
Camera settings
Lullabies settings
OK:SelectMENU:Return
OK:SelectMENU:ReturnOK :SelectMENU:Return
0 9 :0 0 >
1 2 :0 0
1 5 :0 0
1 8 :0 0
OK:SelectMENU:ReturnOK :SelectMENU:Return
≤14 ≥29
ON
OFF
°c
°F
Middle
LowHighOff
OK:SelectMENU:Return
System settings
O S D:
YYYY-MM-DD:
HH-MM-SS:
OK:SelectMENU:ReturnOK :SelectMENU:Return
YESNO
Restore to default settings?
OK:SelectMENU:ReturnOK :SelectMENU:Return
OFF
20s40s60s
OK:SelectMENU:ReturnOK :SelectMENU:Return
Firmware settings
Rx:
Rx Date:
Tx :
Tx Da t e :
Tx :
Tx Da t e :
OK:SelectMENU:Return
1
2
MENU:Return
OK:SelectMENU:Return
Access receiver menu Camera settings
OK:SelectMENU:Return
1 2
Start pairing, please press
the SET button on the camera.
OK:SelectMENU:Return
1 2
Alarm settings
Camera settings
Lullabies settings
OK:SelectMENU:Return
OK:SelectMENU:ReturnOK :SelectMENU:Return
0 9 :0 0 >
1 2 :0 0
1 5 :0 0
1 8 :0 0
OK:SelectMENU:ReturnOK :SelectMENU:Return
≤14 ≥29
ON
OFF
°c
°F
Middle
LowHighOff
OK:SelectMENU:Return
System settings
O S D:
YYYY-MM-DD:
HH-MM-SS:
OK:SelectMENU:ReturnOK :SelectMENU:Return
YESNO
Restore to default settings?
OK:SelectMENU:ReturnOK :SelectMENU:Return
OFF
20s40s60s
OK:SelectMENU:ReturnOK :SelectMENU:Return
Firmware settings
Rx:
Rx Date:
Tx :
Tx Da t e :
Tx :
Tx Da t e :
OK:SelectMENU:Return
1
2
MENU:Return

15
Lullabies
The digital wireless baby monitor has 5 lullabies including White Noise.
They can help you lull your baby to sleep.
1. Select Music Play, and press OK to enter the function. If two
cameras are paired to the monitor, select the camera that you wish to
play music.
2. Select the music you want to play, press OK to confirm, and the
camera will play the lullaby of your choice. Press OK again, and the
lullaby pauses. Select “All” to play all the lullabies in a loop. After
settings are completed, press MENU to return.
3. You can also play music quickly through the music play button
on the panel.
4. Notice: In the current interface, press keys to switch lullabies;
press keys to adjust the volume.
Delete camera
To replace any camera, the old camera must be deleted first before
adding a new camera.
1. Select Camera, and press OK to enter the function.
2. Select the channel to be deleted, and press OK to confirm. Then
select “Delete Camera” and press OK to confirm.
OK:SelectMENU:Return
Access receiver menu Camera settings
OK:SelectMENU:Return
1 2
Start pairing, please press
the SET button on the camera.
OK:SelectMENU:Return
1 2
Alarm settings
Camera settings
Lullabies settings
OK:SelectMENU:Return
OK:SelectMENU:ReturnOK :SelectMENU:Return
0 9 :0 0 >
1 2 :0 0
1 5 :0 0
1 8 :0 0
OK:SelectMENU:ReturnOK :SelectMENU:Return
≤14 ≥29
ON
OFF
°c
°F
Middle
LowHighOff
OK:SelectMENU:Return
System settings
O S D:
YYYY-MM-DD:
HH-MM-SS:
OK:SelectMENU:ReturnOK :SelectMENU:Return
YESNO
Restore to default settings?
OK:SelectMENU:ReturnOK :SelectMENU:Return
OFF
20s40s60s
OK:SelectMENU:ReturnOK :SelectMENU:Return
Firmware settings
Rx:
Rx Date:
Tx :
Tx Da t e :
Tx :
Tx Da t e :
OK:SelectMENU:Return
1
2
MENU:Return
OK:SelectMENU:Return
Access receiver menu Camera settings
OK:SelectMENU:Return
1 2
Start pairing, please press
the SET button on the camera.
OK:SelectMENU:Return
1 2
Alarm settings
Camera settings
Lullabies settings
OK:SelectMENU:Return
OK:SelectMENU:ReturnOK :SelectMENU:Return
0 9 :0 0 >
1 2 :0 0
1 5 :0 0
1 8 :0 0
OK:SelectMENU:ReturnOK :SelectMENU:Return
≤14 ≥29
ON
OFF
°c
°F
Middle
LowHighOff
OK:SelectMENU:Return
System settings
O S D:
YYYY-MM-DD:
HH-MM-SS:
OK:SelectMENU:ReturnOK :SelectMENU:Return
YESNO
Restore to default settings?
OK:SelectMENU:ReturnOK :SelectMENU:Return
OFF
20s40s60s
OK:SelectMENU:ReturnOK :SelectMENU:Return
Firmware settings
Rx:
Rx Date:
Tx :
Tx Da t e :
Tx :
Tx Da t e :
OK:SelectMENU:Return
1
2
MENU:Return

16
VOX Sensitivity settings
VOX (Voice Activation) allows you to set the sound sensitivity for the
camera. This function identifies the volume of the baby’s sound or crying.
When it is above the set threshold, the monitor screen will lit up when it is
in Eco mode or the screen is in standby mode.
1. Select Alert Settings, press OK to enter the settings page, and
select “Vox Sensitivity” settings.
2. Select “Low, Middle, High, Off” as needed and press OK to confirm.
3. Press BACK button to exit.
Temperature alert settings
When it is too hot or too cold in your baby’s room, the temperature alert
will push a notification to your monitor.
1. Select Alert Settings, press OK to enter the settings page, and
select “Temperature Alert” settings.
2. Select “Celsius, Fahrenheit” as needed and press OK to confirm.
3. Select “Alert” “ON, OFF” as needed.
4. Press BACK button to exit.
OK:SelectMENU:Return
Access receiver menu Camera settings
OK:SelectMENU:Return
1 2
Start pairing, please press
the SET button on the camera.
OK:SelectMENU:Return
1 2
Alarm settings
Camera settings
Lullabies settings
OK:SelectMENU:Return
OK:SelectMENU:ReturnOK :SelectMENU:Return
0 9 :0 0 >
1 2 :0 0
1 5 :0 0
1 8 :0 0
OK:SelectMENU:ReturnOK :SelectMENU:Return
≤14 ≥29
ON
OFF
°c
°F
Middle
LowHighOff
OK:SelectMENU:Return
System settings
O S D:
YYYY-MM-DD:
HH-MM-SS:
OK:SelectMENU:ReturnOK :SelectMENU:Return
YESNO
Restore to default settings?
OK:SelectMENU:ReturnOK :SelectMENU:Return
OFF
20s40s60s
OK:SelectMENU:ReturnOK :SelectMENU:Return
Firmware settings
Rx:
Rx Date:
Tx :
Tx Da t e :
Tx :
Tx Da t e :
OK:SelectMENU:Return
1
2
MENU:Return
OK:SelectMENU:Return
Access receiver menu Camera settings
OK:SelectMENU:Return
1 2
Start pairing, please press
the SET button on the camera.
OK:SelectMENU:Return
1 2
Alarm settings
Camera settings
Lullabies settings
OK:SelectMENU:Return
OK:SelectMENU:ReturnOK :SelectMENU:Return
0 9 :0 0 >
1 2 :0 0
1 5 :0 0
1 8 :0 0
OK:SelectMENU:ReturnOK :SelectMENU:Return
≤14 ≥29
ON
OFF
°c
°F
Middle
LowHighOff
OK:SelectMENU:Return
System settings
O S D:
YYYY-MM-DD:
HH-MM-SS:
OK:SelectMENU:ReturnOK :SelectMENU:Return
YESNO
Restore to default settings?
OK:SelectMENU:ReturnOK :SelectMENU:Return
OFF
20s40s60s
OK:SelectMENU:ReturnOK :SelectMENU:Return
Firmware settings
Rx:
Rx Date:
Tx :
Tx Da t e :
Tx :
Tx Da t e :
OK:SelectMENU:Return
1
2
MENU:Return
Note: There is no audible alert for VOX.
Alert Settings

17
System settings
Time settings
Calibrate time on the monitor.
1. Select Settings, and press OK to enter the settings page.
2. Select Time Settings, and press OK to enter the settings page.
After settings are completed, press OK to confirm.
3. Press BACK button to exit.
Timer Alerts Settings
You can set the a timer to prevent you from forgetting to feed your baby
as busy or for other reasons, which may remind you.
1. Select Alert Settings, press OK to enter the settings page and
select “Alerts” Settings.
2. Select the time periods and quantity of “Alerts” as needed, and press
OK to enter the settings page. After the settings are completed,
press OK to confirm.
3. Press BACK button to exit.
OK:SelectMENU:Return
Access receiver menu Camera settings
OK:SelectMENU:Return
1 2
Start pairing, please press
the SET button on the camera.
OK:SelectMENU:Return
1 2
Alarm settings
Camera settings
Lullabies settings
OK:SelectMENU:Return
OK:SelectMENU:ReturnOK :SelectMENU:Return
0 9 :0 0 >
1 2 :0 0
1 5 :0 0
1 8 :0 0
OK:SelectMENU:ReturnOK :SelectMENU:Return
≤14 ≥29
ON
OFF
°c
°F
Middle
LowHighOff
OK:SelectMENU:Return
System settings
O S D:
YYYY-MM-DD:
HH-MM-SS:
OK:SelectMENU:ReturnOK :SelectMENU:Return
YESNO
Restore to default settings?
OK:SelectMENU:ReturnOK :SelectMENU:Return
OFF
20s40s60s
OK:SelectMENU:ReturnOK :SelectMENU:Return
Firmware settings
Rx:
Rx Date:
Tx :
Tx Da t e :
Tx :
Tx Da t e :
OK:SelectMENU:Return
1
2
MENU:Return
OK:SelectMENU:Return
Access receiver menu Camera settings
OK:SelectMENU:Return
1 2
Start pairing, please press
the SET button on the camera.
OK:SelectMENU:Return
1 2
Alarm settings
Camera settings
Lullabies settings
OK:SelectMENU:Return
OK:SelectMENU:ReturnOK :SelectMENU:Return
0 9 :0 0 >
1 2 :0 0
1 5 :0 0
1 8 :0 0
OK:SelectMENU:ReturnOK :SelectMENU:Return
≤14 ≥29
ON
OFF
°c
°F
Middle
LowHighOff
OK:SelectMENU:Return
System settings
O S D:
YYYY-MM-DD:
HH-MM-SS:
OK:SelectMENU:ReturnOK :SelectMENU:Return
YESNO
Restore to default settings?
OK:SelectMENU:ReturnOK :SelectMENU:Return
OFF
20s40s60s
OK:SelectMENU:ReturnOK :SelectMENU:Return
Firmware settings
Rx:
Rx Date:
Tx :
Tx Da t e :
Tx :
Tx Da t e :
OK:SelectMENU:Return
1
2
MENU:Return

18
Language selection
Switch language displayed on the monitor.
1. Select Settings, and press OK to enter the settings page.
2. Select Language Settings, and press OK to enter the settings
page. Select a language you need and press OK to confirm.
3. Press BACK button to exit.
Alert sound On/Off
Switch the alert sound “ON/OFF” on the monitor.
1. Select Settings, and press OK to enter the settings page.
2. Select Alert Sound Settings, and press OK to enter the settings
page.
3. Select “ON/OFF” and press OK to confirm.
4. Press BACK button to exit.
Power saving mode
You can set the monitor to automatically enter Power saving mode. The
monitor will automatically enter energy saving state according to the
length of time you set.
1. Select Settings, and press OK to enter the settings page.
2. Select Eco Mode, and press OK to enter the settings page.
Select a time that suits your need and press OK to confirm.
3. Note: There are three options for sleep time: 20 seconds, 40 seconds,
and 60 seconds. You can choose according to your needs. Selecting
“OFF” and pressing OK will turn off the Power saving mode.
4. Press BACK button to exit.
OK:SelectMENU:Return
Access receiver menu Camera settings
OK:SelectMENU:Return
1 2
Start pairing, please press
the SET button on the camera.
OK:SelectMENU:Return
1 2
Alarm settings
Camera settings
Lullabies settings
OK:SelectMENU:Return
OK:SelectMENU:ReturnOK :SelectMENU:Return
0 9 :0 0 >
1 2 :0 0
1 5 :0 0
1 8 :0 0
OK:SelectMENU:ReturnOK :SelectMENU:Return
≤14 ≥29
ON
OFF
°c
°F
Middle
LowHighOff
OK:SelectMENU:Return
System settings
O S D:
YYYY-MM-DD:
HH-MM-SS:
OK:SelectMENU:ReturnOK :SelectMENU:Return
YESNO
Restore to default settings?
OK:SelectMENU:ReturnOK :SelectMENU:Return
OFF
20s40s60s
OK:SelectMENU:ReturnOK :SelectMENU:Return
Firmware settings
Rx:
Rx Date:
Tx :
Tx Da t e :
Tx :
Tx Da t e :
OK:SelectMENU:Return
1
2
MENU:Return

19
Restore to default settings
Restore the monitor to default settings.
1. Select Settings, and press OK to enter the settings page.
2. Select Restore to Default Settings, and press OK to enter the
settings page.
3. The device will prompt “Restore to default settings?”. Select YES and
press OK to confirm. The device begins to execute a factory reset.
4. Press BACK button to exit.
View version information
View version information of the monitor and camera.
1. Select Settings, and press OK to enter the settings page.
2. Select Version Information, and press OK to enter the version
information view page.
3. Press BACK button to exit.
OK:SelectMENU:Return
Access receiver menu Camera settings
OK:SelectMENU:Return
1 2
Start pairing, please press
the SET button on the camera.
OK:SelectMENU:Return
1 2
Alarm settings
Camera settings
Lullabies settings
OK:SelectMENU:Return
OK:SelectMENU:ReturnOK :SelectMENU:Return
0 9 :0 0 >
1 2 :0 0
1 5 :0 0
1 8 :0 0
OK:SelectMENU:ReturnOK :SelectMENU:Return
≤14 ≥29
ON
OFF
°c
°F
Middle
LowHighOff
OK:SelectMENU:Return
System settings
O S D:
YYYY-MM-DD:
HH-MM-SS:
OK:SelectMENU:ReturnOK :SelectMENU:Return
YESNO
Restore to default settings?
OK:SelectMENU:ReturnOK :SelectMENU:Return
OFF
20s40s60s
OK:SelectMENU:ReturnOK :SelectMENU:Return
Firmware settings
Rx:
Rx Date:
Tx :
Tx Da t e :
Tx :
Tx Da t e :
OK:SelectMENU:Return
1
2
MENU:Return
OK:SelectMENU:Return
Access receiver menu Camera settings
OK:SelectMENU:Return
1 2
Start pairing, please press
the SET button on the camera.
OK:SelectMENU:Return
1 2
Alarm settings
Camera settings
Lullabies settings
OK:SelectMENU:Return
OK:SelectMENU:ReturnOK :SelectMENU:Return
0 9 :0 0 >
1 2 :0 0
1 5 :0 0
1 8 :0 0
OK:SelectMENU:ReturnOK :SelectMENU:Return
≤14 ≥29
ON
OFF
°c
°F
Middle
LowHighOff
OK:SelectMENU:Return
System settings
O S D:
YYYY-MM-DD:
HH-MM-SS:
OK:SelectMENU:ReturnOK :SelectMENU:Return
YESNO
Restore to default settings?
OK:SelectMENU:ReturnOK :SelectMENU:Return
OFF
20s40s60s
OK:SelectMENU:ReturnOK :SelectMENU:Return
Firmware settings
Rx:
Rx Date:
Tx :
Tx Da t e :
Tx :
Tx Da t e :
OK:SelectMENU:Return
1
2
MENU:Return

20
If Try
There is no picture
from the camera
• checking all connections to the camera. Make
sure the adaptor is plugged in.
• making sure that the cameras and monitor are
both ON.
• making sure that the camera is in range of the
monitor.
The picture keeps
dropping
• moving the camera closer to the monitor.
• repositioning the camera, monitor or both to
improve the reception.
• adjusting the monitor antenna to vertical
position.
There are audio
problems
• making sure that there is sound within range of
the camera microphone.
• moving the camera or monitor farther apart if
the unit emits a loud screeching noise.
There is an irregular
beeping coming
from the monitor
That is the Alert tone. Go to the Alert screen to
turn the alert volume down or off.
The picture has
become choppy
The picture may become choppy when
experiencing a lower frame rate. Try:
• moving the camera closer to the monitor.
• removing obstructions between the monitor
and camera.
• adjusting the monitor and camera antennas to
vertical position.
The monitor picture
has frozen
Use a blunt object like a paper clip to press
RESET and reset the monitor. The monitor turns
off. Press POWER to turn it back on again.
TROUBLESHOOTING
If you have problems with the system, there is often a quick and simple
solution. Please try the following:
Table of contents
Other Uniden Baby Monitor manuals

Uniden
Uniden UBW2101 User manual

Uniden
Uniden BW5151R Series User manual

Uniden
Uniden BW4351 User manual

Uniden
Uniden BW6141R Series User manual

Uniden
Uniden BW618PTR User manual

Uniden
Uniden BW6101R Series User manual

Uniden
Uniden BW30xx Series User manual

Uniden
Uniden BW140R User manual

Uniden
Uniden BW615PTR User manual

Uniden
Uniden Guardian UBR243 User manual

Uniden
Uniden BW3451R+1 User manual

Uniden
Uniden BW120 User manual

Uniden
Uniden BW6151R Series User manual

Uniden
Uniden BW610R User manual

Uniden
Uniden BW614PTR User manual

Uniden
Uniden Lullaboo G403 User manual

Uniden
Uniden Guardian UBR223 User manual

Uniden
Uniden BW4301 User manual

Uniden
Uniden BW2001 User manual

Uniden
Uniden BW30 Series User manual