manuals.online logo
Brands
  1. Home
  2. •
  3. Brands
  4. •
  5. Uniden
  6. •
  7. Gateway
  8. •
  9. Uniden UOE1600 User manual

Uniden UOE1600 User manual

Other Uniden Gateway manuals

Uniden VG-100 User manual

Uniden

Uniden VG-100 User manual

Uniden UOE1600-GW User manual

Uniden

Uniden UOE1600-GW User manual

Popular Gateway manuals by other brands

Telecom FM onestream gfx Programming guide

Telecom FM

Telecom FM onestream gfx Programming guide

UfiSpace LoRa GPE810U Quick setup guide

UfiSpace

UfiSpace LoRa GPE810U Quick setup guide

Merak MMk-736F Quick setup guide

Merak

Merak MMk-736F Quick setup guide

Robustel R3010 user guide

Robustel

Robustel R3010 user guide

turck BL20-PG-EN-V3 user manual

turck

turck BL20-PG-EN-V3 user manual

IBM Security Web Gateway Appliance quick start guide

IBM

IBM Security Web Gateway Appliance quick start guide

SSS Siedle Smart Gateway Commissioning instructions

SSS Siedle

SSS Siedle Smart Gateway Commissioning instructions

ADTRAN 424RG Installation

ADTRAN

ADTRAN 424RG Installation

Chorus Hyperfibre XGS-250WX-A user guide

Chorus

Chorus Hyperfibre XGS-250WX-A user guide

Dragino G308 user manual

Dragino

Dragino G308 user manual

Data Domain DD690g Installation and setup guide

Data Domain

Data Domain DD690g Installation and setup guide

Raritan Laptop Release notes

Raritan

Raritan Laptop Release notes

Haivision Torpedo quick start guide

Haivision

Haivision Torpedo quick start guide

ATCOM AG-268 user manual

ATCOM

ATCOM AG-268 user manual

LST M500RFE-AS Specification sheet

LST

LST M500RFE-AS Specification sheet

Vega VEGA BS-3 user manual

Vega

Vega VEGA BS-3 user manual

Kinnex Media Gateway quick start guide

Kinnex

Kinnex Media Gateway quick start guide

2N Telekomunikace 2N StarGate user manual

2N Telekomunikace

2N Telekomunikace 2N StarGate user manual

manuals.online logo
manuals.online logoBrands
  • About & Mission
  • Contact us
  • Privacy Policy
  • Terms and Conditions

Copyright 2025 Manuals.Online. All Rights Reserved.

Powering up
1. Plug the UOE1600 in and allow it to power up without connecting any
telephones. When the power LED stops flashing the UOE1600 will be fully
powered up and operational.
2. Use an Ethernet cable to connect your Personal Computer, Laptop or Desktop
running Windows XP, Vista or Windows7/8, to the LAN port of the UOE1600.
3. Open your browser and enter 192.168.123.1 in the address bar, and press
enter. When prompted enter the user name, which is “admin1234” and
password which is the word “admin” plus the last 6 alphanumeric characters of
the system’s “WAN MAC” address (lower case), which is found on the label on
the back of the system.
4. Attention: To secure your system against unwanted outside intrusion we
strongly recommend that the first thing you do is change all of the
System’s Passwords! Before you begin programming you should change all
three levels of passwords, admin1234, support and user. A password of up to
16 alphanumeric characters may be used and we recommend that you use at
least 10.
The best passwords consist of upper and lower case characters and includes a
special character.
MAKE SURE TO MAKE A NOTE OF YOUR PASSWORD!
To change the password, log in as the Administrator go to:
Management --> Access Control --> Password
Default Login and Passwords:
Level/Rights
Login
Default Password
New Password
Administrator
admin1234
adminxxxxxx
Administrator
support
supportxxxxxx
User (Limited)
user
userxxxxxx
xxxxxx = The last 6 alphanumeric characters of the system’s WAN MAC
Address (lower case)
5. Although the UOE1600 system comes up fully operational you may want to
make some programming changes. You can do this manually or use the
Wizard to walk you through the most common programming
parameters.
6. Use the provided Ethernet cable to connect the UOE1600 WAN
port to your network router or network switch, depending on your
network configuration choice.
7. Connect your UIP3000 (or UIP6000) telephones to your network router or
switch, one at a time, allowing each of them to authenticate. The first one will
be assigned extension 201. Each additional UIP3000 or UIP6000 telephone
will automatically authenticate and be assigned the next available extension
number.
8. Change the Extension Password - The UOE1600 allows your UIP3000 or
UIP6000 telephones to automatically authenticate with the system. The
password will be a randomly generated 10-digit number. It is a good idea to
change the password from the UOE1600 “Phone Extension Table” on all
extensions to a unique 6 to 10 digit alphanumeric password that has both upper
and lower case letters.
BE SURE TO MAKE A NOTE OF YOUR NEW PASSWORDS!
At Default:
• Extension 201 is the Attendant Extension. (dial 0)
• All incoming telephone line calls will be picked up by the auto attendant.
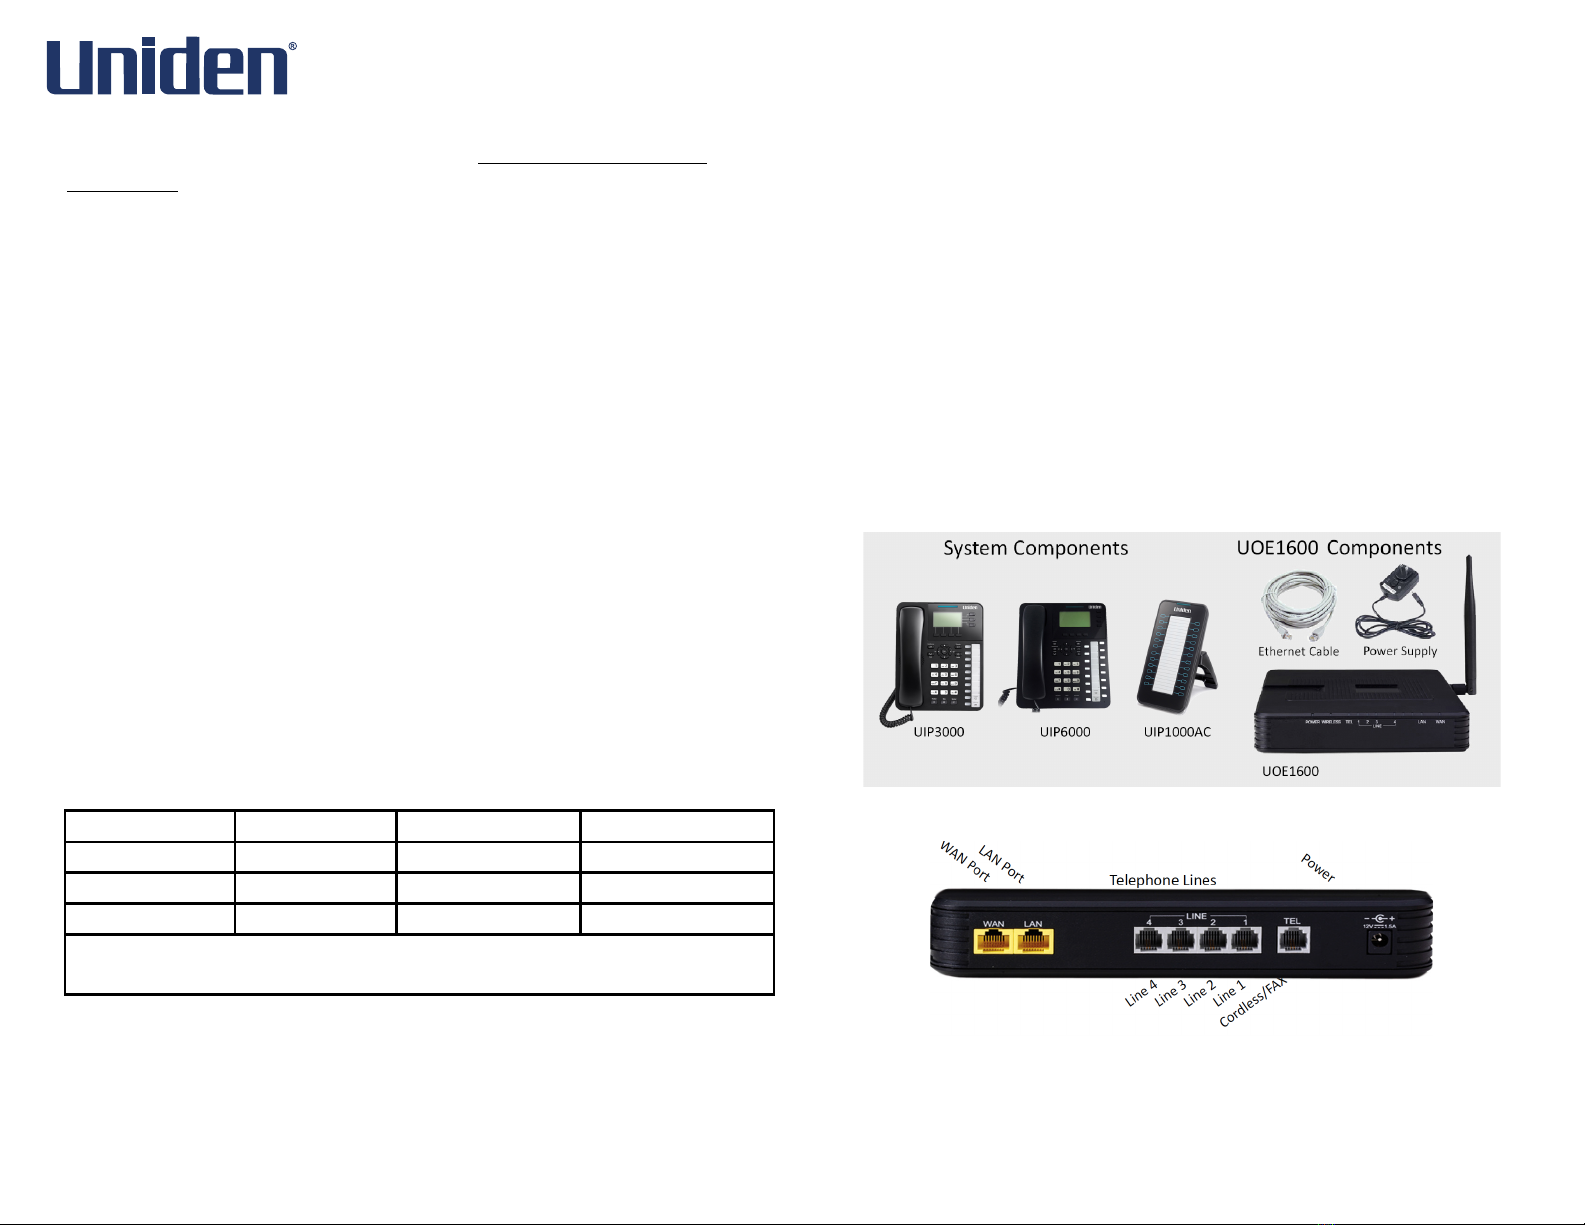
Installation Components
Getting Started
The UOE1600 can be installed several different ways. Installing the UOE1600 as
below will allow the system to synchronize the time and date from the Internet
and also connect low cost Uniden Office Express™ VoiP lines.
Network Configuration Choices
Connecting to an Existing Network:
Connect the WAN port of your UOE1600 to your existing network, leaving the
LAN port disconnected after using it for the initial installation programming. (You
need to enable UPnP server setting in router or setup router’s DMZ to UOE1600.)
Remote Phones Connecting to an Existing Network:
Obtain a static IP address from your Internet Service Provider (ISP) or use
dynamic IP address with Dynamic DNS. (Please check UOE1600 Administration
Guide for the further information.) Connect the WAN port of your UOE1600 to a
dedicated network switch (purchased separately) and enter the Static IP address
in the WAN programming of the UOE1600, without connecting the LAN. UIP3000
or UIP6000 should be pre-configured SIP Proxy settings as UOE1600’s WAN IP
address. (Please check UIP3000 and UIP6000 manuals for the further
information)
Using the UOE1600 as a Router and Connecting Remote Phones:
Obtain a static IP address from your Internet Service Provider (ISP) or use
dynamic IP address with Dynamic DNS. (Please check UOE1600 Administration
Guide for the further information). Connect the WAN port of your UOE1600 to the
ISP Modem and use the LAN port to connect all of your phones and computers.
Connecting Telephone Lines:
You can connect up to four (4) analog (standard or PSTN) telephone lines to your
UOE1600. Connect one line to each port, in the order that you want them to ring
1 – 4.
In this configuration you should
contact your ISP and have
them place their modem into
bridge mode, allowing the
UOE1600 to authenticate
directly to the ISP.
Telephone
Company Lines
Use the telephone line
cords to connect the
telephone lines to the
UOE1600.