Unimac CB200 User manual

Three-in-One Air Brad Nailer
User Manual
[Revision 2.0 April 2017]
READ THIS MANUAL CAREFULLY BEFORE USE AND KEEP FOR FUTURE REFERENCE – FAILURE TO DO
SO MAY RESULT IN INJURY, PROPERTY DAMAGE AND MAY VOID WARRANTY. • Products covered by this
manual may vary in appearance, assembly, inclusions, specifications, description and packaging.

Three-in-One Air Brad Nailer
E&OE ©2017Unimac i
Table of Contents
PREFACE...................................................................................................................................................................... 2
SAFETY INFORMATION.............................................................................................................................................. 2
ASSEMBLY.................................................................................................................................................................. 4
Air System.....................................................................................................................................................4
Loading Fasteners.........................................................................................................................................4
OPERATING INSTRUCTIONS...................................................................................................................................... 5
Using the Nailer.............................................................................................................................................5
Clearing a Jammed Fastener ........................................................................................................................5
REGULAR MAINTENANCE.......................................................................................................................................... 5
TROUBLESHOOTING ................................................................................................................................................... 6
EXPLODED PARTS DRAWING ....................................................................................................................................7
PARTS LIST................................................................................................................................................................. 8
SPECIFICATIONS........................................................................................................................................................10

Three-in-One Air Brad Nailer
E&OE ©2017Unimac 2
Preface
Thanks for buying the Nailer, another high-quality machine from our company.
To get the most out of your purchase, please read the manual before using the Nailer.
We ask you to please read this manual carefully beforehand to familiarise yourself with this product and after
reading, please store this instructional manual for future reference. Failure to follow the proper protocols listed in
the manual may cause personal injury to the operator or damage to equipment.
Safety Information
WARNING! ENSURE THAT NO PART OF ANY HUMAN, ANIMAL OR CLOTHING IS PLACED IN/NEAR THE
AREA WHERE NAILS ARE FIRED OUT OF THE GUN, REGARDLESS OF WHETHER YOU THINK THE GUN IS
EMPTY OR LOADED WITH NAILS.
•Keep your working area clean.
•Do not allow children to enter areas where the nailer is stored or in use, or handle the nailer even if the nailer
is unpowered.
•Do not operate the nailer under the influence of alcohol or drugs.
•Use safety glasses. Safety glasses should conform to ANSI Z87.1 specifications. Safety glasses should be
worn when loading, operating, unloading or servicing the nailer.
•Use ear protection. Exposure to high noise levels can lead to hearing damage.
•Never use oxygen combustible gases, bottled gases or high pressure compressed gas as a power source
for this tool as it may explode and cause serious injury.
•Dress safely. Protective gloves and non-skid footwear or safety shoes are recommended when working with
and operating the nailer. Do not wear loose clothing or jewellery as they can get caught in moving parts.
Also, wear a protective hair covering to prevent your hair from getting caught in the nailer.
•When operating the tool, keep proper footing and balance to avoid damage resulting from losing balance.
•Before using the tool, carefully check if there are damaged parts.
•Replace parts and accessories. Only allow the use of the same replacement parts while servicing. Approved
accessories and replacement parts are available.
•Be alert. Watch what you are doing. Use common sense. Do not operate any tools while you are tired.
•Store the nailer when not in use. The nailer should be cleaned, fully assembled and then stored in a dry
location to reduce rust. For safety, keep out of reach of children.
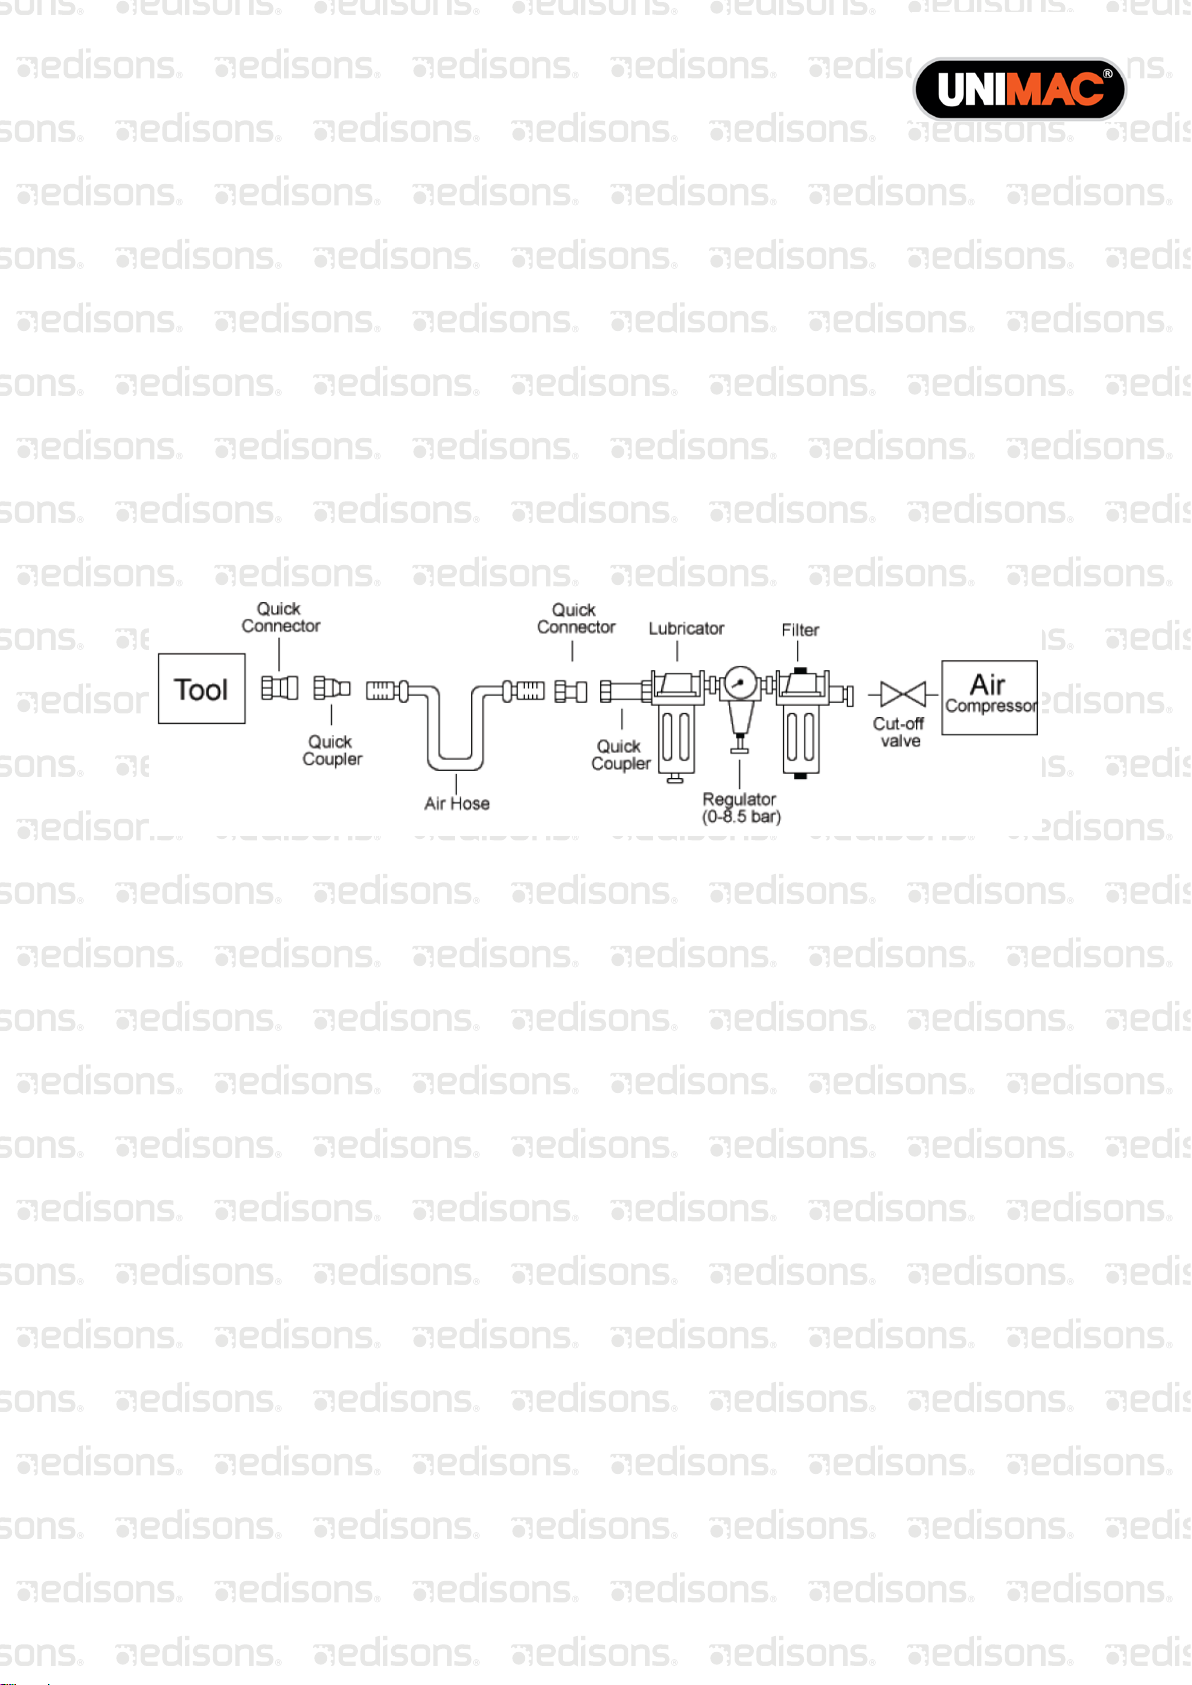
•Pay attention to the air hose and their connections. Don’t trip over hoses. Make sure that all connections are
tight.
•After loading the fasteners, never point the nail gun at yourself or others.
•Use the correct air connector. The connector on the nail gun must not hold pressure when the air supply is
disconnected. If the wrong fitting is used, the nail gun can be charged with air after being disconnected and
still be able to drive a fastener.

Three-in-One Air Brad Nailer
E&OE ©2017Unimac 3
•When connecting the air, the nail gun may possibly fire the fasteners as soon as you plug it into the air hose.
Remove all the fasteners before connection.
•Do not press the safety bracket and the trigger when loading.
•If the fasteners are jammed, disconnect the nail gun and remove the jammed fasteners.
•Disconnect the nail gun from the air supply hose before doing maintenance, clearing a jammed fastener,
leaving the work area, moving the nail gun to another location, or handing it to another person.
•Always assume the tool contains fasteners. Do not aim the tool at yourself or others.
•Do not load fasteners with the trigger or safety is pressed to prevent unintentional firing of a fastener.
•Remove your finger from the trigger when not driving fasteners. Never carry a tool with your finger on the
trigger; the gun will fire a fastener if the safety is bumped while the trigger is pressed.
•Grip the nail gun firmly to maintain control, while allowing it to recoil away from the work surface as the
fastener is driven. If the safety bracket is allowed to connect with the work surface again before the trigger is
released, an unwanted fastener may be fired.
•Do not drive fasteners on top of other fasteners, or with the tool at a steep angle; the fastener can ricochet,
causing personal injury.
•Do not drive fasteners close to the edge of the work piece. The work piece is likely to split, allowing the
fastener to fly free or ricochet, causing personal injury.
The warnings and instructions explained in this instruction manual cannot cover all possible conditions and
situation that may occur. Common sense and caution are factors which cannot be built into this product and
must be supplied by the operator.

Three-in-One Air Brad Nailer
E&OE ©2017Unimac 4
Assembly
Air System
•Use clean, dry and regulated compressed air at 4-7 bar (60-100psi).
•Never exceed maximum and minimum pressure. Pressure that is too high or low will cause noise, excess
wear and tear or misfiring.
•When connecting the air supply, always keep hands and body away from the discharge area of the tool.
•A filter-regulator lubrication is required and should be located as close to the tool as possible (see Fig. 1).
•Keep the air filter clean. A dirty filter will reduce air pressure, causing a reduction in power and efficiency.
•For better performance, install a quick connector in your tool and quick coupler on the hose.
•Be sure that all connections in the air supply system are sealed to prevent air loss.
Figure 1
Loading Fasteners
Always disconnect the tool from the compressed air before loading.
When loading the tool, always point the tool away from yourself or others.
Make sure that you are not holding the tool with trigger depressed while loading the
tool.
1. Disconnect the tool from the air supply. Grasp the nailer firmly with one hand.
Press the latch with your thumb and pull the magazine back. Insert the fasteners into the magazine keeping
the point down.
2. Release the latch and pusher. Slide the pusher against the nails until it contacts the nails and locks into
place.
3. Connect the tool to the air supply. Make sure that the air pressure is in the correct range denoted in the
technical data.
4. Test the driving depth in a sample piece of wood before use. If the fastener is being driven too far or not far
enough, adjust the regulator to provide more or less air pressure.
Never operate the nail gun unless the safety nose is in contact with the work piece. Do not operate the nail gun
without fasteners, this will cause damage to the nailer.
Never fire fasteners into the air because this may cause injury to the operator or others.

Three-in-One Air Brad Nailer
E&OE ©2017Unimac 5
Operating Instructions
Using the Nailer
1. Press the safety bracket against the intended project.
2. Hold your intended project down but make sure that the nailer is still far away from your holding hand.
3. Squeeze the trigger.
4. For continuous nailing, squeeze the trigger repeatedly.
Clearing a Jammed Fastener
1. Disconnect the tool from the air supply.
2. Open the latch, check for bent or misfired nails and remove those nails from the lower housing.
3. Use a slender, soft steel rod to push the drive blade to the uppermost position.
4. Use needle nose pliers to remove the jammed fastener.
Regular Maintenance
•Frequent, but not excessive lubrication is required for best performance. Oil added through the airline
connection will lubricate the inside parts. An automatic airline oiler is recommended but oil may be added
manually before every operation or after about 1 hour of continuous use. Only a few drops of oil at a time are
necessary.
•Use only pneumatic tool oil. Do not use detergent oil or additives as these lubricants will cause accelerated
wear-out of the seal.
•Use a small amount of oil on all moving surfaces and pivots.
•Dirt and water in the air supply are major causes of pneumatic tool wear-out. Use a filter/oiler for better
performance and longer life. The filter must have enough flow capacity for the specific application.
•Keep tools clean for better and safer performance. Use non-flammable cleaning solutions (Caution: such
solutions may damage the O-ring and other tool parts do not soak unless necessary).
•Check if there are worn and damaged parts.
•Inspect trigger and safety mechanism to assure the system is complete and functional; no loose or missing
parts, no binding or sticking parts.

Three-in-One Air Brad Nailer
E&OE ©2017Unimac 6
Troubleshooting
Stop using the tool immediately if any of the following problems occur. Repairs or replacement must be done by
a qualified person or an authorised service centre only.
Problem Cause Solution
Air leaking at trigger area O-ring in trigger valve Check/Replace O-ring/Lubricate
Air leaking at the lower portion of the
body and nose
Screw is loose at connecting portion of
the nose and body Tighten screws
O-ring is damaged between body and
nose Check/Replace O-ring/Lubricate
Bumper is damaged Replace the bumper
Air leaking at the upper portion of the
body and cylinder cap Screw is loose at the connecting
portion of the cylinder and body Tighten the screw
Failure to start Tool is dry, lack of lubrication Use pneumatic tool oil
The spring in the cylinder cap is
damaged. Replace the spring in the cylinder
cap
Blade driving fasteners too deeply Safe bracket positioned incorrectly Replace bumper
Air pressure is too high Adjust air pressure
Skipping fasteners/feeding
Intermittently working
Something stuck between the small
piston and small cylinder Disassemble/Clean/Lubricate
O-ring on the small piston is worn out
and damaged Check/Replace O-ring/Lubricate
Tool is dry, lack of lubrication Use pneumatic oil tool
Air pressure is low Adjust air pressure
Connecting screw of nose and body is
loose Tighten all screws
Wrong sized fasteners Use recommended fasteners
Bent fasteners Use recommended fasteners
Small piston bumper is worn out and
damaged Replace bumper and lubricate small
piston
Feed hook is bounded Clean feed hook and torsion spring
Nail length is not correct with loading
space of nail housing Use recommended fasteners
Fasteners are jammed
Wrong size of fasteners Use recommended fasteners
Damaged or worn out driver guide Check and replace the driver
Magazine or nose screw loose/dirty Tighten and clean the magazine

Three-in-One Air Brad Nailer
E&OE ©2017Unimac 7
Exploded Parts Drawing

Three-in-One Air Brad Nailer
E&OE ©2017Unimac 8
Parts List
Refer to the Exploded Parts Drawing for the location of parts listed below.
Item
No. Part No. Description Pcs. Item
No. Part No. Description Pcs.
1 A.03.04.0001 Exhaust valve collar 1 46 A.07.19.0021 Stopper 1
2 A.00.00.0241 Screw 5*35 4 47 A.00.05.0011 Washer #5 2
3 A.09.33.XXXI Cylinder cap 1 48 A.00.00.0201 Screw 5*20 2
4 A.03.11.0021 Seal, air 1 49 A.01.00.0221 Spring 1
5 A.02.00.1361 O-ring 22.9*1.5 1 50 A.00.00.0031 Screw 4*12 5
6 A.03.14.0011 Exhaust valve site 1 51 A.00.05.0001 Washer #4 3
7 A.OI.00.0331 Spring 1 52 A.07.12.0301 Driver guide cover 1
8 A.02.00.0201 O-ring 9.8*2.4 1 53 A.07.11.0641 Release catch 1
9 A.02.00.0571 O-ring 32*2.5 1 54 A.08.01.1251 Plate 1
10 A.03.08.0041 Firing valve piston 1 55 A.08.00.0511 Spacer 1
11 A.02.00.0251 O-ring 13*3 1 56 A.00.00.0071 Screw 4*18 2
12 A.02.00.0461 O-ring 24.5*3 1 57 A.08.01.1241 Driver guide 1
13 A.02.00.0431 O-ring 22.9*2.7 1 58 A.00.11.0001 Pin 1.5*10 1
14 A.06.02.0071 Piston head 1 59 A.00.00.0011 Screw 4*8 2
15 A.06.01.0051 Piston driver coupling 1 60 A.00.04.0011 Nylon nut M5 1
16 A.00.06.0031 Pin 4.2*10 1 61 A.07.06.0221 Magazine support 1
17 A.06.00.0831 Driver blade 1 62 A.03.16.0001 Belt hook 1
18 A.03.05.0021 Collar 1 63 A.00.00.0211 Screw 5*22 1
19 A.02.00.0761 O-ring 44.8*2.6 1 64 A.07.09.0071 Click lever 1
20 A.08.00.0271 Spacer 1 65 A.01.00.0231 Spring 1
21 A.02.00.0501 O-ring 26.59*2.95 1 66 A.07.18.0081 Tail cover 1
22 A.03.03.0231 Cylinder 1 67 A.00.04.0001 Nylon nut M4 1
23 A.03.09.0191 Bumper 1 68 A.07.1
0.0071 Spacer 1
24 A.02.05.0351 Gasket 1 69 A.00.00.0551 Screw 4*38 1
25 A.00.05.0041 Ring 1 70 A.00.06.0061 Step pin 1
26 A.04.09.XXXI Body 1 71 A.00.11.0031 Pin 2*11 2
27 A.03.10.0141 Nozzle 1 72 A.07.08.0241 Steel bar 1
28 A.05.05.0011 Seal, air 1 73 A.01.00.0032 Spring 2
29 A.05.03.0011 Upper remote housing 1 74 A.02.00.1351 O-ring 3*1.25 (red) 1
30 A.OI.04.0011 Spring 1 75 A.07.06.0011 Spring holder (white) 2

Three-in-One Air Brad Nailer
E&OE ©2017Unimac 9
Item
No. Part No. Description Pcs. Item
No. Part No. Description Pcs.
31 A.02.00.0041 O-ring 2.4*1.2 2 76 A.07.07.0181 Pusher 1
32 A.05.04.0021 Remote core 1 77 8.03.00.0021 Piston head set 1
33 A.05.03.0091 Remote housing 1 78 8.06.00.0751 Driver blade set 1
34 A.02.00.0221 O-ring 11*1.9 1 79 8.03.03.0231 Cylinder set 1
35 A.00.11.0051 Pin 2*16 1 80 8.05.03.0021 Trigger valve set 1
36 A.05.01.0011 Releasing blade 1 81 8.05.00.0021 Trigger set 1
37 A.05.00.0141 Trigger 1 82 A.07.00.0671 Upper mag 1
38 A.00.06.0541 Pin 1 83 A.07.01.0861 Lower mag 1
39 A.D7.11.0451 Catch guide plate 1 84 A.07.01.8715 Guide plate 1
40 A.00.11.0191 Pin 3*24 2 85 A.02.04.0371 Grip 1
41 A.02.00.0661 O-ring 37.5*3.55 1 86 A.00.05.0061 E-ring 2.5 1
42 A.10.01.XXX1 Tail cover 1 87 B.07.01.0841 Clip assembly 1
43 A.03.07.XXXX Air plug 1
44 A.02.04.0031 Grip 1
45 A.OS.00.0421 spacer 1

Three-in-One Air Brad Nailer
E&OE ©2017Unimac 10
Specifications
Working Pressure 60-100PSI
Air Inlet Size 1/4" NPT
Compatible fasteners
T50 Brad - 18 Gauge 19-50mm
F50 Finishing - 16/18 Gauge 10-50mm
9040 Narrow Crown Staples - 18 Ga. 10-40mm
Nail Capacity 100 pcs.
Product Dimension (L x W x H) 250 x 60 x 250mm
Product Weight 1.2kg
Note Fasteners are standard and can be purchased at hardware
stores

Three-in-One Air Brad Nailer
E&OE ©2017Unimac 11
Some experts believe that the incorrect or prolonged use of almost any product may
cause serious injury or death. To help reduce your risk of serious injury or death, refer
to the information below. For more information, see www.datastreamserver.com/safety
Consult all documentation, packaging and
product labelling before use. Note that some
products feature documentation available
online. It is recommended to print and retain
the documentation.
Before each use, check the product for
loose/broken/damaged/missing parts, wear or
leaks (if applicable). Never use a product with
loose/broken/damaged/missing parts, wear or
leaks.
Products must be inspected and serviced (if
applicable) by a qualified technician every 6
months. This is based on average residential
use by persons of average size and strength,
and on a property of average metropolitan
size. Use beyond these recommendations
may require more frequent
inspections/servicing.
Ensure that all users of the product have
completed a suitable industry recognised
training course before being allowed access
to the product.
The product has been supplied by a general merchandise
retailer that may not be familiar with your specific application or
description of application. Be sure to attain third-party approval
from a qualified specialist for your application before use,
regardless of any assurances from the retailer or its
representatives.
This product is not intended for use where fail-safe operation is
required. As with any product (for example, automobile,
computer, toaster), there is the possibility of technical issues
that may require the repair or replacement of parts, or the
product itself. If the possibility of such failure and the associated
time it may take to rectify could in any way inconvenience the
user, business or employee, or financially affect the user,
business or employee, then the product is not suitable for your
requirements. This product is not intended for use where
incorrect operation or a failure of any kind, including but not
limited to, a condition requiring product return, replacement,
parts replacement or service by a technician may cause
financial loss, loss of employee time or an inconvenience
requiring compensation.
If this product has been purchased in error when considering
the information presented here, contact the retailer directly for
details of their returns policy, if required.
©2017 Unimac. All rights reserved. No part of this document, including descriptive content, concepts, ideas,
diagrams or images may be reproduced or transmitted in any form or by any means, electronic or mechanical,
including photocopying, scanning or recording, or any information storage and retrieval system, without express
permission or consent from the publisher.
Table of contents
Other Unimac Nail Gun manuals