Unimac CB700 User manual

Pneumatic Air Coil Nailer
User Manual
[Revision 2.0 April 2017]
READ THIS MANUAL CAREFULLY BEFORE USE AND KEEP FOR FUTURE REFERENCE – FAILURE TO DO
SO MAY RESULT IN INJURY, PROPERTY DAMAGE AND MAY VOID WARRANTY. • Products covered by this
manual may vary in appearance, assembly, inclusions, specifications, description and packaging.

Pneumatic Air Coil Nailer
E&OE ©2017Unimac i
Table of Contents
IMPORTANT SAFETY INSTRUCTIONS...................................................................................................................... 1
FASTENER SPECIFICATIONS..................................................................................................................................... 4
TECHNICAL SPECIFICATIONS ................................................................................................................................... 5
IN THE BOX.................................................................................................................................................................. 5
OPERATING INSTRUCTIONS...................................................................................................................................... 6
Foreword.......................................................................................................................................................6
Power Source................................................................................................................................................6
Preparing the Tool.........................................................................................................................................7
USING THE TOOL ........................................................................................................................................................ 8
Firing Fasteners ............................................................................................................................................8
Clearing a Jammed Fastener ........................................................................................................................9
MAINTENANCE ...........................................................................................................................................................10
Clean and Inspect the Tool Daily.................................................................................................................10
Service and Repairs....................................................................................................................................10
TROUBLESHOOTING ................................................................................................................................................... 11
EXPLODED PARTS DRAWING ..................................................................................................................................13
PARTS LIST................................................................................................................................................................14

Pneumatic Air Coil Nailer
E&OE ©2017Unimac 1
Important Safety Instructions
Ensure that no part of any human, animal or clothing is placed in/near the area where
nails are fired out of the gun, regardless of whether you think the gun is empty or loaded
with nails.
Please make certain that the person who is to use this equipment carefully reads and
understands these instructions before starting operations.
WARNING: When using pneumatic tools, basic safety precautions should always be followed to reduce the risk of
personal injury, including the following:
Read and follow all instructions.
There are certain applications for which this tool was designed. We strongly recommend that this tool SHOULD
NOT be modified and/or used for any application other than for which it was designed. If you have any questions
relative to its application, please contact your local seller.
1. KEEP WORKING AREA CLEAN.
Cluttered areas invite injuries.
2. DON’T ALLOW CHILDREN IN THE WORKING AREA.
Do not let them handle the tool.
3. Use safety glasses.
To prevent eye injuries, the tool operator and all persons in/near
the working area must wear safety glasses with permanently
attached, rigid, plastic side shields. These safety glasses must
conform to ANSI Z87.1 requirements (approved glasses have “Z87”
printed or stamped on them.)
4. Use ear protection.
The working area may be exposed to high noise levels that can
lead to hearing damage.
5. Dress safely.
Protective gloves and non-skid footwear or safety shoes are
recommended when working with and operating this tool. Don't
wear loose clothing or jewellery. They can get caught in moving
parts. Also, wear a protective hair covering to prevent long hair
from getting caught in the tool.
6. Use only clean, dry and regulated compressed air at 70 to
120 PSI (5 to 8.3 BAR).
7. Never use oxygen, carbon dioxide, combustible gases or any
other bottled gas as a power source for this tool.
8. Do not connect the tool to pressure levels that potentially
exceed 180 PSI (12.3 BAR).
9. Use only an air hose that is rated for 150% of the
maximum system pressure. Please try to use a hose of ID 3/8”
connecting nailer with compressor.

Pneumatic Air Coil Nailer
E&OE ©2017Unimac 2
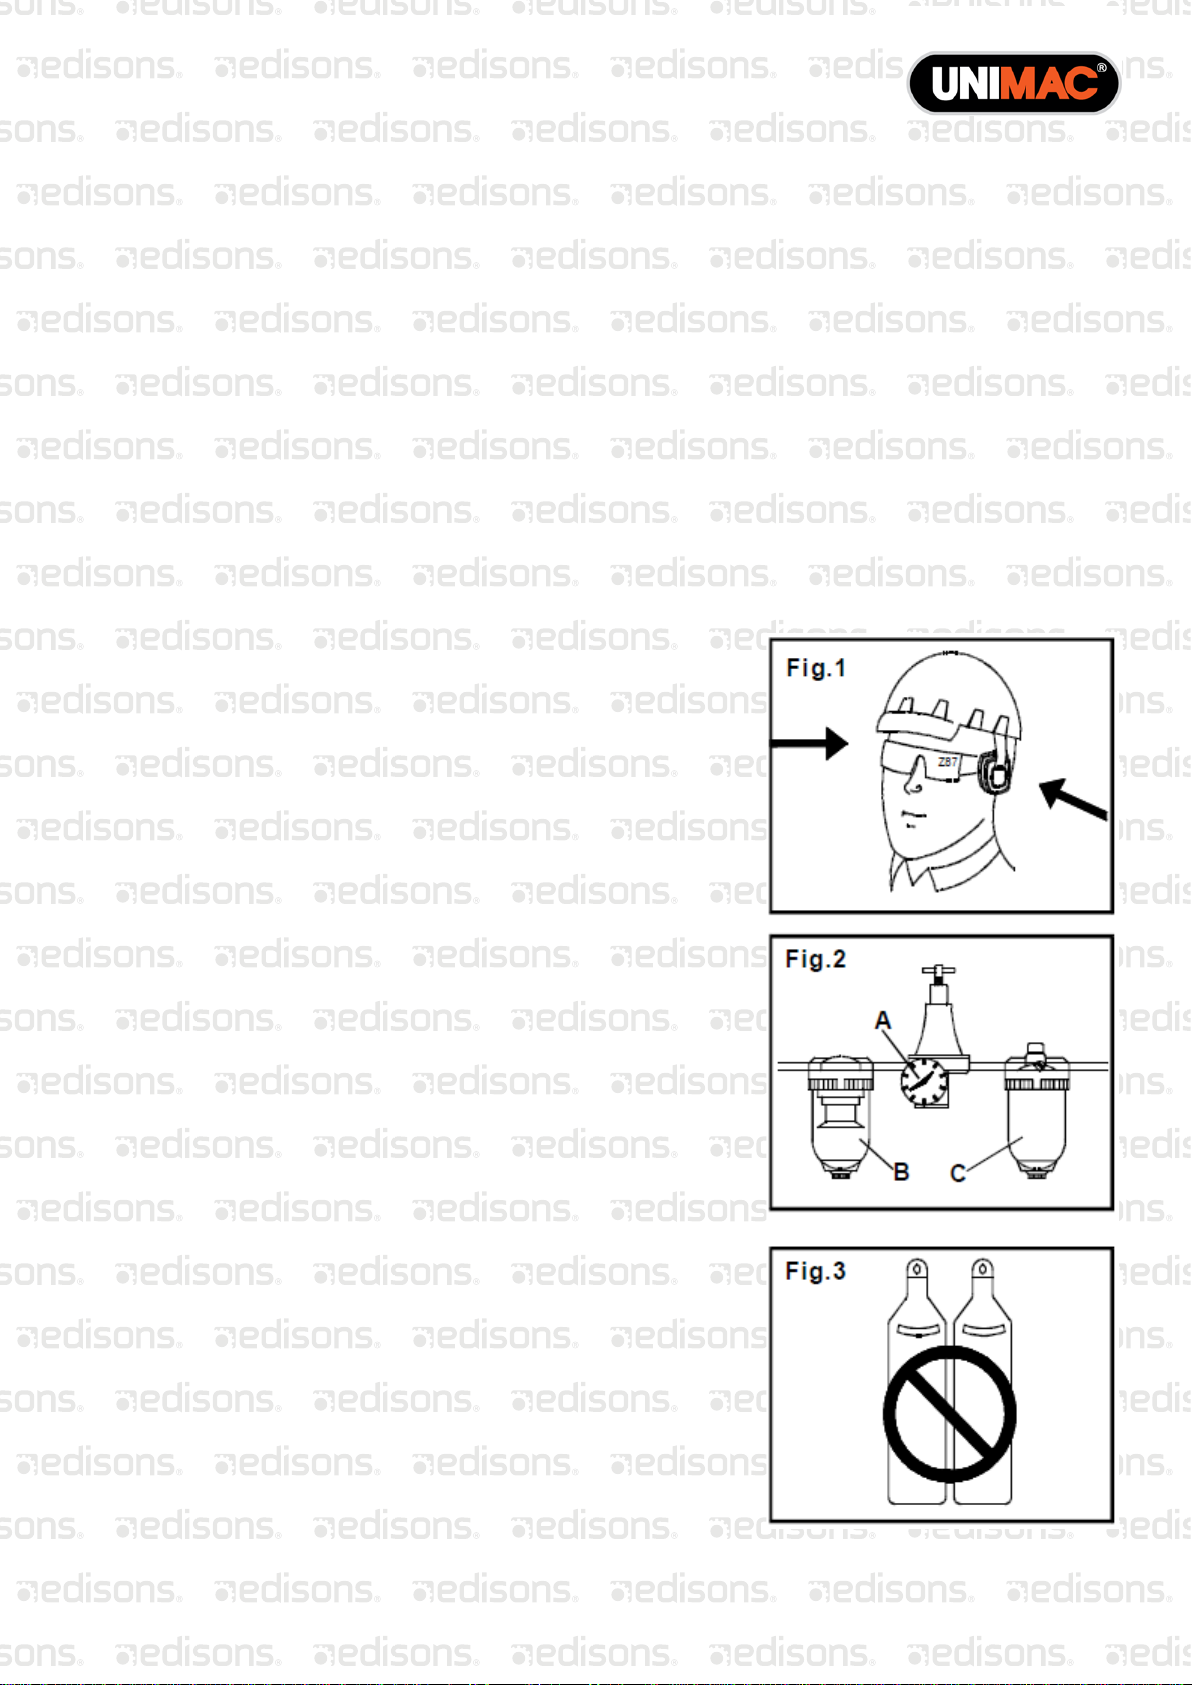
10. DON'T OPERATE the TOOL NEAR ANY COMBUSTIBLE, or any
other easily-explosive material; don’t operate the tool under
conditions that easily produce corrosions, rusting and
environments with heavy dust in the atmosphere.
11. Disconnect the tool from the air supply hose before
doing any tool maintenance, clearing a jammed fastener, leaving
the work area, moving the tool to another location, or handing the
tool to another person.
12. Disconnect only the quick connector with the body tail
portion of the air inlet, no compressed air can be guaranteed when
disconnecting. If operating the tool is not correct, it can remain
charged with air after being disconnected and still be able to fire a
fastener, causing personal injury.
13. Replace parts and accessories.
Use only the same replacement parts while servicing. Approved
accessories and replacements parts are available.
14. Before using the tool, check carefully if there are any parts
that are damaged to obtain ideal results. Do not use the tool if the
tool has any air leaks, uncompleted, damaged parts or if it needs
to be repaired.
15. Never use the tool if the safety, trigger or spring is inoperable,
missing or damaged. Do not alter or remove the safety, trigger or
springs. Make daily inspections of the free movements of the
trigger and safety mechanism.
16. Use only parts and fasteners that are recommended by the
seller.
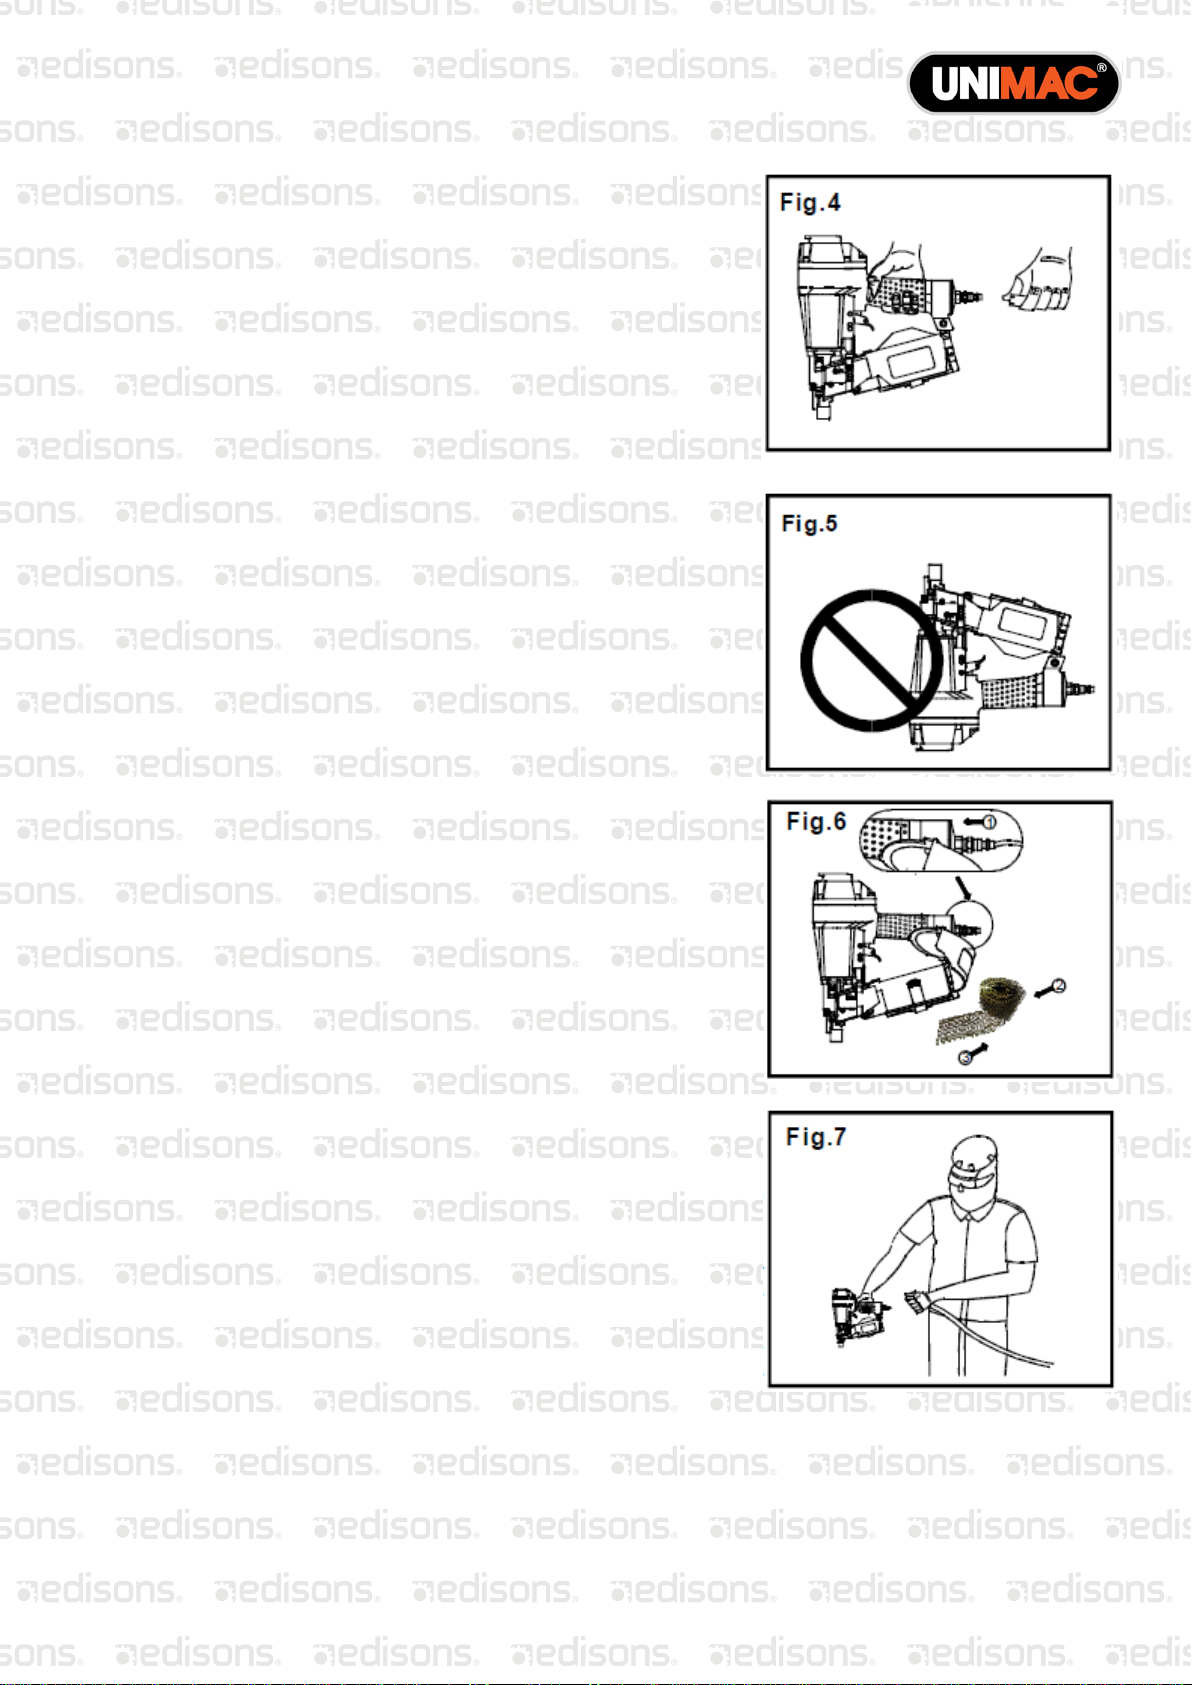
17. Connect the tool to an air supply before loading fasteners
to prevent a fastener from being fired during the connection. The
tool-driving mechanism may cycle when the tool is connected to
the air supply. When not in use, remove all of the fasteners from
the nail housing.
18. Always assume that the tool contains fasteners.
Keep the tool pointed away from yourself and others at all times.
Do not fool around with/around the tool. Respect the tool as a
working implement.
19. Do not load fasteners with the trigger or safety depressed to
prevent any unintentional firing of a fastener.
20. Remove your finger from the trigger when not driving
fasteners. Never carry the tool with finger on the trigger; tool will
fire a fastener if the safety is bumped while the trigger is
depressed.
21. Don’t overreach. Keep proper footing and balance at all times
when using or handling the tool.
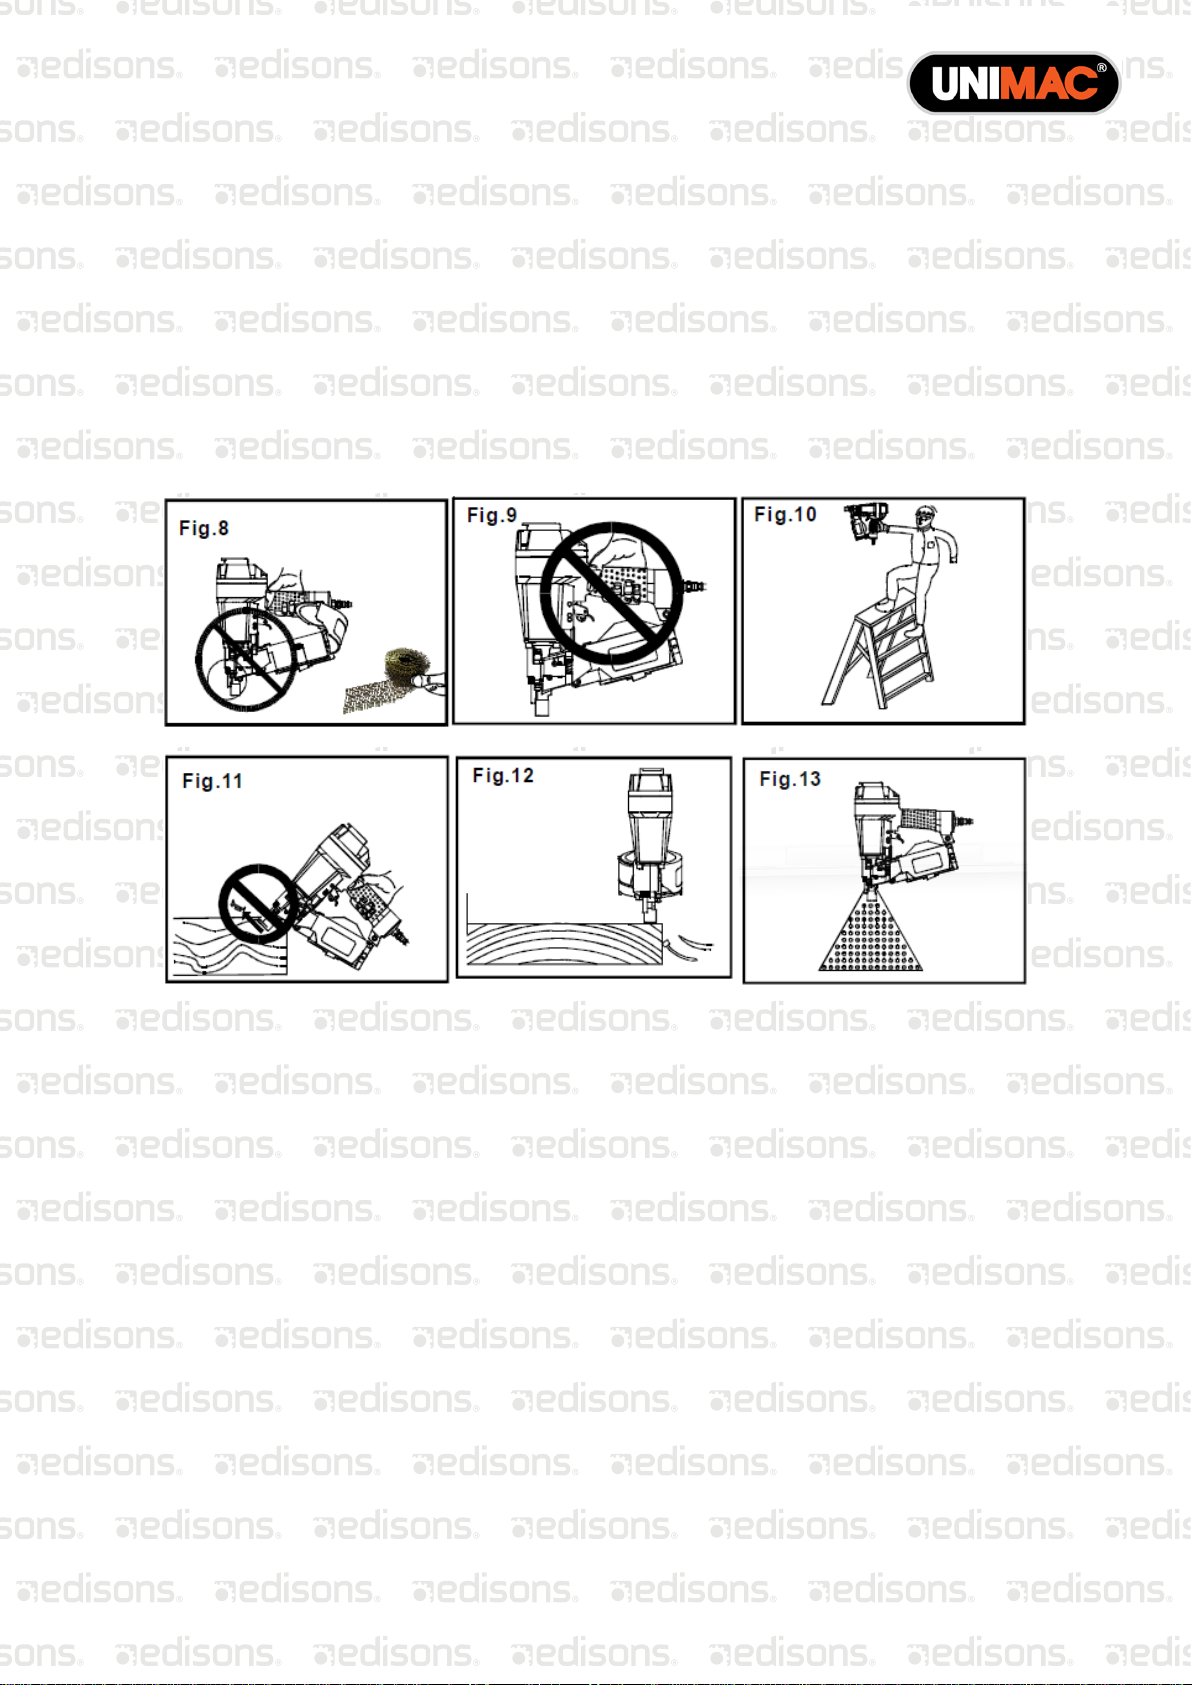
22. Fire fasteners into work surfaces only: NEVER into
materials that are too hard to penetrate.
23. Grip the tool firmly to maintain control while allowing
the tool to recoil away from the work surface as a fastener is being driven. If the safety bracket is allowed to
contact the work surface again before the trigger is released, an unwanted fastener will be fired.

Pneumatic Air Coil Nailer
E&OE ©2017Unimac 3
24. Do not drive fasteners on top of other fasteners, or with the tool at too steep an angle: the fasteners
can ricochet, causing personal injury.
25. Do not drive fasteners close to the edge of the work piece. The work piece is likely to split,
allowing the fastener to fly free or ricochet, causing personal injury.
26. Stay alert. Watch what you are doing. Use common sense. Do not operate any tool when you are tired.
27. Keep hands and body parts away from the area shown in Figure 13 to avoid injuries.
28. This tool is equipped with an adjuster that can adjust the driving depth. When adjusting the driving
depth, first disconnect the tool from the air supply and rotate the knob of the adjuster by hand until it is
satisfactory.
29. When not in use, tool should be cleaned and put back into the packaging box. For safety reasons, keep
out of reach of children.

Pneumatic Air Coil Nailer
E&OE ©2017Unimac 4
Fastener Specifications
Only use recommended the fasteners.

Pneumatic Air Coil Nailer
E&OE ©2017Unimac 5
Technical Specifications
Material Steel/Plastic
Nailgun Angle 15 degrees
Working Pressure 70-120PSI
Air Inlet Size 1/4" NPT
Type Wire and plastic collated
Capacity 250-300pcs
Nail Length 32-65mm
Nail Diameter 2.3-2.9mm
Head Diameter 5-7mm
Product Dimension (L x W x H) 320 x 125 x 320mm
Product Weight 3.5kg
Note Fasteners are standard and can be purchased at hardware
stores
In the Box
1 x CB700 Coil Nailer
1 x Carry Case
1 x Safety Goggles
1 x Oil Lubrication in bottle
1 x Allen Key

Pneumatic Air Coil Nailer
E&OE ©2017Unimac 6
Operating Instructions
Foreword
The Pneumatic Air Coil Nailer is a heavy duty, coil-fed, pneumatic nailer using compressed air as a power
source. It is designed to install 1 – ¼” to 2 – ½” or 0.091” – 0.114” diameter nails of various lengths. It is widely
used for the connections of frame and of both frame and felt. The tool has a magnesium alloy body and the
cylinder cap is made of a light material that provides, high specific strength and rigidity.
Power Source
This tool is designed to operate on clean, dry, compressed air at regulated pressures between 70 and 120 PSI
(4.9 and 8.3 bar).
The preferred system would include a filter (C) Fig.2, a pressure regulator (A) Fig. 2, and automatic oiler (B)
Fig.2 located as close to the tool as possible (within15 feet is ideal).
All compressed air contains moisture and other contaminants that are detrimental to internal components of the
tool. An airline filter will remove most of these contaminates and significantly prolong the life of the tool. If an in-
line oiler is not available, place five or six drops of tool oil into the tool’s air inlet at the beginning of each
workday.
Only disconnect the quick connector with the body tail portion of the air inlet. No compressed air can be
guaranteed when disconnecting. If operation is incorrect, the tool can remain charged with air after being
disconnected and still be able to fire a fastener, causing personal injury.
CAUTION: All line components (hoses, connectors, filters, regulators, etc.) must meet 150% of the maximum
system pressure. Please try to use a hose of ID 3/8” connecting the nailer with the compressor when
disconnecting.
Do not connect this tool to a system with maximum potential. Only disconnect the quick connector being
connected with the connector of the body tail portion air inlet, no compressed air can be guaranteed when
moving to another location or handing the tool to another person.
Disconnect the tool from the air supply before performing maintenance, clearing a jammed fastener, leaving the
work area, moving the tool to another location or handing the tool to another person.

Pneumatic Air Coil Nailer
E&OE ©2017Unimac 7
Preparing the Tool
1. After reading and understanding this entire manual, connect the tool to the air supply.
CAUTION:
−Keep the tool pointed away from yourself and others at all times.
−Always connect the tool to an air supply before loading fasteners.
−Do not load fasteners with the trigger or safety depressed.
−Always wear Z87 approved safety glasses and hearing protection when preparing or operating the tool.
−Never use a tool that leaks air or needs repair.
2. Depress the Handle (See A, Fig. 14) and open the Latch. Rotate the Upper Nail Housing to the side of the
Body.
3. The Adjuster Plate can be moved up and down when twisting the Adjuster Nut (see B, Fig.15). Depending
on the length of the nails, the Adjuster Plate should be adjusted correctly to the position indicated inside the
Lower Nail Housing.
4. Place a coil of nails over the Lower Nail Housing. Uncoil enough nails to reach the Feed Hook and place the
second nail between the teeth on the Feed Hook (see Fig. 16).
5. Close the Upper Nail Housing and depress the Latch (see Fig. 17).
6. Adjust the directional EXHAUST deflector (see Fig. 18), so that the exhaust air blast will be directed away
from the operator. Grasp the deflector and rotate it to the desired position for the current application.

Pneumatic Air Coil Nailer
E&OE ©2017Unimac 8
Using the Tool
Complete all steps of Preparing the Tool before using the tool.
Firing Fasteners
This tool can be fired in two different ways:
Trigger fire (single sequential) or bump fire (contact actuation).
Trigger firing (single sequential): Turn the rotating shaft so that the tail of the rotating shaft is up (see Fig. 18A).
When the safety bracket is pressed against the work place, push the trigger repeatedly and the nails can be shot
continuously.
1. Trigger firing: Put the nose on the working surface, lightly push the tool toward the working surface until the
safe bracket is depressed, then press the trigger to fire the fasteners. This “trigger fire” method provides the
most accurate fastener placement. In this method, the safety bracket can be adjusted downwards with the
knob to avoid striking two nails at the same time.
2. Another method is to press the trigger assembly, then press the safety bracket repeatedly. The tool can
repeatedly fire multiple fasteners. The tool will fire one fastener when the safety bracket is pressed only one
time. This method is working in the non-accurate position, so use this method for the work efficiency to
increase.
a. Original factory setting is single sequential trigger mode.
b. Read and understand this manual before changing the trigger mode. Improper use may result in serious
injury.
c. Manufacturer assumes no responsibility for any injuries and losses caused by any improper use of this
tool.
CAUTION: Remove your finger from the trigger when not firing any fasteners. Never carry the tool with your
finger on the trigger; the tool will fire a fastener if the safety is pressed.
Keep the tool pointed at a safe direction at all times.
Never attempt to drive a fastener into material that is too hard or at too steep an angle, or near the edge of
the work piece. The fastener can ricochet, causing personal injury.
Disconnect the tool from the air supply before performing maintenance, clearing a jammed fastener, leaving
the work area, moving the tool to another location, or handing the tool to another person.
Clean and inspect the tool daily. Carefully check for proper operation of trigger and safety mechanism. Do
not use the tool unless both the trigger and the safety mechanism are functional, or if the tool is leaking air or
if it needs any other repair.

Pneumatic Air Coil Nailer
E&OE ©2017Unimac 9
3. Driving depth will be increased or decreased by rotating the depth of the drive knob or adjuster (Fig. 19A).
Test fire a fastener and check the depth. If the nail is driven in too deeply, rotate the adjuster clockwise to
make the safety bracket push downwards. Whereas, rotate the adjuster counter clockwise to make the
safety bracket push upwards. Repeat this step to achieve the desired results (See Fig. 20).
Clearing a Jammed Fastener
1. CAUTION: Disconnect the tool from the air supply.
2. Open the latch, rotate the lower housing and remove the nails of the lower housing.
3. Use a slender, soft steel rod to drive the drive blade to its uppermost position. Use the needle nose pliers to
remove the jammed fastener (Fig. 21).
4. Follow the instructions in Preparing the Tool to reload fasteners.

Pneumatic Air Coil Nailer
E&OE ©2017Unimac 10
Maintenance
Clean and Inspect the Tool Daily
Caution: Disconnect the tool from the air supply before cleaning and inspecting it. Correct all problems before
operating.
•Check the filter of the compressor weekly and switch of the manual valve to drain water and other
contaminants out.
•Do not soak the tool in cleaning solutions. Such solutions can damage internal parts. The exposed portion of
the small piston rod and the feed hook must be kept clean.
•Inspect the trigger and safety mechanism to ensure that the system is complete and functional: no loose or
missing parts, no binding or sticking parts should be found.
•Keep all screws tight. Loose screws can cause personal injury or can damage the tool.
•Check if there are any worn and damaged parts. If there are any, please replace them immediately.
•If the tool is used without an in-line oiler, place 5 or 6 drops of air tool oil into the air inlet of the tool at the
beginning of each workday.
Service and Repairs
All quality tools will eventually require servicing of replacement parts due to wear-and-tear from normal use.
Some user serviceable components are described in the Troubleshooting section. All repairs made by local
agencies are fully guaranteed against defective material and workmanship. We cannot guarantee repairs made
or attempted by anyone other than these agencies.

Pneumatic Air Coil Nailer
E&OE ©2017Unimac 11
Troubleshooting
CAUTION: Disconnect the tool from the air supply first before performing any service procedure.
PROBLEM CAUSE SOLUTION
Air is leaking from the
trigger area.
O-ring in trigger valve stem is
worn and damaged.
O-ring in trigger valve head is
worn and damaged.
Tool has foreign matter lodged in
it.
Check/Replace the O-ring/Lubricate.
Clean/Lubricate the tool.
Air is leaking from the
lower body portion and
the nose.
Screw is loose at the connecting
portion of the nose and body.
O-ring is damaged between the
body and nose.
Bumper is damaged.
Tool has foreign matter lodged in
the contacting portion of the
bumper and body.
Tighten/Re-check the screw.
Check/Replace the O-ring/Lubricate.
Replace the bumper.
Disassemble the tool and clean it.
Air is leaking from the
body portion and the
cylinder cap.
Screw is loose at the connecting
portion of the cylinder and body.
Gasket is damaged.
Tighten the screw and recheck.
Replace the gasket.
Failure to start the tool. Tool is too dry, lacks lubrication.
The spring in the cylinder cap is
damaged.
Use pneumatic tool oil
Replace the spring in the cylinder cap.
Tool is firing fasteners in
too deeply.
Safety bracket position is
incorrect.
Air pressure is too high.
Rotate the knob of the adjuster to move the
safety bracket down.
Decrease air pressure.
Tool is skipping
fasteners/feeding
intermittently.
Tool has foreign matters lodged
between the small piston and the
small cylinder.
O-ring on the small piston is worn
and damaged.
Tool is too dry and lacks
lubrication.
The spring in the small piston is
damaged.
Air pressure is too low.
Connecting screw of the nose and
the body is loose.
Stopped hook can't stop the
fasteners.
Bent fasteners.
Wrong size fasteners.
Small piston bumper is worn and
damaged.
Disassemble/Clean/Lubricate.
Check/Replace the O-ring/Lubricate
Use pneumatic tool oil.
Replace the small piston spring.
Increase the air pressure, but don't exceed 120
PSI (8.3 bar).
Tighten all screws.
Replace the taper spring of the stopped hook.
Use recommended fasteners.
Replace the bumper and lubricate the small
piston.
Clean the feed hook and torsion spring.
Adjust the adjuster plate at the nail housing tail
portion according to the recommended nail
length to make the directional arrow on the nail
housing tail point to the correct direction.
Stop using the tool.

Pneumatic Air Coil Nailer
E&OE ©2017Unimac 12
PROBLEM CAUSE SOLUTION
Feed hook is sticking.
Nail length is not correct with the
loading space of the nail housing.
Weld wires in the nail coil are
broken.
Tool runs slowly or has
power loss
Tool is too dry and lacks
lubrication.
The spring in the cylinder cap is
damaged.
Tool has foreign matter lodged
between the piston assembly and
the cylinder.
The cylinder has not been
assembled to home position.
O-ring on the valve is dry after
disassembly.
Air pressure is too low.
Driver is worn (sort)
Inner diameter of the hose is too
small
Use pneumatic tool oil.
Replace the spring in the cylinder cap.
Disassemble/Clean/Lubricate.
Reassemble after disassembling.
Reassemble after lubricating.
Increase the air pressure, but don't exceed 120
PSI (8.3 bar).
Replace the piston assembly.
Use a bigger inner diameter for the hose.
Fasteners are jammed Fasteners are of the wrong size.
Weld wires in the nail coil are
broken.
Use recommended fasteners.
Stop using the tool.

Pneumatic Air Coil Nailer
E&OE ©2017Unimac 13
Exploded Parts Drawing

Pneumatic Air Coil Nailer
E&OE ©2017Unimac 14
Parts List
ITEM Description ITEM Description
1 Screw 48 Nut
2 Bushing 49 Screw
3 Exhaust Cover 50 Safety bracket A
4 Seal 51 Spring
5 Screw 52 Bushing
6 Spring Washer 53 Adjusting screw
7 Cylinder Cap 54 Safety bracket B
8 Gasket 55 Washer
9 Spring 56 Pin
10 O-ring 42.8 x 2.65 57 Latch
11 Valve 58 Washer
12 O-ring 58.7 x 3.5 59 Spring
13 Valve Seat 60 Stop nail pawl A
14 Collar 61 Stop nail pawl B
15 Cylinder Seal 62 Pin
16 Cylinder 63 Spring
17 O-ring 52.4 x 2.5 64 Hand wheel Assembly
18 Restrictive Plate 65 Rotating Shaft Pin
19 O-ring 80 x 3.1 66 Spring pin
20 O-ring 48.6 x 3.4 67 Washer
21 Piston Assembly 68 Torsion spring
22 Bumper 69 Piston
23 Body 70 O-ring 12.3 x 1.9
24 Guide holder 71 O-ring 24.3 x 2.8
25 Spring pin 72 Spring
26 Safe bracket guider 73 Bumper
27 Valve Guide 74 Cover
28 Trigger Valve Seat 75 Lock washer 28
29 Spring 76 Feed Hook
30 Trigger Valve Stem 77 Washer
31 O-ring 20.3 x 2.5 78 Screw
32 O-ring 20.3 x 1.5 79 Upper Nail Housing

Pneumatic Air Coil Nailer
E&OE ©2017Unimac 15
ITEM Description ITEM Description
33 O-ring 9.5 x 1.9 80 Pin
34 O-ring 1 0.3 x1.9 81 Lower Nail Housing
35 O-ring 12.8 x 1.9 82 Spring
36 O-ring 5.5 x 1.5 83 Steel ball
37 Trigger Valve Guide 84 Adjuster stem
38 Spring 85 Washer
39 Spring Pin 2.5 x 17 86 Adjuster Bushing
40 Pin 87 Adjuster Plate
41 Trigger 88 Adjuster nut
42 Trigger Spring 89 Spring pin
43 O-ring 46 x 1.3 90 Soft Grip Sleeve
44 O-ring 8.3 x 1.8 91 End cap
45 Nose 92 O-ring 65.4 x 2.5
46 Cover 93 Air plug
47 Washer

Pneumatic Air Coil Nailer
E&OE ©2017Unimac 16
Some experts believe that the incorrect or prolonged use of almost any product may
cause serious injury or death. To help reduce your risk of serious injury or death, refer to
the information below. For more information, see www.datastreamserver.com/safety
Consult all documentation, packaging and
product labelling before use. Note that some
products feature documentation available
online. It is recommended to print and retain
the documentation.
Before each use, check the product for
loose/broken/damaged/missing parts, wear or
leaks (if applicable). Never use a product with
loose/broken/damaged/missing parts, wear or
leaks.
Products must be inspected and serviced (if
applicable) by a qualified technician every 6
months. This is based on average residential
use by persons of average size and strength,
and on a property of average metropolitan size.
Use beyond these recommendations may
require more frequent inspections/servicing.
Ensure that all users of the product have
completed a suitable industry recognised
training course before being allowed access to
the product.
The product has been supplied by a general merchandise retailer
that may not be familiar with your specific application or
description of application. Be sure to attain third-party approval
from a qualified specialist for your application before use,
regardless of any assurances from the retailer or its
representatives.
This product is not intended for use where fail-safe operation is
required. As with any product (for example, automobile,
computer, toaster), there is the possibility of technical issues that
may require the repair or replacement of parts, or the product
itself. If the possibility of such failure and the associated time it
may take to rectify could in any way inconvenience the user,
business or employee, or financially affect the user, business or
employee, then the product is not suitable for your requirements.
This product is not intended for use where incorrect operation or
a failure of any kind, including but not limited to, a condition
requiring product return, replacement, parts replacement or
service by a technician may cause financial loss, loss of
employee time or an inconvenience requiring compensation.
If this product has been purchased in error when considering the
information presented here, contact the retailer directly for details
of their returns policy, if required.
©2017 Unimac. All rights reserved. No part of this document, including descriptive content, concepts, ideas, diagrams
or images may be reproduced or transmitted in any form or by any means, electronic or mechanical, including
photocopying, scanning or recording, or any information storage and retrieval system, without express permission or
consent from the publisher.
Table of contents
Other Unimac Nail Gun manuals