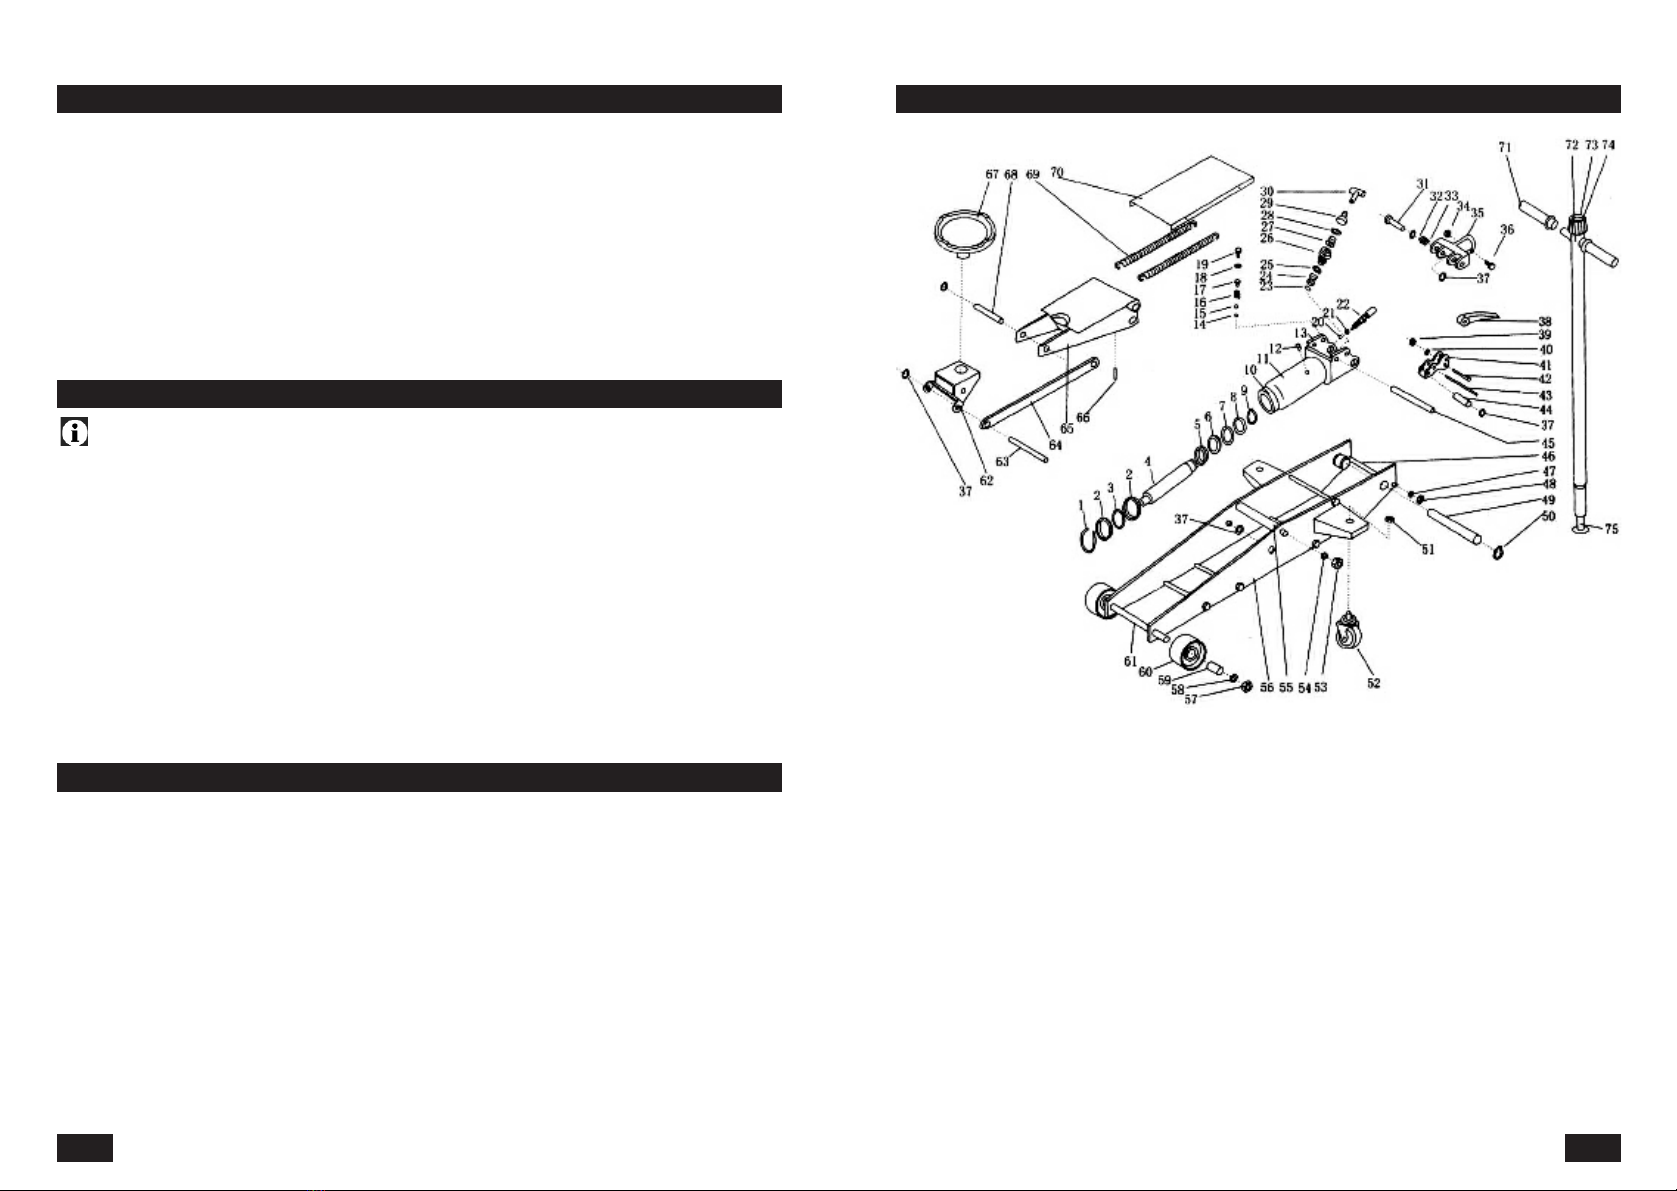
Unimax HJ-2/800 User manual

???
??????
WARRANTY CARD
Product: HYDRAULIC LIFT HJ-2/800
Type: HJ800
Date of manufacture:
Date of sale, stamp, signature:
Serial number (product series):
Repair centre notes:
Without the correctly filled warranty card or without proof of purchase receipt, including
the product type (invoice, purchase receipt) no warranty claim will be processed.
1. KH Trading machines and tools are covered by 6/24 months warranty, starting on the date of
purchase, as described in the Civil Code (proof of purchase or invoice receipt must be
enclosed with the warranty card when making a claim).
2. This warranty does not cover defects caused by unprofessional handling, machine overloads, not
complying with instructions contained in this manual, using accessories that are not approved,
unauthorized repair, regular wear and tear and damages occurred during transport. Further, this
warranty does not cover parts and accessories such as the motor, carbon brushes, seals and
hot-air operated parts and parts that need to be changed regularly.
3. If the repair is to be found as not covered by the warranty policy, all costs including the repair and ship-
ping to and from the repair centre will be paid by the customer, according to valid price list. See www.
4. When making a claim, you must present the warranty card, showing the date of the purchase, the
serial number of the machine, vendor stamp and signature of sales clerk, as well as the proof of
purchase receipt.
5. Warranty claim shall be made at the vendor shop where you bought your machine or you may mail
it to a service centre. The vendor is obligated to fill out the warranty card (date of sale, serial
number, vendor stamp and signature). All these information must be filled in at the time of sale.
6. The warranty period will be extended for the period of time for which the machine has been in the
service centre possession. If the repair or defect is not covered by the warranty policy, all costs including
the repair and shipping will be paid by the owner of the machine / tool. We recommend sending the
machine in its original packaging. Please, also enclose brief description of the defect with the packaging.
7. Before sending the machine for repair, clean it thoroughly. If the received machine is dirty, it may
be rejected by the service shop or you may be charged a cleaning fee.
SERVICE
Logistic centre Klecany
Topolová 483
250 67 Klecany
Czech Republic
Claim department phone number: 266 190 156 T-mobile: 603 414 975
266 190 111 O2: 601 218 255
Fax: 260 190 100 Vodafone: 608 227 255
http://www.KHnet.cz
Email: ser[email protected]
HHYYDDRRAAUULLIICCLLIIFFTT
HHJJ--22//880000
USER'S MANUAL
HJ800

2
Dear customer. Thank you for purchasing equipment from KH Trading, s.r.o.
Our company is ready to offer you our services - before, during and after you buy our product.
If you have any question, comment or idea, please contact our business centre. We will do our best to address
your comment or question in timely matter.
Before first use, please read this manual carefully. It is your responsibility to study all instructions,
necessary for safe use and operation and to understand all risks that may be involved during the use
of power machines.
WARNING! Do not try to use this machine before reading this entire manual and before you know
how to handle it. Keep this manual for future reference. Pay special attention to safety instructions.
Not complying with safety rules may cause injury to the operating person or to people standing by
or it may cause damage to the machine or to the work piece. Pay special attention to safety notes
and safety labels on the machine. Never remove or damage them.
Please, write information such as the invoice number
and the number of the sale receipt here in this box.
Massive construction, convenient extended lift body, with which you are even able to get under worse
accessible places.
The long rod serves for safer and more comfortable lift handling, pedal in the lower part of the lever is for
lifting by foot pumping.
The accuracy of instructions, graphs and information contained herein, depends on the printing date. Due to
continuous product improvement, the manufacturer reserves the right to change technical parameters of the
product, without prior customer notification.
Maximum load . . . . . . . . . . . . . . . . . . . . . . . . . . . . . . . . . . . . . . . . . . . . . . . . . . . . . . . . . . . . . . .2 t
Lift height . . . . . . . . . . . . . . . . . . . . . . . . . . . . . . . . . . . . . . . . . . . . . . . . . . . . . . . . . . . . . .660 mm
Maximum height . . . . . . . . . . . . . . . . . . . . . . . . . . . . . . . . . . . . . . . . . . . . . . . . . . . . . . . . .800 mm
Minimum height . . . . . . . . . . . . . . . . . . . . . . . . . . . . . . . . . . . . . . . . . . . . . . . . . . . . . . . . . .140 mm
Packaging dimensions (l× w × h) . . . . . . . . . . . . . . . . . . . . . . . . . . . . . . . . . . . . . .1,250 × 470 × 210
Net weight . . . . . . . . . . . . . . . . . . . . . . . . . . . . . . . . . . . . . . . . . . . . . . . . . . . . . . . . . . . . . . .58 kg
Gross weight . . . . . . . . . . . . . . . . . . . . . . . . . . . . . . . . . . . . . . . . . . . . . . . . . . . . . . . . . . . . . .65 kg
DESCRIPTION
TECHNICAL SPECIFICATIONS

REPAIR AND MAINTENANCE REPORT
Report and maintenance report:
DATE SERVICE SHOP
REPAIR AND MAINTENANCE REPORT
3
???
•This device may be used by a qualified person, 18 years or older who has been
trained in work and environmental safety procedures.
Symbols used in this manual
Warning!
This symbol informs you about the risk of personal injury or damage to the machine
or materials.
Note:
Additional information.
General instructions
•Plastic bags and packaging materials pose danger for small children and animals.
•Make sure you know your tool or machine and you are familiar with its operating procedure. Know the
hazards if not used correctly.
•Person using this machine must know how to safely operate this equipment, must be properly trained
and familiar with hazards and risk that may occur during use of this machine.
•Maintain your working area clean. Disorganized and dirty working area may cause accidents.
•Never work in narrow or poorly lit rooms. Make sure that the floor is stable and that your work may be
done comfortably. Always keep stable posture.
•Observe your work continuously and use all your senses during work. Do not continue to work if you
cannot pay full attention.
•Maintain your equipment clean.
•Handles must be kept free of grease and dirt.
•Make sure no children, unauthorized persons or animals have access to your workshop.
•Never put your hands or legs inside the working area.
•Use only for purposes for which it has been designed.
•Do not underestimate your abilities and know your limits. Use both hands.
•Never work under the influence of alcohol or other drugs.
•Do not use the machine if you feel dizzy or weak.
•Any modifications or improvements to the machine are strictly prohibited. DO NOT USE if you discover
bent part, crack or other damage.
•Never perform any maintenance while the machine is in use.
•If you see any unusual sign or hear any strange sound, stop working immediately.
•Before use, make sure all screws are tighten securely.
•Insure the correct maintenance of the machine. Before use, make sure the machine is in good working
conditions and without any damage.
•Use only original spare parts during repairs.
•Using non-original spare parts or other parts not approved by the manufacturer may cause injury to the
operating personnel.
•Do not overload your machine. The Warranty does not apply to damages incurred by overload.
SAFETY PRECAUTIONS

4
•Do not expose to extremely high temperature or direct sunlight.
•This machine is not designed for use in humid environments or under water.
•if you are not using your machine, store it in a dry and safe place, out of reach of children.
•Before use make sure that all safety elements work correctly and efficiently. Make sure all moving parts
are in good condition.
•Before use make sure that no part is cracked or stuck, Make sure all parts are attached and assembled
as designed. Beware of all other conditions that may have a negative effect on the proper functioning of
your device.
•If not stated otherwise in this manual, all damaged parts and safety elements must be repaired or changed.
Lifting equipment
•Lift only objects with maximum weight allowed or less.
•Keep your hands away from moving parts of the machine.
•Release or lower the object slowly. Beware of sudden stops or sudden quick release.
•Your machine has been designed for use on solid, smooth and even surfaces.
•Before lifting any object, make sure that the cart is secured against movement.
•Use caution during object lowering. You may get injured during lowering the load.
Vehicle service centre accessories and equipment
•Before performing any repair, secure the vehicle against movement.
Hydraulic equipment
•Small escape trace of hydraulic fluid form the hydraulic pump and from other hydraulic equipment is usual
phenomenon and it is not considered as defect. If there is a shortage of hydraulic fluid it must be refilled
regularly.
•Before uncoupling compressed air piping or hose, wait until the pressure equalizes.
•Before starting your work, inspect all couplings and piping for leakage. If leak is found repair it immediately.
•Never try to lift more than the maximum allowed weight. Do not try to extend the piston bar using
excessive force. It may come out of the cylinder completely.
•Keep your tools far away from heat sources and fire to prevent damages to your tools.
•Hydraulic fluid spill on floor creates danger of slipping and risk of personal injuries. If you discover a spill,
have it cleaned immediately. Use appropriate cleaning wool or absorbing substances. In accordance
with the rules of waste law management, absorbing substances or wool must be properly stored in an
enclosed metal container and delivered to an authorized waste collection centre.
•Do not mix different hydraulic fluids together (e.g. from different manufactures).
•Follow the hydraulic fluid change deadlines.
•Make sure that you are using clean hydraulic fluids. Dirt in the fluids significantly lowers the lifespan of the
fluid and may cause irreversible damages to your machine.
•Use protective covers and blind flanges to prevent impurities from entering into the device.
Power machines
•Before initiating maintenance work with the use of hydraulic machines, gradualy decrease the work
pressure to atmospheric.
•Should the machine contain compressed springs, always insure its gradual and safe release with the aid
of an appropriate preparation.

8
No. Description Number
of pieces
1 Wired fuse 1
2 Washer 2
3 O ring 1
4 Piston 1
5 RING 1
6 Sealing washer 1
7 O ring 1
8 Safety ring 1
9 Wired fuse 1
10 Cylinder 1
11 Cabinet 1
12 Oil change input stopper 1
13 Cylinder base 1
14 Steel ball 4 mm diameter 1
15 Spring washer 1
16 Spring 1
17 Safety valve 1
18 Sealing washer 1
19 Safety valve screw 1
20 Steel ball 6 mm diameter 3
21 O ring 1
22 Bypass valve rod 1
23 Washer 1
24 Valve 1
25 Washer 1
26 Pump cylinder 1
27 Y ring 1
28 O ring 1
29 Duster 1
30 Pump piston 1
31 Stud 2
32 Washer 2
33 Torque spring 2
34 Bolt M10 1
35 Lever bracket 1
36 Screw M8×50 1
37 Washer 10
38 Foot pedal 1
39 Safety bolt M10 1
40 Spring washer 1
No. Description Number
of pieces
41 Pedal clutch 1
42 Screw M8×55 1
43 Pedal rod 1
44 Stud 1
45 Stud 2
46 Stud 6
47 Spring washer 12
48 Nut 12
49 Stud 6
50 Wired fuse 1
51 Nut M16×1,25 2
52 Rear wheel 2
53 Nut M16×1,5 2
54 Spring washer 18 mm 2
55 Connecting spindle 1
56 Body 2
57 Nut M16×1,5 2
58 Washer 2
59 Friction casing 2
60 Front wheel 2
61 Front wheel spindle 1
62 Saddle bed 1
63 Stud 1
64 Rod 2
65 Arm 1
66 Stud 1
67 Seat 1
68 Stud 1
69 Spring 2
70 Cover 1
71 Handle 2
72 Handle spindle 1
73 Rotational lever button 1
74 Stud 1
75 Connecting rod 1
LIST OF PARTS
5
Safety regulations for hydraulic lift HJ800
•The lift is designed for lifting (cars, trailers etc.). When lifting, the lifted load must not be occupied by
persons.
•The lifted load must be properly secured against unwanted movement (with the help of chock etc.).
•It is forbidden to work below the load, which is found on the lift! Always secure the load with sufficient
support.
•Make sure the load does not exceed the permitted maximum load of the lift. Danger of damage to the lift
and load.
•Only use the lift on a solid and flat surface.
•Pay careful attention to balancing the load.
•Check the oil status!
•The hydraulic lift serves for common lifting of loads (cars etc.).
•The lift is equipped with wheels to facilitate manipulation. The lift should not be used in any case for
manipulation with loads.
•Before throwing the packaging material out, make sure no part is left inside. If so, take it out and install it.
Use the part listing for check-up and the installation drawing for guidance.
•Pedal clutch (41) has already been mounted to the lift body, to connect the foot pedal (38) use nut
(39), washer (40), and screw (42). Mount the pedal clutch and foot pedal and tighten.
•Lever (72) must be inserted in lever bracket (35). Before doing it, loosen washer (34) and screw (36)
under the lever opening to facilitate insertion. Once the lever has been inserted, tighten.
Aerating
•During preparation and lifting, air can enter the hydraulic system and it is not possible to use the full lift
height.
•Before first use, loosen aerating valve (73) by turning it counter-clockwise.
•Place the load on the lift.
•Press the lift foot lever several times briefly and then close the aerating valve.
Lifting the load
•Place the lift into the body place, which are specified by the vehicle manufacturer for lifting.
•Turn lever button (73) clockwise and close the aerating valve by gently tightening it. Only use relative
strength. Do not tighten completely!
•Place the lift correctly under the lifted object. Make sure the lifted object is supported steadily and as
close as possible to the gravitational centre. This will restrict the lifts chance of slippage.
•Raise the lift by pumping the foot pedal until the required height is achieved. Once lifted, support the
object with stable supports.
Releasing the load
•Slowly turn lever button (73) counter clockwise. The release speed is given by the rotation of lever button
(73).
ASSEMBLY
OPERATION

Oil check
•Open the aerating valve (turning button (73) counter clockwise) and press the piston into the lowest
position possible.
•Open the oil input stopper (12).
•Fill with clean hydraulic oil, do not use break fluid.
•Close the oil input stopper (12).
Lubrication
Lubricate working surfaces with appropriate grease regularly.
•Used hydraulic fluids must be disposed off in accordance with the Law of waste disposal management.
When the operational life of your device is over, dispose off it in accordance with valid rules and regulations.
Your product is made of metal and plastic parts that may be recycled when separated.
1. Disassemble all parts.
2. Separate all parts according to the material they are made of (e.g. metals, rubber, plastics, etc.).
Take the separated parts to the recycling facility near you for further processing.
Information about the locations of recycling centres may be found at your local City office or throughout an
Internet search.
If the machine breaks down, send it back to the vendor for quick repair.
Please, enclose brief description of the defect. That makes repair easier. If the machine is still covered by
warranty, enclose the warranty card and proof of purchase receipt. After the warranty period expires, we
repair your machine for a special price.
To prevent possible damages during shipping, packed the machine carefully or use the original packaging
material. We are not liable for shipping damages due to incorrect packaging of your machine. If making
a claim at the shipping company the level and method of packaging plays a major role during claim evaluation
process.
Note: Pictures and contents in this manual may slightly differ from the actual product or accessories.
It is due to continuous improvement of our products. Such small differences have no effect on the product
functionality
6
MAINTENANCE
DISPOSAL
CAUTION
7
PART DRAWING
This manual suits for next models
1
Table of contents
Other Unimax Jack manuals