UREVO UR9TM0010 User manual
USER MANUAL
FOLDING TREADMILL
MAKING FITNESS FUN
Model: UR9TM0010

English

02
IMPORTANT: FOR UREVO ONLY
For damaged or defective product, questions, replacement parts or any other service support,
please contact our customer service department by the below methods:
For The Best Service, Email us with order ID at:
US: Services@urevosports.com
EU: service_eu@urevosports.com
WALMART: service_walmart@urevosports.com
Response Time: 1-2 Business Days.
Emailing us with the information above will be the best method to receive a response during
peak business hours.
Website: www.urevosports.com
PLEASE DO NOT RETURN THIS PRODUCT TO THE STORE.
SERVICE

03
IMPORTANT SAFETY GUIDELINES
Please carefully read this manual before use to ensure your safety and avoid accidents.
1. Wear suitable sports shoes and do not run barefoot for exercise. We do not assume any
responsibility for abnormalities and injuries caused by failure to wear shoes since they
have nothing to do with product quality.
2. Consider your physical condition when you start to train with this product. Train appropriately
and regularly to ensure that you have enough physical strength for training. Improper or
excessive training will not benefit your health.
3. Children under 10 years old are not allowed to use this product; persons who are indisposed,
mentally disabled or lack common sense are not allowed to use it; take care of elders and
children and keep them from approaching or touching the product during its use; we do not
assume any responsibility for accidental injuries due to violation operation, unauthorized
modification or disassembly of the machine, and ignorance of precautions since they have
nothing to do with the quality of our products.
4. This product is suitable for home use rather than professional training and testing, nor
medical purposes.
5. Damaged power cord must be replaced by the manufacturer or professional maintenance
personnel to avoid danger.
6. Check all parts before use to ensure the screws and nuts are tightened.
7. Wear tight fitting clothes to prevent clothes from being caught by the machine when using
it. Keep children or pets away from the equipment to avoid accidents.
8. Place the equipment on smooth, clean and level ground. Make sure there are no sharp
objects near it. Do not use it near water and heat sources.
9. Avoid touching any moving parts with hands. Do not place your hands and feet in the space
under the running belt.
10. This product is for one person only when it is running.
11. Please use the accessories provided by the manufacturer only, and do not attempt to repair
on your own.
12. The maximum weight capacity for this product is 265 lbs / 120 kg.
DO NOT EXCEED MAXIMUM WEIGHT CAPACITY.
13. Please make sure to add 10ml of lubricant when using the product for the first time. Add
lubricating oil every one year or after 100 hours of working.

04
POWER SUPPLY PRECAUTIONS
1. Use 220~240VAC 50Hz power supply.
2. The power plug must be reliably grounded, and the socket must be equipped with a
dedicated circuit to avoid sharing a circuit with other electrical equipment.
3. Directly plug the power cord firmly into the socket.
4. Use a qualified socket to avoid dangers arising therefrom. If the plug does not match the
socket, do not use the plug and ask an electrician to handle it.
5. Do not let the power cord contact the rollers. Do not put the power supply on the running
belt. Do not use any damaged plugs.
6. Do not pull out or insert the power plug with wet hands.
7. Pull out the plug from the socket before cleaning and maintenance.
8. Check whether the treadmill functions normally before use. If normally, you can use it,
otherwise do not use it and contact our Customer Service Department in time.
9. Clip the safety lock wire to your clothes before exercise for emergency stop.
10. Ensure that there is a 2000*1000mm vacant safe area without obstacles behind the
treadmill during exercise.
11. In case of an abnormality, pull up with the handrail to keep your feet off the running belt
and jump out of the treadmill.
12. If you feel dizzy, chest pain, nausea, or breathless during exercise, stop exercising
immediately and consult a fitness coach or doctor.
13. Do not use this product outdoors, under high humidity or sunlight.
14. Power off and unplug when you leave.

05
PRECAUTIONS FOR INSTALLATION
1. Read the instructions carefully before installation.
2. Take out all parts from the package and separately place them on the clean ground for
your overall check and easy installation.
3. Check whether all parts are complete according to the packing list.
4. Be careful when using tools or handling. Do not install the product by force according to
your preference.
5. Check whether tools and packaging materials left behind are dangerous. Plastic and foam
are harmful to children.
6. Install the product properly after carefully reading the steps and instructions in the
manual.
7. This product must be properly installed by an adult. If necessary, ask a professional
to install it.
Warning: Install the product properly and do not damage it.
IMPORTANT:
Read all instructions carefully before using this product. Retain this owner’s manual for future
reference.
The specifications of this product may vary from this photo, subject to change without notice.
06
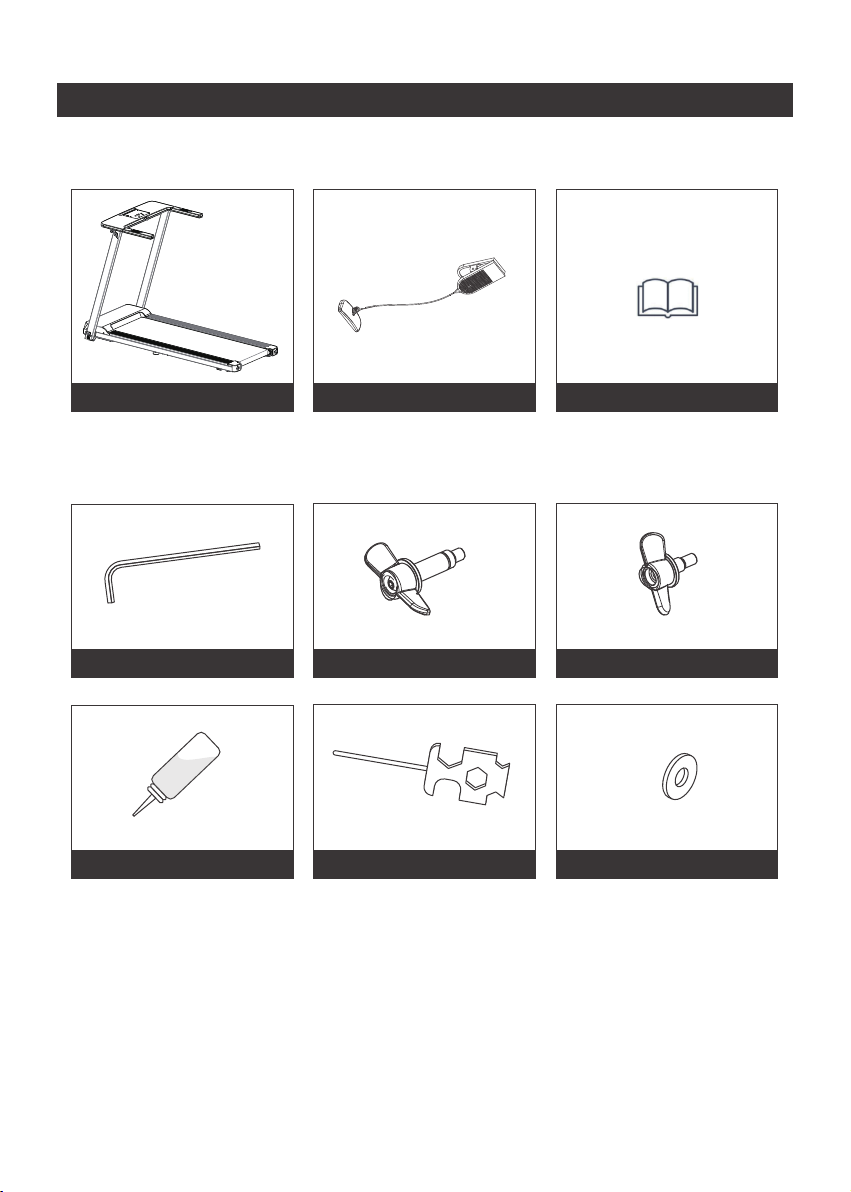
PARTS LIST
TOOL PACK
PACKAGE LIST
Speed/Function ×1 Safety lock × 1 Manual & Warranty card × 1
F
6mm L-shaped hexagon wrench (1 pc)
A B C
Long knob (2 pcs) Short knob (2 pcs)
Lubricating oil (1 bottle)
D E F
Multi-function open spanner (1 pc) Plastic gasket (4 pcs)

07
PRODUCT STRUCTURE
Display Safety lock
Column
Knob
Motor cover
Running belt
Edge strip
Adjusting foot pad
Rear shield (L)
Rear shield (R)
Power
08
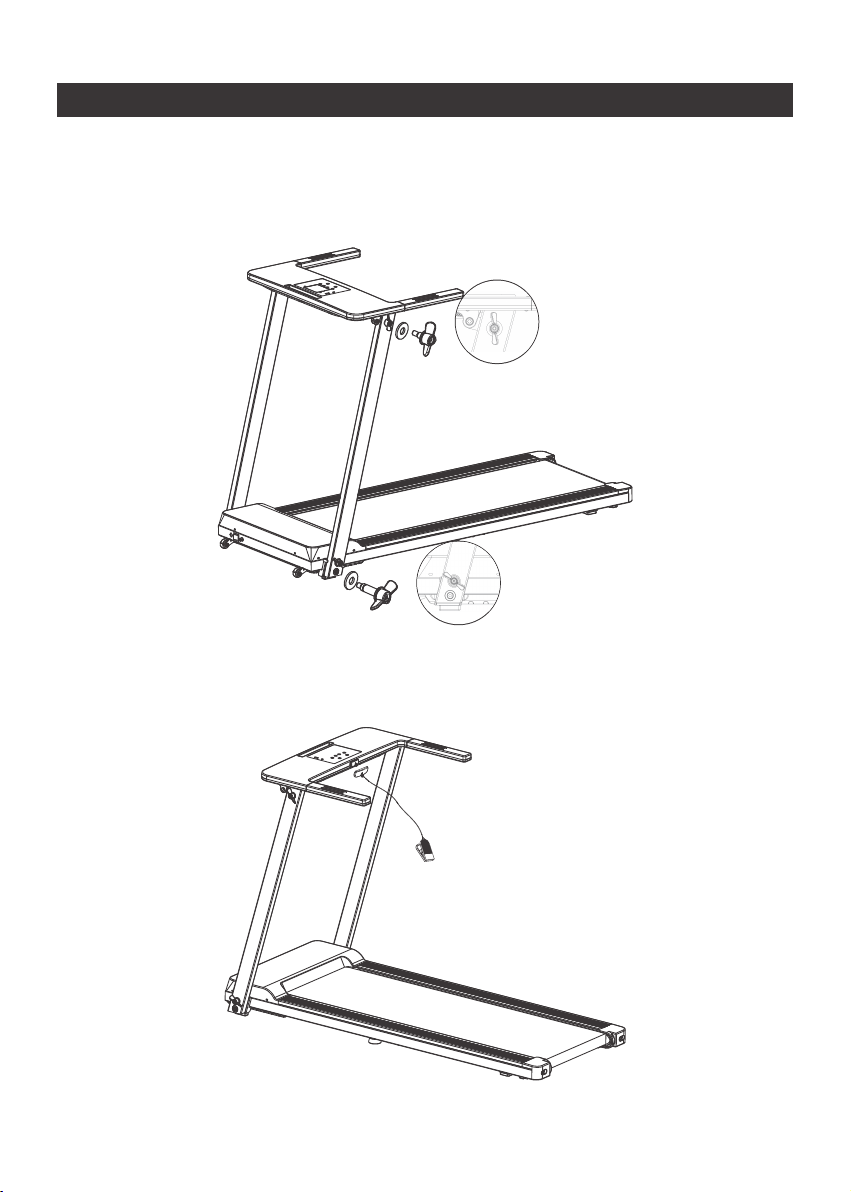
ASSEMBLY
Step 1: Lift the machine out of the package and place it on the ground. Hold the column tube
and stand it up. Apply gasket F to the knob B and then fix it at the bottom connection
of the treadmill and tighten the knobs well. Similarly, use knob C with gasket F to fix
both ends of the dashboard on the treadmill column and tighten the knobs.
Step 2: Install the red safety switch (the end of its magnet) at the place with a yellow label in the
middle below the dashboard. The installation of the machine is completed.
FB
F
C

09
The treadmill will only work if the safety lock is properly placed on the slot of the dashboard.
Clip the safety lock to your clothes. In the unlikely event of an accident, pull off the safety lock
to immediately shut down the motor. If you want to continue using the treadmill, put the
safety lock back.
ASSEMBLY
Step 3: Operation:Plug in the power cord and turn on the Power. The indicator will light up,
you will hear a beep and the display will also light up.
Power
Table of contents
Other UREVO Treadmill manuals


Popular Treadmill manuals by other brands


Smooth Fitness
Smooth Fitness EVO 3i user manual

NordicTrack
NordicTrack NETL81810.0 user manual

Schwinn
Schwinn 830/Journey 8.0 Assembly manual / owner's manual

Keys Fitness
Keys Fitness HealthTrainer HT-740T owner's manual

Spirit
Spirit XT8 Service manual

NordicTrack
NordicTrack T 14.0 Treadmill Manuel de l'utilisateur