UREVO STROL 3 User manual

UREVO STROL 3
User Manual • Uživatelský manuál •
Užívateľský manuál • Használati utasítás

2
English
3 –25
Čeština
26 –48
Slovenčina
49 –71
Magyar
72 –95

3
Dear customer,
Thank you for purchasing our product. Please read the following instructions carefully
before first use and keep this user manual for future reference. Pay particular attention
to the safety instructions. If you have any questions or comments about the device,
please contact the customer line.
✉www.alza.co.uk/kontakt
✆+44 (0)203 514 4411
Importer Alza.cz a.s., Jankovcova 1522/53, Holešovice, 170 00 Praha 7, www.alza.cz

4
IMPORTANT
SAFETY
GUIDELINES
Read all instructions before using this appliance.
1. If the supply cord is damaged, it must be replaced by a special cord set available
from the manufacturer or its service agent.
2. The free area shall not be less than 0.6 metres greater than the training area in
the directions from which the equipment is accessed.
3. If any of the adjustment devices are left projecting, they could interfere with the user's
movement.
Warning, that a folded treadmill should not be operated.
4. Warning, to allowing the running surface to come to a complete stop before folding.
5.Noise emission under load is higher than without load.
6.On airborne noise: 65dB.
7. This appliance is not intended for use by persons (including children) with reduced
physical, sensory, or mental capabilities, or lack of experience and knowledge, unless
they have been given supervision or instruction concerning use of the appliance by a
person responsible for their safety. Children should be supervised to ensure that they
do not play with the appliance.
8. Maximum user's weight is 130kg.

5
POWER SUPPLY PRECAUTIONS
1. Use US: 120~60Hz\EU:220~240V~ 50-60Hz power supply.
2. The power plug must be reliably grounded, and the socket must be equipped with a
dedicated circuit to avoid sharing a circuit with other electrical equipment.
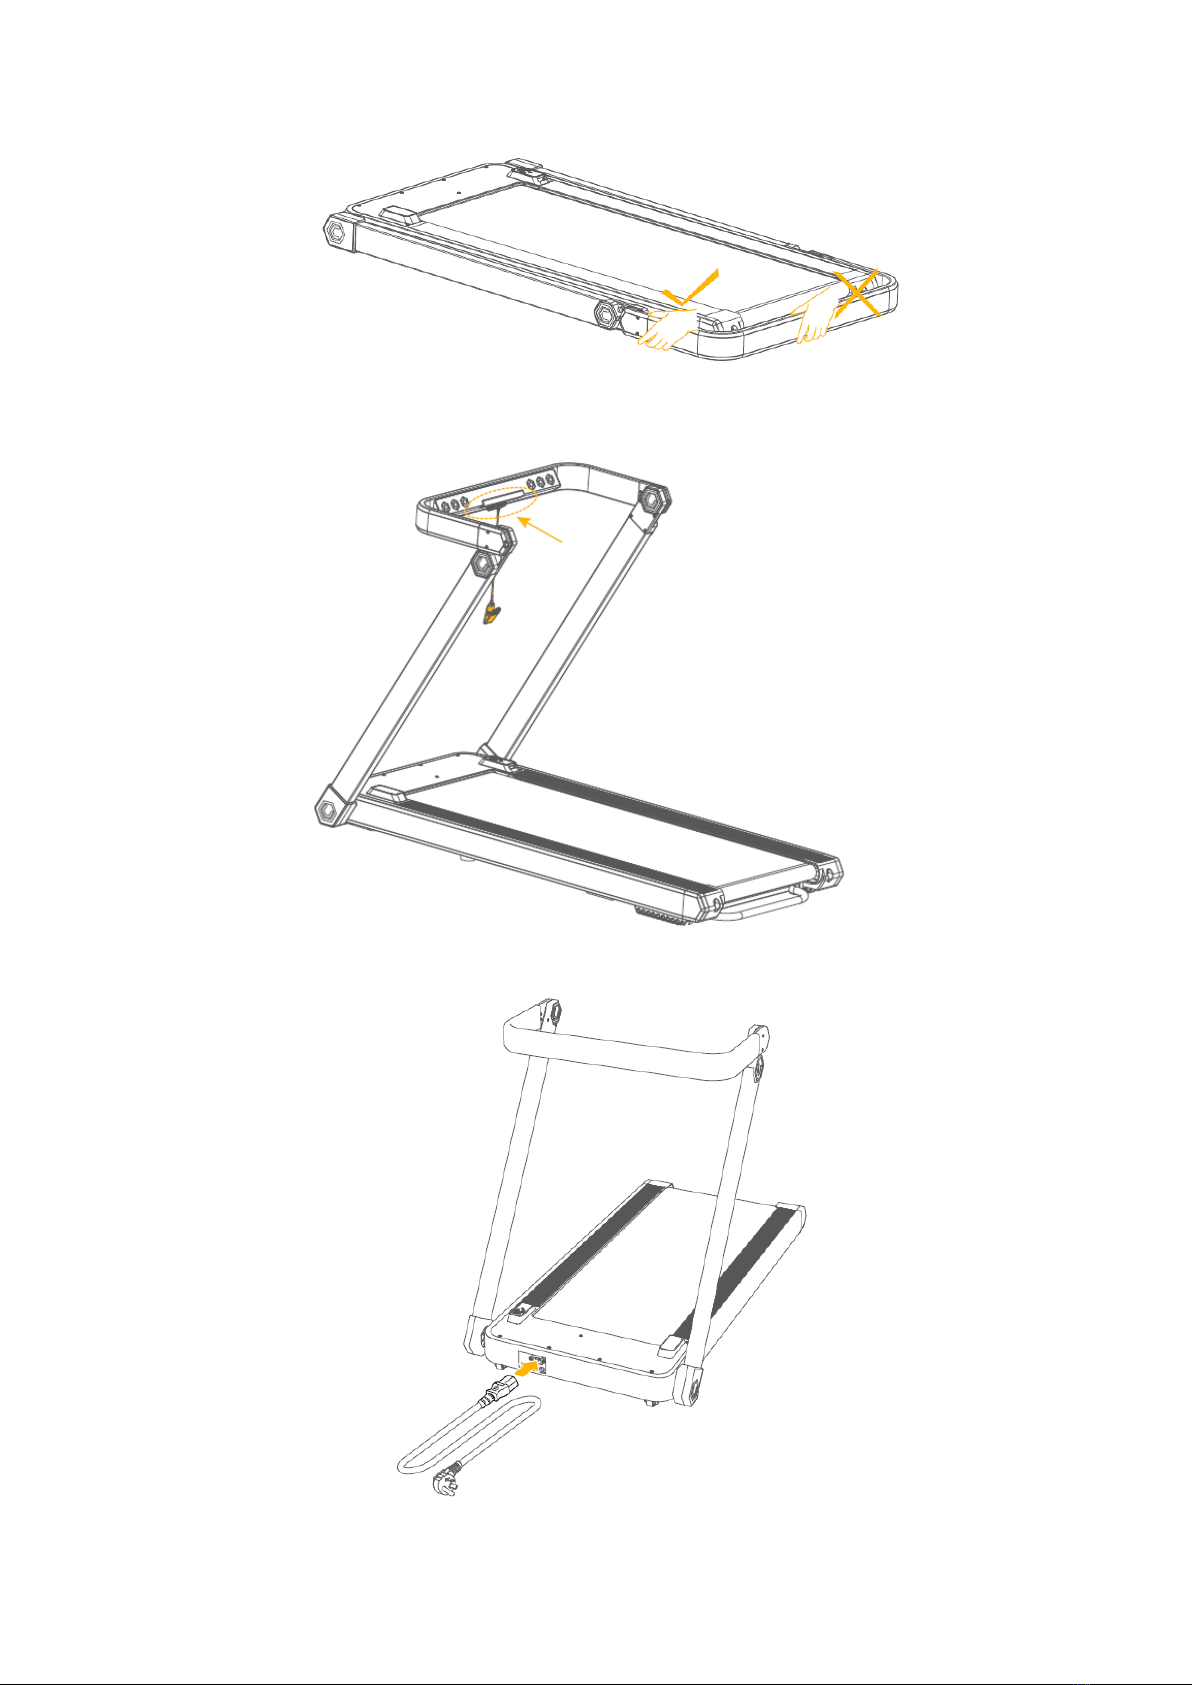
3. Directly plug the power cord firmly into the socket.
4. Use a qualified socket to avoid dangers arising therefrom. If the plug does not match
the socket, do not use the plug and ask an electrician to handle it.
5. Do not let the power cord contact the rollers. Do not put the power supply on the
running belt. Do not use any damaged plugs.
6. Do not pull out or insert the power plug with wet hands.
7. Pull out the plug from the socket before cleaning and maintenance.
8. Check whether the treadmill functions normally before use. If normally, you can use it,
otherwise do not use it and contact our Customer Service Department in time.
9. Clip the safety lock wire to your clothes before exercise for emergency stop.
10. Ensure that there is a 2000*1000mm vacant safe area without obstacles behind the
treadmill during exercise.
11. In case of an abnormality, pull up with the handrail to keep your feet off the running
belt and jump out of the treadmill.
12. If you feel dizzy, chest pain, nausea, or breathless during exercise, stop exercising
immediately and consult a fitness coach or doctor.
13. Do not use this product outdoors, under high humidity or sunlight.
14. Power off and unplug when you leave.
PRECAUTIONS FOR INSTALLATION
1. Take out all parts from the package and separately place them on the clean ground
for your overall check and easy installation.
2. Check whether all parts are complete according to the packing list.
3. Be careful when using tools or handling. Do not install the product by force according
to your preference.

6
4. Check whether tools and packaging materials left behind are dangerous. Plastic and
foam are harmful to children.
5. Install the product properly after carefully reading the steps and instructions in the
manual.
6. This product must be properly installed by an adult. If necessary, ask a professional to
install it.
Warning: Install the product properly and do not damage it.
IMPORTANT:
Read all instructions carefully before using this product. Retain this owner's manual for
future reference. The specifications of this product may vary from this photo, subject to
change without

7
PACKING LIST
Product accessories
Multifunctional x 1
Safety lock x 1
Remote control x 1
Power cord x 1
Batery x 2
User Manual x 1
Tool pack
6mm L-shaped hexagon
wrench x 1
5mm L-shaped hexagon
wrench x 1
Lubricating oil x 2

8
PRODUCT
OVERVIEW
IPAD bracket
Multifunctional
table
Right armrest
Right upright column
Safety Key
Remote control
Card slot for remote
control
Tread-belt
Sidebar
Right rear
corner guard
Mobile portable
pipe
Left rear
corner guard
Stopper
Protecting
cover of the
standing pipe
Left armrest
Left upright column
Decorative
cover
Console
Power switch
Power cord
socket
Transport
wheel

9
OPERATION
SAFETY
KEY
The treadmill will only work if the safety lock is properly placed on the slot of the
console.
Make sure the Safety Key clip on the clothes when exercising in case of an accident.
In any situation, pulling off the Safety Key, the treadmill will stop in an emergency, the
"SPEED" window displays "E07'', At this time, you may not perform any other
operation on the treadmill except shutting it down.
After the Safety Key is attached correctly again, the treadmill will enter the standby
mode.
PREPARATION BEFORE USE
First, unpack the host, take it out of the package and lay it flat on a carpet or cushion.
Then, left the left and right upright columns up to the limited points as shown in the step
(1) in the figure below; then fold the armrest in the direction indicated by the arrow to
the flat position as shown in the step (2).
•Make sure to hold the left and right armrests and lift them up when conducting
step (1). Do not hold the middle of the armrest.
•Please mind your hand when folding down the armrest. Do not place your hand
at the rotating point.
Finally, place the stoppers which are under the left and right sides, under the tread belt
according to the direction as shown in the step (3) in the figure below, so they will not be
exposed.

10
4. Suck the "safety lock" into the yellow frame of the console.
5. Plug in power cord to appliance.

11
6. Insert the power plug, and then turn on the power switch. With a sound of "Di",
the treadmill's instrument is turned on and the treadmill is started.
7. Install the multifunctional table.
a. Place the table on the console and the armrest.

12
b. Fix the fixing hooks under table on the armrest as shown in the figure.
7. Install the Battery on the Remote Control.
CONSOLE
Start
The treadmill will be in standby mode after powering on and all windows are turned
on.
Calories
Distance
Speed
Time
Display Screen

13
Key
Function
Speed shortcut key: Press this key directly to adjust the speed to 5
Km/h when it is running
Speed shortcut key: Press this key directly to adjust the speed to
10 Km/h when it is running
Press this key to start the treadmill when it is off.
Press this key to pause the treadmill when it is running.
Press this key to stop the treadmill when it is running.
Press this key to slow down the speed by 0.5Km/h when it is running.
Press this key to increase the speed by 0.5Km/h when it is running.
At any time, as soon as the safety lock switch is disconnected, the treadmill
will rapidly stop running and "E07" will be displayed on the window. All
normal operation and running shall be carried out when the safety lock is
properly placed in corresponding position.
Display screen
Name
Function
SPEED
In standby mode, display "0.0";
When starting, display the countdown of "3"-"2"-"1" in sequence;
Display the exercising speed when exercising;
When the safety lock is disconnected , display "EDT';
TIME
Display the exercising time when exercising;
DIS.
Display the exercising distance when exercising;
CAL.
Display the exercising distance when exercising;

14
REMOTE CONTROL
PAIR THE REMOTE CONTROL WITH THE TREADMILL
During standby mode, simultaneously press and hold the keys and for a long
time, with the console screen displaying and the treadmill ringing for 0.5 seconds then
the treadmill enters pairing mode successfully.
Remote Control: Long press the key to start the treadmill. Press and for 2
seconds, with the remote control screen displaying , it is paired successfully and
sports data will be displayed.
FUNCTIONS
OF THE REMOTE
CONTROL
KEY
Press the key in standby mode; then, the treadmill will start running
at the lowest speed of 1.0Km/h after a 3-second countdown.
Press the key in running mode and the treadmill will stop running.
Speed up: Press the key to increase the speed by 0.5Km/h each time;
press and hold the key"+" to increase the speed by 0.5Km/h
continuously.
Slow down: Press the key to decrease the speed by 0.5Km/h each time;
press and hold the key"-" to decrease the speed by 0.5Km/h
continuously.
Function display: The display screen displays the speed data while adjusting the speed.
The display screen will switch the function menu per 5s and circularly display time,
speed, distance, and calories while not adjusting the speed.
Start/Stop
Speed up
Calories
Speed
Time
Distance
Slow down

15
PARAMETER DISPLAY AND SETTING RANGE
Speed
Time
Distance
Heat
Display range
1.0 -14Km/h
0:00-99.59
0~99.9KM
0KCL-999KCL
MODE
The three-in-one treadmill has three modes: running machine mode (with the
upright column erected), walking machine mode (with the upright column
folded) and working mode (with table installed).
Running treadmill mode
When the upright column is erected, it is in running machine mode, at the speed of 1.0-
14Km/h.
Walking machine mode
When the standing pipe is folded (see page 14-15), the machine is in walking mode,
during which, the running speed of the belt is 1.0-6.0Km/h
.

16
Working mode
When the standing pipe is folded (see page 14-15), have the multifunctional table
installed at the same time. In the working mode, it needs to be operated by the
remote
control, and the running speed of the belt is 1.0-6.0Km/h.
FOLDING
Please turn off the power switch and remove the power plug before folding.
1. Remove the multifunctional table.
a. Loosen the fixing hooks on the armrests under the table.

17
b.Remove the table from the console and the armrest.
2. Pull out the stoppers under the left and right sides according to the shown direction.
3.Flip the armrests to the position as shown in the figure in the direction of the
arrow as the shown step
G)
in the figure below. Then hold the left and right upright
columns and lower them to the stoppers as the shown step
®·

18
ERROR CODE
ERROR CODE
FAULT ANALYSIS
HANDLING METHOD AND SEQUENCE
E01
Poor signal
The signal line is not plugged in
properly. Plug it in well.
E02
The motor wire is loose or
falling off, or check whether
the carbon brush 1s worn
out
Check whether the motor wire is loose
or falling off. If not, check whether the
carbon brush is worn out. If it is worn
out, replace the motor; If not, which
means the ECU is damaged, then
replace the EC.
E03
No sensing signal
The sensor cable is not plugged in
properly.
E04
The controller or the
motor is abnormal
Overloaded, replace the controller
and the motor.
E0S
Overload protection
Overloaded, replace the electric
control
E06
Failed to self-check the
system
System fault, replace the electric
control.
E07
The safety lock is not
sucked
Turn off the power supply, and power
on again after 1 minute
Abnormal
display
Outside interference
Turn off the power supply, and power
on again after 1 minute.
SPECIFICATIONS
Folded size
1346*691*125 mm
Unfolded Dimension
1292*691*948 mm
Running area
420*1080 mm
Motor Power
735W
Speed range
1.0 -14Km/h
Maximum load bearing capacity
130 KG, 286LBS
Machine Weight
39.6 KG, 87.3LBS
Controlling Mode
Console&Remote control

19
MAINTENANCE
GENERAL
CLEANING:
Proper maintenance is helpful to prolong the service life of the treadmill.
Please
place the treadmill in a dry and shady environment. Do not place the treadmill
outdoors in direct sunlight.
Check and lock all parts of the treadmill regularly, and replace defective parts in
time.
Do not use the treadmill by force when it is damaged, so as to avoid product and
personal damage.
TREADMILL ADJUSTMENT:
The treadmill Tread-belt is adjusted before leaving the factory, but after use, it will
be stretched or have deviated from the center position. Please adjust it in time to
avoid damage to the treadmill.
Adjust the tightness of the Tread-belt
If you are using the treadmill, the Tread-belt slips or does not run smoothly, you can
adjust the tightness of the Tread-belt to improve it.
1. Insert the Allen key in the adjustment screw socket on the left side of the Tread-belt,
and turn the wrench clockwise to tighten the Tread-belt;
2. Repeat step 1 to adjust the right screw. Be sure in adjusting the screw to rotate the
same distance;
3. Repeat steps 1 and 2 until the Tread-belt doesn't slip;
4. If you need to loosen the Tread-belt, please turn the key counterclockwise, and note
that the left and right sides should rotate the same distance.
The Tread-belt should not be adjusted too tightly, otherwise it will damage the Tread-
belt, increase the pressure of the front/ rear rotary drum, damage the drum bearing,
produce noise and other problems.
Adjustment of Tread-belt position
When using the treadmill, because of the possible force difference exerted by two feet
and the unbalanced pressure exerted on the tread-belt, the tread-belt may deviate from
the center, but this deviation phenomenon is normal. Leave the treadmill running
unloaded for a period oftime and the tread-belt will automatically return to the center. If
it doesn't work, you need to adjust it manually.

20
1. Run the treadmill without load and adjust the speed to 1.0 - 1.5 Km/h;
2. Observe the distance from the Tread-belt to the left and right sidebars:
•If it deviates to the left, use an Allen key to turn the left screw clockwise;
•If it deviates to the right, use an Allen key to turn the right screw clockwise;
•If the Tread-belt is still not in the middle, repeat the above action until it is
adjusted to the middle;
Do not over-tighten the rotary drum as this will cause permanent damage to the
bearing.
LUBRICATING
THE
TREADMILL:
When the treadmill leaves the factory, Lubricant has been added, but necessary
inspection is more helpful to keep the treadmill in the best condition for use.
Inspection steps
1. Pull up the side Tread-belt and reach out to touch the surface of the running deck
as far as possible;
2. If you feel there is Lubricating oil, you don't need to add Lubricant for the time
being;
3. If you touch the surface and it feels very dry, you need to add 10ml Lubricating oil.
Tighten
Tighten
Table of contents
Languages:
Other UREVO Treadmill manuals