urmet domus 1043 User manual

DS 1043-028B LBT 7629
Mod.
1043
MANUALE D’INSTALLAZIONE ED USO DEI RIVELATORI GAS
SERIE SMART3 PER GAS INFIAMMABILI
USER MANUAL FOR
SMART3 SERIE EXPLOSIVE GAS DETECTORS

2
DS1043-028B LBT 7629
1 INTRODUZIONE
1.1 DESCRIZIONE
I Rilevatori di gas della serie “SMART3” vengono impiegati per rilevare,
in una atmosfera costituita principalmente da aria, la presenza di
sostanze combustibili, in concentrazioni esprimibili in % LIE (Limite
Inferiore di Esplosività).
Il sensore industriale (PELLISTORE) utilizzato nelle versioni per
miscele esplosive conferisce una precisione ed una selettività ottimale
con la maggior parte dei gas esplosivi, evitando al massimo falsi
allarmi.
Il microprocessore presente sulla scheda elettronica del rivelatore,
oltre al normale funzionamento èprovvisto dei seguenti algoritmi
software:
Autodiagnosi del sistema, che verifica costantemente il corretto
funzionamento dell’hardware, sensore compreso.
Durante tale fase il LED rosso lampeggia molto lentamente
Inseguitore di Zero per il mantenimento del parametro del sensore
prescindendo da possibili derive dovute a variazioni termiche o fisiche
del sensore stesso.
Filtro digitale che consente di correggere fenomeni transitori che
potrebbero causare una instabilità del sistema o errori di lettura con
conseguenti falsi allarmi;
Ciclo d’isteresi viene applicato alle uscite digitali associate alle
soglie d’allarme e consente l’eliminazione delle continue commutazioni
nell’intorno dei punti di soglia.
Watch-dog per il controllo del microprocessore. In caso di intervento
la corrente di uscita viene forzata a 0mA, il led rosso di segnalazione
resta acceso.
Se sul rilevatore èinstallata la scheda 3 relè, il relèdi Fault si attiva.
Il Rivelatore fornisce una uscita proporzionale in corrente (4-20 mA)
corrispondente allo 0 % del LIE (Limite Inferiore d’Esplosività).
Opzional disponibile:
•una scheda dotata di 3 relè(SKBR3N) con contatti puliti liberi da
tensione. Un relèèassociato all’uscita di Fault e watch-dog mentre
gli altri due possono essere associati a due delle tre soglie di allarme
presenti.
Il rivelatore “SMART3”viene commercializzato:
•nel contenitore antideflagrante
EEx d certificato ATEX (SMART3 AD);
•nel contenitore EEx nA (SMART3 DU).
1.2 CARATTERISTICHE TECNICHE PER GAS
ESPLOSIVI
Elemento sensibile: PELLISTORE NEMOTO serie NET PEL
Testa sensore: Certificata ATEX
CESI 01ATEX013U o
CESI 01ATEX066U
Campo di misura: 0 -100% LIE
Risoluzione: Out analog 0.1 mA
Alimentazione: 12- 24 Vdc - 20% + 15%
Assorbimento a 12Vcc: 140 mA (medio);
180 mA (massimo)
Unitàdi controllo: Microprocessor 10 bit
Segnalazioni luminose: Led ad intermittenza
Uscita proporzionale: 4-20 mA (default) o 0-10-20mA
Uscite a relècon led
di indicazione stato (opzionale):
N°3 relècontatti in
scambio liberi da tensione 24V-1A
Procedura di autozero: Compensazione delle
derive di zero
Filtro digitale: medie mobili sui valori acquisiti
Risoluzione: 1024 punti
Precisione: ±5% F.S.oppure 10% della lettura
Tempo preriscaldamento: 5 minuti
Tempo stabilizzazione: < 1 minuto
Tempo di risposta: < 30 sec. T50; < 60 sec. T90
Ripetibilità: ± 5% del F.S. oppure 10% della lettura
Temperatura di stoccaggio: -25 / + 60 °C
Temperatura operativa: -10 / + 55 °C
Umiditàrelativa: 20-90 % Rh / 40°C
Pressione di esercizio: 80-110 KPa
Velocitàdell’aria: < 6 mS
Peso: Eex d 700 gr., EEx nA 400 gr.
Watch-dog: Interno per il controllo del microprocessore
Dimensioni: EExd: L.105, H. 200, D. 110 mm
Eexn: L.106, H.180, D.62 mm.
Orientamento:
Installazione verticale con sensore
rivolto verso il basso
Certificazione ATEX: Per versione
EEx d CESI01ATEX053
In conformitàalle normative:
EN50014:1997+A1..A2
EN50018: 2000
INDICE
1 INTRODUZIONE ..................................................................................................................................................................................................2
1.1 Descrizione...................................................................................................................................................................................................2
1.2 Caratteristiche tecniche per gas esplosivi ....................................................................................................................................................2
2 PREDISPOSIZIONE DEL SITO D’INSTALLAZIONE............................................................................................................................................3
3 INSTALLAZIONE...................................................................................................................................................................................................3
3.1 Modalitàper il corretto montaggio ................................................................................................................................................................3
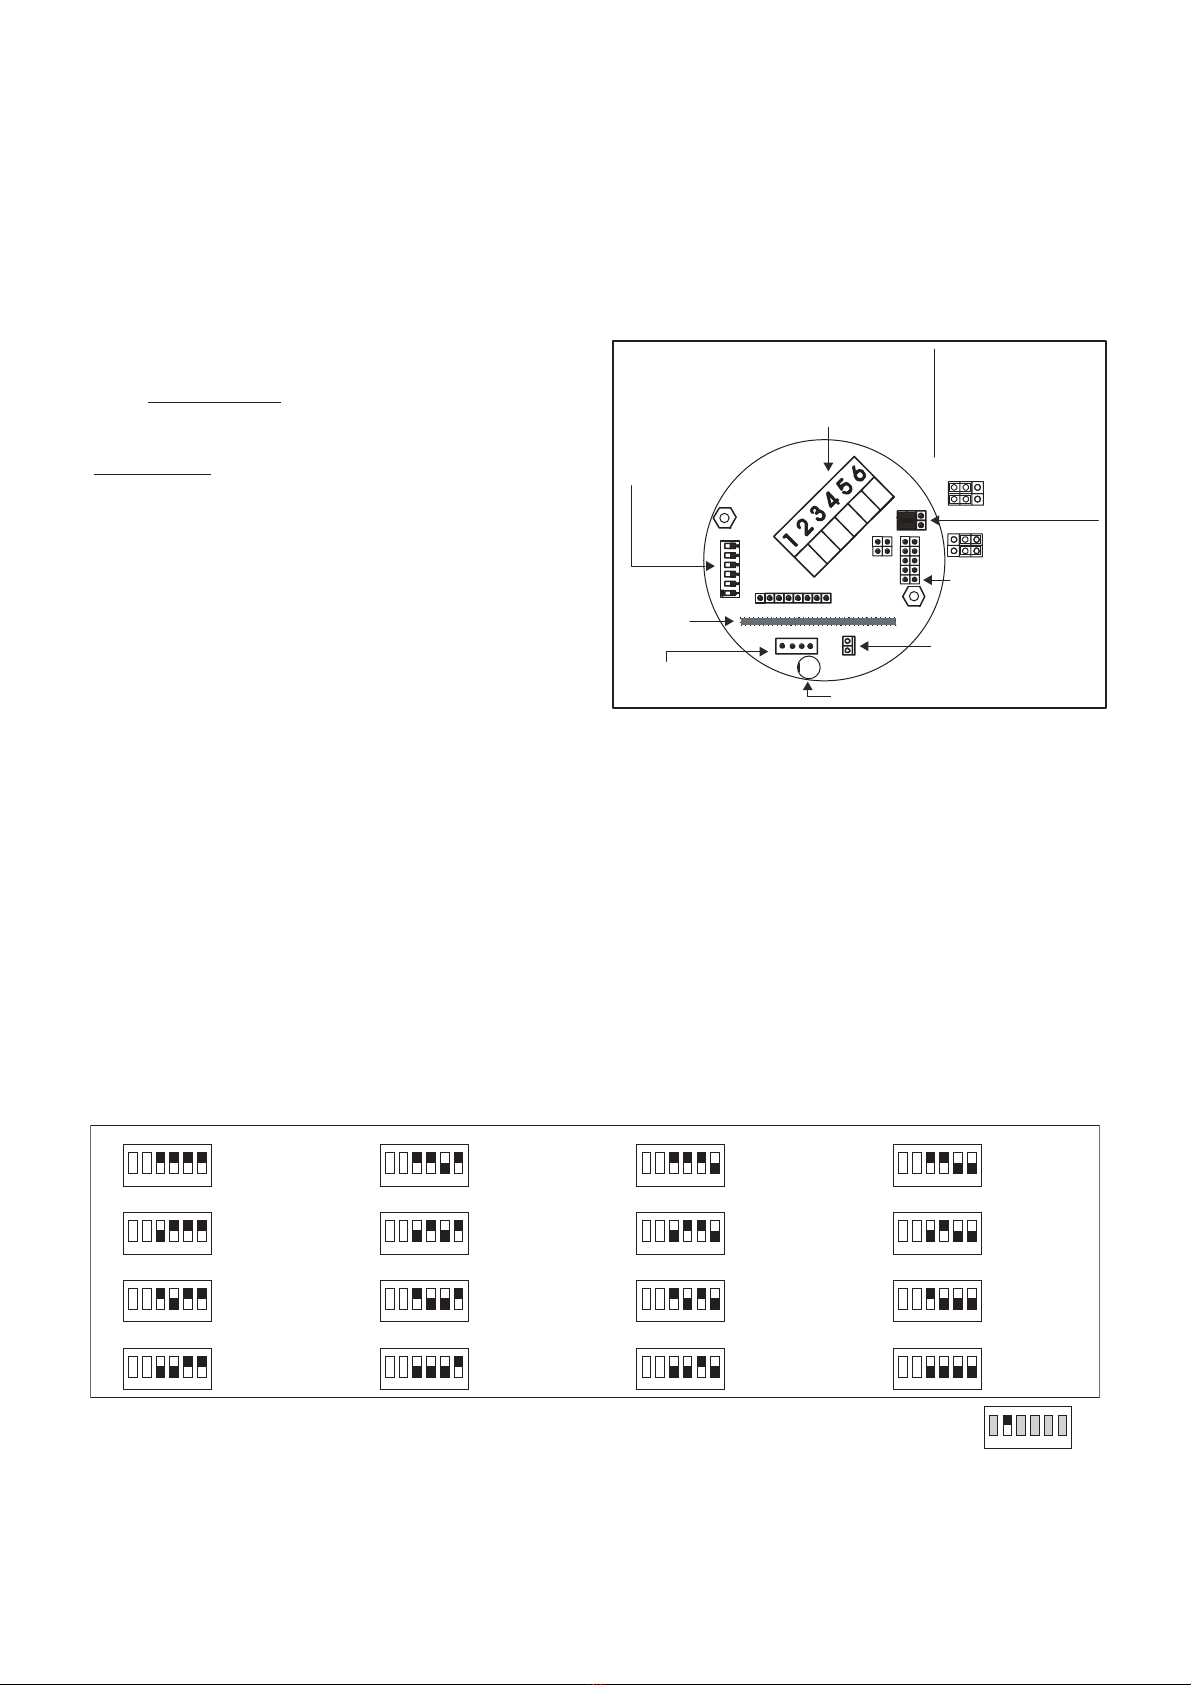
3.2 Schema topografico......................................................................................................................................................................................3
3.2.1 Schema topografico scheda 3 relè(opzionale) ...................................................................................................................................3
3.2.2 Programmazione del rivelatore............................................................................................................................................................3
3.3 Collegamento, modalitàstand alone oppure uscita 4-20 mA .......................................................................................................................4
4 COLLAUDO E USO...............................................................................................................................................................................................4
4.1 Accensione ...................................................................................................................................................................................................4
4.2 Collaudo........................................................................................................................................................................................................4
4.3 Uso ...............................................................................................................................................................................................................4
5 MANUTENZIONE..................................................................................................................................................................................................4
5.1 Manutenzione preventiva..............................................................................................................................................................................4
5.2 Manutenzione correttiva ...............................................................................................................................................................................4
5.3 Istruzioni per la dismissione
6 SEGNALAZIONI DI ALLARME E DI GUASTO......................................................................................................................................................4
7 IDENTIFICAZIONE RIVELATORI .........................................................................................................................................................................4
ITALIANO

3
DS1043-028B LBT 7629
2 PREDISPOSIZIONE DEL SITO
D’INSTALLAZIONE
Durante le operazioni di montaggio/installazione, gli impianti devono
essere messi in sicurezza. Ricordiamo anche come in fase di
installazione sia opportuno tenere in considerazione alcune norme
generali in quanto un posizionamento non corretto puòpregiudicare il
funzionamento ottimale del rivelatore. Si raccomanda di non installare
rivelatori gas nelle vicinanze di prese d’aria e/o ventilatori che
provocano forti correnti d’aria.
I rivelatori non devono essere altresìposti in zone nelle quali siano
presenti vibrazioni e, sebbene immuni da disturbi a radiofrequenze è
consigliabile non installarle in prossimitàdi emettitori radio (ponti radio
o apparecchiature simili).
Altra buona norma èquella di installare il rivelatore in zone facilmente
accessibili per le operazioni di test e calibrazione.
Tutti i gas piùleggeri dell’aria, disperdendosi nell’ambiente
occuperanno la parte alta dell’ambiente ed il rivelatore deve quindi
essere posizionato a 30 cm dal soffitto per ottenere un efficace
intervento.
I gas piùpesanti dell’aria, GPL, Butano, Vapori benzina al contrario,
disperdendosi stazioneranno nella parte bassa dell’ambiente ed il
rivelatore deve quindi essere posizionato a 30 cm dal pavimento.
Vi sono alcune sostanze che se presenti nella atmosfera da analizzare
possono alterare considerevolmente la risposta del sensore fino a
danneggiarlo irrimediabilmente (es. siliconi, silicati alogeni, tetraetile di
piombo, acido solfidrico, tetracloruro di carbonio tricloroetilene-trielina
).
Allorchési presuma la presenza di queste sostanze, si consiglia di
verificare frequentemente e sempre dopo ogni intervento degli allarmi,
la sensibilitàdel rilevatore con gas di taratura.
Il rilevatore viene calibrato in fabbrica specificamente per la sostanza
richiesta dal cliente. Non èpossibile successivamente modificare la
taratura dello stesso, se non da parte del costruttore, in quanto trattasi
di una procedura che richiede procedure ed attrezzature particolari.
3 INSTALLAZIONE
3.1 MODALITÀPER IL CORRETTO MONTAGGIO
Il rivelatore deve sempre essere installato con l’elemento sensibile
(testa di rivelazione) rivolta verso il basso. Il contenitore del rivelatore,
per nessuna ragione deve essere forato; per il fissaggio utilizzare i
fori giàesistenti.
Per la versione EEx d da installare in aree classificate esplosive si
raccomanda l’utilizzo di pressacavi antideflagranti per sigillare l’entrata
dei cavi.
3.2
SCHEMA TOPOGRAFICO CIRCUITO
3.2.1 SCHEMA TOPOGRAFICO SCHEDA 3 RELÈ(OPZIONALE)
Consultare il manuale fornito con la stessa
3.2.2 PROGRAMMAZIONE DEL RIVELATORE
Il rilevatore viene calibrato per il gas specificato al momento
dell’acquisto. Successivamente èpossibile ricalibrare lo strumento
utilizzando l’apposito strumento come specificato al punto 5.2.
Il rilevatore viene configurato per avere di default una uscita
proporzionale 4-20mA.
Èpossibile ottenere uscite a 0-10-20mA corrispondenti a:
•0mA: condizione di normale funzionamento o guasto
•10mA: superamento prima soglia di allarme
•20mA: superamento seconda soglia di allarme
Configurando diversamente i dip-switch presenti sulla scheda base
si possono modificare le soglie di allarme. Anche disponendo della
scheda opzionale a 3 relèèpossibile modificare le soglie di intervento
dei relècome indicato nella tabella seguente.
123
123
123
Circuito rivelatore
DIP-SWITCH
per selezionare
le soglie
Scheda
amplificatore
analogica
Connessione
elemento sensibile
Morsettiera di
collegamento estraibile
4-20mA
Uscita negativa
"DEFAULT"
J11 Connettore per
scheda display o relé
Connettore di misura
per controllo
parte analogica
Jp4
Jp3
1 +Vcc 12-24V.
2 Rs485 A
3 Rs485 B
4 Gnd
5 +Vcc 12-24V.
6 +/- 4-20mA OUT
Led di indicazione di stato
4-20mA
Uscita positiva
1
11
Custom
123456
ON
2
23 5 10
123456
ON
3
35 10 15
123456
ON
4
45 10 20
123456
ON
4
123456
ON
5
10 15 30
123456
ON
6
10 20 30
123456
ON
7
10 25 35
123456
ON
10 15 25
8
123456
ON
9
15 30 45
123456
ON
10
25 35 50
123456
ON
11
20 40 60
123456
ON
15 25 40
12
123456
ON
13
Non usata
123456
ON
14
19 18 17
123456
ON
15
19 17 15
123456
ON
2
ON
23 25 27(*)
(**)
(**)
PROGRAMMAZIONE JUMPERS PER SOGLIE DI ALLARME RILEVATORE
(VALORI IN % RIFERITI AL FONDO SCALA)
I DIP SWITCH PER IMPOSTARE LE SOGLIE DI ALLARME SONO I N. 3 - 4 - 5 - 6
IL DIP SWITCH N. 1 NON ÈUTILIZZATO E DEVE ESSERE IN POS. OFF
(*) SOLO PER RILEVATORI DI ARRICCHIMENTO DI OSSIGENO
(**) SOLO PER RILEVATORI DI DEFICENZA DI OSSIGENO
IL DIP SWITCH N. 2 SELEZIONA LA MODALITÀ
DELL'USCITA IN CORRENTE
Posizionare ON: uscita analogica proporzionale in corrente (4-20 mA)
corrispondente allo 0-100% del fondo scala del rilevatore.
Posizionare OFF: uscita Doppia Soglia 10-20 mA per centrali
a variazione di assorbimento (le so
g
lie operative sono la 1 e la 2).

4
DS1043-028B LBT 7629
3.3 COLLEGAMENTO, MODALITÀSTAND ALONE
OPPURE USCITA 4-20 MA
Verificare che nella confezione ci siano tutte le parti componenti. Per il
collegamento del sensore con l’unitàdi elaborazione e alimentazione
si raccomanda l’uso di cavo schermato. La sezione del cavo da
utilizzare dipende dalla distanza del rilevatore dalla centrale:
•
per distanze inferiori a 100 mt. si usino cavi con sezione di 0.75 mm
2
;
• per distanze comprese fra 100 e 200 mt si usino cavi con sezione
di 1.0 mm2;
• per distanze comprese fra 200 e 300 mt si usino cavi con sezione
di 1.5 mm2.
Nel caso vi siano giunzioni nel cavo di collegamento, assicurarsi che
vi sia continuitàanche sulla schermatura dei cavi.
Ricordarsi che la schermatura deve essere collegata a terra unicamente
dal lato unitàdi controllo o gruppo di alimentazione, mentre non dovrà
mai essere collegata sui rilevatori.
Assicurarsi che la realizzazione di giunzioni sui cavi di alimentazione
mediante dispositivi di serraggio o a crimpare, sia eseguito a regola
d’arte con capicorda e/o morsetti che nel tempo non si ossidino o
allentino. Èsempre preferibile eseguire giunzioni saldate.
Il rilevatore SMART3 puòessere collegato a centrali di sicurezza di
qualsiasi tipo. Le prestazioni migliori si ottengono con una centrale
di tipo analogico 4-20 mA con indicazione proporzionale della
concentrazione di gas in ambiente.
SCHEMA COLLEGAMENTO per 4-20 mA
Nello schema seguente viene riportato il tipico collegamento di un
rilevatore SMART3 ad una centrale Urmet Domus.
N.B.
NEL CASO DI CENTRALI CON INGRESSO 4-20 MA È POSSIBILE
COLLEGARE 1 SOLO RILEVATORE A CIASCUN INGRESSO.
4 COLLAUDO E USO
4.1 ACCENSIONE
Al momento in cui il circuito viene alimentato, si accende, ad
intermittenza lenta, il led rosso sulla scheda base. L’uscita in corrente
è1,5mA circa. Trascorsi 2 minuti circa il led rosso lampeggia con una
frequenza pari allo stato in cui si trova il rilevatore (vedere Tabella al
punto 4.3) e l’uscita in corrente si porta a 4,0mA.
Terminata la fase di preriscaldamento il rilevatore èin grado di
funzionare correttamente. Sono comunque necessarie 2 ore circa
affinchéil rilevatore raggiunga le prestazioni ottimali.
4.2 COLLAUDO
Verificare la risposta del rivelatore utilizzando una miscela idonea
oppure con vapori di alcool.
4.3 USO
Il rivelatore funziona automaticamente e autonomamente pertanto non
èrichiesto alcun contributo da parte del suo utilizzatore.
In caso di malfunzionamento il rilevatore forza l’uscita a 1.8mA circa.
Se la concentrazione di gas misurata supera il 100 % LIE, il LED
sul circuito stampato si accende come per la segnalazione del fault;
l’uscita viene forzata a 23 mA e per ripristinare il corretto funzionamento
del rivelatore si dovràtogliere e ridare alimentazione.Il LED rosso
lampeggiante posto sulla scheda base del circuito indica lo stato in cui
il rilevatore si trova come illustrato nella tabella sottostante.
5 MANUTENZIONE
5.1 MANUTENZIONE PREVENTIVA
Tutti i RIVELATORI DI GAS ad uso industriale, secondo la direttiva
CEI 31-35 CAP. IV, devono essere controllati ogni tre-sei mesi.
I risultati delle prove effettuate dovranno essere registrate su di un
apposito quaderno da esibire alle autoritàcompetenti e seguito di un
eventuale verifica.
Nel caso in cui siano presenti inquinanti nell’ambiente in grado
di alterare le caratteristiche originali dei sensori, le operazioni di
manutenzione dovranno essere effettuate con maggior frequenza.
5.2 MANUTENZIONE CORRETTIVA
Per anomalie riscontrabili durante il test funzionale rivedere la fase
di collaudo al capitolo 4. Se durante la manutenzione preventiva il
rilevatore non rileva il gas per cui ètarato, inviare il prodotto al fornitore
dello stesso che a sua volta provvederàad inviarlo al costruttore.
Èpossibile ricalibrare il rilevatore utilizzando il dispositivo di
acquisizione dei parametri da richiedere al fornitore (CAL-GAS).
5.3
ISTRUZIONI PER LA DISMISSIONE
Togliere alimentazione al rilevatore, scablare la morsettiera e rimuovere il
contenitore dalla tubatura metallica e dai relativi sistemi di bloccaggio.
6
SEGNALAZIONI DI ALLARME E DI GUASTO
Per l’utilizzo in stand alone del rivelatore SMART3 ènecessario
disporre della scheda 3 relè(SKBR3N). Su questa scheda si possono
verificare gli stati di allarme e di guasto tramite gli appositi led.
7
IDENTIFICAZIONE RIVELATORI
RIVELATORI EEx n
RIVELATORI EExd
COLLEGAMENTO RILEVATORI UTILIZZANDO
L'USCITA (4-20 mA)
CON CENTRALI ANALOGICHE 4-20mA
MORSETTIERA
CENTRALE
CAVO SCHERMATO 3 X 0,75
S
+
-
1 2 3 4 5 6
MORSETTIERA
RILEVATORE
1 +Vcc 12-24V. 4 GND
2 Rs485 A 5 +Vcc 12-24V.
3 Rs485 B 6 +/- 4-20mA OUT
segnale
aliment.
aliment. (-)
(+)
Frequenza lampeggio in secondi Significato
1 ON - 1 OFF Tempo pre-riscaldo
1 ON - 1 OFF Normale funzionamento
0,1 ON - 1 OFF Allarme 1
2 x 0,1 ON - 1 OFF Allarme 2
3 x 0,1 ON - 1 OFF Allarme 3
ON Over Range
ON Guasto-W.D.
Codice Descrizione
1043/721 Rivelatore di gas metano
1043/722 Rivelatore di Vapori di Benzina
1043/723 Rivelatore di gas GPL
1043/724 Rivelatore di gas Propano
1043/725 Rivelatore di gas Butano
1043/726 Rivelatore di CO
1043/728 Rivelatore di gas Pentano
1043/729 Rivelatore di Idrogeno
1043/730 Rivelatore di gas Etanolo
1043/731 Rivelatore di Ammoniaca
Codice Descrizione
1043/701 Rivelatore di gas metano
1043/703 Rivelatore di gas GPL
1043/704 Rivelatore di gas Propano
1043/705 Rivelatore di gas Butano

5
DS1043-028B LBT 7629
INDEX
1 INTRODUCTION ...................................................................................................................................................................................................5
1.1 Description....................................................................................................................................................................................................5
1.2 Explosive gas technical characteristics ........................................................................................................................................................5
2 INSTALLATION SITE PREARRANGEMENT........................................................................................................................................................6
3 INSTALLATION .....................................................................................................................................................................................................6
3.1 Correct positioning mode..............................................................................................................................................................................6
3.2 Detector circuit layout ...................................................................................................................................................................................6
3.2.1 3-relay card layout (optional) ...............................................................................................................................................................6
3.2.2 Detector programming.........................................................................................................................................................................6
3.3 Stand alone or 4-20 mA output connection ..................................................................................................................................................7
4 TESTING AND WORKING OPERATION..............................................................................................................................................................7
4.1 Power ON .....................................................................................................................................................................................................7
4.2 Testing..........................................................................................................................................................................................................7
4.3 Use ...............................................................................................................................................................................................................7
5 MAINTANCE .........................................................................................................................................................................................................7
5.1 Preventive maintance routine .......................................................................................................................................................................7
5.2 Corrective maintance routine........................................................................................................................................................................7
5.3 Disassembly instructions ..............................................................................................................................................................................7
6 ALARM AND FAULT INDICATIONS .....................................................................................................................................................................7
1 INTRODUCTION
1.1 DESCRIPTION
“SMART3”gas detectors are used in atmospheres where the principal
constituent is air to detect the presence of combustible substances,
with concentrations expressed as a % LEL (Lower Explosion Limit).
The professional industrial type catalytic sensor (PELLISTOR)
employed for the detection of flammable compounds offers a great
precision and selectivity with most of the explosive gases, thus avoiding
false alarms.
The management software incorporates algorithms designed to correct
the effects of transients, which may cause unstable operation or
incorrect readings with associated false alarms.
The main software algorithms are:
Self diagnostic procedure to control the detector main operational
parts, both hardware and sensing element.
During this phase the red LED blinks very slowly
Zero point tracking to maintain the zero parameter of the sensor
apart from possible drifts due to thermal or physical variations of the
sensor.
Digital filter employed in the digital analysis of the analogue values
sampled, it allows correcting phenomena that might cause system’s
instability or wrong readouts thus provoking false alarms.
Hysteresis cycle applied to the outputs to eliminate continuous O.C.
switching close to the preset alarm thresholds.
Watch-dog for the microprocessor control. In case of intervention the
output current drops down to 0mA.
The red LED stops blinking and remains on.
If the 3-relay card is plugged in, Fault relay will activate.
The detector offers a proportional output current (4-20mA)
corresponding to 0 % LEL (Lower Explosion Limit).
Available optional:
• A three-relay card (SKBR3N) with tension free changeover contacts.
One relay is associated to Fault and Watch-dog. The remaining two
are to be associated to two out of the three preset thresholds.
“SMART3”detectors are available:
• in Explosion proof EExd ATEX certified enclosure (SMART3 AD);
• in EEx nA enclosure (SMART3 DU).
1.2
EXPLOSIVE GAS TECHNICAL CHARACTERISTICS
Sensing element: NET PEL NEMOTO PELLISTOR
Sensor head: ATEX certificate
ATEX CESI 01ATEX013U or CESI 01ATEX066U
Measurement range: 0 –100 % LEL
Resolution: Out analog 0.1 mA;
Power supply: 12- 24 Vdc - 20% + 15%
Consumption at 12Vdc: 140 mA (medium);
180 mA (max)
Control unit: Microprocessor 10 bit
Visual indications: Flickering LED
Proportional output: 4-20 mA (default) or
0-10-20mA
Relay outputs, with status
indicating LED (optional):
3 relays with tension free
changeover contacts 24V-1A
Auto zero routine: Zero drift compensation
Digital filte: variable average on the values sampled
Resolution: 1024 points
Precision: ±5% full scale or 10% readout
Warm-up time :5 minutes
Stabilization time: < 1 minutes
Response time: < 30 sec. T50; < 60 sec. T90
Repeatability: ±5% Full scale or 10% readout
Storage temperature: -25 / + 60 °C
Operating temperature: -10 / + 55 °C
Relative humidity: 20-90 % Rh / 40°C
Operative pressure: 80-110 KPa
Air velocity: < 6 mS
Weight: Eex d 700 gr. EEx nA 400 gr.
Watch-dog:
Internal, for the microprocessor status control
Dimension: EExd: L.105, H. 200, D. 110 mm
Eexn: L.106, H.180, D.62 mm.
Orientation: The detector must be mounted
sensor head downward
ATEX certificate:
CESI01ATEX053 for EEx d version
In compliance with
EN50014:1997+A1..A2
EN50018: 2000
ENGLISH

6
DS1043-028B LBT 7629
2
INSTALLATION SITE PREARRANGEMENT
At the mounting/installation phase be sure all safety precautions have
been considered.
Always consider how important it is the correct positioning of gas
detectors to get the optimum response. Be careful never to install gas
detectors close to air intakes or fans causing strong air currents.
Be sure the detectors are attached to a firm base to prevent vibration
that can damage them, producing unreliable results.
Although the electronics comply with the electromagnetic compatibility
rules, it is advised to keep the detectors at a distance from any radio
frequency senders (such as radio links or similar).
Please be also sure that detectors are placed in a convenient location
for future maintenance and calibration requirements.
All of the gas lighter than air tend to spread upwards so the detector
should be placed at 30 cm from the ceiling in order to maximise the
effectiveness of the detection.
LPG as well as Butane, Gasoline vapours and all of the gases
heavier than air tend to spread downwards so the detector should be
placed at 30 cm from the floor.
There are some substances that, when present in the atmosphere
being analysed, can considerably change the response of the sensor
and even damage it irremediably, in particular silicones, silicon
halides, tetraethyl lead, hydrogen sulphide, carbon tetrachloride,
trichlorethylene
Whenever their presence is presumed, it is recommended to check the
detector’s sensitivity at short time intervals, and always after an alarm
intervention, with sample gas bottles.
Detectors are factory calibrated for the specific gas required by the
customers. Future modification of the preset calibration can be carried
out in our Laboratory only, it being a procedure requiring specific
procedures and equipments.
3 INSTALLATION
3.1 CORRECT POSITIONING MODE
The detector is always to be mounted with the sensing element placed
downward. For no reasons at all the enclosure can be drilled. Wall
mount the detectors by employing the existing holes.
For EEx d versions to be mounted in classified hazardous areas we
advise to use explosion proof cable glands to seal the cables inlets.
3.2 DETECTOR CIRCUIT LAYOUT
3.2.1 3-RELAY CARD LAYOUT (OPTIONAL)
Please refer to the technical instruction supplied along with the card.
3.2.2 DETECTOR PROGRAMMING
Detectors are factory calibrated for the specific gas required by the
customers. Future modification of the preset calibration can be carried
out by employing the instrument described on paragraph 5.2.
The default configuration provides a 4-20mA proportional output.
It is also possible to have outputs set at 0-10-20mA corresponding to:
•0mA: correct working condition or Fault
•10mA 1st alarm threshold attainment
•20mA 2nd alarm threshold attainment.
By modifying the dipswitches configuration on the motherboard,
different alarm thresholds might be obtained.
It is also possible to modify the relay intervention when using the
3-relay card, as per the following table:
123
123
123
Detector circuit layout
Thresholds
setting point
DIP-SWITCH
Analog
amplifier
board
Sensing
element connection
Main plugin terminal board
for connections
4-20mA
Negative output
mode "DEFAULT"
J11 Plug-in connettor
for display or
relay board
Measure connettor for
checking of analog
circuit part
Jp4
Jp3
1 +Vcc 12-24V.
2 Rs485 A
3 Rs485 B
4 Gnd
5 +Vcc 12-24V.
6 +/- 4-20mA OUT
Status led indication
4-20mA
Positive output
mode
1
11
Custom
123456
ON
2
23 5 10
123456
ON
3
35 10 15
123456
ON
4
45 10 20
123456
ON
4
123456
ON
5
10 15 30
123456
ON
6
10 20 30
123456
ON
7
10 25 35
123456
ON
10 15 25
8
123456
ON
9
15 30 45
123456
ON
10
25 35 50
123456
ON
11
20 40 60
123456
ON
15 25 40
12
123456
ON
13
Not used
123456
ON
14
19 18 17
123456
ON
15
19 17 15
123456
ON
2
ON
23 25 27(*)
(**)
(**)
ALLARM LEVELS JUMPERS PROGRAMMING
(% VALUES REFERRED TO THE DETECTOR'S RANGE)
ONLY DIP SWITCHES No. 3 - 4 - 5 - 6 ARE TO BE USED TO SET ALARM LEVELS
THE SWITCH No. 1 IS NOT USED AND MUST BE IN OFF POSITION
(*) JUST FOR ENRICHEMENT OXYGEN GAS DETECTOR VERSION
(**) JUST FOR DEPLETION OXYGEN DETECTOR VERSION
THE DIP SWITCH No. 2 SELECTS
THE CURRENT OUTPUT MODE
ON Position: 4-20 mA transmission output proportional
to the detector range: 0-100%.
OFF Position: 10-20 mA current loop output to operate with
fire control panels usiging a current/voltage conversion
(the operative thresholds are the 1st and 2nd)

7
DS1043-028B LBT 7629
3.3 STAND ALONE OR 4-20 MA OUTPUT
CONNECTION
Please check the carton box comprises all of the components.
Wiring between the detector and the control panel should be carried
out with shielded cables. Wires’cross section depends on the distance
between the control panel and the detector:
• for a distance up to m 100 we advice a 3 core wire with cross section
area of 0.75 mm2;
•
for a distance between m 100 and 200 we recommend 3 x 1.0 mm
2
;
•
for a distance between m 200 and 300 we recommend 3 x 1.5 mm
2
.
Should any junctions be necessary on the wires, please make sure
there is no interruption on the shield.
Please remember that the shield is to be connected to the ground from
the control panel side only. Also remember never to connect the shield
to the connectors
Ensure the wire connections, either clutching or crimping type, are duly
carried out with terminals that do not oxidise or loosen. Better of all
would be to solder them.
The SMART3 gas detectors are designed to be connected to any
control unit accepting a 4-20 mA input signal, better when panels have
an LC display for the proportional readout of the concentration.
4-20 mA CONNECTION DIAGRAM
The following drawing shows the connection of a SMART3 detector
to a Urmet Domus control panel.
N.B.: CONTROL PANELS ACCEPTING A 4-20MA INPUT SIGNALS
ALLOW THE CONNECTION OF ONLY ONE DETECTOR PER
INPUT.
4 TESTING AND WORKING OPERATIONS
4.1 POWER ON
When the detector is powered on, the red LED on the motherboard
starts blinking at slow intermittence. Output current is nearly 1.5mA.
After two minutes the red LED intermittence frequency is equivalent
to its status (see table on paragraph 4.3) and the output current is
4.0mA.
Once the warm-up is over the detector starts working correctly and does
not need any further operation, although the optimal performances will
be reached after two hours.
4.2 TESTING
Testing should be carried out by using appropriate gas mixture or
alcohol vapour.
4.3 USE
The detector works autonomously and automatically. Once duly
connected no further operations are required.
In case of malfunction the current is forced to 1.8mA.
Should the measured gas concentration exceed 100 the red LED on
the motherboard lights up, as for the FAULT status signalling; output
current would be forced to 23mA and to reset the normal working
conditions it would be necessary power the unit off and on.
The flashing red LED on the motherboard indicates the detector’s
working condition as detailed in the following table:
5 MAINTENANCE
5.1 PREVENTIVE MAINTENANCE ROUTINES
All GAS DETECTORS are to undergo a working test every three to six
months, according to the EN 60079 –10.
Test results are to be recorded into a suitable book to be shown to the
Authority in case of inspection.
In environments where polluting elements might alter the original
sensor performances periodical testing should be carried out at shorter
time intervals.
5.2 CORRECTIVE MAINTENANCE ROUTINES
For any anomaly found during the working test please check the tests
performances as described on chapter 4. If during the preventive
maintenance performances the detector does not react to the gas it
has been calibrated for, please return the instrument to your supplier
that on his turn will return it to the manufacturer for repair.
It is possible to recalibrate the detector by employing the
parameter acquisition device available on request.
5.3 DISASSEMBLY INSTRUCTIONS
Power the unit off, disconnect the wires on the terminals and dismount
the housing from any blocking systems.
6 ALARM AND FAULT INDICATIONS
To employ SMART3 as stand alone detectors it is necessary to use the
3 relay card (SKBR3N).
The LEDs mounted on the relay card allow an easy check of alarm and
fault status.
4-20 mA CONNECTION
TO ANALOG CONTROL UNIT
CONTROL UNIT'S
TERMINAL BOARD
SHIELDED CABLE 3 X 0,75
S
+
-
1 2 3 4 5 6
GAS DETECTOR TERMINALS IDENTIFICATION
1 +Vcc 12-24V.
2 Rs485 A
3 Rs485 B
4 GND
5 +Vcc 12-24V.
6 +/- 4-20mA OUT
signal
aliment.
aliment. (-)
(+)
Flash rate seconds Meaning
1 ON - 1 OFF Start-up time
1 ON - 1 OFF Normal mode
0,1 ON - 1 OFF Alarm 1
2 x 0,1 ON - 1 OFF Alarm 2
3 x 0,1 ON - 1 OFF Alarm 3
ON Over Range
ON Fault-W.D.

20151 MILANO - Via Gallarate 218
Tel. 02.380.111.75 - Fax 02.380.111.80
00043 CIAMPINO (ROMA) - Via L.Einaudi 17/19A
Tel. 06.791.07.30 - Fax 06.791.48.97
80013 CASALNUOVO (NAPOLI)
Via Nazionale delle Puglie 3
Tel. 081.193.661.20 - Fax 081.193.661.04
30030 VIGONOVO (VENEZIA) - Via del Lavoro 71
Tel. 049.738.63.00 r.a. - Fax 049.738.63.11
DS 1043-028B LBT 7629
http://www.urmetdomus.com
e-mail:[email protected]
FILIALI
URMET DOMUS S.p.A.
10154 TORINO (ITALY)
VIA BOLOGNA 188/C
Telef. 011.24.00.000 (RIC. AUT.)
Fax 011.24.00.300 - 323
Call Center 011.23.39.801
STABILIMENTO
MT1015U
Other manuals for 1043
11
This manual suits for next models
3
Table of contents
Languages: