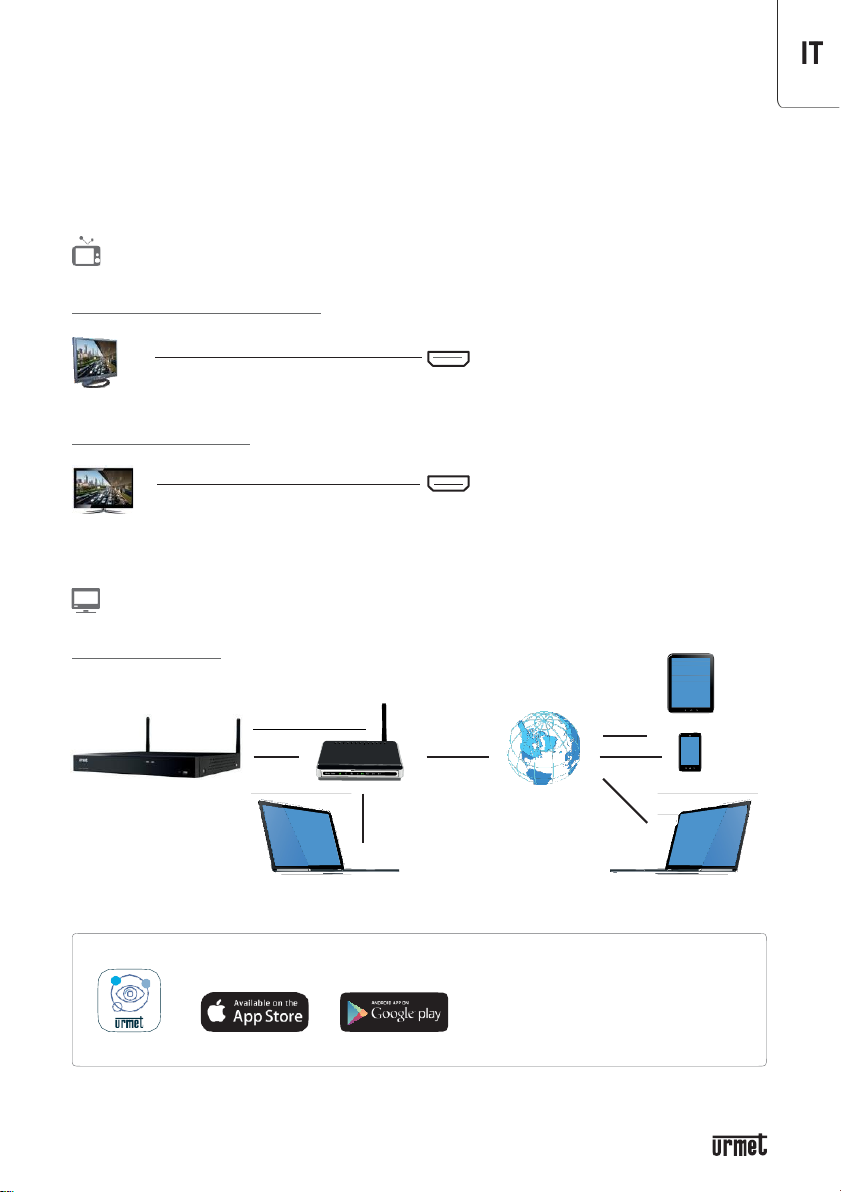
urmet domus H.265 WIFI NVR User manual

2
DS1098-046B
IT Cosa contiene il kit
Il kit contiene tutti i dispositivi, i cavi e i software che servono a installare, configurare e far funzionare il
sistema. È possibile eseguire l’installazione senza bisogno di competenze specialistiche.
2 telecamere wi-fi
Installabili a parete, complete di illuminatori
all’infrarosso per visione notturna, Led a luce
bianca e PIR
2 alimentatori per telecamere
Per il collegamento delle telecamere alla rete
elettrica dell’edificio
1 NVR H.265 a 8 canali 1098/820
Net Videorecorder digitale a 8 canali con hard
disk interno per la registrazione video
IMPORTANTE: le prestazioni Wi-Fi sono influenzate da
diversi fattori, le prestazioni funzionali del prodotto
descritto possono attenuarsi in caso di INTERFERENZE
causate da router wireless, stazioni base cellulari per
reti 4G o superiori, radar, forni a microonde e
sottostazioni elettriche. Inoltre la distanza tra NVR e
telecamere IP da collegare influisce sulle prestazioni
wireless. Per questi motivi si consiglia di limitare il
numero massimo di canali a 6.
1 mouse
Per programmare e controllare il funzionamento
dell’NVR
1 alimentatore per NVR
Per il collegamento dell’NVR alla rete elettrica
dell’edificio
1 CD
E

3
IT
Come visualizzare le immagini
Le immagini riprese dalle telecamere o memorizzate sull’hard-disk dell’NVR possono essere visualizzate
connettendo all’NVR un monitor HDMI oppure un TV color dotato di ingresso HDMI di ultima generazione. In
alternativa è possibile collegare l’NVR alla rete LAN domestica e, se questa è connessa a Internet, controllare
l’impianto anche da remoto da PC, smartphone e tablet o con l’ausilio di apposite applicazioni.
MONITOR CONNESSO ALL’NVR
Monitor con ingresso HDMI (opzionale)
Cavo HDMI
TV color digitale (opzionale)
CavoHDMI
COLLEGAMENTO DELL’NVR AL ROUTER PER CONNESSIONE DA REMOTO
PC o dispositivo mobile
WI-FI
Cavo LAN ADSL
iPhone
®
iPad®
Android®
iUVS plus
Con funzione di registrazione e Playback
direttamente su mobile e tablet.

4
DS1098-046B
IT Schema di collegamentogenerale
A partire dal pannello posteriore dell’NVR, il presente schema mostra come connettere tutti i componenti del
sistema.

5
IT
1. NVR URMET 1098/820
2. TELECAMERE WIFI URMET
3. USCITA HDMI PER MONITOR O TV
4. INGRESSO USB
5. ALIMENTATORI TELECAMERE
6. ALIMENTATORE NVR
7. INGRESSO LAN
8. INGRESSO ALIMENTAZIONE NVR
9. SLOT SD
Gli alimentatori vanno inseriti in prese poste in prossimità degli apparati e di facile accesso.

6
DS1098-046B
IT
Controllo e configurazionetramite
monitor o TV
Sesièsceltodiutilizzareilkitcollegandoall’NVRunmonitorounTVcolorconingressoHDMIdiultimagenerazione
è possibile utilizzare il menu dell’NVR per configurare il sistema e visualizzare le immagini, interagendo con il
sistema tramite il mouse incluso
Controllo e configurazione tramite PC
Collegando l’NVR alla LAN di casa tramite un cavo Ethernet 10/100 Mbps (non incluso) connesso alla porta
RJ45 o tramite connessione WiFi al router WiFi di casa, è possibile controllare il sistema da PC o da remoto,
se la LAN è collegata al web.
Una volta configurati NVR e telecamere in rete è possibile collegarsi all’NVR tramite browser internet del PC.
La postazione PC dev’essere connessa sulla stessa rete locale (LAN) cui è connessol’NVR.
Per effettuare la connessione all’NVR su PC con sistema operativo Windows e collegato alla stessa rete cui
è connesso l’NVR, installare il software “Device Config. Tool”: per il download del tool accedere al sito
www.urmet.com, nella sezione Prodotti “AREA VIDEOSORVEGLIANZA” e digitare il codice prodotto di
riferimento nel campo di ricerca. A installazione terminata eseguire il software, che rileverà l’NVR in rete
locale LAN e lo mostrerà in elenco, a questo punto cliccare sull’indirizzo IP dell’NVR visualizzato nell’elenco.
Per ulteriori informazioni fare riferimento al manuale d’uso o guida rapida dell’NVR.
E’ anche possibile collegarsi a uno o più NVR in contemporanea dal client software URMET UVS PRO,
disponibile al download dal sito www.urmet.com nella sezione Prodotti “AREA VIDEOSORVEGLIANZA” e
digitare il codice prodotto di riferimento nel campo di ricerca.
Per ulteriori informazioni fare riferimento al manuale d’uso o guida rapida dell’NVR.

7
IT
Caratteristiche della trasmissione
WiFi della telecamera edell’NVR
•
Standard di trasmissione: 802.11 b/g
•
Bande di frequenza utilizzate dai dispositivi: 2412-2472Mhz
•
Potenza massima trasmessa in radiofrequenza all’interno delle bande di frequenza utilizzate dai
dispositivi: 17 dBm
Cosa fare se...
1.
Ho modificato la password, ma non la ricordo più: come posso acecdere al sistema?
In caso di smarrimento della password contattare il servizio
clienti.
2.
Il videoregistratore è acceso ma non visualizzo alcuna immagine
Controllare l’alimentazione e il funzionamento degli apparati.
3.
Il videoregistratore si surriscalda spesso
Si raccomanda di posizionare l’NVR in un luogo in cui ci sia una buona circolazione d’aria, lontano da
fonti di calore, per favorirne la stabilità e la durata.
4.
La registrazione non funziona normalmente
Verificare che lo schermo corrente sia in modalità Play per uscrie dalla modalità di riproduzione ed entrare
nella funzione di registrazione [Record].
5.
È possibile registrare durante la riproduzione?
Sì, il sistema supporta la registrazione durante la riproduzione.
6.
È possibile cancellare dal videoregistratore alcuni fileregistrati?
Per motivi di integrità dei dati non è consigliato cancellare fii le registrati direttamente dal dispositivo.
Per cancellare davvero tutti i file registrati selezionare la funzione “formattare l’hard disk”.
7.
Perché il buzzer continua a suonare?
Verificare se è attivata la funzione di rilevazione movimento es e il sistema ha rilevato un movimento,
assicurarsi che l’hard disk funzioni correttamente e abbia sufficiente spazio disponibile; controllare che
non ci sia perdita del segnale video.
8.
Perché non riesco a utilizzare la funzione[Stop]?
Per fermare una registrazione programmata, modificare l’impostazione di quel periodo impostandola su
[No Record].

8
DS1098-046B
EN Kit contents
The kit contains all the devices, cables and software you need to install, configure and operate the system. No
special skills are needed for installation.
2 wi-fi cameras
Suitable for wall-mounting, complete with
infrared illuminators for night vision, white light
LED and PIR
2 camera power units
For connecting the cameras to the mains of the
building
1 H.265 8 channels NVR ref.1098/820
8 channel net video recorder with internal hard
disk for video recording
IMPORTANT: Wi-Fi Performance is affected by several
factors, the functional performance of the described
product may attenuate when there are INTERFERENCES
caused by wireless routers, 4G or higher Mobile Cellular
Base Stations, Radars, Microwave oven and Substation.
Moreover the distance between the NVR and the IP
Cameras to be linked will affect the wireless
performance. For these reasons, we recommend
limiting the maximum number of channels to 6.
1 remote control and 1 mouse
For programming and controlling NVR operation
1 power unit for NVR
For connect the NVR to the mains of the building
1 CD
E

9
EN
How to view images
The images filmed by cameras or stored on the hard disk of the NVR can be displayed by connecting an HDMI
monitor or a colour TV with the latest HDMI input to the NVR.. Alternatively, the NVR can be connected to the
home LAN and, if the latter is connected to the Internet, you can control the system remotely from a PC,
smartphone or tablet using specific apps.
MONITOR CONNECTED TO THE NVR
Monitor WITH HDMI port (optional)
HDMI cable
Digital colour TV (optional)
HDMI cable
REMOTE CONNECTION OF THE NVR TO THEROUTER
PC or mobile device
WI-FI
ADSL
LAN cable
iPhone
®
iPad®
Android®
iUVS plus
With recording and playback functions
directly to mobile and tablet.

10
DS1098-046B
EN General wiring diagram
Starting from the rear panel of the NVR, this diagram shows how to connect all system components.

11
EN
1. NVR URMET 1098/820
2. URMET WI-FI CAMERA
3. HDMI OUTPUT
4. USB INPUT
5. CAMERA POWER UNITS
6. NVR POWER UNIT
7. LAN INPUT
8. POWER INPUT NVR
9. SLOT SD
The socket-outlet shall be installed near the equipment and shall be easily accessible.

12
DS1098-046B
EN
Control and configuration via
monitor or TV
If you have chosen to use the kit by connecting a monitor or colour TV with next-generation HDMI port to the NVR,
you can use the NVR menu to configure the system and view the images. You can interact with the system using
the mouse included.
ControlandconfigurationviaPC
By connectingthe NVR to your home LANviaa 10/100 Mbps Ethernet cable (not included) connected to the RJ45 port or via
WiFi connection to your home WiFi router, you can control the system from your PC or remotely, if the LAN is connected to
the web.
After having configured NVR andcameras on thenetwork,the NVR can beconnected usingthe Internet browser
of the PC. The PC workstation must be connected to the LAN to which the NVR isconnected.
Install the “Device Config. Tool” software on a PC with Windows operating system connected to the same
network as the NVR to connect the NVR. To download the "Device Config. Tool" go to www.urmet.com, in the
Products section "CCTV VIDEO SURVEILLANCE AREA" and enter the reference product code in the search
field. At the end of installation, run the software which detects NVR on the LAN and located it on the list. At
this point, click on the IP address of the NVR shown on the list.
For more information, see the instruction manual of the NVR.
It is also possible to connect to one or more NVR at the same time using the URMET UVSPRO client software,
available for download from www.urmet.com in the Products section 'CCTV VIDEO SURVEILLANCE AREA' and
enter the reference product code in the search field.
For more information, see the instruction manual of the NVR.

13
EN
Specification of the WiFi transmis-
sion of the camera and of the NVR
•
Transmission standards: 802.11 b/g
•
Frequency bands in which the radio equipment operates: 2412-2472Mhz
•
Maximum radiofrequency power transmitted in the frequency bands in which the radio equipment
operates: 17 dBm
What to do if...
1.
I changed the password, but I have forgotten it. How can I access the system?
Contact customer care to recover the password.
2.
The video recorder is on but nothingappears
Check the power supply and that everything is working.
3.
The video recorder tends to overheat
You are advised to position the NVR in a well-ventilated place away from sources ofheat to promote stability
and working long-life of the device.
4.
The recording function is not working
Check that the current screen is in Play mode to close playback mode and open the [Record] function.
5.
Can I record while playing a recordingback?
Yes. You can record during playback.
6.
Can I delete recorded files from the videorecorder?
For the sake of data integrity it is not advisable to delete the recorded files directly on the device. Select
the “format hard disk” function to delete all files permanently.
7.
Why does the device keep buzzing?
Check whether the motion detection function is on and whether the system has detected motion. Make sure
that the hard disk is working correctly and that there is enough available free space; check for video signal
loss.
8.
I cannot use the [Stop] function. Why?
Set the time setting to [No Record] to stop a programmed recording.

14
DS1098-046B
DE Inhalt des Kits
Der Kit enthält sämtliche zur Installation, Konfiguration und Inbetriebnahme notwendigen Vorrichtungen, Kabel
und Software-Pakete. Die Installation kann ohne Bedarf an Fachkompetenzen ausgeführt werden.
2 WI-FI-Kameras
Komplett mit IR-Beleuchtung für die Nachtsicht
an der Wand installierbar, weißes LED-Licht
und PIR
2 Netzteile für Kameras
Für den Anschluss der Kameras an das
Stromnetz des Gebäudes
1 NVR H.265 mit 8 Kanälen 1098/820
Digitaler Net-Videorecorder mit 8 Kanälen und
interner Festplatte für die Videoaufzeichnung
WICHTIG: Die Wi-Fi-Leistung wird von verschiedenen
Faktoren beeinflusst. Die Funktionsfähigkeit des
beschriebenen Produkts kann durch Interferenzen
beeinträchtigt werden, die von drahtlosen Routern,
Mobilfunk-Basisstationen für 4G-Netze oder höher,
Radargeräten, Mikrowellenherden und elektrischen
Umspannwerken verursacht werden. Außerdem wirkt
sich die Entfernung zwischen dem NVR und den
anzuschließenden IP-Kameras auf die Funkleistung
aus. Aus diesen Gründen empfehlen wir, die maximale
Anzahl der Kanäle auf 6 zu begrenzen.
1 Maus
Zur Programmierung und Steuerung des
Betriebs des NVR
1 Netzteil für NVR
Für den Anschluss des NVR an das Stromnetz
des Gebäudes
1 CD
E

15
DE
Anzeigen der Bilder
Die von den Kameras aufgenommenen oder auf der Festplatte des NVR gespeicherten Bilder können durch
Anschließen eines HDMI-Monitors oder eines mit HDMI-Eingang der letzten Generation ausgestatteten
Farbfernsehgeräts an den NVR angezeigt werden. Alternativ dazu kann der NVR an das LAN-Heimnetz
angeschlossen und, wenn dieses über einen Internetanschluss verfügt, die Anlage auch standortfern über PC,
Smartphone und Tablet oder mit Hilfe entsprechender Applikationen gesteuert werden.
AN DEN NVR ANGESCHLOSSENERMONITOR
Monitor mit HDMI-Eingang (Option)
HDMI-Kabel
Digitales Farbfernsehgerät (Option)
HDMI-Kabel
ANSCHLUSS DES NVR AN DEN ROUTER FÜR STANDORTFERNEVERBINDUNG
PC oder mobiles Gerät
WI-FI
ADSL
LAN-
Kabel
iPhone® iPad® Android®iUVS plus
Mit Aufzeichnungs-und Playback-Funktion
direkt auf Mobiltelefon und Tablet.

16
DS1098-046B
DE Allgemeiner Anschlussplan
Von der Geräterückseite des NVR ausgehend zeigt dieser Plan, wie alle Anlagenkomponenten
anzuschließen sind.

17
DE
1. NVR URMET 1098/820
2. WI-FI-KAMERAS URMET
3. HDMI -AUSGANG
4. USB-EINGANG
5. KAMERANETZTEILE
6. NVR-NETZTEIL
7. LAN-EINGANG
8. LEISTUNGSAUFNAHME NVR
9. SLOT SD
Die Steckdose nahe der Einrichtung angebracht und leicht zugänglich sein mus

18
DS1098-046B
DE
Kontrolle und Konfiguration über
Monitor oder TV
Wenn Sie sich für die Verwendung des Kits entschieden haben, indem Sie einen Monitor oder Farbfernseher mit dem
neuesten HDMI-Eingang an den NVR anschließen, können Sie das NVR-Menü verwenden, um das System zu konfigurieren
und Bilder zu betrachten, wobei Sie mit der mitgelieferten Maus mit dem System interagieren können.
Kontrolle und Konfiguration überPC
WennSiedenNVRüberein10/100Mbit/s-Ethernet-Kabel(nichtimLieferumfangenthalten),dasandenRJ45-Portangeschlossenist,
oder über eine WiFi-Verbindung mit Ihrem Heim-WiFi-Router an Ihr Heim-LAN anschließen, können Sie das Systemvon Ihrem PC aus
oderausderFernesteuern,wenndasLANmitdemInternetverbundenist.
Sobald NVR und Kameras im Netz konfiguriert sind, kann man sich über den Internet-Browser des PC mit dem
NVR verbinden. Der PC muss in demselben lokalen Netzwerk (LAN) angeschlossen sein wie der NVR.
Um den Anschluss an den NVR auf einem PC mit Betriebssystem Windows, der an dasselbe Netzwerk wie
der NVR angeschlossen ist, herzustellen, die Software “Device Config. Tool” installieren: Um das Tool
herunterzuladen, gehen Sie auf www.urmet.com, in der Rubrik Produkte "CCTV VIDEO SURVEILLANCE AREA"
und geben Sie den entsprechenden Produktcode in das Suchfeld ein. Nach Abschluss der Installation die
Software ausführen, die dann den NVR im lokalen LAN-Netzwerk erfasst und ihn in der Liste anzeigt. Nun die
in der Liste erscheinende IP-Adresse des NVR anklicken.
Für weitere Informationen beziehen Sie sich auf die Bedienungsanleitung oder Kurzanleitung des NVR.
Es ist auch möglich, sich mit einem oder mehreren NVR gleichzeitig über die Client Software URMET UVS PRO
zu verbinden, die auf der Website www.urmet.com im Bereich Produkte "CCTV VIDEO SURVEILLANCE AREA"
heruntergeladen werden kann, und den Referenzproduktcode in das Suchfeld einzugeben.
Für weitere Informationen beziehen Sie sich auf die Bedienungsanleitung oder Kurzanleitung des NVR.

19
DE
SpezifikationenderWLAN-Übertra-
gungsstandardsderKamerasund
der NVRs
•
Übertragungsstandard: 802.11 b/g
•
Frequenzbänder in denen die Geräte operieren: 2412-2472Mhz
•
Maximale Sendestärke in den Frequenzbändern in denen die Geräte operieren: 17dBm
Was tun wenn...
1.
Ich das Passwort geändert, es aber vergessen habe: wie erhalte ich Zugriff auf die Anlage?
Wenden Sie sich, wenn Sie das Passwort nicht mehr wissen, an den Kundendienst.
2.
Der Videorecorder eingeschaltet ist, aber aber keine Bildereinblendet
Kontrollieren Sie die Versorgung und den Betrieb der Geräte.
3.
Der Videorecorder oft sehr heiß wird
Es wird empfohlen, den NVR an einem Ort mit guter Luftzirkulation und von Wärmequellen entfernt
aufzustellen, um seine Stabilität und Lebensdauer zu verlängern.
4.
Die Aufzeichnung nicht normal funktioniert
Überprüfen Sie, ob die momentane Ansicht sich auf Play befindet, um den Wiedergabemodus zu verlassen
und sich in die Aufzeichnungsfunktion [Record] zu begeben.
5.
Kann während der Wiedergabe aufgezeichnetwerden?
Ja, das System unterstützt die Aufzeichnung während der Wiedergabe.
6.
Können aus der Videoaufzeichnung einige aufgezeichnete Dateien gelöscht werden?
Aus Gründen der Datenintegrität ist es nicht empfehlenswert, aufgezeichnete Dateien direkt vom Gerät zu
löschen. Um wirklich alle aufgezeichneten Dateien zu löschen, die Funktion “Festplatte formatieren”
auswählen.
7.
Warum ertönt der Summer weiter?
Überprüfen Sie, ob die Bewegungserfassungsfunktion aktiviert ist undob die Anlage eine Bewegung erfasst
hat. Vergewissern Sie sich, ob die Festplatte korrekt funktioniert und über ausreichend Speicherplatz
verfügt. Kontrollieren Sie, ob kein Videosignalverlust vorliegt.
8.
Warum kann ich die Funktion [Stop] nichtverwenden?
Um eine programmierte Aufzeichnung zu stoppen, die Einstellung dieses Zeitraums durch Einstellung
auf[No Record] ändern.

20
DS1098-046B
FR
Contenu du kit
Le kit comprend tous les dispositifs, les câbles et les logiciels nécessaires à l’installation, à la configuration et
à la mise en marche du système. L’installation peut être effectuée sans de particulières compétences
spécifiques
2 caméras sans fil
Possibilité d’installation au mur, avec
dispositifs d’éclairage à l’infrarouge pour une
meilleure vision nocturne , LED à lumière
blanche et PIR
2 alimentations pour caméras
Pour le raccordement des caméras au secteur
du bâtiment
1 NVR H.265 à 8 canaux 1098/820
Net Videorecorder numérique à 8 canaux avec
disque dur interne pour l’enregistrement vidéo
IMPORTANT: les performances du Wi-Fi sont affectées par
plusieurs facteurs, les performances fonctionnelles du produit
décrit peuvent être dégradées par des INTERFÉRENCES
causées par des routeurs sans fil, des stations de base
cellulaires pour les réseaux 4G ou supérieurs, des radars, des
fours à micro-ondes et des sous-stations électriques. En outre,
la distance entre le NVR et les caméras IP à connecter affecte
les performances sans fil. Pour ces raisons, nous
recommandons de limiter le nombre maximum de canaux à 6.
1 sourie
Pour la programmation et le contrôle du
fonctionnement du NVR
1 alimentation pour NVR
Pour le raccordement du NVR au secteur du
bâtiment
1 CD-ROM
E
This manual suits for next models
1
Table of contents
Languages:
Other urmet domus Network Hardware manuals
Popular Network Hardware manuals by other brands

Vertex Standard
Vertex Standard EVX-Link manual

AvaLAN
AvaLAN AW5802mTR-EVAL user manual

ATTO Technology
ATTO Technology ATTO FibreBridge 1290E Specification sheet

Patton electronics
Patton electronics 2450 user manual

DPS Telecom
DPS Telecom NetGuardian 832A G5 user manual

KuWFi
KuWFi CPE70R quick start guide