URSUS TROTTER UT-KAFFEEDELUXE User manual

MANUAL DE USUARIO Y LETRA DE GARANTÍA
Espresso Coee Maker

Manual de Instrucciones
ESPRESSO KAFFEEMASCHINE
UT-KAFFEEDELUXE
ESPECIFICACIONES TECNICAS:
WATTS: 1050W
VOLTAJE: 220V
FREQUENCIA: 50HZ
CLASE: 1
RESGUARDOS IMPORTANTES
ANTES DE USAR EL ARTEFACTO ELÉCTRICO,
SIEMPRE SE DEBEN SEGUIR LAS SIGUIENTES
PRECAUCIONES BÁSICAS, INCLUIDAS LAS
SIGUIENTES:
1. Lee todas las instrucciones.
2. Antes de usar, compruebe que la tensión de la
toma de corriente corresponde a la tensión nominal
marcada en la placa de características.
3. Este electrodoméstico se ha incorporado con un
enchufe con conexión a tierra. Asegúrese de que la
toma de corriente de su casa esté bien conectada a
tierra.
4. Para protegerse contra incendios, descargas
eléctricas y lesiones personales, no sumerja las
partes principales del producto, cable, enchufe, agua
u otro líquido.
5. El aparato no debe estar sumergido.
6. Retire el enchufe de la toma de corriente antes de
limpiarlo y cuando no lo use. Deje que el aparato se
enfríe completamente antes de despegar, colocar
los componentes o antes de limpiarlo.
7. No opere ningún artefacto con un cable o enchufe
dañado o después de que el electrodoméstico
no funcione correctamente, o se caiga o dañe de
cualquier manera. Devuelva el artefacto al centro
de servicio autorizado más cercano para su examen,
reparación o ajuste eléctrico o mecánico.
8. El uso de accesorios no recomendados por el
fabricante del artefacto puede provocar incendios,
descargas eléctricas o lesiones a las personas.
9. Coloque el aparato sobre una supercie plana o
mesa, no cuelgue el cable de alimentación sobre el
borde de la mesa o mostrador.
10. Asegúrese de que el cable de alimentación no
toque la supercie caliente del aparato.
11. No coloque la cafetera sobre una supercie
caliente o al lado del fuego para evitar daños.
12. Para desconectar, desconecte el enchufe de la
toma de corriente. Siempre sostenga el enchufe.
Pero nunca tire del cable.
13. No use el electrodoméstico para un uso diferente
al previsto y colóquelo en un ambiente seco.
14. Tenga cuidado de no quemarse con el vapor.
15. No toque la supercie caliente del
electrodoméstico (como la varilla de vapor y la malla
de acero que acaba de hervir). Use el mango o las
perillas.
16. No permita que la cafetera funcione sin agua.
17. NO retire el embudo de metal mientras elabora el
café. Por favor, retire el embudo de metal para hacer
café adicional después de terminar de elaborar la
cerveza por más de 10 segundos. También se debe
tener cuidado al retirar el embudo de metal ya que
las partes metálicas estarán calientes. Asegúrese de
sostenerlo por el asa y de usar el clip de retención
del ltro para desechar los motivos. Se debe tener
precaución al mover la unidad con líquidos calientes.
18. Conecte el enchufe a la toma de corriente antes
de usar y apague cualquier interruptor antes de
desconectar el enchufe de la toma de corriente.
19. Este aparato puede ser utilizado por niños
mayores de 8 años si se les ha supervisado o
instruido sobre el uso del artefacto de una manera
segura y si comprenden los peligros involucrados. La
limpieza y el mantenimiento del usuario no deben ser
realizados por niños a menos que sean mayores de 8
años y estén bajo supervisión. Mantenga el aparato
y su cable fuera del alcance de los niños menores de
8 años.
20. Los dispositivos pueden ser utilizados por
personas con capacidades físicas, sensoriales o
mentales reducidas o por falta de experiencia
y conocimiento si se les ha dado supervisión
o instrucciones sobre el uso del artefacto de
una manera segura y comprenden los peligros
involucrados.
21. Los niños no deben jugar con el aparato.
22. Este dispositivo está destinado a ser utilizado en
aplicaciones domésticas y similares, tales como:
- áreas de cocina para el personal en tiendas, ocinas
y otros entornos de trabajo;
- casas de campo;
- por clientes en hoteles, moteles y otros entornos
residenciales;
- ambientes tipo bed and breakfast.
23. No lo use al aire libre.
24. Guarde estas instrucciones.
CONOCE A TU ESPRESSO MAKER UT-
KAFFEEDELUXE

INSERTAR EL FILTRO
1. Para insertar el ltro seleccionado en el portaltro,
asegúrese de alinear la muesca en el ltro con la
ranura dentro del portaltro.
2. Gire el ltro hacia la izquierda o hacia la derecha
para jarlo en su lugar. Esto ayudará a asegurar el
ltro en el portaltro.
ANTES DEL PRIMER USO
Para garantizar que la primera taza de café tenga un
excelente sabor, debe enjuagar la cafetera con agua
tibia de la siguiente manera:
1. Saque el tanque de agua de la cafetera. Vierta
agua en el tanque de agua, el nivel del agua no debe
exceder la marca “MAX” en el tanque, luego insértela
en la cafetera.
2. Nota: El aparato se suministra con un tanque
extraíble para facilitar la limpieza, primero puede
llenar el tanque con agua y luego insertar el tanque
en el aparato.
3. Coloque la malla de acero en un embudo metálico
(no café en malla de acero), luego coloque el embudo
metálico debajo del soporte del embudo metálico
(vea la Fig.1) y gírelo en sentido contrario a las agujas
del reloj hasta que quede bien jo (Fig.2, 3)
Mantenga la perilla en posición abierta durante
aproximadamente 15 segundos, ya que el vapor
inicial contiene demasiada agua, luego mantenga
Control de vapor: hacia
abajo vapor, hacia arriba
apagado Termometro
Perilla de
vapor
Control de bombeado:
Abajo para preparacion,
arriba para apagar
ON/OFF boton
Indicador de cafe (Verde): Se
encendera cuando temperatura es
ideal para el cafe
Indicador de
encendido (rojo):
Indicador de vapor (amarillo): Se
encendera cuando temperatura
es ideal para el vapor.

la perilla en posición abierta durante
aproximadamente 15 segundos, ya que el vapor
inicial contiene demasiada agua, luego mantenga
la perilla en la posición “O” y realice el siguiente
paso. 5. Inserte la varilla de vapor en la leche unos
dos centímetros, luego gire la perilla de vapor
lentamente en sentido antihorario, saldrá vapor de
la varilla de vapor. La leche espumada se produce
moviendo el recipiente de arriba a abajo.Nota: Nunca
toque la salida de vapor durante el chorro de vapor
y tenga cuidado de no quemarlo. Nota: Nunca gire
la perilla de vapor rápidamente, ya que el vapor se
acumulará rápidamente en poco tiempo, lo que
puede aumentar el riesgo de explosión.6. Cuando se
alcanza el objetivo requerido, puede girar la perilla
de vapor a la posición “O” .7. Siga la operación
siguiente para evitar que la salida de vapor se
bloquee después de terminar de espumar leche cada
vez: coloque una jarra vacía debajo de la banda de
vapor, luego encienda la perilla de vapor y presione
el botón de control de la bomba en la posición
inferior, la bomba bombeará agua, después de que
el agua uya durante 30 segundos, presione el botón
de control de la bomba “” en la posición más alta,
nalmente, limpie la salida de vapor con una esponja
húmeda, ¡pero tenga cuidado de no quemarla!
Presione y suelte el botón ON / OFF “” para cortar la
fuente de alimentación.9. Vierta la leche espumosa
en el expreso preparado, ahora el capuchino está
listo. Endulce si lo desea, espolvoree la espuma con
un poco de cacao en polvo.Nota: Siga la operación
siguiente si la salida de vapor está bloqueada:
primero gire la perilla de vapor a la posición “O” y
enfríe la cafetera durante aproximadamente media
hora , luego golpee la salida de vapor varias veces con
una aguja de aproximadamente 1 mm de diámetro,
nalmente, presione el botón de vapor “” y gire la
perilla de vapor para vericar si el aparato puede
producir vapor normalmente cuando el indicador
de vapor (amarillo) se ilumina. Póngase en contacto
con el departamento de servicio si el aparato no
puede producir vapor después de operar como se
indica arriba. Nota: después de cocer al vapor, le
recomendamos que permita que el fabricante se
enfríe al menos durante 5 minutos antes de volver
a hacer café. De lo contrario, podría producirse
un olor a quemado en su café Espresso. Si desea
preparar café inmediatamente, siga los siguientes
pasos: Primero, presione y suelte el botón de vapor
“” en la posición más alta; sumerja la varita de vapor
en una taza; en segundo lugar, presione el botón de
control de la bomba “” hacia abajo hasta la posición
más baja y encienda la perilla de control de vapor y
habrá ujo de agua de la varilla de vapor; después de
que el indicador de listo se apague, presione y suelte
el botón de control de la bomba “” en la posición
más alta, luego gire la perilla de control de vapor a la
posición “O”. Cuando se ilumina el indicador de listo,
puede comenzar a preparar café nuevamente.
LECHE ESPUMOSA / PRODUCCIÓN DE VAPOR
PARA CALENTAR LÍQUIDOS:
La varita de vapor se puede usar para espumar
la leche y hacer bebidas calientes como beber
chocolate, agua o té.
MÉTODO:
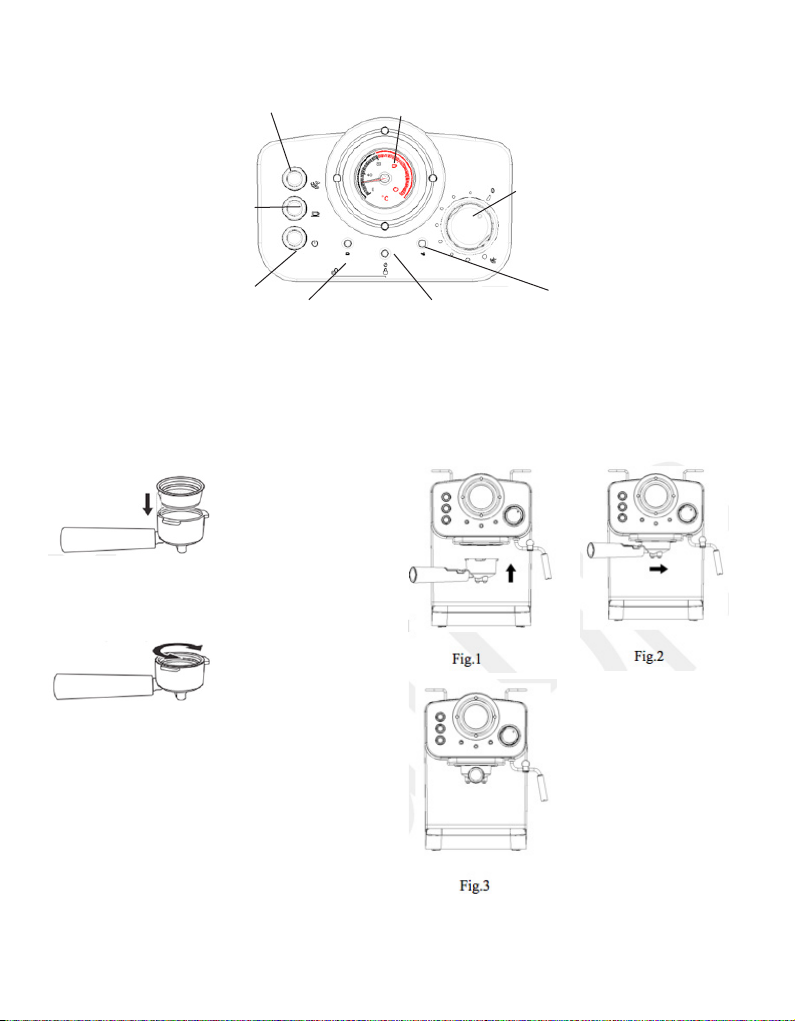
1. Retire el tanque extraíble y llénelo con el agua
deseada, el nivel del agua no debe exceder la marca
“MAX” en el tanque. Luego inserte el tanque en el
aparato correctamente.
2. Luego, conecte el dispositivo a la fuente de
alimentación.
3. Presione el botón ON / OFF “” para encender la
unidad, el indicador de encendido (rojo) se ilumina.
4. Presione hacia abajo el botón de control de la
bomba “” en la posición inferior, asegúrese de que
el botón de vapor “” esté en la posición más alta, la
bomba bombeará agua, cuando haya agua saliendo,
cierre la bomba de inmediato.
5. Presione el botón de vapor “” en la posición
inferior y espere un momento; el aparato comenzará
a calentar hasta que se encienda la luz (amarilla),
signica que la calefacción ha nalizado.
6. Sumerja la varilla de vapor en el líquido que se
va a calentar. Si desea sorber leche, sumerja la
varilla de vapor unos 2 centímetros en la leche. Gire
lentamente la perilla de vapor en sentido antihorario
para comenzar a producir vapor.
7. Luego se obtiene el resultado deseado, puede
girar la perilla de vapor a la posición “O”.
8. Siga la operación siguiente para evitar que la
salida de vapor se bloquee después de terminar de
espumar leche cada vez: coloque una jarra vacía
debajo de la banda de vapor, luego encienda la perilla
de vapor y presione el botón de control de la bomba
en la posición inferior , la bomba bombeará agua,
después de que el agua uya durante 30 segundos,
presione el botón de control de la bomba “” en la
posición más alta, nalmente, limpie la salida de
vapor con una esponja húmeda, ¡pero tenga cuidado
de no quemarla!
9. Presione y suelte el botón ON / OFF “” para cortar
la fuente de alimentación.
Nota: Siga la operación siguiente si la salida de vapor
está bloqueada: primero gire la perilla de vapor a la
posición “O” y deje que la cafetera se enfríe durante

aproximadamente media hora, luego pise la salida de
vapor varias veces con una aguja 1 mm de diámetro,
nalmente, presione el botón de vapor “” y gire la
perilla de vapor para vericar si el aparato puede
producir vapor normalmente cuando se ilumina el
indicador de vapor (amarillo). Comuníquese con el
departamento de servicio si el electrodoméstico no
puede producir vapor después de operar como se
indica arriba.
FUNCIÓN DE APAGADO AUTOMÁTICO:
El aparato se apagará automáticamente 29 minutos
después de presionar el botón ON / OFF.
LIMPIEZA Y MANTENIMIENTO:
1. Corte la fuente de alimentación y deje que la
cafetera se enfríe por completo antes de limpiarla.
2. Limpie la carcasa de la cafetera con una esponja a
prueba de humedad con frecuencia y limpie el tanque
de agua, la bandeja de goteo y la repisa extraíble con
regularidad, luego séquelos.
Nota: No lo limpie con alcohol o limpiador solvente.
Nunca sumerja la carcasa en agua para limpiarla.
3. Separe el embudo de metal girándolo en el sentido
de las agujas del reloj, elimine los residuos de café
en el interior, luego puede limpiarlo con limpiador,
pero al nal debe enjuagar con agua limpia. No lave
el embudo de metal en un lavavajillas.
4. Limpie todos los accesorios en el agua y seque
completamente.
Nota: Limpie el aparato después de cada uso para
que funcione correctamente.
LIMPIEZA DE DEPÓSITOS MINERALES
1. Para asegurarse de que su cafetera pueda funcionar
de manera eciente, la tubería interna esté limpia y
el sabor máximo del café, debe limpiar los depósitos
minerales que quedan cada 1-2 meses.
2. Llene el tanque con agua y descalcicador al
nivel MAX (la proporción de agua y desincrustante
es 4: 1, los detalles se reeren a las instrucciones
del descalcicador. Utilice el “descalcicador
doméstico”, puede usar el ácido cítrico (que puede
obtenerse de un químico) o farmacias) en lugar del
descalcicador (cien partes de agua y tres partes de
ácido cítrico).
3. De acuerdo con el programa de precalentamiento,
coloque el embudo de metal (sin café en polvo)
y la jarra (jarra) en su lugar. Prepare agua por
“PRECALENTAMIENTO”.
4. Presione el botón ON / OFF “” para encender la
unidad, el indicador de encendido (rojo) se iluminará,
debe presionar el botón de control de la bomba “”
en la posición inferior, asegúrese de que el botón
de vapor “” esté en la posición más alta, cuando
sale agua y cierra la bomba presionando el botón
de control de la bomba “” nuevamente, y espere un
momento, la cafetera comienza a calentarse.
5. Cuando el indicador de listo (verde) se ilumina,
muestra que el calentamiento ha nalizado. Al
presionar el botón de control de la bomba “”
en la posición inferior y hacer dos tazas de café
(aproximadamente 2 onzas). Luego cierre la bomba
y espere 5 segundos.
6. Presione hacia abajo el botón de vapor “” en la
posición inferior, esperando hasta que el indicador
amarillo se ilumine. Haga vapor durante 2 minutos,
luego gire la perilla de vapor a la posición “O” para
dejar de producir vapor. Presione el botón de
ENCENDIDO / APAGADO “” para apagar la unidad
inmediatamente, haga que los desincrustantes se
depositen en la unidad por lo menos durante 15
minutos.
7. Reinicie la unidad y repita los pasos de 4-6 al
menos 3 veces.
8. Luego presione y suelte el botón de vapor “” en la
posición más alta, cuando la luz verde esté encendida,
presione hacia abajo el botón de control de la bomba
“” hasta la posición más baja para preparar hasta que
no queden restos de desincrustante.
9. Luego prepara café (sin café molido) con agua del
grifo en el nivel MAX, repite los pasos de 4-6 por 3
veces (no es necesario esperar 15 minutos en el paso
de 6), luego prepara hasta que no quede agua en el
tanque.
10. Repita el paso de 9 al menos 3 veces para
asegurarse de que la tubería esté limpia.

SINTOMAS
Agua ltra por debajo de la
maquina
Agua ltra desde el exterior del
ltro
Café espresso tiene un gusto
acido
La cafeteria no funciona.
No hay generaciòn de vapor
CAUSA
Hay exceso de agua en el recipiente
Hay una malfunction en la maquina
Hay polvo de café en las esquinas
del ltro.
Limpiar correctamente
removiendo depositos minerales
El polvo de café se almacena en un
lugar caliente y húmedo durante
mucho tiempo. El polvo de café se
vuelve malo.
La toma de corriente no está bien
enchufada.
El indicador de vapor listo no se
ilumina.
El contenedor es demasiado
grande o la forma no es apta.
Has utilizado leche descremada
NO DESARME EL APARATO USTED MISMO SI
NO ENCUENTRA LA CAUSA DE LA FALLA, ES
MEJOR QUE SE COMUNIQUE CON EL CENTRO DE
SERVICIO CERTIFICADO.
RECICLAJE AMIGABLE CON EL MEDIO AMBIENTE
TÚ PUEDES AYUDAR A PROTEGER EL
MEDIOAMBIENTE!
RECUERDE RESPETAR LAS REGLAMENTACIONES
LOCALES: ENTREGAR LOS EQUIPOS ELÉCTRICOS
QUE NO FUNCIONAN A UN CENTRO DE
ELIMINACIÓN DE RESIDUOS APROPIADO.
CORRECCIONES
Favor limpiar recipiente
Recurra a su servicio tecnico
designado
Removerlas.
Limpie la cafetera por el
contenido en “antes del primer
uso” por varias veces.
Por favor, use polvo de café
fresco, o almacene el polvo de
café no usado en un lugar fresco y
seco. Después de abrir un paquete
de café en polvo, vuelva a cerrarlo
rmemente y guárdelo en un
refrigerador para mantener su
frescura.
Enchufe el cable de alimentación
correctamente en un
tomacorriente de pared, si el
aparato aún no funciona, póngase
en contacto con el servicio técnico
autorizado para repararlo.
Only after the steam ready
indicator is illuminated, vapor se
puede utilizar para espumar.
Usar jarra alta y delgada
se leche entera o leche semi-
descremada

Instruction manual
ESPRESSO KAFFEEMASCHINE
UT-KAFFEEDELUXE
TECHNICAL DATA:
POWER: 1050W
VOLTAGE: 220V
FREQUENCY: 50HZ
CLASS: 1
IMPORTANT SAFEGUARDS
BEFORE USING THE ELECTRICAL APPLIANCE,
THE FOLLOWING BASIC PRECAUTIONS SHOULD
ALWAYS BE FOLLOWED INCLUDING THE
FOLLOWING:
1. Read all instructions.
2. Before using check that the voltage of wall outlet
corresponds to rated voltage marked on the rating
plate.
3. This appliance has been incorporated with a
grounded plug. Please ensure the wall outlet in your
house is well earthed.
4. To protect against re, electric shock and injury to
persons do not immerse main parts of the product,
cord, plug, in water or other liquid.
5. The appliance must not be immersed.
6. Remove plug from wall outlet before cleaning
and when not in use. Allow appliance cool down
completely before taking o, attaching components
or before cleaning.
7. Do not operate any appliance with a damaged
cord or plug or after the appliance malfunctions,
or is dropped or damaged in any manner. Return
appliance to the nearest authorized service facility
for examination, repair or electrical or mechanical
adjustment.
8. The use of accessory attachments not
recommended by the appliance manufacturer may
result in re, electric shock or injury to persons.
9. Place appliance on at surface or table, do not
hang power cord over the edge of table or counter.
10. Ensure the power cord do not touch hot surface
of appliance.
11. Do not place the coee maker on hot surface or
beside re in order to avoid to be damaged.
12. To disconnect, remove plug from wall outlet.
Always hold the plug. But never pull the cord.
13. Do not use appliance for other than intended use
and place it in a dry environment.
14. Be careful not to get burned by the steam.
15. Do not touch the hot surface of appliance (such
as steam wand, and the steel mesh just boiling). Use
handle or knobs.
16. Do not let the coee maker operate without
water.
17. DO NOT remove the metal funnel while brewing
coee. Please remove the metal funnel to make
additional coee after nish brewing for more than
10 seconds. Caution should also be taken while
removing the metal funnel since the metal parts will
be hot. Please make sure to hold it by the handle and
to use the lter retention clip to dispose the grounds.
Caution should be taken when moving unit with hot
liquids.
18. Connect plug to wall outlet before using and
turn any switch o before plug is removed from wall
outlet.
19. This appliance can be used by children aged
from 8 years and above if they have been given
supervision or instruction concerning use of the
appliance in a safe way and if they understand the
hazards involved. Cleaning and user maintenance
shall not be made by children unless they are older
than 8 and supervised. Keep the appliance and its
cord out of reach of children aged less than 8 years.
20. Appliances can be used by persons with reduced
physical, sensory or mental capabilities or lack of
experience and knowledge if they have been given
supervision or instruction concerning use of the
appliance in a safe way and understand the hazards
involved.
21. Children shall not play with the appliance.
22. This appliance is intended to be used in household
and similar applications such as:
– sta kitchen areas in shops, oces and other
working environments;
– farm houses;
– by clients in hotels, motels and other residential
type environments;
– bed and breakfast type environments.
23. Do not use outdoors.
24. Save these instructions.


Steam control
button:down to
steaming and up to stop Thermometer
Steam Knob
Pump control
button:down to make
coee and up to stop
ON/OFF button
Coee indicator(green): When
coee tempenratuer is high
enough,it will turns on
Indicador de Power
indicator(red): When the
appliance turns on,the
indicator will turns on
Steam indicator(yellow): When
steam tempenratuer is high
enough,it will turns on
INSERTING THE FILTER
1. To insert the selected lter in the porta-lter, make
sure to align the notch on the lter with the groove
inside the porta-lter.
2. Turn the lter to the left or right to lock in place.
This will help secure the lter in the porta-lter.
BEFORE THE FIRST USE
To ensure the rst cup of coee tastes excellent, you
should rinse the coee maker with warm water as
following:
1. Pull out
the water tank of the coee maker. Pour water into
water tank, the water level should not exceed the
“MAX” mark in the tank, then insert it into the coee
maker.
2. Note: The
appliance is supplied with a removable tank for easy
cleaning, you can ll the tank with water rstly, and
then insert the tank into the appliance.
3. Set steel
mesh into metal funnel (no coee in steel mesh),
then put the metal funnel under the metal funnel
holder (see Fig.1), and turn it anticlockwise until it is
xed tightly (see Fig.2 and Fig.3).

4. Place an espresso cup you have prepared on
drip plate. Make sure the steam knob is at the “O”
position.
5. Note: As the appliance is not equipped with any
cup or jug, prepare your own jug or cup.
6. Connect into power source, press down the
ON/OFF button “ ” to turn on the unit. The power
indicator (red) will be illuminated.
7.
Press down the pump control button“ ”, the pump
will pump water, when there is water owing out
and close the pump by pressing the pump control
button“ ” again.
8. Make sure the steam button “ ” is at the higher
position and wait for a moment, the appliance
begin preheating until the coee indicator (green)
illuminates, it means that the preheating is nished.
9. Press down the pump control button“ ” again, and
water will ow out.
10.
After water has own for 1 minute, press the pump
control button “ ”, you can pour out the water in each
container then clean them thoroughly, now you can
start brewing coee.
Note: There may be noise when pumping the water
for the rst time, it is normal, as the appliance is
releasing the air in the appliance. After about 20s,
the noise will disappear.
PREHEATING
To make a cup of good hot Espresso coee, it is
recommended to preheat the appliance before
making coee, including the funnel and cup, so that
the coee avour will not be inuenced by the cold
parts.
1. Remove the removable water tank and ll it with
desired water, the water level should be between the
“MAX” mark and the “MIN” mark in the tank. Then
insert the tank into the appliance properly.
2. Set steel mesh into metal funnel (no coee in steel
mesh), then put the metal funnel under the metal
funnel holder (see Fig.1), and turn it anticlockwise
until it is xed tightly (see Fig.2 and Fig.3).
3. Place an espresso cup you have prepared on
removable cup shelf.
4. Then connect the appliance into power supply.
Make sure the steam knob is at the “O” position.
5. Press the ON/OFF button “ ” to turn on the unit,
the power indicator (red) will illuminate, make sure
the steam button “ ” is at the higher position.
6. Press down the pump control button“ ” to the
lower position, when there is water owing out,
close the pump immediately by pressing the pump
control button“ ” again to the higher position. The
purpose of the step is to pump the water of the tank
into the housing.
7. When the coee indicator (green) is illuminated,
and you should press down the pump control button
“ ” again, there will be hot water owing out.
8. After water has own for 20S, press the pump
control button“ ”. The preheating is nished.
MAKE ESPRESSO COFFEE
1. Remove the funnel by turning it clockwise.
2. Add ground coee to steel mesh with measuring
spoon, a spoon ground coee power can make about
a cup of top-grade coee, then press the ground
coee powder tightly with the tamper.
3. Set steel mesh into metal funnel , then put the
metal funnel under the metal funnel holder (see
Fig.1), and turn it anticlockwise until it is xed tightly
(see Fig.2 and Fig.3).
4. Pour out the hot water in the cup. Then place the
hot cup (yourself cup) on removable cup shelf.
5. Make sure the steam knob is at the “O” position
and the steam button “ ” is at the higher position.
6. At the time, the coee indicator (green) is
illuminated, once the lamp illuminates, you should
press down the pump control button“ ” to the lower
position, wait for a moment, there will be coee
owing out.
7. You should press and release the pump control
button “ ”to the higher position manually when
desired coee is obtained or the color of coee
changes weak obviously.
8. After nishing making coee, press the ON/
OFF button “ ”, and the power indicator and coee
indicator go out and the coee maker stops working,
your coee is ready now.
WARNING: do not leave the coee maker unattended
during making coee, as you need operate manually
sometimes!
Note: During brewing coee or making steam, it is
normal that the ready indicator is likely to extinguish,
it only means that the heater is heating up to keep
the temperature at the standard range.
9. You can take the metal funnel out by turning
clockwise, then pour the coee residue out with the
steel mesh pressed by press bar.
10. Let them cool down completely, then rinse under
running water.
MAKE CAPPUCCINO
You can get a cup of cappuccino by topping a cup of
espresso with frothing milk.

Note: during making steam, the metal funnel must be
assembled in position.
METHOD:
1. Prepare espresso rst with container big enough
according to the part “MAKE ESPRESSO COFFEE”,
and make sure that the steam knob is at the “O”
position.
2. Press down the steam button “ ” to the lower
position, waiting for until the steam indicator
(yellow) illuminates.
3. Fill a jug with about 100 grams of milk for each
cappuccino to be prepared, you are recommended
to use whole milk at refrigerator temperature (not
hot!).
4. In order to get better milk foam performance,
you are recommended to keep steam knob at
open position for approx 15s , since the early steam
contains too much water, then keep the knob at “O”
position and conduct next step .
5. Insert the steam wand into the milk about two
centimeters, then turn the steam knob slowly in
anticlockwise, steam will come out from the steam
wand. Frothed milk is produced by moving vessel
round from up to down.
Note: Never touch steam outlet during steam jetting
and be careful not to burnt.
Note: Never turn the steam knob rapidly, as the
steam will accumulate rapidly in short time which
may increase the potential of the risk of explosion.
6. When the required purpose is reached, you can
turn the steam knob to the “O” position.
7. Please follow the operation as below to avoid the
steam outlet being blocked after nish frothing milk
each time: put an empty jug under the steam band,
then turn on the steam knob and press down the
pump control button “ ” to the lower position, the
pump will pump water, after the water owing out
for 30 seconds, press the pump control button “ ”
to the higher position, nally, clean the steam outlet
with wet sponge, but care not to be burnt!
8. Press and release the ON/OFF button “ ” to cut o
the power source.
9. Pour the frothed milk into the espresso prepared,
now the cappuccino is ready. Sweeten if desired,
sprinkle the froth with a little cocoa powder.
Note: Please follow the operation as below if the
steam outlet is blocked: rstly turn the steam knob
to “O” position and make the coee maker cool
down for about half an hour, then poke the steam
outlet for several times with a needle about 1mm in
diameter, nally, press down the steam button “ ” and
turn on the steam knob to check if the appliance can
produce steam normally when the steam indicator
(yellow) illuminates. Please contact the service
department if the appliance can not produce steam
after operate as above.
Note: after steaming, we recommend you allow the
maker to cool down at least for 5 min before making
coee again. Otherwise burnt odor may occurred
in your Espresso coee. If you want to make coee
immediately, follow the next steps: First, press and
release the steam button “ ” to the higher position;
dip the steam wand into a cup; secondly, press the
pump control button “ ” down to the lower position
and turn on the steam control knob and there will
be water ow out from steam wand ; after the ready
indicator extinguish, press and release the pump
control button “ ” to the higher position, then turn
the steam control knob to “O” position. When the
ready indicator illuminate, you can start to brew
coee again.
FROTHING MILK/PRODUCING STEAM TO HEAT
LIQUIDS
The steam wand can be used to froth milk and make
hot beverages like drinking chocolate, water or tea.
METHOD:
1. Remove the removable tank and ll it with desired
water, the water level should not exceed the “MAX”
mark in the tank. Then insert the tank into the
appliance properly.
2. Then connect the appliance to power supply.
3. Press down the ON/OFF button “ ” to turn on the
unit, the power indicator (red) illuminates.
4. Press down the pump control button “ ” to the
lower position, make sure the steam button “ ” is
at the higher position, the pump will pump water,
when there is water owing out, close the pump
immediately.
5. Press down the steam button“ ” to the lower
position and wait for a moment, the appliance begins
to heat until the (yellow) lamp illuminates, it means
the heating is nished.
6. Dip the steam wand into the liquid to be heated.
If you want to froth milk, dip the steam wand about
2 centimeters into the milk. Turn the steam knob in
anti-clockwise slowly to start making steam.
7. Then the desired result is got, you can turn the
steam knob to the “O” position.
8. Please follow the operation as below to avoid the
steam outlet being blocked after nish frothing milk
each time: put an empty jug under the steam band,
then turn on the steam knob and press down the
pump control button “ ” to the lower position, the

pump will pump water, after the water owing out
for 30 seconds, press the pump control button “ ”
to the higher position, nally, clean the steam outlet
with wet sponge, but care not to be burnt!
9. Press and release the ON/OFF button “ ” to cut o
the power source.
Note: Please follow the operation as below if the
steam outlet is blocked: rstly turn the steam knob
to “O” position and make the coee maker cool
down for about half an hour, then poke the steam
outlet for several times with a needle about 1mm in
diameter, nally, press down the steam button “ ” and
turn on the steam knob to check if the appliance can
produce steam normally when the steam indicator
(yellow) illuminates. Please contact the service
department if the appliance can not produce steam
after operate as above.
AUTOMATIC POWER OFF FUNCTION
The appliance will turn o automatically 29 minutes
after pressing ON/OFF button.
CLEANING AND MAINTENANCE:
1. Cut o power source and let the coee maker cool
down completely before cleaning.
2. Clean housing of coee maker with moisture-
proof sponge often and clean water tank, drip tray
and removable shelf regularly then dry them.
Note: Do not clean with alcohol or solvent cleanser.
Never immerse the housing in water for cleaning.
3. Detach the metal funnel by turning it clockwise,
get rid of coee residue inside, then you can clean
it with cleanser, but at last you must rinse with clear
water. Do not wash the metal funnel in a dishwasher.
4. Clean all the attachments in the water and dry
thoroughly.
Note: Clean the appliance after every use in order to
make it work properly.
CLEANING MINERAL DEPOSITS
1. To ensure your coee maker can operate eciently,
internal piping is clean and the peak avor of coee,
you should clean away the mineral deposits left
every 1-2 months.
2. Fill the tank with water and descaler to the MAX
level (the proportion of water and descaler is 4:1,
details refers to the instruction of descaler. Please
use “household descaler”, you can use the citric acid
(obtainable from chemist’s or drug stores) instead of
the descaler (one hundred parts of water and three
parts of citric acid).
3. According to the program of preheating, put the
metal funnel (no coee powder in it) and carafe (jug)
in place. Brew water per “PREHEATING”.
4. Press down the ON/OFF button “ ” to turn on the
unit, the power indicator (red) will be illuminated,
you should press the pump control button “ ” to the
lower position, make sure the steam button “ ” is at
the higher position, when there is water owing out
and close the pump by pressing the pump control
button “ ” again, and wait for a moment, the coee
maker begins to be heated.
5. When the ready indicator (green) illuminates, it
shows the heating is nish. Pressing down the pump
control button “ ” to the lower position and make
make two cups coee (about 2Oz). Then close the
pump and wait for 5s.
6. Press down the steam button “ ” to the lower
position, waiting for until the yellow indicator is
illuminated. Make steam for 2min, then turn the
steam knob to the “O” position to stop making
steam. Press the ON/OFF button “ ” to turn o the
unit immediately, make the descalers deposit in the
unit at least 15 minutes.
7. Restart the unit and repeat the steps of 4-6 at
least 3 times.
8. Then pressing and release the steam button “
” to the higher position, when the green lamp is
illuminated, press down the pump control button “ ”
to the lower position to brew until no descaler is left.
9. Then brewing coee (no coee powder) with tap
water in the MAX level, repeat the steps of 4-6 for 3
times (it is not necessary to wait 15 minutes in step
of 6), then brewing until no water is left in the tank.
10. Repeat the step of 9 at least 3 times to make sure
the piping is cleanly.

SYMPTOM
Water leaks from the bottom of
coee maker.
Water leaks out of outer side of
lter.
Acid (vinegar) taste exists in
Espresso coee.
The coee maker cannot work
any more.
The steam cannot froth.
CAUSA
There is much water in the drip
tray.
The coee maker is malfunction.
There is some coee powder on
lter edge.
No clean correctly after cleaning
mineral deposits.
The coee powder is stored in a
hot, wet place for a long time. The
coee powder turns bad.
The power outlet is not plugged
well.
The steam ready indicator is not
illuminated.
The container is too big or the
shape is not t.
You have used skimmed milk
DO NOT TAKE APART THE APPLIANCE BY
YOURSELF IF THE CAUSE OF FAILURE IS NOT
FOUND, YOU HAD BETTER CONTACT CERTIFIED
SERVING CENTER.
ENVIRONMENT FRIENDLY DISPOSAL
YOU CAN HELP PROTECT THE ENVIRONMENT!
PLEASE REMEMBER TO RESPECT THE LOCAL
REGULATIONS: HAND IN THE NON-WORKING
ELECTRICAL EQUIPMENTS TO AN APPROPRIATE
WASTE DISPOSAL CENTER.
CORRECCIONES
Please clean the drip tray.
Please contact with the
authorized service facility for
repairing.
Get rid of them.
Clean coee maker per the
content in “before the rst use”
for several times.
Please use fresh coee powder,
or store unused coee powder in
a cool, dry place. After opening
a package of coee powder,
reseal it tightly and store it in
a refrigerator to maintain its
freshness.
Plug the power cord into a wall
outlet correctly, if the appliance
still does not work, please contact
with the authorized service facility
for repairing.
Only after the steam ready
indicator is illuminated, the steam
can be used to froth.
Use high and narrow cup.
Use whole milk or half-skimmed
milk

POLIZA GARANTIA 24 MESES 2014 CR.ai 1 07-03-14 14:59
URSUS TROTTER SMALL APPLIANCES S.A.
Una empresa Chilena con precisión Alemana que da conanza
San Pablo - Tel.: - Fax.:
Casilla 3234- Santiago - Chile
ventas@ursustrotter.cl - www.ursustrotter.cl
Sujeto a alteración sin previo aviso.

POLIZA GARANTIA 24 MESES 2014 CR.ai 2 07-03-14 14:59

ursustrotter.cl
Table of contents
Languages:
Other URSUS TROTTER Kitchen Appliance manuals