V2 Wally2-230V User manual

Wally2-230V
Wally2-120V
IL n. 343
EDIZ. 28/03/2012
V2 S.p.A.
Corso Principi di Piemonte, 65/67
12035 RACCONIGI (CN) ITALY
tel. +39 01 72 81 24 11 - fax +39 01 72 84 050
[email protected] - www.v2home.com
I
GB
F
E
P
D
NL
RICEVITORE BICANALE ALI ENTATO A 230V / 120V CON
POSSIBILITÀ DI CO ANDO CARICHI FINO A 1500W
230V / 120V DUAL CHANNEL RECEIVER, CAPABLE TO
CONTROL LOADS UP TO 1500 W
RÉCEPTEUR BICANAL ALI ENTÉ EN 230V AVEC POSSIBILITÉ
DE CO ANDE DE CHARGES JUSQU’À 1500W
RECEPTOR BICANAL DE 230V CON POSIBILIDAD DE
CONTROL DE CARGAS HASTA 1500W
RECEPTOR DE DOIS CANAIS DE 230V CO POSSIBILIDADE
DECO ANDO CARGAS ATÉ 1500W
2-KANAL 230V-E PFÄNGER IT DER ÖGLICHKEIT,
LASTEN BIS 1500W ZU STEUERN
TWEEKANAALSONTVANGER VOEDING 230V / 120V ET
OGELIJKHEID O LADINGEN TOT 1500W TE BESTUREN

Fig. 1
COLLEGA ENTI ELETTRICI
ELECTRICAL CONNECTIONS
BRANCHE ENTS ÉLECTRIQUES
CONEXIONES ELÉCTRICAS
LIGAÇÕES ELÉCTRICAS
ELEKTRISCHE ANSCHLÜSSE
ELEKTRISCHE AANSLUITINGEN

Fig. 2

ENGLISH
7
IPORTANT RE ARKS
For technical information or any installation problem, you can call
our customer service during office hours
TEL. (+39) 01 72 81 24 11
V2 S.p.A. has the right to modify the product without
previous notice; it also declines any responsibility to
damage or injury to people or things caused by improper
use or wrong installation.
mPlease read this instruction manual very carefully
before installing and programming your devoce..
• This instruction manual is only for qualified technicians, who
specialize in installations.
• Every programming and/or every maintenance service should
be done only by qualified technicians.
• The installer should make arrangements for installation of an
automatic protection device and a fuse.
The standards require a breaker spacing of at least 3 mm for
each pole (EN 60335-1).
The automatic breaker should guarantee omnipolar system
power isolation.
The protection device trip current should not exceed 8A.
• The connection cables should be suitable for installation in
wet outdoor environments
• It is essential to use cables of the proper size for the cable
duct used to guarantee a protection level of IP55 for the
casing.
DECLARATION OF CONFOR ITY
V2 SpA hereby declares that the products:
WALLY2-230V, WALLY2-120V
comply with the following directives:
99/05/CEE radio
2006/95/CEE electrical safety
2004/108/CE electromagnetic compatibility
To verify compliance, the following technical standards
have been applied:
EN 60335-1, EN 55014-1, EN 55014-2, EN 301 489-1,
EN 301 489-3, EN 300 220 - 3
Racconigi, 29/07/2010
V2 S.p.A. legal representative
Cosimo De Falco
230V dual channel receiver, capable to
control loads up to 1500W
• Operates with Royal or Personal Pass series transmitters:
the first remote control to be memorised determines the
mode of operation; Royal or Personal Pass.
• The Personal Pass version allows up to 240 different remote
controls to be memorised.
• Monostable, bistable or timer operating logoc.
• Basic programming using button SW1 or advanced
programming using the PROG2 programming device and
WINPPCL software
PROGRA ING
The self learning programming system enables the code
memorization and the setting of the following functioning
modes:
ONOSTABLE: it activates the corresponding relay through the
time of TX transmission. When the transmission stops, the relay
goes automatically off.
BISTABLE: it activates the corresponding relay on the first TX
transmission. The relay goes off on the second transmission.
TI ER: the tx transmission activates the corresponding relay
which goes off after the set time (max 7,5 minutes).
NOTE: the first remote control to be memorised determines
the mode of operation; Royal or Personal Pass.
To change the operating mode, it is essential to perform a
CO PLETE CANCELLATION and then memorise the new
remote control.
mI PORTANT: to memorize the code in the correct way
it is necessary to keep a minimum distance of 1,5 metres
between the transmitter and the receiver's antenna.
TECHNICAL DATA 230V models 120V models
Alimentation 230Vac - 50 z 120Vac - 60 z
Relay contact 10A / 250Vac 10A / 120Vac
Nominal Frequency 433,92 - 868,30 Mhz
Working temperature -20 ÷ +60 °C
Consumption 20 mA standby
Sensibility ≥ -103 dBm
S/N > 17dB @ 100dBm m=100%
Size 113 x 113 x 57 mm
Weight 200g
Protection IP55

ENGLISH
8
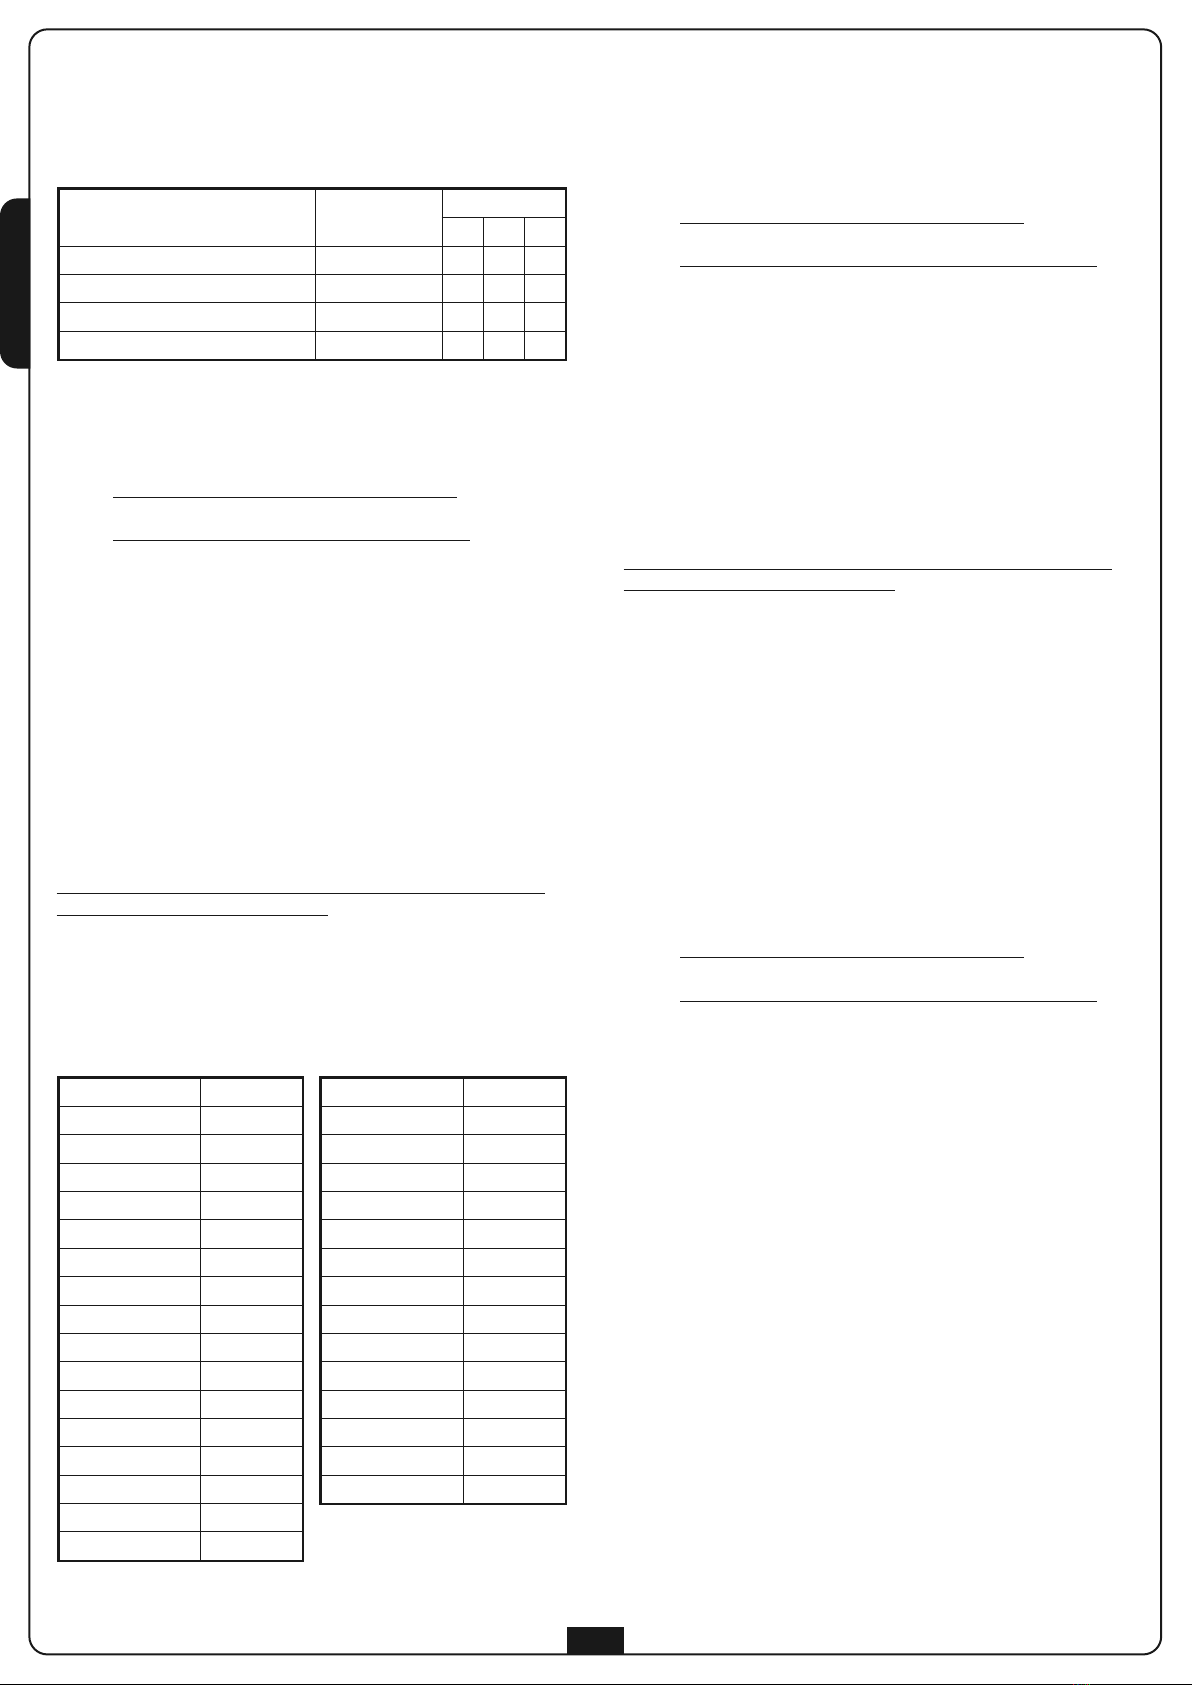
SELECTING THE CHANNEL AND THE
ONOSTABLE / BISTABLE OPERATION LOGIC
Select the channel and the operating logic by referring to the
following table:
1. Press the SW1 key of the receiver N times, as indicated
above: the relevant led goes on
2. Within 5 seconds, press and hold the button on the remote
control.
- if the remote control unit is a ROYAL version, the
procedure ends at point 3
- if the remote control unit is a PERSONAL PASS version, go
to point 4 and follow the procedure until the end of the
section
3. LED on the receiver is turned off to indicate the code has
been memorised correctly
4. The led of the receiver goes out and goes on again: the code
has been memorised and the receiver remains standby for 5 s
with a new code to be memorised
5. Memorise all the remote control units necessary
6. After 5 seconds without a valid transmission, LED L1 is turned
off and the receiver returns to normal operating mode
PROGRA ING THE TI ER FUNCTION
To memorise a transmitter on channel 1, associating it with the
TIMER function, proceed as follows:
1. Press and hold the SW1 key on the receiver:
LED L1 (associated with the first channel) comes on
2. After 4 seconds, LED L1 is turned off
3. When led L1 goes off, release the SW1 button. Led L1 starts
a sequence of flashings at low speed (1 flash per second).
The number of flashing corresponds to the time which can
be set as shown in the table.
4.The number of flashes for LED L1 corresponds to the period
of time it is desired be set.
5. Press button SW1 on the receiver during the desired period of
flashing: the series of flashes in interrupted and LED L1
remains on
6. Within 5 seconds, press and hold the button on the remote
control:
- if the remote control unit is a ROYAL version, the
procedure ends at point 7
- if the remote control unit is a PERSONAL PASS version, go
to point 8 and follow the procedure until the end of the
section
7. LED L1 on the receiver is turned off to indicate the code has
been memorised correctly
8. LED L1 on the receiver is turned off and then comes on again:
the code has been memorised and the receiver remains
standby for 5 s with a new code to be memorised
9. Memorise all the remote control units necessary
10. After 5 seconds without a valid transmission, LED L1 is turned
off and the receiver returns to normal operating mode
To memorise a transmitter on channel 2, associating it with the
TIMER function, proceed as follows:
1. Press and release the SW1 key: LED L1 comes on
2. Press and release the SW1 key: LED L3 also comes on
3. Press and hold the SW1 key: LEDs L1 and L3 are turned off
and LED L2 comes on
4. After 4 seconds, LED L2 is turned off
5. When led L1 goes off, release the SW1 button. Led L1 starts
a sequence of flashings at low speed (1 flash per second).
The number of flashing corresponds to the time which can
be set as shown in the table.
6. The number of flashes for LED L1 corresponds to the period
of time it is desired be set.
7. Press button SW1 on the receiver during the desired period of
flashing: the series of flashes in interrupted and LED L1
remains on
8. Within 5 seconds, press and hold the button on the remote
control:
- if the remote control unit is a ROYAL version, the
procedure ends at point 9
- if the remote control unit is a PERSONAL PASS version, go
to point 10 and follow the procedure until the end of the
section
9. LED L1 on the receiver is turned off to indicate the code has
been memorised correctly
10. LED L1 on the receiver is turned off and then comes on again:
the code has been memorised and the receiver remains
standby for 5 s with a new code to be memorised
11. Memorise all the remote control units necessary
12. After 5 seconds without a valid transmission, LED L1 is turned
off and the receiver returns to normal operating mode
N° Flashing Time
1 01 sec.
2 02 sec.
3 03 sec.
4 04 sec.
5 05 sec.
6 06 sec.
7 07 sec.
8 08 sec.
9 09 sec.
10 10 sec.
11 11 sec.
12 12 sec.
13 13 sec.
14 14 sec.
15 15 sec.
16 30 sec.
N° Flashing Time
17 1 min.
18 1,5 min.
19 2 min.
20 2,5 min.
21 3 min.
22 3,5 min.
23 4 min.
24 4,5 min.
25 5 min.
26 5,5 min.
27 6 min.
28 6,5 min.
29 7 min.
30 7,5 min.
N°I PULSES
SW1
LED ON
L1 L2 L3
C ANNEL 1 MONOSTABLE 1 •
C ANNEL 1 BISTABLE 2 • •
C ANNEL 2 MONOSTABLE 3 •
C ANNEL 2 BISTABLE 4 • •

ENGLISH
9
SUBSITUTIVE TRANS ITTER
(Personal Pass system only)
The substitutive transmitter, generated only by means of
WINPPCL, allows to replace by radio a transmitter stored in the
receiver.
A single transmition with the specially programmed
SUBSTITUTIVE TX, nearby the receiver, replaces the transmitter
code with the new one without removing the receiver from the
installation.
Three code substitutions are permitted, if transmitter TX A is
memorised, the options are::
TX B replaces TX A (TX A is no longer operative)
TX C replaces TX B (TX B is no longer operative)
TX D replaces TX C (TX C is no longer operative)
CODE REPLACE ENT
(Royal system only)
The memorized transmitter code can be replaced by a new code
by following the same procedure for the memorization.
In this way the new code will be memorized and the previous
one cancelled.
FULL CODE ERASING
To perform a full code erasing do the following:
• Remove the power to the receiver.
• Press and hold the SW1 key on the receiver.
• At the same time, power-up the receiver.
The receiver LED goes on: release the SW1 key
• The memory spaces are empty and available for a new
programming.
To perform a partial code erasing the PROG2 portable
programmer is required.
RELAY CONTACTS
The contact on the load terminal board is the normally open
type; it is possible to modify the contact to make it work as a
normally closed contact: short-circuit jumper Aand jumper B
using tin-based solder and make a sharp cut in the jumper C
circuit (Fig.2).
ROLLING CODE ODE
(Personal Pass system only)
The receiver manages the rolling code for the Personal Pass
system. This function is disabled by default.
Rolling code mode may be activated by WinPPCL or by using the
SW1 programming button.
• Press and hold the SW1 key on the receiver:
• After 4 seconds, LED L1 is turned off
• After 10 seconds, LED L3 comes on
• Release the key: LED L3 starts to flash for 5 seconds:
Single flashes ROLLING CODE disabled
Double flashes ROLLING CODE enabled
• To change the settings, press button SW1 within 5 seconds of
the flashing starting; LED L1 will flash in accordance with the
new settings.
• Wait 5 s from pressing the last button selecting the desired
flashing, LED L1 is turned off and the new configuration is
memorised.
RE OTE RADIO LEARNING
(Personal Pass system only)
This procedure allows to memorize new transmitters by radio, in
sequence and without removing the receiver from the
installation.
The transmitter which allows to enable the programming by
radio must be memorized in advance.
All transmitters programmed by radio will share the same key
configuration as the transmitter which activated the
programming.
Example:
TX A transmitter memorized with the following key configuration:
Key 1 in monostable configuration.
Key 2 in 10 s timer configuration.
Key in bistable configuration.
TX B transmitter to memorize.
• old for 5 seconds minimum the keys 1+2 or 1+3 of TX A
• Release both keys
• Press, within 5 seconds, the required key of TX B:
LED L1 on the receiver is turned off and then comes on again
to indicate the code has been memorised correctly
• Within 5 seconds, transmit using the other key on TX B that it
is desired to memorise; repeat this operation for any other
transmitters.
• To exit the self-learning mode wait for at least 5 seconds
The key configuration of TX B transmitter and other
transmitters, set with this procedure, will be the same as
TX A transmitter.
This manual suits for next models
1
Table of contents
Other V2 Receiver manuals
Popular Receiver manuals by other brands

TechniSat
TechniSat DigiPal 2 operating manual

DAPAudio
DAPAudio D140773 manual

Romantis Satellite Communications
Romantis Satellite Communications UHP-8000 General description and installation guide

Sony
Sony HCD-FC7 - System Components Service manual

Danfoss
Danfoss RX1 installation instructions

Onkyo
Onkyo TX-SR343 Basic Manual