Vaask WMD-001-M02 User manual

SURFACE MOUNT INSTALLATION GUIDE
PREMIUM HAND SANITIZING FIXTURE
ASSEMBLED IN THE USA
Original instructions (English language/U.S. version). All versions of this manual in languages other than
English are translated based on the original, capturing its substance without additions or alterations.
Patents applied for in the USA and abroad.
Model #: WMD-001-M02 | Rev. SIG-230106
Patent No. D970,919
®

| 2
FOR COUNTRIES NOT COVERED BY THE EUROPEAN UNION
This appliance is not intended for use by people (including children) with reduced
physical, sensory or mental capabilities, or lack of experience and knowledge,
unless a person responsible for their safety has given them supervision or instruction
concerning the use of the appliance. Children should be supervised to ensure that
they do not play with the appliance.
FOR COUNTRIES COVERED BY THE EUROPEAN UNION
This appliance can be used by children age 8 and older and by people with reduced
physical, sensory or mental capabilities, or a lack of experience and knowledge, only
if someone supervises them or instructs them on the safe use of the appliance and
the user understands the hazards involved.
Children shall not play with this appliance, nor shall they clean or maintain the
appliance, without supervision.
To prevent accidents and machine damage, read these instructions before
installation or use.
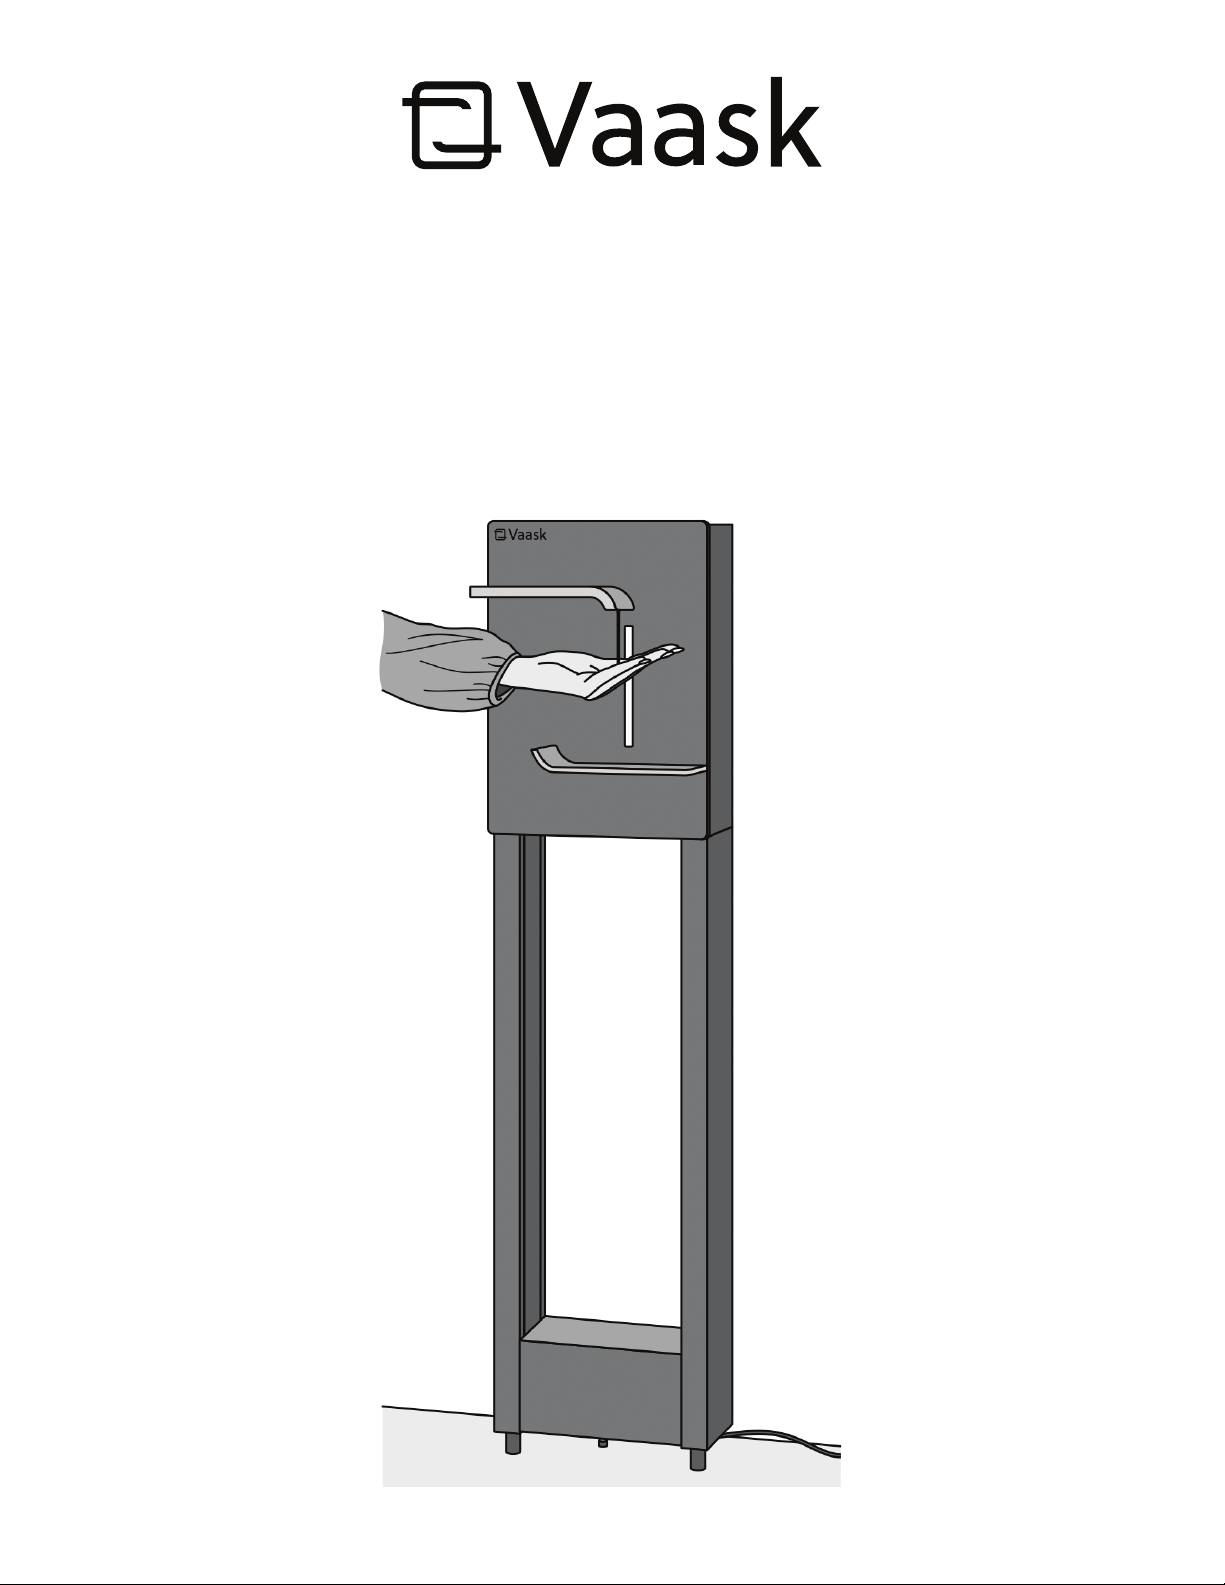
For help, call +1 (512) 956-7687 or visit vaask.com.

| 3
INSTALLATION
This equipment is not designed for maritime use or for use in mobile installations such as
caravans or aircraft, except under certain conditions. Contact the Vaask Technical Service
Department at +1 (512) 956-7687 with specific requirements.
Inspect the dispenser for transport damage, and do not install or use a damaged unit.
Contact Customer Service at +1 (512) 956-7687 if you find damage.
ELECTRICAL SAFETY
Before installation, make sure the voltage and frequency listed on the data plate match
that of the electrical supply. This data must correspond in order to prevent injury and
machine damage. Consult a qualified electrician if you are unsure.
To guarantee the electrical safety of this appliance, it is imperative that continuity exists
between the appliance and an effective grounding system. If you have any doubt, get a
qualified electrician to check the electrical system of the facility. The manufacturer cannot
be held responsible for damages caused by the lack or inadequacy of an effective grounding
system.

| 4
DIMENSIONAL DRAWINGS AND PARTS

| 5
TOOLS NEEDED
WHAT’S INCLUDED IN THE BOX
Box 2 Hand Sanitizing Fixture
Box 1 Surface mount
Six (6) screws and six (6) drywall anchors, bagged*
* Non-drywall construction may require the installer to
use other fasteners. The adhesive or anchor system
you choose should hold at least 200 pounds.

| 6
100 to 220V
single-phase AC
electrical conduit /
wire port
Faucet
Hand sensor
Dispense nozzle
LED display
Catch tray
Wall façade
retention clips
Wall façade
retention clips
Optional direct-to-stud
mounting holes
BOX 2 HAND SANITIZING FIXTURE
Junction box
Stored in box:
3 X
Pump
Enclosure
Pump tubeFirmware update portFaçade clip screw
Nozzle tube
Control buttons
Slam latch
Door
Door harness
Power switch
Refill cap
Refillable 2.0L
cartridge
Slam latchDip tube cap
Cartridge
release button
WAGO connector

| 7
BEFORE YOU BEGIN
If you choose to plug your Surface mount [option B in the diagram below] into an
outlet, then ensure that it will be located no more than 8 ft (2.4 m) from a 110V to
220V single-phase outlet with at least 0.25-amp capacity. Most standard outlets
meet these requirements.
*The Surface mount can be plugged into an outlet or hardwired by a certified electrician.

| 8
Options for power location include:
A. Existing outlet between frame legs
B. Existing outlet to left or right of wall frame
C. Hardwiring the hand sanitizing fixture. For this option, contact a certified
electrician, who can install the fixture in accordance with local building code
requirements.

| 9
INSTALLATION INSTRUCTIONS
PRE-INSTALLATION STEPS
1. Remove the Surface mount from box 1.
2. Adjust for the baseboard trim height.
• If the baseboard trim along the bottom of the wall is thicker than 0.15 in
(4 mm) and taller than 1 in (2.5 cm), then the Surface mount needs to be
installed higher on the wall to compensate. The base posts can be removed if
desired.
• Otherwise, the mount can be attached to the wall with the base posts resting
on the floor.

| 10
INSTALL SURFACE MOUNT TO WALL
1. Remove the lower box cover from the Surface mount by unscrewing the captive
thumb screw.
2. Temporarily place the Surface mount in its desired location.
3. Rest the bottom edge of the mount on the baseboard if the baseboard is taller
than 1 in (2.5 cm). Otherwise, rest the base posts directly on the floor.
4. Use a bubble level to ensure that the mount is flush with the floor.

| 11
5. Mark hole locations (A) and (B) using a pencil.
6. Remove the Surface mount from the wall.
7. If installing the Surface mount to drywall, insert the included drywall anchors
with a Phillips screwdriver at the six marks. The anchors are self-tapping and do
not require pre-drilling.

| 12
8. Align the frame with the anchor locations and attach using the six included
screws and a Phillips screwdriver.
9. Route the cord, but do not plug it in yet:
A. If the outlet is between the legs of the Surface mount, then route the cord
directly upwards.
B. If the outlet is to the left or right of the Surface mount, then route the cord
through the oval hole in the bottom of the frame.
10. Take the Vaask hand sanitizing fixture out of Box 2, and remove the foam inserts.
11. Attach the power cord connectors from the fixture to the Surface mount.

| 13
12. With the fixture door open, carefully align the fixture to the opening of the
Surface mount (A) and slide in until the edges are completely flush (B).
13. Hand-tighten the screw in each of the four corners of the enclosure (A).
A
A A
A

| 14
14. Plug in, and turn on the switch within the enclosure. The light should illuminate.
15. Store all excess cord within the bottom box area.
16.Replace the bottom box cover and attach using the captive thumb screw.

| 15
COMMISSION YOUR VAASK UNIT
1. With the empty cartridge still attached, press the “refill system” button to purge
the dispenser of residual sanitizer.
2. Press the silver tab on the dip tube connector to remove the empty cartridge
from the dispenser.

| 16
3. Unscrew the large cap on top of the refillable cartridge.
4. Fill the cartridge to the desired fill level with hand sanitizer gel made of
60% to 95% alcohol.
NOTE: Fire code stipulates that the cartridge can be filled up
to the following levels:
• 1.2 L in open areas and corridors
• 2.0 L in areas separated from corridors by doors
5. Put the large cap back on the cartridge and hand-tighten.
6. Connect the filled cartridge to the dispenser by inserting the dip tube connector
into the mating connector.
7. Press the “refill system” button to prime the dispenser.
8. Once the pump stops spinning, the dispenser is ready for use.
CARE AND CLEANING
Use microfibear cloth.
Use non-abrasive, multipurpose cleaner or rubbing alcohol.
Dissolve stuck-on sanitizer with rubbing alcohol.
Do not use paper cloths or abrasive cleaners on surfaces.
Both can damage unit.

| 17
SHIPPING, RETURNS AND WARRANTY CLAIMS
RETURN POLICY
Return Conditions for New Product Only
• FOR PRODUCTS THAT HAVE BEEN INSTALLED, OR PRODUCTS WITH CUSTOM PAINT OR
APPEARANCE PACKAGE, SALE IS FINAL AND NON-REFUNDABLE.
• Customer must notify Vaask of the return within 45 calendar days of the ship date, as set
forth by Vaask in its sole and absolute discretion. The customer must ship product back
within 10 business days of receiving he Return Material Authorization.
• An additional service fee and/or parts replacement fee may be assessed for any product
that is rdamaged, including during shipment;, is missing components; or has been modified
in any way. Such fees and charges will vary based upon the actual material and labor costs
necessary to repair the product, to replace missing, or modified parts, and to return the
product to its original factory condition.
Instructions for Return of New Product
1. To request a return, the customer may contact Vaask by phone +1 (512) 956-7687, by email
com/returns.
2. Once Customer Service determines the product’s return eligibility and calculated restocking
fees, Vaask will provide the customer an RMA number and the address to which the product
must be shipped.
3. The customer may, in Vaask’s sole and absolute discretion, be responsible for shipping the
product, including all insurance, freight, or other transportation charges, to the return
address provided by Vaask. The product should be properly packed to avoid damage in
transit. Vaask will not be responsible for such damage.
4. Once Vaask receives the item, the company will inspect the returned items to ensure that it
is not damaged and/or that no components are missing.
5. The amount of the purchase minus restocking fee and original shipping charges will be
credited to the billing account on the order.
6. The credit will be applied to the balance of the billing account. If the balance is less than the
refunded amount, the remaining funds will be refunded to the credit card used for purchase
if applicable, or a check for the amount will be mailed to the address listed for the billing
account on the Sales Agreement.

| 18
WARRANTY POLICY
Instructions for a Warranty Return
1. To request a return and obtain an RMA number, the customer may contact Vaask Customer
request on vaask.com/returns.
2. Please use the return label supplied by your Customer Service associate.
The return shipment address is:
Vaask
c/o Global Returns
5811 Trade Center Drive, Ste 900
Austin, TX 78744 USA
3. Use the packaging for the replacement part to return the original part. The RMA number
must appear on the outside of the packaging.
4. If the part weighs over 50 lb (22.7 kg), you will be provided a prepaid Bill of Lading. To
schedule a freight pickup, please contact Customer Service. We will only charge freight
costs if the original part is not covered under warranty.
5. If the part weighs 50 lb (22.7 kg) or less, please use the provided prepaid shipping label and
schedule a carrier pickup or drop off the package at your local carrier’s office location.
5-YEAR LIMITED PRODUCT WARRANTY
Where Vaask, LLC (“Vaask,” “we” or “us”) has identified in or on product packaging or in a
product website description that a Vaask-branded hand sanitizing fixture has a 5-Year Limited
Product Warranty (a “Qualifying Product”), then for that Qualifying Product, Vaask warrants
to the original purchaser that the Qualifying Product will be free from defects in materials and
workmanship under normal use for a period of five (5) years from the date of original shipment
by Vaask of the Qualifying Product (the “Limited Warranty Period”), subject to the terms and
conditions set forth herein. This is a limited warranty, and it contains specific exclusions and
limitations. This limited product warranty is non-transferable and applies only to a Qualifying
Product sold directly by Vaask.
If a qualifying defect arises and a warranty claim is received by Vaask within the Limited
Warranty Period, Vaask will, at its option and to the extent permitted by law, ship new or
refurbished replacement parts to the original purchaser at no charge or replace the Qualifying
Product with a new or refurbished product at no charge. To the extent permitted by law, these
are your sole and exclusive remedies for a product defect, and Vaask’s total liability shall not
exceed the invoice amount to the original purchaser for the defective Qualifying Product. This
Limited Product Warranty is valid only in the jurisdictions where the products are sold directly
by Vaask and is valid only to the extent permitted by the applicable laws of such jurisdictions.
Any replacement product will be warranted for the remainder of the original warranty period or
thirty (30) days, whichever is longer, or for any additional period of time that may be required by
applicable law.

| 19
1. How To Obtain Warranty Service
To obtain warranty service, you must contact Customer Service at +1 (512) 956-7687 or
info@Vaask.com. Proof of purchase must be presented upon Vaask’s request.
In some cases, a Vaask Customer Service representative will schedule a trouble-shooting
call with the customer to attempt to diagnose the problem remotely. Based on our remote
diagnostics, we may choose to ship the replacement part(s) to the customer free of charge.
We may ask the customer to send us the defective components for diagnostics, in which
case we will cover the return shipping costs provided the customer follows our shipping
instructions. If we send replacement parts, the customer will have the option to install the
replacement parts (following our provided instructions) or schedule a repair appointment
for Vaask or one of our authorized service providers to conduct the repairs at the customer’s
location. If we are unable to diagnose the problem remotely, or if we otherwise determine
that replacement of the product is necessary, we will ship a replacement product free of
charge. In these cases, the customer may choose to schedule an appointment with Vaask or
one of our authorized service providers to install the replacement product.
2. Exclusions And Limitations
This Limited Product Warranty applies only to the original purchaser of a Qualifying Product.
Without limiting the foregoing, the Limited Product Warranty does not apply to any Vaask
products and services other than Qualifying Products; non-Vaask products, even if included
or sold with a Qualifying Product; or consumables (such as hand sanitizer).
THIS LIMITED PRODUCT WARRANTY DOES NOT APPLY TO DAMAGE TO A PRODUCT
OR PART OF A PRODUCT THAT HAS BEEN SERVICED, ALTERED, REFURBISHED OR
MODIFIED BY ANYONE WHO IS NOT AUTHORIZED BY VAASK, NOR DOES IT APPLY TO ANY
COSMETIC DAMAGE SUCH AS DISCOLORATION, SCRATCHES AND DENTS. IN ADDITION,
THIS LIMITED PRODUCT WARRANTY DOES NOT APPLY TO DAMAGE OR DEFECTS CAUSED
BY (A) USE WITH NON-VAASK PRODUCTS; (B) ACCIDENT, ABUSE, MISUSE, MISHANDLING,
FLOOD, FIRE, EARTHQUAKE OR OTHER EXTERNAL CAUSES; (C) NORMAL WEAR AND
TEAR OR AGING OF THE PRODUCT; (D) OPERATING THE PRODUCT (I) OUTSIDE THE
PERMITTED OR INTENDED USES DESCRIBED BY VAASK, (II) NOT IN ACCORDANCE WITH
INSTRUCTIONS PROVIDED BY VAASK, OR (III) WITH IMPROPER VOLTAGE OR POWER
SUPPLY; OR (E) FAILURE TO CLEAN THE PRODUCT IN ACCORDANCE WITH VAASK’S
CLEANING GUIDELINES.
No Vaask agent or employee is authorized to make any modification, extension or addition to
this Limited Product Warranty. This Limited Product Warranty shall be governed by the laws
of the State of Texas, USA, without regard to any conflict of laws principles that may provide
the application of the law of another jurisdiction. If any provision of our Limited Product
Warranty is held to be unenforceable, such provision shall be severed and the remaining
provisions will remain enforceable.
Table of contents
Other Vaask Accessories manuals