Vacmaster VP220 User manual


2ARY, Inc. | 5200 W 110th Street Suite 200, Overland Park, KS 66211 | www.VacMasterFresh.com | 800-821-7849
VP220 Chamber Vacuum Sealer | User Guide
Contents
Welcome
Important Safeguards................................................................................................................3
Vacuum Packaging Guidelines........................................................................................... 4
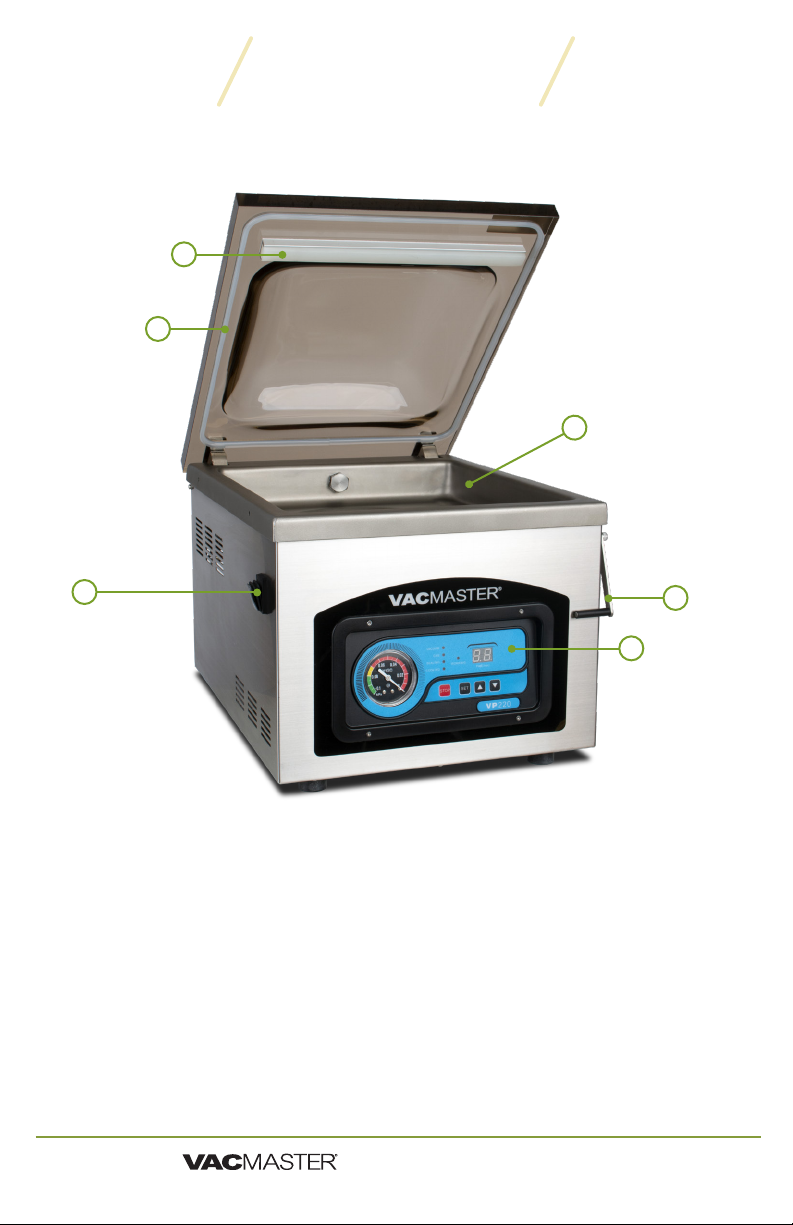
VP220 Features................................................................................................................................. 5
VP220 Control Panel..................................................................................................................... 6
VP220 Setup.........................................................................................................................................7
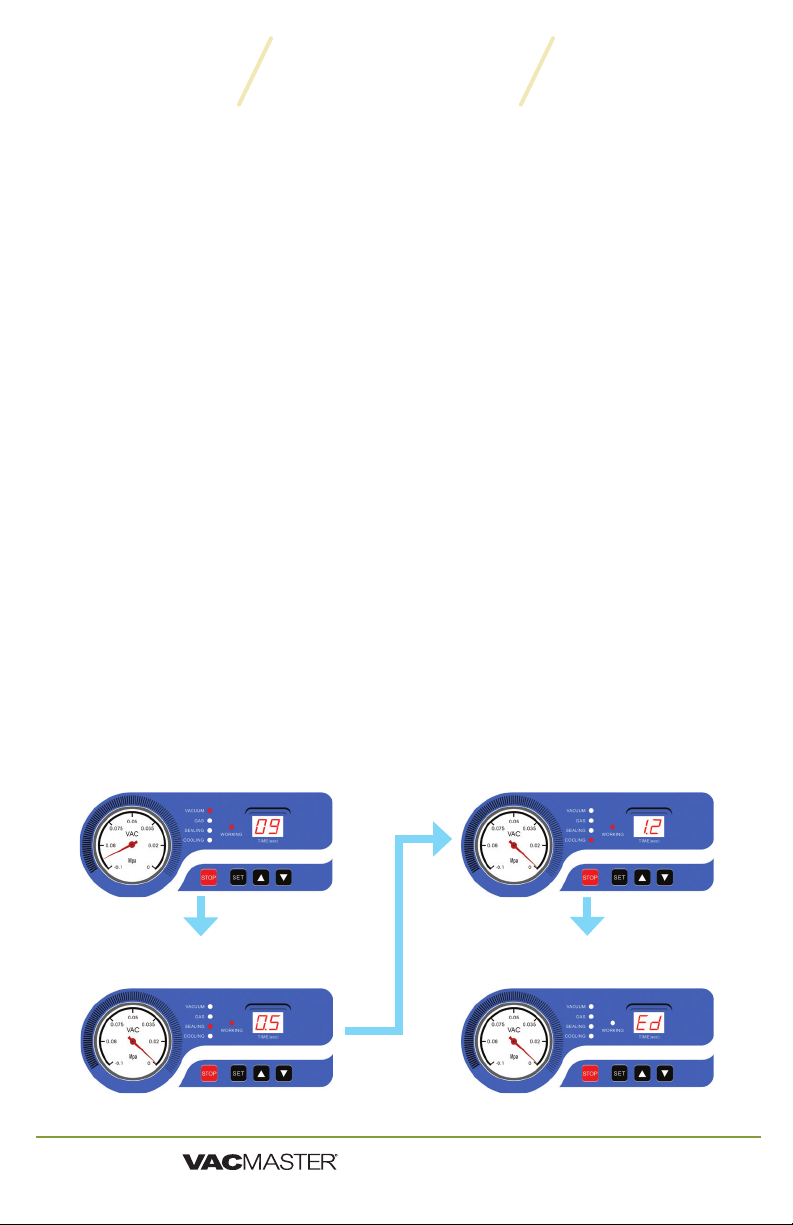
How To.......................................................................................................................................................8
Troubleshooting...............................................................................................................................11
Cleaning and Care........................................................................................................................ 12
Parts......................................................................................................................................................... 13
Notes........................................................................................................................................................18
Limited Warranty and Registration .............................................................................. 19
Thank you for purchasing the VacMaster®VP220 Chamber Vacuum
Sealer. With the help of the VP220, you will now be able to keep
food fresh for longer in the refrigerator, freezer or pantry. The VP220
effectively removes air and extends freshness up to five times longer
than traditional methods. Our versatile and convenient machine can
also be used to preserve and organize other items, like keepsakes or
small, easy-to-lose items. Your VP220 will quickly become invaluable to
all your packaging needs; it will never leave your countertop.
The VP220 is a chamber vacuum system, which offers two distinct
advantages over non-chamber, external suction units. First, a much
higher level of vacuum can be achieved, which means a longer shelf life
for foods that you package. Secondly, liquids and liquid-rich foods can
be effectively vacuum packaged. Foods like fresh meats, fish, soups,
stews and marinated vegetables are packaged quickly with ease and no
mess. The VacMaster®VP220 is perfect for sous vide cooking.
Register your product and get support at
www.VacMasterFresh.com

3
ARY, Inc. | 5200 W 110th Street Suite 200, Overland Park, KS 66211 | www.VacMasterFresh.com | 800-821-7849
VP220 Chamber Vacuum Sealer | User Guide
For your safety, always follow these basic precautions when using a
VacMaster®VP220 Vacuum Sealer:
1. Read all instructions in this User’s Guide before use.
2. Do not use the VP220 on a wet or hot surface, or near a heat
source.
3. To protect against electrical shock, do not immerse any part
of the vacuum sealer, power cord, or plug in water or any other
liquid.
4. Unplug the machine before cleaning or when not in use.
5. To disconnect, unplug the power cord from the electrical outlet.
Do not disconnect by pulling on the cord.
6. Do not operate the VP220 if it has a damaged cord or plug.
7. Do not operate the VP220 if it malfunctions or is damaged.
Contact Customer Service at 800-821-7849.
8. Use the VP220 only for its intended use.
9. Closely supervise children when using any electrical appliance.
Do not allow the VP220 to be used as a toy.
10. The VP220 (120V appliances only) has a grounded plug. Use only
a grounded electrical outlet. To reduce risk of electrical shock, do
not modify the plug in any way.
11. Do not use an extension cord.
12. The power cord should not drape over a counter or tabletop, as
the cord could be tripped over or pulled on unintentionally.
13. Do not place or operate near an electric or gas burner, or a
heated oven.
14. Extreme caution and care must be used when sealing or
handling any pouches containing hot liquids.
15. Do not use outdoors.
SAVE THESE INSTRUCTIONS
Important Safeguards

4ARY, Inc. | 5200 W 110th Street Suite 200, Overland Park, KS 66211 | www.VacMasterFresh.com | 800-821-7849
VP220 Chamber Vacuum Sealer | User Guide
Vacuum Packaging Guidelines
▫Vacuum packaging is not a substitute for canning. All perishables
still need to be refrigerated or frozen.
▫Follow all food safety regulations as outlined by the FDA at
www.FDA.gov
▫Use only VacMaster®Vacuum Chamber Pouches and accessories.
▫Delicate foods can be frozen prior to packaging to protect them
from getting crushed by the vacuum.
▫Use VacMaster®Bone Guards to cover an item’s sharp edges to
prevent pouch punctures.
▫Allow foods and liquids to cool before vacuum packaging.
▫Avoid overfilling the pouch. Leave 3" minimum of space between the
contents and the open end of the pouch. This is called head space.
This prevents spills during the vacuum sealing process.
▫To prevent wrinkles from forming in the seal, gently stretch the
pouch flat along the seal bar before closing the lid.
▫VacMaster®pouches are boilable, freezable, and microwavable.
When microwaving, it is important to pierce the pouch.
▫Some fruits and vegetables may release gases, known as
outgassing. When packaging these fruits and vegetables,
outgassing can cause the vacuum to be gradually lost over time.
Blanching or freezing before vacuum packaging helps prevent this
from occuring.
NOTE: Due to the risk of anaerobic bacteria, soft cheeses, fresh
mushrooms, garlic and onions should never be vacuum packaged.

5
ARY, Inc. | 5200 W 110th Street Suite 200, Overland Park, KS 66211 | www.VacMasterFresh.com | 800-821-7849
VP220 Chamber Vacuum Sealer | User Guide
VP220 Features
1. Seal Pad
2. Lid Gasket
3. Power Switch
4. Vacuum Chamber
5. Lid Lock: This feature is used to keep the lid closed while the
machine is in storage. DO NOT USE while the machine is operating.
6. Control Panel
1
2
4
6
5
3

6ARY, Inc. | 5200 W 110th Street Suite 200, Overland Park, KS 66211 | www.VacMasterFresh.com | 800-821-7849
VP220 Chamber Vacuum Sealer | User Guide
VP220 Control Panel
1. Vacuum Gauge: Indicates the vacuum level inside the chamber.
2. Function Lights:
Vacuum: Illuminates to adjust vacuum time as well as during the
vacuum process. During set up, adjust the vacuum time using the
UP/DOWN Buttons.
Gas: This model does not offer the gas flush option.
Sealing: Illuminates to adjust vacuum time as well as during the
sealing process. During set up, adjust the sealing time using the
UP/DOWN Buttons.
Cooling: Illuminates to adjust vacuum time as well as during the
cooling process. During set up, adjust the cooling using the UP/
DOWN buttons.
3. Working Indicator Light: Illuminates to indicate the machine is
currently in use.
4. LED Screen (Time): Displays current function or cycle time,
measured in seconds.
5. STOP Button: Press to stop the cycle and immediately seal the
pouch. This button will only work when the machine has entered
the vacuum seal process.
6. SET Button: Press to select the vacuum time, sealing time, or
cooling time. Use with the UP/DOWN buttons.
7. UP/DOWN Buttons: Press to increase or decrease vacuum time,
sealing time, or cooling time.
6
1
4
7
5
23

7
ARY, Inc. | 5200 W 110th Street Suite 200, Overland Park, KS 66211 | www.VacMasterFresh.com | 800-821-7849
VP220 Chamber Vacuum Sealer | User Guide
VP220 Setup
How to Use
Please read all instructions before operating the VP220
1. Attach the power cord and plug the machine into a grounded
electrical outlet - Properly insert the electrical cord into the
power outlet on the back of the machine and then plug the
cord into the wall outlet.
2. Open the machine lid - Release the lid lock, located on the
right side of the machine, and allow the lid to lift and remain
open.
3. Turn the power switch on - Push the
black switch on the left side of the
machine, switching from the "0"
to the "I"position. The LED Screen
on the control panel will illuminate
showing a symbol.
IMPORTANT: Do not turn the machine on until the lid lock has
been released. The lid lock feature is used ONLY to keep the lid
closed while the machine is in storage.
Adjusting the VP220 Timing Controls
NOTE: Timing adjustments must be made with the lid lock off and the lid open.
To adjust/set the timing controls, press the SET button on the control panel
until the required label (Vacuum, Sealing or Cooling) is illuminated. For
each selection, the current time setting will show on the LED Screen. All
time settings are displayed in seconds.
For initial testing, the time settings should be:
Vacuum Time: 40 seconds
Sealing Time: 1.2 seconds
Cooling Time: 2 seconds
To change the timing control settings, please read "Adjusting the VP220
Timing Controls" on Page 8.

8ARY, Inc. | 5200 W 110th Street Suite 200, Overland Park, KS 66211 | www.VacMasterFresh.com | 800-821-7849
VP220 Chamber Vacuum Sealer | User Guide
How to Use
Adjusting the VP220 Timing Controls (Cont’d)
Vacuum Time: To increase or decrease the vacuum time, press the SET
button until VACUUM is illuminated and then use the UP/DOWN buttons
to adjust the vacuum time accordingly. The time setting will display on
the LED Screen on the control panel.
NOTE: Filler plates can be used to reduce the vacuum time required. Place
the filler plates inside the chamber as desired. Filler plates occupy space,
leaving less air to be removed from the chamber. If you require more space
inside the chamber, remove the filler plates to accommodate your product.
Sealing Time: To increase or decrease the sealing time, press the SET
button until SEALING is illuminated and then use the UP/DOWN buttons
to adjust the sealing time to accommodate your application. It is
recommended that you make adjustments in 0.1 second increments to
avoid melting the pouch.
NOTE: For thicker pouches, you should increase the seal time in 0.1 second
increments until the pouch seals completely. In addition, for thinner pouches,
you should decrease the seal time in 0.1 second increments to avoid over-
sealing the pouch.
Cooling Time: To increase or decrease the cooling time, press the SET
button until COOLING is illuminated and then use the UP/DOWN buttons
to adjust the cooling time accordingly.
NOTE: The VP220 settings will always default to the most recently used
settings on the machine.
TIP: To protect the lifespan of your seal bar, set the cooling time to 1 second
more than the sealing time.

9
ARY, Inc. | 5200 W 110th Street Suite 200, Overland Park, KS 66211 | www.VacMasterFresh.com | 800-821-7849
VP220 Chamber Vacuum Sealer | User Guide
How to Use
Sealing with a Chamber Pouch (cont’d)
NOTE: After setting the timing controls, press the SET button until the function
lights on the control panel are no longer illuminated. The machine will not start
until all function lights are off.
1. Select a vacuum chamber pouch
Select the proper size of vacuum chamber pouch for the product
that you are packaging. Make sure that the mouth of the pouch
does not exceed the length of the seal bar and make sure the
entire pouch fits inside the chamber. Allow 1" to 2" of extra
headspace at the top of the pouch to ensure a quality, air-tight
seal. The VP220 accepts chamber pouches up to 10" W x 13"L.
2. Fill the pouch and place inside the chamber
Fill the pouch with the product to be vacuum packaged and place
the pouch inside the chamber. Keep pouches that contain liquids
or wet product below the height of the seal bar. Lay the pouch flat
inside the chamber, with the opening of the pouch across the seal
bar. Make sure that the pouch lies flat across the seal bar and is
free of wrinkles.
NOTE: The entire pouch must remain inside the chamber.
3. Close the machine lid to vacuum and seal
Close the lid and press down firmly for 2-3 seconds or until the
vacuum gauge begins to move.
Vacuum Cycle
Runs for a set time - counting down to zero
Sealing Cycle
Runs for a set time - counting down to zero
Cooling Cycle
Runs for a set time - counting down to zero
Lid Release
Indicates the end of the process

10 ARY, Inc. | 5200 W 110th Street Suite 200, Overland Park, KS 66211 | www.VacMasterFresh.com | 800-821-7849
VP220 Chamber Vacuum Sealer | User Guide
How to Use
Sealing with a Chamber Pouch (cont’d)
4. Inspect the pouch
When the lid opens, remove and inspect the pouch.
Vacuum confirmation: Check the quality of the vacuum by looking
at the tightness of the pouch and the product. Look for air pockets
or air leaks. If you notice that the product is not vacuum packaged
tightly, then increase the vacuum time by 5 seconds and vacuum
and seal again.
Seal confirmation: Inspect the pouch seal. A positive seal will
appear clear upon inspection. If the seal is spotty or incomplete,
increase the seal time by 0.1 second. If the seal appears white or
milky, decrease the seal time by 0.1 second. Once the settings are
determined for your application, vacuum and seal again.
If the product is vacuumed sealed tightly, the process is complete.

11
ARY, Inc. | 5200 W 110th Street Suite 200, Overland Park, KS 66211 | www.VacMasterFresh.com | 800-821-7849
VP220 Chamber Vacuum Sealer | User Guide
Troubleshooting
VP220 will not turn on:
▫Make sure the machine is properly plugged into a grounded outlet.
▫Check the power cord for tears and frays. Do not use this machine
if the power cord is damaged.
▫Make sure the power switch is turned on. The LED screen will be
illuminated when on.
▫If you see ‘F1’ displayed on the LED screen and the machine will not
function, make sure the lid is open and turn the power off. Turn
the machine back on and it should return to working order.
VP220 does not pull a complete vacuum with pouch:
▫The vacuum time may not be set high enough. Set the vacuum
time higher and vacuum again.
▫To vacuum and seal properly, the opening of the pouch must be
within the vacuum chamber. For detailed instructions, refer to
"How To Use the VacMaster®VP220 Chamber Vacuum Sealer" on
page 10.
▫The seal bar, lid gasket and vacuum pouch need to be clean, dry
and free of debris for the vacuum process to be successful. Wipe
surface of the seal bar, lid gasket and the inside of the pouch and
try again.
Vacuum pouch loses vacuum after being sealed:
▫Sharp items can poke small holes in pouches. To prevent this,
cover sharp edges with a paper towel or VacMaster®Bone Guard
and vacuum in a new pouch.
VP220 is not sealing pouch properly:
▫The seal time may not be long enough. Increase the seal time and
try again.
▫Pouches will not seal if any moisture, food particles or debris are
present in the seal area. Wipe the inside of the pouch clean and
try again.
▫Pouches must be properly placed along the seal bar. Make sure
the entire pouch is over the seal bar and there are no wrinkles in
the pouch material.
If problems persist, contact customer support at
(800) 821-7849

12 ARY, Inc. | 5200 W 110th Street Suite 200, Overland Park, KS 66211 | www.VacMasterFresh.com | 800-821-7849
VP220 Chamber Vacuum Sealer | User Guide
Cleaning & Storage
▫Disconnect the power cord from the electrical outlet by unplugging
it. Do not disconnect by pulling on the cord.
▫Do not immerse in water or spray directly with liquid.
▫Check the Vacuum Chamber and Gasket, making sure they are clean
and free of debris. If needed, use a clean, damp cloth with mild soap.
a. Wipe the vacuum chamber clean.
b. Wipe the gasket clean.
c. Wipe the seal area clean.
▫Do not store the VP220 outside.
▫Do not use any acetone-based or abrasive cleaners on the lid or
other plastic parts. Only clean lid with a damp cloth and mild soap.

13
ARY, Inc. | 5200 W 110th Street Suite 200, Overland Park, KS 66211 | www.VacMasterFresh.com | 800-821-7849
VP220 Chamber Vacuum Sealer | User Guide
Parts Information
VP220
Dome assembly
No. Name qty unit Part Number
1
Lid Bolt
4 pc
2
Upper Plate for Lid
2 pc
3
Lid
1 pc
979451
4
Lid Gasket
1.5 m
979425
5
Lower Plate for Lid
2 pc
6
Lid Lock Label
1 pc
7
Seal Pad Tape
0.62 m
8
Seal Pad Holder 2 Pc
9
Seal Pad 2 pc 979452

14 ARY, Inc. | 5200 W 110th Street Suite 200, Overland Park, KS 66211 | www.VacMasterFresh.com | 800-821-7849
VP220 Chamber Vacuum Sealer | User Guide
Parts Information
C
hamber
No. Name qty unit Part Number
10 Chamber 1 pc
11 Hinge Connecting Eye 2 pc
12 Upper Hose Coupling 1 pc
13 Hinge Nut (M6) 2 pc
14 Elbow Hose Fitting 1 pc
15 Roller Pin 2 pc
16 Roller 2 pc
17 Left Hinge 1 pc
979453
18 Cotter Pin 4 pc
19 Hinge Pin 2 pc
979455
20 Hinge Pin Screw (M5x12) 2 pc
21 Hinge Pin Nut (M5) 2 pc
22
Socket Set Screw (M5x10)
2 pc

15
ARY, Inc. | 5200 W 110th Street Suite 200, Overland Park, KS 66211 | www.VacMasterFresh.com | 800-821-7849
VP220 Chamber Vacuum Sealer | User Guide
Parts Information
23 Right Hinge 1 pc
979454
24 Hinge Stop Nut (M6) 2 pc
25
Hinge Stop Hex Screw (M6x55)
2 pc
26 Bumper Hinge 2 pc
27
Plate Assy Hinge Nut (M5)
2 pc
28 Right Plate Assembly 1 pc 979456
29
Plate Assy Hinge Washer (Φ6mm)
2 pc
30
Plate Assy Hinge Screw (M6x16)
2 pc
31 Plate Assy Spring 2 pc
32 Plate Assy Washer 2 pc
33 Plate Assy Nut (M6) 2 pc
34
Plate Assy Hex Screw (M6x18)
2 pc
35 Seal Bar 1 pc 979458
36 Piston 2 pc 979459
37 Piston Hose Tee 1 pc
38 Piston Hose 1.5 m
39 Spring Adjustment Eye 2 pc
40 Lid Spring 2 pc 979256
41 Micro Switch 1 pc 979460
42
Micro Switch Screws (M5x12)
2 pc
43 Micro Switch Mount 1 pc
44 Left Plate Assembly 1 pc 979457
45 Vac Port Gasket 1 pc
46 Vac Port 1 pc

16 ARY, Inc. | 5200 W 110th Street Suite 200, Overland Park, KS 66211 | www.VacMasterFresh.com | 800-821-7849
VP220 Chamber Vacuum Sealer | User Guide
Parts Information
Housing
No. Name qty unit Part Number
47 Housing 1 pc
48 Housing Screw (M4x12) 8 pc
49 Rubber Foot 4 pc 979461
50
Rubber Foot Screw (M4x16)
4 pc
51
Pump Hex Screw (M5x20)
4 pc
52 Pump Spacer 4 pc
53 Pump Washer (Φ5mm)
4 pc
54 Back Cover 1 pc
55 Voltage Label 1 pc
56 Model Data Label 1 pc
57 Rubber Pump Washer 2 pc
58 Vacuum Pump 1 pc 978377
59
Lower Hose Washer (Φ16x2.4mm)
1 pc
60 Lower Hose Coupling 1 pc
61 Pump Hose 0.78 m 979157
62 Socket Fuse (10 amp) 1 pc 979462

17
ARY, Inc. | 5200 W 110th Street Suite 200, Overland Park, KS 66211 | www.VacMasterFresh.com | 800-821-7849
VP220 Chamber Vacuum Sealer | User Guide
Parts Information
63
Socket Plug Screw (M3x8)
2 pc
64 Socket Plug 1 pc 979463
65 Socket Plug Bracket 1 pc
66 Solenoid 1 pc 979450
67 Solenoid Screw (M4x10) 2 pc
68 Exhaust Filter Hose Barb 1 pc 979143
69 Air Intake Filter 1 pc 979144
70 Air Intake Filter Bracket 1 pc 979145
71
Air Intake Filter Hose Barb
1 pc 979146
72
Air Intake Filter Bracket Screw (M5x12)
3 pc
73 Support Arm 1 pc
74 Support Arm Spring 1 pc 979148
75 Support Arm Nut (M5) 1 pc
76 Support Arm Bracket 1 pc
77
Support Arm Screw (M5x16)
1 pc
78
Seal Transformer Screw (M4x12)
4 pc
79 Seal Transformer 1 pc 979464
80
Power Module Screw (M3x10)
4 pc
81 Power Module 1 pc 979465
82
Control Relay Screw (M3x6)
4 pc
83 Control Relay 2 pc 979466
84 Solenoid Valve Hose 1.5 m 979156
85 Bottom Housing Plate 1 pc
86 Power Switch 1 pc 979468
87 Power Switch Mount 1 pc
88 Timer Relay 1 pc 979467
89 Timer Relay Mount Block 4 pc
90 Vacmaster Decal Panel 1 pc 979130
91 Main Board 1 pc 979469
92 Vacuum Gauge 1 pc 979126
93 Control Panel Mount 1 pc 979470
94
Control Panel Screw (M3x8)
4 pc
95 Control Panel Decal 1 pc 979122
96 VP220 Decal 1 pc 979471
97
Vacmaster Decal Panel Screw (M3x8)
4 pc
98 Lid Latch Nut (M6) 2 pc
99 Lid Latch 1 pc 979170
100 Lid Latch Screw (M6x20) 1 pc

18 ARY, Inc. | 5200 W 110th Street Suite 200, Overland Park, KS 66211 | www.VacMasterFresh.com | 800-821-7849
VP220 Chamber Vacuum Sealer | User Guide
Notes

19
ARY, Inc. | 5200 W 110th Street Suite 200, Overland Park, KS 66211 | www.VacMasterFresh.com | 800-821-7849
VP220 Chamber Vacuum Sealer | User Guide
ARY, Inc., a distributor and manufacturer of vacuum packaging and other machines
(collectively, the "Goods"), extends to the purchaser of the Goods a Limited One Year
Warranty, from the receipt of the Goods, under terms and conditions set out herein.
All Goods sold by ARY, Inc. are warranted to be free from defects in material and
workmanship at the time of delivery to purchaser. Defective material may be
returned to ARY, Inc. after inspection by an agent of ARY, Inc. and upon receipt from
ARY, Inc. of shipping instructions specific to the defective Goods authorized by ARY,
Inc. to be returned. ARY, Inc. at its sole option, may either (i) replace or repair any
defective materials and workmanship (and return the Goods to purchaser without
charge), (ii) refund the purchase price, or (iii) grant a reasonable allowance with the
foregoing procedure.
This warranty is subject to the following limitations:
i. ARY, Inc.’s responsibility and the purchaser’s exclusive remedy under this
warranty is limited to the repair or replacement of defects in material and
workmanship, refund of the purchase price, or grant of a reasonable allowance on
account of such defects, all as set forth above. ARY, Inc. is not responsible for any
consequential damages resulting from the breach of this or any other express or
implied warranty with respect to the Goods.
ii. This express warranty is the only warranty applicable. It excludes all other express
oral or written warranties and all warranties implied by law with respect to the Goods,
including any warranties or merchantability or fitness for a particular purpose.
iii. Every claim under this warranty shall be deemed waived by purchaser unless made
in writing within one (1) year of the receipt of the Goods to which such claim relates.
iv. This warranty, as to the Goods, is void (a) to repairs made by anyone other
than ARY, Inc. without prior authorization from ARY, Inc., (b) to performance of any
system of which ARY, Inc.’s Goods are a component part, (c) to deterioration by
corrosion or any cause of failure other than defect of material or workmanship,
(d) to any components of the Goods, including, without limitation, Teflon tape, lid
gaskets and seal wire, or (e) if any of the Good or parts thereof have been tampered
with or altered by someone other than ARY, Inc., or subjected to misuse, neglect,
abuse, or misuse in application.
ARY, Inc.’s maximum liability hereunder, arising from any cause whatsoever,
whether based in contract, tort (including negligence), strict liability, or any
other theory of law, shall not exceed the purchase price. A suit based on any
aforementioned cause of action must be commenced within one year from the date
said action accrues.
Register your product and get support at
www.VacMasterFresh.com/product-registration
Limited Warranty

All Rights Reserved. VacMaster®is a trademark or registered trademark of ARY, Inc. in the United States and other countries.
P.O. Box 412888
Kansas City, MO 64141
www.VacMasterFresh.com
800.821.7849
A Product of
Other manuals for VP220
1
Table of contents
Other Vacmaster Food Saver manuals

Vacmaster
Vacmaster VP112S User manual

Vacmaster
Vacmaster PRO360 User manual

Vacmaster
Vacmaster VP230 User manual

Vacmaster
Vacmaster DUO550 User manual

Vacmaster
Vacmaster VP230 User manual

Vacmaster
Vacmaster vp320 User manual

Vacmaster
Vacmaster BS116 User manual

Vacmaster
Vacmaster PRO275 User manual

Vacmaster
Vacmaster VP330 User manual

Vacmaster
Vacmaster VP95 User manual