Vacon NXP User manual

nx frequency converters
shaft synchronization
application apfiff11
user's manual

2 • vacon
Tel. +358 (0)201 2121 • Fax +358 (0)201 212 205
ABOUT THE SHAFT SYNCHRONIZATION APPLICATION MANUAL
Congratulations for choosing the Smooth Control provided by Vacon NX Frequency Converters!
This manual is available in both paper and electronic editions. We recommend you to use the elec-
tronic version if possible. If you have the electronic version at your disposal you will be able to bene-
fit from the following features:
The manual contains several links and cross-references to other locations in the manual which
makes it easier for the reader to move around, to check and find things faster.
The manual also contains hyperlinks to web pages. To visit these web pages through the links you
must have an internet browser installed on your computer.

shaft synchronization application vacon • 3
24-hour support +358 (0)40 837 1150 • Email: vacon@vacon.com
Vacon shaft synchronization application manual
INDEX Document code: ud01115B
Date: 26.10.2006
1. Introduction ....................................................................................................................... 5
1.1 Requirements ............................................................................................................................. 6
1.2 Trial Time period......................................................................................................................... 6
2. Control I/O ......................................................................................................................... 7
3. Connection of signals between master and follower drive (OPT-A7) ................................. 8
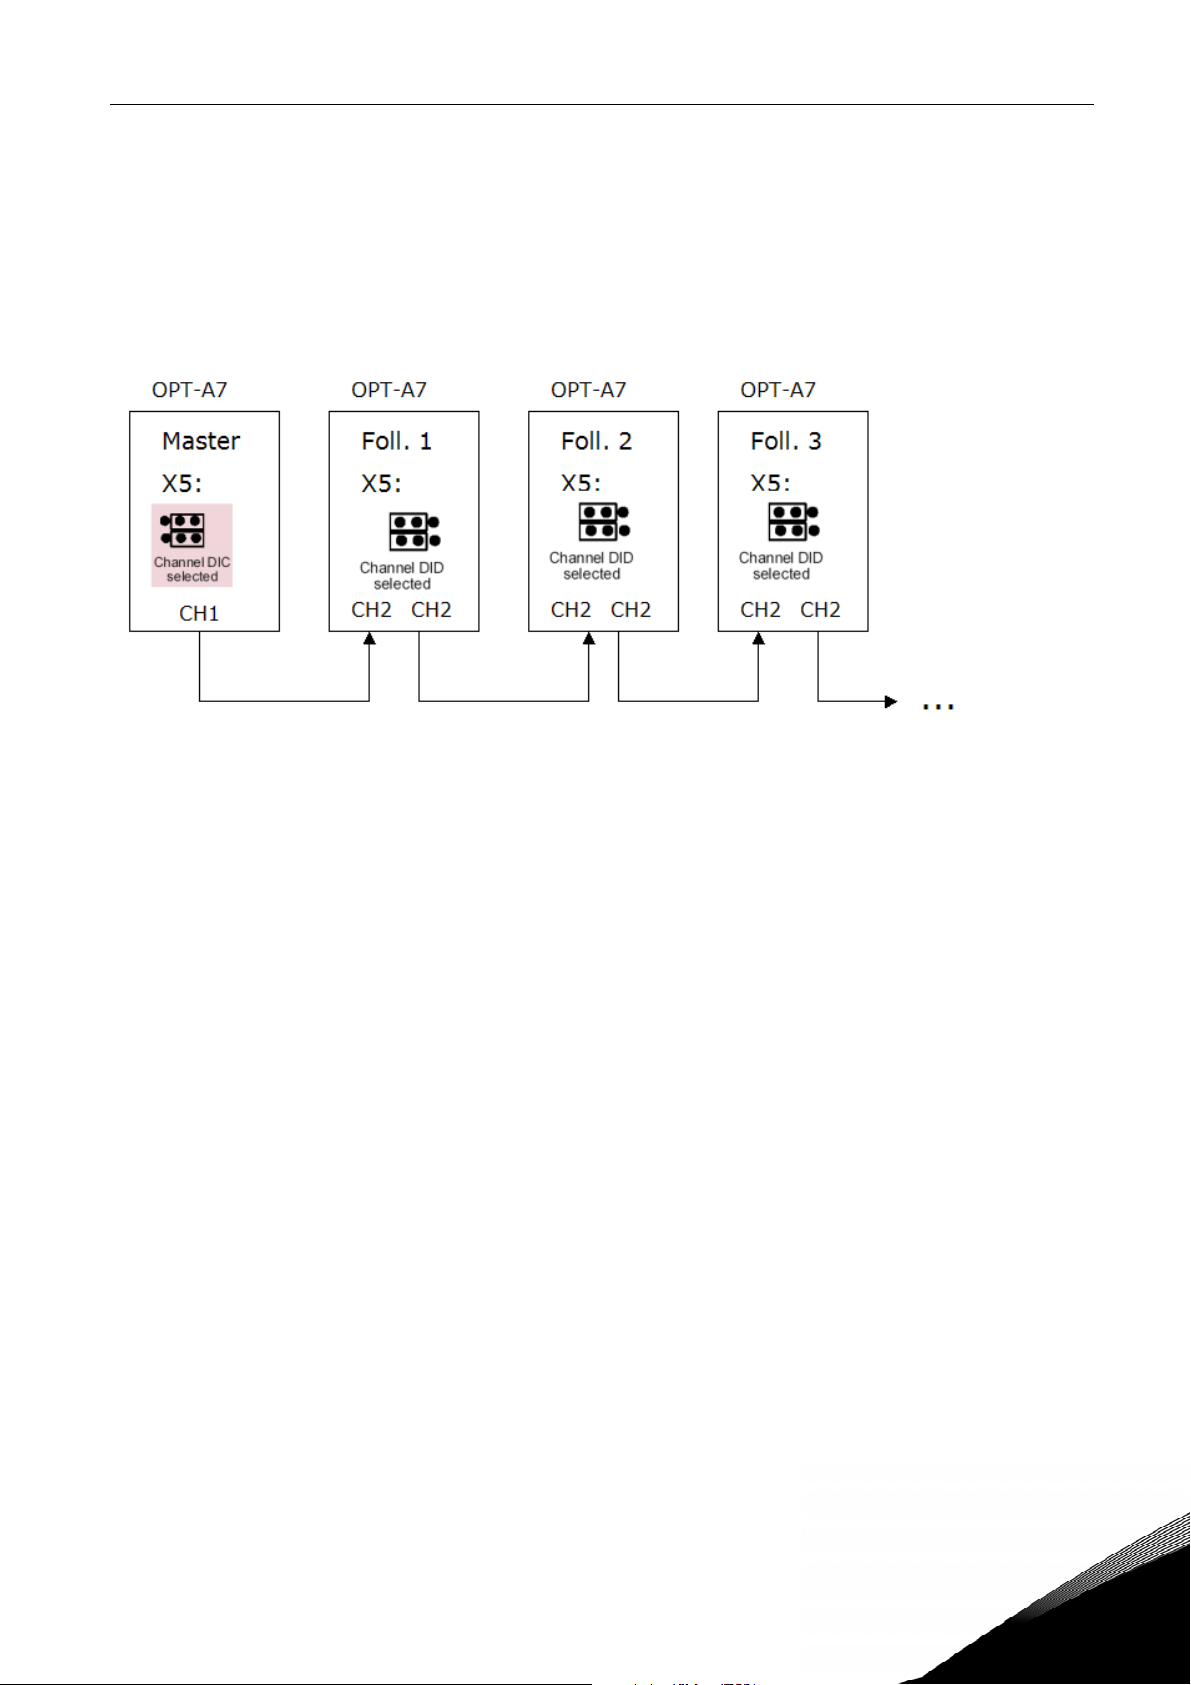
4. Jumper setting on the OPT-A7 board................................................................................. 9
5. “Terminal To Function” (TTF) programming principle ..................................................... 10
5.1 Defining an input/output for a certain function on keypad ..................................................... 10
5.2 Defining a terminal for a certain function with NCDrive programming tool.......................... 11
5.3 Defining unused inputs/outputs............................................................................................... 12
6. Shaft Synchronization Application – Parameter lists....................................................... 13
6.1 Monitoring values (Control keypad: menu M1)........................................................................ 13
6.2 Basic parameters (Control keypad: Menu M2 G2.1) ........................................................... 14
6.3 Input signals.............................................................................................................................. 15
6.3.1 Basic settings (Control keypad: Menu M2 G2.2.1) .................................................... 15
6.3.2 Analogue input 1 (Control keypad: Menu M2 G2.2.2)................................................ 15
6.3.3 Analogue input 2 (Control keypad: Menu M2 G2.2.3)................................................ 16
6.3.4 Free analogue input, signal selection (Keypad: Menu M2 G2.2.4) ........................... 16
6.3.5 Digital inputs (Control keypad: Menu M2 G2.2.5)...................................................... 17
6.4 Output signals........................................................................................................................... 18
6.4.1 Delayed digital output 1 (Keypad: Menu M2 G2.3.1) ................................................. 18
6.4.2 Delayed digital output 2 (Keypad: Menu M2 G2.3.2) ................................................. 18
6.4.3 Digital output signals (Control keypad: Menu M2 G2.3.3) ........................................ 19
6.4.4 Limit settings (Control keypad: Menu M2 G2.3.4)..................................................... 20
6.4.5 Analogue output 1 (Control keypad: Menu M2 G2.3.5) ............................................. 21
6.4.6 Analogue output 2 (Control keypad: Menu M2 G2.3.6) ............................................. 21
6.4.7 Analogue output 3 (Control keypad: Menu M2 G2.3.7) ............................................. 22
6.4.8 Mechanical Brake (Control keypad: Menu M2 G2.3.8).............................................. 22
6.5 Drive control parameters (Control keypad: Menu M2 G2.4)............................................... 23
6.6 Motor control parameters (Control keypad: Menu M2 G2.5).............................................. 24
6.6.1 PMSM settings (Control keypad: Menu M2 G2.5.19)................................................. 25
6.7 Protections (Control keypad: Menu M2 G2.6)...................................................................... 26
6.8 Fieldbus parameters (Control Keypad: Menu M2 G2.7) ...................................................... 28
6.9 Torque control parameters (Control Keypad: Menu M2 G2.8) ............................................ 29
6.10 Shaft synchronization parameters (Control keypad: Menu M2 G2.9) ................................ 30
6.11 License key (Control keypad: Menu M2 G2.10) ................................................................... 31
6.12 Keypad control (Control keypad: Menu M3)............................................................................. 31
6.12.1 System menu (Control keypad: Menu M6)................................................................. 31
6.12.2 Expander boards (Control keypad: Menu M7) ........................................................... 31
7. Description of parameters ............................................................................................... 32
7.1 Keypad control parameters...................................................................................................... 85

4 • vacon shaft synchronization application
Tel. +358 (0)201 2121 • Fax +358 (0)201 212 205
7.2 Application specific variables in the monitor menu and fieldbus interface ........................... 86
8. Shaft Synchronization operation ...................................................................................... 87
8.1 Shaft Synchronization fieldbus interface................................................................................. 90
9. Appendices....................................................................................................................... 91
9.1 Closed loop parameters (ID’s 612 to 621)................................................................................ 91
9.1.1 Note on use of permanent magnet motors (“AC brushless” motors).......................... 91
9.2 Parameters of motor thermal protection (ID’s 704 to 708):.................................................... 92
9.3 Parameters of stall protection (ID’s 709 to 712):..................................................................... 92
9.4 Fieldbus control parameters (ID’s 850 to 859) ........................................................................ 92
10. Shaft synchronization application specific fault codes..................................................... 93
11. COMMISSIONING of shaft synchronization application .................................................... 93

introduction vacon • 5
24-hour support +358 (0)40 837 1150 • Email: vacon@vacon.com 1
shaft synchronization application
(Software APFIFF11 V1.13 or higher)
Select the Shaft Synchronization Application in menu M6 on page
S6.2.
1. INTRODUCTION
The Shaft Synchronization Application provides Position synchronization control of a follower drive
to a master position signal, with the ability to control the synchronization ratio online via fieldbus,
parameter or by digital trim +/- input. The drive requires feedback from an encoder or resolver. The
master position signal comes from an incremental encoder or a single phase pulse generator and is
read using the OPT-A7 board if the follower drive employs an induction motor or the OPT-BC board
if the motor is of a PM synchronous type.
The application offers general purpose functionality support also for independent speed or torque
control when the shaft synchronization mode is not enabled.
Specific application features:
• Synchronization commands: enable sync. mode, engage/release, freeze and reference
speed are all controlled from digital inputs or fieldbus control register
• Ratio range -4 to +4 in steps of 1/65536 can be controlled by parameter or fieldbus in RUN
mode
• Programmable trim inputs +/- and trim ratio change parameter for temporary ratio change
from digital inputs
• Programmable ratio change ramp
• Programmable engage/ release ramp
• Digital or relay outputs for “Ratio change” and “Synchronization engaged”
• Supported fieldbuses: Profibus, CanOpen, Modbus, Modbus TCP
• Synchronization regulator cycle time is 5 ms
• Phasing from standstill or during running (offset of follower position)
• Mechanical brake control
Other general purpose features:
• Induction motor identification
• PM motor rotor angle identification
• All digital and analogue inputs and outputs are freely programmable
• Analogue input signal range selection, with automatic adjustment
• Supervision of two frequency thresholds
• Supervision of torque limit
• Supervision of reference limit
• Second ramp and S-shape ramp programming
• Programmable start/stop and reverse logic
• DC-braking at start and stop
• Programmable U/f curve and switching frequency
• Fully programmable motor thermal and stall protection
• Input and output phase supervision
• Joystick with programmable hysteresis
NOTE: The Shaft Synchronization application creates a rigid electrical coupling between master and
follower(s) axis. The application is not suitable if there is a rigid mechanical coupling
between master and follower(s).

6 • vacon introduction
Tel. +358 (0)201 2121 • Fax +358 (0)201 212 205
1
1.1 Requirements
− NXP frequency converter with control board type VB00561 (“nxp2” type) or newer.
− NXP00002V155 system software package (NXP00002V160 for the support of single phase master
pulse reference).
− Double encoder board OPTA7 for induction motor with HTL incremental encoder for closed loop
control. The second encoder channel is used for master pulse reference.
− Resolver board OPTBC for permanent synchronous motor with resolver feedback for closed loop
control. The second encoder channel is used for master pulse reference.
− Application license key is needed for shaft synchronization functions (based on power unit serial
number)
However there is a 2 week trial time without charge. It is always possible to run the drive in
multi-purpose mode without the license key.
1.2 Trial Time period
Trial time is very useful for test and evaluation. If FC has to be replaced during a weekend there is 2
weeks trial time for free and during that time a new license can be ordered from Vacon.
After loading the application it will be possible to run in Shaft synchronization mode without license
key for 2 weeks (336 h)
STEPS IN TRIAL PERIOD
1. A warning F72 with the text “Trial time” will appear on the display (until <24 hours left) at
every run request
rising edge
in shaft synchronization mode.
2. When only 24 hours is left of trial time the warning F73 “<24 hours left” is triggered and
remains on all the time when FC is in run in shaft synchronization mode.
3. When trial time has expired and the drive will trip with F72 Error: “TrialTimeOver”
NOTE: Drive will trip in run mode!
4. A monitoring value V1.23 on the keypad shows Trial time left (h). The trial time starts from
336 h and counts down to 0.
NOTE:The trial time counter is counting when the shaft synchronization is enabled by digital input
or from fieldbus.

control i/o vacon • 7
24-hour support +358 (0)40 837 1150 • Email: vacon@vacon.com 2
J
umper bloc
k
X
3:
CMA and CMB grounding
CMB connected to GND
CMA connected to GND
CMB isolated from GND
CMA isolated from GND
CMB and CMA
internally connected together,
isolated from GND
= Factory default
2. CONTROL I/O
OPT-A1
Terminal Signal Description
1 +10Vref Reference output Voltage for potentiometer, etc.
2 AI1+ Analogue input, voltage range
0—10V DC
Voltage input frequency reference
3 AI1- I/O Ground Ground for reference and controls
4 AI2+
5 AI2-
Analogue input, current range
0—20mA
Current input frequency reference
6 +24V Control voltage output Voltage for switches, etc. max 0.1 A
7 GND I/O ground Ground for reference and controls
8 DIN1 Start forward
(programmable)
Contact closed = start forward
9 DIN2 Start reverse
(programmable)
Contact closed = start reverse
10 DIN3 Shaft Synchronization Enable
(programmable)
Contact closed = Enabled
11 CMA
Common for DIN 1—DIN 3 Connect to GND or +24V
12 +24V Control voltage output Voltage for switches (see #6)
13 GND I/O ground Ground for reference and controls
14 DIN4 Synch. Mode BIT0
(programmable)
Contact closed = Engage Synchronization
15 DIN5 Synch. Mode BIT1
(programmable)
Contact closed = Freeze follower speed
16 DIN6 Free
(programmable)
Programmable
17 CMB Common for DIN4—DIN6 Connect to GND or +24V
18 AOA1+
19 AOA1-
Output frequency
Analogue output
Programmable
Range 0—20 mA/RL, max. 500Ω
20 DOA1 Digital output
READY
Programmable
Open collector, I≤50mA, U≤48 VDC
OPT-A2
21 RO1
22 RO1
23 RO1
Relay output 1
RUN
Programmable
24 RO2
25 RO2
26 RO2
Relay output 2
FAULT
Programmable
Table 1. Shaft Synchronization application default I/O configuration and
connection example.
Note: See jumper selections below.
More information in the product's
User's Manual.
READY
220
VAC
RUN
mA
Reference potentiometer,
1…10 kΩ

8 • vacon connection of signals between master and follower
Tel. +358 (0)201 2121 • Fax +358 (0)201 212 205
3
3. CONNECTION OF SIGNALS BETWEEN MASTER AND FOLLOWER DRIVE (OPT-A7)
NOTE: To eliminate the risk of electrical noise, use only double shielded twisted pair cable for
connections.

jumper setting on the opt-a7 board vacon • 9
24-hour support +358 (0)40 837 1150 • Email: vacon@vacon.com 4
4. JUMPER SETTING ON THE OPT-A7 BOARD
The X5 jumper selects which channel is sent to the repeater outputs (connections17-20)
On the Master drive OPT-A7 the channel 1 (DIC) has to be sent to repeater outputs.
If there are more than one follower normally channel 2 (DID) is to be sent from follower(s) to
follower(s). Then all drives will follow master drive.
See the Option board manual UD00741 for more information.
Master drive can have any software application. Follower is regulating based on incoming encoder
channel 2 pulses.
COMMISSIONING NOTE:
Always check in option board menu (M7) that master pulses are coming to encoder channel 2
on the follower OPT-A7 board (or OPT-BC if resolver board is used).
Pulses per revolution for follower channel 2 (P7.3.1.4 Enc 2 Pulse/rev for OPT-A7) should
normally be set equals to Master encoder pulses/rev.

10 • vacon "terminal to function" (ttf) programming principle
Tel. +358 (0)201 2121 • Fax +358 (0)201 212 205
5
5. “TERMINAL TO FUNCTION” (TTF) PROGRAMMING PRINCIPLE
The programming principle of the input and output signals in the Multipurpose Control Application
as well as in the Pump and Fan Control Application (and partly in the other applications) is differ-
ent compared to the conventional method used in other Vacon NX applications.
In the conventional programming method,
Function to Terminal Programming Method (FTT),
you
have a fixed input or output that you define a certain function for. This application, however, use the
Terminal to Function Programming method (TTF)
in which the programming process is carried out
the other way round: Functions appear as parameters which the operator defines a certain
input/output for. See
Warning
on page 11.
5.1 Defining an input/output for a certain function on keypad
Connecting a certain input or output with a certain function (parameter) is done by giving the para-
meter an appropriate value. The value is formed of the
Board slot
on the Vacon NX control board
(see the product's User's Manual) and the
respective signal number
, see below.
Function name
Slot Terminal number
Terminal type
Example: You want to connect the digital output function
Reference fault/warning
(parameter
2.3.3.7) to the digital output DO1 on the basic board OPT-A1 (see the product's User's Manual).
First find the parameter 2.3.3.7 on the keypad. Press the
Menu button right
once to enter the edit
mode. On the
value line
, you will see the terminal type on the left (DigIN, DigOUT, An.IN, An.OUT)
and on the right, the present input/output the function is connected to (B.3, A.2 etc.), or if not con-
nected, a value (0.#).
When the value is blinking, hold down the
Browser button up
or
down
to find the desired board slot
and signal number. The program will scroll the board slots starting from 0 and proceeding from A
to Eand the I/O selection from 1to 10.
Once you have set the desired value, press the
Enter button
once to confirm the change.
READY
I/Oterm
DigOUT:B.1
AI Ref Faul/Warn
READY
I/Oterm
DigOUT:0.0
READY
I/Oterm
DigOUT:0.0
READY
I/Oterm
DigOUT:B.1
enter
AI Ref Faul/Warn AI Ref Faul/Warn AI Ref Faul/Warn

"terminal to function" (ttf) programming principle vacon • 11
24-hour support +358 (0)40 837 1150 • Email: vacon@vacon.com 5
5.2 Defining a terminal for a certain function with NCDrive programming tool
If you use the NCDrive Programming Tool for parametrizing you will have to establish the connec-
tion between the function and input/output in the same way as with the control panel. Just pick the
address code from the drop-down menu in the
Value
column (see the Figure below).
Figure 1. Screenshot of NCDrive programming tool; Entering the address code
!
WARNING
Be ABSOLUTELY sure not to connect two functions to one and same
output in order to avoid function overruns and to ensure flawless
operation.
Note: The
input
s
, unlike the
output
s
, cannot be chan
g
ed in RUN state.

12 • vacon "terminal to function" (ttf) programming principle
Tel. +358 (0)201 2121 • Fax +358 (0)201 212 205
5
5.3 Defining unused inputs/outputs
All unused inputs and outputs must be given the board slot value 0and the value 1also for the ter-
minal number. The value 0.1 is also the default value for most of the functions. However, if you want
to use the values of a digital input signal for e.g. testing purposes only, you can set the board slot
value to 0and the terminal number to any number between 2…10 to place the input to a TRUE state.
In other words, the value 1 corresponds to 'open contact' and values 2 to 10 to 'closed contact'.
In case of analogue inputs, giving the value 1 for the terminal number corresponds to 0% signal
level, value 2corresponds to 20%, value 3to 30% and so on. Giving value 10 for the terminal number
corresponds to 100% signal level.

shaft synchronization application – parameter lists vacon • 13
24-hour support +358 (0)40 837 1150 • Email: vacon@vacon.com 6
6. SHAFT SYNCHRONIZATION APPLICATION – PARAMETER LISTS
On the next pages you will find the lists of parameters within the respective parameter groups. The
parameter descriptions are given on pages 32 to 85.
Column explanations:
Code = Location indication on the keypad; Shows the operator the present param. number
Parameter = Name of parameter
Min = Minimum value of parameter
Max = Maximum value of parameter
Unit = Unit of parameter value; Given if available
Default = Value preset by factory
Cust = Customer’s own setting
ID = ID number of the parameter
= On parameter code: Parameter value can only be changed after the FC has been
stopped.
= Apply the Terminal to Function method (TTF) to these parameters (see chapter 3)
6.1 Monitoring values (Control keypad: menu M1)
The monitoring values are the actual values of parameters and signals as well as statuses and
measurements. Monitoring values cannot be edited.
See the product's User's Manual for more information.
Code Parameter Unit ID Description
V1.1 Output frequency Hz 1 Output frequency to motor
V1.2 Frequency reference Hz 25 Frequency reference to motor
control
V1.3 Motor speed rpm 2 Motor speed in rpm
V1.4 Motor current A 3
V1.5 Motor torque % 4 In % of Motor nominal torque
V1.6 Motor power % 5 Motor shaft power
V1.7 Motor voltage V 6
V1.8 DC link voltage V 7
V1.9 Unit temperature °C 8 Heatsink temperature
V1.10 Motor temperature % 9 Calculated motor temperature
V1.11 Analogue input 1 V/mA 13 AI1
V1.12 Analogue input 2 V/mA 14 AI2
V1.13 DIN1, DIN2, DIN3 15 Digital input statuses
V1.14 DIN4, DIN5, DIN6 16 Digital input statuses
V1.15 Analog Iout MA 26 AOA1
V1.16 Torque reference % 18
V1.17 Actual ratio*2^16 1700 Actual synch. ratio
V1.18 Position error u 1701 Psotion error in user unit
V1.19 Encoder 1 Freq Hz 1124 Shaft Frequency filtered
V1.20 Encoder 2 Freq Hz 53 Master encoder frequency
V1.21 Pole pair number 58 Calculated pole pair number
based on given motor data
V1.22 ID Run Status 49 Status of ID run made
V1.23 Trial time left h 67 Hours left of trial time
V1.24 Accum Space Error u 1803
Displays accumulated position
error when follower not
running in synch. mode.
G1.25 Multimonitoring items Displays three selectable
monitoring values
Table 2. Monitoring values

14 • vacon shaft synchronization application – parameter lists
Tel. +358 (0)201 2121 • Fax +358 (0)201 212 205
6
6.2 Basic parameters (Control keypad: Menu M2 G2.1)
Code Parameter Min Max Unit Default Cust ID Note
P2.1.1 Max frequency Par. 2.1.1 320,00 Hz 50,00 102
NOTE: If fmax > than the
motor synchronous speed,
check suitability for motor
and drive system
P2.1.2 Acceleration time 1 0,1 3000,0 s 1,0 103
P2.1.3 Deceleration time 1 0,1 3000,0 s 1,0 104
P2.1.4 Current limit 0,4 x IH2 x IHA IL107
P2.1.5 Nominal voltage of
the motor 180 690 V
NX2: 230V
NX5: 400V
NX6: 690V
110
P2.1.6 Nominal frequency
of the motor 30,00 320,00 Hz 50,00 111
Check the rating plate of
the motor
P2.1.7 Nominal speed of
the motor 300 20 000 rpm 1440 112
The default applies for a 4-
pole motor and a nominal
size frequency converter.
P2.1.8 Nominal current of
the motor 0,4 x IH2 x IHA IH113 Check the rating plate of
the motor.
P2.1.9 Motor cosϕ0,30 1,00 0,85 120
Check the rating plate of
the motor
P2.1.10 I/O Reference 0 14 0 117
0=AI1
1=AI2
2=AI1+AI2
3=AI1-AI2
4=AI2-AI1
5=AI1xAI2
6=AI1 Joystick
7=AI2 Joystick
8=Keypad
9=Fieldbus
10=Motor potentiometer
11=AI1, AI2 minimum
12=AI1, AI2 maximum
13=Max frequency
14=AI1/AI2 selection
P2.1.11 Keypad control
reference 0 9 8 121
0=AI1
1=AI2
2=AI1+AI2
3=AI1-AI2
4=AI2-AI1
5=AI1xAI2
6=AI1 Joystick
7=AI2 Joystick
8=Keypad
9=Fieldbus
P2.1.12 Fieldbus control
reference 0 9 9 122 See par. 2.1.12
P2.1.13 Jogging speed
reference 0,00 Par. 2.1.2 Hz 5,00 124
P2.1.14 Preset speed 1 0,00 Par. 2.1.2 Hz 10,00 105 Multi-step speed 1
P2.1.15 Preset speed 2 0,00 Par. 2.1.2 Hz 15,00 106 Multi-step speed 2
P2.1.16 Preset speed 3 0,00 Par. 2.1.2 Hz 20,00 126 Multi-step speed 3
P2.1.17 Preset speed 4 0,00 Par. 2.1.2 Hz 25,00 127 Multi-step speed 4
P2.1.18 Preset speed 5 0,00 Par. 2.1.2 Hz 30,00 128 Multi-step speed 5
P2.1.19 Preset speed 6 0,00 Par. 2.1.2 Hz 40,00 129 Multi-step speed 6
P2.1.20 Preset speed 7 0,00 Par. 2.1.2 Hz 50,00 130 Multi-step speed 7
Table 3. Basic parameters G2.1

shaft synchronization application – parameter lists vacon • 15
24-hour support +358 (0)40 837 1150 • Email: vacon@vacon.com 6
6.3 Input signals
6.3.1 Basic settings (Control keypad: Menu M2 G2.2.1)
Code Parameter Min Max Unit Default Cust ID Note
Start
signal 1
(Default:
DIN1)
Start
signal 2
(Default:
DIN2)
P2.2.1.1 Start/Stop logic
selection 0 7 0 300
0
1
2
3
4
5
6
7
Start forw.
Start/Stop
Start/Stop
Start pulse
Start
Fwd pulse
Start pulse
Start pulse
Start rev.
Reverse
Run enable
Stop pulse
Mot.pot.UP
Rev pulse
Rev pulse
Enabl pulse
P2.2.1.2 Motor potentiometer
ramp time 0,1 2000,0 Hz/s 10,0 331
P2.2.1.3
Motor potentiometer
frequency reference
memory reset
0 2 1 367
0=No reset
1=Reset if stopped or
powered down
2=Reset if powered down
Table 4. Input signals: basic settings, G2.2.1
6.3.2 Analogue input 1 (Control keypad: Menu M2 G2.2.2)
Code Parameter Min Max Unit Default Cust ID Note
P2.2.2.1 AI1 signal selection 0 A.1 377
P2.2.2.2 AI1 filter time 0,00 10,00 s 0,10 324 0=No filtering
P2.2.2.3 AI1 signal range 0 3 0
320
0=0…100%*
1=20…100%*
2= -10V…+10V*
3= Custom range*
P2.2.2.4 AI1 custom
minimum setting -100,00 100,00 % 0,00 321
P2.2.2.5 AI1 custom
maximum setting -100,00 100,00 % 100,00 322
P2.2.2.6
AI1 reference
scaling, minimum
value
0,00 320,00 Hz 0,00
303
Selects the frequency that
corresponds to the min.
reference signal
P2.2.2.7
AI1 reference
scaling, maximum
value
0,00 320,00 Hz 0,00
304
Selects the frequency that
corresponds to the max.
reference signal
P2.2.2.8 AI1 joystick
hysteresis 0,00 20,00 % 0,00 384
P2.2.2.9 AI1 joystick offset -50,00 50,00 % 0,00 165
Table 5. Analogue input 1 parameters, G2.2.2
*Remember to place jumpers of block X2 accordingly.
See NX User's Manual, chapter 6.2.2.2

16 • vacon shaft synchronization application – parameter lists
Tel. +358 (0)201 2121 • Fax +358 (0)201 212 205
6
6.3.3 Analogue input 2 (Control keypad: Menu M2 G2.2.3)
Code Parameter Min Max Unit Default Cust ID Note
P2.2.3.1 AI2 signal selection 0 A.2 388
P2.2.3.2 AI2 filter time 0,00 10,00 s 0,10 329 0=No filtering
P2.2.3.3 AI2 signal range 0 3 1
325
0=0…100%*
1=20…100%*
2= -10V…+10V*
3= Custom range*
P2.2.3.4 AI2 custom
minimum setting -100,00 100,00 % 0,00 326
P2.2.3.5 AI2 custom
maximum setting -100,00 100,00 % 100,00 327
P2.2.3.6
AI2 reference
scaling, minimum
value
0,00 320,00 Hz 0,00
393
Selects the frequency that
corresponds to the min.
reference signal
P2.2.3.7
AI2 reference
scaling, maximum
value
0,00 320,00 Hz 0,00
394
Selects the frequency that
corresponds to the max.
reference signal
P2.2.3.8 AI2 joystick
hysteresis 0,00 20,00 % 0,00 395
P2.2.3.9 AI2 joystick offset -50,00 50,00 % 0,00 166
Table 6. Analogue input 2 parameters, G2.2.3
6.3.4 Free analogue input, signal selection (Keypad: Menu M2 G2.2.4)
Code Parameter Min Max Unit Default Cust ID Note
P2.2.4.1 Scaling of current
limit 0 3 0
399
0=Not used
1=AI1
2=AI2
3=Fieldbus
P2.2.4.2 Torque limit 0 3 0 485 See par. 2.2.4.1
Table 7. Free analogue input signal selection, G2.2.6

shaft synchronization application – parameter lists vacon • 17
24-hour support +358 (0)40 837 1150 • Email: vacon@vacon.com 6
6.3.5 Digital inputs (Control keypad: Menu M2 G2.2.5)
Code Parameter Min Default Cust ID Note
P2.2.5.1 Start signal 1 0 A.1 403
P2.2.5.2 Start signal 2 0 A.2 404
P2.2.5.3 Run enable 0 0.2 407 Motor start enabled (cc)
P2.2.5.4 Reverse 0 0.1 412 Direction forward (oc)
Direction reverse (cc)
P2.2.5.5 Preset speed 1 0 0.1 419
P2.2.5.6 Preset speed 2 0 0.1 420
P2.2.5.7 Preset speed 3 0 0.1 421
P2.2.5.8 Motor potentiometer
reference DOWN 0 0.1 417 Mot.pot. reference decreases
(cc)
P2.2.5.9 Motor potentiometer
reference UP 0 0.1 418 Mot.pot. reference increases
(cc)
P2.2.5.10 Fault reset 0 0.1 414 All faults reset (cc)
P2.2.5.11 External fault (close) 0 0.1 405 Ext. fault displayed (cc)
P2.2.5.12 External fault (open) 0 0.2 406 Ext. fault displayed (oc)
P2.2.5.13 Acc/Dec time selection 0 0.1 408 Acc/Dec time 1 (oc)
Acc/Dec time 2 (cc)
P2.2.5.14 Acc/Dec prohibit 0 0.1 415 Acc/Dec prohibited (cc)
P2.2.5.15 DC braking 0 0.1 416 DC braking active (cc)
P2.2.5.16 Jogging speed 0 0.1 413 Jogging speed selected for
frequency reference (cc)
P2.2.5.17 AI1/AI2 selection 0 0.1 422
P2.2.5.18 Motor control mode 1/2 0 0.1 164
Closed cont.=Mode 2 is used
Open cont.=Mode 1 is used
See par 2.6.1, 2.6.12
SHAFT SYNCHRONIZATION SPECIFIC PARAMETERS
P2.2.5.19 Synch. enable 0 A.3 1710
Enable shaft synchronization
control mode (software
license required)
Disabled = multi-purpose
control mode
P2.2.5.20 Synch. ModeBit0 0 A.4 1711 Engage synchronization input
P2.2.5.21 Synch. ModeBit1 0 A.5 1712 Reference speed/Freeze
follower speed request input
P2.2.5.22 Synch. trim + 0 0.1 1713 Trim input for increasing of
ratio in run mode
P2.2.5.23 Synch. trim - 0 0.1 1714 Trim input fordecreasing of
ratio in run mode
P2.2.5.24 Brake Opened Ack 0 0.1 1602 Hardware feedback from
mechanical brake.
Table 8. Digital input signals, G2.2.4
cc = closing contact
oc = opening contact

18 • vacon shaft synchronization application – parameter lists
Tel. +358 (0)201 2121 • Fax +358 (0)201 212 205
6
6.4 Output signals
6.4.1 Delayed digital output 1 (Keypad: Menu M2 G2.3.1)
Code Parameter Min Max Unit Default Cust ID Note
P2.3.1.1 Digital output 1
signal selection 0 0.1 486
P2.3.1.2 Digital output 1
function 0 26 1 312
0=Not used
1=Ready
2=Run
3=Fault
4=Fault inverted
5=FC overheat warning
6=Ext. fault or warning
7=Ref. fault or warning
8=Warning
9=Reverse
10=Jogging spd selected
11=At speed
12=Mot. regulator active
13=Freq. limit 1 superv.
14=Freq. limit 2 superv.
15=Torque limit superv.
16=Ref. limit supervision
17=External brake control
18=I/O control place act.
19=FC temp. limit superv.
20=Reference inverted
21=Ext. brake control
inverted
22=Therm. fault or warn.
23=On/Off control
24=Fieldbus input data 1
25=Fieldbus input data 2
26=Fieldbus input data 3
P2.3.1.3 Digital output 1 on
delay 0,00 320,00 s 0,00 487 0,00 = delay not in use
P2.3.1.4 Digital output 1 off
delay 0,00 320,00 s 0.00 488 0,00 = delay not in use
Table 9. Delayed digital output 1 parameters, G2.3.1
6.4.2 Delayed digital output 2 (Keypad: Menu M2 G2.3.2)
Code Parameter Min Max Unit Default Cust ID Note
P2.3.2.1 Digital output 2
signal selection 0 0.1 489
P2.3.2.2 Digital output 2
function 0 26 0 490 See par. 2.3.1.2
P2.3.2.3 Digital output 2 on
delay 0,00 320,00 s 0,00 491 0,00 = delay not in use
P2.3.2.4 Digital output 2 off
delay 0,00 320,00 s 0,00 492 0,00 = delay not in use
Table 10. Delayed digital output 2 parameters, G2.3.2

shaft synchronization application – parameter lists vacon • 19
24-hour support +358 (0)40 837 1150 • Email: vacon@vacon.com 6
6.4.3 Digital output signals (Control keypad: Menu M2 G2.3.3)
Code Parameter Min Default Cust ID Note
P2.3.3.1 Ready 0 A.1 432
P2.3.3.2 Run 0 B.1 433
P2.3.3.3 Fault 0 B.2 434
P2.3.3.4 Inverted fault 0 0.1 435
P2.3.3.5 Warning 0 0.1 436
P2.3.3.6 External fault 0 0.1 437
P2.3.3.7 Reference
fault/warning 0 0.1 438
P2.3.3.8 Overtemperature
warning 0 0.1 439
P2.3.3.9 Reverse 0 0.1 440
P2.3.3.10 Unrequested direction 0 0.1 441
P2.3.3.11 At speed 0 0.1 442
P2.3.3.12 Jogging speed 0 0.1 443
P2.3.3.13 External control place 0 0.1 444
P2.3.3.14 External brake control 0 0.1 445
P2.3.3.15 External brake control,
inverted 0 0.1 446
See explanations on page
53.
P2.3.3.16 Output frequency limit
1 supervision 0 0.1 447
P2.3.3.17 Output frequency limit
2 supervision 0 0.1 448
P2.3.3.18 Reference limit
supervision 0 0.1 449
P2.3.3.19 Temperature limit
supervision 0 0.1 450
P2.3.3.20 Torque limit
supervision 0 0.1 451
P2.3.3.21 Motor thermal
protection 0 0.1 452
P2.3.3.22 Motor regulator
activation 0 0.1 454
P2.3.3.23 Fieldbus input data 1 0 0.1 455
P2.3.3.24 Fieldbus input data 2 0 0.1 456
P2.3.3.25 Fieldbus input data 3 0 0.1 457
P2.3.3.26 Fieldbus input data 4 0 0.1 169
P2.3.3.27 Fieldbus input data 5 0 0.1 170
P2.3.3.28 SynchronEngaged 0 0.1 1720
P2.3.3.29 Ratio changing 0 0.1 1721
P2.3.3.30 External Brake Opened 0 0.1 1722 Indication for mechanical
brake fully open
Table 11. Digital output signals, G2.3.3
!
WARNING
Be ABSOLUTELY sure not to connect two functions to one and
same output in order to avoid function overruns and to ensure
flawless operation.

20 • vacon shaft synchronization application – parameter lists
Tel. +358 (0)201 2121 • Fax +358 (0)201 212 205
6
6.4.4 Limit settings (Control keypad: Menu M2 G2.3.4)
Code Parameter Min Max Unit Default Cust ID Note
P2.3.4.1 Output frequency
limit 1 supervision 0 3 0 315
0=No limit
1=Low limit supervision
2=High limit supervision
3=Brake-on control
P2.3.4.2
Output frequency
limit 1;
Supervised value
0,00 Par. 2.1.2 Hz 0,00 316
P2.3.4.3 Output frequency
limit 2 supervision 0 4 0 346
0=No limit
1=Low limit supervision
2=High limit supervision
3=Brake-off control
4=Brake on/off-control
P2.3.4.4
Output frequency
limit 2;
Supervised value
0,00 Par. 2.1.2 Hz 0,00 347
P2.3.4.5 Torque limit
supervision 0 3 0 348
0=Not used
1=Low limit supervision
2=High limit supervision
3=Brake-off control
P2.3.4.6 Torque limit
supervision value -1000,0 1000,0 % 100,0 349
P2.3.4.7 Reference limit
supervision 0 2 0 350
0=Not used
1=Low limit
2=High limit
P2.3.4.8 Reference limit
supervision value 0,00 Par. 2.1.2 Hz 0,00 351
P2.3.4.9 FC temperature
supervision 0 2 0 354
0=Not used
1=Low limit
2=High limit
P2.3.4.10 FC temperature
supervised value –10 75
°C 0 355
Table 12. Limit settings, G2.3.4
Other manuals for NXP
3
Table of contents
Other Vacon Media Converter manuals