Vacron VDH-NK900 User manual

VDH-NK900
Hardware Manual
2018 NOV V1.0

Hardware Manual
i
Contents
A. CAUTION................................................................................................................................................ 1
B. Introduction........................................................................................................................................... 2
1. Product Overview........................................................................................................................ 2
2. Main functions ............................................................................................................................. 2
C. Unpacking .............................................................................................................................................. 3
1. Accessories ................................................................................................................................... 3
2. Unpacking..................................................................................................................................... 3
D. Installation ............................................................................................................................................. 3
E. Product appearance ............................................................................................................................ 4
1. Front Panel.................................................................................................................................... 4
2. Rear Panel ..................................................................................................................................... 5
3. Installation Illustration ............................................................................................................... 6
Video input......................................................................................................................... 6
Connections for video outputs ...................................................................................... 7
Audio Inputs....................................................................................................................... 7
Audio Output..................................................................................................................... 7
AlarmIn/AlarmOut connections .................................................................................... 8
F. Q & A and Maintenance ..................................................................................................................... 9
1. Q & A.............................................................................................................................................. 9
2. Maintenance............................................................................................................................... 11
G. Appendix : Specifications ................................................................................................................. 12
1. 36CH NVR ................................................................................................................................... 12

Hardware Manual
1
A. CAUTION
To our dear customer!
Thank you for using our products. If you encounter any problems when using,
please do not hesitate to contact our resellers. We will provide excellent services to
you via our resellers.
The software/hardware improvements of this series are subject to change without
notice to you in advance. Before using, please read this user manual carefully to
ensure that you can use the device correctly and safely.
Caution for this NVR series
After installation, never put anything heavy over this device. Owing to the use
of the harddrive(s) insides this device, check the cooling fan periodically to see
if it is in good condition. Never use this device when the cooling function is
out of order!
Do not allow any solid object or liquid fall into or penetrate into the device.
Use cleaning tools (brushes) regularly to clean circuit boards, connectors, fans,
chassis, etc. Before cleaning, turn off the power and unplug the power.
Do not attempt to disassemble the equipment, repair, or replace parts. In case
the machine does not work properly, please contact the resellers or
manufacturers. In the shortest time, we will solve the problems you have
during using.
When not using the remote control for a long time, take out the inside battery
To prevent the control from the damage coming from battery leakage!
If this equipment connects to outdoor cameras or other external alarm
devices, ground this equipment to prevent it from electrical surges.
This NVR supports remote video monitoring via Internet. Free or non-free
domain names provided by ISPs are needed for the monitoring functions.
Free domain names may sometimes have problems and nothing to do with
NVR. Non-free domain names have less problems. Choose the domain names
carefully before using the networking function.
Operating environment
Keep and use this device at places where temperature ranges 0℃~40℃. Avoid
direct sunlight or near heat sources.
Do not install this equipment in a humid environment
Do not expose this equipment in smoky, dusty environments;
Avoid strong collision, do not drop the machine
Keep the installation level, install in a stable place, avoid the product falling;
Do not block any ventilation openings. And ensure well ventilation around the
machine
Please use this equipment within rated input and output current/voltage
range.
This device is for long-time use. For safety, do not have flammable items
placed next to the device.

Hardware Manual
2
B. Introduction
1. Product Overview
This equipment is an excellent digital surveillance product designed
specifically for the security use. Using embedded LINUX operating system, it
makes the system more stable. Using standard H.264 video compression and
G.711A audio compression technology achieves audio and video functions
such as high-quality, low bit rate and single-frame playback. Using TCP / IP
and other network technologies, it provides strong network data transmission
capacity and remote control capabilities.
This equipment can be used individually or be connected to form a powerful
security monitoring network. Using professional network video surveillance
software platform, be fully experienced the powerful networking and remote
monitoring capabilities.
This equipment can be used for security in banks, telecommunications, power
stations, justice, transport, intelligence communities, factories, warehouses,
resources, water conservancy facilities and other categories.
2. Main functions
Hisilicon SoC CPU special design for NVR with the best image process
efficiency.
Support 4 units of SATA/SATA II device up to 8TB HDD recording
capacity.
Advanced H.265 compress technology provides the best HDD space
usage.
Embedded Linux system, to eliminate the threat from virus and hacking.
Support 36CHs of IP camera (1080P) video and also support analogue
camera video with optional Video server(AXIS).
Support HD output.
Support IP CAM position layout and editable user definition.
The USB mobile storage device or remote NAS.
Support 3 users log on by Client-side software or browser.

Hardware Manual
3
C. Unpacking
1. Accessories
★Power cable and adaptor AC110-240V 150W x 1PCS
★HDD screws x 16pcs
★Mouse x 1pcs
2. Unpacking
When you receive the product, check first whether the packing of the
equipment has obvious damage. The protective material used for the package
during transport can cope with most of the accidental impact
Then, take out the device, remove the protective film of the digital video
recorder and check if there is any visible damage;
Finally, open the case, check the front panel data cable, power cord, power
supply fan and motherboard to see if they are connected firmly.
Front/Rare panels
The key functions of the front panel and the interfaces of the rear panel are
described in detail in the manual.
Please carefully check the plate or foil on the rear panel of the product to see
if it is the model you ordered.
Inside check
In addition to checking for visible signs of damage, be careful to check the
connections between the front panel data cable, power cord and
motherboard.
D. Installation
Steps and cautions:
1、Room temperature below 35℃
2、Reserve space for air circulation around 15 cm (6 inches)
3、Chassis installation starts from bottom to up
4、With multiple components in the chassis, take precautions to avoid
overloading to the power outlet.
Hardware Manual
4
E. Product appearance
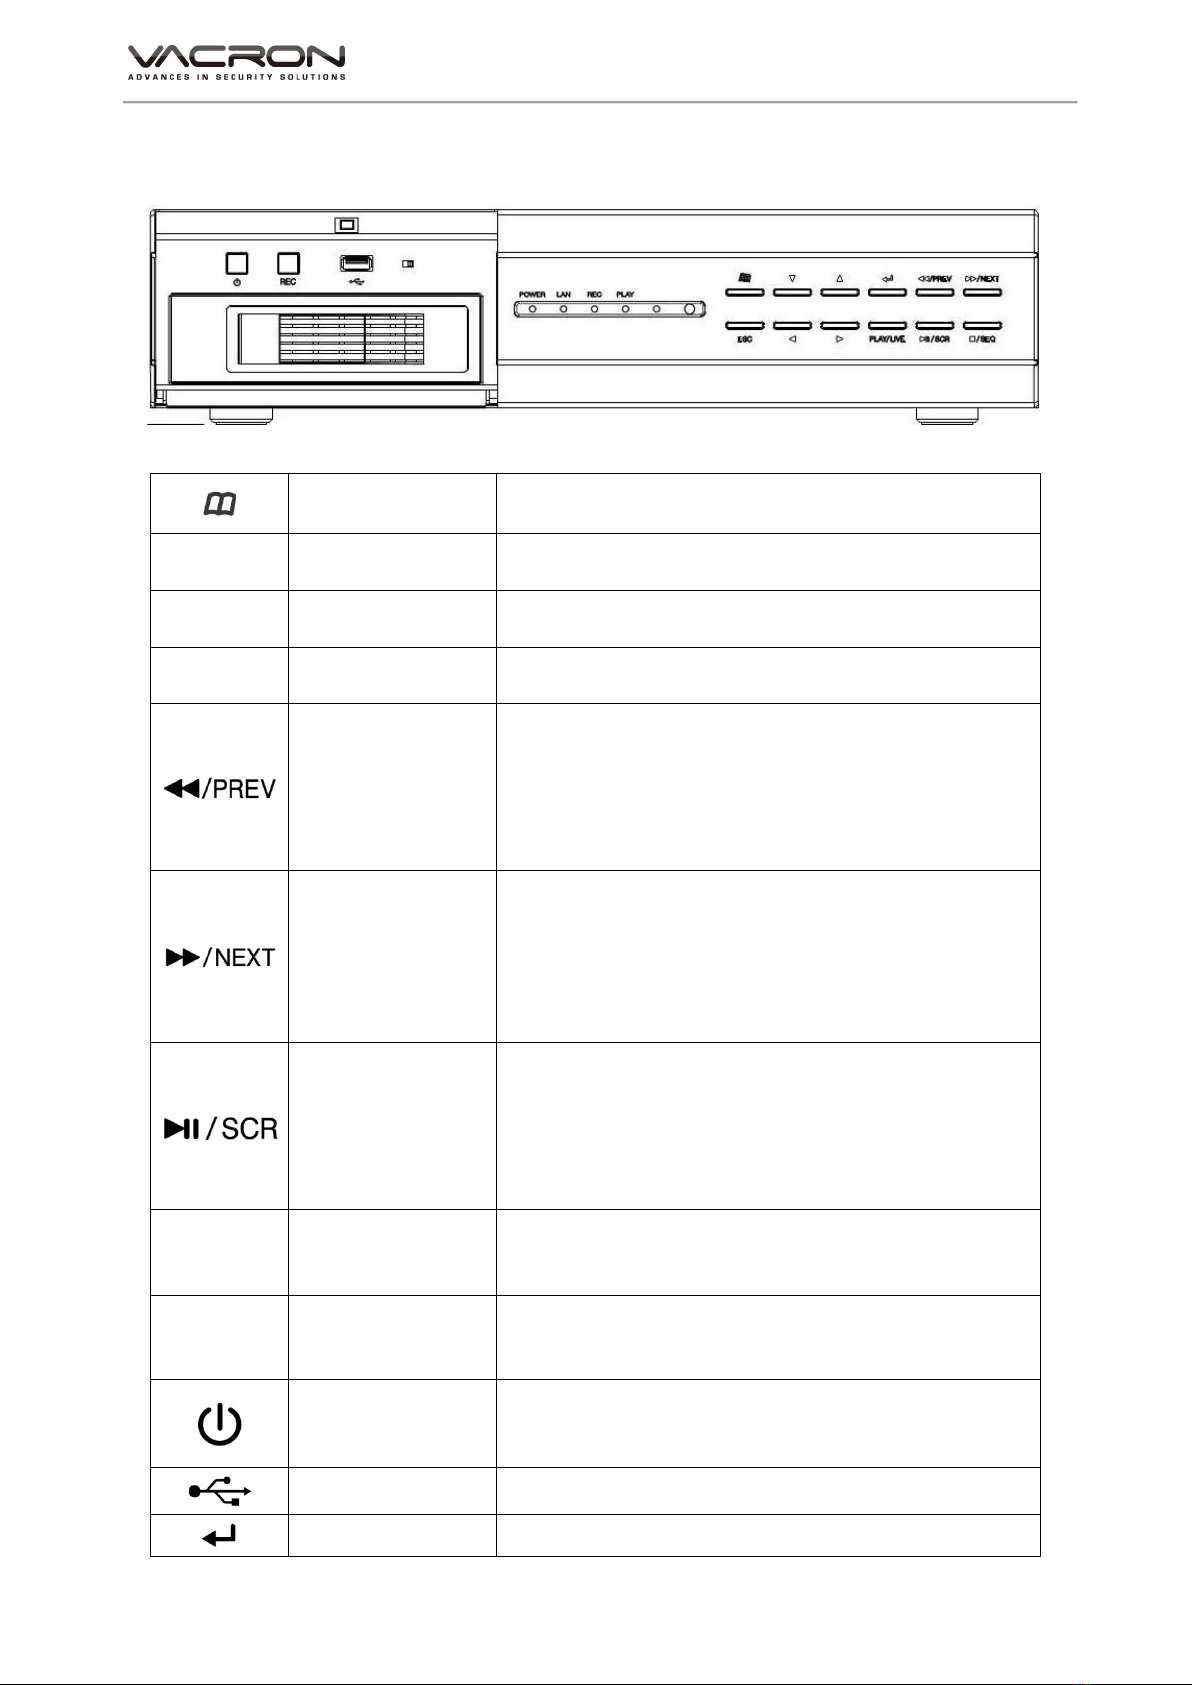
1. Front Panel
MENU Going to Menu
ESC ESC Exit
■/SEQ Stop Stop when Playback
INFO INFO Information Page
Backward
When playing back,there are 2*、4*、8*、
16*、32*、1/2*、1/4* backward speeds.
Under live page、2Ch and 9Ch can be
changed
Forward
When playback,there are 2*、4*、8*、
16*、32*、1/2*、and 1/4* forward speeds
Under live mode, 2Ch and 9Ch can be
changed
Play
Pause
Under Live mode, going to broadcast and
copy; however, under playback mode, going
to broadcast.
Pause
PLAY/LIVE Playback
LIVE
Under LIVE mode, going to playback.
Under playback, going to LIVE mode.
REC Record
Under LIVE mode, going to manual force
recording.
Power
One touch, turn on and press 3 second, turn
off.
USB Port USB/ Mouse
Confirm Confirm
Hardware Manual
5
POWER Power Indicator Power on
LAN Network
Indicator Network on and this LED flashing
REC Recording
Indicator NVR recording function on
PLAY Play Back
Indicator Playback
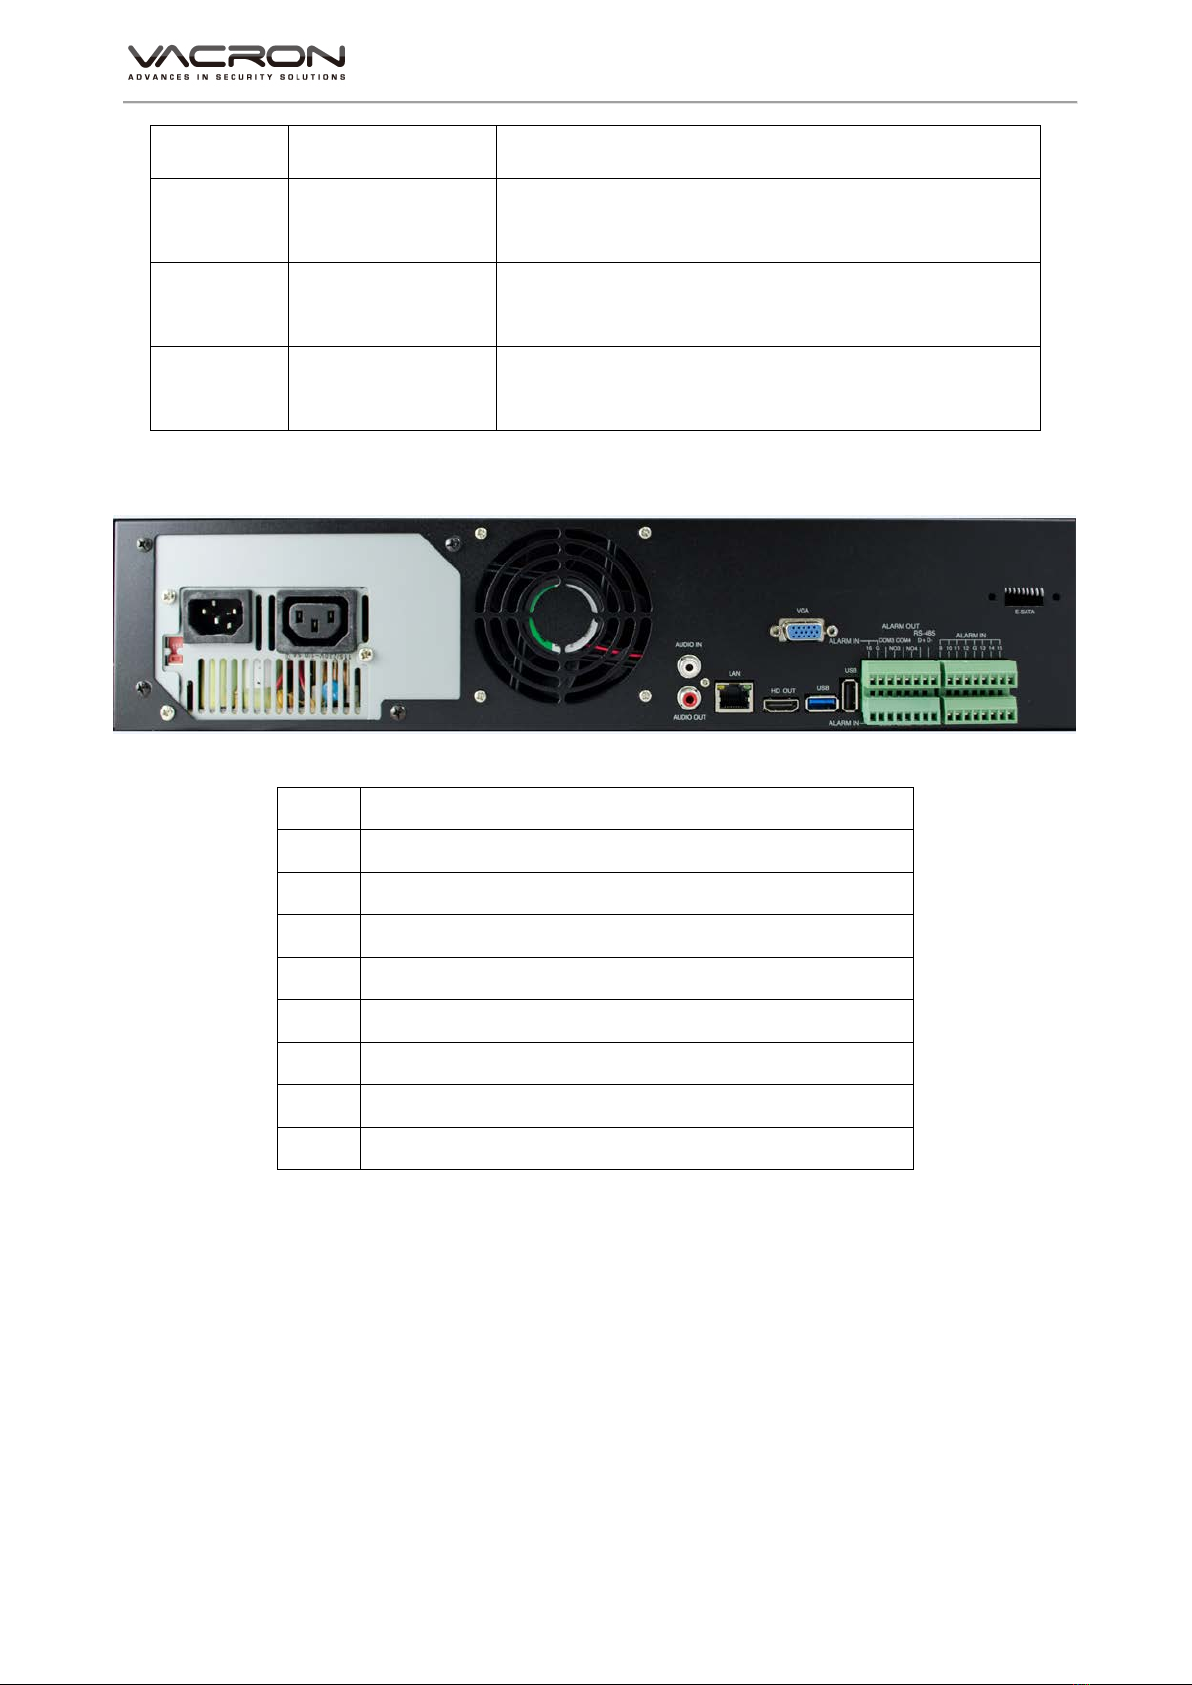
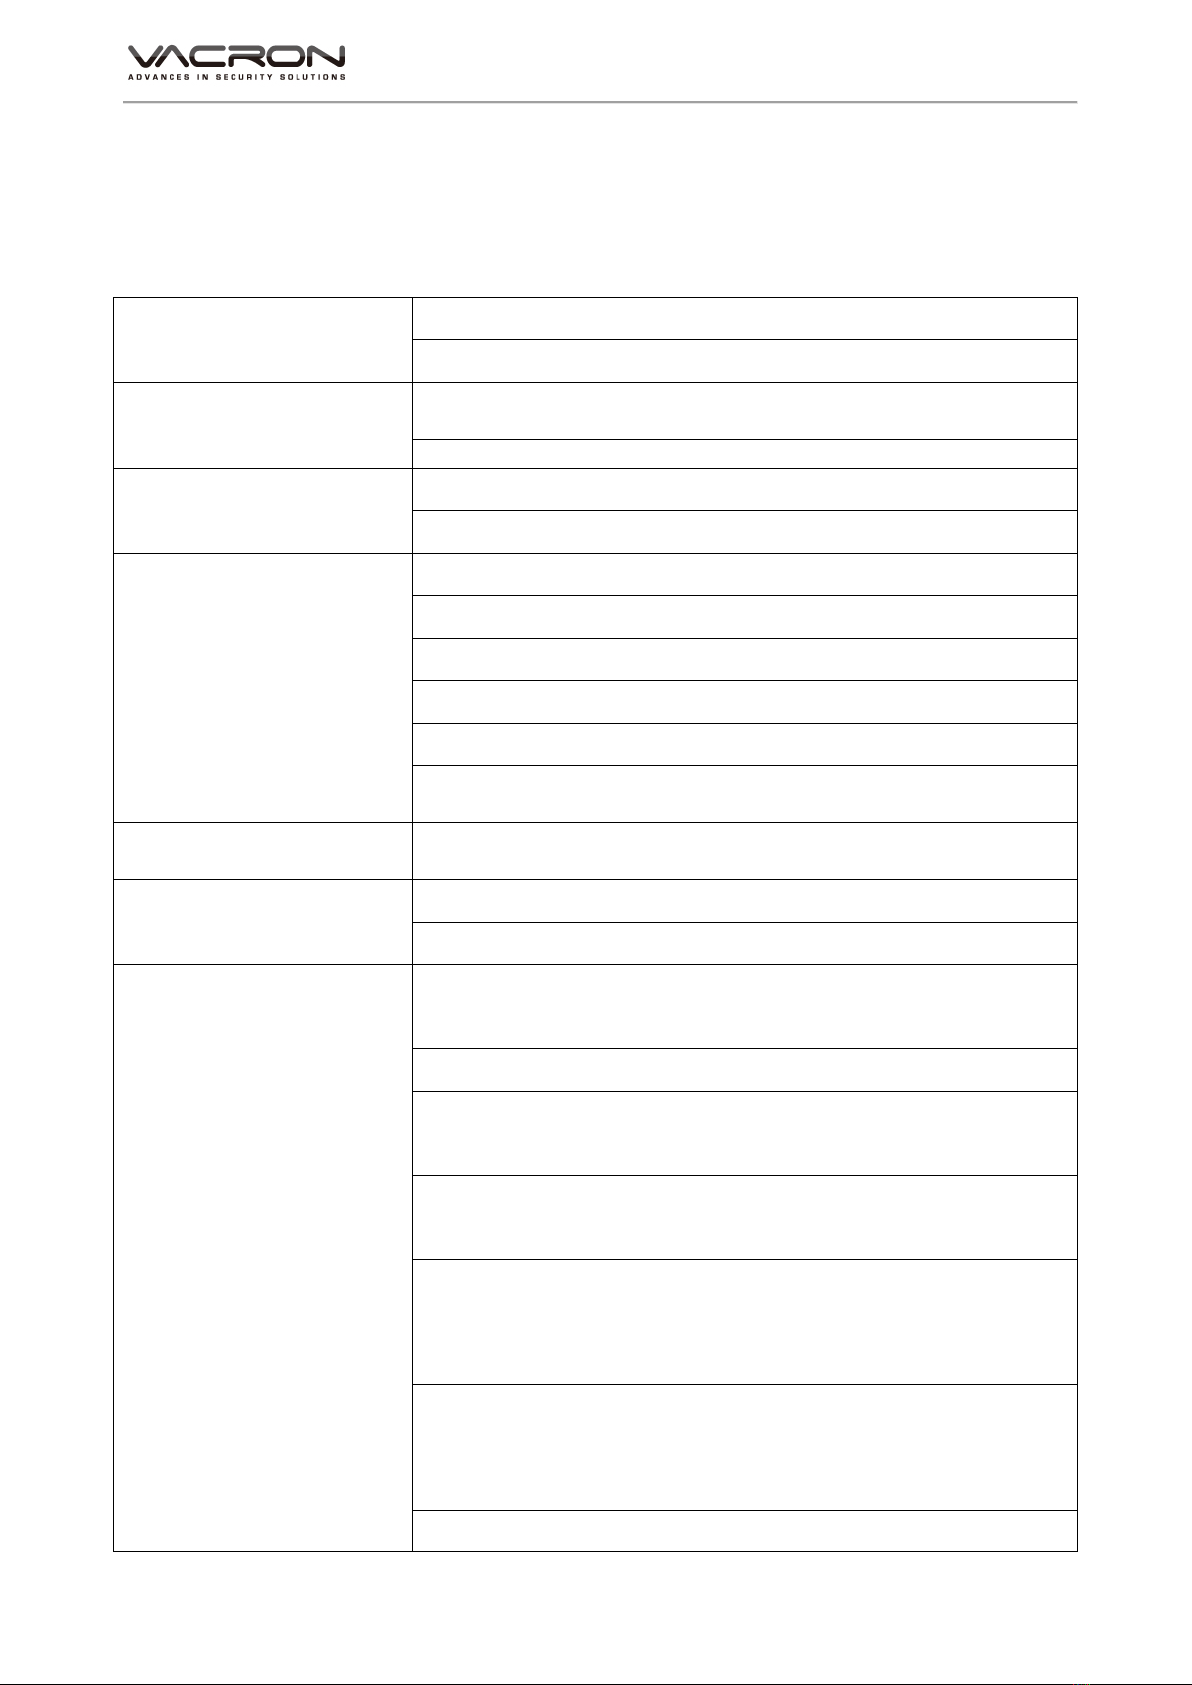
2. Rear Panel
1 Audio Output
2 LAN port
3 HD Digital Output
4 VGA output
5 USB Mouse Port 3.0
6 USB Mouse Port 2.0
7 16CH Alarm Input
8 4CH Alarm Out
9 RS-485 Port
Alarm In/Alarm Out
Hardware Manual
6
3. Installation Illustration
Video input
Input interface is RJ-45 type; input signal is IP CAM
The Video signal should comply with national standards, a higher signal to
noise ratio, low distortion, low-interference; clear images, no deformation,
nature color and appropriate brightness.
Make sure stable and reliable signals from cameras
Cameras should be installed in a suitable position to avoid backlighting,
low-light environment, or adopts the better BLC, low-light cameras.
Cameras and digital video recorders should be common ground, stably and
reliably, in order to ensure the normal operation of the cameras.
Make sure the transmission cables are stable and reliable
Adopt high-quality, well-shielded coaxial cables, and choose the right model
based on the transmission distance. If the distance is too far, use shielded

Hardware Manual
7
twisted pair, video compensation equipment, optical transmission and other
ways to ensure signal quality based on the specific circumstances.
Video cable should avoid strong electromagnetic interference with other
devices and circuits, in particular, should avoid the current of high voltage.
Make sure the connectors well-connected:
Cables and shielded cable should be well-connected firmly to avoid false,
joint welding or oxidation.
Connections for video outputs
The video outputs include VGA and HDMI interfaces.
Pay attention to the following when you select a PC display instead of a
monitor.
1. Do not remain switched on for a long time to extend the life of the
equipment;
2. Regular degaussing will help to maintain the normal operation of the
monitor.
3. Keep away from equipment with strong electromagnetic interference.
Using TV as video output device is an unreliable alternative. It is also
required to minimize the time of use and strictly control the power, the
interference caused by neighboring devices. Leakage risks of low quality TVs
may result in damage to other equipments.
Audio Inputs
Voice input impedance is high, so the microphone must be a microphone
connected to the power supply.
Like video input, voice transmission cables should avoid interference, fake,
poor contact, and special attention to prevent the current of the
high-voltage.
Audio Output
The audio output parameters of NVR are generally greater than 200mv 1KΩ
(BNC), you can directly connect to the low impedance headphones, powered
speakers or other sound devices through a power amplifier.
When the external speakers and microphones can not achieve spatial
segregation, it is prone to the phenomenon of whistling.
You may adopt the following actions,
1. Using better directional microphones
2. Adjust the speaker volume to make it lower than the value of the
generated howling.

Hardware Manual
8
3. Using sound-absorbing materials for decoration to reduce sound
reflections and improve the acoustic environment;
4. Adjusting the layout of the microphone and speakers can reduce the
whistling.
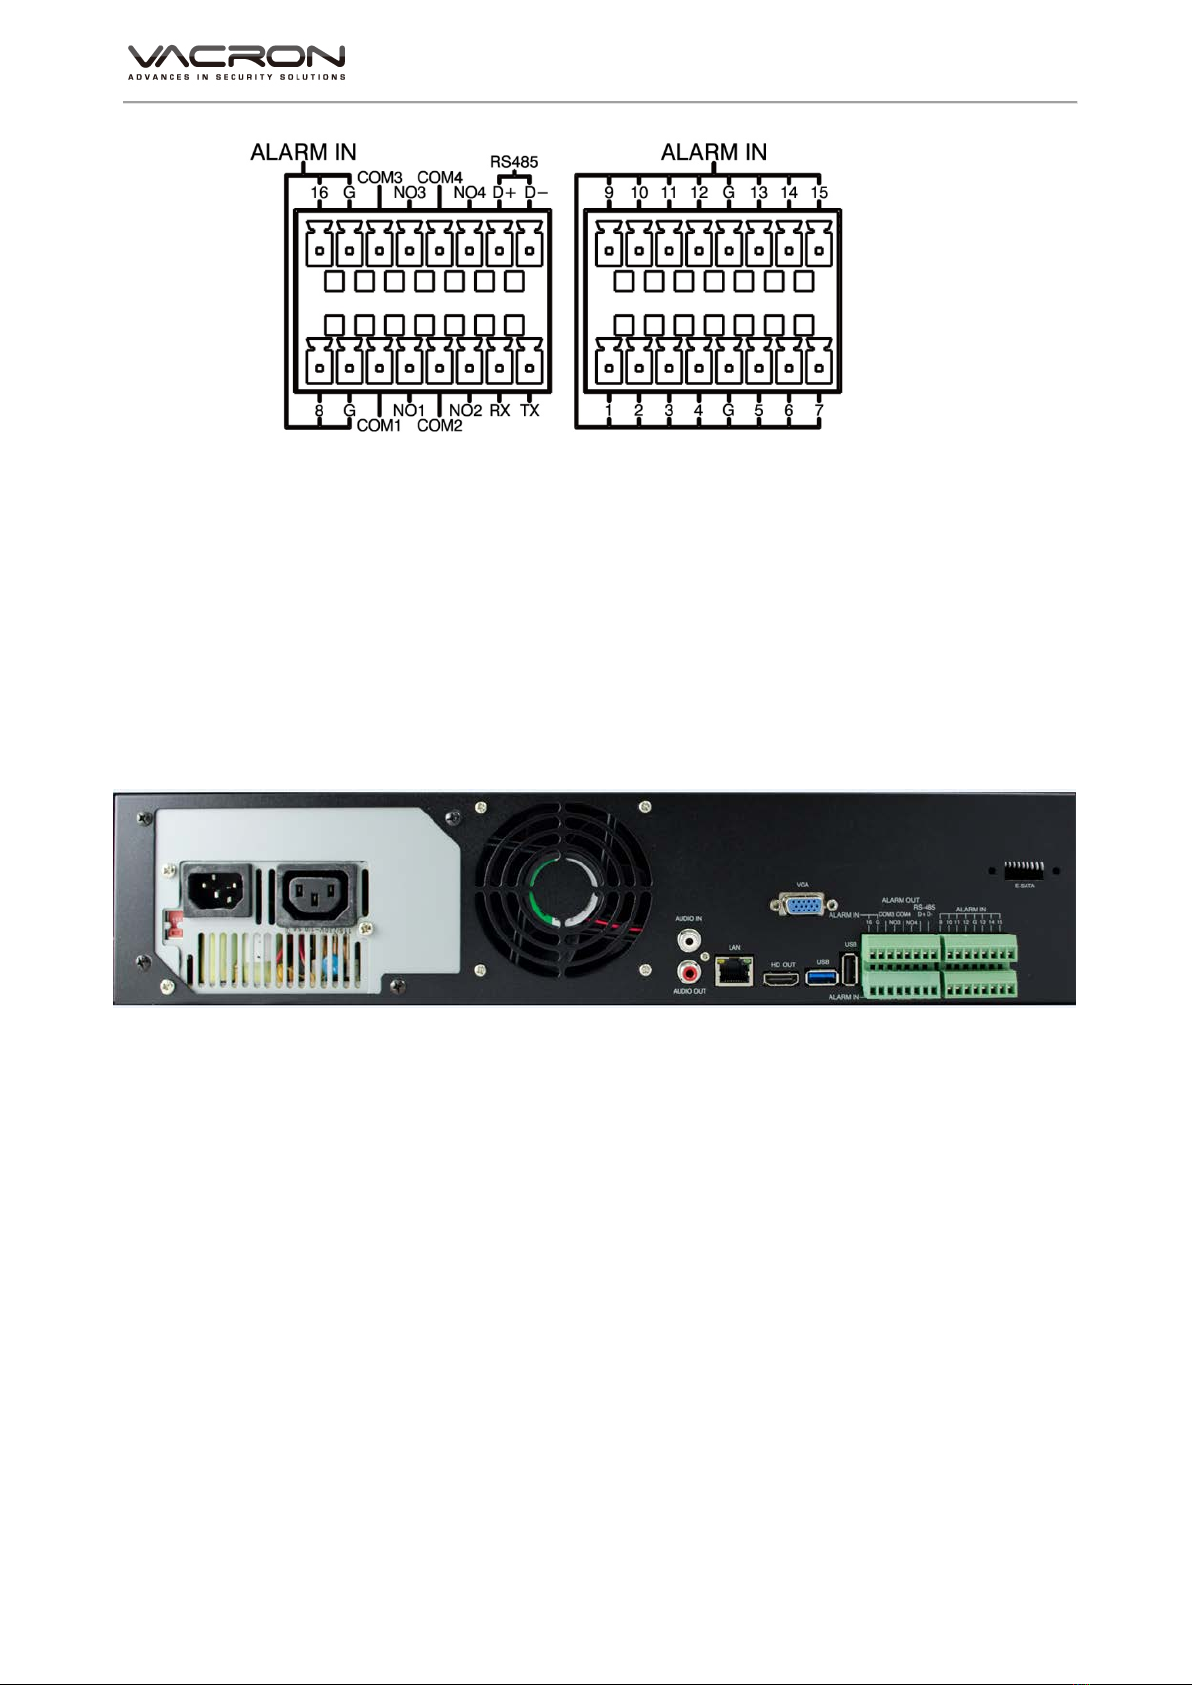
AlarmIn/AlarmOut connections
Pay attention to the following before installation.
1. AlarmIn
(a) Alarm input is grounding alarm input
(b) The alarm input signals require voltage signals to the ground
(c) When the alarm device is shared with two NVRs or connected to a
NVR and other devices, it should be isolated by relays.
2. Alarm OUT
The alarm output of the NVR can not be connected with high-power
load (no more than 1A). In the output circuit, be careful about the
excessive current that may cause damage to the relay. When using
high-power load, extra relays are needed.

Hardware Manual
9
F. Q & A and Maintenance
1. Q & A
Q 1.After power on, NVR doesn’t work.
A: The possible causes:
1. Wrong power input
2. bad connection of power cable
3. Power error
4. Firmware update error
5. Disk error or cable problem
6. Front panel error
7. Main PCB board error
Q 2.After power-on, NVR will restart after several minutes or the screen
freezes.
A: The possible causes:
1. Unstable or low input voltage
2. The hard drive has bad sectors or cable error
3. Low adaptor power
4. Front video signal not stable
5. High temperature, too much dust and the machine runs in a bad
condition
6. NVR hardware error
Q 3.HDD not found after power-on
A : The possible causes:
1. No power for the Hard Drive
2. Hard Drive cable error
3. Hard Disk error
4. Main board SATA slot error
Q 4. No output: Single, multiple or all channels
A : The possible causes:
1. Wrong firmware: Update to the right firmware
2. Brightness set to 0: set it to the default value
3. No signal input or signal too weak
4. Mask used
5. NVR hardware error
Q 5.No recorded file in local side
A : The possible causes:

Hardware Manual
10
1. Hard Disk error
2. Desired files are overwritten
3. Recording not enabled
Q 6.No audio sound
A : The possible causes:
1. Not powered-microphone
2. Not powered-speaker
3. Audio cable error
4. NVR hardware error
Q 7.Wrong time
A : The possible causes:
1. Wrong setting
2. Bad battery connection or low voltage
3. Bad frequency oscillator
Q 8.Motion detection not function
A : The possible causes:
1. Wrong schedule settings
2. Wrong area settings
3. Low sensitivity
Q 9.Mosaic or no video when Network preview and file playback
A : The possible causes:
1. Network traffic jam
2. Bandwidth limitation in the NVR side
3. Group mode is used in the NVR networking setting. More mosaics in
group mode, not recommended.
4. Masks or channel protection in NVR side
5. No rights for the user account
6. Bad NVR output
Q 10. Networking not stable
A : The possible causes:
1. Networking not stable
2. IP conflict
3. MAC conflict
4. LAN card error (PC/NVR)
Q 11. The remote controller can not work
A : The possible causes:
1. Wrong control address
2. Long distance or poor angle

Hardware Manual
11
3. Battery run out
4. Controller or NVR front panel is out of order
Q 12. Forget the administrative password or Internet password
A : The possible solution:
1. Please contact local customer service staff or call the customer service
phone headquarters, we will guides you how to solve by the machine
type and version of the program.
2. Maintenance
Damped dust on the PCB board will cause a short circuit and will do
something wrong to the NVR or damage it. For long-term stability of the
NVR, regularly brush the circuit boards, connectors, fans and chassis to
remove dust.
Please ensure the project is well-grounded, so images, audio signal will
not be disturbed. At the same time, we can protect the NVR from static
or inductive voltage damage.
Do not remove audio/video cables and RS-484 when the NVR is
powered on, or they will be damaged.
Do not use the TV interface in the NVR video output (VOUT), or the NVR
output circuit will be damaged easily.
Do not turn off the power switch directly to shut down the NVR. Use the
menu shutdown or OFF button on the front panel (press more than three
seconds) to turn off the power automatically to avoid hard Drive crash.
Keep the NVR away from heats and hot places.
Keep the NVR chassis well-ventilated for better heat dissipation.
Have regular checks and system maintenance。
Hardware Manual
12
G. Appendix : Specifications
1. 36CH NVR
System CPU: Hisilicon SoC
Operating system:Linux
Storage
Device/Interface
Build in SATA interface x 4,compatible
SATA/SATAII/SATA III HDD( Max. 10TB)
E-SATA *1 (Max 16T)
User Interface 14 operating buttons on Front panel controller
NVR IR remote control
Video And Other I/O
Interface
Dual video:HD OUT/VGA
ALARM IN x 16 / ALARM OUT x 4
USB 2.0 *2
USB 3.0 *1
Headphones (speakers) sound output x1
Ethernet x1 – 10/100/1000 (IEEE 802.3 Type 10Base-T /
IEEE 802.3u Type 100Base-TX / I);Auto-MDIX
Network Protocol
Ipv4 / ARP / TCP / UDP / ICMP / SMTP / HTTP / RTP /
RTSP / RTCP
Video Format H.265 compression format
E-Map
Live / Playback
VGA at 30 FPS mode, capable monitoring Max.36
channel real-time video.
1080P capable monitoring 4 channel real-time video.
Max.4 channel video playback by 1080P at 30FPS,
Max.16 channel VGA at30 FPS.
The real-time monitor screen support channel switch
display—the single
Channel switch, group channel switch. Record files
playback can search by time and event. (IP-CAM
displacement)
Playback speed: Slow motion / fast motion
multi-playback speed, single image format (forward or
reverse)
Capable doing multi-works as real-time monitoring,

Hardware Manual
13
recording and playback at same time.
Event Notification
Event report content: Camera displacement detection,
camera disconnection, hard disk damage
Recording Mode
Constant recording
Schedule recording
(Include movement detected recording), capable save
the video records 3 sec before event and 60 min after
event.
Force recording
Recording without real-time monitor (as user
permission )
Backup Management Video output format: AVI
The USB mobile storage device or remote NAS
System Management
Remote Client software; live, playback set up by PC
(remote side)
Authorization: Maximum 10 group accounts, Hierarchical
authority
Support 3 users log on by Client-side software or
browser.
Systems operation records, record login time, IP and
selected video.
Browser: MS IE11
Support Equipment
Support megapixel IP Camera video
Support CCTV camera video via Video Server.
Power Input: 115/230VAC, 8/4A, 50-60Hz, Output: 150W
Weight 5.7KG(without hard disk)
Operating Temperature 0-45 ℃
Size 390mm(length)*430mm(width )*100(height)
★Product specifications are subject to change without notice; please contact us for the latest
information.
Manufacturer :
FUHO TECHOLOGY CO., LTD.
No. 30 Lane 726 Sec. 3 Jinma Rd., Changhua City
Phone: 886-4-751- 2881 Fax: 886-4-751-6631
Table of contents
Other Vacron Security System manuals

Vacron
Vacron VDH-NK200 User manual

Vacron
Vacron VVH-MD657/AVM-360PV User manual

Vacron
Vacron VVH-MDE304 Installation guide

Vacron
Vacron VDH-NK350A User manual

Vacron
Vacron SA-650HD User manual

Vacron
Vacron VDH-NK385 User manual

Vacron
Vacron MDE52 User manual

Vacron
Vacron VDH-NK800 User manual

Vacron
Vacron VVH-MDE304 User manual

Vacron
Vacron VVH-MDE43E83 User manual


