Vacron VVH-MDE43E83 User manual

4 & 8CH
Mobile DVR Systems
2019 JULY V1.0 (optional WIFI / 4G / G-MOUSE optional)
* The company reserves the right to modify this product manual without prior notice.
The product screen display and operation content should be based on the actual
machine.

&+0RELOH'956\VWHPV 8VHU0DQXDO
i
Safety Precautions
Take and review some testing video initially to make sure the images were
recorded correctly. Please note that manufacturer, its subsidiaries and affiliates,
and its distributors are not liable for consequential damages arising from any
malfunction of main device accessory, including memory device that results in the
failure of an image to be recorded or to be recorded in a way that is machine
readable.
Before using the product, please ensure that you read the safety
precautions described below. Always ensure that the product is used
correctly.
• Please keep device away from children.
• Use only recommended power sources.
• Do not attempt to disassemble, alter or apply heat to the product.
• Avoid dropping or subjecting the product to severe impacts.
• To avoid the risk of injury, do not touch the interior of the product if it has been
dropped or otherwise damaged.
• Stop using the product immediately if it emits smoke, a strange smell, or
otherwise behaves abnormally.
• Do not use organic solvents such as alcohol, benzene, or thinner to clean the
product.
• Do not let the product come into contact with water (e.g. sea water) or other
liquids.
• Do not allow liquids or foreign objects to enter the VVR.
• Do not place the VVR near or in direct flame.
• Do not handle the power cord with wet hands.
• Do not use the equipment in a manner that exceeds the rated capacity of the
electrical outlet or wiring accessories. Do not use if the power cord or plug are
damaged, or not fully plugged into the outlet.
• Do not allow direct or metal objects (such as pins or keys) to contact the

&+0RELOH'956\VWHPV 8VHU0DQXDO
ii
terminals or plug.
• Avoid using, placing or storing the product in the humid or dusty areas.
Before using 3G/4G products, please ensure that you read the safety
notifications described below.
• Company and user shall not modify certified low power radio frequency device
the frequency, increase the power and change the characteristics and functions
without permit.
• Use low power radio frequency device shall not affect flight safety and interfere
with legal communications; when there is interference happened should be
immediately suspended, and improve without interfering may continue to use.
• Legal communication means operation of radio communication in accordance
with the provisions of the Telecommunications Act Low-power radio frequency
device must endure the interference of legal communications, industrial, scientific
and medical radiation wave equipment.

&+0RELOH'956\VWHPV 8VHU0DQXDO
iii
Index
A. Product Features
B. Specifications
C. System Support
D. Accessories
E. Physical Appearance
F. Power On / Power Off
G. Remote Control
H. System Interface and Operation
I. Computer Player
: Format the hard disk. For detailed operation instructions, please refer to the
"Format/Restore Hard Disk" instructions. ................................................................................ 25
J. Format/Restore Hard Disk
K. 4G Network Settings

&+0RELOH'956\VWHPV 8VHU0DQXDO
1
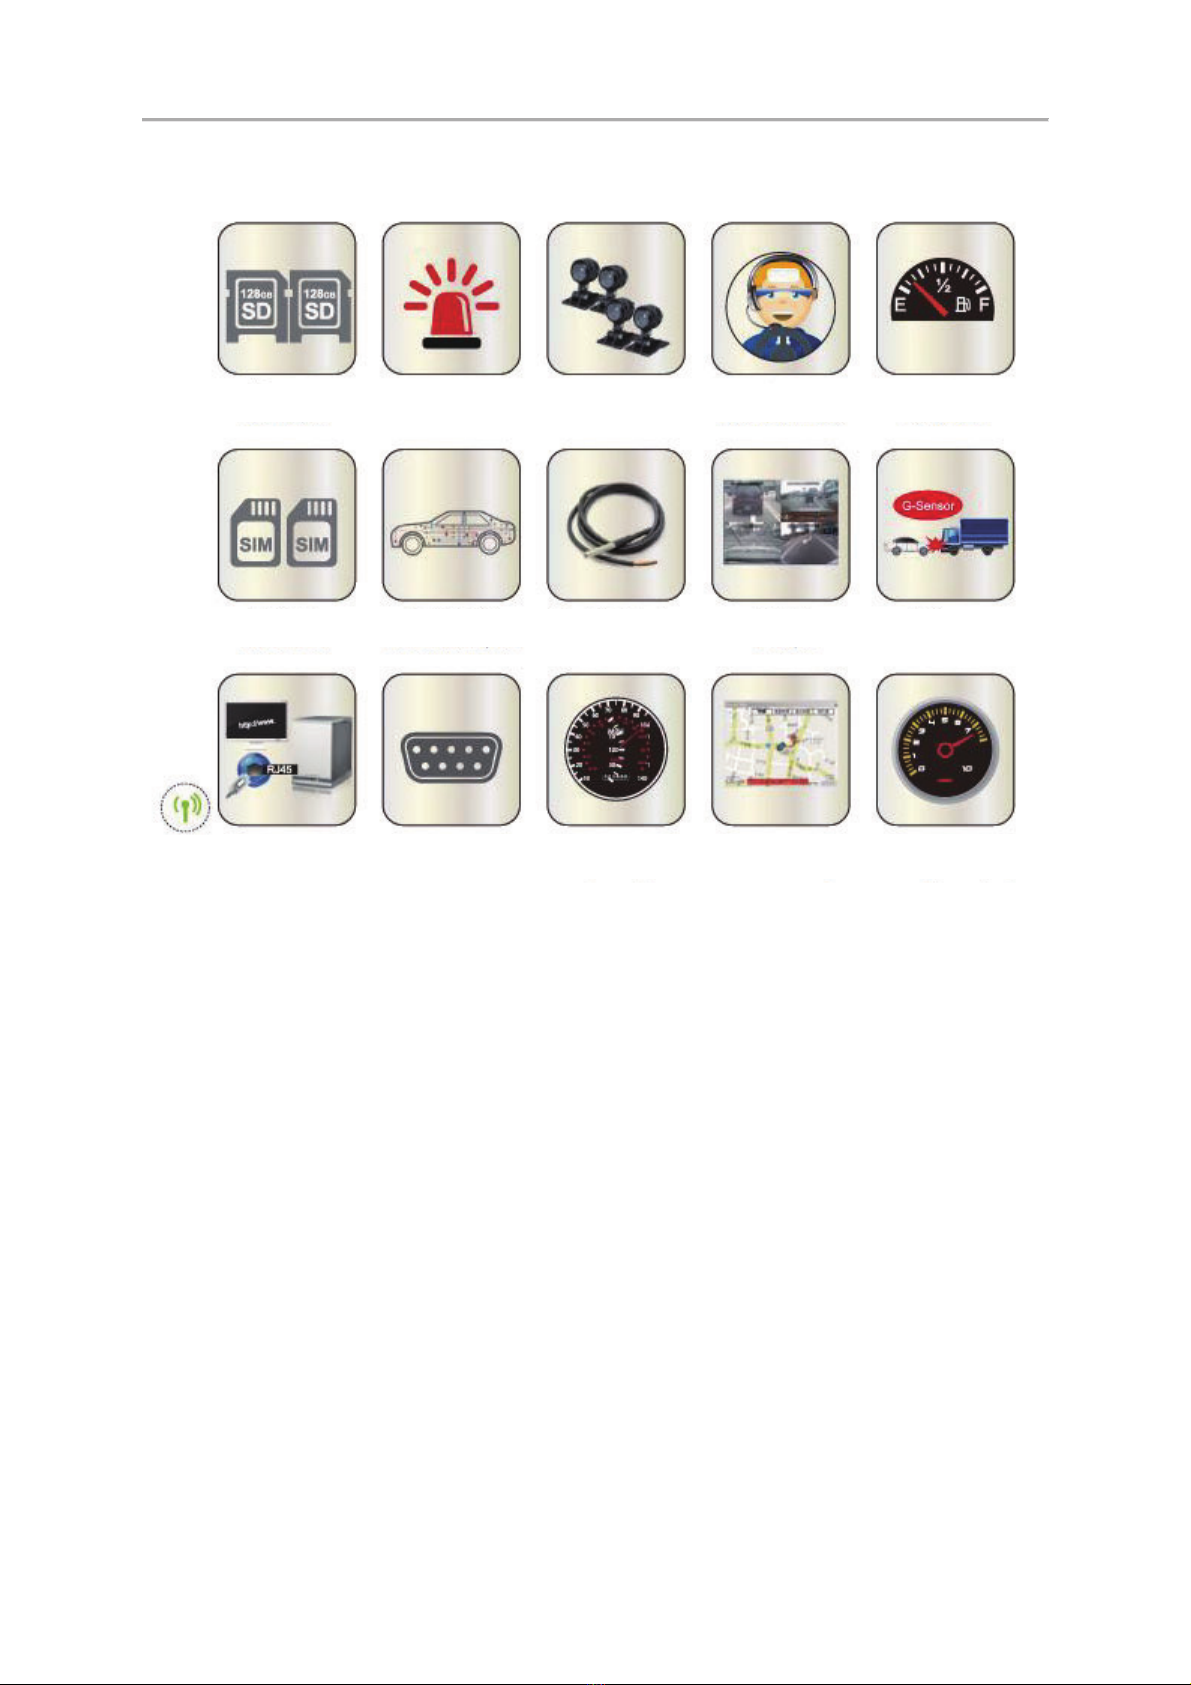
A. Product Features
2/
Wide voltage input DC +8V ~ +60V, suitable for all kinds of vehicles, such as
sedans, buses, construction trucks, and electric cars.
3/
Built-in lithium battery 2200mA/Hr and low power consumption mode about
5mA/Hr to achieve a long-term monitoring in power saving mode, such as GPIOs,
internal and external battery low voltage detection, six axis sensor (G+Gyro)
detection, RTC timing wake up detects peripheral status.
4/
Built-in ARM MCU for customized functions integration
5/
Built-in MCU can use the GPS coordinates to switch between two different SIM
cards when crossing state boarders.
6/
Two RS232 interfaces for equipment connection such as RFID reader.
7/
One wire interface to support power and max. 128 sensor signals of the external
equipment such as temperature sensor, i-Button, RFID readers, etc.
8/
Support two GPS, which can power up by the built-in battery.
7.1
Use the built-in GPS+GLONASS and AGPS functions of the 4G module for
faster and more accurate positioning information.
7.2
Support one GPS Mouse to get a stronger GPS signal.
9/
Built-in CAN Bus 2.0A/B interface for integrating CAN Bus devices such as
Mobile-Eye.
:/
Support more than 10 external I/O and their input voltage withstand up to
DC+60V for different integration need.
10. Built-in G-Sensor and Gyro Sensor for driving behavior analysis applications.
11. Built-in A/D conversion detection for speed, RPM, and fuel consumption.
12. Support dual SD cards to store GPS, video and audio data.
13. Support Wi-Fi USB dongle / RJ45 (optional) and the 4G network; and integrating
ADAS and DSM systems.
14. Support Chrome, Firefox, Edge, etc.
13. Support two-way audio.

&+0RELOH'956\VWHPV 8VHU0DQXDO
2
B. Specifications
Item
Description
Operating System
Embedded Linux
Video Compression
H.264
Resolution
1080P/720P/960H
Video Input / Output
Input: 4 / 8CH 1080P@30FPS
Output: CVBS x 1 , VGA x 1
Network
4G
GPS
GPS+GNSS or G-Mouse
Alarm I/O
1. Analog Input x 2:
A. Voltage Range: 0-60V
2. Digital Signal Input (max. 60V) x 13:
A. ACC x1
B. Tachometer x 1
C. Speedometer x 1
D. + / - trigger x 10
3. Output x 2 (max. withstand 50V)
A. Out 1 Sink current 1A (max)
B. Out 2 Sink current 0.5A (max)
Audio Input / Output
Support condenser MIC and speakers Ƌ4Ω/ 2Wƌ
(Amplifier circuits are not required for MIC and speakers)
Communication
Interface
1. CAN bus (2 wires) x 1
2. RS232 (2 wires) x 2
3. Dual SIM cards (MCU switch)
4. RJ45 (optional)
Storage
Dual SD cards, 8GB ~ 256GB Class 10 or above
LED Light
Power / Record Light (red), Network (green), GPS (blue)
Alarm Buzzer Output
Supported

&+0RELOH'956\VWHPV 8VHU0DQXDO
3
Note 1: SD cards are sold separately. Recommend to use 8GB ~ 256GB Class 10 or higher.
Note 2: The product specifications are subject to change without prior notice.
USB Interface
USB Wi-Fi (optional)
Support Wi-Fi (AP Mode) 802.11b / g / n Application: Wi-Fi
Connection
Battery Type
Lithium Battery 3.7V / 2200mA
Display
1 / 4 / 9CH
Simplex Mode
Record / Playback
Control Interface
GUI
Language
English, Traditional Chinese, Simplified Chinese
Display Mode
1 / 4 / 9CH
Disconnect Detection
Yes
Power Specifications
Operating
Mode
8-60 VDC, 6W (12V, 0.6A) Cameras and LED
monitor Not connected
Sleep
Mode
<10mA@ >12.6V
Output
Max. 12V @ 1.35A
Weight
920g (Cameras and accessories Excluded)
&+0RELOH'956\VWHPV 8VHU0DQXDO
4
C. System Support
!"
#!" $%&" '#$ (
)$ *+)'#, "-" ."

&+0RELOH'956\VWHPV 8VHU0DQXDO
5
D. Accessories
zThe following accessories include in the standard package.
1. 5A fuse power cable x 1
2. I/O cable x 2
3. Remote Control x 1
4. GPS/GNSS active antenna x1
zOptional accessories
1. 7”LCD Monitor
2. G-MOUSE
3. Temperature
4. RFID Reader
5. IR Extension Cable
&+0RELOH'956\VWHPV 8VHU0DQXDO
6
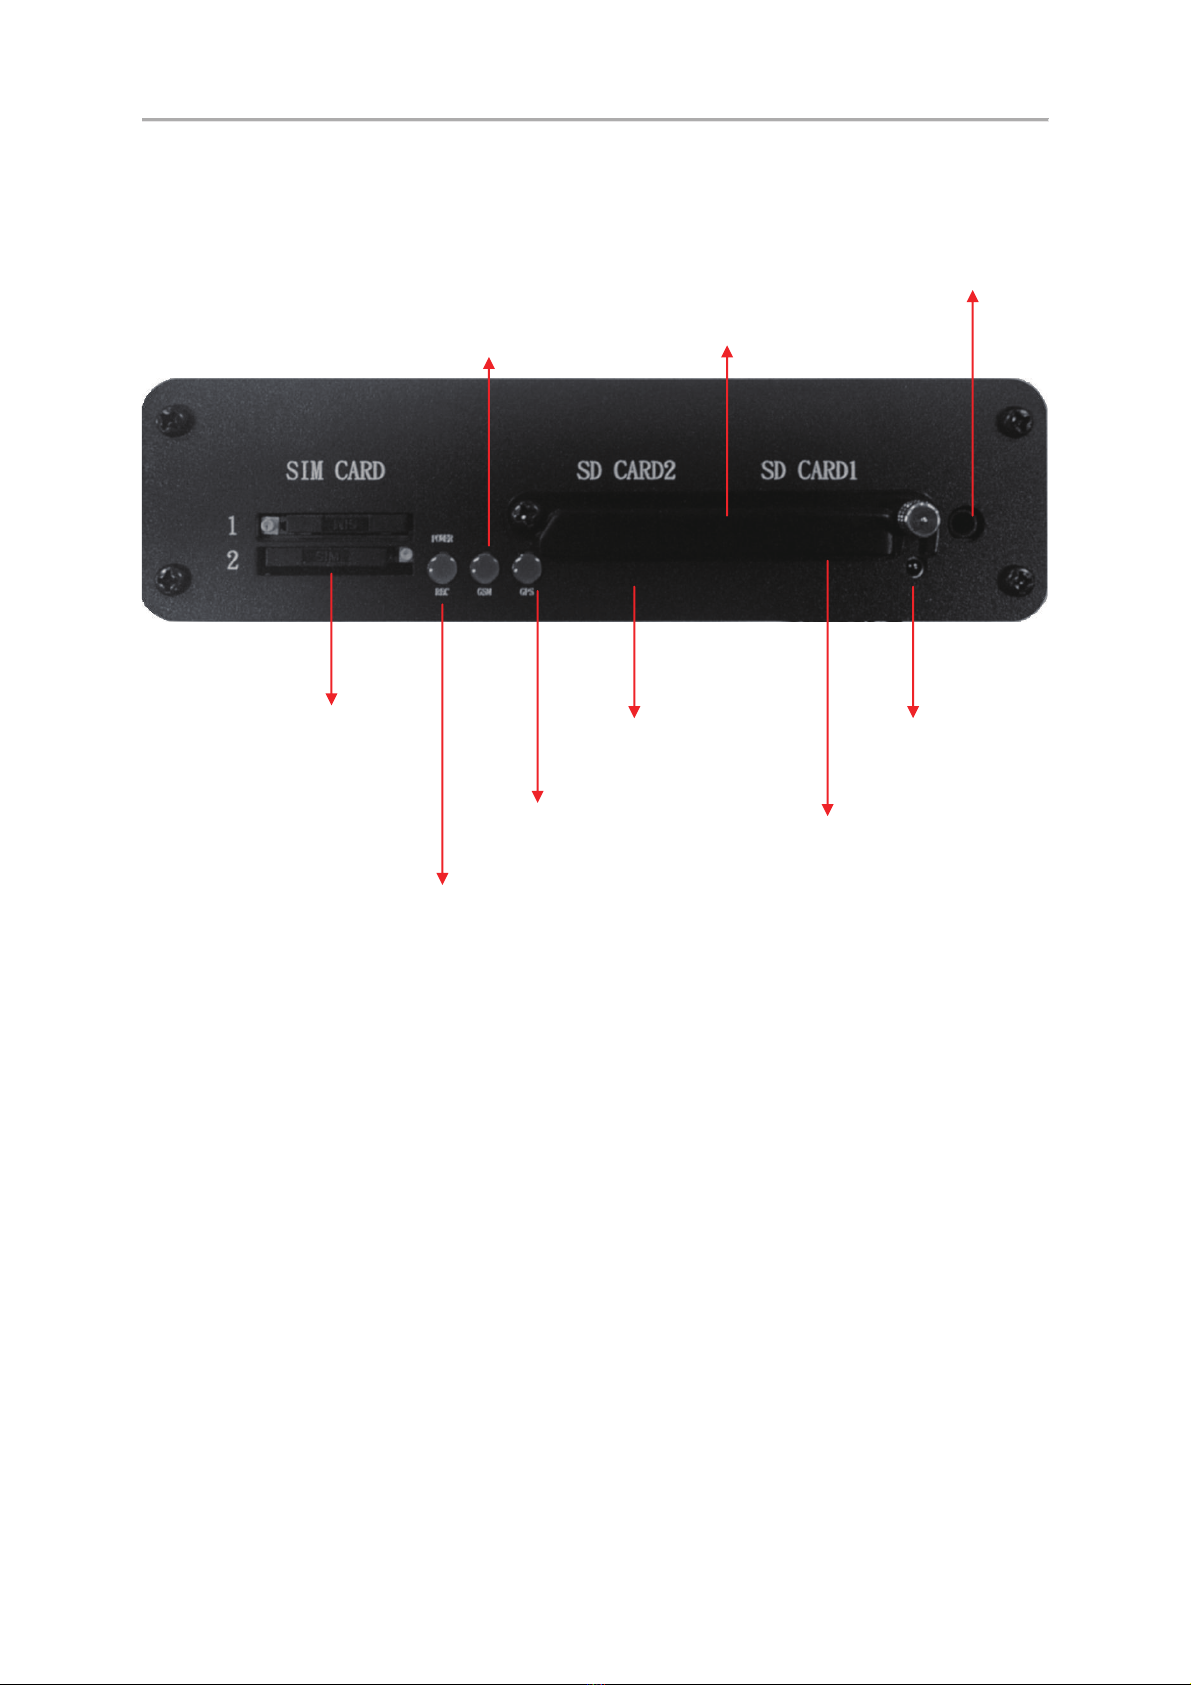
E. Physical Appearance
,55HFHLYHU
6,0 6ORW
3RZHU5HFRUG/LJKW
*60/LJKW
*36/LJKW
6'&DUG6ORW
6' &DUG 6ORW
'XVW&RYHU
6'&DUG6ORW
,5([WHQVLRQ-DFN
&+0RELOH'956\VWHPV 8VHU0DQXDO
7
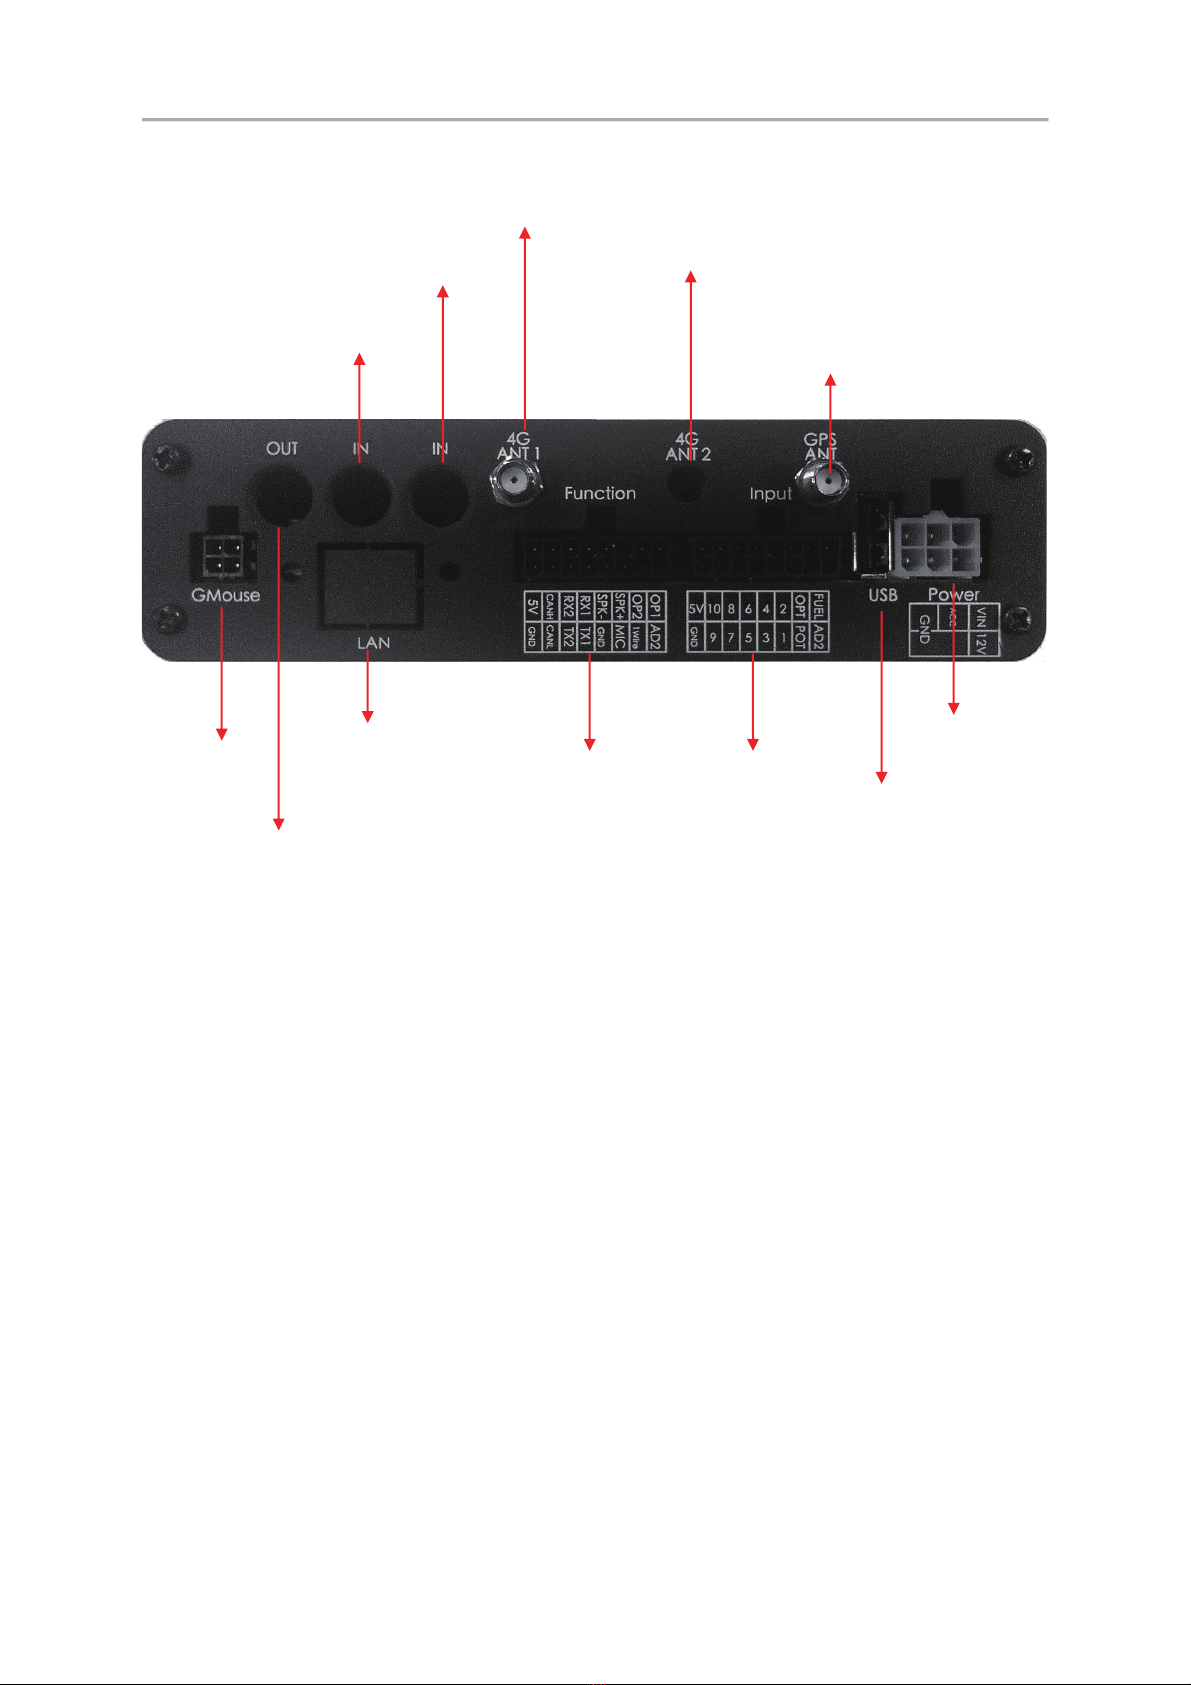
G-Mouse / 4G / Wi-Fi (Optional)
*0RXVH
* $QWHQQD5HVHUYHG
a&+&DPHUD3RUWV
)XQFWLRQDO
,23RUWV
3RZHU3RUW
9LGHR2XWSXW
9*$&9%6
a&+&DPHUD3RUWV
6LJQDO,2
3RUWV
86%6ORW
* $QWHQQD
*36*166 $QWHQQD
5-

&+0RELOH'956\VWHPV 8VHU0DQXDO
8
zSignal I/O Ports
Contact
Item
Description
Note2
1
AD
Analog 2
A
2
PTO
PTO
D
3
IN1
IN1
D
4
IN3
IN3
D
5
IN5
IN5
D
6
IN7
IN7
D
7
IN9
IN9
D
8
GND
P
9
FUEL
Fuel analog1
A
10
OPT
R.P.M.
D
11
IN2
IN2
D
12
IN4
IN4
D
13
IN6
IN6
D
14
IN8
IN8
D
15
IN10
IN10
D
16
5V
5V Output(always)
P
Note 1: (IN1-10 Alarm Function Definition)
Note 2: (Signal source definition: A is an analog signal; D is a digital signal; P is
power signal.)

&+0RELOH'956\VWHPV 8VHU0DQXDO
9
zFunction I/O Ports
Contact
Item
Description
Note
1
GND
P
2
ONEWIRE
One Wire Device
D
3
MIC+
Microphone IN
Ai
4
MIC-
GND
D
5
RS232 TX1
RS232 TX1
Do
6
RS232 TX2
RS232 TX2
Do
7
CAN-L
CAN Bus_L
D
8
GND
P
9
OUT1
OUTPUT1 sink 1A/50v
10
OUT2
OUTPUT2 sink 0.5A/50v
11
SPK+
Audio out
Ao
12
SPK-
Audio out
Ao
13
RS232 RX1
RS232 RX1
Di
14
RS232 RX2
RS232 RX2
Di
15
CAN-H
CAN Bus_H
D
16
5V
5V Output (controlled)
P

&+0RELOH'956\VWHPV 8VHU0DQXDO
10
Note: (Signal source definition: A is an analog signal; D is a digital
signal; P is power signal; i & o are in and out respectively.)
Output example: load & signal

&+0RELOH'956\VWHPV 8VHU0DQXDO
11
F. Power On / Power Off
(1) Power On
Put the SD card into the SD card slot and close the SD card slot lock, then turn
on the power and it will take approximately 30 seconds. When lights start
flashing as the recording is in progress.
(2) Power Off
Turn off the power; please wait for 3 seconds until super capacitor without
electricity. Then take the SD card out and playback the recording files in
computer.
(3) LED Lights
zRecord Light (red)
Not flashing: Not recording
Light flashing: Recording
Rapid flashing: Event recording
zGPS Light (blue):
Light flashing: Not connected
Light On: Connected.
zNetwork Light (green):
Light Off: Not connected
Light flashing: Connected
Light On: Connected to the server
(4) SD Card Mode
When both cards are empty cards, the recording priority is SD1. If there is
video data in the SD card, the latest video file data is preferred.
Note : If the playback function is used on the local player, simultaneous
recording cannot be performed.炸
&+0RELOH'956\VWHPV 8VHU0DQXDO
12
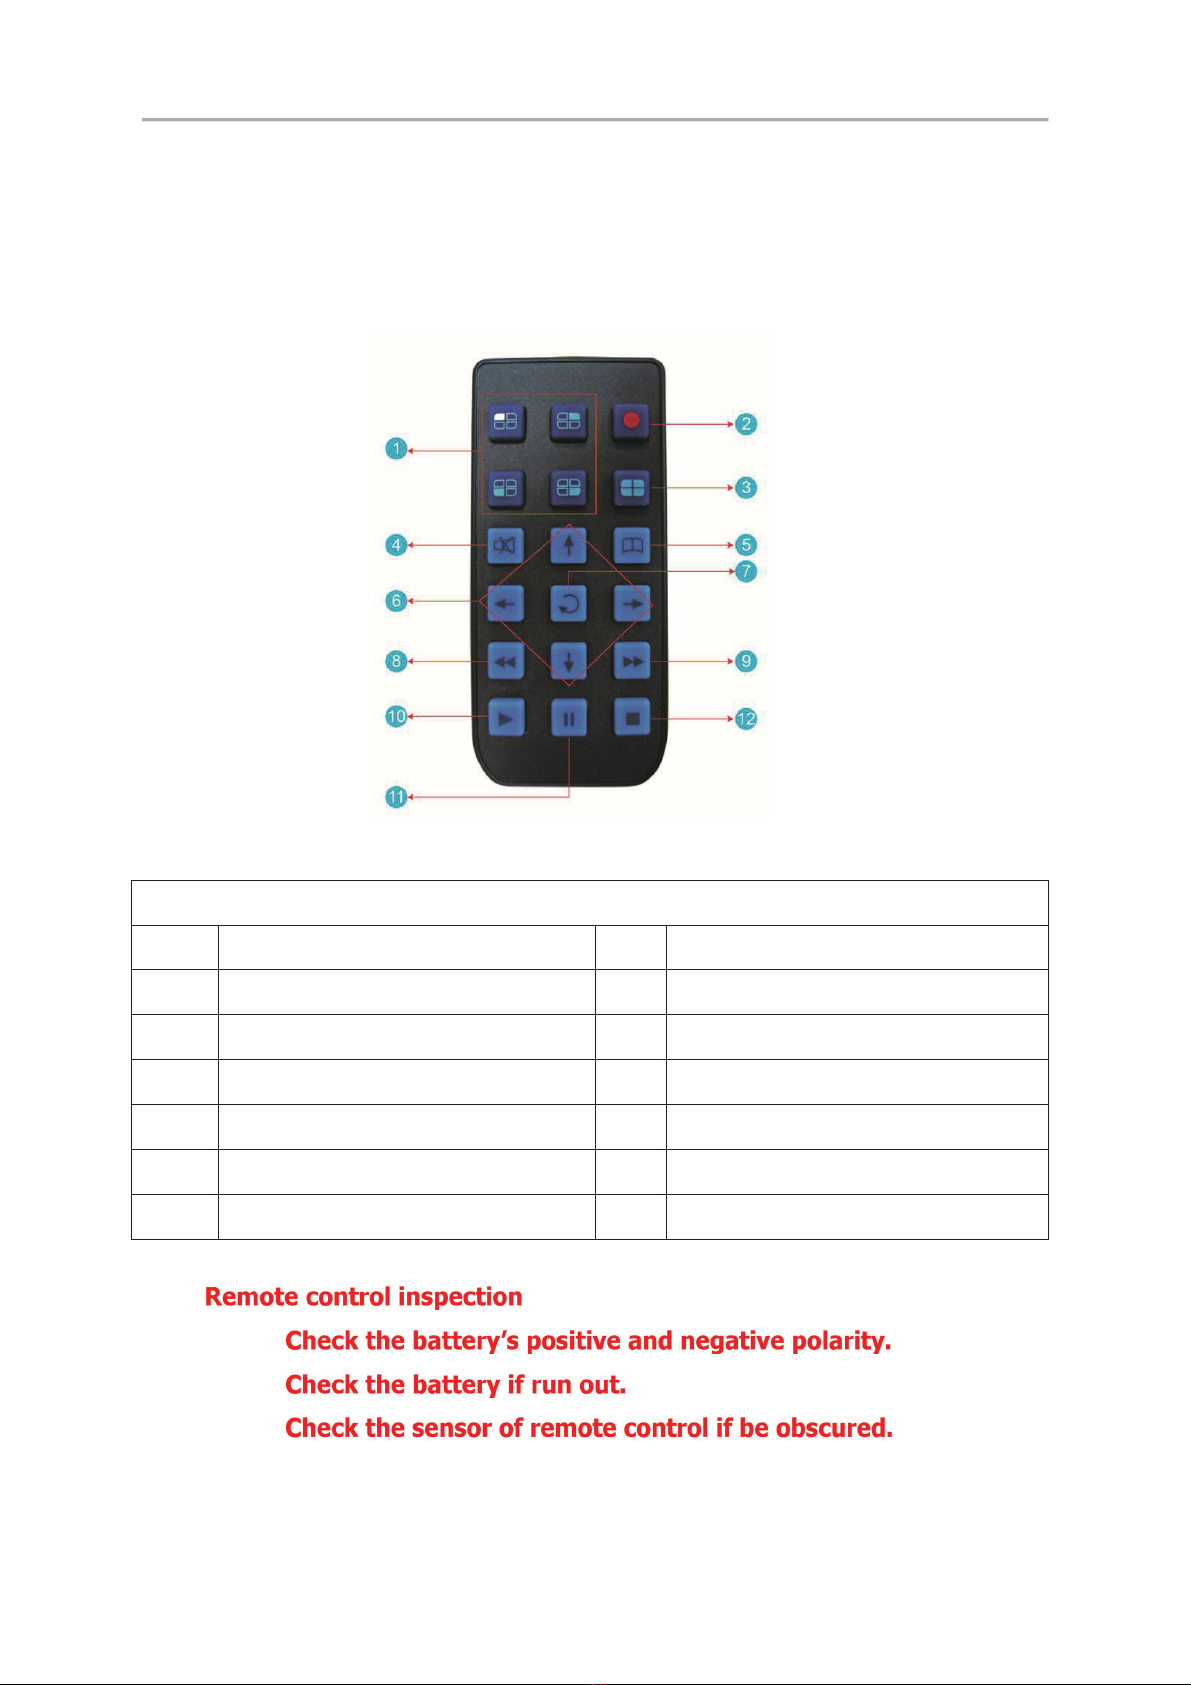
G. Remote Control
Remote control playback and computer playback are available.
Remote control operation
Remote control button Introduction
Item
Descripton
Item
Description
1
Split screen display
7
Enter
2
Force recording
8
Reverse
3
Quad full-screen display
9
Fast forward
4
Speaker mute button
10
Playback mode, play button
5
Menu
11
Pause
6
Navigation
12
Stop and Exit
*
(1)
(2)
(3)
(4) Check if there are fluorescent lamps are used nearby.
&+0RELOH'956\VWHPV 8VHU0DQXDO
13
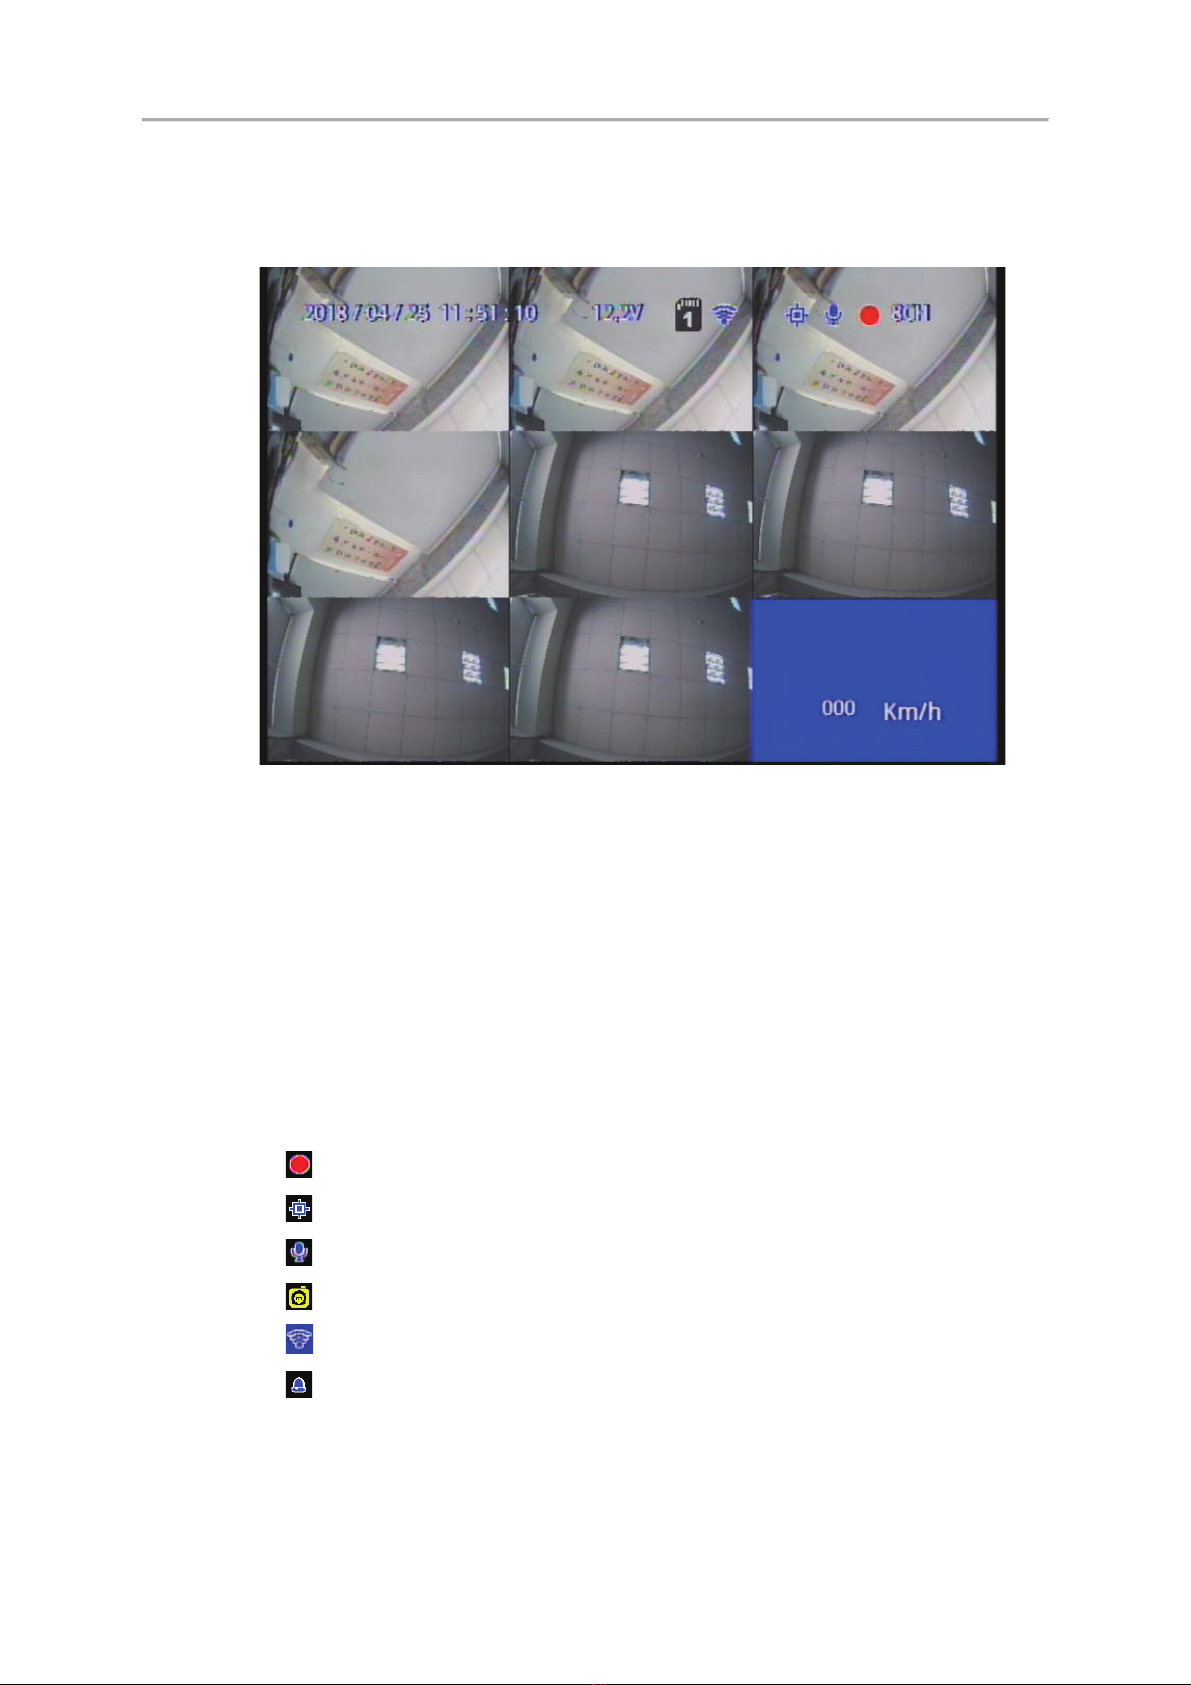
H. System Interface and Operation
Live View Display
Live View Display –8-split View
(1) Screen operation guide line
To make channel 1~4 single-channel display, switch between display
by menu selection or remote control
To display quad screen, press the button quad
To open the menu press the menu button
To play mode press the play button
(2) Illustration
: Indicates video recording
: Indicates video recording
: Indicates audio recording
: Indicates event recorded
: Indicates Internet connected
: Alarm triggered

&+0RELOH'956\VWHPV 8VHU0DQXDO
14
OSD menu operation and setting instructions:
Camera type
Two channels a group free to choose the camera signal source
of 1080Pˣ720PˣD1
( Selecting error will have no image )
Image settings
FPS: 15-30 FPS
Picture quality: Normal, better, best
Image
adjustment
brightness, contrast, color adjustment
Subtitle
Select whether to store OSD display subtitles in the videos
Channel settings
Image output mode to set the normal mode, mirror mode, flip
mode, flip mirror mode, and determine whether to write
to the storage device
Time setting
When there is a GPS signal, the system will correct it
according to the set time zone. If there is no GPS signal, you
can set the date and time by yourself.
GPS setting
current speed and speed unit settings in the live screen
Plate settings.
Enterable text range 烉A~Z & 0~9
Operating mode
Set the channel mode of the system at startup
Audio Recording ON/OFF
Recording duration after ACC off
Alarm Settings
Alarm trigger mode
System
protection
Low voltage protection triggered in ACC mode
Disk protection tips
4G Network
4G ON/OFF and display the current setting information (this
function is optional)
G Senor Settings
When this function is enabled, when the vehicle is subjected
to a certain degree of collision, automatic forced recording will
be triggered to completely record the accident scene.
SD card
operating mode
Backup: SD2 is a spare option. When an SD1 disk is abnormal,
the system will change to SD2 to store video data.
expansion : SD1 and SD2 will loop recording when
expansion mode is selected ˤ
NTSC/PAL
Select the corresponding system according to the local
environment

&+0RELOH'956\VWHPV 8VHU0DQXDO
15
Language
switching
Switching Traditional Chinese, Simplified Chinese, and
English.
Restore default
After restoring the factory settings, the machine will reboot
and clear the original settings
Format hard
disk
After formatting the hard disk, the footage will be deleted.
Firmware update
The firmware update program is stored in the SD card and the
firmware is updated by the device. Keep power on during
firmware update. After the update is completed, it will
automatically reboot. (If both SD cards are inserted, SD1
is mainly used to update the storage location)

&+0RELOH'956\VWHPV 8VHU0DQXDO
16
Playback mode
Local playback and computer playback
zLocal playback
Press the Play button in live view mode to enter the playback page
Select search and press enter to enter the file list
Select the file to played back, press the enter key to enter playback
zComputer playback: Read the hard disk for playback
The hard disk that contains the video file is read by the computer
and then the playback software CarBox2.exe is executed.
Click the icon to enter playback mode
After selecting the hard disk, the file list will appear, and the
playback will start according to the video file to be played.
Table of contents
Other Vacron Security System manuals

Vacron
Vacron VVG-MDE31A User manual

Vacron
Vacron VDH-NK380 User manual

Vacron
Vacron VDH-NK200 User manual

Vacron
Vacron VDH-NK350A User manual

Vacron
Vacron VDH-NK900 User manual

Vacron
Vacron VVH-MD657/AVM-360PV User manual

Vacron
Vacron SA-650CF User manual

Vacron
Vacron VVH-MDE304 User manual

Vacron
Vacron SA-650HD User manual

Vacron
Vacron MDE52 User manual


