Val6 KBE5S User manual

O wne r’s Manual
Manue l d’utilisatio n
2-step
IMPORTANT
•
This Owner’s Manual provides important information on proper handling, operation, and maintenance. FAILURE TO FOLLOW THE INSTRUC-
TIONS, PRECAUTIONS, OR SAFETY TIPS IN THIS MANUAL AUTOMATICALLY VOIDS ALL WARRANTIES, EXPRESS OR IMPLIED.
•
FAILURE TO COMPLY WITH THE INSTRUCTIONS, PRECAUTIONS, AND SAFETY TIPS IN THIS MANUAL CAN RESULT IN DEATH,
SERIOUS BODILY INJURY AND PROPERTY LOSS OR DAMAGE FROM HAZARDS OF FIRE, EXPLOSION, BURN, ASPHYXIATION,
CARBON MONOXIDE POISONING, AND / OR ELECTRICAL SHOCK.
•
Readand thoroughlyunderstandthisOwner’s Manual before usingthe heater inany way, including unpacking,assembling, fueling, inspecting,
lighting,operating,adjusting,turningoff,coolingdown,moving,orstoringtheheater.
•
PleasekeepthisManualforthe user’s needandreference.
•
Do not allow anyone who has not read and understood this Owner’s Manual to assemble, inspect, light, operate, adjust, turn off, cool down, re-
fuel,move, orstorethe heater.
•
The requirements of local authorities having jurisdiction shall be followed.
•
Theinstallationofthe unitshallbeinaccordancewiththeregulationsofthe authoritieshavingjurisdiction.
INFRA-RED OIL HEATER
APPAREIL DE CHAUFFAGE Á INFRA-ROUGE Á COMBUSTIBLE
IMPORTANT
•
Ce manuel d’utilisation fournit des informations importantes sur la manipulation, l’utilisation et l’entretien de l’appareil. L’INOBSERVATION
DES INSTRUCTIONS, PRÉCAUTIONS ET CONSIGNES DE SÉCURITÉ MENTIONNÉES DANS CE MANUEL REND CADUQUES
TOUTES LES GARANTIES, QU’ELLES SOIENT EXPRESSES OU IMPLICITES.
•
L’INOBSERVATION DES INSTRUCTIONS, PRÉCAUTIONS ET CONSIGNES DE SÉCURITÉ MENTIONNÉES DANS CE MANUEL
PEUT PROVOQUER DES BLESSURES GRAVES, VOIRE LA MORT, OU L’ENDOMMAGEMENT OU LAPERTES DE BIENS MATÉ-
RIELS EN RAISON D’UN INCENDIE, D’UNE EXPLOSION, DE BRÛLURES, D’ASPHYXIE, D’EMPOISONNEMENT AU MONOXYDE
DE CARBONE ET/OU DE SECOUSSE ÉLECTRIQUE.
•
Lisez attentivement ce manuel d’utilisation et assurez-vous d’en comprendre le contenu avant même de déballer l’appareil, de l’installer, de le
remplirdecombustible, de l’inspecter,del’allumer,del’exploiter,de lerégler,del’arrêter,delelaisserrefroidir,deledéplaceroudele stocker.
•
Veuillezconservercemanuelpourlesbesoinsdel’utilisateuretcommemoyenderéférence.
•
Ne permettez à quiconque n’ayant pas lu ni compris ce manuel de déballer l’appareil, de l’installer, de le remplir de combustible, de l’inspecter,
del’allumer, de l’exploiter, de le régler, del’arrêter,dele laisser refroidir,de ledéplacer oude le stocker.
•
Lesconditionsimposéesparlesautoritéslocalesayantjuridictiondoiventêtresuivies.
•
L’installation de l’unité doit être faite conformément aux règlements des autorités ayantjuridiction.
English
Français

C o nte nts
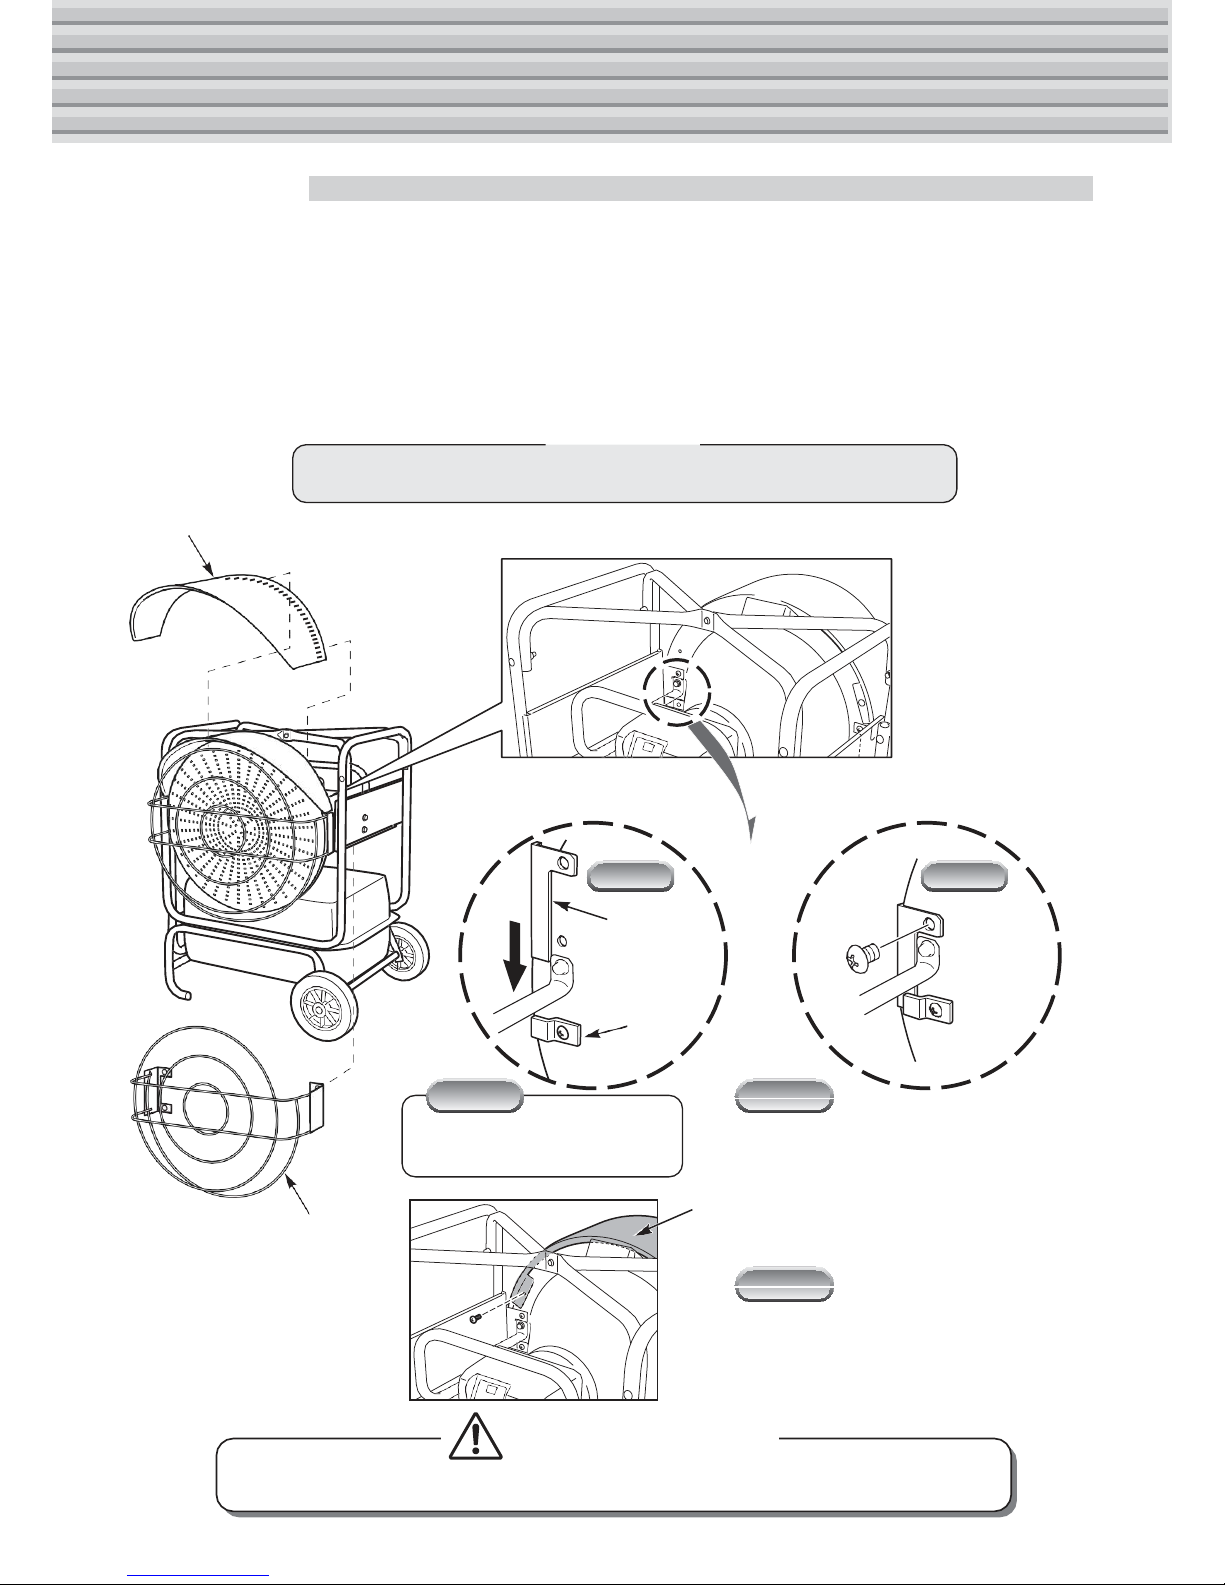
ASSEMBLY INSTRUCTION ....................... 1
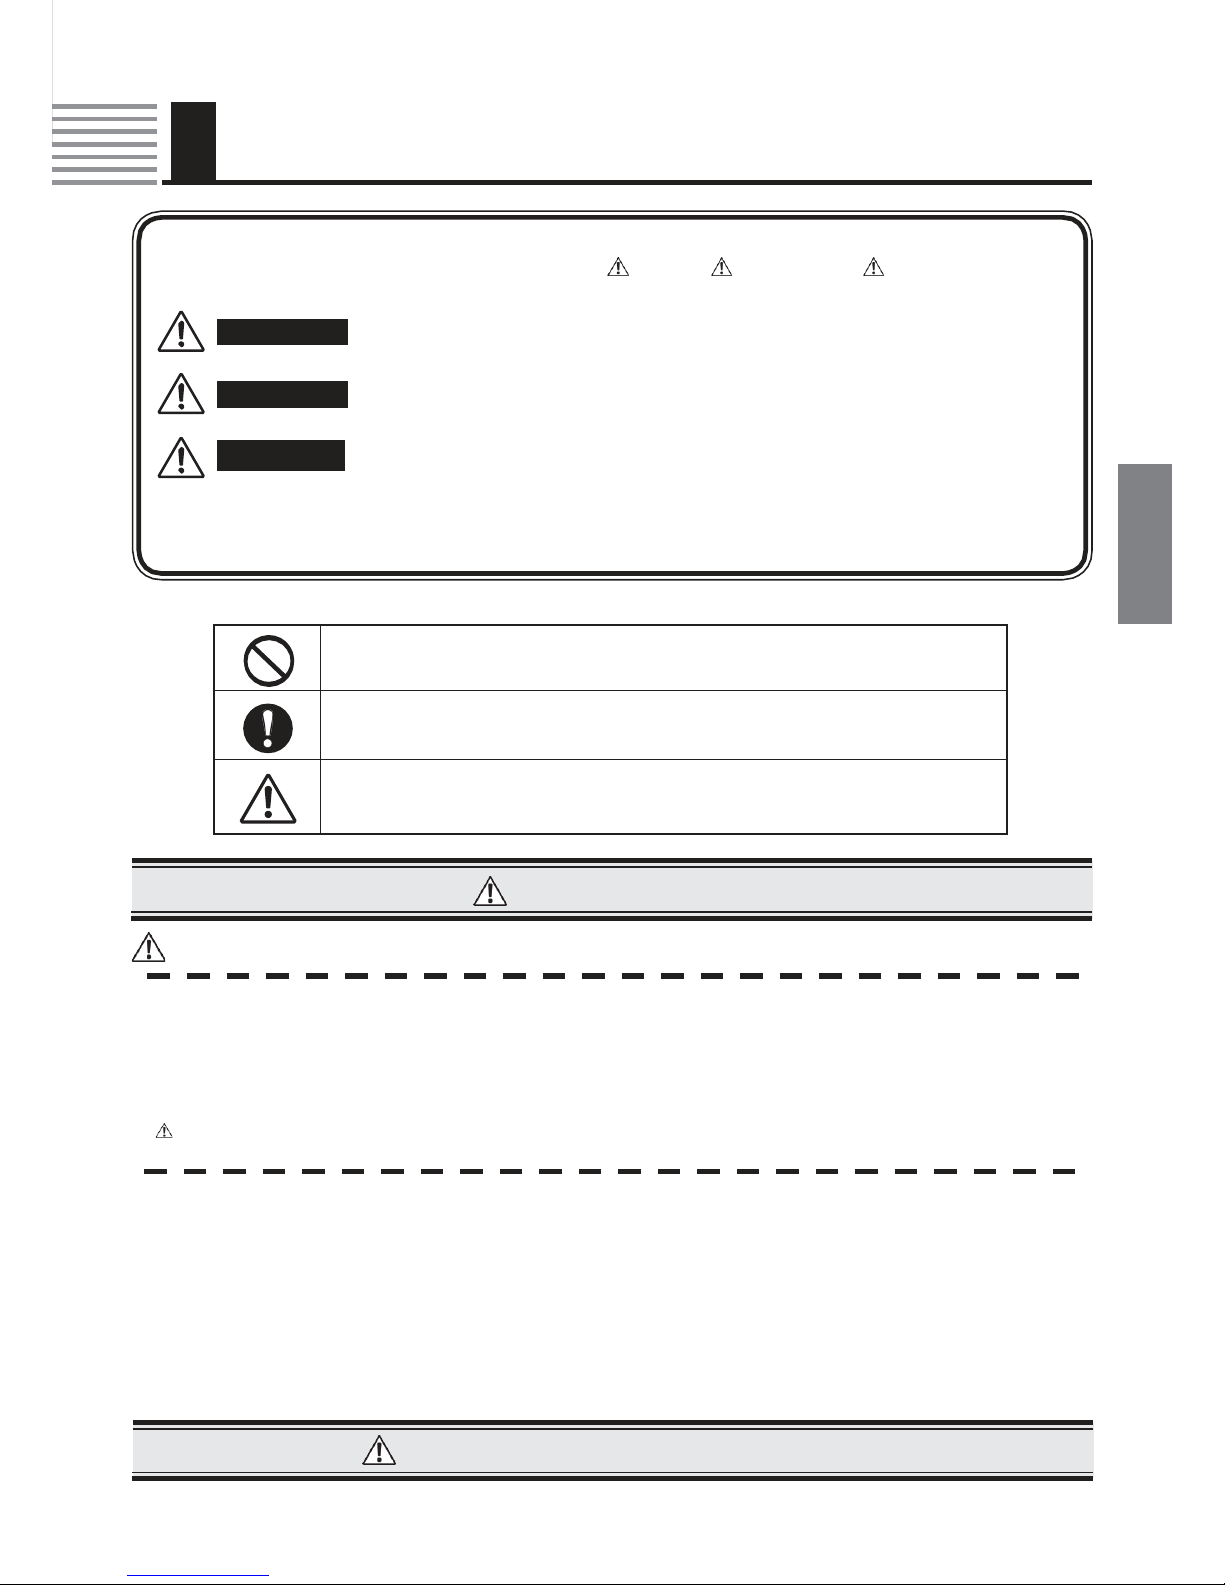
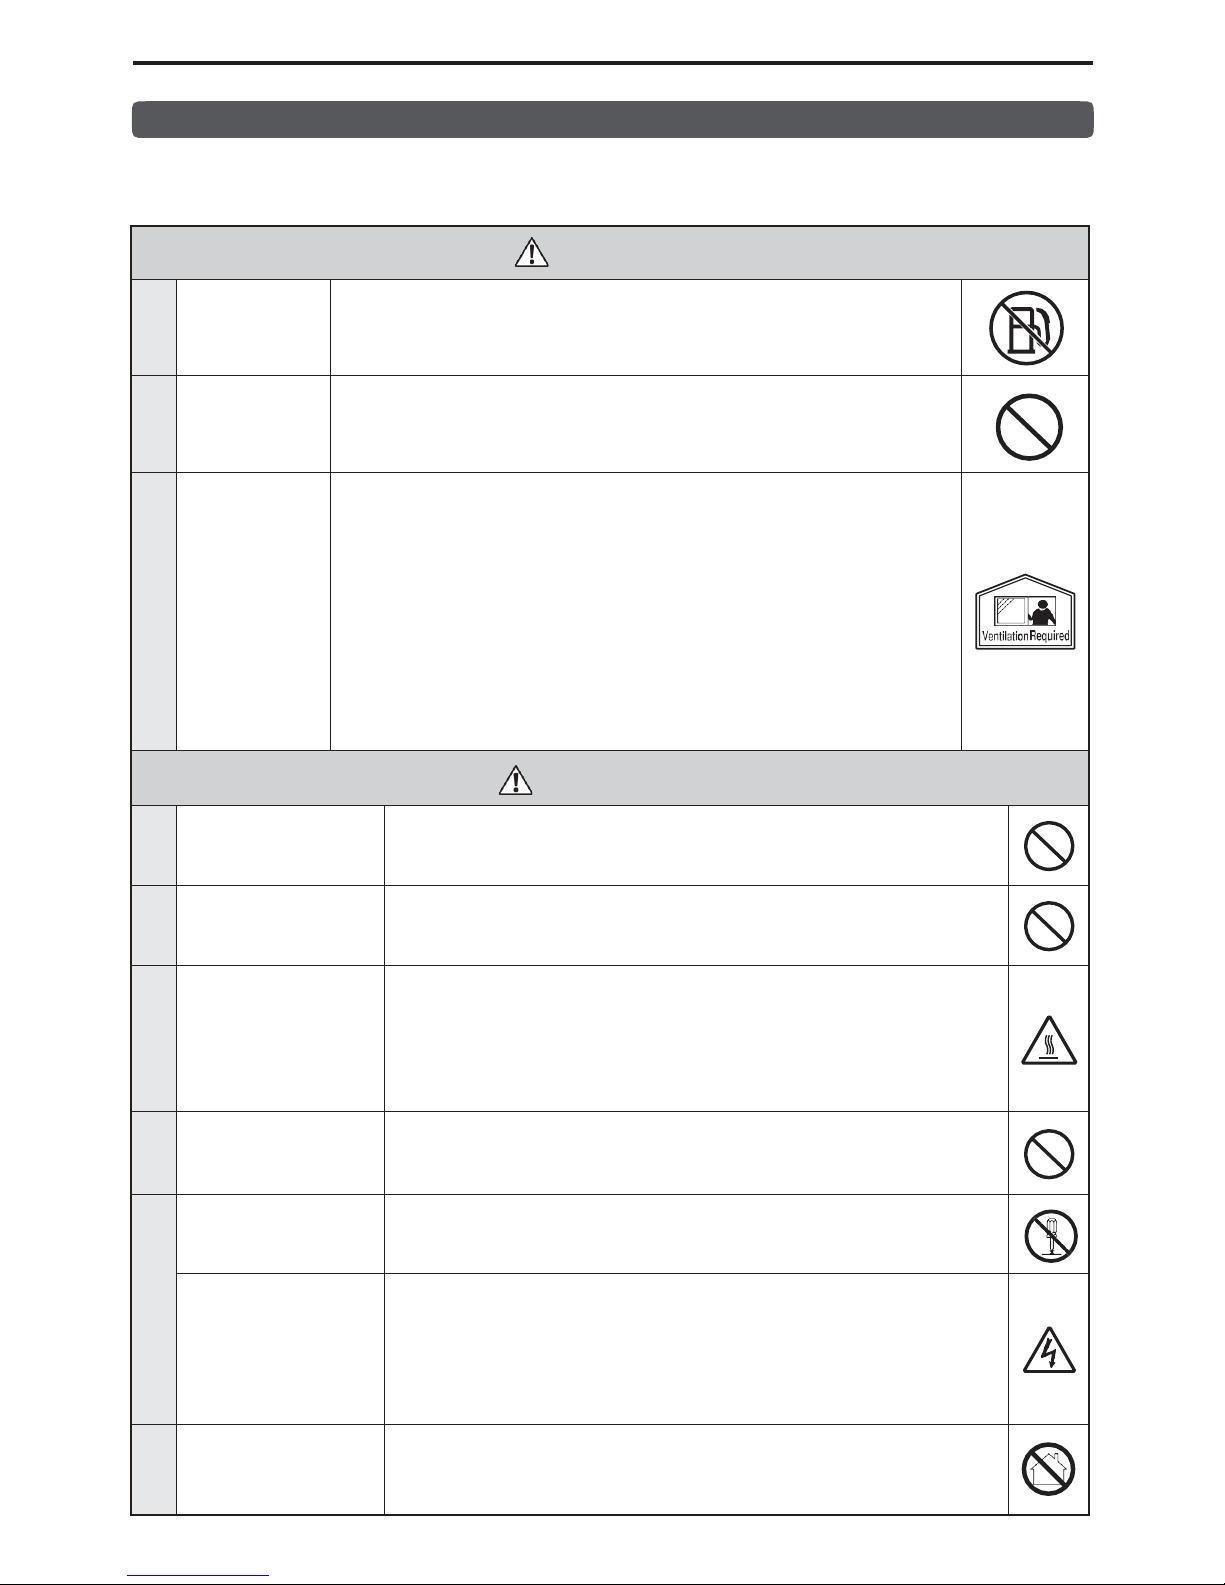
1. Special precautions ........................ 3
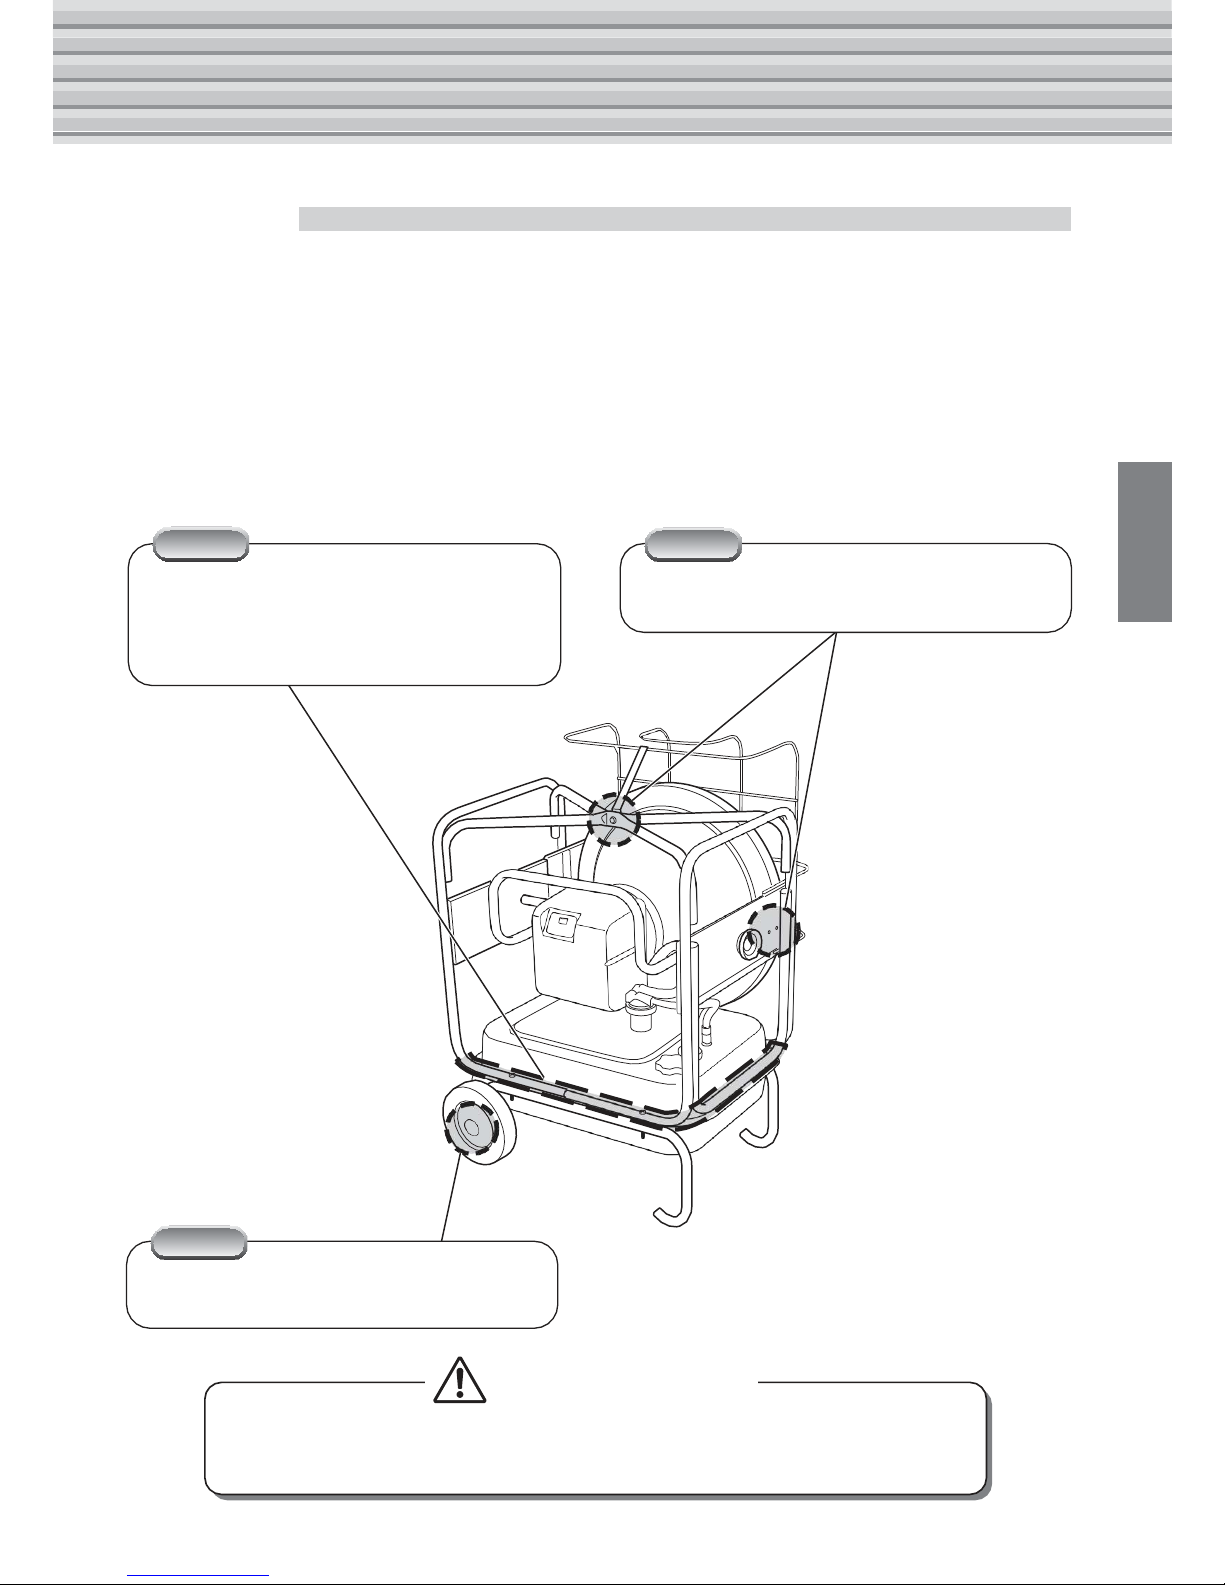
2. Names of components.................... 7
3. How to use....................................... 8
3-1. Preparation for operation........ 8
3-2. Operating procedures ........... 10
3-3. How to connect the
Control Device ........................11
3-4. Use of the HeatShieldingMat ..11
3-5. Operation with Portable
Generator............................... 11
4.
Inspection...................................... 12
4-1. Daily inspection..................... 12
4-2. Periodic inspection ............... 14
5. How to store the heater ................ 14
6. Troubleshooting............................ 15
7. Exchange procedure..................... 15
7-1. Fuse ........................................ 16
7-2. Nozzle ..................................... 16
8. Specifications................................ 17
9. Safety labels.................................. 18
10. Warranty policy ........................... 19
Ta b le d e s m a tiè re s
DIRECTIVES RELATIVES À
L’ASSEMBLAGE .................................... 20
1. Précautions particulières................ 22
2. Nomsdesprincipauxcomposants .. 26
3. Comment l’utiliser ........................... 27
3-1. Préparatifs d’utilisation......... 27
3-2. Procédures d’utilisation........ 29
3-3. Branchement du dispositif de
commande............................. 30
3-4. Utilisation du tapis de
protection thermique ............
30
3-5. Alimentation à partir d’un
groupe électrogène portatif .........
30
4. Inspection ...................................... 31
4-1. Inspection quotidienne.......... 31
4-2. Inspection périodique............ 33
5. Comment entreposer l’appareil
de chauffage .................................. 33
6. Dépannage..................................... 34
7. Méthode de remplacement ........... 34
7-1. Fusible .................................... 35
7-2. Buse........................................ 35
8. Caractéristiques techniques ........ 36
9. Étiquettes de sécurité................... 37
10. Garantie.......................................... 38

1
■
KBE5S
The unit is packaged without having the safety guard and wheel parts assembled.
Prior to assembly, check the heater and supplied parts for possible shipping
damage. If any damage is found, do not proceed further. Immediately notify the
dealer from whom you purchased the heater on how to proceed.
Be sure to assemble the safety guard properly before the unit is used.
Follow the instruction below to assemble the safety guard and wheels parts in the
correct order.
N
No
o.
.2
2
Put the main structure on the wheel frame
and fasten them
with the screws provided.
Screws which are used for temporary joint
in packing are not needed for assembling.
N
No
o.
.3
3
The safety guard must be fastened with the
screws provided.
N
No
o.
.1
1
Put the shaft through the shaft plate, then
mount the wheels, washers and cutter-pins.
CAUTION
To help prevent accidents, never use the unit without the safety
guard.
A
AS
SS
SE
EM
MB
BL
LY
Y
I
IN
NS
ST
TR
RU
UC
CT
TI
IO
ON
N
English

2
■
KBE5L
The unit is packaged without having the safety guard and the visor parts assembled.
Prior to assembly, check the heater and supplied parts for possible shipping damage.
If any damage is found, do not proceed further and immediately notify the dealer from
whom you purchased the heater.
Be sure to assemble the safety guard and the visor properly before the unit is used.
Follow the instruction below to assemble the safety guard and the visor in the correct order.
Visor
Behind view
N
No
o.
.1
1
Safety
guard
Hook
Closeup
N
No
o.
.2
2
N
No
o.
.1
1
At first the safety guard must
be slid under the hook.
N
No
o.
.2
Then the safety guard must be fastened
with the screws provided on both sides.
Safety guard Visor
N
No
o.
.3
Finally, the visor must be fastened with
the 2 screws provided on both sides.
Observation
Before assembling, make sure 6 screws and visor are included in package.
CAUTION
To help prevent accidents, never use the unit without the safety guard.
A
AS
SS
SE
EM
MB
BL
LY
Y
I
IN
NS
ST
TR
RU
UC
CT
TI
IO
ON
N

3
Thank y o u fo r having b o ug ht o ur Infrare d Oil He ate r “VA L6”.
1
Special precautions
■
Following signs, used throughout this Manual, are defined as follows:
Prohibited
(This indicates “actions that are strictly forbidden”.)
Mandatory
(This indicates “actions or instructions” that must be carried out.)
Caution
(This indicates “actions” that require careful attention)
WARNING
●
When operating or servicing this heater, please follow all instructions described in this Manual.
●
When replacing parts, use only the genuine parts made or approved by the manufacturer of the heater. Please note that we shall not be held
responsible or liable for any damage or accident that results from using any unapproved or non-genuine parts.
●
We shall not be held liable or responsible for any damage or accident that results from disobeying or not properly carrying out any instruc-
tions in this Manual, or from the improper modification or operation of the heater.
●
The State of California requires the following warning:
WARNING: COMBUSTION BY-PRODUCTS PRODUCEDWHEN USING THIS PRODUCT CONTAIN CARBONMONOXIDE,ACHEMI-
CAL KNOWN TO THE STATE OF CALIFORNIATO CAUSE CANCER AND BIRTH DEFECTS (OR OTHER REPRODUCTIVE HARM).
1. As we cannot predict every possible situation of danger while operating this heater, the contents described in this Manual could not fully
foresee a whole range of possible dangers. So, when operating or doing daily inspection (to this heater), please pay full attention not only to
the contents of this Manual and the Labels on the heater itself, and also be constantly alert for factors that might affect the safe operation of
the heater. Do not hesitate to stop operation and contact your dealer if you have any questions about any matter not discussed in this Manual.
2. If you have any question or want to know more detailed information about the heater, please contact yourdealer.
3. If any irregular or missing page(s) is found in this Manual, please contact your dealer and we will exchange it with a new one.
4. Please keep the set of Standard Parts supplied with the heater.
5. The operator of the heater is responsible for warning anyone who works around the heater or comes near the heater of the dangers of the
heater and the safety precautions that must thereby be taken pursuant to this Manual.
This Manual aims to supply the user with detailed information on how to properly use, operate and service this VAL6 Heater.
◆ This Manual explains necessary precautions that must be strictly followed for proper and safe op-
eration. Precautions are divided into 3 categories Danger, Warning, and Caution. Please read
and understand well the details and meanings of each category.
“DANGER” means that failure to follow the given precaution (s) may lead
DANGER
WARNING
CAUTION
to death, serious injury and/or major fire.
“WARNING”
means that failure to follow the given precaution (s) may
likely result in death, serious injury, fire and/or possible explosion.
“CAUTION”
means that failure to follow the given precaution (s) may re-
sult in serious injury and/or property damage.
* Depending upon the circumstances, even the category of “CAUTION” can lead to grave damage to persons and/or
property. Caution and recommendation listed in each category are equally important for safe operation, so be sure to
follow the precautions in all 3 categories.
Important Notice
Purpose of this Owner’s Manual
English

4
*
It is important that the safety precautions listed below are understood and followed prior to first
operation of the heater. These precautions must also be followed thereafter.
DANGER
1
Use of gasoline
prohibited
Never use gasoline, for any purpose, for example, for cleaning or as fuel, in
connection with, or around, operation or storage of the heater, as a fire and/or
explosion may result.
2
Use of flamma-
bles prohibited
Never use or store the heater where thinner, gasoline, liquid propane gas, or
other highly flammable vapors, etc., are present, because these may lead to ex-
plosion or fire.
3
Ventilation
required
Never use the heater in poorly ventilated areas. Poor ventilation allows a
buildup of carbon monoxide produced by the heater, especially if there is also
inadequate combustion. CARBON MONOXIDE is a colorless and odorless
poisonous gas that may lead to death or other injury. Always provide a fresh
supply of outside or circulating air whenever the heater is used. Some people
are more affected by carbon monoxide than others, including pregnant women,
persons with heart disease, lung disease, anemia, and/or under the influence of
alcohol. High altitude also creates a higher danger of susceptibility to carbon
monoxide. Danger signs that a person may be suffering from carbon monoxide
poisoning include, headache, dizziness, burning eyes and nose, nausea, and dry
mouth or sore throat. If any of these symptoms occur, immediately seek medi-
cal attention, ventilate the area, and turn the heater off.
WARNING
1Keep aerosol contain-
ers away from the
heater
Never place sealed, pressurized containers (such as aerosol cans) near the heat-
er as exposure to heat from the heater may build up pressure in the container
and cause it to explode with deadly force.
2Never use the heater
where flammable
dusts are present
Never operate the heater where highly flammable dusts (of wood, paper, tex-
tile, etc.) are present. Dusts, after sucked and heated by the heater, will be
blown out “sparked” and cause a fire.
3
Be careful of hot sur-
faces on and around
the heater
Portions of the heater (both while the heater is in operation and for 30 minutes
or more after the heater is turned off), are hot to the touch and may burn the
skin and/or ignite clothing and other combustible materials. Avoid touching
the burner and nearby areas while the heater is in operation and for at least 30
minutes after it is turned off. Also do not move or service the heater while it is
operating or hot.
4
Do not service the
heater while burning
Do not service or handle the heater while burning, in operation, hot or
plugged-in to avoid any injury and/or trouble.
5Modification of the
heater prohibited
Never modify the heater by any means. Any modification may increase the
chance of burns, fires, explosions, or other problems before, during, and after
operation of the heater.
6
Be careful of electri-
cal shock
To avoid electrical shock, never use the heater where exposed to rain, snow
or high humidity. If the heater or any part of it becomes immersed in water,
immediately contact a qualified service agency to inspect the heater and de-
termine if anything needs to be replaced prior to further operation. Make sure
the power plug is disconnected from the electrical outlet, before starting daily
inspection and maintenance.
7Never use the heater
for any residential
application
This heater is for industrial use only. Never use the heater for any residential
application at all time. Wrong use of this heater can result in potential death,
serious injury, fire and/or possible explosion.
To Help Ensure Safe Operation, Comply with the Following Precautions

5
CAUTION
1Keep flammable ma-
terials away from the
heater
To avoid a fire, please keep all flammables more than 2.5m (8.2ft.) away from
the front of the radiation disk, and more than 2m (6.56ft.) away from all sides
(left/right and top/rear) of the heater.
2
Do not block the
heater
To avoid a fire, never place any object within one (1) meter (3.28 feet) from (the
front of) the radiation disk.
3Do not try to ignite
the heater more than
3 times in a row
If the heater does not ignitethe firsttime, do nottry to ignite more than two more times
in a row thereafter because a fire may result. If the heater does not ignite after the third
attempt,stop trying and consultyourdealerprior to furtheroperationoftheheater.
4Do not operate the
heater unattended
Do not leave the heater unattended while it is in operation or cooling down so
that unexpected problems, such as fire, can be dealt with immediately.
5
Placing the heater on
combustible matteror
flooring isprohibited
The heater is for use on non combustible matter or flooring only unless the
shielding mat, part #503002-05001 is used.
Materials of shielding mat : glass cloth and aluminum film
Dimension of shielding mat : 1200 x 1200 x (3.5) mm (L x W x H)
6
Operation of the heater
wheneitherthe heater orthe
operatoriswetisprohibited
Do not use the heater where it is exposed to water, e.g, rain or snow, and do
not operate the heater with wet hands or if it becomes wet. Water contact may
cause an electric shock or other danger or malfunction.
7
Do not use the heater
in high altitudes
When the heater is used in an altitude higher than 1000m (3000 ft) above sea
level, some adjustments will be required. Please contact your dealer about the
adjustments. The heater, if not duly adjusted, may cause a fire.
8Stop using the heater
when anything ir-
regular is found
If a burning smell or smoke occurs during operation of the heater, immediately
turn off the heater and consult your dealer. Further operation may result in a
fire or other hazard.
9
Donotmovetheheater
while in operation
Moving the heater while it is on or otherwise in operation is prohibited. Move-
ment may result in a fire, especially if the heater is overturned or unbalanced.
10
Turn the heater off
before unplugging it
Before taking the electric plug out of the outlet, please make sure the operat-
ing lamp is OFF.
11
Turn off while refueling
Never refill the fuel tank when the heater is on or it is still hot. Refueling while the
heater is still operating or hot may cause a “flash back” of flames to the fuel container
or other hazard, causing serious injury and/or property damage. For the same reason,
refuelingshouldonlybedoneoutdoorsandawayfromanyopenflame.Inaddition,
spilling fuel on a carpet while refueling or otherwise creates an additional fire hazard.
12
Use only the correct
voltage
Only electrical voltage and frequency specified on the model plate must be
used, to avoid a fire, electrical shock and/or damage.
13
Ground the heater
before operation
Prior to operation, confirm that the heater is properly connected to a grounded
power cord and outlet. Attempting to use or operating the heater without prop-
er grounding may result in dangerous electrical shock.
14 Do not pull out the
power plug by pulling
on the power cord
When disconnecting the power cord, always pull out the plug, never the cord,
to unplug the cord. To pull out the cord may damage the cord itself and result
in fire through electrical shock or short circuit.
To Help Ensure Safe Operation, Comply with the Following Precautions
English

6
CAUTION
15
Do not damage the
power cord
Do not place excessive force on the cord by bending, pulling, twisting, pinch-
ing or remodeling. Also, do not place any heavy objects on the heater, etc. that
may damage it, to avoid a fire and electric shock.
16
Use gloves
When cleaning the heater, use gloves, to avoid any injury to hand or fingers.
Use of gloves while operating and moving the heater is also recommended.
17
Make sure the flame
is extinguished and
the power off before
leaving the heater un-
attended
After shutting off the heater, make sure that the flame is extinguished and the
power disconnected before leaving the
heater unattended. It is also not safe
to leave the heater unattended while it is cooling off or to leave it in any area
where children are present or may come upon it.
18
Do not dispose of the
heater illegally
When you dispose of the heater, please do not dispose of it illegally and con-
sult your local authorities or specialists on how to properly dispose of it.
19
Do not use the heater
in the following places
or conditions
To prevent accident or injury, do not use the heater in the following places or
under the following conditions:
•
On vibrating, trembling, or unstable flooring
•
On ladders, scaffolds, or sawhorses
•
On any floor that is slanted, sloped, or not level
•
On stairs or anywhere where it might block access to emergency exits
•
Near unstable or stacked materials
•
In windy, humid, or dusty areas, and areas where metal particles are present
•
In areas where the flow of people or vehicles is impeded or obstructed
Always use caution in determining where to place the heater for use or storage
and take into account both present and potential future dangers.
20
Do not operate in ex-
treme temperatures
Make sure that the heater operates at temperatures between –20oC and 40oC (–
4o and 104o F) for KBE5S and –20oC and 30oC (–4o and 86o F) for KBE5L. If
the heater operates at more than 40oC (104o F) / 30oC (86o F), the heater will
overheat and result in fire.
21 Provide the Owner’s
Manual to the new
owner
If the heater is sold or given to a new owner, make sure that this Owner’s
Manual is transferred to the new owner along with the heater.
22 Do not use fuel of low
quality
Do not use fuel of low quality such as discarded oil or fuel mixed with water.
23 Be careful when
moving or storing the
heater
When the heater is moved or stored, it must be in a level position to avoid a
leakage of fuel.
24
Keep away from chil-
dren
The heater should not be used, cooled, or stored where children could have ac-
cess to it. The heater must not be ignited, operated, maintained, attended to, or
otherwise used in any way by children.
25 Children or the hand-
icapped are not to
operate this heater
This heater is not to be operated by children or physically handicapped or
person without proper knowledge and experience unless they have been given
proper supervision or instruction.
26
Never look directly
straight into the ra-
diation disk
While the heater is in operation, avoid looking straight into the radiation disk.
It may cause eye injury.
To Help Ensure Safe Operation, Comply with the Following Precautions

7
2
Names of components
●
KBE5S
25.8
27.4
q
Burner Cover
w
Burner Handle
q
w
e
r
!3 !4 !0
o
!5
e
Switch Section
r
Transport Handle
t
Wheel
y
Fuel Tank
u
DrainBolt
i
TankLegs
o
Radiation Disk
!0
Knob Bolt
!1
Fuel Cap
!2
Fuel Gauge
!3
Fuel Filter
!4
Fuel Suction and Return Hoses
t
y u
i
!1 !2
!5
Protector
27.9
●
KBE5L
25.9
29.2
(inch) !6 Flame Monitor (Flame Eye)
!7
Fuse
!8
Air intake Motor
!9
Tip-over Switch
@0
Fuel Preheater
q
w
e
r
!3 !4 !0
o
!5
(for KBE5L only)
◆
Burner Section
@0
!8 !7 !6 !9
t
y u
i
28.0
◆
Switch Section
!1 !2
(inch)
●
KBE5S
@2 @3
@1
Operating Switch
This ignites or extinguishes the flame. (Refer to pages 10.)
RUN MISFIRE
@2
Operating Lamp
This is lit while (the heater is) operating and cooling down.
●
KBE5L
ON OFF
@1
@3
Misfire Lamp
This is lit when the flame is extinguished irregularly.
@4 Change-over Switch (for KBE5L only)
This chages over combustion in two step.
@2 @3
RUN MISFIRE When the flame is extinguished, turn “OFF” the operating switch.
ON
OFF
HIGH
LOW
Then turn “ON” the operating switch again after the cause of misfire is solved.
@1 @4
32.1
35.9
36.3
36.4
22.2
22.2
English

8
Description of Safety Devices
!6
Flame Monitor
This automatically extinguishes the flame when ignition fails or flame
goes out during the operation. This monitor, when it detects any irregu-
larity before ignition, automatically extinguishes the flame.
Operating condition: Misfire lamp is lit and Post-Purge continues for three (3)
minutes.
!7 Electric Overload
System (Fuse)
This shuts off the power supply when excessive electric current passes
through, due to irregular trouble of the devices.
Operating condition: The whole operation stops.
!9
Tip-over Switch
Automatically extinguishes the flame when motion or an impact is de-
tected during operation.
Operating condition: Misfire lamp lights and the post purge sequence
will run for about 3 minutes if the heater is in operation.
@0
Fuel Preheater
This Fuel Preheater warms the fuel up to prevent its viscosity from rising.
This starts to operate at the time of plugged-in.
Anomaly detection
system for fan motor
This automatically extinguishes the flame when some errors are detected in fan
motor such as cable disconnection or fan clogging.
3
How to use
3-1. Preparation for operation
■
Refueling
Observations
•
Please use “kerosene” or “Fuel-Oil no heavier than No.2 (Diesel)” and do not use poor quality or foul fuel, to help avoid
ignition, operating, and other problems.
DANGER
•
Never use highly flammable fuel like gasoline, to avoid fire.
•
Never contaminate or mix fuels. For example, never contaminate kerosene with gaso
-
line by using a gasoline container to carry kerosene. Even a small amount of gasoline,
or other volatile fuels, in kerosene is hazardous. Store kerosene only in containers spe
-
cifically labeled and approved for kerosene and do not use the container for any other
fuels or chemicals.
•
Please refuel only while the heater is turned off and completely extinguished.
•
Use only the electric power (voltage and frequency) specified on the model plate of the
heater to operate the heater. Using electrical power different from the specifications
may result in fire, electrical shock, and/or damage.
•
Please confirm the ground/earth cable is properly connected, to prevent electrical shock.
CAUTION • When disconnecting the electric power cord, be sure to always pull the plug out by it-
self. Do not pull out the plug by pulling on the power cord. Also, do not allow or cause
excessive force to be exerted on the cord at any time to avoid damaging it and causing
a fire or shock hazard. The heater should not be operated with the power cord in a taut
or tightened position to further avoid damage to the cord, accidental unplugging of the
electricity, and fire and/orshock.

9
20 degrees
Tighten
20 degrees
Loosen
Remove the fuel cap and insert a suction
pump into the fuel tank.
Watch the fuel gauge while refueling. When
the gauge reaches the maximum level, stop
refueling.
Wipe off any fuel that has spilled onto the
fuel tank or elsewhere.
Replace the fuel cap and tighten it securely.
Do not operate the heater with a loose fuel
cap or without a fuel cap.
■
Adjust the angle of the main unit
Prior to operation, loosen the knob bolt to
move and set the main heater unit at the
desired angle, and tighten the knob bolt
firmly.
The vertical angle of the radiation disk is
adjustable up to 20 degrees.
●
KBE5S
●
KBE5L
■
Connecting the Power Supply
Make sure that the operating switch is
“OFF” , then plug the heater’s power plug
into approved, grounded, three-wire
extension cord.
Plug extension cord into standard 120 volt/
60 Hz, 3-prong grounded outlet.
Extension Cord Size Requirement
•
6 to 10 feet (1.8 to 3 meters) long, use 18
AWG (0.75 mm2) rated cord
•
11 to 100 feet (3.3 to 30.5 meters) long,
use 16 AWG (1.0 mm2) rated cord
AC Outlet
Extension Cord Connect
Grounded Power Pin
CAUTION
•
Do not adjust the angle of the main unit while the heater is plugged in, operating, or hot
to avoid severe burns and electric shock.
•
Do not use an adapter to change the power plug or power outlet from grounded (3
prongs or inlets) to ungrounded (2 prongs or inlets) as this improperly overrides the
CAUTION safety function in grounding the heater by the provided power plug. Also if the power
cord or plug need to be replaced, please be sure to replace it only with genuine or man-
ufacturer-approved replacement parts.
1
3
2
1
2
English

10
•
To make sure the heater is ignited, please do not leave the heater until you confirm that it is burning and otherwise func-
tioning properly.
RUN
MISFIRE
ON
OFF HIGH
LOW
3-2. Operating procedures
■
IgnitionProcedures
Observations
Use the fuel gauge to check if the fuel is
sufficiently filled up in the tank.
Operating Switch “ON”
Turn “ON” the operating switch, and the
operating lamp will light and the heater will
ignite in about 5 seconds.
Stop the operation completely. Wait for the operating lamp to turn off. After the operating lamp has
turned off, try step 2 above again. DO NOT TRY TO IGNITE THE HEATER MORE THAN THREE
TIMES IN A ROW AS FIRE MAY RESULT.
■
Changingcombustion speed(forKBE5Lonly)
The heater has two-step combustion and it
can be changed by change-over switch.
■
Shut-DownOperation
Change-over switch
Observations
•
Before you disconnect the power plug from the AC outlet, please make sure that the air intake motor is stopped.
•
Never disconnect the power plug while the heater is operating, it will cause nozzle to be clogged.
CAUTION
•
After the operation is shut down, please make sure that the flame is completely extin-
guished before leaving the heater unattended or moving or storing it.
CAUTION
•
If you detect smoke or a burning smell coming from the heater, turn the heater off im-
mediately to help prevent a fire, contact your dealer and the heater inspected before
further operation.
•
More than three consecutive attempts to ignite the heater may cause a fire. If the heater
does not ignite after three consecutive attempts, stop trying and contact your dealer for
an inspection of the heater.
•
When using the heate
r, be careful so that the floor surface (in front of it ) may not get
overheated.
•
Do not operate the heater, while fuel tank is dirty and foul, to prevent poor ignition or
improper burning.
If ignition fails, try again as follows
RUN
MISFIRE
ON
OFF
1
2

11
Turn “OFF” the operating switch, and the
heater flame will be extinguished, then the
cooling operation will also automatically
stop after about three (3) minutes, and fi-
nally the operating lamp will turn off.
Operating switch “OFF”
3-3. How to connect the Control Device
Uncouple the terminals (A) attached to the
tip of white wires that come out of the burn-
er base.
Connect both male and female terminals,
which are uncoupled, to the connectors (B)
of control device.
Terminals (A)
To Control Device
Connectors (B)
3-4. Use of the Heat Shielding Mat
To avoid unexpected fire or trouble, NEVER
use the heater on combustible flooring un-
less the heat shielding mat, which is avail-
able as an option, is used.
Heat shielding mat
3-5. Operation with Portable Generator
The heater operates within the voltage
range of 108 Volts to 132 Volts. Before
plugging the heater into the generator, the
output voltage of generator should be veri-
fied.
If the voltage does not measure in this
range, the heater should not be plugged
into the generator.
•
When the heater is controlled by another device (such as a thermostat or a timer), the
heater could turn itself on at any time.
CAUTION •When the heater is controlled by another device, extra care must be taken to ensurethat
the heater is not accidentally turned on without someone nearby who can immediately
attend to any problems when the heater is ignited, operating, and cooling off.
To connect the control device
WARNING
•
Before operating the heater from a portable generator, please confirm that the genera-
tor has been properly connected to the ground earth. To operate the generator without
proper grounding may result in electrical shock. Please refer to
the owner’s manual
supplied by the generator’s manufacturer.
RUN
MISFIRE
ON
OFF
1
2
English

12
4
Inspection
4-1. Daily inspection
■ Inspection of the filter and drainage of water from the fuel tank
Check whether or not the filter element is
dirty or fouled.
In case the filter element is dirty or clogged,
please replace it with a new one, and bind
the cup firmly with the tightening ring.
If water has collected in the cup, discard the
water. Also, water in the cup means there is
water in the tank as well. Follow the instruc-
tions on page 13 and drain the water from
the fuel tank.
Fuel Strainer
Element
Tightening Ring
Loosen
Remove
Element
●
KBE5S
O Ring Gasket
Holddown spring
Cup
Tightening Ring
●
KBE5L
O Ring Gasket
Holddown spring
Tightening Ring
Fuel Preheater
Cup
Remove the fuel cap and insert a suction
pump into the tank.
Remove as much fuel as possible (with the
suction pump). Be sure that the fuel being
removed is put only into a can or other con-
tainer approved in your area for holding
flamable liquids such as kerosene and Fu-
el-Oil no heavier than No.2 (Diesel)
Drainage of water from the fuel tank
WARNING
•
Never inspect or service the heater while it is burning, in operation, hot or plugged-in
to avoid any injury and/or trouble.
CAUTION
•
Before starting any inspection or service, to avoid electric shock, please make sure the
heater is shut down and that the power cord is disconnected.
•
When cleaning the heater, please wear gloves to prevent possibleinjury.
Observations
•
Prior to each operation check the heater for signs of damage. Do not operate a damaged heater. Have it inspected and
repaired by a qualified serviceagency.
•
Prior to each operation check the heater for signs of fuel leakage. Do not operate a heater with fuel leakage. Have it in-
spected and repaired by a qualified serviceagency.
CAUTION
•
Fuel preheater must be hot. Do not replace the filter element while the heater is plugged
in, operating or hot to avoid severe burns.
Checking the filter element
Observations
•
Do not operate the heater without the filter element.
1
3
2
1
2

13
3 Tighten the fuel cap firmly. Prepare an empty container of about 3 liters
(0.7gallons) capacity: to hold kerosene and
water remaining in the fuel tank, place the
container under the drain bolt (of the fuel
tank).
Next, use a 24mm wrench to remove the
drain bolt and tilt the fuel tank until the fuel is
completely drained out of the tank. (At the
same time, be careful not to lose the drain
bolt packing.)
•KBE5S •KBE5L
Restore the drain bolt packing and tighten the
drain bolt firmly so that fuel can not leak out
(of the fuel tank).
Wipe off kerosene or water spilled over the
tank and the surrounding area.
Be sure to dispose of in a safe manner as
approved in your local area the kerosene,
etc, placed in the empty container and the
materials used to clean up any spilled kero-
sene, etc. Safely clean and/or dispose of
the empty container as also approved in
your local area.
Wrench
(24mm)
Loosen
Drain bolt
packing
Drain bolt
■
Inspection and cleaning of the flame monitor
Observations
•
When removing the flame monitor, hold it by its main assembly; do not pull out the cord.
Unscrew two screws of burner cover and
remove the burner cover. Pull out the flame
monitor and check whether or not its lens is
dirty/foul.
If the lens is dirty/foul, clean the surface of
the lens with a soft cotton swab or cloth until
it is clear. Do not use any cleansers of any
type, e. g., glass cleaner, to clean the lens.
Replace the flame monitor. Then securely
replace the burner cover using the provided
screws.
Screw
Burner cover
Flame Monitor
Lens Pull out
Cotton Swab
Soft Cloth
Flame Monitor
4
5
6
7
8
1
2
3
English

14
■
Inspection of “dirt/dust” on the main unit
Check whether or not dirt/dust is on and
around the heater.
If dirt or dust is found, remove it with a vacu-
um cleaner or a soft, non-abrasive, cloth. Do
not use any cleansers of any type, especially
spray cleansers, as they may leave a resi-
due or infiltrate the operating mechanism of
the heater and cause a fire, clog or other-
wise damage theheater.
4-2. Periodic inspection
The heater must be checked periodically, and especially after periods of sustained or heavy use,
for safe and proper operation, and for service maintenance. Have your dealer inspection of the
heater no less than twice a year.
5
How to store the heater
When you store the heater, please disconnect the power plug from the extension cord and/or the
AC outlet and store the heater indoors where it is less humid.
CAUTION
•
If the heater is stored or not used for an extended period of time, empty the fuel tank to
help prevent fuel leakage and other possible fire dangers.
Observations
•
Do not store the fuel over summer months for use during next heater season. Using old fuel could damage the heater.
1
2

15
6
Troubleshooting
■ When you face problems with your heater, please refer to this check-
list before consulting with your dealer.
In case satisfactory results do not result by referring to the table, or you have problems not described in
this table, please contact your dealer. While consulting with him, please describe the problem you have,
together with model name and serial number of your heater.
(For finding the heater’s serial number, please refer to page 18.)
Phenomenon
Possible Cause Remedy
The heater does notstart.
(The lampdoes not lightup.)
Power cord is not connected with an
AC outlet. Power supply is cut off.
Please connect the power cord with an AC outlet,
and check the power supply.
Blown fuse
Replace fuse with a new one.
(Please refer to page 16.)
The heater does not start.
(The lamp is lit.)
Safety devices are working.
Please confirm if “Flame Monitor” is exposed to any type of light
(sunlight or electric lamp, etc.), and move the heater to prevent
the radiation disk from detecting any type of light directly.
The heater does not ig-
nite.
No fuel in the fuel tank.
Please pour fuel into the tank.
There is water in the fuel tank.
Please clean up the tank and fillit with fresh/clean fuel.
Fuel filter element is clogged.
Check the filter element and replace it with a new one.
Nozzle is clogged
Replacenozzlewithanewone.
(Pleaserefertopage16.)
The flame goes out dur-
ing the operation.
Wrong or foul fuel is used.
Please clean up the fuel tank and fill it with fresh/
new fuel.
Flame monitor is dirty.
Please clean up the Flame Monitor
(Please refer to page 13).
Fuel filter element is clogged.
Please check the filter element and replace it with a
new one.
If the following phenomenon takes place, it is usually not a sign of trouble. Please check
again before consulting with your dealer.
Phenomenon
Explanation
When used for the first time, smoke or
smell comes out of the heater.
Because fuel is burning together with dusts, etc. This phenomenon will
disappear after a short while.
At the time of ignition or shut-down of the
heater, noise comes from the burner section.
Noise is caused by expansion or shrinkage of the burner section due to
temperature’s up and down. This is not irregular.
7
Exchange procedure
WARNING
•
Never service the heater while it is burning, in operation, hot or plugged-in to avoidany
injury and/or trouble.
•
Before starting any service, to avoid electric shock, please make sure the heater is shut
CAUTION down and that the power cord is disconnected.
•
When servicing the heater, please wear gloves to prevent possibleinjury.
English

16
7-1. Fuse
Unscrew two screws of burner cover and
remove the burner cover.
Unscrew the screw cap of fuse holder and
take out the fuse.
3 Replace with a new one.
4 Put the screw cap back into fuse holder.
Put the burner cover back with two screws
removed.
Screw
Unscrew two screws and take
burner cover off
Open a screw cap and take out a fuse
7-2. Nozzle
Remove three nuts from burner attachment
bolts and take the burner assembly off.
Remove the nozzle using the nozzle
wrench provided as standard parts.
Replace with a new nozzle.
Nut
Unscrew three nuts and take the burner off
Nozzle
Tighten the nozzle using the nozzle wrench
until the nozzle is fixed.
Burner assembly Put the burner assembly back with three
nuts removed.
Loosen
Observations
•
Place the burner assembly taken out within the reach of two fuel hoses.
Screw cap
Fuse
Check whether
the fuse
is blown
out
1
2
5
1
2
3
4

17
8
Specifications
Model Number VAL6KBE5S VAL6KBE5L
Model Number
VAL6KBE5S VAL6KBE5L
Type Radiated direct flame
Power Supply
AC120V (60Hz)
Ignition System
High intensity discharge Power
Consumption
•
Whenigniting:100W
•
When burning: 80 W
•
When igniting: 150W
•
When burning:120 W
Fuel
Kerosene or Fuel-Oil no heavier than No.2(Diesel)
Fuel Consumption
0.85 gallons/h,
2.67kg/h
High : 0.90 gallons/h, 2.82kg/h
Fuse Type
3A
Low : 0.75 gallons/h, 2.32kg/h
Noise Level
69dB (A) High : 72dB (A)
Heat Output 111,000BTU,
32.5kW
High : 118,000BTU, 35kW
Low : 71dB (A)
Low : 100,000BTU, 29kW
Safety System
•
Flame Monitor (Flame Eye)
•
Surge Protection System
•
Tip-over switch
Tank Capacity
9 gallons
15 gallons
Continuous Oper-
ating Time
10 hours High : 16 hours
Low : 20 hours
Standard Parts
•
Filter Element x 2
•
Nozzle x 1
•
Nozzle Wrench x 1
•
Oil Seal x 2
Dimensions (inch)
(H x W x D)
36.4 x 27.9 x 27.4 36.3 x 28.0 x 29.2
Disk Diameter 22.2
Weight (Dry) 83.8 lbs, 38kgs. 92.6 lbs, 42kgs.
Wiring Diagram
●
KBE5S
●
KBE5L
English

18
●
KBE5S
q
e
u
y
9
Safety labels
●
Safety labels provide important information for safe use of the heater. So, please do not remove or soil them.
●
If any of the labels is unreadable or removed, please ask your dealer for a new one and replace with the new one.
q
Danger Label
w Hot Surface Caution Label
50300–203–002
w
●
KBE5L
w
q
r
e
r
i
t t
y
e
Caution Label
r
FloorTemperatureCautionLabel
u
SpecificationsLabel
i
SpecificationsLabel
t
Caution on Refueling Label
y
Warning Label
VAL6KBE5L
H : 118000BTU/h, 35kW
L : 100000BTU/h, 29kW
H: 0.9GAL/h, 2.82kg/h
L: 0.75GAL/h, 2.32kg/h
Kerosene or Fuel-Oil no heavier than
NO.2 (Diesel)/Kerosene ou gasoil.
WARNING/AVERTISSEMENT
DO NOT TOUCH HOT SURFACE
NE PAS TOUCHER, SURFACE CHAUDE
This manual suits for next models
1
Table of contents
Languages:
Other Val6 Heater manuals