Valentin WMX 5001 User manual


Copyright by Carl Valentin GmbH / 7997315.1023
Information on the scope of delivery, appearance, performance,
dimensions, and weight reflect our knowledge at the time of printing.
We reserve the rights to make modifications.
All rights, including those regarding the translation, are reserved.
No part of this document may be reproduced in any form (print,
photocopy, or any other method) or edited, copied, or distributed
electronically without written permission from Carl Valentin GmbH.
Due to the constant further development of our devices discrepancies
between manual and device can occur.
Please check www.carl-valentin.de for the latest update.
Due to the constant further development of our devices discrepancies
between manual and device can occur.
Please check www.carl-valentin.de for the latest update.
Trademarks
All named brands or trademarks are registered brands or registered
trademarks of their respective owners and may not be separately
labelled. It must not be concluded from the missing labelling that it is
not a registered brand or a registered trademark.
The following products are covered in this manual
WMX 5001
right side, spring mounted
ILX 5X, right version
WMX 5101
left side, spring mounted
ILX 5X, left version
WMX 5201
right side, spring mounted
ILX 8X, right version
WMX 5301
left side, spring mounted
ILX 8X, left version
Carl Valentin GmbH
Postfach 3744
78026 Villingen-Schwenningen
Neckarstraße 78 –86 u. 94
78056 Villingen-Schwenningen
Phone
Fax
+49 7720 9712-0
+49 7720 9712-9901
E-Mail
Internet
www.carl-valentin.de

Wipe-On Applicators
Table of Contents
10.23
Operating Manual
3
Table of Contents
1Introduction............................................................................ 5
1.1 General Instructions ................................................................ 5
1.2 Intended Use........................................................................... 6
1.3 Safety Instructions................................................................... 6
2Product Description.............................................................. 9
2.1 Product Designation................................................................ 9
2.2 Function................................................................................... 9
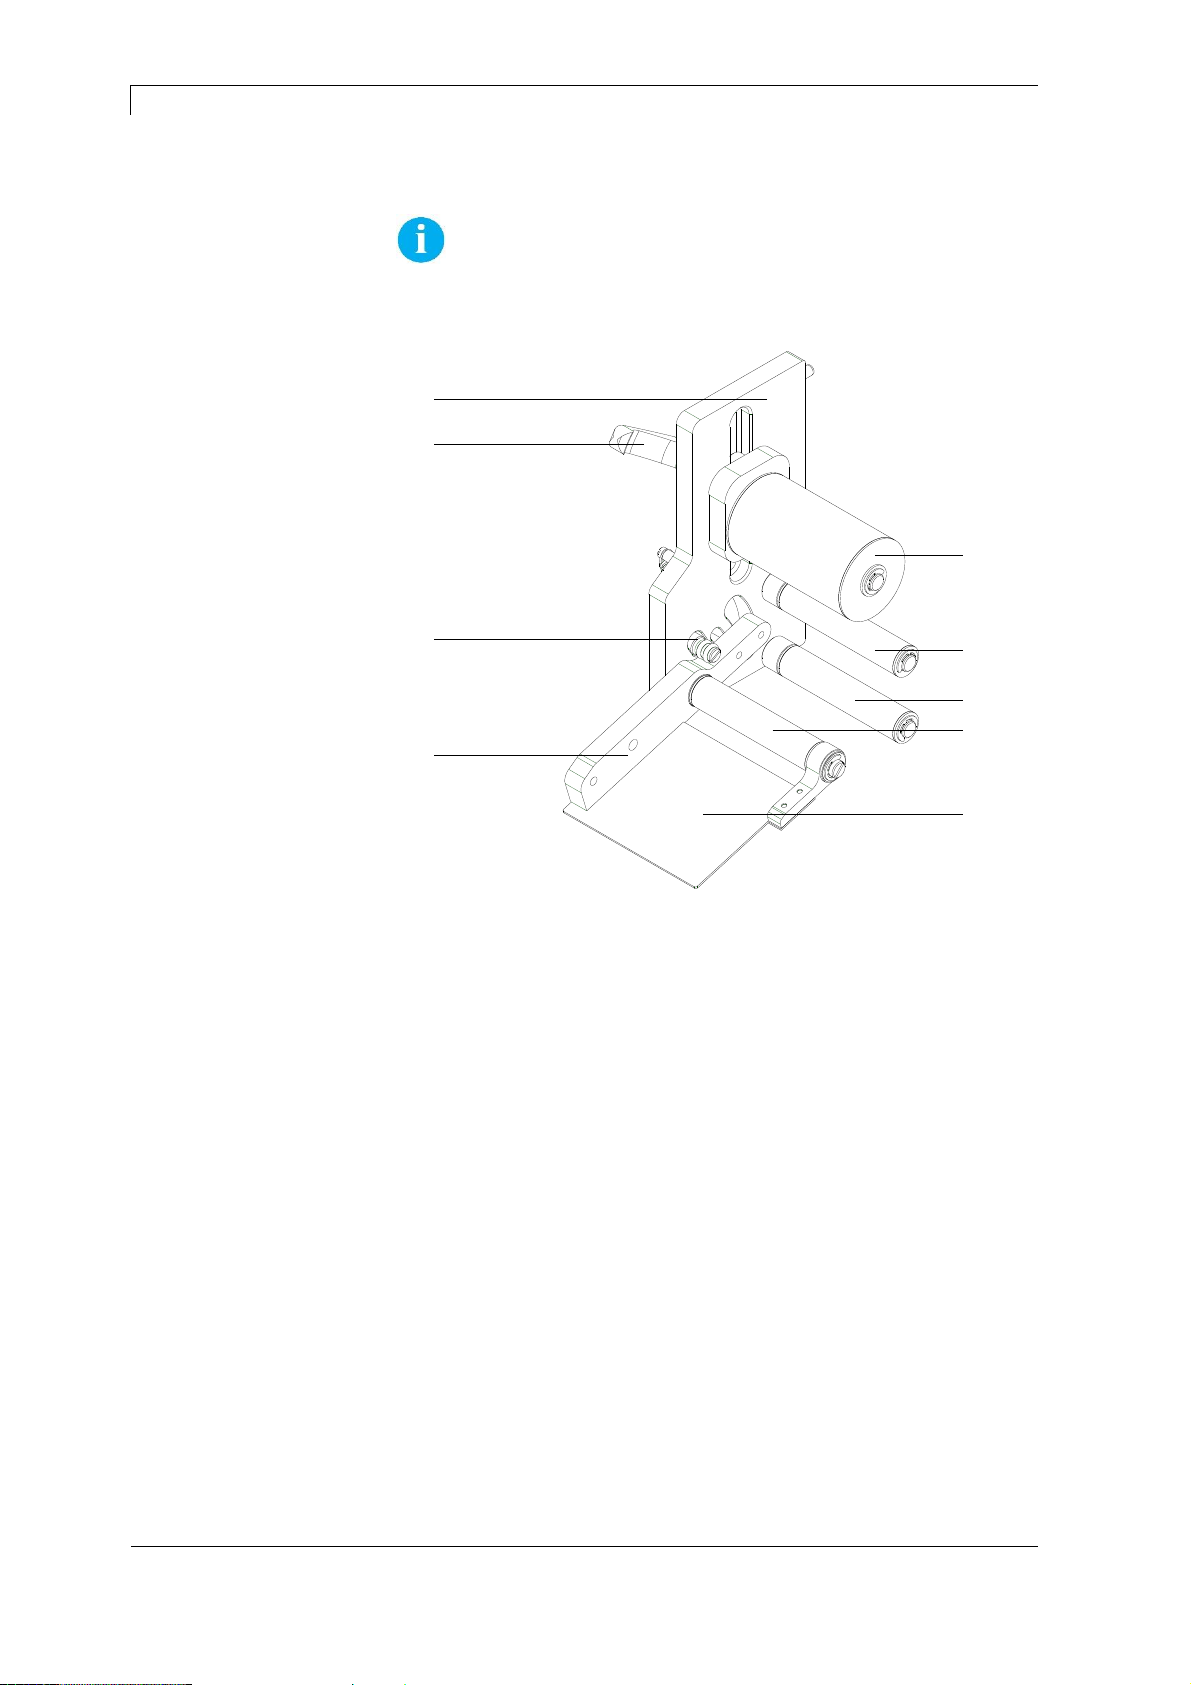
2.3 Overview................................................................................ 10
3Technical Data..................................................................... 11
4Installation............................................................................ 13
4.1 Unpack the Wipe-On Applicator............................................ 13
4.2 Scope of Delivery .................................................................. 13
4.3 Connect the Transducer to Printing System ......................... 13
4.4 Connect the Wipe-On Applicator........................................... 14
4.5 Install the Pressure Roller (Optional) .................................... 15
4.6 Install the Pressur Brush (Optional) ...................................... 15
4.7 Insert the Label Material........................................................ 16
4.8 Adjust the Displacement Unit................................................ 17
5Adjustments......................................................................... 19
5.1 Adjust the Dispensing Angle ................................................. 19
5.2 Adjust the Pressur Roller (Optional)...................................... 21
5.3 Adjust the Pressure Brush (Optional).................................... 22
5.4 Adjust the Labelling Position................................................. 23
6Options................................................................................. 25
6.1 Product Sensor...................................................................... 25
7Environmentally-Friendly Disposal................................... 27
8Index ..................................................................................... 29

Table of Contents
Wipe-On Applicators
4
Operating Manual
10.23

Wipe-On Applicators
Introduction
10.23
Operating Manual
5
1 Introduction
1.1 General Instructions
Important information and instructions in this document are
designated as follows:
DANGER identifies an extraordinarily great and immediate
danger which could lead to serious injury or even death.
WARNING identifies a possible danger could lead to
serious bodily injury or even death if sufficient precautions
are not taken.
WARNING of cutting injuries.
Pay attention that cutting injuries caused by blades, cutting
devices or sharp-edged parts are avoided.
WARNING of hand injuries.
Pay attention that hand injuries caused by closing
mechanical parts of a machine/equipment are avoided.
WARNING of hot surfaces.
Pay attention so as not to come into contact with hot
surfaces.
CAUTION indicates a potentially dangerous situation
which could lead to moderate or light bodily injury or
damage to property.
NOTICE gives you tips. They make a working sequence
easier or draw attention to important working processes.
Gives you tips on protecting the environment.
Handling instruction
Optional accessories, special fittings
Time
Information in the display

Introduction
Wipe-On Applicators
6
Operating Manual
10.23
1.2 Intended Use
The device is a state-of-the-art device which complies with the
recognized safety-related rules and regulations. Despite this, a danger
to life and limb of the user or third parties could arise and the device
or other property could be damaged while operating the device.
The device may only be used while in proper working order and for
the intended purpose. Users must be safe, aware of potential dangers
and must comply with the operating instructions. Faults, in particular
those which affect safety, must be remedied immediately.
The device is intended exclusively as a peripheral unit for the printing
systems of ILX series to apply suitable materials that have been
approved by the manufacturer. Any other or additional use is not
intended. The manufacturer/supplier is not liable for damage resulting
from misuse. Any misuse is at your own risk.
Intended used includes heeding the operating manual, including the
maintenance recommendations/regulations specified by the
manufacturer.
1.3 Safety Instructions
Couple the applicator to devices using extra low voltage only.
Before making or undoing connections, switch off all devices involved
(computer, printer, accessories etc.).
Operate the applicator in a dry environment only and do not get it wet
(sprayed water, mist etc.).
Do not operate the applicator in explosive atmosphere and not in
proximity of high voltage power lines.
Do not operate the applicator in explosive atmosphere and not in
proximity of high voltage power lines.
Maintenance and servicing work can only be carried out by trained
personnel.
Operating personnel must be trained by the operator on the basis of
the operating manual.
WARNING!
Danger of injury from rotating parts!
During operation, the rotating parts are freely
accessible. When working on the device wear tightly
fitting clothes and tie up long hair. Loosely hanging
pieces or long hair can get caught in parts of the device.
Never use highly inflammable consumables.

Wipe-On Applicators
Introduction
10.23
Operating Manual
7
Carry out only the actions described in these operating instructions.
Any work beyond this may only be performed by the manufacturer or
upon agreement with the manufacturer.
Unauthorized interference with electronic modules or their software
can cause malfunctions.
Other unauthorized work or modifications to the device can endanger
operational safety.
Always have service work done in a qualified workshop, where the
personnel have the technical knowledge and tools required to do the
necessary work.
There are warning stickers on the device that draw your attention to
dangers. Therefore the warning stickers are not to be removed as
then you and others cannot be aware of dangers and may be injured.

Introduction
Wipe-On Applicators
8
Operating Manual
10.23

Wipe-On Applicators
Product Description
10.23
Operating Manual
9
2 Product Description
2.1 Product Designation
Designation
Specification
Device Type
WMX 5001
right side,
spring mounted
ILX 56/8, ILX 54/12,
right side
WMX 5101
left side,
spring mounted
ILX 56/8, ILX 54/12,
left side
WMX 5201
right side,
spring mounted
ILX 80/8, ILX 81/12,
right version
WMX 5301
left side,
spring mounted
ILX 80/8, ILX 81/12,
left version
2.2 Function
The described wipe-on applicators are additional modules for the
printing systems of ILX series and serve the automatic application of
printed labels onto a product. The application of labels is made with
the so-called wipe-on procedure. Here the printed label is removed
from the backing paper and taken from the dispenser of the wipe-on
applicator, then rolled on the product with the pressure roller or
applied on the product with the pressure brush.
The operation of printing system with wipe-on applicator requires the
use of an external start signal (see chapter 6.1, page 25).

Product Description
Wipe-On Applicators
10
Operating Manual
10.23
2.3 Overview
NOTICE!
The figure of overview applies to wipe-on applicators
WMX 5001 / 5101 / 5201 / 5301 - right version.
B
C
D
E
H
I
A
G
F
Figure 1
A =
Return pulley
B =
Return pulley
C =
Return pulley
D =
Return pulley
E =
Dispensing edge
F =
Rocker lever
G =
Stop bolt
H =
Clamping lever for return pulley
I =
Base plate

Wipe-On Applicators
Technical Data
10.23
Operating Manual
11
3 Technical Data
Wipe-on applicator
WMX 5001 / 5101
WMX 5201 / 5301
Print module
ILX 56/8 and ILX 54/12
ILX 80/8 and 81/12
Passage width
60 mm
90 mm
Min label width
20 mm
20 mm
Min label height
15 mm
15 mm
Max label height
130 mm
130 mm
Buffer length from printhead to
dispensing edge
296.0 mm - 389.0 mm
296.0 mm - 389.0 mm
Distance bottom edge printing
system to labelling level
14.9 mm1- 38.5 mm2
14.9 mm1- 38.5 mm2
Weith
0.8 kg2
1.0 kg2
1
The indication refers to the minimum dispensing angle
2
The indication refers to the maximum dispensing angle

Technical Data
Wipe-On Applicators
12
Operating Manual
10.23

Wipe-On Applicators
Installation
10.23
Operating Manual
13
4 Installation
4.1 Unpack the Wipe-On Applicator
Lift the wipe-on applicator out of the box.
Check the wipe-on applicator for transport damages.
Check delivery for completeness.
4.2 Scope of Delivery
•Wipe-on applicator
•2x holding shaft (length 300 mm).
•1x mounting angle
•4x cylinder screw M5x12
•4x washer
•Documentation
NOTICE!
Retain original packaging for subsequent transport.
4.3 Connect the Transducer to Printing System
The use of the printing system with wipe-on applicator requires the
utilization of an external start signal.
E.g. the optionally available product sensor for the external start signal
can be attached to the printing system
For detailed information refer to chapter 6.1, page 25).

Installation
Wipe-On Applicators
14
Operating Manual
10.23
4.4 Connect the Wipe-On Applicator
NOTICE!
The figure of overview applies to wipe-on applicators WMX
5001 / 5101 / 5201 / 5301.
A
B
C
D(4x)
E(4x)
F G
Figure 2
1. Insert the cylinder pins (B) on the wipe-on applicator into the
intended drillings of the carrier plate (A) of the printing system.
2. Attach the mounting angle (F) with the washers (D) and screws
(E) to the front plate (G) of the printing system and the base plate
(C) of the wipe-on applicator.

Wipe-On Applicators
Installation
10.23
Operating Manual
15
4.5 Install the Pressure Roller (Optional)
A B C
Figure 3
NOTICE!
The figure of overview applies to
wipe-on applicators WMX 5001 /
5101 / 5201 / 5301
Fix the pressure roller (C) with the washer
(B) and clamping lever (A) to the wipe-on
applicator.
4.6 Install the Pressur Brush (Optional)
NOTICE!
The figure of overview applies to wipe-on applicators WMX
5001 / 5101 / 52001 / 5301.
A B C
Figure 4
Fix the pressure brush (B) with the
washer (B) and clamping lever (A) to
the wipe-on applicator.

Installation
Wipe-On Applicators
16
Operating Manual
10.23
4.7 Insert the Label Material
NOTICE!
The figure of overview applies to wipe-on applicators WMX
5001 / 5101 / 5201 / 5301.
F
E BCD A
Figure 5
1. Insert the label material (B) according to the label run up to the
dispensing edge (E) of the printing system.
NOTICE!
For a detailed description for inserting material into the
printing system please refer to the chapter Inserting Material
in the operating manual of the printing system.
2. Move the return pulley (F) of the displacement unit upwards
against the stop for a better positioning of the label material (see
chapter 4.8, page 17).
3. Pull out the label material as long as it reaches to the backing
paper rewinder (A).
4. Remove all labels from the pulled out label material.
5. Insert the backing paper in arrow direction into the wipe-on
applicator. Guide the backing paper according to the operating
manual of the printing system to the rewinder (A).
Label run - Printing
system and wipe-on
applicator

Wipe-On Applicators
Installation
10.23
Operating Manual
17
4.8 Adjust the Displacement Unit
NOTICE!
When changing the label height it is necessary to move the
return pulley of displacement unit (F) in order to bring the
beginning of the label material into a suitable apply position.
G
HF
Figure 6
NOTICE!
The angle position of clamping lever (G) can be changed by
pressing the disengaging knob (H).
1. Turn the clamping lever (G) against clockwise direction in order to
loosen the return pulley of the displacement unit (F).
2. Push the displacement unit into the desired position.
3. Turn the clamping lever (G) in clockwise direction to tighten the
return pulley of the registration unit (F).

Installation
Wipe-On Applicators
18
Operating Manual
10.23

Wipe-On Applicators
Adjustments
10.23
Operating Manual
19
5 Adjustments
5.1 Adjust the Dispensing Angle
NOTICE!
The figure of overview applies to wipe-on applicators WMX
5001 / 5101 / 5201 / 5301.
C A
B
D
Figure 7
1. Move the dispensing rocker (D, Figure 5) forwards/upwards by
pulling out the knurled knob (C, Figure 5).
2. Loosen the screw (C).
3. Change the angle position of dispensing edge (B) as required. For
this shift the stop bolt (A) along the elongated hole in the base
plate (D). Shift upward increases the dispensing angle and shift
downward reduces the dispensing angle.
4. Fix the position of stop bolt by tightening the screw (C). If
necessary insert a slotted screwdriver in the slot of the stop bolt
(A) to facilitate the tightening of screw (C).
NOTICE!
With the stop bolt (A) the angle position of dispensing edge can
be set between approx. 16 degrees and 36 degrees.

Adjustments
Wipe-On Applicators
20
Operating Manual
10.23
Minimum angle adjustment (16 degrees)
Maximum angle adjustment (36 degrees)
Figure 8
5. Turn the internal rewinder (A, Figure 5) of the printing module as
long as the backing paper is again tensioned.
6. Press the dispensing rocker (D, Figure 5) again upwards and
engage.
This manual suits for next models
3
Table of contents
Other Valentin Printer manuals