Valor HORIZON 645CFV Clearview User manual

4002225-05
645CFV Clearview
Vintage Iron Front Kit
Installation Instructions
CSA approved for use with Valor Models 534I Heaters ONLY
Note: This kit must be installed
by a qualified installer, service
agency or gas supplier. These
instructions are to be used in
conjunction with the fireplace
main installation instructions.
INSTALLER
Leave this manual
with the appliance.
CONSUMER
Retain this manual
for future reference.
HOT GLASS WILL
CAUSE BURNS.
DO NOT TOUCH GLASS
UNTIL COOLED.
NEVER ALLOW CHILDREN
TO TOUCH GLASS.
WARNING
!
A barrier designed to reduce the risk of burns from the hot viewing
glass is provided with this appliance and shall be installed
for the protection of children and other at-risk individuals.
HORIZON
The 645CFV Horizon Clearview Vintage Iron Front is designed to be used on
the 534I Valor heaters.
Mantel clearances are unchanged from those shown in the 534I installation
manual.
Overview (Heater and fret sold separately)
534I
Heat Exchanger Cover
Heat Baffle
Window
Bolts
Cover
Barrier
Screen
Fret
Clearview Front
*NOTE: Bottom of plate is flush with
bottom of heater. Install bottom of
heater flush with finished hearth.
1-1/2”
(38 mm)
Appliance
outline
37-1/4”(946 mm)
31-1/4”(794 mm)
2-1/2”
(64 mm)
© Copyright Miles Industries Ltd., 2013
Note: Wall finish must be flush or slightly
in front of this frame on heater!

2
3. Remove the existing baffle supplied on the heater
(3 screws). Fix the convection heat baffle supplied
to the heater (3 screws). You may need to remove
the window to gain space for a screwdriver.
Check the appliance manual for window removal
instructions.
Slide the baffle in or out so that its first bend lines
up with the front face of the backing plate.
4. Re-install the window if you have removed it. Follow
the procedure supplied in the appliance manual.
5. Fit the side shrouds to the heater by first sliding
them up beside the convection baffle and then
hooking the tabs down to the heater frame.
Installation
Install the heater as per installation instructions
supplied with it.
Finish the wall at sides up to the black frame on heater.
Finish the wall 1 inch (25 mm) above the top of the
black frame on heater. Ensure that the wall finish is
flush or slightly in front of the black frame. Allow for
height of finished hearth or the backing plate will not
install.
If the wall above the heater is finished to the black
frame, the wall finish must be cut 1 inch (25 mm) to
allow the fitting of the backing plate.
Alternatively, if the wall finish is non-combustible, the
flange on the top rear of the backing plate can be
broken off the plate to allow the finish behind the plate.
1. Install the backing plate to the heater fixing it with
4 screws provided. The position of the plate can
be adjusted front to back to accommodate the wall
finish thickness.
2. Slide in and place the heat exchanger cover as
indicated. The bottom tabs cover the ports.
1
2
1
1
2
2
Heat Baffle
Backing Plate3-Sided
Frame
Convection heat baffle
position—
right side section view
Heat Exchanger
Heat Exchanger Cover

3
6. Hook the chosen fret (sold separately).
Four frets are offered for the Clearview Horizon
front: Clearview 646CCB, Traditional RA24TB,
Contemporary RA24CV, or Ventana 1225VFB.
Note: The Ventana Fret 1225VFB must be fitted
with the valve shield provided in the Clearview
Horizon kit before being installed on the front.
Remove the 2 screws at the back of the fret, fit the
shield to the back of the fret, and fix it with the 2
screws.
7. Hook the window bolt cover to the top of the
window frame as indicated. Do not hook it to the
firebox frame.
8. Install the barrier screen.
a. Slide the right-hand side tabs between the
3-sided frame front plate and the black backing
plate, resting the bottom tabs on the bottom of
the appliance’s black frame.
b. Holding the screen, slide the left-hand top lever
so that its tab goes behind the front plate.
c. Swivel the left-hand side lever so that its tab
goes behind the front plate.
d. Insure that the screen is secure in all corners.
Window
bolts
cover
Window frameFirebox frame
Ventana Fret
Clearview Fret

4
Code Description Part Number
1 Heat Exchanger Cover 4002221AH
2 Convection Heat Baffle 4002208AZ
3 Window Bolt Cover 4002210BY
4 Backing Plate 4002219AZ
5 LH Window Trim 4002209AZ
6 RH Window Trim 4002216AZ
7 645 Valve Shield 4002226BY
8 3-Sided Frame 4002220VI
9 Barrier Screen 4003377
Hardware Kit 4002265
Repair Parts List
WARNING
DO NOT TOUCH THE BARRIER SCREEN OR
FIREPLACE WHILE THEY ARE HOT!
Let the
Let the
fireplace cool first before cleaning it.
FOR SAFETY PURPOSE, ensure the barrier
screen is re-installed on the fireplace front after
maintenance if it has been removed.
WARNING
!
Maintenance
To clean the fireplace trim, use mild soap and water.
To clean the barrier screen, dust with a soft brush.
If the barrier becomes damaged, the barrier shall
be replaced with the manufacturer’s barrier for this
appliance.
To clean the window and ceramics inside the firebox,
consult the Owner’s Information section of the
Installation and Owner’s Manual supplied with the
fireplace.
DO NOT CLEAN THE GLASS WINDOW WITH
AMMONIA!
Designed and Manufactured by / for
Miles Industries Ltd.
190 – 2255 Dollarton Highway, North Vancouver, BC, CANADA V7H 3B1
Tel. 604-984-3496 Fax 604-984-0246
www.valorfireplaces.com
Because our policy is one of constant development and improvement, details may vary slightly from those given in this publication.
1
2
3
5
4
6
7
8
9

5
La Devanture Clearview 645CFV finie fer antique est con-
çue pour être installée sur les foyers Valor Horizon 534I.
Les dégagements pour manteaux de cheminée
demeurent les mêmes que ceux indiqués dans le guide
d’installation fourni avec le foyer 534I.
Guide d’installation
Homologuée par la CSA pour utilisation avec les foyers Valor 534I SEULEMENT
© Tous droits réservés Miles Industries Ltd., 2013
H
Ho
Ho
Ho
Ho
Ho
m
m
mo
lo
g
uée
p
Devanture Clearview 645CFV
HORIZON
Concept (foyer et base vendus séparément)
534I
Couvercle
d’échangeur
de chaleur
Déflecteur
de chaleur
Bordure de
fenêtre
Grille de
protection Base
Devanture
Clearview
*NOTE : Le bas de la plaque est égal
au bas du foyer. Assurez-vous que le
bas du foyer soit égal à la dalle
protectrice / plancher protecteur.
1-1/2”
(38 mm)
Appareil
37-1/4”(946 mm)
31-1/4”(794 mm)
2-1/2”
(64 mm)
Note : La finition du mur doit
être égale ou légèrement
devant l’encadrement noir
du foyer!
LE PREMIER
FOYER À GAZ RADIANT
MC
®
Note : Cette devanture doit être installée par un in-
stallateur qualifiée, une agence de service certifiée
ou un fournisseur de gaz. Ces instructions doivent
être utilisées conjointement avec les instructions
fournies avec le foyer.
INSTALLATEUR : Laissez cette notice avec l’appareil.
CONSOMMATEUR : Conservez cette notice pour consultation ultérieure.
UNE SURFACE VITRÉE CHAUDE PEUT
CAUSER DES BRÛLURES.
LAISSEZ REFROIDIR LA SURFACE VITRÉE
AVANT D’Y TOUCHER.
NE PERMETTEZ JAMAIS À UN ENFANT
DE TOUCHER LA SURFACE VITRÉE.
AVERTISSEMENT
!
Une grille de protection conçue pour réduire les risques de brûlures sur la vitre
chaude de la fenêtre est fournie avec cet appareil et doit être installée pour la
protection des enfants et autres individus à risques.

6
3. Enlevez le déflecteur déjà installé sur le foyer (3
vis). Fixez le déflecteur inclus dans le kit au foyer
(3 vis). Enlevez la fenêtre si vous avez besoin de
plus d’espace pour un tournevis. Consultez les
directives d’enlèvement de la fenêtre dans le guide
d’installation du foyer.
Tirez ou poussez le déflecteur afin que son premier
cran soit égal à la surface de la plaque de
soutien.
4. Réinstallez la fenêtre si vous l’avez enlevée en
suivant les directives du guide d’installation du foyer.
5. Fixez les montants au foyer en insérant d’abord
le haut du montant entre l’encadrement et le
déflecteur et ensuite en insérant les languettes de
côtés dans les trous de l’encadrement du foyer.
Installation
Installez le foyer selon son guide d’installation.
Finissez le mur sur les côtés jusqu’à l’encadrement
noir du foyer. Finissez le mur au-dessus à 1 pouce (25
mm) de l’encadrement noir du foyer. Assurez-vous que
la finition du mur est égale ou dépasse légèrement la
surface avant de l’encadrement noir du foyer. Tenez
compte de la hauteur de la dalle de protection s’il y
a lieu afin de permettre l’installation de la plaque de
soutien.
Si le mur au-dessus du foyer est fini jusqu’à
l’encadrement noir, coupez-le de 1 pouce (25 mm) afin
de permettre l’installation de la plaque de soutien.
Alternativement, si la finition du mur est incombustible,
la languette à l’arrière au haut de la plaque de soutien
peut être coupée afin de permettre la finition du mur
derrière la plaque.
1. Installez la plaque de soutien au foyer à l’aide de 4
vis fournies. La plaque peut être ajustée d’avant en
arrière selon l’épaisseur de la finition du mur.
2. Insérez et placez le couvercle sur l’échangeur de
chaleur tel qu’indiqué. Les pattes du bas couvrent
les orifices.
Échangeur de chaleur
Couvercle de l’échangeur
1
2
1
1
2
2
Déflecteur
de chaleur
Plaque de soutien
Bordure
à 3
côtés
Position du déflecteur—
coupe transversale côté
droit

7
6. Accrochez la base choisie (vendues séparément).
Quatre bases sont offertes pour la Devanture
Clearview Horizon : Clearview 646CCB,
Traditionnelle RA24TB, Contemporaine RA24CV,
ou Ventana 1225VFB.
Note : La Base Ventana 1225VFB doit être d’abord
fixée à l’écran de soupape fourni avec la Devanture
Clearview avant d’être accrochée sur le foyer.
Enlevez les 2 vis à l’arrière de la base, placez
l’écran contre l’arrière de la base et fixez-la à l’aide
des 2 vis.
7. Accrochez la bordure de fenêtre sur le cadre de
fenêtre tel qu’indiqué. Ne l’accrochez pas sur le
bord de la boîte de foyer. Entretien
8. Installez la grille de protection.
a. Insérez les onglets du côté droit de la grille entre
la bordure à trois côtés et la plaque de soutien
noire de la devanture tout en reposant les
onglets du bas de grille sur l’encadrement noir
de la caisse du foyer.
b. En tenant la grille, poussez le levier supérieur
vers la gauche de façon à se qu’il soit inséré
entre la bordure et la plaque de soutien.
c. Pivotez le levier inférieur vers le haut et la
gauche de façon à ce qu’il soit inséré entre la
bordure et la plaque de soutien.
d. Assurez-vous que la grille est bien accrochée
aux quatres coins.
Bordure
de fenêtre
Cadre de fenêtre Bord de la
boîte de foyer
Base Ventana
Base Clearview

8
Entretien
Pour nettoyer la devanture, utilisez une solution d’eau
et de savon doux. Pour nettoyer la grille, utilisez une
brosse à poils doux.
Si la grille est endommagée, elle doit être rem-
placée par la grille conçue par le manufacturier
pour cet appareil.
Pour nettoyer la fenêtre et l’intérieur de la boîte de
foyer, consultez la section Information à l’intention du
consommateur dans le Guide de l’installation et du
consommateur fourni avec le foyer.
NE NETTOYEZ PAS LA VITRE DE LA FENÊTRE
AVEC UN PRODUIT À BASE D’AMMONIAQUE!
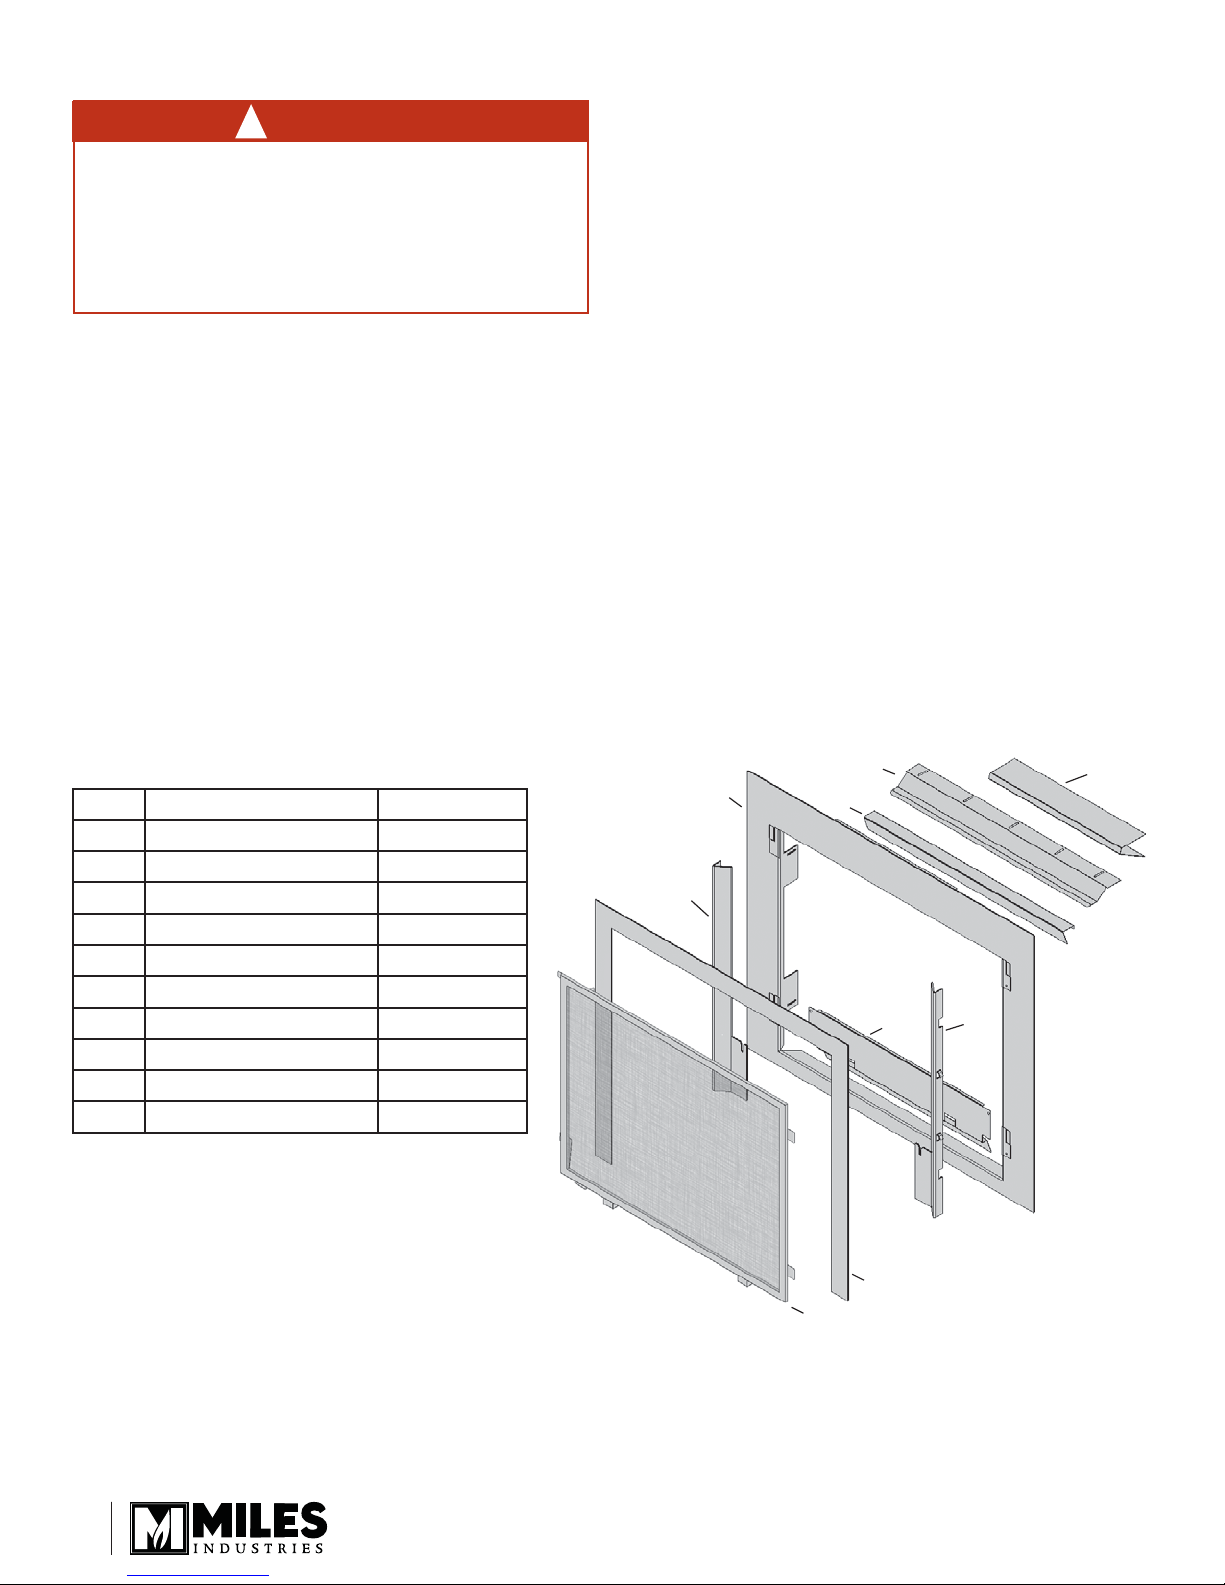
AVERTISSEMENT
NE TOUCHEZ PAS LA GRILLE DE PROTECTION
OU LE FOYER LORSQU’ILS SONT CHAUDS!
Laissez le foyer refroidir avant de le nettoyer.
POUR DES RAISONS DE SÉCURITÉ,
assurez-vous que la grille de protection soit
réinstallée sur la bordure après l’entretien.
AVERTISSEMENT
!
Conçue et fabriquée par / pour
Miles Industries Ltd.
190 – 2255 Dollarton Highway, North Vancouver, BC, CANADA V7H 3B1
Tél. 604-984-3496 Téléc. 604-984-0246
www.foyervalor.com
Parce que nous favorisons une politique de développement continu, certains détails de la présente publication peuvent varier.
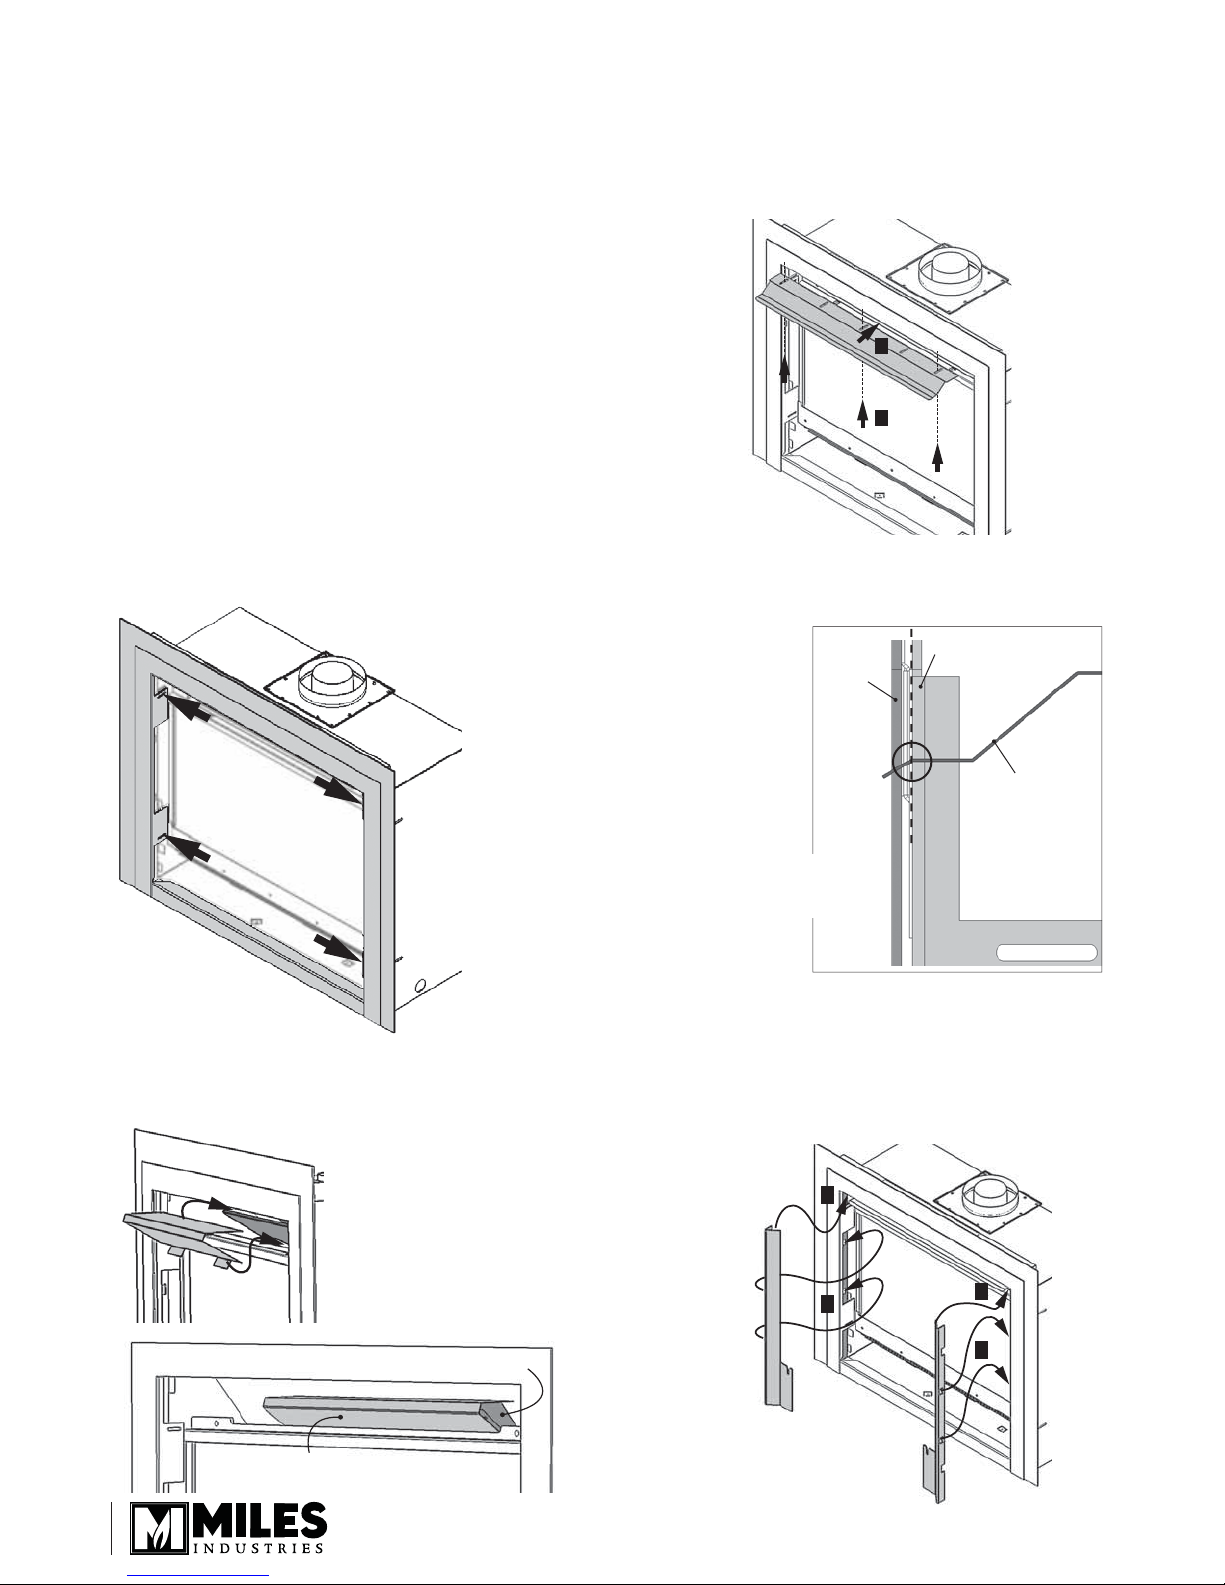
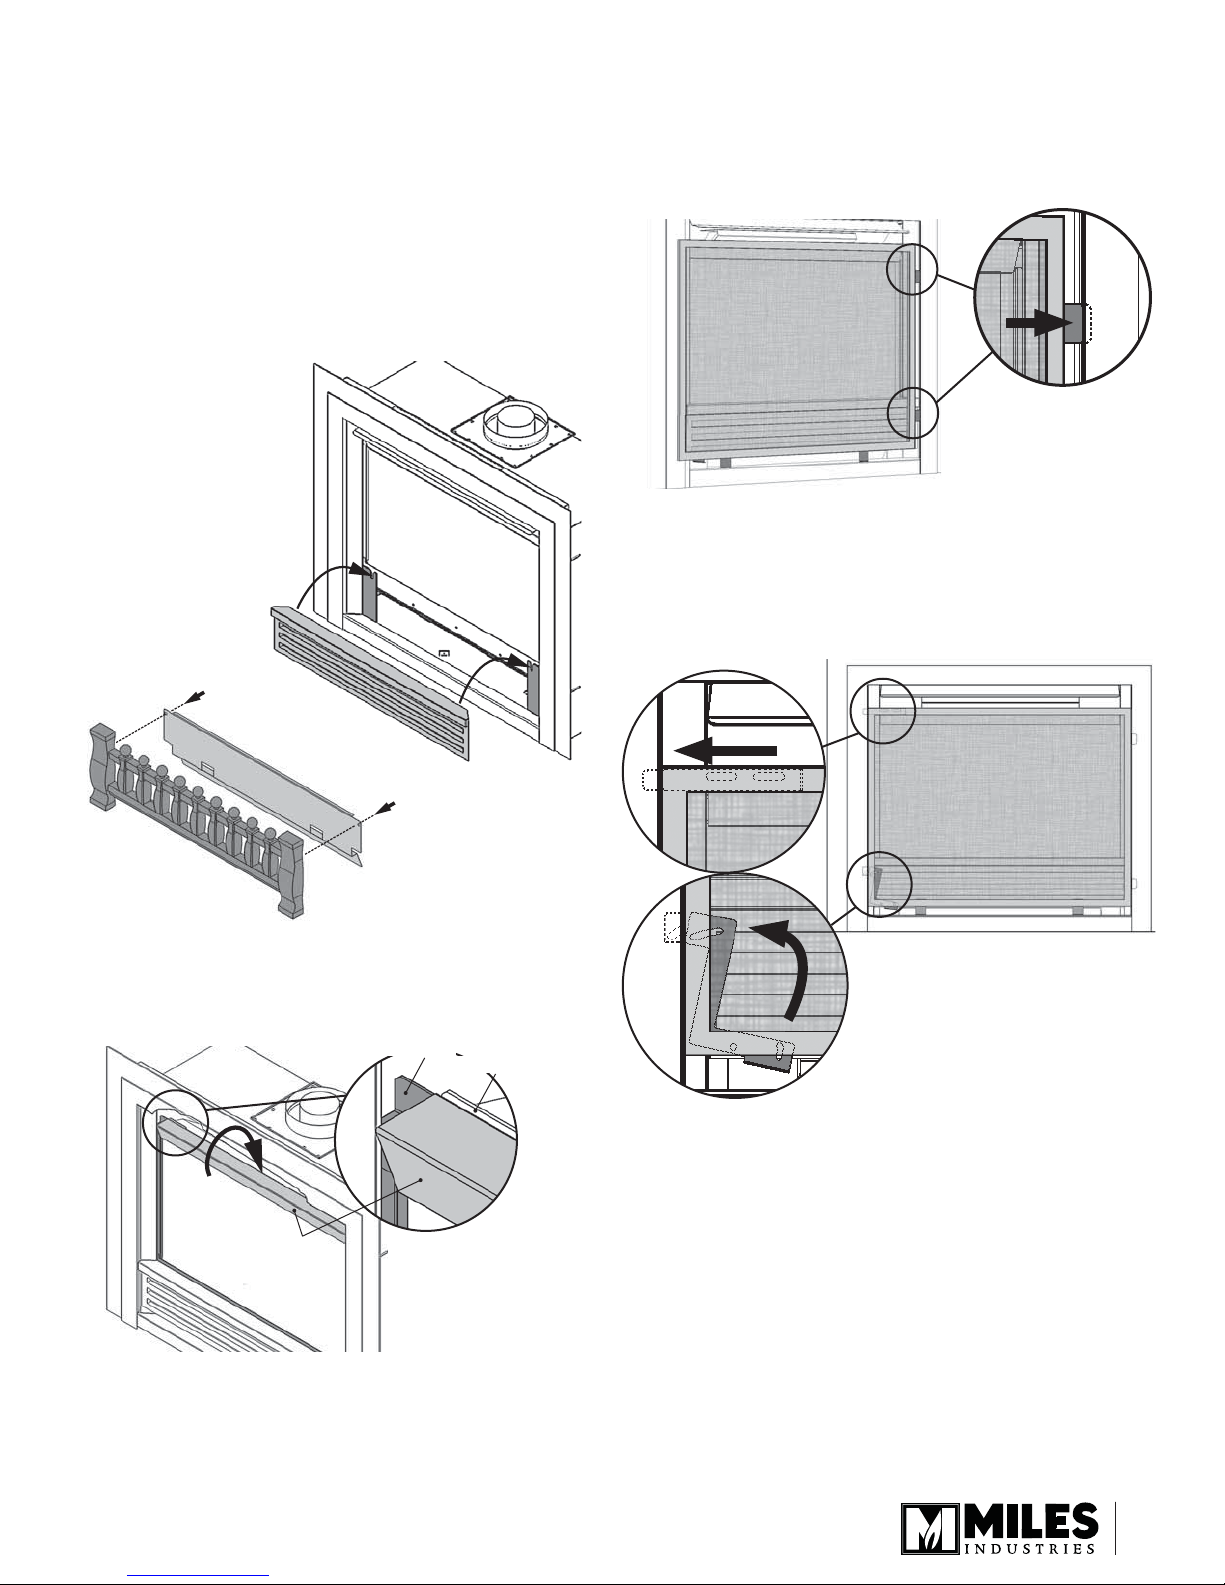
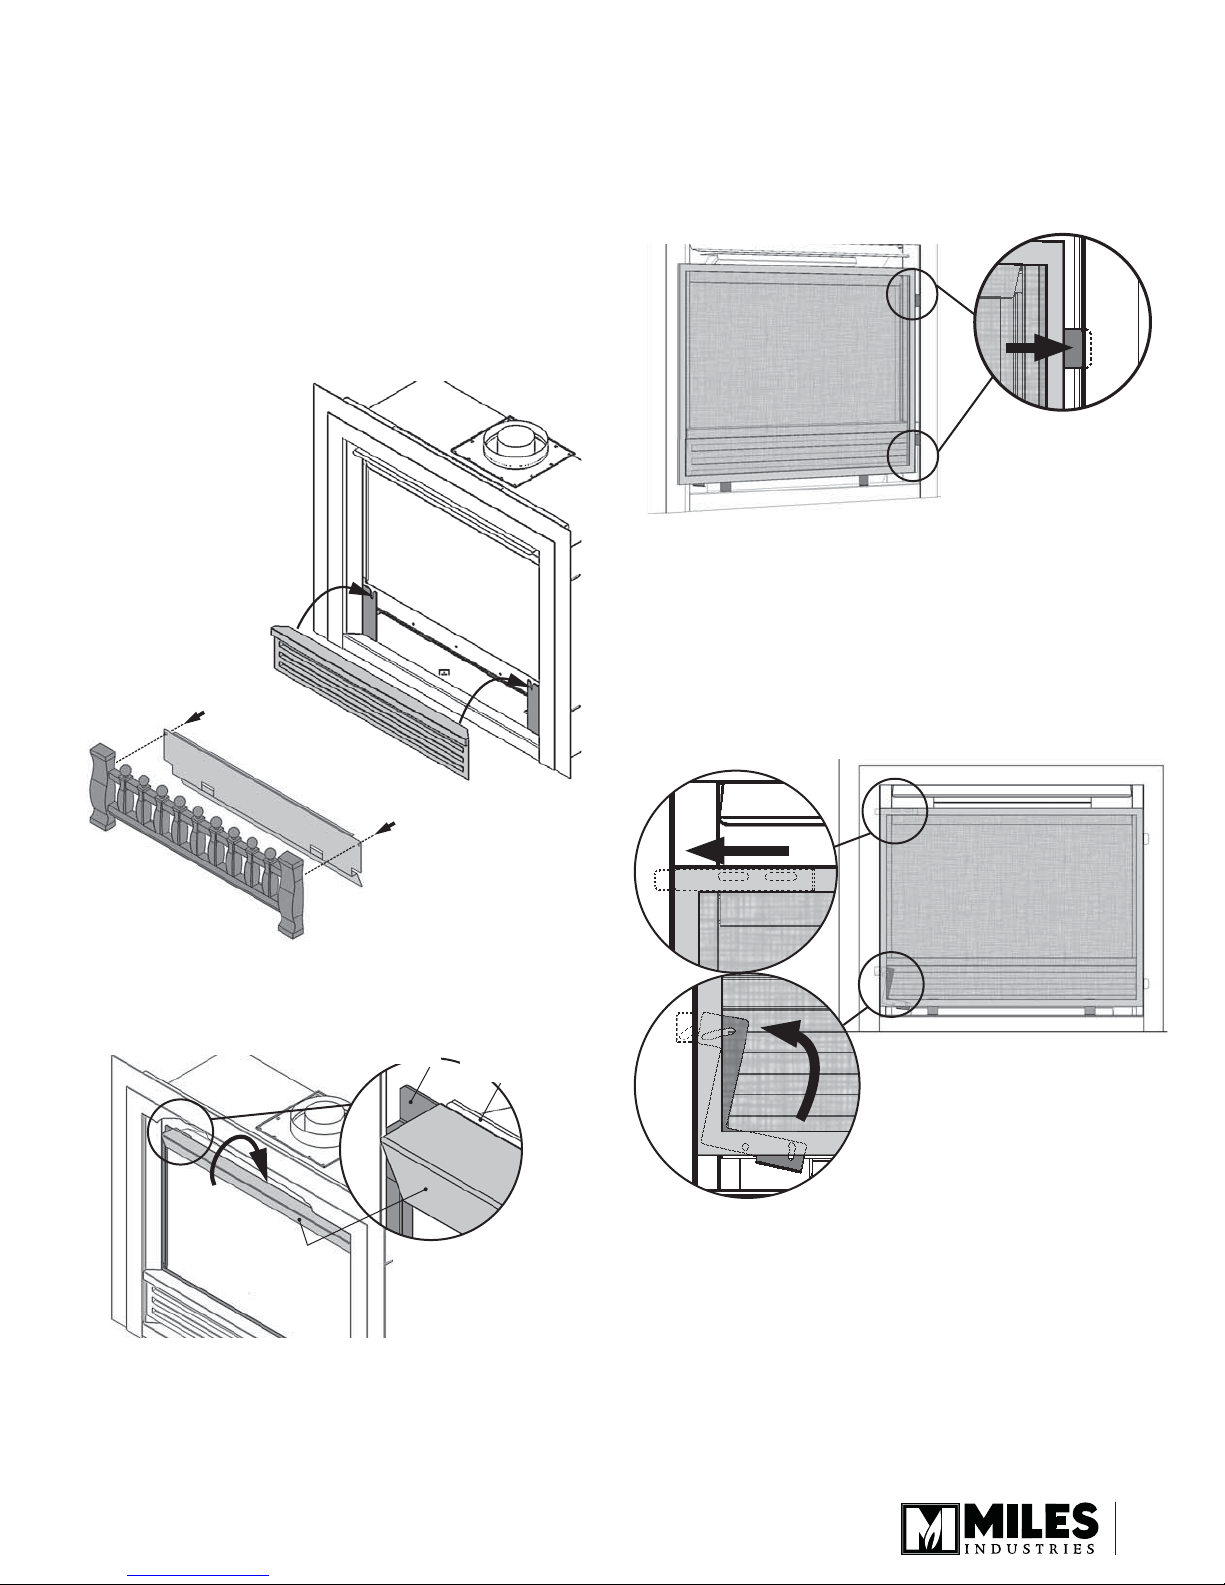
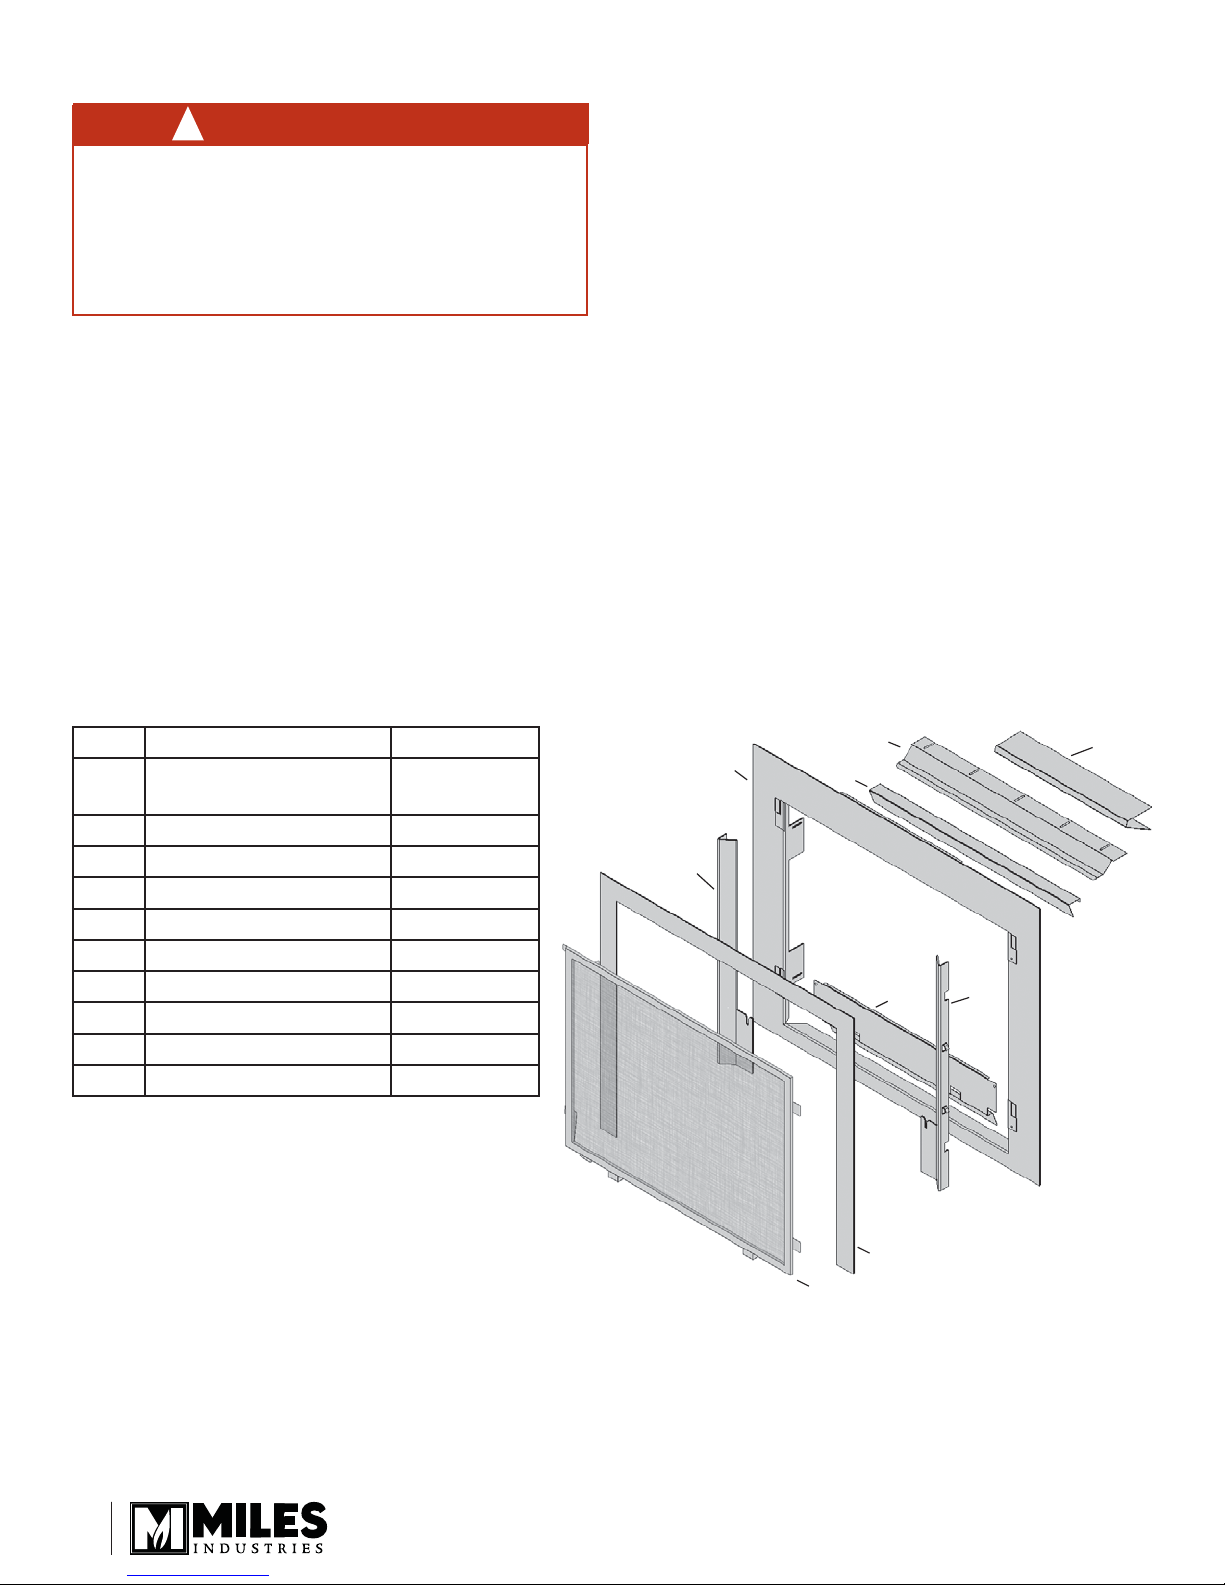
Code Description Pièce no
1 Couvercle échangeur de
chaleur 4002221AH
2Déflecteur de chaleur 4002208AZ
3 Bordure de fenêtre 4002210BY
4 Plaque de soutien 4002219AZ
5 Montant gauche 4002209AZ
6 Montant droit 4002216AZ
7 Écran de soupape 645 4002226BY
8 Bordure à 3 côtés 4002220VI
9 Grille de protection 4003377
Quincaillerie 4002265
Pièces
1
2
3
5
4
6
7
8
9
Table of contents
Languages:
Other Valor Heater manuals
Popular Heater manuals by other brands

BriskHeat
BriskHeat SRL-ADJ Series instruction manual

EINHELL
EINHELL FW 400 operating instructions

Thorne & Derrick
Thorne & Derrick EXHeat RFA Series Installation, operation and maintenance instructions

Gerlach Germany
Gerlach Germany GL 7927 user manual

HeatStar
HeatStar MH4B Operating instructions and owner's manual

Greenlee
Greenlee 849 Operation, service and parts instruction manual