VARON NT-1 User manual


Catalogue(English) 01-14
Foreword 01
Safety Precaution 02
Product Introduction 03
Technical Parameters 04
Installation and Use 05-10
Use Tips 11
Maintenance 12
Problems and Solutions 13
Packing List 14
Katalog(Deutsch) 15-28
Vorwort 15
Sicherheitsvorkehrungen 16
Beschreibung des Produkts 17
Technische Parameter 18
Installation und Nutzung 19-24
Vorsichtsmaßnahmen für die Verwendung 25
Wartung und Pflege 26
Störung und Fehlersuche 27
Packliste 28
Sommaire(Français) 29-42
Avant-propos 29
Précautions de sécurité 30
Présentation du produit 31
Paramètre technique 32
Installation et utilisation 33-38
Précautions d'emploi 39
Entretien et maintenance 40
Dépannage 41
Liste de colisage 42
目录(にほんご) 43-56
前書き 43
安全注意事項 44
製品概要 45
技術パラメータ 46
設置と使用 47-52
使用注意事項 53
メンテナンスと保守 54
故障と排除 55
梱包リスト 56
Índice(Español) 57-70
Prólogo 57
Precauciones de Seguridad 58
Introducción al Producto 59
Parámetros Técnicos 60
Instalación y Uso 61-66
Precauciones de Uso 67
Mantenimiento 68
Problemas y Soluciones 69
Lista de Empaque 70
Indice(Italiano) 71-84
Premessa 71
Precauzione di sicurezza 72
Introduzione del prodotto 73
Parametri tecnici 74
Installazione ed uso 75-80
Precauzione sull’uso 81
Manutenzione 82
Errore e rimozione 83
Contenuto dell’imballo 84

Dear users,
This manual introduces the functional features, operation steps, precautions
and maintenance of the product in detail.
In order to ensure that you can use this product more effectively, please
read this manual carefully before use; Please keep it carefully for
unexpected needs.
Please don’t open the package before you use it, otherwise it will lose the
qualification of warranty.
Please note that our company reserves the right to update the products
and technologies. Some illustrations in the manual may be different from
what you see in this product. Therefore, please refer to the actual products
you have received.
Foreword Safety precautions
▶In order to prevent power failure or equipment failure, the oxygen users
who in urgent need please assist with other standby oxygen supply devices
(such as Oxygen cylinder. This product can not be used for life support or
life extension! Not suitable for newborns or infants!
▶Oxygen can support combustion, Do not smoke when the equipment
works!
▶Do not use the equipment when there are high temperature, sparks and
fire in the air!
▶To avoid accidents, children are not allowed to operate the equipment
alone. When breathing oxygen, do not wrap the hose around the neck;:The
elderly who can't act easily need to be accompanied by a guardian.
▶It is forbidden to move the equipment by pulling the power cord or hose;
▶When the product works, oxygen is directly separated from the air.
Please do not use it in the environment of lampblack and poisonous gas;
▶The product cannot be connected with other equipment which from
another manufacturer;
▶If any accessories are damaged or lost, please contact the supplier first;
▶It is forbidden to use the adapter that is not equipped with the product or
does not meet the safety requirements of GB9706 and 1-2007 standards.
▶It is forbidden to use lithium batteries that are not equipped with the
product.
▶When the battery is not in use, please pay attention to protect the
battery interface and the battery interface on the device. Do not touch the
conductor or touch it directly by hand.
▶Remove the battery before the equipment is discarded, and contact the
relevant departments for proper disposal of the equipment and accessories
according to the relevant regulations of the local government.
02
English
01 English

1. Product Principle
This product uses air as raw material, DC12V power supply or battery as
power source, adopts high-quality French imported molecular sieve and
small oil-free air compressor, and uses advanced pressure swing adsorption
separation method (PSA method) at room temperature to extract high Purity
oxygen; this method is a pure physical method which is stable, safe and
reliable.
2. Scope of product application
It is only used for health and beauty, not for medical treatment.
3. Structural characteristics
▶ Full plastic shell, safe and reliable;
▶ With built-in battery, it can achieve outdoor oxygen absorption;
▶ Small mini size, light weight, can be carried around;
▶ It has the function of accumulating time which can understand the
total time of machine use in real time;
▶ It has an oxygen concentration alarm function, which can prompt
the user of the oxygen production status of the machine in real time;
Product Introduction Technical Parameters
04
English
03 English
1.Model:NT-1
2.Power supply:AC 100~240V 50 60HZ
DC 12~16.8V
3.Power:75 W
4.Built-in battery capacity: 92 WH 6.4 AH
5.Flow gear:1~5 gear (5 gears have the highest flow).
6.Oxygen concentration:93%±3
7.Noise level:≤58dB(A) (the highest grade)
8.Dimensions:7.09"*4.92"*10.63"
9.Net weight:2.95 kg
10.Electrical classification:Class II
11.Oxygen supply mode:pulse oxygen supply
12.Machine working mode:continuous operation
13.Normal working environment:
Ambient temperature range:50°F~95°F;
Relative humidity range:30%~75%;
Atmospheric pressure range:860hPa~1060hPa,
Note:When the storage and transportation temperature is lower than 5℃, the
equipment should be stored at normal operating temperature for more than 4
hours before using.
14.Storage and transportation environment:
Ambient temperature range:-20℃~60℃;
Relative humidity range:10%~93%, and there is no frost phenomenon in
the environment;
Atmospheric pressure range:700hPa~1060hPa
Note:The oxygen generator should be stored in a well-ventilated room
without strong sunlight, corrosive gas Inside, avoid sudden shock and upside-
down during transportation.
/

1. Please check the package when receiving the package
Before installing and using the product, please firstly check whether the
appearance of the product is intact and whether the variety and quantity of
accessories are consistent with the packing list in the user manual. If there is any
defect, please contact the seller or manufacturer in time.
Installation and use Installation and use
06
English
05 English
Operation panel
Oxygen outlet
Power connector
Radiator grille
Figure 1 Right side view –
Figure 2 left side view –
Note:It is normal for
hot air to be discharged
from the heat dissipation
vent. Make sure that the
air space at the air inlet
and outlet is smooth.
Note: The user cannot
disassemble without
p e r m i s s i o n ,i f
necessary,It needs to
be returned to the
dealer or professional
for processing.
Attention: User is not
allowed to open this
part.
Figure 3Schematic diagram of internal battery placement –
3. Introduction to operation panel function
2. Outline diagram
1. Button function introduction
▶ Power button: Start and stop keys. Short press the button, the
machine will start to work; long press the button for 3 seconds during work,
the machine will stop working;
▶ Grade:Adjust output oxygenflow;
▶ Time:Setting device using time, adjustable from 0~240 minutes
2. Display content introduction
▶ Accumulated hours: display how long the device has been working
(unit: hour)
Figure 4 Operation panel diagram –

Installation and use Installation and use
08
English
07 English
▶ Timing/Min:display the device how many minutes the device are
working.
Remark: One screen showing Timing min & Accumulated hours. The default
display is accumulated hours. When pushing Timing/Min button, it is shift to
Timing minutes. If there is no new instruction, it is automatically switched back to
the accumulative hours display after 10 seconds.
▶ Gear: Output oxygen flow gear, a total of five gears (the five gears have
the largest flow)
Gear setting
Single pulse oxygen
flow rate (ML)
Allowable error is±20%
1 2 345
20 25 30 40 50
▶ Power indicator: Indicates the current built-in battery power, calculated
using voltage value, considering the actual usage, this item is for reference only;
There are a total of four battery indicator lights on the operation panel:
100% indicator light is on ---- battery power≥90%;
75% indicator light is on ---- 90%>battery power≧75%;
50% indicator light is on ---- 75%>battery power≧50%;
25% indicator light is on ---- 50%>battery power≧25%;
The 25% indicator flashes ---- battery power<25%.
▶ Indicator light and Alarm light:
Alam light:The light is on when the device is operated abnormally, meanwhile
will display the alarm code.
F0001 ---- Low Battery Warning;
F0002 ---- No Breath Detected;
F0011 ---- High Temperature with Alarm;
F0012 ---- Oxygen Sensor Abnormal Alarm;
Low Concentration:When the oxygen concentration is lower than 82%,the light
is on. When the oxygen concentration is lower than 50%, the light is on with
alarm.
Breath Signal:When the respiratory signal of the user is detected during the
operation of the equipment, the light is on. Meanwhile, the device will
automatically pulse oxygen supply.
3. Use Guidance

Installation and use Installation and use
10
English
09 English
4.1 Connect power
Select the appropriate power connection according to the use environment.
▶ Use built-in battery only
The device has a built-in battery installed by default. If the battery is sufficient, it
can be turned on.
▶ Use AC adapter
Connect the AC adapter and the AC power cord firmly, then connect the input
end plug of the AC power cord to the indoor power strip, and finally connect the
output end of the AC adapter to the charging port of the device.
Connected, the power indicator on the AC adapter lights up red at this time,
indicating that the power connection is normal and the built-in battery is
charging; if the power indicator on the AC adapter lights up green, it indicates
that the power supply is connected properly and the built-in battery is fully
charged.
Requirement input terminal: AC voltage is 100~240V, frequency 50/60Hz.
▶ Use the car power cord in the car
Connect the input end of the car power cord to the car cigarette lighter, and
then connect the output end of the car power cord to the charging port of the
device. At this time, the red light of the car power cord lights up, indicating that
the power supply is connected normally.
Requirement input terminal: DC voltage is DC 12~16.8V, current is 6A.
4.2.Connect disposable oxygen inhaler
Connect the flared end of the disposable oxygen inhaler tube
firmly to the oxygen outlet of the device, and wear the other
end with reference to the figure below.
1.Put on the disposable oxygen inhaler tube as shown in the
figure, adjust the vent to a suitable position, and push the
fixing ring upward after putting it on for fixation.
2.Note that the tube of the disposable oxygen inhaler should
not be kinked or blocked, so as not to cause equipment
related alarms and affect normal use.
3.If you need to buy an oxygen inhaler yourself, please
contact the equipment provider
4.Selection under guidance.
4.3. Get started
Press the power button to start the machine, use the gear button to select the
gear that suits you, and you can start to inhale oxygen after wearing the
disposable oxygen inhaler.
This device is a pulsed oxygen supply with a built-in breathing sensor. When the
user inhales, the machine will automatically release oxygen and the "breathing
signal" light will flash; when the user does not inhale, the machine will not
provide oxygen.
4.4. Shut down
If you need to stop oxygen supply during use, press and hold the "ON key"
for 3 seconds to shut down.
After use, first unplug the horn of the disposable oxygen inhaler from the
oxygen outlet of the device, then unplug the power cord port at the charging

Use Tips Maintenance
12
English
11 English
Ⅰ.Battery Charging
1. Due to transportation control and other reasons, the built-in battery of the
device only retains power for testing when leaving the factory, or there is no
power at all, so the device needs to be charged before first use.
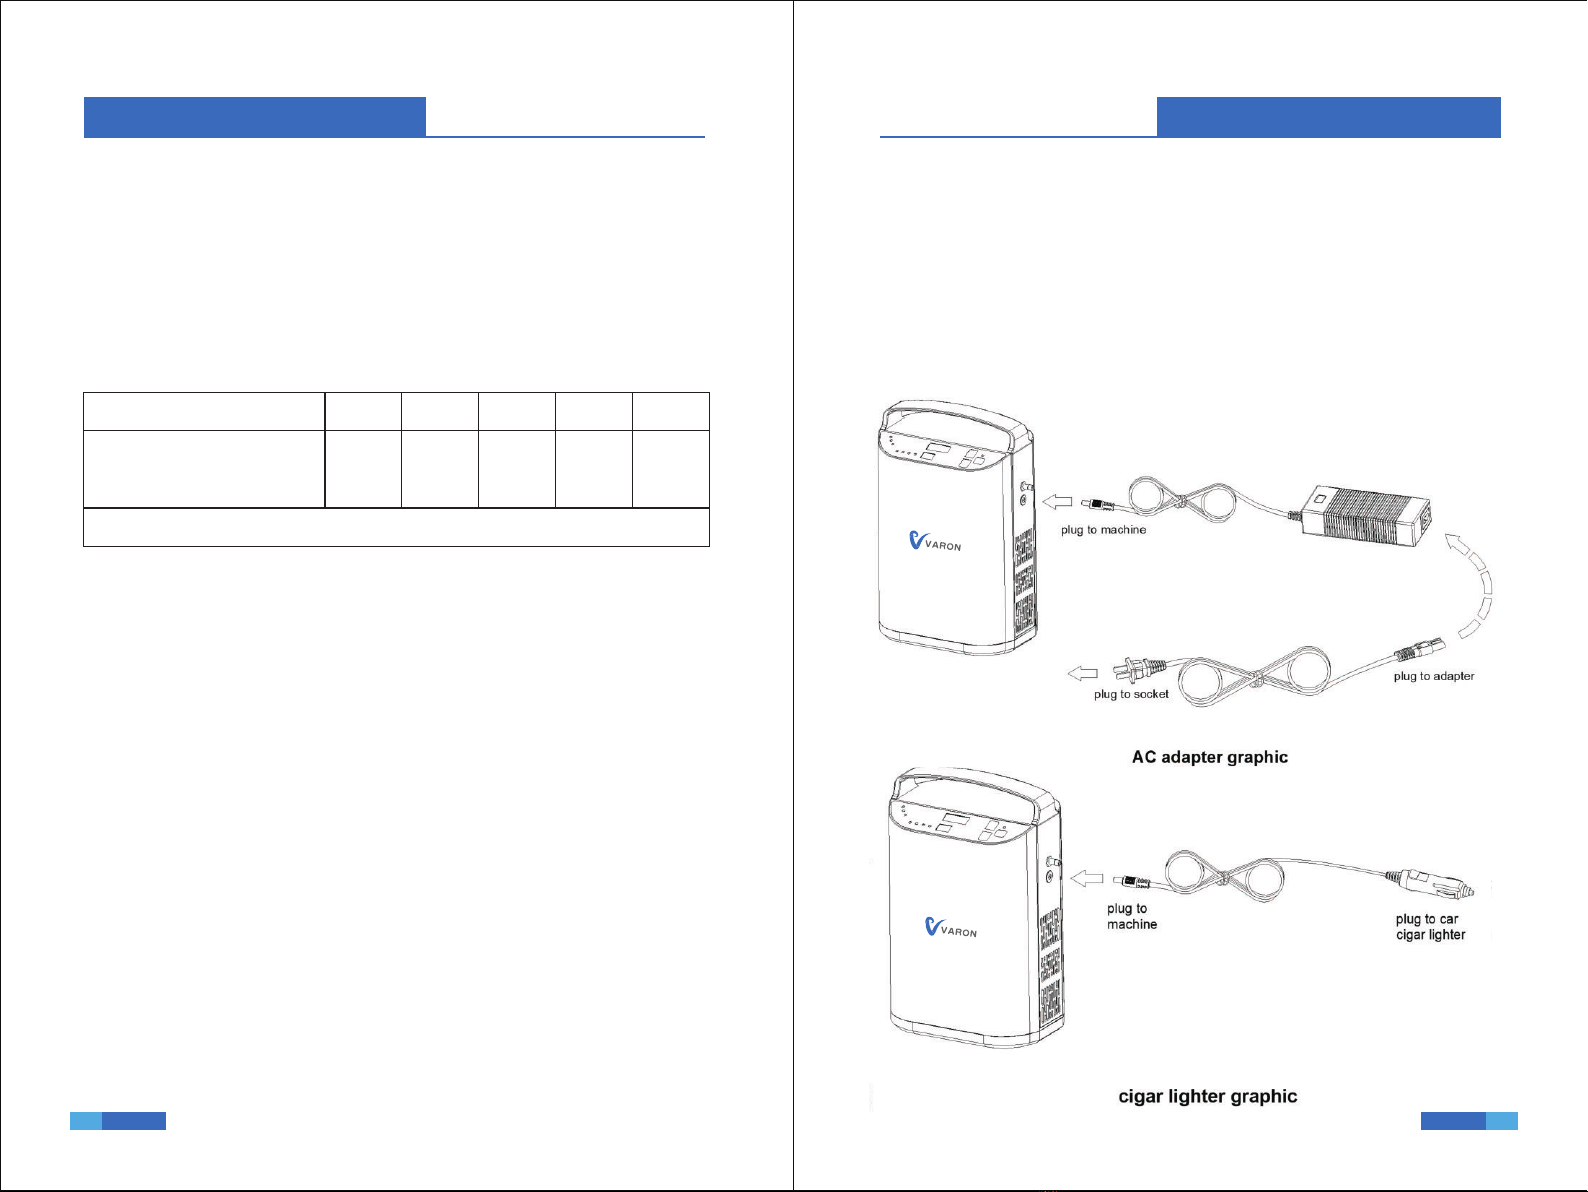
2. The built-in battery will only be charged automatically when the AC adapter is
used; if the vehicle power cord is used, it can only supply power to the device and
cannot charge the built-in battery.
3. This device currently does not support the use of non-built-in batteries.
4. The AC adapter and the car power cord will share the same power socket, so
only one of them can be used at a time.
5. When the power of the built-in battery is less than 25%, the power indicator will
flash to remind you to connect the power adapter or charger to power the device.
6. When the device is not working, the battery in the device will fully charge for
about 4-8 hours. When the device is in operation, the charging time will be
extended to 9 hours.
7. When using the vehicle power cord in a car, turn on the engine. When the
engine is off, the device cannot be used to prevent the battery from losing power
in the car. And only the dedicated car power cord can be used.
Ⅱ.Guidelines for Using Electromagnetic Environment
In order to prevent this machine from being interfered by strong electromagnetic
environment or other electrical products, please keep this machine and other
household appliances at least 30cm apart during use.
Ⅲ.Non-Professionals are not Allowed to Disassemble the Oxygen Generator
Case
If professional maintenance personnel need the electrical schematic diagram of
the product, please contact the manufacturer or after-sales service.
Ⅳ.Use and Purchase Of Disposable Oxygen Inhaler
1. This equipment is a pulse oxygen supply mode. To use this equipment, it must
be connected to an oxygen inhaler.
2. In order for the oxygen concentrator to correctly detect breathing and deliver
pulsed oxygen, please ensure that the disposable oxygen inhaler is correctly
installed and that the tube of the oxygen inhaler is not kinked or blocked.
3. Do not use oxygen inhalers that are not compatible with this device. You need
to purchase a suitable oxygen inhaler under the guidance of the equipment
provider or professional medical staff to ensure the normal operation of the device
and the normal use of the user.
Ⅰ. Clean the Shell
Wipe and clean the outside of the machine at least once a month: first cut off the
power, and then wipe with a slightly damp cotton cloth or sponge. Be careful not
to let liquid penetrate into the cracks of the chassis.
After cleaning, place the machine in a ventilated place for 2 hours, and wait until
the surface is completely dry before using it.
Ⅱ. Cleaning the Disposable Oxygen Inhaler
The oxygen inhaler is cleaned once a week, and the nasal suction tip on the
oxygen inhaler should be cleaned after each use.
It can be soaked in white vinegar for about 5 minutes and then rinsed with water,
or wiped with medical alcohol. It is recommended that the oxygen inhaler be
replaced every 2 months of use. (Note: The inside of the oxygen inhaler tube
should be kept dry)
Ⅲ. Battery Maintenance
If you do not use the machine for a long time, you need to charge the device
once every three months to avoid the battery's long-term low power and non-use
which may cause a decrease in battery life. Each time the battery is charged to
25% to 50%.

Problems and Solutions Packing List
14
English
13 English
Malfunction Problems Solutions
Unable to Turn on
Battery is exhausted Connect the adapter to charge the
battery
Poor power cord connection
Check the power connection
Battery is not installed
correctly Reinstall the battery correctly
Machine malfunction Contact the seller
No Oxygen Output
The tube of the oxygen
inhaler is knotted or
blocked
Replace with a new oxygen inhaler
The oxygen inhaler is not
tightly connected to the
equipment, causing air
leakage
Reinstall the oxygen inhaler correctly
Machine malfunction Contact the seller
Smell in Oxygen
The oxygen inhaler
has not been cleaned
for a long time, resulting
in dirt in the tube
Clean or replace in time oxygen
tube
The new oxygen inhaler will
have a slight disinfection
smell at the beginning of
use, this is normal
The smell will disappear automatically
after a few days of use
Machine malfunction Contact the seller
Regular and Slight
Exhaust Sound
The sound of nitrogen
exhaust when the
machine is producing
oxygen
This is the normal action of the
machine to produce oxygen
and discharge nitrogen, which
is a normal phenomenon
No. Item Amount
1Oxygen Concentrator 1
2AC Adapter 1
3AC Power Cord 1
4Car Power Cord 1
5English Manual 1
6Disposable Oxygen Inhaler 2
7Certificate 1
8Backpack 1

Vorwort Sicherheitsvorkehrungen
16
Deutsch
15
Deutsch
Lieber Benutzer.
Diese Bedienungsanleitung beschreibt ausführlich die Funktionsmerkmale,
Betriebsverfahren, Vorsichtsmaßnahmen und die Wartung dieses Produkts.
Damit Sie das Produkt effizienter nutzen können, lesen Sie diese
Bedienungsanleitung bitte vor der Verwendung sorgfältig durch und bewahren
Sie es anschließend für den späteren Gebrauch auf.
Benutzer dürfen das Produkt nicht ohne Erlaubnis zerlegen, da sonst die
Garantie verfällt.
Bitte beachten Sie, dass wir uns das Recht vorbehalten, unsere Produkte und
Technologien zu aktualisieren. Einige Abbildungen in der Bedienungsanleitung
können von dem abweichen, was Sie auf dem Produkt sehen, daher beziehen
Sie sich bitte auf das tatsächliche Produkt, das Sie erhalten haben.
▶
vermeiden, müssen Personen, die dringend Sauerstoff benötigen, mit anderen
Reservesauerstoffversorgungseinheiten ausgestattet werden (z. B.
Sauerstoffflaschen. Sauerstoffbeutel usw.), darf dieses Produkt nicht zu
lebenserhaltenden oder lebensverlängernden Zwecken verwendet werden! Nicht
geeignet für Neugeborene oder Kleinkinder!
▶Sauerstoff kann brennbar sein, daher ist das Rauchen während des Betriebs
des Geräts strengstens verboten!
▶Verwenden Sie das Gerät nicht, wenn es in der Umgebung Hitze, Funken,
offene Flammen usw. gibt!
▶Um Unfälle zu vermeiden, lassen Sie Kinder das Gerät nicht allein
bedienen.Wickeln Sie den Schlauch nicht um den Hals, wenn Sie Sauerstoff
einatmen; lassen Sie ältere Menschen mit eingeschränkter Beweglichkeit bei
der Verwendung des Geräts immer von einer Begleitperson unterstützen.
▶Es ist strengstens verboten, das Gerät durch Ziehen am Netzkabel oder am
Schlauch zu bewegen.
▶Dieses Produkt trennt den Sauerstoff direkt aus der Atemluft.Verwenden Sie
es daher nicht in einer Umgebung mit Fett, Dämpfen oder giftigen oder
schädlichen Gasen.
▶Dieses Produkt darf nicht an andere Geräte angeschlossen werden, die
vom Hersteller nicht zugelassen sind.
▶Bei defektem oder fehlendem Zubehör wenden Sie sich an den
Geräteanbieter.
▶Es ist verboten, Adapter zu verwenden, die nicht mit dem Produkt
ausgestattet sind oder die nicht den Sicherheitsanforderungen der Norm
GB9706,1-2007 entsprechen.
▶Es ist verboten, Lithiumbatterien zu verwenden, die nicht mit dem Produkt
ausgestattet sind.
▶Wenn Sie den Akku nicht benutzen, achten Sie darauf, den Akkuanschluss
und den Akkuanschluss am Gerät zu schützen, indem Sie den Leiter nicht
berühren oder ihn direkt mit den Händen anfassen.
▶Entnehmen Sie den Akku, bevor Sie das Gerät entsorgen, und wenden Sie
sich an die zuständigen Behörden, um das Gerät und das Zubehör gemäß
den geltenden örtlichen Vorschriften zu entsorgen.
Um einen Stromausfall oder eine mögliche Fehlfunktion der Geräte zu

Beschreibung des Produkts Technische Parameter
18
Deutsch
17
Deutsch
I. Produkt-Prinzip
Dieses Produkt verwendet Luft als Rohstoff, eine DC12V-Stromversorgung
oder eine Batterie als Stromquelle, verwendet ein hochwertiges französisches
Original-Molekularsieb und einen kleinen ölfreien Luftkompressor und
extrahiert hochreinen Sauerstoff aus Luft bei Raumtemperatur durch die
fortschrittliche variable Druckadsorptionstrennungsmethode (PSA-Methode);
diese Methode ist eine rein physikalische Methode, und die
Sauerstoffausgabe ist stabil, sicher und zuverlässig.
II. Anwendungsbereich des Produkts
Nur für die Gesundheits- und Schönheitspflege zur Sauerstoffergänzung, nicht
für medizinische Zwecke
III. Strukturelle Merkmale
▶Vollkunststoffgehäuse, sicher und zuverlässig.
▶Mit eingebauter Batterie für die Sauerstoffaufnahme im Freien.
▶Geringe Größe und geringes Gewicht, daher leicht zu transportieren.
▶Mit einer Zeitsummenfunktion, die es ermöglicht, in Echtzeit die
Gesamtzeit zu ermitteln, in der die Maschine in Betrieb war.
▶Mit Sauerstoffkonzentrationsalarmfunktion, die den Benutzer über den
Sauerstoffproduktionsstatus der Maschine in Echtzeit informieren kann.
1. NT-1
2.Stromversorgung:AC 100~240V 50 60HZ
DC 12~16.8V
3.Leistung:75 W
4.Eingebaute Batteriekapazität: 92 WH 6.4 AH
5.Durchflussmenge:1~5 Stände (5 höchste Durchflussmenge)
6.Sauerstoffkonzentration:93%±3
7.Geräusch der gesamten Maschine:≤58dB(A) (der höchste Gang)
8.Umrissgröße:7.09"*4.92"*10.63"
9.Nettogewicht:2.95 kg
10.Elektrische Klassifizierung: Klasse II
11.Sauerstoffversorgungsmodus:Puls-Sauerstoffversorgung
12.Maschinenbetriebsart:Dauerbetrieb
13.Normales Arbeitsumfeld:
Umgebungstemperaturbereich:;
Bereich der relativen Luftfeuchtigkeit:30%~75%;
Atmosphärischer Druckbereich:860hPa~1060hPa
Hinweis:Wenn die Lager- und Transporttemperatur niedriger als 5 °C ist, soll
das Gerät vor dem Gebrauch in die normale Betriebstemperatur gebracht
werden.
Das Gerät soll vor dem Gebrauch für mehr als vier Stunden in die Umgebung
mit normaler Arbeitstemperatur gebracht werden.
14.die Lager- und Transportbedingungen:
Umgebungstemperaturbereich:-20℃~60℃;
Relative Luftfeuchtigkeit:10% bis 93%, keine Kondensation.
Atmosphärischer Druckbereich:700hPa~1060hPa
Hinweis:Die sauerstofferzeugenden Angüsse solln in einem gut belüfteten
Raum ohne starke Sonneneinstrahlung oder korrosive Gase gelagert
werden.Vermeiden Sie beim Transport starke Erschütterungen und Umkippen.
Modell-Nr:
/
50°F~95°F

I. Kontrolle beim Auspacken
Bevor Sie das Produkt installieren und in Betrieb nehmen, solln Sie sich
vergewissern, dass sich das Produkt in einem guten Zustand befindet und
dass die Vielfalt und Menge des Zubehörs mit der Packliste in der
Bedienungsanleitung übereinstimmt. Bei Mängeln wenden Sie sich bitte
rechtzeitig an den Verkäufer oder Hersteller.
Bedienfeld
Sauerstoff-Ausgang
Anschluss zum Aufladen
Lufteinlass zur Wärmeabfuhr
Abb. 1 Seitenansicht rechts –
II. Schematische Darstellung der Form
Installation und Nutzung Installation und Nutzung
20
Deutsch
Abb. 2 – Seitenansicht links
Vorsicht! Es ist normal,
dass heiße Luft aus dem
L u f t e n t l a s s z u r
Wärmeabfuhr austritt.
Stellen Sie sicher, dass
der Luftein-und-auslass
reibungslos funktioniert.
19
Deutsch
Tragegriff
Lufteinlass des Kompressors
Luftauslass zur Wärmeabfuhr
Hinweis: Es ist den
Nutzern nicht gestattet,
sie privat zu demontieren,
falls dies erforderlich ist,
muss an den Händler
oder einen Fachmann
zurückgegeben werden.
Abb. 3 Schema für die Anordnung der eingebauten Batterie –
III. Einführung in die Funktionen des Bedienfelds
I.
▶Ein/Aus-Taste: Start- und Stopptaste. Ein kurzer Druck auf die Taste
setzt die Maschine in Betrieb; ein langer Druck auf die Taste für 3 Sekunden
während des Betriebs stoppt die Maschine.
▶Einstellungsschlüssel: Einstellung der Größe der Durchflussmenge
des Sauerstoffausgangs.
▶Timer-Taste: Stellt die Zeit für jede Benutzung des Geräts ein.
einstellbar von 0 bis 240 Minuten.
II. Beschreibung der Anzeige
▶Gesamtzeit: Zeigt an, wie lange das Gerät bereits in Betrieb ist (in
Stunden)
Einführung in die wichtigsten Funktionen
Abb. 4 Schema des Bedienfelds –
Batterie-Stecker
und -Buchse
Eingebaute Batterie
Batterieabdeckung
Batteriefach

Installation und Nutzung Installation und Nutzung
22
Deutsch
21
Deutsch
▶Timer: Zeigt an, wie lange das Gerät bereits in Betrieb ist (in Stunden)
▶Hinweis: Die kumulierte Zeit und der Timer werden auf dem gleichen
Display angezeigt, und die Standardanzeige ist die kumulierte Zeit.
Wenn die Taste „Timer“ gedrückt wird, wird auf die Timerzeit umgeschaltet,
wenn es keinen neuen Befehl gibt, 10 Sekunden schaltet nach 10 Sekunden
automatisch auf die Anzeige der Gesamtzeit zurück.
▶Stadien: Ausgangs-Sauerstoffdurchflussmenge, insgesamt fünf Stufen
(fünf Stufen für den maximalen Durchfluss)
Einstellung des Stalls
Einzelpuls-
Sauerstoffflussrate (ML)
Zulässiger Fehler von±20 %
1 2 345
20 25 30 40 50
▶Leistungsanzeige: Zeigt den aktuellen internen Batteriestand an, der
anhand des Spannungswerts unter Berücksichtigung der tatsächlichen
Nutzungsbedingungen berechnet wird; diese Angabe dient nur als Referenz.
Auf dem Bedienfeld befinden sich insgesamt vier Betriebsanzeigen.
Die 100%-Anzeige leuchtet immer ---- Batteriekapazität≧90%.
75%-Anzeige leuchtet immer ---- 90%>Batteriekapazität≧75
50%-Anzeige leuchtet immer ---- 75%> Batteriekapazität≧50%.
25%-Anzeige leuchtet immer ---- 50%>Batteriekapazität≧25%.
25%-Anzeige leuchtet immer ---- Batteriekapazität <25%.
▶ Kontrollleuchte und Alarmleuchte:
Alarmleuchte: Diese Leuchte leuchtet immer dann auf, wenn eine Anomalie
im Betrieb des Geräts festgestellt wird, während auf dem digitalen Bildschirm
der entsprechende Alarmcode angezeigt wird, der folgende Bedeutung hat:
F0001 ---- Alarm bei schwacher Batterie.
F0002 ---- Kein Atemalarm.
F0011 ---- Hochtemperaturalarm, gleichzeitig ertönt ein Alarmton.
F0012 ---- Ein abnormaler Sauerstoffsensor-Alarm, der von einem akustischen
Alarm begleitet wird.
Niedrige Sauerstoffkonzentration: Diese Leuchte leuchtet immer dann auf,
wenn während des Betriebs des Geräts eine Sauerstoffkonzentration von
unter 82 % festgestellt wird; diese Leuchte leuchtet immer dann auf, wenn
eine Sauerstoffkonzentration von unter 50 % festgestellt wird, und gleichzeitig
ertönt ein Alarm.
Atemsignal: Diese Leuchte blinkt, wenn das Gerät während des Betriebs das
Atemsignal des Benutzers erkennt, und das Gerät gibt automatisch
Sauerstoffimpulse ab.
III. Anweisungen für den Gebrauch
Dieses Ende wird in den
Ladeanschluss des
Hauptgeräts eingesteckt
Dieses Ende wird
in den Adapter
eingesteckt
Dieses Ende wird in den
Innenraumstecker eingesteckt
Abb. für Netzkabel und Netzadapter
Abb. für Autostromkabel
Dieses Ende wird in den
Ladeanschluss des
Hauptgeräts eingesteckt.
Dieses Ende wird an den
Zigarettenanzünder im
Auto angeschlossen.

Installation und Nutzung Installation und Nutzung
24
Deutsch
23
Deutsch
1. Stromversorgung anschließen
Wählen Sie den geeigneten Stromanschluss entsprechend der Umgebung, in
der Sie das Gerät verwenden.
▶ Verwenden Sie nur den internen Akku
Das Gerät wird standardmäßig mit eingebautem Akku ausgeliefert und kann
eingeschaltet werden, wenn die Leistung ausreichend ist.
▶ Verwendung des Netzadapters
Schließen Sie das Netzteil und das Netzkabel fest an, stecken Sie dann das
Eingangsende des Netzkabels in den Innenstecker und verbinden Sie
schließlich das Ausgangsende des Netzteils mit dem Ladeanschluss dieses
Geräts. Der Akku ist vollständig geladen.
Erforderlicher Eingang: Wechselspannung 100 bis 240 V, Frequenz 50/60 Hz
▶ Verwendung des Autostromkabels in einem Auto
Schließen Sie den Eingang des Autostromkabels an den Zigarettenanzünder
des Autos an und verbinden Sie dann den Ausgang des Autostromkabels mit
dem Ladeanschluss des Geräts.
Erforderlicher Eingang: Gleichspannung DC 12~16.8V, Stromstärke 6A
2. Einweg-Sauerstoffabsorber anschließen
Schließen Sie das Hornende des Einweg-Sauerstoffabsorbers fest an den
Sauerstoffausgang des Geräts an und tragen Sie das andere Ende wie in der
Abbildung unten gezeigt.
Tragen Sie den Einweg-Sauerstoffabsorber wie in der Abbildung gezeigt,
stellen Sie die Austrittsöffnung auf eine geeignete Position
ein und drücken Sie den Befestigungsring nach oben, um
ihn nach dem Tragen zu fixieren.
Achten Sie darauf, den Schlauch des Einweg-
Sauerstoffabsorbers nicht zu knicken oder zu blockieren,
da dies einen Alarm auslösen und die normale Verwendung
des Geräts beeinträchtigen kann.
Wenn Sie einen eigenen Sauerstoffkonzentrator kaufen
m ü s s e n , w e n d e n S i e s i c h b i t t e a n I h r e n
Ausrüstungslieferanten oder lassen Sie sich von einem Arzt
beraten.
3. Erste Schritte
Drücken Sie die Ein-/Ausschalttaste, um das Gerät zu starten, wählen Sie die
entsprechende Stufe mit Hilfe der Schalttaste aus und setzen Sie den Einweg-
Sauerstoffabsorber auf, um mit der Sauerstoffinhalation zu beginnen.
Das Gerät ist eine pulsierende Sauerstoffversorgung mit eingebautem
Atemsensor. Wenn der Benutzer einatmet, gibt das Gerät automatisch
Sauerstoff ab und die Leuchte „Atmungssignal“ blinkt; wenn der Benutzer
nicht einatmet, gibt das Gerät keinen Sauerstoff ab.
4. Ausschalten
Wenn Sie die Sauerstoffzufuhr während des Gebrauchs unterbrechen
müssen, halten Sie die „Ein/Aus-Taste“ 3 Sekunden lang gedrückt, um das
Gerät auszuschalten.
Ziehen Sie am Ende des Gebrauchs den Einweg-Sauerstoffabsorber aus der
Sauerstoffsteckdose, dann das Netzkabel aus dem Ladeanschluss des Geräts
und schließlich den Netzstecker, um die Netzstromversorgung zu
unterbrechen.

Vorsichtsmaßnahmen für die Verwendung
Wartung und Pflege
26
Deutsch
25
Deutsch
I. Aufladen der Batterie
1. Aus Gründen der Transportkontrolle wird der eingebaute Akku des Geräts ab
Werk nur mit Teststrom oder gar keinem Strom ausgeliefert, so dass das Gerät
vor der ersten Verwendung aufgeladen werden muss.
2. Der eingebaute Akku wird nur automatisch aufgeladen, wenn der Netzadapter
verwendet wird; wenn das Fahrzeugstromkabel verwendet wird, d.h. es kann das
Gerät nur zum Arbeiten mit Strom versorgen und den eingebauten Akku nicht
aufladen.
3. Dieses Gerät unterstützt derzeit die Verwendung externer Akkus nicht.
4. Der Netzadapter und das Kfz-Netzkabel teilen sich dieselbe Steckdose, so
dass jeweils nur einer von beiden verwendet werden kann
5. Wenn die interne Batterieleistung unter 25 % sinkt, blinkt die Batterieanzeige,
um anzuzeigen, dass das Gerät über ein Netzteil oder ein Ladegerät mit Strom
versorgt werden soll;
6. Wenn das Gerät nicht in Betrieb ist, dauert es ca. 4-8 Stunden, bis der Akku
des Geräts vollständig aufgeladen ist.Wenn das Gerät in Betrieb ist, verlängert
sich die Ladezeit auf 9 Stunden.
7 Wenn Sie das Kfz-Netzkabel in einem Auto verwenden, schalten Sie bitte den
Motor ein und verwenden Sie das Gerät nicht bei ausgeschaltetem Motor, um zu
verhindern, dass die Autobatterie Strom verliert.Und verwenden Sie nur das
spezielle Autostromkabel.
II. Hinweise zur Nutzung der elektromagnetischen Umgebung
Um starke elektromagnetische Störungen oder Interferenzen mit anderen
elektrischen Geräten zu vermeiden, halten Sie bitte einen Abstand von
mindestens 30 cm zwischen dem Gerät und anderen Haushaltsgeräten ein.
III.Das Gehäuse des Sauerstoffkonzentrators darf von Laien nicht geöffnet
werden. Wenn professionelles Wartungspersonal den elektrischen
Schaltplan des Produkts benötigt, wenden Sie sich bitte an den Hersteller
oder den Kundendienst.
IV: Verwendung und Kauf eines Einweg-Sauerstoffkonzentrators
1. Dieses Gerät ist Puls-Sauerstoff-Versorgung Methode, verwenden Sie dieses
Gerät, muss der Sauerstoff-Absorber Verwendung angeschlossen werden.
2. Damit der Sauerstoffkonzentrator die Atmung richtig erkennen und
Pulssauerstoff abgeben kann, vergewissern Sie sich bitte, dass der Einweg-
Sauerstoffabsorber richtig installiert ist und dass der Sauerstoffabsorberschlauch
nicht geknickt oder blockiert ist.
3. Verwenden Sie keine Sauerstoffabsorber, die nicht mit diesem Gerät
kompatibel sind. Kaufen Sie Sauerstoffabsorber, die mit diesem Gerät kompatibel
sind, unter Anleitung des Geräteanbieters oder medizinischen Fachpersonals, um
den ordnungsgemäßen Betrieb des Geräts und die normale Verwendung durch
den Benutzer sicherzustellen.
I. Reinigung des Gehäuses
Wischen Sie die Außenseite des Gehäuses mindestens einmal im Monat ab:
Trennen Sie zuerst die Stromzufuhr, wischen Sie dann mit einem leicht
feuchten Baumwolltuch oder Schwamm nach, wobei Sie besonders darauf
achten müssen, dass die Flüssigkeit nicht in die Spalten des Gehäuses
eindringt.
Nach der Reinigung soll das Gerät an einem belüfteten Ort aufgestellt und 2
Stunden lang stehen gelassen werden, bis die Oberfläche vollständig
getrocknet ist, bevor es benutzt wird.
Reinigung des Einweg-Sauerstoffabsorbers
II. Der Sauerstoffabsorber soll einmal pro Woche und der Nasensauger
nach jedem Gebrauch gereinigt werden.
Etwa 5 Minuten in weißem Essig einweichen und dann mit Wasser reinigen
oder mit medizinischem Alkohol abwischen. Es wird empfohlen, den
Sauerstoffkonzentrator alle 2 Monate zu ersetzen. (Hinweis: Der
Sauerstoffabsorberschlauch soll trocken gehalten werden)
III. Wartung der Batterie
Wenn das Gerät über einen längeren Zeitraum nicht benutzt wird, muss es
alle drei Monate aufgeladen werden, um zu vermeiden, dass die
Batterieleistung über einen längeren Zeitraum hinweg sinkt und sich die
Lebensdauer der Batterie verkürzt. Jedes Mal, wenn der Akku auf 25 % bis
50% aufgeladen wird, ist dieser Vorgang bei normalem Gebrauch nicht
erforderlich.

28
Deutsch
27
Deutsch
Störungsphänomene Mögliche Ursachen Lösungen
Kann nicht
eingeschaltet werden
Batterie verbraucht Adapter zum Laden des Akkus
anschließen
Schlechte Netzkabelverbindung
Prüfen Sie den Stromanschluss
Batterie nicht korrekt
installiert Setzen Sie die Batterie wieder
richtig ein
Ausfall der Maschine
Wenden Sie sich an Ihren Fachhändler
Keine
Sauerstoffabgabe
Geknickte oder blockierte
Sauerstoffabsorberschläuche
Ersetzen Sie den Sauerstoffabsorber
durch einen neuen.
D i e K l a p p e d e s
Sauerstoffabsorbers ist
nicht fest mit dem Gerät
verbunden, so dass Luft
austritt.
Bauen Sie den Sauerstoffabsorber
wieder korrekt ein.
Fehlfunktion der Maschine Wenden Sie sich an Ihren
Ausrüstungslieferanten
Sauerstoff hat einen
schlechten Geruch
Sauerstoffabsorber wurde
lange Zeit nicht gereinigt,
was zu Verschmutzungen
in der Röhre führte
Rechtzeitig reinigen oder durch
eine neue ersetzen Sauerstoff-
Ansaugrohr
Neue Sauerstoffabsorber
können zu Beginn der
Nutzung einen leichten
Desinfe k t i o n s g e r u c h
aufweisen, dies ist normal.
Der Geruch verschwindet nach
einigen Tagen der Anwendung
von selbst.
Der Molekularturm im Inneren
der Maschine ist verstopft
Wenden Sie sich für die Behandlung
an Ihren Händler
Im Inneren der
Maschine ist
regelmäßig ein leichtes
Auspuffgeräusch
zu hören.
Wenn die Maschine
Sauerstoff produziert
Stickstoff-Abgasgeräusch
Dies ist die normale Sauerstoff-
und Stickstoffentladung der
Maschine, die ein normales
Phänomen ist.
Seriennummer Name Menge
1Hauptmaschine 1 Satz
2AC-Adapter 1Stück
3AC-Netzkabel 1 x
4Fahrzeug-Stromkabel 1 x
5Gebrauchsanweisung 1 Buch
6Einweg-Sauerstoffabsorber 2 Sätze
7Konformitätsbescheinigung 1 Blatt
8Rucksack 1
Störung und Fehlersuche
Packliste

Cher utilisateur :
Ce manuel décrit en détail les caractéristiques, les étapes de fonctionnement,
les précautions et la maintenance de ce produit.
Afin de garantir une utilisation plus efficace de ce produit, veuillez lire
attentivement ce manuel avant utilisation. Après lecture, veuillez le conserver
dans un endroit sûr pour une utilisation ultérieure ;
Sans autorisation, l'utilisateur ne doit pas démonter le produit sans
autorisation, sinon la qualification de garantie sera perdue.
Veuillez noter que notre société se réserve le droit de mettre à jour les
produits et technologies. Certaines illustrations du manuel peuvent être
différentes de ce que vous voyez sur ce produit. Par conséquent, veuillez
vous référer aux produits réels que vous avez reçus.
Avant-propos
Précautions de sécurité
29 30
FrançaisFrançais
▶Afin d'éviter une panne de courant ou une panne d'équipement, les
utilisateurs d'oxygène qui ont un besoin urgent doivent s'aider avec d'autres
dispositifs d'alimentation en oxygène de secours (tels que des bouteilles
d'oxygène, des sacs à oxygène, etc.). Ce produit ne peut pas être utilisé pour
le maintien de la vie ou l'extension de la vie ! Il ne convient pas aux nouveau-
nés ni aux nourrissons !
▶L'oxygène peut favoriser la combustion. Lorsque le matériel fonctionne, il
est strictement interdit de fumer !
▶N'utilisez pas l'appareil en présence de facteurs tels qu'une température
élevée, des étincelles et des flammes nues dans l'environnement !
▶Pour éviter les accidents, veuillez ne pas laisser les enfants utiliser seuls
l'équipement. Lorsque vous inhalez de l'oxygène, n'enroulez pas le tuyau
autour du cou. Lorsque les personnes âgées à mobilité réduite l'utilisent,
assurez-vous d'avoir un tuteur à proximité pour vous aider ;
▶Il est strictement interdit de déplacer l'appareil en tirant sur le cordon
d'alimentation ou le tuyau ;
▶Lorsque ce produit fonctionne, l'oxygène est directement séparé de l'air
pour la respiration. Par conséquent, veuillez ne pas l'utiliser dans
l'environnement de vapeurs huileuses, de gaz toxiques et nocifs ;
▶Ce produit ne peut pas être connecté à d'autres équipements non autorisés
par le fabricant ;
▶Si des accessoires sont endommagés ou manquants, veuillez contacter le
fournisseur de l'équipement ;
▶Il est interdit d'utiliser des adaptateurs non produits ou d'autres adaptateurs
qui ne répondent pas aux exigences de sécurité des normes GB9706 et 1-
2007.
▶Il est interdit d'utiliser des piles au lithium qui ne sont pas équipées avec le
produit.
▶Lorsque vous n'utilisez pas la batterie, veillez à protéger l'interface de la
batterie et l'interface de la batterie sur l'appareil. Ne touchez pas le
conducteur. Ne le touchez pas directement avec vos mains.
▶Retirez la batterie avant de mettre l'équipement au rebut et contactez les
services compétents pour une élimination appropriée de l'équipement et des
accessoires conformément aux réglementations en vigueur du gouvernement
local.

31
Français
1. Principe du produit
Ce produit utilise de l'air comme matière première, une alimentation DC12V
ou une batterie comme source d'alimentation, adopte un tamis moléculaire
importé de France de haute qualité et un petit compresseur d'air sans huile, et
utilise une méthode avancée de séparation par adsorption modulée en
pression (méthode PSA) à température ambiante pour extraire oxygène de
haute pureté; cette méthode est une méthode purement physique qui est
stable, sûre et fiable.
2. Champ d'application du produit
Il est uniquement utilisé pour le supplément d'oxygène de type santé et
beauté, pas pour un traitement médical
3. Caractéristiques structurelles
Coque entièrement en plastique, sûre et fiable ;
▶ Avec la batterie intégrée, il peut atteindre l'absorption d'oxygène à
l'extérieur;
▶Petite taille, poids léger, peut être transporté;
▶Il a pour fonction d'accumuler du temps, ce qui permet de comprendre
le temps total d'utilisation de la machine en temps réel ;
▶Il dispose d'une fonction d'alarme de concentration d'oxygène, qui peut
informer l'utilisateur de l'état de production d'oxygène de la machine en temps
réel ;
▶
Présentation du produit
Paramètre technique
1. NT-1
2.Alimentation:Courant alternatif CA 100~240V 50 60HZ
Courant continu DC 12~16.8V
3.Puissance:75 W
4.Capacité de la batterie intégrée:92 WH 6.4 AH
5.Engrenage de débit:1 à 5 engrenages (5 engrenages ont le débit le plus
élevé)
6.Concentration d'oxygène:93%±3
7.Bruit de l'ensemble de la machine:≤58dB(A) (la plus haute qualité)
8.Dimensions:7.09"*4.92"*10.63"
9.Poids net:2.95 kg
10.Classification électrique: Classe II
11.Mode d'alimentation en oxygène: alimentation en oxygène par
impulsions
12.Mode de fonctionnement de la machine:fonctionnement continu
13.Environnement de travail normal :
Plage de température ambiante:;
Plage d'humidité relative:30% à 75%;
Plage de pression atmosphérique:860 hPa à 1060 hPa
Remarque:lorsque la température de stockage et de transport est inférieure
à 5℃, l'équipement doit être placé dans un environnement de température de
fonctionnement normal pendant plus de quatre heures avant utilisation.
14.Environnement de stockage et de transport:
Plage de température ambiante:-20℃ à 60℃;
Plage d'humidité relative:10% à 93% sans condensation.
Plage de pression atmosphérique:700 hPa à 1060 hPa
Remarque:le générateur d'oxygène doit être stocké dans une pièce bien
ventilée sans forte lumière du soleil, sans gaz corrosif, et éviter les chocs
violents et l'inversion pendant le transport.
Modèle:
/
50°F à 95°F
32
Français

1. Contrôle de déballage
Avant d'installer et d'utiliser le produit, veuillez vérifier si l'apparence du produit
est intacte et si le type et la quantité d'accessoires sont conformes à la liste de
colisage du manuel d'utilisation. S'il y a un défaut, veuillez contacter le
vendeur ou le fabricant à temps.
Panneau de commande
Sortie d'oxygène
Port de chargement
Entrée d'air de refroidissement
Figure 1 Vue latérale droite –
2. Schéma d'apparence
Figure 2 Vue latérale gauche –
Remarque : il est normal que
de l'air chaud soit évacué de
l'évent d'échappement du
radiateur.
Assurez-vous que les orifices
d ' a d m i s s i o n d ' a i r e t
d'échappement s'écoulent bien
Endroit tenu à la main
Entrée d'air du compresseur
Ventilation d'échappement
de refroidissement
Remarque : L'utilisateur
ne peut pas le démonter
en privé. Le cas échéant,
renvoyez-le au revendeur
ou à un professionnel
pour élimination.
Figure 3 Schéma schématique du placement de la batterie interne –
3. Introduction à la fonction du panneau de commande
I.
▶
bouton et la machine commencera à fonctionner. Pendant que la machine
fonctionne, maintenez le bouton enfoncé pendant 3 secondes, la machine
fonctionnera ;
▶Touche shift: ajuster le débit d'oxygène de sortie ;
▶Touche minuterie: régler l'heure de chaque utilisation de la machine.
Réglable de 0 à 240 minutes ;
2. Affichage du contenu
▶Temps cumulé: afficher depuis combien de temps l'appareil a fonctionné
(unité : heure)
Présentation de la fonction des boutons
Touche d'alimentation: démarrer ou arrêter, appuyez brièvement sur le
Figure 4 Schéma du panneau de commande –
Prise mâle et femelle
de la batterie
Batterie intégrée
Couvercle de la batterie
Compartiment à piles
33
Français
Installation et utilisation
34
Français

▶Timing: afficher la durée de fonctionnement de l'appareil (unité : heure)
▶Remarque: le temps d'accumulation et la synchronisation partagent le
même affichage, l'affichage par défaut est le temps accumulé ;
Lorsque vous appuyez sur la "touche minuterie", il passe à l'heure de
chronométrage. S'il n'y a pas de nouvelle commande, il revient
automatiquement à l'affichage du temps cumulé au bout de 10 secondes.
▶Engrenage: engrenage de débit d'oxygène de sortie, un total de cinq
engrenages (le cinquième engrenage a le plus grand débit)
Réglage de l'engrenage
Débit d'oxygène à
impulsion unique (ML)
L'erreur admissible est de ± 20 %
1 2 345
20 25 30 40 50
▶Indicateur d'alimentation: indiquer la puissance actuelle de la batterie
intégrée, calculée par valeur de tension. Compte tenu de l'utilisation réelle, cet
élément est uniquement à titre de référence ;
Il y a un total de quatre voyants de batterie sur le panneau de commande :
Le voyant 100% est allumé ---- puissance de la batterie ≧90% ;
Le voyant 75% est allumé ---- 90%> puissance de la batterie ≧75% ;
Le voyant 50% est allumé ---- 75%> puissance de la batterie≧50% ;
Le voyant 25% est allumé ---- 50%> puissance de la batterie≧25% ;
Le voyant 25% clignote ---- puissance de la batterie < 25 %.
▶ Voyant indicateur et voyant d'alarme:
Voyant d'alarme: Ce voyant est toujours allumé lorsqu'une anomalie est
détectée pendant le fonctionnement de l'équipement, et le code d'alarme
correspondant s'affichera en même temps sur l'écran numérique. La
signification de chaque code est la suivante :
F0001 ---- Alarme de batterie faible ;
F0002 ---- Aucune respiration détectée ;
F0011 ---- Température élevée avec alarme;
F0012 ---- Alarme anormale du capteur d'oxygène ;
Faible concentration en oxygène: lorsque l'appareil détecte que la
concentration en oxygène est inférieure à 82%, le voyant est toujours allumé ;
lorsque la concentration en oxygène est inférieure à 50%, le voyant est
toujours allumé et une alarme retentit.
Signal respiratoire: lorsque le signal respiratoire de l'utilisateur est détecté
pendant le fonctionnement de l'appareil, le voyant clignote et l'appareil émet
automatiquement de l'oxygène.
4. Guide d'utilisation
Branchez le port de charge
de l'hôte à cette prise
Branchez l‘adaptateur
à cette prise
Branchez la multiprise
intérieure à cette prise
Schéma d'utilisation du cordon d'alimentation secteur et de l'adaptateur secteur
Schéma d'utilisation du cordon d'alimentation de la voiture
Branchez le port de charge
de l'hôte à cette prise
Branchez l'allume-cigare de
la voiture à cette prise
35
Français
Installation et utilisation
36
Français
Table of contents
Languages:
Other VARON Medical Equipment manuals
Popular Medical Equipment manuals by other brands

MDMS
MDMS ANI Monitor V2 user manual

Johnson & Johnson
Johnson & Johnson Ethicon Echelon Flex instructions

Plymouth
Plymouth Nitronox Plus quick start guide

Braun
Braun AESCULAP 3D EinsteinVision 3.0 quick guide

Whitehall
Whitehall WATER BATH SP-1600-D-B Instructions for operation and care

PARCUS MEDICAL
PARCUS MEDICAL PEEK Instructions for use