Vaughan Coldstream Picture Light WA0377 User manual

Care Instructions -
Read Before Installation
- This box contains fragile and valuable goods that
have been carefully packed. Please take utmost care
in unpacking the parcel as damage can occur in this
process.
- Please be sure you have received the correct
number of boxes i.e. 1 of 2, 2 of 2 etc.
- Under no circumstances should the product be
lifted out by the neck or light tting.
- If you have received any damaged goods or are
missing any part of your order, please contact our
sales oce as soon as possible
Recycling
-
Recyclable packaging used, please consult with
your local recycling centre for further information.
- Waste electrical products should not be disposed
of with conventional household waste. Please
recycle all parts when possible.
Cleaning Instructions
Brass - all types: Use a soft dry lint free cloth
Bronze, Nickel, Silver & Chrome: Use a dry cloth
only, no chemical cleaners
Glass: We recommend using a strong alcohol such as
isopropyl alcohol. Note: some modern cleaning
solutions can contain chemicals that can leave a
greasy lm on glass.
Gilt Wood: Use a dry cloth only
Ceramic: Use a damp cloth only
Wood: Wax polish i.e. Antique wax
Alabaster: Dust with a soft brush or a clean dry cloth.
Avoid water or water-based cleaners. Any marks that
cannot be removed by dusting must be cleaned by a
specialist.
Lacquered Furniture: Furniture polish
Crystal: Damp cloth
Card/Laminated Shades: Use a Feather duster only
Silk Shades: Gently tap to lift dust
Needlework: Dry-clean
-Any decorative parts made from other materials
must be removed and cleaned separately to avoid
damage - e.g. alabaster.
After choosing a suitable location that meets all the requirements of
the safety information, install the unit following the steps overleaf.
-Carefully unpack all parts and check for damage or missing parts
before commencing installation.
- Installation of this product must be carried out by a qualied electrical
contractor.
- Luminaire is suitable for indoor locations only.
-Be sure to follow the steps in the order given.
-Shut o power at the fuse box or circuit breaker box.
- If necessary, remove old xture and all mounting hardware from the
junction box.
- The supply wires must be rated for at least 90°C
-This product must be installed in accordance with all applicable installation codes by a person familiar with
the construction and operation of the product and the hazards involved.
- Ensure that the support for the luminaire is of sucient structural strength and that any xing screws do not
interfere with the connecting cables.
- The light must be mounted on a non-ammable surface as a xed luminaire, and is not suitable for portable
use.
- The unit can get very hot during use. Switch the product o and allow to cool before handling or changing
bulbs.
- Ensure adequate ventilation space is allowed between the unit and any object above, in front or to either
side of the unit. Suggested minimum space is 19½”above and 19½”on all sides.
- To prevent tarnishing, it is advisable to wear gloves at all times when handling the product.
Safety Information - Read Before Installation
VAUGHAN
Installation Guide
www.vaughandesigns.com
Coldstream Picture Light
WA0377
Rev 1

After choosing a suitable location that meets all the requirements of
the safety information, install the unit following the steps overleaf.
-Carefully unpack all parts and check for damage or missing parts
before commencing installation.
- Installation of this product must be carried out by a qualied electrical
contractor.
- Luminaire is suitable for indoor locations only.
-Be sure to follow the steps in the order given.
-Shut o power at the fuse box or circuit breaker box.
- If necessary, remove old xture and all mounting hardware from the
junction box.
- The supply wires must be rated for at least 90°C
-This product must be installed in accordance with all applicable installation codes by a person familiar with
the construction and operation of the product and the hazards involved.
- Ensure that the support for the luminaire is of sucient structural strength and that any xing screws do not
interfere with the connecting cables.
- The light must be mounted on a non-ammable surface as a xed luminaire, and is not suitable for portable
use.
- The unit can get very hot during use. Switch the product o and allow to cool before handling or changing
bulbs.
- Ensure adequate ventilation space is allowed between the unit and any object above, in front or to either
side of the unit. Suggested minimum space is 19½”above and 19½”on all sides.
- To prevent tarnishing, it is advisable to wear gloves at all times when handling the product.
Après avoir choisi un emplacement approprié qui répond à toutes les exigences des informations de sécurité,
installez l'appareil en suivant les étapes indiquées au verso.
- Déballez soigneusement toutes les pièces et vériez qu'elles ne sont pas endommagées ou manquantes
avant de commencer l'installation.
- L'installation de ce produit doit être eectuée par un électricien qualié.
- Le luminaire est destiné à un usage intérieur uniquement.
- Veillez à suivre les étapes dans l'ordre indiqué.
- Coupez le courant au niveau de la boîte à fusibles ou du disjoncteur.
- Si nécessaire, retirez l'ancien appareil et toutes les pièces de montage de la boîte de jonction.
- Les ls d'alimentation doivent être prévus pour une température minimale de 90°C.
- Ce produit doit être installé conformément à tous les codes d'installation applicables par une personne qui
connaît bien la construction et le fonctionnement du produit, ainsi que les risques encourus.
- Assurez-vous que le support de la lampe est susamment solide et que les vis de xation n'interfèrent pas
avec les câbles de branchement.
- Le luminaire doit être monté sur une surface ininammable en tant que luminaire xe, et ne convient pas à
une utilisation portable.
- L'appareil peut devenir très chaud pendant l'utilisation. Éteignez le produit et laissez-le refroidir avant de
manipuler ou de changer les ampoules.
- Veillez à ce qu'un espace de ventilation susant soit prévu entre l'appareil et tout objet situé au-dessus,
devant ou de chaque côté de l'appareil. L'espace minimum suggéré est de 50cm au-dessus et de 50cm sur
tous les côtés.
- Pour éviter le ternissement, il est conseillé de porter des gants à tout moment lors de la manipulation du
produit.
Informations de sécurité - À lire avant l'installation
www.vaughandesigns.com
Coldstream Picture Light Coldstream Picture Light
WA0377

3. Having identied the house-
hold wiring, connect the building
supply and the product cables
together in the wire connectors as
shown above.
Hot = (Black)
Ground = (Green)
Neutral = (White)
LLEENN
2. Using the back plate as a guide,
mark drill mounting holes into the
mounting surface.
1. Straighten the product wiring,
remove the grub screw and the
backplate from the product.
5. Reattach the product to the
backplate by engaging the lower
tabs, align with top ledge of back
plate and secure with the grub
screw.
4. Adjust the cables so they are
inside the wall box. Attach the
backplate onto the wall using
suitable xings.
www.vaughandesigns.com
Coldstream Picture Light
WA0377

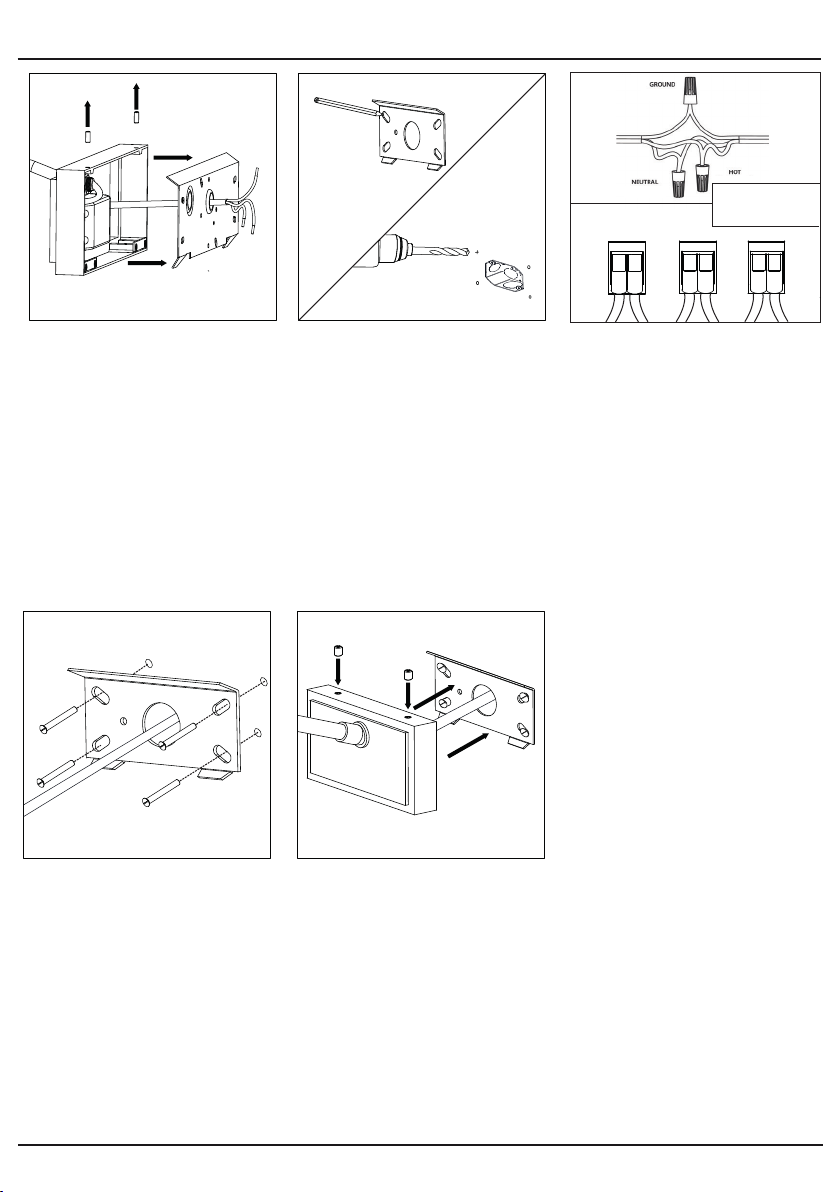
1. Redressez le câblage du produit, retirez la vis sans tête
et la plaque arrière du produit.
2. À l'aide de la plaque arrière comme guide, marquez les
trous de montage dans la surface de montage.
3. Après avoir identié le câblage domestique, connectez
les câbles d'alimentation du bâtiment et les câbles du
produit ensemble dans les connecteurs de ls comme
indiqué ci-dessus.
4. Ajustez les câbles pour qu'ils soient à l'intérieur de la
boîte murale. À l'aide de xations appropriées, xez la
plaque arrière à la surface de montage.
5. Fixez à nouveau le produit sur la plaque arrière en
engageant les languettes inférieures, alignez-les avec le
rebord supérieur de la plaque arrière et xez-les avec la
vis sans tête.
Français
1. Enderece el cableado del producto, retire el tornillo sin
cabeza y la placa posterior del producto.
2. Utilice la placa posterior como guía para marcar los
oricios en la supercie de montaje.
3. Una vez identicado el cableado de la casa, conecte el
suministro del edicio y los cables del producto juntos en
los conectores de cables como se muestra arriba.
4. Ajuste el cable para que quede dentro de la caja de la
pared. Asegure la placa posterior a la supercie de
montaje con las jaciones adecuadas.
5. Vuelva a colocar el producto en la placa posterior
mediante las pestañas inferiores, alinéelo con el borde
superior de la placa posterior y asegúrelo con el tornillo
sin cabeza.
Español
1. Ziehen Sie die Kabel des Produktes glatt, entfernen Sie den
Gewindestift und die Rückwand vom Produkt.
2. Benutzen Sie die Rückwand als Schablone und zeichnen Sie
Bohrbefestigungslöcher an die Befestigungsäche.
3. Nach Identikation der Hausstromverkabelung verbinden Sie
die Gebäudeversorgung und die Produktkabel in den
Leitungsverbindern wie oben gezeigt.
4. Stellen Sie das Kabel so ein, dass es sich in der Wanddose
bendet. Verwenden Sie geeignete Befestigungen und
montieren Sie die Rückplatte an der Befestigungsäche.
5. Montieren Sie das Produkt wieder an der Rückwand, indem
Sie die unteren Schlaufen einstellen, richten Sie es mit dem
oberen Rand der Rückwand aus und sichern Sie es mit dem
Gewindestift.
Deutsche
1. Districare il circuito elettrico del prodotto, rimuovere il grano
e la piastra posteriore dal prodotto.
2. Utilizzando la piastra posteriore come guida, segnare e
trapanare i fori di montaggio sulla supercie di montaggio.
3. Dopo aver individuato l'impianto elettrico domestico,
collegare l'alimentazione dell'edicio ai cavi del prodotto nei
connettori per cavi come mostrato sopra.
4. Sistemare i cavi in modo che siano all'interno della scatola a
parete. Utilizzando supporti adeguati, ssare la piastra
posteriore alla supercie di montaggio.
5. Riattaccare il prodotto alla piastra posteriore servendosi delle
linguette inferiori, allineandolo con la mensola superiore della
piastra posteriore e ssandolo con il grano.
Italiano
Coldstream Picture Light
WA0377
WA0377_US_IG
Table of contents
Languages:
Other Vaughan Lighting Equipment manuals
Popular Lighting Equipment manuals by other brands

IN HOUSE LED
IN HOUSE LED Dali Push user manual

SECO-LARM
SECO-LARM SL-126-A24Q installation manual

Christie
Christie CounterAct Series user guide

Zhiyun
Zhiyun CINEPEER CX100 user guide

Osram
Osram traxon ecue ARCHISHAPE 2.0 Dot S installation guide

Armacost Lighting
Armacost Lighting RibbonFlex Home 421502 quick start guide