Vax V-1800U User manual

COMMERCIAL
V-1800U
User Guide
Vax Careline: (UK) 0844 412 8455
(ROI) 1-800 928 308
Performance is everything.
vax.co.uk

1
2
9
4
5
9
10
3
6
7
8
Your machine
2
1 Handle
2 2-in-1 tool (crevice tool and
dusting brush)
3 Brushbar height adjust
4 Cord wrap (hidden)
5 Separator
6 Dirt container
7 On/o button (hidden)
8 HEPA central lter
9 TurboTool (pet version)
10 TurboTool holder
(pet version)
PLEASE NOTE: Some parts may
vary according to model. Please check
inside ap of box for more details.

General Safety Information
3
FOR HOUSEHOLD USE ONLY.
When using the vacuum cleaner, basic safety precautions should always be observed, including the following:
1. Only use the vacuum cleaner indoors on dry surfaces.
2. Turn o the vacuum cleaner controls before disconnecting or connecting from the mains supply.
3. Always unplug the vacuum cleaner before connecting or disconnecting the vacuum hose and accessories.
4. Children should be supervised to ensure that they do not play with the appliance.
5. This appliance can be used by children aged 8 years and above and persons with reduced physical, sensory or mental
capabilities or lack of experience and knowledge if they have been given supervision or instruction concerning use of the
appliance in a safe way and understand the hazards involved. Children shall not play with the appliance. Cleaning and user
maintenance shall not be made by children without supervision.
6. Use only as described in this manual. Use only Vax recommended attachments.
7. Do not use the vacuum cleaner if it has been dropped, damaged, left outdoors or dropped into water. Do not use the vacuum
cleaner with a damaged cord or plug. If the supply cord is damaged, it must be replaced by the manufacturer or a recommended
Service Agent to avoid hazard and invalidating the guarantee.
8. Do not pull or carry by cord/hose. Do not use the cord/hose as a handle, close a door on the cord/hose or
pull cord/hose around sharp edges or corners. Do not run the vacuum cleaner over the cord/hose. Keep the
cord away from heated surfaces.
9. Do not handle the plug or vacuum cleaner with wet hands. Do not use outdoors or on wet surfaces.
10. Do not put any objects into openings. Do not use with any openings blocked and do not restrict air-ow.
Keep all openings free of dust, lint, hair or anything that might reduce airow.
11. Keep hair, loose clothing, ngers and all parts of the body away from openings and moving parts.
12. Do not pick up hot coals, cigarette butts, matches or any hot, smoking or burning objects.
13. Do not pick up ammable or combustible materials (lighter uid, petrol, kerosene etc.) or use in the presence
of explosive liquids or vapours.
14. Do not vacuum up harmful or toxic material (chlorine, bleach, ammonia, drain cleaner etc.).
15. Do not vacuum up hard or sharp objects such as glass, nails, screws, coins, etc.
16. Do not use without ALL of the lters in place.
17. Take extra care when vacuuming on stairs.
18. Keep vacuuming area well lit.
19. Store the vacuum cleaner in a cool, dry area.
20. Turn o the on/o switch before unplugging the vacuum cleaner
21. Use only CE-approved 13 amp extension cords. Non-approved cords may overheat. Care should be taken to
arrange the cord so that the cord cannot be tripped over.
WARNING: Always switch o and unplug the vacuum cleaner from the electrical socket before assembling, opening or emptying
the dirt container, or before connecting/disconnecting the attachments.
CAUTION: The vacuum cleaner is a very powerful unit. Before plugging the cord into the electrical socket, make sure the switch
is in the ‘o’ position.
IMPORTANT: If the brushbar or hose is blocked, switch o the vacuum cleaner and remove the blockage(s) before re-starting the
vacuum cleaner. See Maintenance; Clearing Blockages.
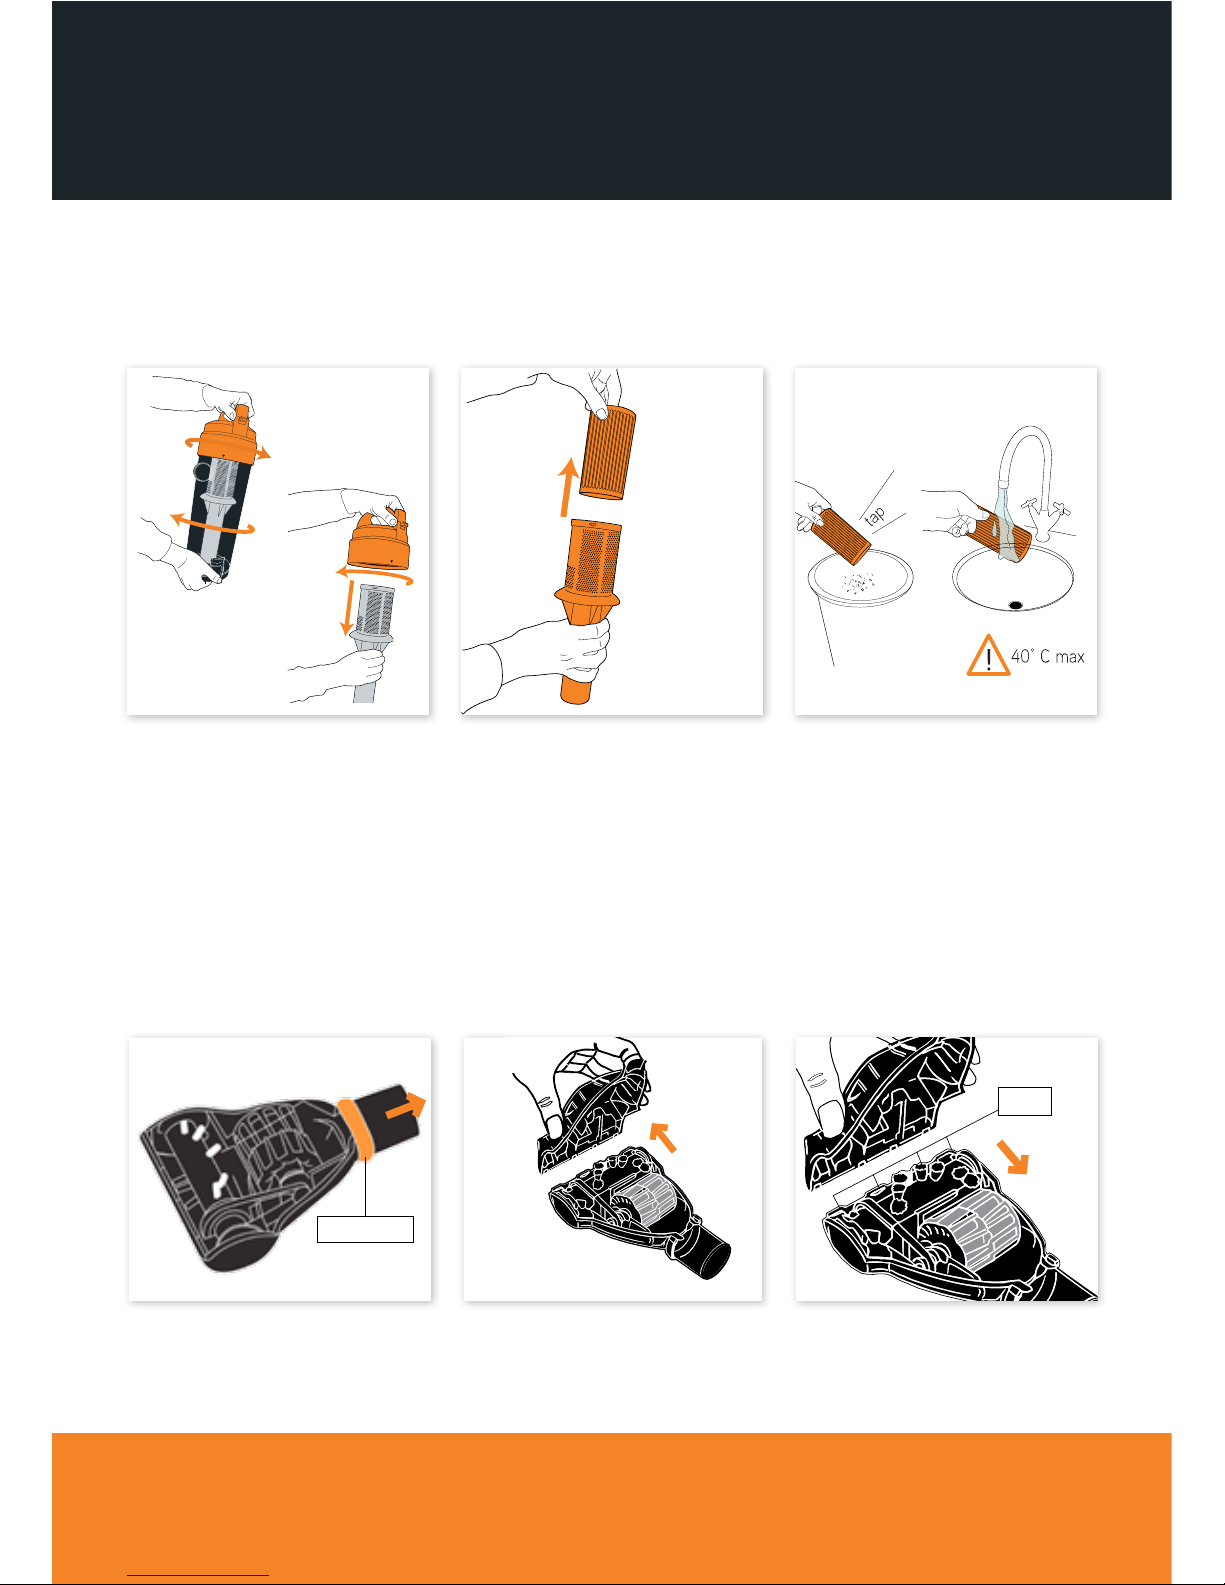
IMPORTANT: Cleaning lters maintains vacuum performance. Vax recommends that your lters should be checked and cleaned
at least every 3 months (depending on the level of use). If your lters are washable make sure they are completely dry before
inserting back into the vacuum cleaner.
IMPORTANT: The motor is equipped with a thermal cut-out. If for any reason the unit should overheat, the thermostat will
automatically turn the unit o. Should this occur, unplug the vacuum cleaner from the electrical socket and turn o the switch.
Remove dirt container and empty. Clean lters. Allow the unit to cool for approximately one (1) hour. To re-start, plug into an electrical
socket and switch back on.
This vacuum cleaner is intended for household use only and NOT for commercial or industrial use.
PLEASE KEEP THESE INSTRUCTIONS FOR FUTURE REFERENCE.
vax.co.uk

Getting started
4
Assembling your upright
PLEASE READ SAFETY INFORMATION BEFORE USE (PAGE 3)
Using a crosshead screwdriver,
remove the screw from the back of
the unit as shown.
Slide the handle down onto the
main body of the unit.
Return the screw and tighten,
securing the handle into the main
body of the unit.
Insert the lower hose to the lower
hose connector.
Place the 2-in-1 tool into the
holder.
Connect the upper hose to the
upper hose connector, rotate hose
clockwise to secure.

5vax.co.uk
Attach the TurboTool holder to
handle. Then t the Turbotool to
the TurboTool holder.
Attaching the TurboTool holder
1
2

How to use
6
Twist the upper cord wrap to fully
unwrap the cord then plug the
unit into the electrical socket and
turn on.
Place foot on the on/o button to
switch the vacuum cleaner on.
Place foot on the vacuum to
recline the vacuum body as
desired.
Operating the appliance
IMPORTANT: Vax recommends
that you raise the height of
the brush bar to the hard oor
position when using this cleaner
on lino and hard oor due to
constant rotation. Vax cannot be
held responsible for damage to
these surfaces if the consumer
fails to take notice of this
recommendation.
Select a oor height setting by
adjusting the brush bar height.
High – long carpet pile.
Low – short carpet pile.
Hard oors

7vax.co.uk
Using the accessories
Pull out the lower hose from the
lower hose connector.
To use the dusting brush, push the
tab and slide up the dusting brush
until it clicks into place.
Choose an accessory, then attach to
the end of the hose.
IMPORTANT: When the vacuum cleaner is stood in the upright position, or when using the hose and tools, the
brush bar height adjust must be set to the highest position.

Looking after your machine
8
Press dirt container release button
to remove the dirt container.
Turn the lid of the dirt container
anticlockwise to remove.
Wipe the separator with a cloth to
remove any dirt.
Emptying and cleaning the dirt container
Cleaning the separator
Hold dirt container over a bin and
press the dirt container latch to open,
allowing dirt to fall out.
Always switch o the appliance and unplug
the mains socket before carrying out any
maintenance.

9vax.co.uk
Clearing blockages
Hose blockages
The exible hose may be disconnected from the
vacuum cleaner. Carefully remove any blockages
found and reconnect the hose securely.
Accessory blockages
Remove accessory from the hose. Carefully remove
the blockage and return to the cleaner.
Turn the lid of the dirt container anti-
clockwise to remove the lid. Then turn
the separator clockwise to remove
lter from the dirt container lid.
Cleaning the HEPA lter
Remove the HEPA central lter
from the separator.
Tap the HEPA central lter against a bin
and wash it under running water (max
400c. Dry thoroughly (24 hrs) before
returning lter to the unit.
IMPORTANT: It is very important to keep the lters clean to maintain
maximum performance of the vacuum. Vax recommend that your lters
should be cleaned at least every 3 months (depending on the level of
use). Do not use detergent to clean the lters.
TurboTool blockages
Tabs
Slide o the locking ring. To re-assemble the TurboTool, ensure
that the tabs are engaged and pivot the
lower housing closed. Slip the locking
ring over the neck of the TurboTool and
into the groove to secure.
Detach lower housing and remove
blockage.
Locking ring

Looking after your machine
10
Replacing the belt
Remove the brushbar cover from
the base of the unit.
Lift the brush bar out of the base of
the unit. Next, remove the belt from
the brushbar and from the motor
spindle towards the rear of the oor
head. Replace the belt.
Turn unit over and remove the
three screws using a crosshead
screwdriver as indicated by arrows.

FAQs
11vax.co.uk
1 Why won’t the vacuum cleaner turn on?
•Itmaynotbepluggedintotheelectricalsocketcorrectly;ensurethattheplugispushedinsecurely.
•Theelectricalsocketmaynotbeworkingproperly;checkthefuseorbreaker,orconsultan
electrician.
•Themotorthermostatmayhavetripped;switchoandunplugthevacuumcleaner,andleavefor
one hour before switching the cleaner back on.
2 Why won’t the vacuum cleaner pick up?
•Thedirtcontainermaybeincorrectlyinstalled;removethedirtcontainerfromtheunitbypressing
the dirt container release button and then re-attaching it to the unit, ensuring it is locked rmly back
into place.
•Theltermaybeclogged;referto‘Maintenance:Cleaningthelters’onpages9.
•Thedirtcontainermaybeblocked;referto‘Maintenance:Emptyingandcleaningthedirtcontainer’
on page 8.
•Theremaybeablockageinthehose/tube;disconnectfromthevacuumcleaner.Carefullyremove
any blockages found and reconnect securely.
3 Why is dust escaping from the vacuum?
•Theltermaybeclogged;referto‘Maintenance:Cleaningthelters’onpages9.
•Thedirtcontainermaybeblocked;referto‘Maintenance:Emptyingandcleaningthedirtcontainer’
on page 8.
•Thedirtcontainermaybeincorrectlytted;removethedirtcontainerfromtheunitbypressingthe
dirt container release button and then re-attaching it to the unit, ensuring it is locked rmly back
into place.
4 Why won’t the accessories pick up properly?
•Hoseblockages:removethehosefromtheunit.Carefullyremoveanyblockagesfoundand
reconnect hose securely.
•Accessoryblockages:removeaccessoryfromhandle/tube.Carefullyremoveblockageandre-
attach to the vacuum cleaner.
•Theaccessorymaybefaulty.Simplycalluson0844 412 8455 for assistance.

Machine Overview
Service & Help
Any queries or concerns about using your Vax, simply visit; vax.co.uk/support - vaxireland.ie or, call the Vax
Careline. Calls are charged at the UK local rate. Please make a note of the serial number and model number of
the vacuum cleaner before calling.
Vax Careline:
(UK) 0844 412 8455
(ROI) 1-800 928 308
Monday - Friday 8.30am to 6.30pm
Saturday - 9.00am to 5.00pm
Consumables
To purchase spares and accessories, please visit vax.co.uk/support
The use of genuine vax spare parts helps to maintain optimised
performance and validates your guarantee
Filter kit (Type 61): 1-1-132045-00
Belt kit (Type 17): 1-1-132048-00
Technical Specication
Voltage: 220-240V -50Hz
Wattage: 1800W
Capacity: 2.4L
Cord length: 7.5m
Weight: 4.7kg (dependant on model)
Subject to technical change without notice.
EEC Statement of Compliance
Manufacturer/EEC importer: Vax Limited, hereby on our own responsibility, declare that the
V-1800U is manufactured in compliance with the following Directives:
Safety: 2006/95/EC Low Voltage Directive
EMC: 2004/108/EC Electromagnetic Compatibility Directive
Disposal
This product should not be disposed of with the house-hold waste. Please recycle where facilities exist.
Check with your Local Authority or retailer for recycling advice.
12

Notes
13vax.co.uk

Notes
14

Notes
15vax.co.uk

COMMERCIAL
Vax Ltd., Kingswood Road, Hampton Lovett, Droitwich, Worcestershire, WR9 0QH, UK
Version 1.0
Performance is everything.
Table of contents
Other Vax Vacuum Cleaner manuals

Vax
Vax bubble vs-21 Product information sheet

Vax
Vax U88-M8-B User manual

Vax
Vax Force 10 Cyclonic VZL-401CSP User manual

Vax
Vax Cordless Slim Vac Series User manual

Vax
Vax VMCP1400 User manual

Vax
Vax VRS7W SERIES User manual

Vax
Vax V-2000 U User manual

Vax
Vax U88-T4 series User manual

Vax
Vax Essentials VEU-102 User manual

Vax
Vax VAU1200 User manual

Vax
Vax h85-ga-b10 Specification sheet

Vax
Vax C85-EW Series Installation instructions

Vax
Vax Mach 1 SERIES User manual

Vax
Vax C85-AS-PH-E User manual

Vax
Vax S10 Series User manual

Vax
Vax V-118 User manual

Vax
Vax DynamoPower C85-Z2-Re User manual

Vax
Vax VO-3000 Product information sheet

Vax
Vax Dual Power Max VRS801 Installation instructions

Vax
Vax VCT-01 User manual