Vectronic Aerospace V6 User manual

Drop Off Realease Transmitter V6
Last Change: 20.07.2022
User's Manual

All rights reserved. No parts of this work may be reproduced in any form or by any means - graphic, electronic, or
mechanical, including photocopying, recording, taping, or information storage and retrieval systems - without the
written permission of the publisher.
Products that are referred to in this document maybe either trademarks and/or registered trademarks of the
respective owners. The publisher and the author make no claim to these trademarks.
While every precaution has been taken in the preparation of this document, the publisher and the author assume no
responsibilityfor errors or omissions, or for damages resulting from the use of information contained in this
document or from the use of programs and source code that may accompany it. In no event shall the publisher and
the author be liable for any loss of profit or any other commercial damage caused or alleged to have been caused
directly or indirectly by this document.
Release Transmitter Terminal
© 2022 VECTRONIC Aerospace GmbH
User's Manual
Raef Mohamed 13.04.2022
Martin Müller
Kai-Immo Wels
Raef Mohamed
Kai-Immo Wels
02.06.2022
10.06.2022
16.06.2022
05.07.2022

Document Change Record

Table of Contents
...............................................................................................................5
1Product Overview
...............................................................................................................6
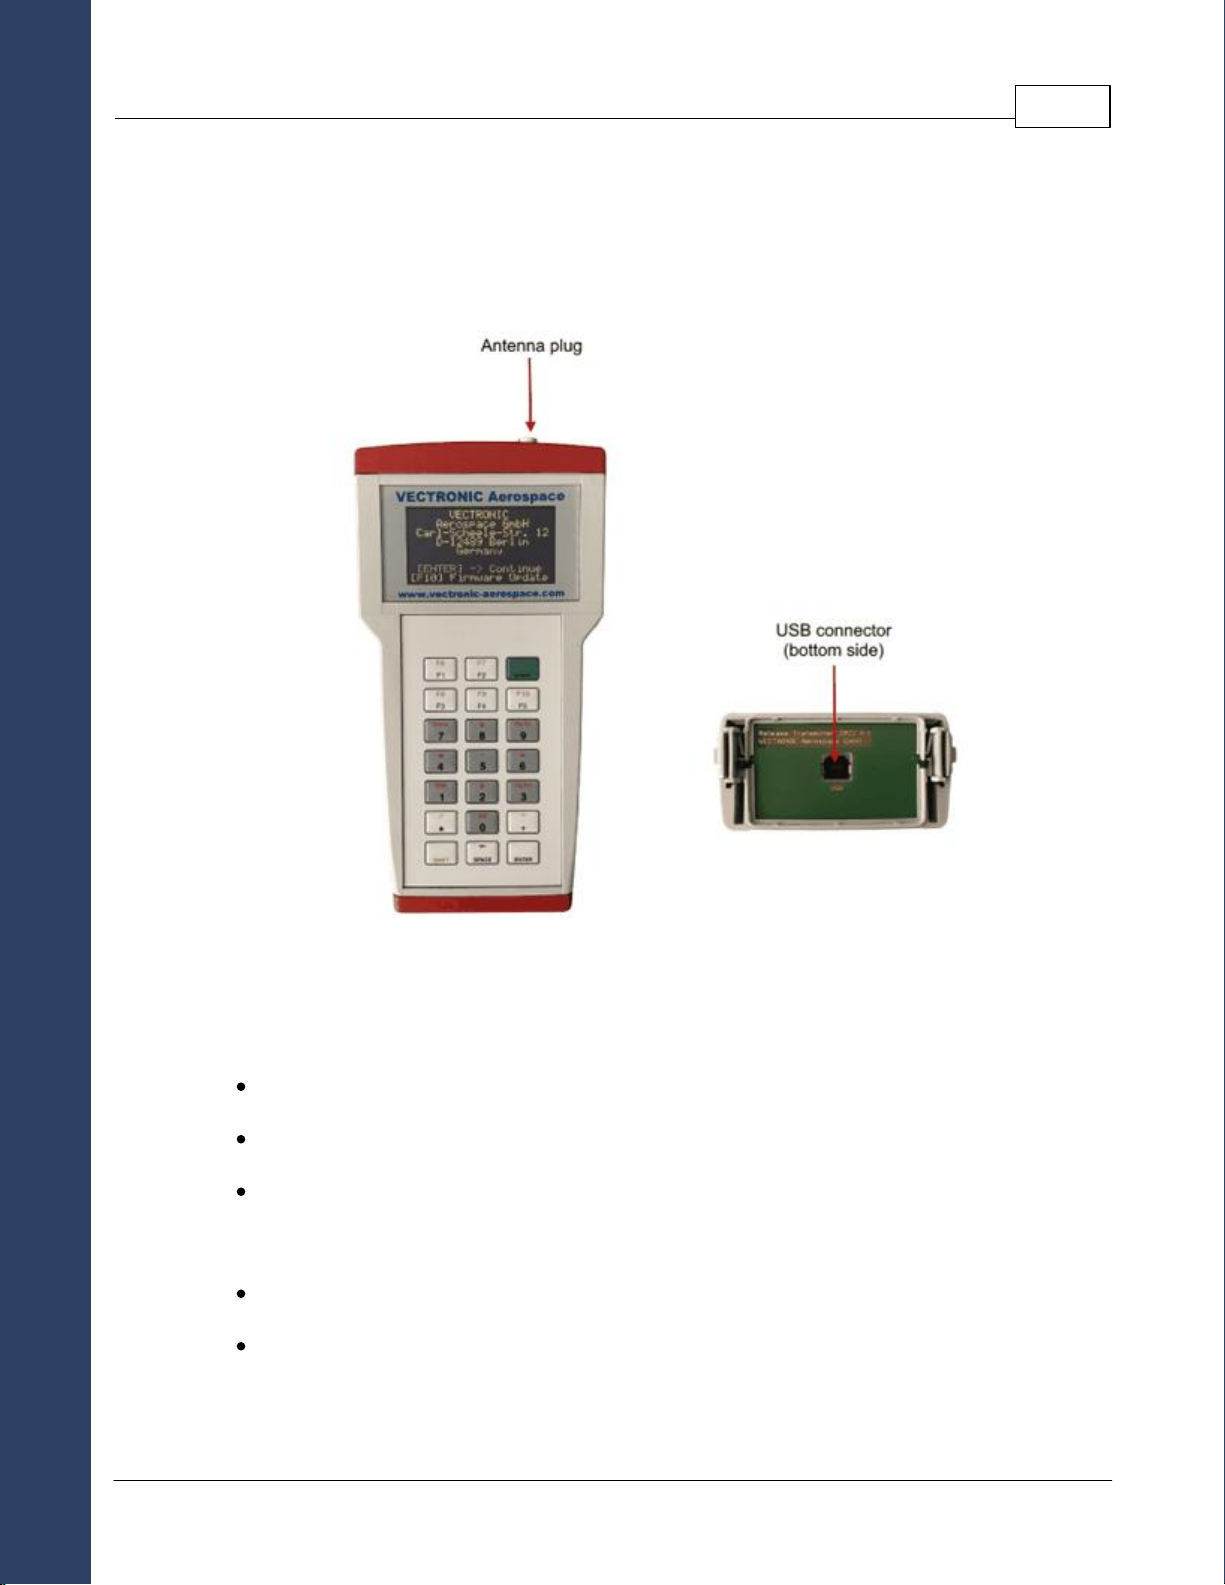
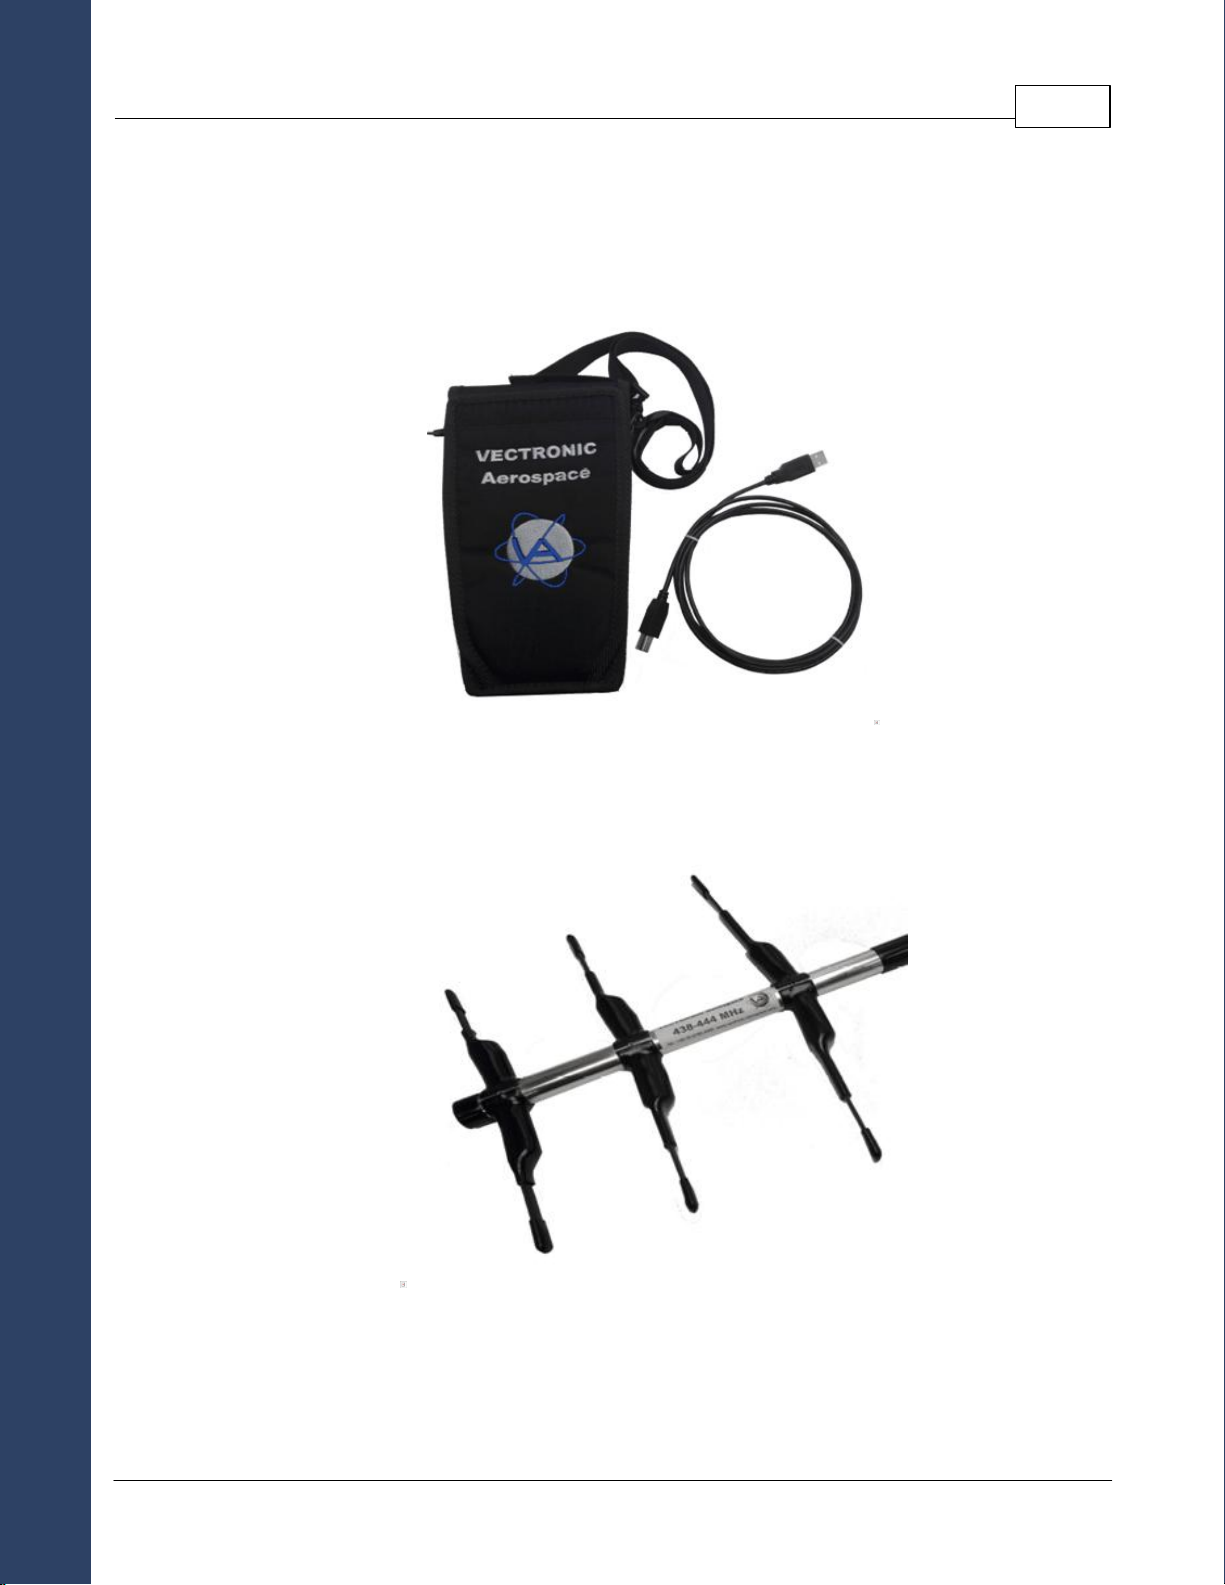
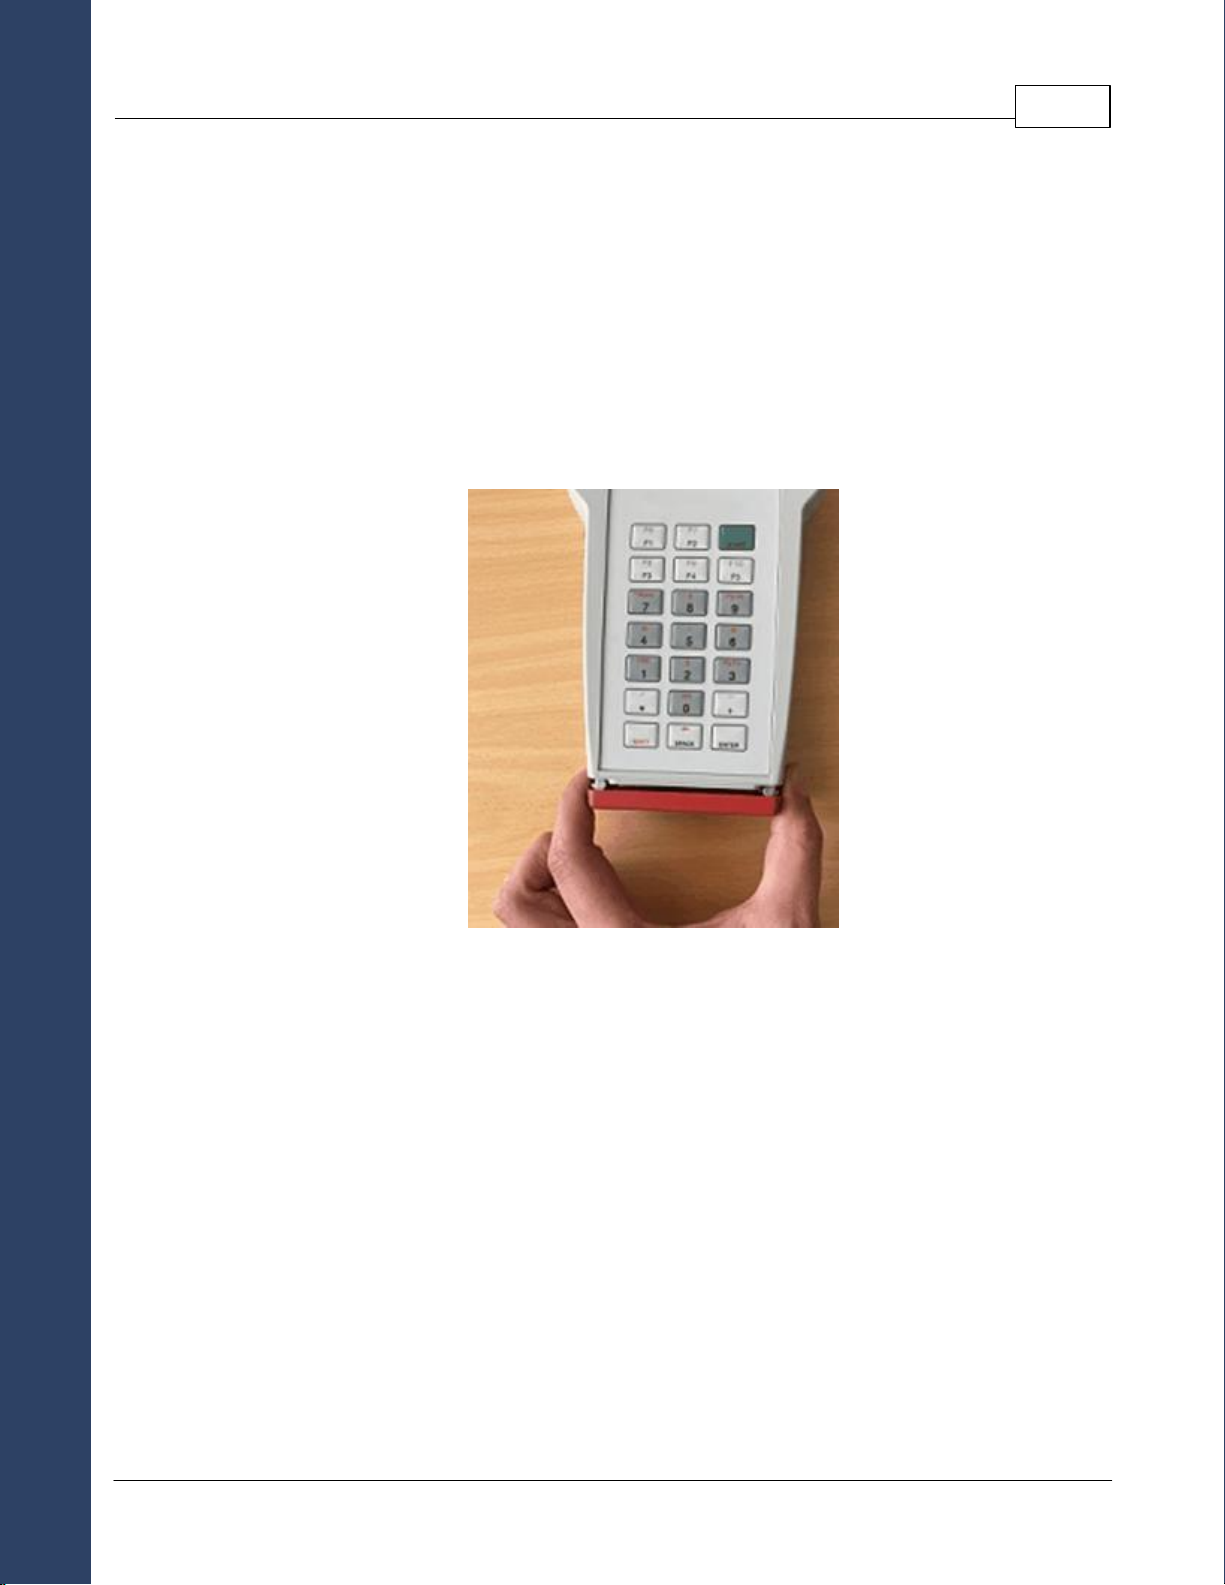
2Terminal Equipment
...............................................................................................................8
3Battery charging
...............................................................................................................9
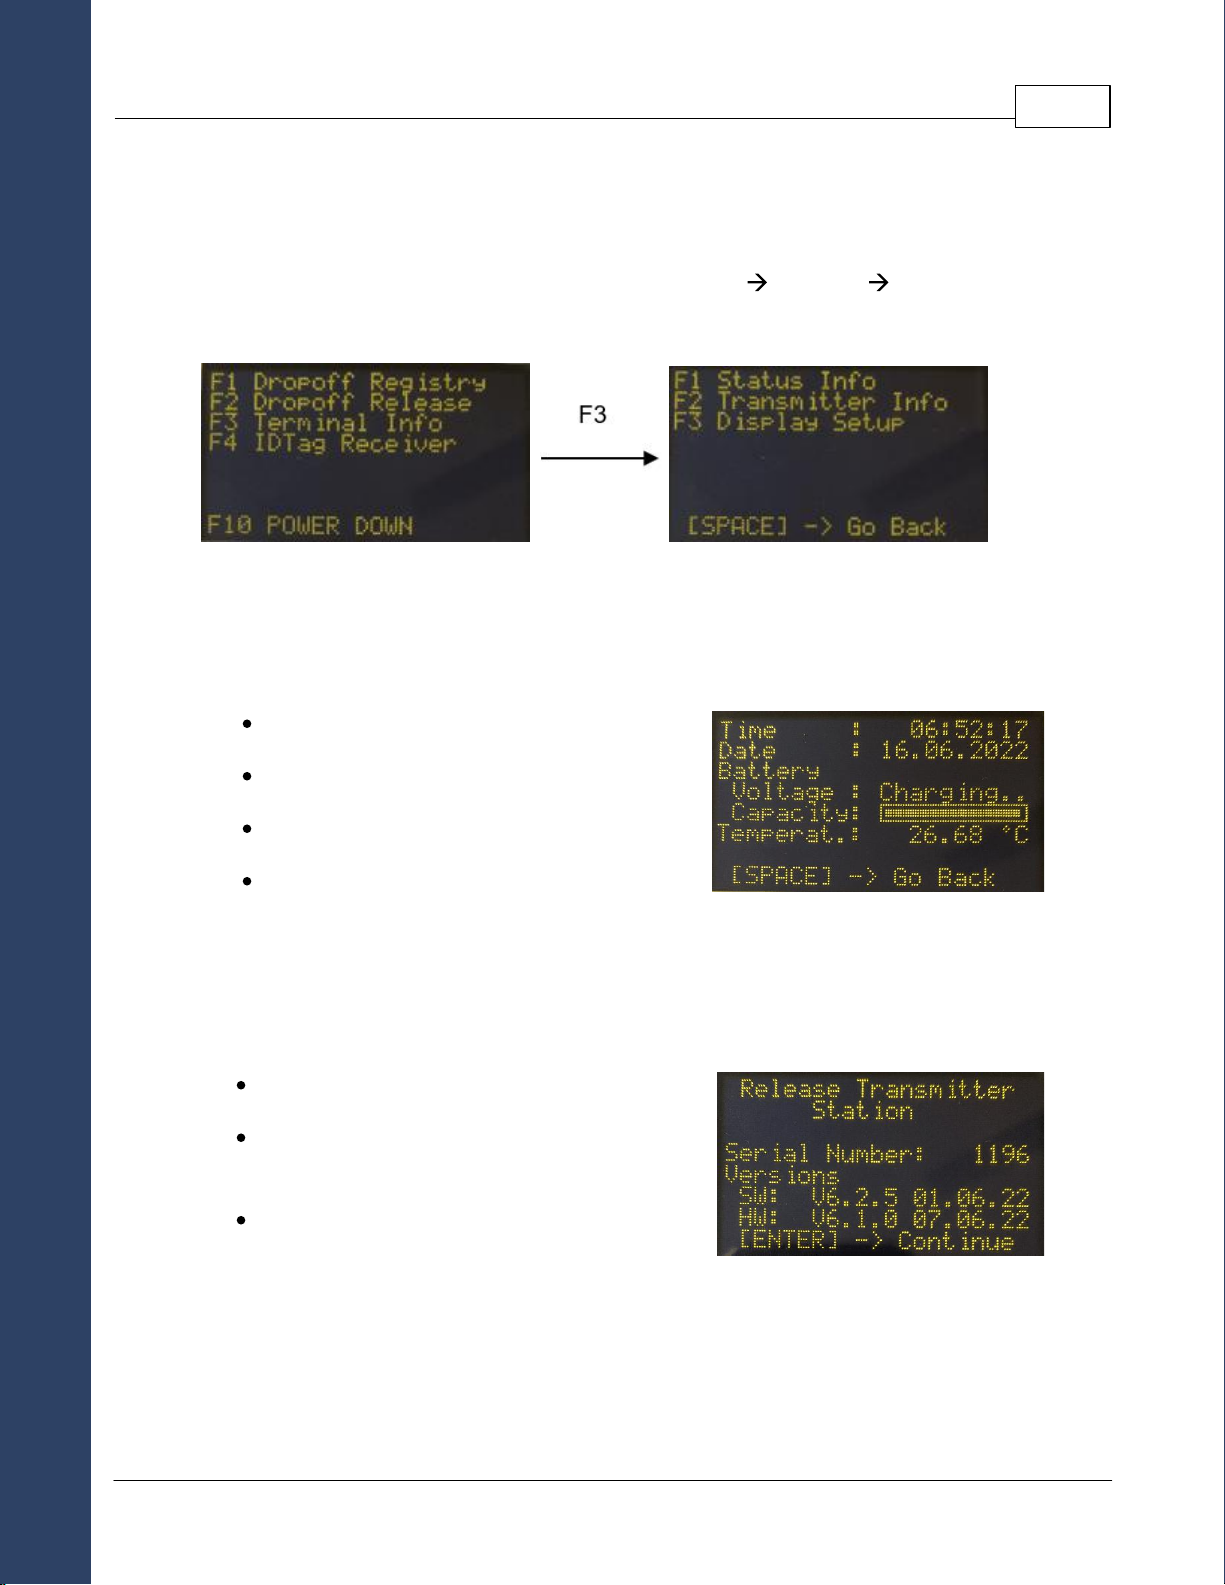
4Terminal Information
...................................................................................................................... 94.1 F1 - Status Info menu
...................................................................................................................... 94.2 F2 - Transmitter Info menu
...................................................................................................................... 104.3 F3 - Display Setup menu
...............................................................................................................11
5Set-up
...................................................................................................................... 115.1 Install Release Transmitter Manager software and drivers
...................................................................................................................... 115.2 Connect Release Transmitter terminal
...................................................................................................................... 115.3 Open Release Transmitter Manager application
...............................................................................................................13
6Drop Off Registry
...............................................................................................................17
7Drop Off Configuration
...................................................................................................................... 177.1 Read Drop Off configuration
...................................................................................................................... 187.2 Update UTC Time
...................................................................................................................... 197.3 Set Release Time
...................................................................................................................... 197.4 Write Configuration
...............................................................................................................20
8Radio Drop Off Release
...............................................................................................................22
9UHF ID Tag Receiver
...............................................................................................................23
10 Power Down

Product Overview 5
© 2022 VECTRONIC Aerospace GmbH
1 Product Overview
The Release Transmitter enables you to release radio controlled VECTRONIC Drop
Offs remotely, receive collar’s UHF ID Tags or configure Drop Offs before deployment.
Figure 1: Release Transmitter terminal
While the Release Transmitter is connected to the PC via USB cable, the following
functions are available in the Release Transmitter Manager software:
Register Drop Off IDs for remote release
Read Drop Off’s configuration
Modify Drop Off’s release mode and release time configuration
As a stand-alone device on-site you can:
Release radio controlled Drop Offs remotely
Check UHF ID Tag signals from collars and proximity tags

Terminal Equipment 6
© 2022 VECTRONIC Aerospace GmbH
2 Terminal Equipment
The Release Transmitter is delivered with a protection bag, USB cable and UHF YAGI
antenna.
Figure 2: Protection Bag & USBcable
Figure 3: UHF YAGI antenna

Terminal Equipment 7
© 2022 VECTRONIC Aerospace GmbH
To release Drop Offs remotely, an UHF Yagi antenna is required. Please do not use
other antennas for Drop Off release, the terminal could be damaged by this.
Connect the antenna to the antenna plug on the top right of the terminal.
To recharge battery, register Drop Offs or load and modify Drop Off’s configuration,
remove the bottom cap of the terminal as shown in Figure 4 and connect it to your PC
using the USB cable. In this case, the UHF YAGIantenna is not required and we
recommend disconnecting the antenna.
Figure 4: Bottom Cap

Terminal Equipment 8
© 2022 VECTRONIC Aerospace GmbH
3 Battery charging
Before you release a radio Drop Off in the field make sure that the Release Transmitter
battery is fully charged.
To charge the battery you have to connect the Release Transmitter via USB cable to the
PC or a standard USB charging adapter with a minimum power of 5W. To check the
charging of the battery, you can perform the following steps:
Press START and switch between menus as shown below:
Figure 5: Start menu
Figure 6: Transmitter Info menu
Figure 7: Main menu
Figure 8: Terminal Info menu
Figure 9: Status Info menu
Now the status of battery and capacityare displayed.

Battery charging 9
© 2022 VECTRONIC Aerospace GmbH
4 Terminal Information
Information about the Release Transmitter is shown in the Terminal Info menu. At first
open the terminal’s Main menu by pressing START ENTER ENTER. Afterwards
press F3 to enter the Terminal Info menu where you can select different submenus.
Figure 10: Main menu
Figure 11: Terminal Info menu
4.1 F1 - Status Info menu
In this menu,the following information can be monitored:
UTC time and date of the device
Battery status (voltage)
Battery capacity
Ambient temperature
Figure 12: Status Info menu
4.2 F2 - Transmitter Info menu
In this menu,the following information can be monitored:
Serial number of the Release Transmitter
SW: Software version and
date of release
HW: Hardware version and
date of production
Figure 13: Transmitter Info menu

Terminal Information 10
© 2022 VECTRONIC Aerospace GmbH
4.3 F3 - Display Setup menu
In this menu,display contrast can be configured:
Maximum contrast value is 255 (default)
Use keypads 2 or 8
to change the contrast value
Press F1 to apply new contrast value
Press F2 to store selected contrast value
Figure 14: Display Setup menu

Terminal Information 11
© 2022 VECTRONIC Aerospace GmbH
5 Set-up
To register Drop Offs for remote release or change Drop Off’s configuration,you first
have to load the according Drop Off Keys via the Release Transmitter Manager to your
terminal.
5.1 Install Release Transmitter Manager software and drivers
The installer software of this application installs the Release Transmitter Manager and
required drivers automatically. The installer is available for download on our website at:
https://www.vectronic-aerospace.com/downloads/
Afterwards execute the installer application.
Please note that this application only supports hardware version V6 of the
Release Transmitter series. Older versions are not supported.
5.2 Connect Release Transmitter terminal
Remove the red cap on the bottom side of the Release Transmitter by pressing the two
plastic clamps. Connect the terminal to the PC via the supplied USB cable. Press
START to turn on the Release Transmitter and afterwards ENTER to initiate the
communication.
5.3 Open Release Transmitter Manager application
The Release Transmitter Manager provides the following functionalities:
Inspect Release Transmitter’s configuration
Register Drop Off devices
Configure Drop Off’s release mode and release time
After opening the Release Transmitter Manager software on the PC, connected
Release Transmitter terminals are recognized automatically and according device
information is displayed in a treeview menu on the left section of the Release

Set-up 12
© 2022 VECTRONIC Aerospace GmbH
Transmitter Manager window as shown below.
Figure 15: Release Transmitter Manager with connected Release Transmitter
By selecting ‘Configuration’ in the treeview menu, the current configuration of the
connected Release Transmitter is displayed in the Configuration tab on the right side of
the window. There the terminals device time can be adjusted and set to UTC time by
clicking ‘Set To PC Time (UTC)’ as shown in Figure 15. This is required in case the
UTC Time is not set correctly.
Furthermore an info text file with this configuration details can be stored by selecting the
Info File tab and ‘Save as Textfile’ afterwards.

Set-up 13
© 2022 VECTRONIC Aerospace GmbH
6 Drop Off Registry
In order to communicate with a Drop Off, the device has to be registered on the Release
Transmitter. For this, the associated Drop Off registration key is needed. All supported
devices from VECTRONIC Aerospace GmbH are shipped with the corresponding key
files with .key extension.
At first, upload the Drop Off key files to the Release Transmitter Manager software. Click
the ‘Manage Drop Off Files’ tab in the upper left section as shown in Figure 16.
Figure 16: Manage Drop Off key files
Afterwards click ‘Add Folder’ and then select the path to the folder in which your key files
are located. You can also drag and drop the folder on the application window.
Note: Any windows directory can be added to the application. The folder may contain no
key files and can also contain other files or subfolders. When detecting key files from
added folders, key files stored in subdirectories will be not detected. In this case, the
subdirectory must be added as well.
By adding a folder, the software attempts to detect all containing key files. Changes of
the folder content during runtime of the application can be updated by clicking the
‘Refresh Content’ button.

Drop Off Registry 14
© 2022 VECTRONIC Aerospace GmbH
The detected and uploaded Drop Off key files are displayed in the lower half of the
window in the Drop Off ID list as shown in the following Figure 17.
-Figure 17 : Upload Drop Off key files
If a Drop Off entry is not shown, the according key file is possibly not valid or there are
permanent issues from the operating system to access the folder.
Added folders can be removed by right clicking the uploaded folder and selecting
‘remove’.
Next step is to register the Drop Offs on the Release Transmitter. Select the ‘Register
Drop Offs’ tab in the upper left section of the Release Transmitter Manager window.The
opening frame shows the Drop Off registry consisting of two separated tables, see
Figure 18.
The left table shows all available Drop Off IDs uploaded to the Release Transmitter
Manager. The right table shows a drop-down box where each connected Release
Transmitter can be selected and a list of all Drop Offs currently registered on that
device.
Adding and removing Drop Offs to the transmitter is achieved by selecting the desired
devices with the mouse and then clicking the arrow buttons in the middle section in the
window. Double-clicks and right-clicks are enabled as an alternative method as well. As

Drop Off Registry 15
© 2022 VECTRONIC Aerospace GmbH
shown in Figure 18 in the right table, when you add or remove Drop Off IDs, these IDs
are marked by green or red arrows as long as the changes are not applied to the
transmitter.
Figure 18: Drop Off registry
The changes are confirmed by clicking the “Update Transmitter” button.
After applying the changes those arrows will disappear and an updated Drop Off List
with the registered IDs will be displayed in the right table as well as in the treeview menu
on the left side of the window.

Drop Off Registry 16
© 2022 VECTRONIC Aerospace GmbH
Figure 19: Updated Drop Off registry
The registered Drop Off IDs can be double checked on the Release Transmitter via
pressing F1 button in the Release Transmitter’s Main menu.
Figure 20: Main menu
Figure 21: Drop Off list

Drop Off Registry 17
© 2022 VECTRONIC Aerospace GmbH
7 Drop Off Configuration
Drop Offs,which are registered to a connected Release Transmitter can be configured
by selecting one of the IDs in the Drop Off list on the left side as shown in Figure 22.
-Figure 22 : Drop Off selection
7.1 Read Drop Off configuration
Loading configuration is achieved by clicking ‘Read Drop Off Configuration’. This will
open a connection window prompting the user to attach the magnet to the Drop Off and
detach it again afterwards, see Figure 23.
Note: User is required to attach the magnet at least one second and then detach it to
initiate the communication. The Drop Off is always shipped with attached magnet to
deactivate the Drop Off timer.
Figure 23: Drop Off connection

Drop Off Configuration 18
© 2022 VECTRONIC Aerospace GmbH
Once the configuration has been loaded from the Drop Off, the device information is
presented as shown in Figure 24.Information could be saved as text file by selecting the
Info File tab and and ‘Save as Textfile’ afterwards.
Figure 24: Drop Off read configuration
7.2 Update UTC Time
User can update the UTC time by clicking ‘Set To PC Time (UTC)’.

Drop Off Configuration 19
© 2022 VECTRONIC Aerospace GmbH
7.3 Set Release Time
Drop Offs can be configured with any of these two time modes.
Absolute Time Mode:
The Drop Off releases exactly at the specified date and time. Please note that all
dates of the Drop Off refer to the Coordinated Universal Time (UTC) which may
be different to the local time.
Relative Time mode:
The Drop Off will be released after a specified time interval which can be
provided using weeks, days, hours, minutes and seconds.
Note: The Relative time resets whenever a magnet is applied to the device.
Consequently, restarting the relative time does not require the use of this
application and can be performed in the field.
7.4 Write Configuration
Writing the changed settings is achieved by clicking ‘Write Configuration’. A connection
window will open prompting the user to attach and detach magnet as shown in Figure
23.User is required to attach the magnet at least one second and then detach it again in
order to initiate the communication and write the configuration.

Drop Off Configuration 20
© 2022 VECTRONIC Aerospace GmbH
8 Radio Drop Off Release
The main feature of the Release Transmitter is to release a radio controlled Drop Off on
demand. The maximum range for this is 500 m. If possible, release the Drop Off while
you can see the animal.
Note: Prior to preparing the Drop Off release,make sure the transmitter’s battery is fully
charged and the voltage is about 4 Volt. Otherwise there might not be enough power to
reach the Drop Off ideally.
Note: Connect the UHF YAGI antenna to the device. A wrong or missing antenna can
damage the device as the amplified signal discharges internally.
Note: It is possible that the animal will be startled when the collar is released and drops
down. Avoid triggering the Drop Off if the animal is in a situation where it could get hurt
by erratic movements (e.g on a cliff edge).
To release a Drop Off, switch on the transmitter,jump to the Main menu and follow the
steps shown below. In the ‘Drop Off Release’ menu (see Figure 26) the desired Drop Off
ID can be selected by pressing keypad 2 or 8
Figure 25: Main menu
Figure 26: Drop Off Release menu
Figure 27: Drop Off Fire menu
Figure 28: Confirm Fire menu
Table of contents
Other Vectronic Aerospace Transmitter manuals